Siruba ASP-PTA100 Original Instructions Manual
- タイプ
- Original Instructions Manual

ASP-PTA100
使用說明書與零件圖
ORIGINAL INSTRUCTIONS BOOK & PARTS LIST

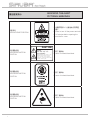
警告圖案表示
INDICATED THE ALERT
PICTORIAL MARKINGS
高壓部位
HIGH-VOLTAGE POSITION
務必關閉電源 10 分鐘後始打開電控
箱蓋子
Be sure to turn off the power and wait
till 10 minutes before opening the
control box´
s
cover.
高速運動部位
HIGH SPEED MOTION
POSITION
謹防工傷事故
In case of industrial accident
高速運動部位
HIGH SPEED MOTION
POSITION
謹防工傷事故
In case of industrial accident
高速運動部位
HIGH SPEED MOTION
POSITION
謹防工傷事故
In case of industrial accident
ii

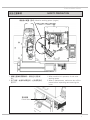
安全注意事項
SAFETY PRECAUTION
1. 機器在運轉與開關機時,請勿進入該區域
內。
2. 為了保修,檢修卸掉罩蓋時,必須將電源切
到 OFF。
1. When machine is in process, do not enter
working space.
2. When in maintenance, make sure turn off the
power before inspecting and removing the
cover.
電源開關
Power switch
機器動作範圍 ( 區域 ) Machine working space (region)
iii
Introduction

3. 在有危及人體的高壓電處,貼有觸電危險警
告標記。在貼有本警告的電器控制部位而需
要保修、檢修時,打開罩蓋僅能由專業的電
氣技術人員進行。
3.In working place with high voltage power,
there is warning sign. When maintaining
machine control part with this warning, open
the cover and only process by professional
electrical engineer.
4. 機器運轉時,有必要馬上停止機器的時候,
可以按下緊急停止開關。
4. When we need to stop machine in process,
we can press emergent stop button.
5. 電源線、氣壓管線需確實固定安置,不可散
落在地面,以免人
員絆倒而發生危險。
6. 為了生命安全,在任何情況下,不可將電源
地線拔掉運轉機器。
7. 打雷時,為了安全要停止作業, 切斷電源。
8. 離開機器工作地點時或工作結束後一定要將
電源開關轉到 OFF。
9. 機器運轉下,不可卸下罩蓋類。
5. Settle down power line and air line certainly.
Tools should not spread on the floor or
stumble workers in danger.
6. For the safety of life, do not disconnect
ground wire in any situation when
processing machine.
7. When in thunder, cut off power to stop the
process for safety.
8. Must t
urn OFF the power when leaving
working place or finishing working.
9. When processing machine, do not remove
the cover.
緊急停止開關
( 電源 OFF)
Emergent stop button
(power OFF)
iv

索引
INDEX
頁 /PAGE
規格 SPECIFICATIONS 1
安裝 INSTALLATION 2
運轉準備 OPERATION PREPARATION 3
操作面板與啟動開關 OPERATION SWITCH 4
車頭參數設定 MACHINE HEAD CONFIGURATION SETTING 5
紙卡安裝與對位 LABEL INSTALLATION AND ALIGNMENT 6
錯誤代碼 ERROR CODE 11
異常排除 TROUBLE SHOOTING 12
動作模式 MODE SELECT 20
按鍵說明 BUTTON INSTRUCTIONS 23
操作說明 OPERATION INSTRUCTION 24
參數說明 PARAMETER INSTRUCTION 27
故障排除 TROUBLE SHOOTING 31
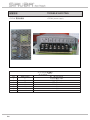
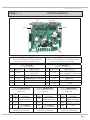
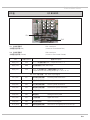
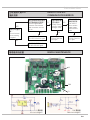
控制板 ( 一 ) CONTROL BOARD (I) 32
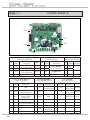
控制板 ( 二 ) CONTROL BOARD (II) 33
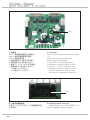
I/O 板 I/O BOARD 34
出現錯誤代
碼 E01:
通訊故障
ERROR CODE E01: COMMUNICATION ERROR 36
簡易維修流程圖 SIMPLE MAINTENANCE 36
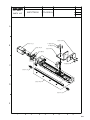
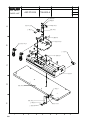
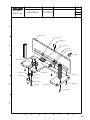
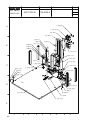
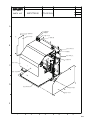
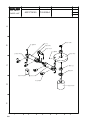
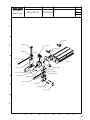
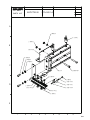
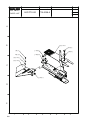
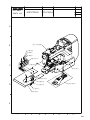
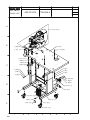
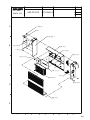
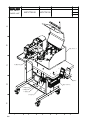
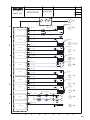
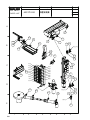
零件圖 PART LIST 38
氣壓流程圖 AIR PRESSURE DIAGRAM 52
氣壓裝配圖 AIR PRESSURE ASSEMBLY DIAGRAM 53
路線總圖 CIRCUIT DIAGRAM 54
v
Introduction

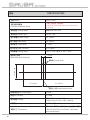
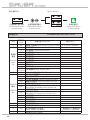
規格
SPECIFICATIONS
型號 Model ASP-PTA100
搭配縫紉機機頭
Collocation Machine Head
平縫(高速電子套結機)
lockstitch (high speed electrical bartacking
machine)
車縫速度 Sewing speed 最高 Max 2000 SPM
使用針型 Needle Type DP×17 #11
紙卡單邊長 Label Length 35~65mm
紙卡寬度 Label Width 35~65mm
摺痕寬度 Crease Width 5~6mm
紙卡厚度 Label Thickness 0.4~0.6mm
車縫範圍 Sewing range 水平 3~6mm ( 最大 ) X axis 3~6mm
氣體消耗量 Air consumption 2L/min
氣壓 Air Pressure 0.5 Mpa
電源電壓 Voltage
單相 AC200~240V 50/60Hz
Single Phase
AC200~240V 50/60Hz
消費電力 Voltage consumption 1150VA(最大 Max)
機器尺寸 Dimensions
寬 1050× 深 750× 高 1530mm ( 含桌板、線架 )
(W)1050×(D)750×(H)1530mm ( With table
and thread stand )
適用紙卡規格
Applicable label dimension
P1
摺痕寬 Crease width
摺縫中心線
Label crease center
5~6mm
35~65mm
35~65mm 35~65mm

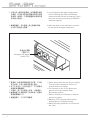
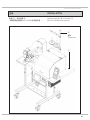
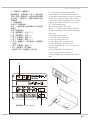
桌板①上,鎖付線架②。
( 線架組裝組請參照 LKS-1903AN 使用說明書 。)
Install thread rack ② on the table ①.
(Ref LKS-1903AN user manual.)
安裝
INSTALLATION
②
①
線架
Thread rack
P2
Introduction

1. 電源電壓
A. 單相 AC200~240V 50/60Hz ±10%。
B. 接地線一定要接地。
2. 氣壓
A. 使用 0.5 Mpa(5kg/c㎡ )。
3. 供油
A. 縫紉機頭部
請參照 LKS-1903AN 使用說明書。
4. 設定紙卡尺寸及補料
鬆開快速把手①後調整滑塊②至紙卡規格對
應尺寸,再將料卡放置於載料平台。
1.Voltage
A. Single Phase AC200~240V 50/60Hz ±10%
B. Ground wire must connect.
2.Air pressure
A. Use 0.5 Mpa(5kg/c㎡ )。
3.Feed oil
A. Machine head
Ref LKS-1903AN user manual.
4. Set label dimension and fill the material
After loosing quick spancer
① , adjust sliding
block ② to satisfy label dimension and then
put label material on material platform.
運轉準備
OPERATION PREPARATION
P3

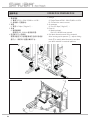
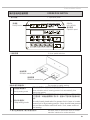
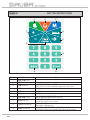
1. 操作面板 1. Operation panel
操作面板與啟動開關
OPERATION SWITCH
準備鍵
Ready button
SIRUBA
LKS-1903AN
操作面板
Operation panel
P4
Introduction
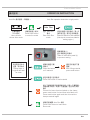
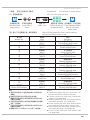
啟動開關
Activation switch
壓腳開關
Switch for presser foot
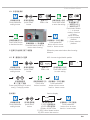
1
直接啟動車縫模式
Directly sewing mode
踩踏啟動開關時,壓腳自動下壓就直接車縫
When activation switch, lowering presser foot automatically, then
directly start sewing
2
兩段式車縫模式
2-step sewing mode
單踩壓腳開關時,可使壓腳下壓或抬升用於車縫對位,壓腳必須處
於下壓狀態,踩踏啟動開關才有作用,壓腳未下壓則無法啟動車縫
動作
We could merely tread switch for presser foot to lower or to raise
presser foot to align sewing position. Users should lower presser
foot and then activation switch will work. If
not, users could not
start sewing.
啟動車縫有兩種模式: Two modes to enable sewing:
※ 模式選擇請參閱人機介面使用說明 ※Please refer to instruction book of human
machine interface for mode selection
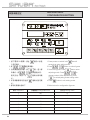
2. 腳踏開關 2. Knee pedal switches

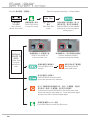
車頭參數設定
MACHINE HEAD
CONFIGURATION SETTING
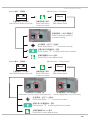
1. 按下電源 ON 開關,按住 鍵約 6 秒進
入設定模式。
2. 按
、 鍵選擇參數。
3. 找到要變更的參數,按
鍵,進入修
改模式,按
、 鍵來變更內容,
更改完後,再按一次
鍵跳出修改模
式。
4. 所有參數都修改完後按
鍵跳出設定模
式。
5. 修改的參數內容如下
1.Press power on switch hold
about 6
seconds to enter setting mode.
2.Press
、 button to select figures.
3.Select the figures. Press
button enter
adjusting mode. Press
、 to
change content. After adjustment, press
to exit adjusting mode setting value.
4.Press
button to exit setting mode.
5.Refer below for configuration figurces.
順序 Sequence 參數編號 Configuration No. 設定值 Setting value
1 241 9
2 19 2
3 20 1
4 24 0
5 37 1
6 51 1
7 62 1
P5

紙卡安裝與對位
LABEL INSTALLATION AND ALIGNMENT
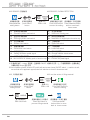
1. 紙卡尺寸變更時
依紙卡摺痕中心至左及右邊的長度來調整
滑塊對應的刻度,寬度亦是如此。
2. 紙卡摺痕偏移調整
若紙卡摺痕偏離夾具位置時,需微量調整紙
卡安裝位置以符合夾持位置。
1.When label dimension changes
According to label crease center, adjust
length between left border and right border
and then adjust width by the same way.
2.Adjust the deviation of label crease
If label crease deviates from the clamp
position, fine tune the installation posit
ion of
label to fit clamp position.
P6
Introduction
紙卡
Label
摺痕
Crease
紙卡摺痕中心
Label crease center
夾具
Clamp

微調紙卡長度位置即可將摺痕偏移至夾具位
置。
Fine-tune label length position to move the
crease deviation to the clamp position
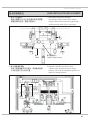
3. 縫線位置調整
紙卡中心偏左或偏右時,將造成縫線不在卡
片正中心位置上。
3. Adjust sewing position
When label deviate left or right from center,
sewing line will not be in the middle of label.
P7
卡片中心線
Label center
縫紉中心
Sewing center

微調卡片寬度位置與限位塊即可改變縫線偏
左或偏右的問題。
Fine-tune label width position and limiting
block to solve the problem that sewing line
deviates left or right.
P8
Introduction
中心線對準
Align center line
限位塊
Limiting block

調整擋邊氣缸固定座可決定紙卡縫線前後的
位置。
Adjust guide block cylinder seat to set label
sewing line position.
P9
擋邊氣缸固定座
Guide block cylinder seat
螺絲鬆開後調整
Adjust after loosing screws

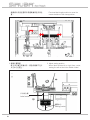
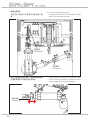
限位銷可限制紙卡左右些許的偏差範圍,當
卡片寬度變更時需調整至紙卡邊界。
Limited pin could limit the deviation of the
label. When label width changes, limited pin
needs to adjust to the label boundary.
限位銷與紙卡邊界需留間隙約 0.5 ~ 1mm,
如此紙卡才不會被撞歪。
Need to keep 0.5~1 mm space for limited pin
and label. Then label will not crash.
P10
Introduction
螺絲鬆開可調整位置
Loose screw to adjust
the position
螺絲鬆開可調整位置
Loose screw to adjust the position
限位銷
Limited pin
保留間隙
Keep space
限位銷
Limited pin
保留間隙
Keep space
紙卡邊界
Label boundary
紙卡邊界
Label boundary

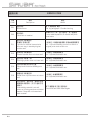
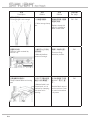
錯誤代碼 ERROR CODE
代碼
Code
說明
Description
備註
Memo
E01
通訊異常
Network error
見 4. 故障排除 章節
Ref. by paragraph 4.Trouble shooting
E02
缺料顯示
Show lack of material
待載料平台下降,進行補料後,按下重置鍵
Lower material platform, fill material and press
reset button
E11
運料氣缸未確實處於
準備點 / 原點位置
Cylinder for material transmission
does not stay in standby/original
position well
1 號氣缸 / 準備點微動開關 / 原點磁簧開關異常
No. 1 cylinder/standby point micro switch or
original point re
ed switch error
E12
前伸氣缸未確實縮回
Forward cylinder does not retract well
2 號氣缸 / 磁簧開關異常
No. 2 cylinder/reed switch error
E14
塑形氣缸未確實下降
Forming cylinder does not lower well
4 號氣缸 / 磁簧開關異常
No. 4 cylinder/reed switch error
E16
夾料臂未確實到待命令位置
Clamp does not arrive standby point
well
6 號氣缸 / 磁簧開關異常
No. 6 cylinder/reed switch error
E18
擋邊氣缸未確實退回
Guide block cylinder does not return
well
8 號氣缸 / 磁簧開關異常
No. 8 cylinder/reed swi
tch error
-
若於運料時,運料失敗,導致成型區
感應器未判讀有料,夾爪不會執行前
伸動作
If transmitting material is not well,
sensor on forming part does not detect
material. Clamp will not forward and
catch material
按下 重置鍵 再次進行運料動作
Press reset and feed material again
P11

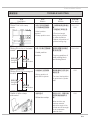
異常排除
TROUBLE SHOOTING
現象
Description
原因
Reason
對策
Solution
參考頁數
Ref. page
摺痕未對夾具中心
Crease is not in the clamp
middle
1. 紙卡安裝位置偏移。
2. 夾具機構位置錯誤。
1.Label position
deviates
2.Clamp position error
1. 微調料槽長度滑塊位
置。
2. 調整氣缸束環位置。
1.Fine tune length
sliding block position
of material platform
2.Adjust the position of
cylinder limiting ring
P.00~P.00
P.00
縫線未在紙卡正中心
Sewing line is not on the label
middle.
1. 紙卡安裝位置偏移
1.Label position
deviates
微調料槽寬度滑塊位
置及限位塊。
Fine tune position of
width sliding block
and limiting block
P.00~P.00
縫線未在指定位置
Sewing line is not on assigned
location
1. 擋邊氣缸位置錯誤
1.Wrong position of
guide block cylinder
微調擋邊氣缸固定座的
鎖固位置。
Fine tune fixed position
of guide block cylinder
seat
P.00
夾槽無法開啟
Unable to open clamp
slotlocation
1. 疊料造成
1.Materials overlap.
吸盤分料時,調整吹嘴
角度與風量使疊料分
離。
When suction cup
catches material,
adjust the angle of air
nozzle and the strength
of air to separate
material stack.
P.00
P12
Introduction
實際位置
Actual location
實際位置
Actual location
預定位置
Assigned
location
預定位置
Assigned
location

現象
Description
原因
Reason
對策
Solution
參考頁數
Ref. page
成形角度不足
Forming angle is not enough 1. 夾槽選用錯誤。
1. Select wrong clamp
slot
更換適用該紙卡摺痕
寬度的夾槽。
Replace clamp slot
which is suitable for
label crease width.
P.00~P.00
吸盤取料失敗
Failure to catch material by
suction cup
1. 載料平台上升停止
位置過低。
1.Material platform
raises not enough.
微調入料檢知位置。
Fine-tune filling
detection position.
P.00
夾具撞擊夾料區紙卡
Clamp crashes label on forming
part
1. 料卡不平整拱起而
被進
入的夾棒撞歪。
1.Material label is not
flat and arch so it is
crashed by clamping
rod when rod is
entering
料卡拱起程度不可超
過 3mm,需人工整
平。
Material label can not
arch more than 3 mm
or need to smoothen
it by users.
P.00
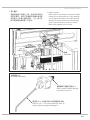
P13

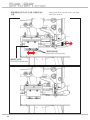
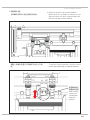
1. 紙卡疊料
吸盤吸附紙卡兩張以上時,將造成夾具無法
開夾而異常,此時可以調整吹氣嘴的角度與
吹氣量大小來進行疊料排除。(註:紙卡若
因印刷油墨沾黏則需人工排除)
1. Labels overlap
When suction cup catches more than 2 labels,
clamp will not open and error. In this situation,
we can adjust the angle of air nozzle and the
strength of air blow to remove material stack
(note: users will need to remove by hand if
labels stick together by ink or else)
旋轉螺桿可調整吹氣量大小
Able to adjust blowing strength
by rotatory screw rod
需使用 3mm 六角板手伸入氣孔調整吹氣角度
Need to use 3 m m hex wrench to enter air
inlet to adjust the angle of blowing air
氣嘴調整方式
Air nozzle adjustment
氣嘴
Air nozzle
P14
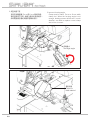
Introduction

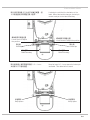
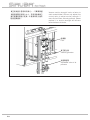
2. 成型角度不足
夾具有對應摺痕5mm或6mm寬的夾槽,
當成型角度不足時,會發生進料失敗的情形,
此時需更換正確的夾槽才能順利成形。
2.Incorrect forming angle
Clamp need to match 5mm or 6mm width
clamp slot. When the forming angle is not
enough, feeding process will be error. In such
situation, we need to replace correct clamp
slot to form it correct.
P15
夾角過大
Too large angle
進料失敗
Failure to
feed material
ページが読み込まれています...
ページが読み込まれています...
ページが読み込まれています...
ページが読み込まれています...
ページが読み込まれています...
ページが読み込まれています...
ページが読み込まれています...
ページが読み込まれています...
ページが読み込まれています...
ページが読み込まれています...
ページが読み込まれています...
ページが読み込まれています...
ページが読み込まれています...
ページが読み込まれています...
ページが読み込まれています...
ページが読み込まれています...
ページが読み込まれています...
ページが読み込まれています...
ページが読み込まれています...
ページが読み込まれています...
ページが読み込まれています...
ページが読み込まれています...
ページが読み込まれています...
ページが読み込まれています...
ページが読み込まれています...
ページが読み込まれています...
ページが読み込まれています...
ページが読み込まれています...
ページが読み込まれています...
ページが読み込まれています...
ページが読み込まれています...
ページが読み込まれています...
ページが読み込まれています...
ページが読み込まれています...
ページが読み込まれています...
ページが読み込まれています...
ページが読み込まれています...
ページが読み込まれています...
ページが読み込まれています...
ページが読み込まれています...
-
 1
1
-
 2
2
-
 3
3
-
 4
4
-
 5
5
-
 6
6
-
 7
7
-
 8
8
-
 9
9
-
 10
10
-
 11
11
-
 12
12
-
 13
13
-
 14
14
-
 15
15
-
 16
16
-
 17
17
-
 18
18
-
 19
19
-
 20
20
-
 21
21
-
 22
22
-
 23
23
-
 24
24
-
 25
25
-
 26
26
-
 27
27
-
 28
28
-
 29
29
-
 30
30
-
 31
31
-
 32
32
-
 33
33
-
 34
34
-
 35
35
-
 36
36
-
 37
37
-
 38
38
-
 39
39
-
 40
40
-
 41
41
-
 42
42
-
 43
43
-
 44
44
-
 45
45
-
 46
46
-
 47
47
-
 48
48
-
 49
49
-
 50
50
-
 51
51
-
 52
52
-
 53
53
-
 54
54
-
 55
55
-
 56
56
-
 57
57
-
 58
58
-
 59
59
-
 60
60


Siruba ASP-PTA100 Original Instructions Manual
- タイプ
- Original Instructions Manual
関連論文
-
Siruba ASP-PTA101 Instruction book
-
-
-
-
-
-
-
-
-
その他のドキュメント
-
Genmitsu 245805502 ユーザーマニュアル
-
DURKOPP ADLER 267 - 2016 取扱説明書
-
DURKOPP ADLER 251-140042 Manual Motor
-
 Duerkopp Adler 261_vaild_from_december_2019 取扱説明書
-
DURKOPP ADLER 261_valid_till_november_2019 取扱説明書
-
Creality CR-200B ユーザーマニュアル
-
Husqvarna 525BX ユーザーマニュアル
-
Wacker Neuson PT6LT ユーザーマニュアル
-
Zanussi ZTE171 ユーザーマニュアル
-
Electrolux EDI97170W ユーザーマニュアル
