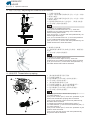
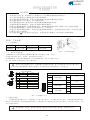
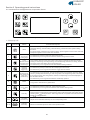
Duerkopp Adler 261_vaild_from_december_2019 取扱説明書
- タイプ
- 取扱説明書

操作说明
Operating Instructions
零件列表
Parts List
261
DURKOPP
ADLER
..


非常感谢您购买 本公司的工业缝纫机。在使用 缝纫机之前,请仔细阅读( 为了您的安全使用)和使用 说 明
书。
工业缝纫机的特 性之一,是要在机针和旋梭等 运动零部件附近进行操作, 而这些零部件很容易引起受 伤 的
危险,所以请在 受过培训的人员或有熟练操作 技术的人员的指导下,正确 地使用本缝纫机。
此样本是二零 年三月的数据而 制成的,后期零件更改,恕不另行通知 。二零
为了您的安全使用
1.安全使用的标记及其意义
本使用说明书及 产品所使用的标记和图案记号 是为了您的安全而正确地使 用本产品,防止您及他人受 到 危
害和损害。
表示方法及含义 如下:
说明
危险
注意
如果忽视此标记 而进行了错误的操作,必将导 致人员死亡或重伤。
如果忽视此标记 而进行了错误的操作,有可能 会引起人员受伤及造成设备 损 坏。
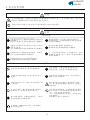
图案和符号
符号△表示“应 注意事项”。
三角中的图案表 示必须要注意的内容。
(如左图的符号表 示“注意受伤”。)
符号○表示“禁 止”。
符号●表示“必 须”。
圆圈中的图案表 示必须要做的内容。
(如左图的符号表 示“必须接地”。)
Ⅰ
警告
如果忽视此标记 而进行了错误的操作,将会引 起人员重伤或死亡。
DURKOPP
ADLER
..

Thank you very much for buying our sewing machine.Before using your new machine,please read the safety instructions below
and the explanations given in the Operation Instruction.
With industrial sewing machines,it is normal to carry out work while positioned directly in front of moving parts such as the
needle and thread take-up lever,and consequently there is always a danger of injury that can be caused by these parts.Follow
the instructions from training personnel and instructors regarding safe and correct operation before operating the machine so
that you will know how to use it correctly.
This sample book is made in and is subject to change without notice.March 2020
SAFETY INSTRUCTIONS
1.Safety indications and their meanings
This instruction manual and the indications and symbols that are used on the machine itself are provided in order to ensure
safe operation of this machine and to prevent accidents and injury to yourself or other people.
The meaning of these indications and symbols are given below.
Indications
DANGER
CAUTION
The instructions which follow this term indicate situations where failure to follow the
instructions will almost certainly result in death or severe injury.
The instructions which follow this term indicate situations where failure to follow the
instructions could cause injury when using the machine or physical damage to equipment
and surroundings.
Symbols
This symbol (△) indicates something that you should be careful of. The picture inside the
triangle indicates the nature of the caution that must be taken.
(For example, the symbol at left means"beware of injury".)
This symbol (○) indicates something that you must not do.
This symbol (●) indicates something that you must do. The picture inside the circle indicates
the nature of the thing that must be done.
(For example, the symbol at left means "you must make the ground connection".)
Ⅱ
CAUTION
The instructions which follow this term indicate situations where failure to follow the
instructions will almost certainly result in death or severe injury.
DURKOPP
ADLER
..

2.安全注意事项
危险
打开控制箱盖时 ,必须先关闭电源开关并将电 源插头从插座上拔下,至少 等待5分钟后,再打开控
制箱盖。触摸带 有高电压的区域将会造成人员 伤亡。
注意
使用环境
应避免在强电气 干扰源(如高频焊机)的附近使
用缝纫机。
强电气干扰源可 能会影响缝纫机的正确操作。
电源电压的波动 应该在额定电压的±10%以内
的环境下使用。
电压大幅度的波 动会影响缝纫机的正确操作。
电源容量应大于 缝纫机的消耗能量。电源容
量不足会影响缝 纫机的正确操作。
环境温度应在5℃-3 5 的范围内使用。
低温或高温会影 响缝纫机的正确操作。
℃
缝纫机的最佳工 作环境是
85%的范围内, 干燥或潮湿的环境均会影响缝
纫机的正确操作 。
相对湿度在45% -
使用时应避免暴 露于直射的阳光下。
直射的阳光会影 响缝纫机的正确操作。
万一发生雷电暴 风雨时,关闭电源开关,并将
电源插头从插座 上拔下。雷电可能会影响缝纫
机的正确操作。
安装
请让受过培训的 技术人员来安装缝纫机。
请委托购买商店 或电气专业人员进行电气
配线。
缝纫机重约40公斤 ,安装工作必须由两人以
上来完成。
在安装完成前, 请不要连接电源,如果误
按启动开关,缝 纫机动作会导致受伤。
请在切断电源后 ,再拔掉电源插头。不然易
成为控制箱发生 故障的原因。
必须接地。接驳 地线不牢固,是造成触电
或误动作的原因 。
固定电缆时,不 要过度弯曲电缆或用卡钉
固定得过紧,会 引起火灾或触电的危险。
如果使用带小脚 轮的工作台,则应该固定小
脚轮,使其不能 移动。
缝纫机头倒下或 竖起时,请用双手进行操
作。单手操作时 因缝纫机的重量万一滑落易
导致受伤。
使用润滑油或黄 油时,务必戴好保护眼镜和
保护手套等,以 防润滑油落入眼中或沾在皮
肤上,这是引起 发炎的原因。
另外,润滑油或 黄油不能饮用,否则会引起
呕吐和腹泻。
将油放在小孩拿 不到的地方。
!
!
!
!
!
!
!
!
!
!
!
!
Ⅲ
请勿将手放入皮 带开口处,否则手可能会将被卷入 皮带中造成重伤。
DURKOPP
ADLER
..

DANGER
Wait at least 5 minutes after turning off the power switch and disconnecting the power cord from the wall outlet before
opening the face plate of the control box. Touching areas where high voltages are present can result in severe injury.
CAUTION
Environmental requirements
Use the sewing machine in an area which is free from
sources of strong electrical noise such as high-
frequency welders.
Sources of strong electrical noise may cause
problems with correct operation.
Any fluctuations in the power supply voltages should
be within ±10% of the rated voltage for the machine.
Voltage fluctuations which are greater than this may
cause problems with correct operation.
The power supply capacity should be greater than
the requirements for the sewing machine's electrical
consumption.
Insufficient power supply capacity may cause
problems with correct operation.
In the event of an electrical storm, turn off the power
and disconnect the power cord from the wall outlet.
Lightning may cause problems with correct operation.
The ambient temperature should be within the range
of 5℃ to 35℃ during use.
Temperatures which are lower or higher than this may
cause problems with correct operation.
The relative humidity should be within the range of
45% to 85% during use, and no dew formation should
occur in any devices.
Excessively dry or humid environments and dew
formation may cause problems with correct operation.
Avoid exposure to direct sunlight during use.
Exposure to direct sunlight may cause problems with
correct operation.
Installation
Machine installation should only be carried out
by a qualified technician.
Contact your dealer or a qualified electrician for
any electrical work that may need to be done.
The sewing machine weighs approximately 40kg.
The installation should be carried out by two or
more people.
Don't connect the power cord until installation is
complete, otherwise the machine may operate if
the foot switch is depressed by mistake, which
could result in injury.
Be sure to connect the ground. If the ground
connection is not secure, you run a high risk of
receiving a serious electric shock, and problems
with correct operation may also occur.
Install the safety covers to the machine head and
motor.
Hold the machine head with both hands when tilting
it back or returning it to its original position.
Furthermore, after tilting back the machine head,
do not push the face plate side or the pulley side
from above, as this could cause the machine head
to topple over, which may result in personal injury
or damage to the machine.
All cords should be secured at least 25mm away
from any moving parts. Furthermore, do not
excessively bend the cords or secure them too
firmly with staples, otherwise there is the danger
that fire or electric shocks could occur.
If using a work table which has caster, the
casters should be secured in such a way so that
they cannot move.
Be sure to wear protective goggles and gloves
when handling the lubricating oil and grease, so
that they don't get into your eyes or onto your
skin, otherwise inflammation can result.
Furthermore, do not drink the oil or eat the
grease under any circumstances, as they can
cause vomiting and diarrhoea.
Keep the oil out of the reach children.
! !
!
!
!
!
!
!
!
!
!
!
2.Notes on safety
Ⅳ
Please do not put hand in belt openings, or hand may be involved into the belt will be seriously injured.
DURKOPP
ADLER
..

注意
缝纫
本缝纫机不能用 于除缝纫以外的任何其他用
途。
发生下列情况时 ,请切断电源。否则误按动启
动开关,缝纫机 动作会导致受伤。
·机针穿线时
·更换机针或梭 芯时
·缝纫机不使用 ,或人离开缝纫机时
如果使用带小脚 轮的工作台,则应该固定小
脚轮,使其不能 移动。
为了安全起见, 在使用本缝纫机之前,请安装
保护装置。如果 未安装这些安全装置就使用缝
纫机,会造成人 身伤害及缝纫机损坏。
缝纫过程中不要 触摸任何活动部件或将物件靠
在运动部件上, 因为这会导致受伤或缝纫机损
坏。
如果缝纫机出现 故障时,请与购买商店或受过
培训的技术人员 联系。
如果缝纫机操作 中发生误动作,或者听到异常
的噪声或闻到异 常的气味,应立即切断电源。
然后与购买商店 或受过培训的技术人员联系。
清洁
在开始清洁作业 前,请切断电源。如果误
踩了脚开关,缝 纫机动作会导致人员受
伤。
使用润滑油或黄 油时,务必戴好保护眼镜
和保护手套等, 以防润滑油落入眼中或沾
在皮肤上,这是 引起发炎的原因,
另外,润滑油或 黄油不能饮用,否则会引
起呕吐和腹泻。
将油放在小孩拿 不到的地方。
本缝纫机仅限于 接受过安全操作培训的人员使
用。
!
!
!
2.安全注意事项
Ⅴ
DURKOPP
ADLER
..

CAUTION
Sewing
This sewing machine should only be used by
operators who have received the necessary training
in safe use beforehand.
The sewing machine should not be used for any
applications other than sewing.
Be sure to wear protective goggles when using the
machine.
If goggles are not worn, there is the danger that if a
needle breaks, parts of the broken needle may
enter your eyes and injury may result.
If an error occurs in machine operation, or if
abnormal noises or smells are noticed, immediately
turn off the power switch. Then contact your nearest
dealer or a qualified technician.
If using a work table which has casters, the casters
should be secured in such a way so that they cannot
move.
Attach all safety devices before using the sewing
machine. If the machine is used without these
devices attached, injury may result.
Do not touch any of the moving parts or press any
objects against the machine while sewing as this may
result in personal injury or damage to the machine.
Cleaning
Turn off the power switch before carrying out
cleaning, otherwise the machine may operate if
the foot switch is depressed by mistake, which
could result in injury.
Be sure to wear protective goggles and gloves
when handing the lubricating oil and grease, so
that they do not get into your eyes or onto your
skin, otherwise inflammation can result.
Furthermore, do not drink the oil or eat the grease
under any circumstances, as they can cause
vomiting and diarrhoea.
Keep the oil out of the reach of children.
Turn off the power switch at the following times,
otherwise the machine may operate if the foot switch
is depressed by mistake, which could result in injury.
·When threading the needle
·When replacing the needle and bobbin
·When not using the machine and when leaving the
machine unattended
If the machine develops a problem, contact your
nearest dealer or a qualified technician.
!
!
!
2.Notes on safety
!
Ⅵ
DURKOPP
ADLER
..

Ⅶ
1.缝纫机的 安 装 Installation
2.膝提组件 的 安装
3 加油 Lubrication
4.油量调节 Adjusting The Amount Of Oil
5.机针的安 装 方法 Attaching The Needle
6.梭芯的安 装 方法 Setting The Bobbin Into The Bobbin Case
7.上线穿线 方 法 Threading The Machine Head
8.线迹长度 的 调节 Adjusting The Stitch Length
9.线架的安 装 Installing The Thread Stand
10 .膝动提 升 高度的调整 Adjusting The Height Of The Knee Lifter
11.踏板操 作 Pedal Operation
12.线张力 的 调整 Adjusting The Needle Thread Tension
13.挑线弹 簧 Thread Take-up Spring
14.压脚提 升 Hand Lifter
15.压脚压 力 的调节 Presser Foot Pressure
16.送布相 位 的调节 Adjusting The Feed Timing
17.送布牙 的 倾斜 Tilt Of Needle Dog
18.送布牙 的 高度 Height Of The Feed Dog
19.机针与 旋 梭的关系 Needle-to-hook Relationship
20 .压脚高 度 的调节adjusting The Height Of Presser Foot
21-1.
- 副动刀压力的 调 整(双刀剪线)
22. Adjusting The Thread Take-up
23. Pedal Pressure And Pedal Stroke
24. Adjusting Of The Pedal
25.手 触 动 倒缝
26.
28.
Knee Lifter Asm
.
定刀与移动刀 的 转换(单刀剪线) Change Of Fixed Knife And Shift Knife
21 2. adjustment Of Secondary Operating Pressure
挑线杆挑线量 的 调节
踏板压力和行 程
踏板的调整
脚踏板的连接 Foot Switch Connection
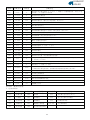
27 .规格 Specifications
常见故障与调 整 Trouble Shooting Cuide
嵌入式数控交 流 伺服系统使用说明书 AHE-59 Numerical Control AC Servo System User Manual
One-touch type recerse feed stitching mechanism
................................................................................................................1
2
3
4
.....................................................................................................2
.............................................................................................................................
.............................................................................................
..............................................................................................
.................................................................4
.....................................................................................5
.....................................................................................5
...........................................................................................5
...........................................................6
.............................................................................................................6
.......................................................................7
....................................................................................................7
.....................................................................................................................8
..........................................................................................8
....................................................................................8
....................................................................................................9
...........................................................................................9
............................................................................10
....................................................................10
....................................11
.............................11
.......................................................................12
........................................................................12
..............................................................................................13
......................................................13
..........................................................................................13
....................................................................................................................14
....................................................................................15
............20
DURKOPP
ADLER
..

1
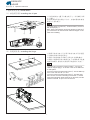
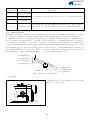
(1).油盘的安装 Installing the oil pan
1) 将塑料油盘 置于台板 的下方,并用螺钉 固
定(8颗)。
注:塑料油盘周边有 限位凸台 ,安装时需将油 盘的
限位点卡到台板 上。
① ② ③
④
使用说明书
Operation Instruction
1.缝纫机的安装 Installation
①
②
③
④
1) Put the plastic oil reservoir① under the table②, then fix it
with screw(8 pcs) ③.
Note: There is limit stopper around the plastic oil reservoir④,
you need set the oil reservoir block with limit stopper on the
table when installing.
DURKOPP
ADLER
..
(2).铰链的安装 Installing the hinge
1)将两只油盘支 座小
于台板的四角并 用鞋钉固定。
2)将机头铰链钩 座 用鞋钉 固定在台板钩槽内
3)将机头连接钩 放入底板孔内,与台 板的机头连接
钩座③相嵌合,再将 机头放到四只角的机头支座 上 。
①与两只油盘支 座大②分别置
③ 。⑤
④
②
③
1) Put the two oil reservoir support (small) ① and two oil
reservoir support (big) ② in the four corner of the table and
fix with spikes.
2) Put the head connecting hook socket ③ into the table top
curve. Then use the nail ⑤ to fix it.
3) Put the head connecting hook socket ④ into table hole,
then connect the head connecting hook socket ③ and the
head connectinghook which should be on the head, and the
machine head will be put on the oil reservoir.
⑤

2
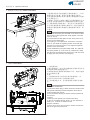
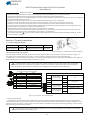
1)将操纵杆组件 ②装到膝抬压脚连接轴①上, 并用
操纵杆接头③连 接,最后拧紧接头螺钉④和⑤ ;
2)将连接好的操 纵杆组件与膝抬压脚连接轴⑦ 连接,
并卡到限位点上;
3)根据个人需求,拧 松接头螺钉④可调整操纵杆左 右
的位置,拧松接头螺 钉⑤可调整操纵杆的前后位置 ;
4)安装好膝抬压脚组件 后,将平垫片⑧和弹簧垫片
⑨分别安装到膝 抬压脚固定螺钉⑩上,最后用螺钉 ⑩
将膝抬压脚连接 轴①和膝抬压脚连接轴⑦锁死 ,防
止脱落。
使用说明书
Operation Instruction
2.膝提组件的安装 Knee lifter asm
⑥
3.加油 Lubrication
1、齿轮箱加油
1)拔出橡胶塞① ,把专用10#缝纫机润滑油从机 壳孔
处加到如图A的刻线 位置为止。
2)如果视油窗浮 标降低到刻线B以下时,请再次把 油
加至刻线A的位置。
注意:
1、新缝纫机或较 长时间没有使用的缝纫机,应
进行约10分钟300 0针/分 钟的磨合运转;
2、若油箱油量太 多,会从齿轮箱抬压脚杆孔处 流
出。
1. Gear box oil lubrication
1) pull out the rubber plug① , fill the oil from the machine case
with special 10# sewing machine lubrication oil and the oil
surface should reach A level .
2) If the oil window showing oil lower than B level, please fill
oil to A level.
(Caution)
1.When you first operate your machine after setup
or after an extended period of disuse, run your machine at
3000 s.p.m. for about 10 minutes for the
purpose of break-in.
2.If there is too much oil in the tank, it will flow out from the
hole of the gear box presser foot.
B
A
①
1) Install the knee lifter plate rod ASM on the knee foot lifter,
then connect it with regulator link, finally tighten connection
screw ④ and ⑤.
2) Connect the knee lifter plate rod with knee press rod ⑦,
and fix it to the limited point.
3) According to your requirement, unscrew the connection
screw ④ can adjust the regulator position of left and right.
Unscrew the connection screw ⑤ can adjust the regulator
position of front and behind.
4) After installed the knee press ASM, install the gasket ⑧
and spring washer ⑨ on the screw ⑩ respectively, finally
lock the knee foot lifterand knee press rod ⑦ with the screw
⑩ tightly, that can prevent it from dropping.
①
②
⑦
DURKOPP
ADLER
..
④
⑤
⑧
⑨
⑩
③

3
使用说明书
Operation Instruction
(1).旋梭油量调整
1) 用螺丝刀调 整油量调节螺钉①,螺丝向+方向(A方
向),转动油量增多 ,向-方向(B方向)转动油量变少。
2) 油量调节螺 丝调节后,请进行30秒钟的空运 转,
以确认油量。
1) Turning the oil amount adjustment screw attached on the
hook driving shaft front bushing in the + direction(in direction
A) will increase the amount of oil in the hook, or in the “-“
direction(in direction B) will decrease it.
2) After the amount of oil in the hook has been properly
adjusted with the oil amount adjustment screw, make the
sewing machine run idle for approximately 30 seconds to
check the amount of oil (oil splashes) in the hook.
Adjusting the amount of oil in the hook
4.油量的调节 Adjusting the amount of oil
①
进行下列2的作业时 , 请卸下推板,同时要充分注 意
手指不要碰到旋 梭。
1) 机头冷却时 , 请进行3分钟左右的空载运转。(适
当的间歇运转)
2) 请在缝纫机 转 到时将油量确认专用纸插入 。
3) 请确认油盘 的 油面高度是否在HIGH和LOW范 围之
内。
4) 油量确认时 间 为5秒钟。(用表来测定)
When carrying out the procedure described below in 2,
remove the slide plate and take extreme caution not to allow
your fingers to come in contact with the hook.
(Caution)
1) If the machine has not been sufficiently warmed up for
operation, make the machine run idle for appro ximately
three minutes.(Moderate inter mitten operation.)
2) Place the amount of oil (oil splashes) confirm mation
paper under the hook while the sewing machine is in
operation.
3) Confirm that the height of the oil surface in the oil
reservoir is within the range between “HIGH” and “LOW”.
4) Confirmation of the amount of oil should be completed in
five seconds.(Check the period of time with a watch.)
注意
旋梭在运转时测 试 油量,请注意人身安全!
CAUTION
①油量确认专用 纸
①Amount of oil confirmation paper
·不用考虑纸的 质量
·Use any paper available regardless of the material
②油量确认位置
②Position to confirm the amount of oil
·把油量确认专 用纸插到旋梭下面。
·Place the amount of oil (oil splashes) confirmation
paper under the hook.
3~10mm
旋梭
Hook
下轴前端
Hook driving shaft front bushing
底板
Bed
油确认专用 纸
Oil splasbes confirmation paper
油盘
Oil reservoir
顶到油盘的 壁面
Closely fit the paper
against the wall
surface of the oil
reservoir
25mm左右
Approx.25mm
70mm左右
Approx.70mm
(2).油量的确认 Confirm the amount of oil
When hook is testing oil amount by running, please take care of your own security!
DURKOPP
ADLER
..

使用说明书
Operation Instruction
5) 左图样品根 据缝制工序需要微调增减,但 注意
不要过大增加或 减少。
(油量过少时,会 烧坏旋梭(发热)。油量过多时,会
玷污缝制品)
6) 油量应确认3次(3张)均无变化。
5) The amount of oil shown in the semples on the left
should be finely adjusted in accordance with sewing
processes. Be careful not to excessively increase/decrease
the amount of oil in the hook. (If the amount of oil is too
small, the hook will be seized (be hook will be hot). If the
amount of oil is too much,the sewing product may be stained
with oil.)
6) Adjust the amount of oil in the hook so that the oil
amount should not change while checking the oil amount
three times (on the three sheets of paper).
从旋梭飞溅出来 的油
Splashes of oil from the hook
1mm左右
油量偏(小)
Appropriate amount of oil(small)
从旋梭飞溅出来 的油
Splashes of oil from the hook
3mm左右
油量偏(大)
Appropriate amount of oil(large)
③适合的油量样 品
③Sample showing the appropriate amount of oil
4
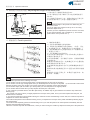
1) 手拿梭芯, 让线往左绕C方向,把它放入梭壳 。
2) 把线穿过梭 壳的穿线口A,然后把线往B方向拉,
从线张力弹簧下 面的穿线口B拉出来。
3) 拉底线C,确认 梭芯是否按箭头方向转动。
6.梭芯的安装方法 Setting the bobbin into the bobbin case
1) Install the bobbin in the bobbin case so that the thread
wound direction is clock wise.
2) Pass the thread through thread slit , and pull the thread in
direction . By so doing, the thread will pass under the tension
spring and come out from notch .
3) Check that the bobbin rotates in the direction of the arrow
when thread is pulled.
请根据线的粗细 、布料的种类选择适当的机针 。
1) 转动手轮, 把针杆升到最高处。
2) 拧松机针固 定螺丝②,手拿机针把机针① 凹部A
横向转到B的方向。
3) 把机针插到 针杆孔的深处。
4) 拧紧机针固 定螺丝②。
5) 确认针的长 孔C在左横向D的方向。
5.机针的安装方法 Attaching the needle
Select a proper needle size according to the count of thread
and the type of material used.
1) Turn the handwheel until the needle bar reaches the
highest point of its stroke.
2) Loosen screw ②, and hold needle ① with its indented
part A facing exactly to the right in direction B.
3) Insert the needle fully into the hole in the needle bar in
the direction of the arrow until the end of hole is reached.
4) Securely tighten screw ②.
5) Check that long groove C of the needle is facing exactly
to the left in direction D.
DURKOPP
ADLER
..

使用说明书
Operation Instruction
7.上线穿线方法 Threading the machine head
注意
为了防止意外的 启动造成的事故,请关掉电源 后进行。
CAUTION
Turn OFF the power before starting the work so as to prevent accidents caused by abrupt start of the
sewing machine.
5
8.缝迹长度的调节 Adjusting the stitch length
9.线架的安装 Installing the thread stand
1)如图所示把线 架安装到台板右上角孔上。
2)用固定螺母① 固定线架。
3)若采用顶线配 线时,请把电源线从线架杆② 中穿
过。
1) Assemble the thread stand unit, and insert it in the hole in
the machine table.
2) Tighten locknut ① to fix the thread stand.
3) For ceiling wiring, pass the power cord through spool rest
rod ②.
1) 按下针距旋 钮
位置对准标盘的 刻线。
2) 刻度盘的数 字 单位为mm。
①同时沿箭头方 向旋转,把箭头
1) Press down the needle pitch knob ① and rotate it along
the direction of the arrow to align the arrow position with the
marking line of the dial.
2) The dial calibration is in millimeters.
DURKOPP
ADLER
..

使用说明书
Operation Instruction
10.膝动提升高度的调整 Adjusting the height of the knee lifter
1) 膝动提升压 脚的标准高度为9mm。
2) 调节膝动提 升调节螺丝①可以把压脚最高 提升
到12mm。
3) 压脚提升到9mm以上时,调整时请注意不要 让针
杆②的前端在最 下方时也不能碰到压脚③。
1) The standard height of the presser foot lifted using the
knee lifter is 9mm.
2) You can adjust the presser foot lift up to 12 mm using
knee lifter adjust screw ①.
3) When you have adjusted the presser foot lift to over 9mm,
be sure that the bottom end of needle bar ② in its lowest
position does not hit presser foot ③.
6
11.踏板操作 Pedal operation
1.踏板有4级操作。
1) 向前轻轻踩 踏板为低速缝纫B。
2) 在继续往前 踩踏板为高速缝纫A。(但是,设 定
了自动倒缝开关 后,倒缝结束之后为高速缝纫 。)
3) 轻轻踩踏板 然后返还缝纫机停止C(机器默认 出
厂设置为下停针 )。
4) 向后踩踏板 为切线动作E。
若有自动抬压脚 功能时,在停止和切线之间增 加半
后踏抬压脚功能 开关。
向后轻轻踩踏板 ,为压脚提升动作D,再继续踩踏 板
为切线动作。
始缝的自动倒缝 过程中,把踏板返还中立位置 则缝
纫机倒缝动作结 束后停止。
高速缝纫或低速 缝纫中向后用力踩踏板缝纫机 均可
切线。
缝纫机切线中把 踏板返还中立位置,但机器仍然把 线
切完。
缝纫机停止机针 下降之后,如果想升起机针时 ,请
往后踩一次踏板 。
1.The pedal is operated in the following four steps.
1) The machine runs at low sewing speed when you lightly depress the from part of the pedal .
2) The machine runs at high sewing speed when you further depress the front part of the pedal . (If the automatic reverse feed
stitching has been preset, the machine runs at high speed after it completes reverse feed stitching.)
3) The machine stops (with its needle up or down) when you reset the pedal to its original position .
4) The machine trims threads when you fully depress the back part of the pedal.
·If your machine is provided with the Auto-lifter (AK Series). An addition step is given between the machine stop and thread
trimming step.
The presser foot goes up when you lightly depress the back part of the pedal, and if you further depress the back part, the
thread trimmer is actuated.
·If you reset the pedal to its neutral position during the automatic reverse feed stitching at seam start, the machine stops after it
completes the reverse feed stitching.
·The machine will perform normal thread trimming even if you depress the back part of the pedal immediately following high or
low speed sewing.
·The machine will completely perform thread trimming even if you reset the pedal to its neutral position immediately after the
machine started thread trimming action.
·When the machine stops with its needle down, and if you want to bring the needle up, depress the back part of the pedal once.
DURKOPP
ADLER
..

使用说明书
Operation Instruction
12.线张力的调整 Adjusting the needle thread tension
1.上线张力的调 整
1) 把第一线张 力螺母向顺时针方向(A方向)转 动,
上线张力变强。
2) 把第一线张 力螺母向逆时针方向(B方向)转 动,
上线张力变弱。
3) 把线张力螺 母2向右C方向逆转,上线张力变强。
4) 向左D的方向转 动则变弱。
1. Adjusting the needle thread tension
1) As you turn thread tension No.1 nut ① clock wise
(indirection A), the thread remaining on the needle after
thread trimming will be shorter.
2) As you turn nut ① counter clock wise (indirection B), the
thread length will be longer.
3) As you turn thread tension nut ② clock wise (indirection
C), the needle thread tension will be increased.
4) As you turn nut ② counter clock wise (indirection D), the
needle thread tension will be decreased.
7
2. Adjusting the bobbin thread tension
1) As you turn tension adjust screw ③ clock wise
(indirection E), the bobbin thread tension will be increased.
2) As you turn screw ③ counter clock wise (indirection F),
the bobbin thread tension will be decreased.
2.底线张力的调 整
1) 把底线张力 螺丝③向右E的方向转动,底线张 力
变强。
2) 向左F的方向转 动则变弱。
1. 要改变挑线 弹簧①的行程时
1) 拧松固定螺 丝②.
2) 把夹线螺钉 ③向右A的方向转动则变大。
3) 向左B的方向转 动则变小。
2. 要改变挑线 弹簧1的压力时
1) 拧松固定螺 丝②,卸下大夹线器组件⑤。
2) 拧松夹线螺 钉固定螺丝④进行调整。
3) 把夹线螺钉 ③向右A的方向转动则变强。
4) 向左B的方向转 动则变弱。
13.挑线弹簧 Thread take-up spring
1. Changing the stroke of thread take-up spring ①
1) Loosen setscrew ②.
2) As you turn tension post ③ clock wise (indirection A), the
stroke of the thread take-up spring will be increased.
3) As you turn the knob counter clock wise (indirection B),
the stroke will be increased.
2. Changing the pressure of thread take-up spring ①
1) Loosen setscrew ②, and remove thread tension (asm.) ⑤.
2) Loosen setscrew ④.
3) As you turn tension post ③ clock wise (indirection A), the
pressure will be increased.
4) As you turn the post counter clock wise (indirection B),
the pressure will be decreased.
A
B
C
D
DURKOPP
ADLER
..

使用说明书
Operation Instruction
14.压脚提升 Hand lifter
1) 让压脚停止 到上升的位置,把压脚扳手① 提到A
的方向。
2) 压脚约上升5.5mm(厚料机种为6mm)停止 ,压脚
扳手向B的方向落下 压脚则返还原来的位置。
3) 膝动提升的 标准量为9mm,最大可上升约12 mm。
1) To stop the machine with its presser foot up, turn hand
lifter lever ① in the direction A.
2) The presser foot will go up about 5.5mm (6mm for thick
material) and stop.
The presser foot will go back to its original position when
hand lifter lever is turned down in direction B.
3) Using the knee lifter, you can get the standard presser
foot lift of about 9mm and the maximum lift of about 12mm .
A
8
B
15.压脚压力的调节 Presser foot pressure
1) 拧松螺母② ,把压脚调节螺钉①向右A方向转 ,
力变强。
2) 向左B方向转, 力变弱。
3) 调节后,拧 紧螺母②。
4) 一般布料时 ,压脚调节螺钉的标准高度为
29~32mm。
1) Loosen nut ②. As you turn presser spring regulator ①
clockwise (in direction A), the presser foot pressure will be
increased.
2) As you turn the presser spring regulator counter.-
clockwise (in direction B), the pressure will be decreased.
3) After adjustment, tighten nut ②.
4) For general fabrics, the standard height of the presser
spring regulator is 29 to 32 mm.
16.送布相位的调节 Adjusting the feed timing
1) 拧松送布偏 心凸轮①的固定螺丝②、③, 朝箭
头方向或反箭头 方向移动送布偏心凸轮,然后 拧紧
固定螺丝。
2) 标准调节位 置是送布牙从针板往下落时, 送布
牙上面与针孔上 端对准针板上面的位置。
3) 提早送布相 位以防止布偏斜时,请向箭头 方向
移动送布偏心凸 轮。
4) 为了良好的 紧线而推迟相位时,请逆箭头 方向
移动偏心凸轮。
1) Loosen screws ② and ③ in feed eccentric cam ①, move
the feed eccentric cam in the direction of the arrow or
apposite direction of the arrow, and firmly tighten the screws.
2) For the standard adjustment, adjust so that the top
surface of feed dog and the top end of needle eyelet are
flush with the top surface of throat plate when the feed dog
descends below the throat palte.
3) To advance the feed timing in order to prevent uneven
material feed, move the feed eccentric cam in the direction
of the arrow.
4) To delay the feed timing in order to increase stitch
tightness, move the feed eccentric cam in the opposite
direction from the arrow.
AB
②
①
①
DURKOPP
ADLER
..

17.送布牙的倾斜 Tilt of the feed dog
1) 标准倾斜(水平)度 是送布轴的刻点A和牙架座①
的B部下降到20度水平 送布轴侧的位置。
2) 为了防止缝 制皱褶,向前抬起送布牙时, 请拧
松紧固螺丝②, 把螺丝刀插入送布轴,然后沿 箭头
方向转90度。
3) 为了减少布 的偏斜,向前下降送布牙时, 请沿
与前头方向相反 方向转90度。
1) The standard tilt (horizontal of the feel dog is obtained
when marker dot A on the feed bar shaft is aligned with
marker dot A on feed rocker ①.
2) To tilt the feed dog with its front up in order to prevent
puckering, loosen the set screw ②, and turn the feed bar
shaft 90 degrees in the direction of the arrow, using a screw
driver.
3) To tilt the feed dog with its from down in order to prevent
uneven material feed, turn the feed bar shaft 90 degrees in
the opposite direction from the arrow.
1) 送布牙 a 从针板 b 突出的量请调整为
0.8~1.0mm。(厚料时为1.0~1.2mm )。
2) 缝制薄料时 ,送布牙伸出过高时容易起褶 。
(0.7~0.9mm为适当。)
3) 调节送布牙 时。
·拧松上下抬牙 叉形曲柄①的固定螺丝②。
·上下移动牙架 进行调节。
·然后拧紧固定 螺丝②。
(注意) 拧得不紧时 , 会损伤叉口部。
18.送布牙的高度 Height of the feed dog
1) The feed dog is factory-adjusted so that it jut out from the
throat plate surface 0.75 to 0.85 mm (1.15 to 1.25 mm for
thick material)
2) If the feed dog just out too much puckering may result
when sewing tight-weight materials (Recommended
protrusion 0.7 to 0.8 mm)
3) To adjust the height of the feed dog
·Loosen screw ② of crank ①.
·Move the feed barcker up or down to make adjustment.
·Securely tighten screw ②.
(Caution) If the clamping pressure is insufficient, the forked
portion will wear out.
注意
为了防止意外的 启 动造成的事故,请关掉电源后 进行。
CAUTION
Turn OFF the power before starting the work so as to prevent accidents caused by abrupt start of the
sewing machine.
注意
为了防止意外的 起 动造成的事故,请关掉电源后 进行。
CAUTION
Turn OFF the power before starting the work so as to prevent accidents caused by abrupt start of the
sewing machine.
Front up
Standard
Front down
Throat plate
前上方
标准
前下方
针板
中厚料
0. ~ . mm8 1 0
薄料
0. ~0. mm7 9
厚料
1.0~ mm1.2
Feed dog
Throat plate
送布牙
针板
使用说明书
Operation Instruction
9
②
DURKOPP
ADLER
..
Heavy material
Thin
material
-weight
Medium
material
heavy

19.机针与旋梭的关系 Needle-to-hook relationship
1)转动手轮,让 针杆降到最低点,然后拧松针 杆
连接柱固定螺丝 ①。
(决定针杆高度 )
2)(DB针时)把针 杆②的刻线 A 对准针杆下轴 套③
的下端,然后拧 紧针杆连接柱固定螺丝①。
(DA针时)把针 杆②的刻线 C 对准针杆下轴 套③
的下端,然后拧 紧针杆连接柱固定螺丝①。
(决定旋梭a的安装 位置)
3)(DB针时)拧松 旋梭固定螺丝,转动带轮在
针杆②上升的方 向,把刻线 B 对准针杆下套 ③的下
端。
(DA针时)拧松旋 梭固定螺丝,转动带轮在针杆
②上升的方向, 把刻线 D 对准针杆下套③的 下端。
4) 在此状态下 ,让旋梭尖⑤对准机针④的中 心,
把机针与旋梭的 间隙调整为0.04~0.1mm,然 后拧
紧螺丝。
(注意)间隙过 小的话,会损伤旋梭尖,间隙 过大
的话,会跳针。
1. Adjust the timing between the needle and the hook as
follows:
1) Turn the handwheel to bright the needle bar down to the
lowest point of its stroke, and loosen set screw ①.
(Adjusting the needle bar height)
2) (For a DB needle) Align market line A on needle bar ②
with the bottom end of needle bar lower bushing ③, then
tighten set screw ①.
(For a DA needle) Align market line C on needle bar ② with
the bottom end of needle bar lower bushing ③, then tighten
set screw ①.
(Adjusting position of the hook A )
3) (For a DB needle) Loosen the three hook setscrews, turn
the handwheel, and align marker line B on ascending
needle bar ② with the bottom end of needle bar lower
bushing ③.
(For a DA needle) Loosen the three hook setscrews, turn the
handwheel, and align marker line D on ascending needle
bar ② with the bottom end of needle bar lower bushing ③.
4) After making the adjustments mentioned the above steps
align hook blade point ⑤ with the center of needle ④.
Provide a clearance of 0.04 mm to 0.1 mm (reference value)
between the needle and the hook, then securely tighten
setscrews in the hook.
(Caution) If the clearance between the blade point of hook
and the needle is smaller than the specified value, the blade
point of hook will be damaged. If the clearance is larger,
stitch skipping will result.
20.压脚高度的调节 Adjusting the height of the presser foot
1) 变换压脚高 度或角度时,请拆下面板孔橡 胶塞
拧松压脚杆的固 定螺丝①进行调节。
2) 调节后,再 拧紧固定螺丝。
1) Loosen setscrew ①, and adjust the presser foot height
and the angle of the presser foot.
2) After adjustment, securely tighten the setscrew ①.
使用说明书
Operation Instruction
①
10
DURKOPP
ADLER
..

使用说明书
Operation Instruction
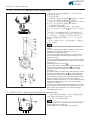
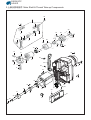
定刀的拆卸方法
1.将缝纫机放倒 。
2.拆下紧固螺钉 ①和旋梭定位勾②。
3.拆下沉头螺钉 ③和定刀④。
移动刀的拆卸方 法
1.用压脚扳手将 压脚抬起。
2.拆下沉头螺钉 ⑤,取下针板⑥。
3.转动缝纫机主 动轮,将针杆停止在最高位置 。
4.拆下沉头螺钉 ⑦,取下移动刀⑧。
定刀压力的调节
1.拆下沉头螺钉 ⑤,取下针板⑥;
2.用套筒扳手⑨ 松开定刀压力调节螺母⑩,把定刀 压
力调节螺钉⑪适当往下调。
注1.拆针板⑥及动 刀 ⑧时,请先取下机针。
组装按相反的顺 序进行。
Removing the fixed knife
1.Tilt back the machine head
2 Remove the screw ①and rotating hook positioner②
3 Remove the screw③and the knife④.
Removing the shift knife
1 Let the presser foot up by presser foot lever
2 Remove the screw ⑤and the needle plate.
3 Turn around the balance wheel, let the needle bar stop
highest
4 Remove the screw ⑦ and the knife⑧.
Adjusting pressure of the fixed knife
1 Remove the screw ⑤ and the needle plate⑥.
2 Use the socket spanner ⑨ removing the screw⑩, moving
down the screw ⑪ to appropriate place.
Note:1 Remove the needle before removing the needle plate
⑥ and the shift knife ⑧.
Installation refer to the reverse order.
.
.
.
.
.
.
.
.
.
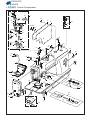
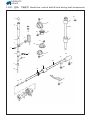
21-1.定刀与移动刀的转换(单刀剪线) Change of fixed knife and shift knife
11
④
③
①
②
⑤
⑥
⑧
⑦
⑨
⑩
⑪
21-2.副动刀压力的调整(双刀剪线) Adjustment of secondary operating pressure
1.副动刀的更换
1) 先拧掉副动 刀定位螺钉②和固定螺钉③, 拆下
副动刀 ;
2) 更换新的副 动刀,并重新拧紧两颗螺钉。
注:更换副动刀后,如右 图所示,要确保刀架④与副动
刀 基本平行。
2.副动刀压力的 调整
当机器需要使用 粗线或者剪线效果不良时,可调节 副
动刀的压力来改 善
1) 拧松副动刀 定位螺钉②和固定螺钉③;
2) 将副动刀向B方 向略微倾斜,然后重新拧紧螺钉,用
手动剪线来确认 调整效果;
注:若机器有出现剪 线卡刀或者剪线压力重的情况,可
将副动刀 略微向A方向倾斜.
①
①
①
④
平行
Parallel
1.Auxiliary Moving knife replacement
1)Firstly, loosen the setting screwer ② and clamping screw
③ of auxiliary moving knife, then detach auxiliary moving
knife ①.
2)Exchange the new auxiliary moving knife and fasten the
two screws.
Noted: after replacing auxiliary moving knife (as shown on
DURKOPP
ADLER
..
ページが読み込まれています...
ページが読み込まれています...
ページが読み込まれています...
ページが読み込まれています...
ページが読み込まれています...
ページが読み込まれています...
ページが読み込まれています...
ページが読み込まれています...
ページが読み込まれています...
ページが読み込まれています...
ページが読み込まれています...
ページが読み込まれています...
ページが読み込まれています...
ページが読み込まれています...
ページが読み込まれています...
ページが読み込まれています...
ページが読み込まれています...
ページが読み込まれています...
ページが読み込まれています...
ページが読み込まれています...
ページが読み込まれています...
ページが読み込まれています...
ページが読み込まれています...
ページが読み込まれています...
ページが読み込まれています...
ページが読み込まれています...
ページが読み込まれています...
ページが読み込まれています...
ページが読み込まれています...
ページが読み込まれています...
ページが読み込まれています...
ページが読み込まれています...
ページが読み込まれています...
ページが読み込まれています...
ページが読み込まれています...
ページが読み込まれています...
ページが読み込まれています...
ページが読み込まれています...
ページが読み込まれています...
ページが読み込まれています...
ページが読み込まれています...
ページが読み込まれています...
ページが読み込まれています...
ページが読み込まれています...
ページが読み込まれています...
ページが読み込まれています...
ページが読み込まれています...
ページが読み込まれています...
ページが読み込まれています...
ページが読み込まれています...
ページが読み込まれています...
ページが読み込まれています...
ページが読み込まれています...
ページが読み込まれています...
ページが読み込まれています...
ページが読み込まれています...
ページが読み込まれています...
ページが読み込まれています...
ページが読み込まれています...
ページが読み込まれています...
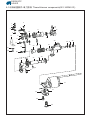
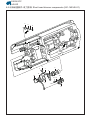
-
 1
1
-
 2
2
-
 3
3
-
 4
4
-
 5
5
-
 6
6
-
 7
7
-
 8
8
-
 9
9
-
 10
10
-
 11
11
-
 12
12
-
 13
13
-
 14
14
-
 15
15
-
 16
16
-
 17
17
-
 18
18
-
 19
19
-
 20
20
-
 21
21
-
 22
22
-
 23
23
-
 24
24
-
 25
25
-
 26
26
-
 27
27
-
 28
28
-
 29
29
-
 30
30
-
 31
31
-
 32
32
-
 33
33
-
 34
34
-
 35
35
-
 36
36
-
 37
37
-
 38
38
-
 39
39
-
 40
40
-
 41
41
-
 42
42
-
 43
43
-
 44
44
-
 45
45
-
 46
46
-
 47
47
-
 48
48
-
 49
49
-
 50
50
-
 51
51
-
 52
52
-
 53
53
-
 54
54
-
 55
55
-
 56
56
-
 57
57
-
 58
58
-
 59
59
-
 60
60
-
 61
61
-
 62
62
-
 63
63
-
 64
64
-
 65
65
-
 66
66
-
 67
67
-
 68
68
-
 69
69
-
 70
70
-
 71
71
-
 72
72
-
 73
73
-
 74
74
-
 75
75
-
 76
76
-
 77
77
-
 78
78
-
 79
79
-
 80
80


Duerkopp Adler 261_vaild_from_december_2019 取扱説明書
- タイプ
- 取扱説明書
その他のドキュメント
-
 ZOJE ZJ9000DA-D5S ユーザーマニュアル
-
 ZOJE ZJ0303L-3-D3 Parts Manual
-
Siruba DL918-NF Instruction book
-
 ZOJE ZJ5770A SERIES ユーザーマニュアル
-
-
-
-
-
-


