HP DesignJet T1708 Printer series Assembly Instructions
- カテゴリー
- 印刷
- タイプ
- Assembly Instructions

© Copyright 2018 HP Development Company, L.P.
Large Format Division
Camí de Can Graells 1-21 · 08174
Sant Cugat del Vallès
Barcelona · Spain
All rights reserved
Printed in XXX
X8
40’
1
2
EN
ZHCN
EN
ZHCN
HP DesignJet T1708
Printer
EN
Assembly instructions
ZHCN
组装说明
*1VD86-90010*
1VD86-90010
EN
Hardware Setup:
1- Assemble the stand
2- Attach the printer body to the stand assembly
3- Set up the printer
4- Printhead and cartridge setup
5- Connectivity & Mobile Printing
Software setup:
Now, it’s easy to print large-format documents from virtually
anywhere, using your laptop, printer touchscreen, iPhone®, or
iPad®.
Install the product software from:
www.hp.com/go/T1708/drivers
ZHCN
硬件设置:
1-组装支架
2- 将打印机机身安装到支架组件上
3- 设置打印机
4- 打印头和墨盒设置
5- 连接和移动打印
软件设置:
现在,使用便携式电脑、打印机触摸屏、iPhone® 或 iPad®,
即可随时随地轻松打印大幅面文档。
从以下位置中安装产品软件:
www.hp.com/go/T1708/drivers
Please read these instructions carefully. These assembly instructions explain how to assemble the printer.
• Because the product is heavy, you may need three people to unpack it. When more than one person isneeded,
this symbol is displayed *.
• You need a roll of 15in (381mm) minimum paper to align the printheads.
• You need a LAN connection to connect the printer to the internet.
Note: Roll and LAN cables are not included.
• To download the printer drivers go to www.hp.com/go/T1708/drivers.
请仔细阅读这些说明。 这些组装说明对如何组装打印机进行了介 绍。
• 因为打印机很重,打开包装可能需要 三人。需要一人以上时,则显示此符号*。
• 要对齐打印头,您还需要最小尺寸 15 英寸的卷筒纸张。
• 附近必须有 LAN 连接,以便将打印机连接到 Internet。
注意: 不附带卷筒和 LAN 电缆。
• 要下载打印机驱动程序,请访问 www.hp.com/go/T1708/drivers
Product working area
Before you start unpacking, consider where you aregoing to put the assembled product.
You should allow some clear space on all sides of the product box. The recommended
clearances are shown intheillustration.
• To assemble the product you will need at least 3 x 3 m (118 x 118 in) of empty
oor space.
• Time required to assemble the printer is approximately 110 minutes.
打印机工作区域
开始打开包装之前,请考虑在何处安放组装好的打印机。应该在打印机包装箱的四
周清理出一些空间。上图显示了建议 的空间大小。
• 要组装本产品,需要至少 3 x 3 米(118 x 118 英寸)的空地。
• 组装打印机大约需要 110 分钟的时间。
1
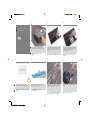
Assemble the stand
组装支架
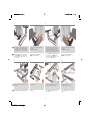
Locate the stand pieces and remove the following: 1. Right
leg / 2. Basket frame / 3. Right foot / 4. Screwdriver and
screws / 5. Cross brace / 6. Left foot / 7. Left leg / 8.Cross
bar.
找到支架组件,然后从盒中取出以下组件:1. 右支腿
/2. 纸筐框架/ 3. 右支脚 /4. 螺丝刀和螺钉 /5. 横梁 6. 左
支脚 / 7. 左支腿 / 8. 十字横杆.
Fix one foot to a leg with 8 screws.
Repeat the process for the other foot and leg.
使用 8 颗螺钉将一个支脚固定到支腿上。
对于另一个支脚和支腿,重复该过程。
Place the cross brace on the oor with the letters L and R
face up.
将横杆支架放在地板上,让有字母 L&R 的一面朝上。
1
*
3 4 5
Enfocus Software - Customer Support

X2+2
EN
EN
ZHCN
ZHCN
Fix the leg to the cross brace with 3 screws at the inner
face of the leg.
Important: Do not fully tighten them.
使用支腿内侧的 3 个螺钉将支腿固定到横梁上。
重要提示: 不要完全拧紧这些螺钉。
Slot a leg onto the cross brace to install the leg with the
long side of the foot as shown in the image. Important:
Note that there are stickers on the legs, make sure the
letters match the ones on the cross brace (R with R, L with
L).
将支腿插入到横梁上以进行安装,支脚的较长一侧如
图中所示。 重要提示:请注意,在支腿上具有标签,
确保文字与横梁上的文字匹配(R 与 R 匹配,L 与 L 匹
配)并插入到位。
Slot the other leg onto the cross brace making sure that
the basket supports located on the feet (1 on each foot)
are on the same side. Important: Note that there are
stickers on the legs, make sure the letters match the ones
on the cross brace (R with R, L with L), and slot into place.
将另一个支腿插入横杆支架,确保位于两个支脚上的
2 个纸筐支撑位于同一侧。 重要说明:请注意,在
支腿上具有标签,以确保文字与横梁匹配 (R 与 R 匹
配,L 与 L 匹配)并在插槽中固定到位
Fix the leg to the cross brace with 3 screws at the inner
face of the leg.
Important: Do not fully tighten them.
使用支腿内侧的 3 个螺钉将支腿固定到横梁上。
重要提示: 不要完全拧紧这些螺钉。
Attach the outside of the leg to the cross brace with 2
screws. Repeat the process with the other leg.
使用 2 个螺钉将支腿外侧固定到横梁上。 对于另一个
支腿,重复该过程。
Turn the stand upright.
将支架立起来。
Fix the cross bar to the bottom of the legs with 4 screws
(2 each side) .
使用 4 颗螺钉(每侧 2 颗)将横杆固定到支腿底部。
Fully tighten all the stand’s screws.
At this point two spare screws should remain.
完全拧紧支架的所有螺钉。 现在,您应该有两个备
用 螺钉。
2
6
10
7
11
9
13
8
12
Enfocus Software - Customer Support

EN
EN
ZHCN
ZHCN
15’
Remove the tape from the transparent covering that
protects the product.
从保护产品的透明覆盖物上撕去胶带。
Open the transparent covering and remove the desiccant
bag from the top of the product.
打开透明护罩并从打印机顶部取出 干燥剂。
Remove the small aps from each of the foam endpieces.
Do not remove the foam end pieces.
从每个泡沫端填塞块中取出小法兰。
不要取出泡沫端填塞块。
There is a round yellow button protruding from the top of
one stand leg, and a square green button protruding from
the top of the other leg. Each button ts into a hole in the
product.
一个底座支柱顶部有一个凸起的黄色圆按钮,另一个支
柱顶部有一个凸起的绿色方形按钮。每个按钮卡入打印
机的一个小孔中。
To nish the stand assembly check that the 4 wheels are
locked.
要完成支架组装,请检查 4 个脚轮是否已锁定。
2
Attach the printer body to the
stand assembly
将打印机机身安装到支架组件上
Remove the tapes from the lm, then remove the tray and
box.
从薄膜中撕下胶带,然后取出包装盒和箱。
EN
ZHCN
IMPORTANT: Make sure there is nothing on top of the printer
body before continuing. In order to attach the stand assem-
bly, carefully turn the printer 180° so the bottom is facing
upwards. You may need a third person.
重要: 继续之前,请确保打印机最上面没有任何东西。
为了连接支架组件,请小心地将打印机翻转 180°,使
底部朝上。 可能需要三个人。
3
17
18 19 20
14
15 16
Enfocus Software - Customer Support

EN
EN
ZHCN
ZHCN
Locate the 4 black screws.
找到 4 个黑色螺钉。
Fix the printer to the stand from underneath with the 4 black
screws.
用 4 个黑色螺钉从下面将打印机固定在底座上。
Place the stand on the product slowly and carefully, so that
the colored buttons on the legs t into the corresponding
holes in the product. IMPORTANT: Make sure there is nothing
on top of the printer body before continuing.
小心翼翼地将底座放置在打印机上,支柱上带颜色的按
钮正好卡入打印机上对应的小孔中。
重要: 继续之前,请确保打印机最上面没有任何东西。
Check that the wheels on the stand are locked.
检查底座的滚轮是否锁紧.
Hold the product by the foam end pieces and rotate it until
it stands on its feet, with all four wheels in contact with the
oor. The T1708 weighs 88.9 kg (196 lb) and T1708dr 89.4
kg (197.1 lb).
抓住产品包有泡沫块的两端,翻转产品直至产品站立,
四个轮子均与地面相接触。 T1708 重 88.9 公斤(196
磅),T1708dr 重 89.4 公斤(197.1 磅)。
Remove the foam end pieces.
取下泡沫端填塞块。
Make sure there is nothing on the printer.
Rotate the product 90°.
IMPORTANT: While you rotate, keep the roll feeds face down-
wards. You may need a third person.
请确保打印机最上面没有任何东西。
将产品旋转 90 度。
重要提示: 在翻转时,确保进纸辊一直 朝下。
可能需要三个人。
Remove the transparent covering from the product.
从打印机上取下透明护罩。
4
2221 23 24
25
26 27 28
Enfocus Software - Customer Support

90º90º
15’
EN
ZHCN
EN
ZHCN
EN
ZHCN
Remove the orange tape pieces from the product, except
for the ones coming from inside the product.
除产品内侧胶带之外,请撕去其他所有橙色胶带。
Open the Window.
打开护盖。
3
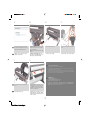
Set up the printer
设置打印机
You will see a cardboard support attached to the product
with tape. Remove the tape.
您将看到用胶带粘到产品上的纸板支架。 撕下胶带。
Remove the tape from the stand, and unfold the fabric.
Pass the fabric through to the front of the printer and then
insert the frame. Check the picture for correct installation.
撕下胶带并展开折叠的棉布 。
将织物绕到打印机正面,然后插入框架。 请查看图片
以正确进行安装。
Clip the basket frame to the feet. Press rmly until it clicks
into place. The basket is now complete.
将纸筐框架夹到支脚中。 用力按压直到其卡入到位。
纸筐现已安装完毕。
Turn the cardboard support 90° to the right.
CAUTION: Avoid hitting the belts.
将纸板架向右旋转 90 度。
注意: 避免撞击皮带。
Carefully lift the cardboard support up and out of the
product. Itwill not be needed again; you can discard it.
小心提起纸板支架,将其从打印机中取出。以后不会再
用到它,您可以将其丢弃。
5
343332 35
3029
31
Enfocus Software - Customer Support

7-15’
EN
EN
ZHCN
ZHCN
Inside the right-hand side of the product, you will see a piece
of cardboard.
在打印机内部右侧,您会看到一块纸板。
Remove the cardboard carefully. It will not be needed again
so it can be disposed o.
小心卸下纸板。以后不会再 用到它,您可以将其丢弃。
Connect the network cable.
接上网线。
Remove the orange tapes and unlock the wheels. Move the
printer to its nal destination.
去掉橙色胶带,解锁脚轮。将打印机移到最终目标位
置 。
If you nd a USB ash drive in a plastic bag inside the box, it
contains the latest Firmware. Please follow the instructions
in the bag. Otherwise, please ignore this step.
* The USB drive is only needed in some units.
如果纸箱里的塑料袋中装有一个 U 盘(包含最新的固
件),请按照塑料袋中的说明进行操作。否则,请忽略
此步骤。
*仅有部分设备型号需要 U 盘。
Connect the power cable to the printer, and the outlet.
将电源线连接到打印机并插入电源插座。
Remove the plastic lm covering the window and the plastic
lm covering the front panel (LCD display). When all cables
are connected, switch the printer on.
取下打印机护盖和前面板(LCD 显示屏)上的塑料薄
膜。在连接所有电缆后,打开打印机电源。
On the front panel, the HP logo appears. Please wait a while.
You will then be prompted to select thelanguage of the
product. If USB ash drive is found, follow the front panel
instructions.
HP 徽标出现在前面板上。请稍等片刻。 随后系统会提
示您选择打印机的语言。如果发现 USB 闪存驱动器,
请按照前面板的说明操 作。
6
36 38
37 39
40 41 42 43
Enfocus Software - Customer Support

10’
EN
EN
ZHCN
ZHCN
47 49
40’
The cartridges must be inserted the right way around: the ink
outlet in the catridge should meet the ink inlet in the slot. Push
the cartridge into the slot until it clicks into place.
Close the ink cartridge cover.
墨盒必须按正确方式插入:即墨盒的出墨口应该紧贴插
槽的进墨口。将墨盒推入插槽,直到它卡入到位.
合上墨盒盖。
The printer now prepares the ink system for use.
Please wait until it has completed before you continue.
打印机现在将准备墨水系统以便使用。 请等到完成后
再继续。
When the ink system is ready, the front panel will prompt
you to open the window and printhead cover.
当墨水系统准备就绪时,前面板将提示您
打开护盖和打印头盖。
Insert the ink cartridges one-by-one (x6). Each cartridge is
marked with its own color, and should be inserted only into
the slot of the same color. Avoid touching pins, leads or
circuits.
逐个插入墨盒 (x6)。每个墨盒都标记了颜色,只能插入
标有 同样颜色的插槽中。避免接触插针、引线或电路。
4
Printhead and cartridge setup
打印头和墨盒设置
EN
ZHCN
When prompted by the front panel to insert the ink
cartridges, open the right-hand side ink cartridge cover.
前面板发出插入墨盒的提示后,打开右侧
墨盒盖。
Open the Window. Remove the label from the printhead
carriage and pull the blue printhead-cover handle up and
towards you to release the latch.
打開上蓋。 從印字頭托架取下標籤,並將印字頭護蓋
的藍色把手向上與向您的方向拉,以鬆開閂鎖。
Push the handle back to raise the lid to access the setup
printheads.
推回手柄以抬起盖子并露出设置打印头。
7
44 45 46
48 50
Enfocus Software - Customer Support

EN
EN
ZHCN
ZHCN
Look at each setup printhead to verify that it has ink inside.
The setup printheads only purpose is to prevent ink loss
during ink cartridge installation.
查看每个设置打印头,并确认打印头内都有墨水。
设置打印头只是为了防止在墨盒安装过程中墨水溢
出。
Remove and discard all the setup printheads. Youmay need
to use force to extract each printhead.
The setup printheads contain ink, which could leak out.
Avoid touching pins, leads or circuits.
卸下并丢弃所有设置打印头。 拔下每个打印头时
可能要用力。
设置打印头中有墨水,有可能泄漏。
避免接触插针、引线或电路。
When all of the setup printheads have been removed, press
“Next”on the front panel. The front panel prompts you to
install the new printheads.
在移除所有设置打印头后,请按 前面板上的“下一
步”。前面板 将提示您安装新打印头。
Unwrap each printhead and remove all orange parts.
拆开每个打印头的包装并卸下所有橙色部件。
The printhead is designed to be inserted into any available
slot. Once the printhead is inserted into a slot it sets up to
work only with that combination of colors, so it is important
to mark the printhead with the specic color combination
to be used.
打印头被设计成可插入任意 可用插槽。 一旦打印头插
入某插槽,它就被设置为仅处理该颜色组合,因此请务
必为打印头标记要使用的 具体颜色组合。
Insert the printheads one by one. Push each printhead into
the slot until it clicks into place.
逐个插入打印头。将每个打印头推入插槽,直到它卡
入到位。
Pull the handle down to close the cover.
将手柄向上拉动,以合上盖板。
Ensure that the end of the blue handle catches the wire loop
on the near side of the carriage.
Lower the handle to rest on the carriage cover.
确保蓝色手柄的末端卡住 墨盒近端的钢丝圈。
放低手柄,将其置于托架盖上。
8
51
52 53 54
55
56 57 58
Enfocus Software - Customer Support

61 62
EN
EN
ZHCN
ZHCN
Add the removable stop to the spindle to keep the roll in
place. Push the removable stop towards the roll as far
asitwill go.
No gap should be left between stop andpaper.
为卷轴加上可移动挡块,使纸卷处于正确位置。将可移
动挡块朝纸卷的方向推动,直至不能再推动为
止。
挡块和纸张之间不能有任何间隙。
From the front of the product, place the spindle into the
product.
从打印机前部,将卷轴放入打印机。
When the front panel prompts you to load paper for print-
head alignment: Take the spindle and use it to load the paper
the rst time.
Note: Calibration requires paper at least 15in (381mm) wide.
当前面板提示您装入纸张以对准打印头时:
取出卷轴,并用它来首次装入纸张。注:打印头对齐需
要宽度至 少为 15 英寸(38.1 厘米)的纸张。建议使用
卷筒纸张。
If the blue removable stop is on the spindle, remove it. Load
the roll onto the spindle as indicated in the image.
如果卷轴上有蓝色可移动挡块,请将其取下。 如图所示
将卷筒装到卷轴上。
Feed the leading edge of the paper into the product until the
product takes hold of it. Do not insert the roll paper into the
cutsheet slot.
将纸张前缘装入打印机,直到打印机进纸。不要将卷筒
纸张插入到裁切纸插槽内。
The product will proceed to align the printheads. This process
involves printing, and therefore needs to use paper with a
straight leading edge. Note: printhead alignment requires
paper at least 15in (381mm) wide. Roll paper is recommended.
打印机将继续对准打印头。此过程涉及打印,因此需要
使用一些前缘平直的纸张。注:打印头对齐需要宽度至
少为 15 英寸(38.1 厘米)的纸张。建议使用卷筒纸
张。
Close the top cover. The product checks and prepares the
new printheads.
合上顶盖。 产品检查并准备 新打印头.
Once the printhead check has nished the product will be
ready to load paper for the printhead alignment.
完成打印头的检查后,打印机将准备装入纸张,以对
齐打印头。
9
59
60
63 6564 66
10’
Enfocus Software - Customer Support

68
2x
EN
EN
ZHCN
ZHCN
EN
ZHCN
The front panel will display a series of messages showing
the progress of the printhead alignment. There is no need
to take any action until the alignment has nished.
前面板将显示一系列消息,说明打印头对齐的进度。
在调校结束之前不需执行任何操作。
HP DesignJet T1708dr only: Paper load on lower roll: Go to
the rear of the product, and remove the orange stoppers
from each end of the spindle.
Note: It is not necessary to install the 2nd roll to start using
the product.
仅 HP DesignJet T1708dr 打印机:下卷筒的介质装入
转到打印机的后面,从卷轴两端取下橙色挡块。 注: N
開始使用此產品前,不需要先安裝第二個捲筒。
Load the paper onto the spindle as indicated in steps 62
and 63.
将纸卷装入到卷轴上。对第二个卷筒执行步骤 62-63。
Open the roll cover. Remove the spindle.
打开卷筒盖。从打印机上取下卷轴。
From the back of the product, place the spindle into the
product.
从打印机背面,将卷轴放入打印机。
Feed the leading edge of the paper into the product until
the product takes hold of it. Then move to the front of the
product. Note: do not close the roll cover until the front
panel noties you. If the paper types of the two rolls dier,
go to step 78 and calibrate the paper.
将纸张前缘装入打印机,直到打印机完全包住它。然后
转到打印机的前面。 注:不要关闭卷筒盖,直到前面
板通知您这么做。如果两个卷筒的纸张类型不同,请执
行步骤 78,并校准纸张。
5
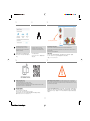
Connectivity and Mobile Printing
1 - Make sure that your printer is correctly connected to the Internet.
2 - Enable the services during initial setup of the printer, or later following the instructions in the front panel. The
printer may need to restart if the rmware has updated.
3-With HP Mobile Printing Solutions you can print straight from your smartphone or tablet in just a few simple steps
wherever you are; using your mobile device OS or sending an email to your printer with a PDF, TIF or JPEG attachment.
For more information check: http://www.hp.com/go/designjetmobility.
连接和移动打印
1 - 确保打印机正确连接到 Internet 上。
2 - 在初次设置打印机期间启用 Web 服务,或者以后
按照前面板上的说明操作。如果更新了固件,打印
机可能需要重启。3- HP 移动打印解决方案,无论您在哪里,都可以通过几个简单步骤直接从智能手机或平
板电脑中进行打印 : 使用移动设备操作系统,或者向打印机发送包含 PDF、TIF 或 JPEG 附件的电子邮件。
欲知详情,请访问 : http://www.hp.com/go/designjetmobility.
10
67
69 70
71
72
Enfocus Software - Customer Support

hp.com/go/DesignJetclick
EN
EN
ZHCN
ZHCN
The connectivity wizard will now start and take you
step by step through connecting your printer to the
internet. Follow the instructions. Take note of the printer’s
email address for email printing.
连接向导现在将启动并引导您 按步骤将打印机连接 到
Internet。请记下 Printer 的用于电子邮件打印 的电子邮
件地址。
Install the product software on your computer.
Download it from: www.hp.com/go/T1708/drivers
Be sure to follow the software installation instructions.
从以下位置中安装产品软件:
www.hp.com/go/T1708/drivers 。 确保按照软件安装
说明进行操作。
Radically simplify the printing experience:
For Windows and Mac - Install the new large format printing software and simplify print-ready le generation.
Auto-discover printers, quickly prepare PDF, JPEG, Ti and HPGL/2 documents, avoid trial and error with PDF error checks and
real-time print preview.
Download from: www.hp.com/go/designjetclick
彻底简化打印体验:
对于 Windows 和 Mac - 安装新版大幅面打印软件,简化打印就绪文件的生成。自动发现打印机;快速准备
PDF、JPEG、Tiff 和 HPGL/2 文档;通过 PDF 错误检查避免试错;以及实时打印预览。
下载网址: www.hp.com/go/designjetclick
Print from your smartphone or tablet
- AirPrint must be enabled on the printer.
- iOS printing is enabled through Airprint, no installation is required.
- For Android printing, install the HP Print Service Plugin from Google Play.
- You can also download the HP Smart App (iOS/Android) to enhance your printing capabilities from a smartphone or tablet.
For more information visit: http://www.hp.com/go/designjetmobility
从智能手机或平板电脑打印:
- 必须在打印机上启用 AirPrint。
- 通过 Airprint 启用 iOS 打印,不需要进行安装。
- 要进行 Android 打印,请从 Google Play 中安装 HP Print Service 插件。
- 您还可以下载 HP Smart App (iOS/Android) 应用程序以增强从智能手机或平板电脑进行打印的功能。
欲知详情,请访问: http://www.hp.com/go/designjetmobility
Optional: Managing printer security in HP Connected. When you enable web services the printer is in unlock mode meaning
everyone who knows the printer’s email address can print. If you are the printer administrator you can change the status to lock
mode, customize your printer’s email address, or manage the printer security (you will need the printer code and an account at HP
Connected. Check your region’s availability).
可选: 在 HP Connected 中管理 Printer 安全性。 当您启用 Web 服务时,打印机处于解锁模式,这意味着凡是知 道打印
机的电子邮件地址的人都可以进行打印。 如果是打印机管理员,您可以将状态更改为锁定模式,自定义打 印机的电子
邮件地址或管理 Printer 安全性。(您需要在 HP Connected 中使用打印机代码和帐户。 请检查是否为 您所在的地区提
供该服务)。
11
73 74 75
76 77
Enfocus Software - Customer Support

EN
ZHCN
You can now, or at some later time, color-calibrate the paper type that you intend to use in the product. Color calibration is
recommended for accurate color printing. It can be started from the front panel’s
Color Calibration.
您可以在现在或以后对打印机中要使用 的纸张类型进行颜色校准。建议进行颜色校准,这样打印的颜色更加准确。 可
通过前面板的
> 颜色校准将其启动 。
EN
ZHCN
© Copyright 2018 HP Development Company, L.P.
The information contained herein is subject to change without notice.
The only warranties for HP products and services are set forth in
the express warranty statements accompanying such products and
services. Nothing herein should be construed as constituting an
additional warranty. HP shall not be liable for technical or editorial
errors or omissions contained herein.
© Copyright 2018 HP Development Company, L.P.
本文档中包含的信息如有更改,恕不另行通知。 有关 HP 产品
和服务的全部保修和保证条款,均已在相关产 品和服务所附带
的保修声明中进行了明确的规定。本文中的任何内容都不应被
引伸为补充保证。 HP 对 本文档中出现的技术错误、编辑错误
或遗漏之处概不 负责。
12
78
Enfocus Software - Customer Support
-
 1
1
-
 2
2
-
 3
3
-
 4
4
-
 5
5
-
 6
6
-
 7
7
-
 8
8
-
 9
9
-
 10
10
-
 11
11
-
 12
12


HP DesignJet T1708 Printer series Assembly Instructions
- カテゴリー
- 印刷
- タイプ
- Assembly Instructions
他の言語で
- English: HP DesignJet T1708 Printer series
関連論文
-
HP Ink Tank 316 ユーザーガイド
-
HP DesignJet T7100 Printer series Assembly Instructions
-
-
-
-
-
-
-
HP ENVY Inspire ユーザーガイド
-
HP DesignJet 820 MFP series リファレンスガイド