
SCF334, SCF332

SCF334, SCF332

SCF334
Fig. A
SCF332
1 2 4 5
14
15
16
17
18
13
7
6
8 10 11
12
3
9
图 A


English 6
简体中文
31

6
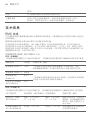
Contents
Contents _____________________________________________________________6
Introduction __________________________________________________________ 7
General description (Fig. A) ______________________________________________ 7
Intended use _________________________________________________________ 8
Important safety information ____________________________________________ 8
Contraindications ______________________________________________________ 8
Warning ______________________________________________________________9
Caution _____________________________________________________________ 10
Preparing for use _____________________________________________________ 10
Cleaning and sanitizing ________________________________________________ 10
Cleanable parts ______________________________________________________ 10
Disinfection (optional) __________________________________________________11
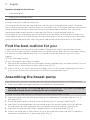
Find the best cushion for you ___________________________________________ 12
Assembling the breast pump ___________________________________________ 12
Using the breast pump ________________________________________________ 13
When to express milk _________________________________________________ 13
Tips ________________________________________________________________ 14
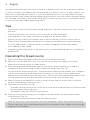
Operating the breast pump _____________________________________________ 14
Storing breast milk ____________________________________________________ 15
Compatibility ________________________________________________________ 16
Feeding _____________________________________________________________ 16
For your child‘s safety and health _______________________________________ 16
Warning _____________________________________________________________ 16
Before rst use _______________________________________________________ 17
Cleaning bottles ______________________________________________________ 17
Assembling bottles ___________________________________________________ 17
Heating breast milk ___________________________________________________ 17
Maintenance and storage of bottles _____________________________________ 18
Additional information _________________________________________________ 18
Choosing the right teat for your baby_____________________________________ 18
Replacement ________________________________________________________ 19
Batteries ____________________________________________________________ 19
Recycling ___________________________________________________________ 19
Removing the batteries ________________________________________________ 19
Ordering accessories __________________________________________________ 19
Accessories __________________________________________________________ 20
Manual breast pump converter__________________________________________20
Assembling the manual breast pump _____________________________________ 20
English

Operating the manual breast pump ______________________________________20
Additional items ______________________________________________________ 21
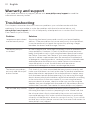
Warranty and support _________________________________________________ 22
Troubleshooting ______________________________________________________ 22
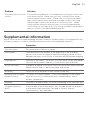
Supplemental information _____________________________________________ 23
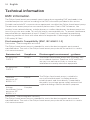
Technical information _________________________________________________ 24
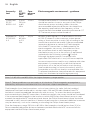
EMC information _____________________________________________________ 24
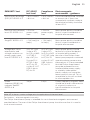
Electromagnetic Compatibility (EMC, IEC 60601-1-2) _______________________ 24
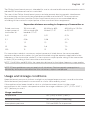
Usage and storage conditions ___________________________________________ 27
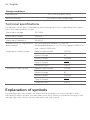
Technical specications ________________________________________________ 28
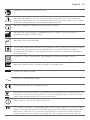
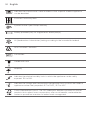
Explanation of symbols ________________________________________________ 28
Introduction
Congratulations on your purchase and welcome to Philips Avent! To fully benet from the
support that Philips Avent oers, register your product at www.philips.com/welcome.
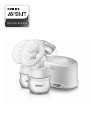
The Philips Avent breast pump has a unique design that enables you to sit in a more
comfortable position while expressing. The soft massage cushion* is designed to feel soft
and warm and to mimic your baby’s suckling action to provide milk ow - comfortably and
gently. The breast pump starts in a gentle mode that helps to stimulate your milk ow. You
can then choose from three suction modes, according to your own personal comfort. The
pump is easy to assemble and operate and all parts that come into contact with breast milk
are dishwasher-safe.
Healthcare professionals say that breast milk is the best nutrition for babies during the rst
year, combined with solid food after the rst 6 months. Your breast milk is specially adapted
to your baby’s needs and help protect your baby against infection and allergies. A breast
pump can help you to breastfeed longer. You can express and store your milk so that your
baby can still enjoy the benets, even if you cannot be there to provide it yourself. As the
pump is compact, quiet and discrete to use, you can take it with you anywhere, allowing you
to express milk at your own convenience and maintain your milk supply.
This breast pump is for household use only.
*The cushions included with this pump were designed to comfortably t the majority of
mothers. However, if you need it, you can buy a larger cushion separately.
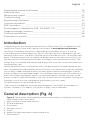
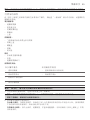
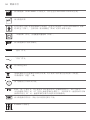
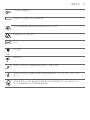
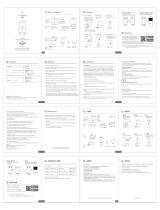
General description (Fig. A)
Figure A. The numbers mentioned below refer to the numbers on the gure of the front
foldout page of this user manual.
1 Motor unit with silicone tube and cap *
2 Silicone diaphragm *
3 Pump body *
4 Massage cushion *
5 Cover *
6 Battery housing (single electric breast pump only)
7 On/o button
English
7

8 Stimulation button
9 Low suction button
10 Medium suction button
11 Deep suction button
12 Adapter
13 White valve *
14 Philips Avent Natural bottle *
15 Dome cap *
16 Screw ring *
17 Nipple *
18 Sealing disc *
*Note:The twin electric breast pump comes with two pieces of the marked parts, except for
the motor unit.
SCF332 contains: Single electric breast pump (including bottle), manual handle, diaphragm
with stem, breast pads (4)
SCF334 contains: Twin electric breast pump (including bottle), breast pads (4), travel bag
Intended use
The Philips Avent Comfort Single/Twin electric breast pump is intended to express and collect
milk from the breast of a lactating woman.
The device is intended for a single user.
Important safety information
Read this user manual carefully before you use the breast pump and save it for future reference.
This user manual can also be found online via the Philips Avent website: www.philips.com/avent
Contraindications
Never use the breast pump while you are pregnant, as pumping can induce labor.
8
English

Warning
Warnings to avoid choking, strangulation and injury:
- Do not allow children or pets to play with the motor unit, the adapter or accessories.
- Children should be supervised to ensure that they do not play with the appliance.
- Always unplug the breast pump immediately after use.
- Do not leave the breast pump unattended when it is plugged in.
- This breast pump is not intended for use by persons (including children) with reduced
physical, sensory or mental capabilities, or lack of experience and knowledge. Such
persons can only use this breast pump if they are supervised by or have received proper
instruction concerning use of the appliance by a person responsible for their safety.
Warnings to avoid electric shock:
- Inspect the breast pump, including the adapter, for signs of damage before each use.
Do not use the breast pump if the adapter or plug is damaged, if it does not work properly
or if it has been dropped or submerged in water.
Warnings to prevent burns:
- Only use the adapter indicated on the appliance to prevent overheating of the adapter.
- Non-rechargable batteries are not to be recharged to prevent overheating and leaking of
batteries.
Warnings to avoid poisoning and contamination and to ensure hygiene:
- For hygienic reasons, the breast pump is only intended for repeated use by a single user.
- Clean, rinse and sanitize all pump parts, except the motor unit, the tube and cap and the
adapter, before each use.
- Only store breast milk collected with a cleaned and sanitized pump.
- Do not use the breast pump if the silicone diaphragm appears to be damaged or broken.
See chapter ‘Ordering accessories’ for information on how to obtain replacement parts.
- Do not use antibacterial or abrasive cleaning agents when you clean breast pump parts.
- If you are not going use the appliance for a long period of time, remove the batteries to
prevent leaking of batteries.
Warnings to avoid breast and nipple problems and pain:
- Do not attempt to remove the pump body from your breast while under vacuum. Switch
o the appliance and break the seal between your breast and the pump funnel with your
nger. Remove the pump from your breast.
- Never use the breast pump while you are sleepy or drowsy to avoid lack of attention
during use.
- Always switch o the breast pump before you remove the pump body from your breast to
release the vacuum.
- Never use any accessories or parts from other manufacturers or that Philips Avent does not
specically recommend. This could lead to improper working of the appliance and could
inuence Electromagnetic Compatibility (EMC). If you use such accessories or parts, your
warranty becomes invalid.
- Do not continue pumping for more than ve minutes at a time if you do not succeed in
expressing any milk. Try to express at another time during the day.
English
9

- If the process becomes very uncomfortable or painful, stop using the pump and consult
your breastfeeding advisor.
- If the pressure generated is uncomfortable or causes pain, switch o the appliance, break
the seal between the breast and the pump body with your nger and remove the pump
from your breast.
Caution
Caution to prevent damage to and malfunctioning of the product:
- Never drop or insert any foreign object into any opening.
- Prevent the adapter and motor unit from coming into contact with water.
- Keep the adapter and the silicone tubes away from heated surfaces to avoid overheating
and deformation of these parts.
- Never put the motor unit or the adapter in water, in a dishwasher or in a sanitizer.
- Although the breast pump is compliant with applicable EMC directives, it may still be
susceptible to excessive emissions and/or may interfere with other equipment.
A consequence can be that the breast pump switches o or goes into error mode.
To prevent interference, keep other electric equipment away from the breast pump
during expressing (see ‚Technical information‘).
- There are no user serviceable parts inside the motor unit of the breast pump. No
modication of equipment is allowed. If you do, your warranty becomes invalid.
- Do not short-cut the supply terminals of the batteries.
Preparing for use
Cleaning and sanitizing
The motor unit, the silicone tube, cap and the adapter do not require cleaning and sanitizing,
as they do not come into contact with breast milk. Clean and sanitize all other parts of the
breast pump before rst use. Also clean these parts after each subsequent use and sanitize
them before each subsequent use.
Caution: Never put the motor unit or the adapter in water, in a dishwasher or in a sanitizer,
as this causes permanent damage to these parts.
Cleanable parts
Clean the following parts before (rst) use and after each subsequent use. Please check the
list in the General Description section to see which items are included with your breast pump.
Breast pump parts:
- Silicone diaphragm
- Pump body
- Massage cushion
- White valve
- Cover
10
English

Bottle parts:
- Philips Avent Natural bottle
- Dome cap
- Screw ring
- Teat
- Sealing disc
Accessories
- Manual breast pump converter
- Handle
- Silicone diaphragm with stem
Supplies needed for cleaning:
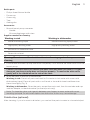
Washing in sink Washing in dishwasher
- Mild dishwashing liquid - Mild dishwashing liquid/tablet
- High quality drinking water - High quality drinking water
- Soft brush or clean dish towel
- Clean sink or bowl
Warning: Do not use antibacterial or abrasive cleaning agents when you are
cleaning.
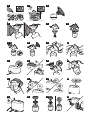
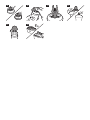
1 Disassemble the breast pump and bottle completely. Also remove the white valve from the
breast pump.
Caution: Be careful when you remove the white valve and when you clean it. If it gets
damaged, your breast pump does not function properly. To remove the white valve,
gently pull at the ribbed tab on the side of the valve.
2 Wash the parts in the sink or dishwasher.
Washing in sink: Detach all parts and soak for 5 minutes in hot water with some mild
dishwashing liquid. Clean all parts with a soft brush or clean dish towel and then rinse
them thoroughly (Fig. 3).
Washing in dishwasher: Clean the parts, except the motor unit, the silicone tube and cap
and the adapter, in the dishwasher (on the top rack only).
Note: To clean the valve, rub it gently between your ngers in warm water with some
washing-up liquid. Do not insert objects into the valve, as this may cause damage.
Disinfection (optional)
After cleaning, if you also want to disinfect, you can boil the parts in water in a household pot.
English
11

Supplies needed for disinfection:
- A household pot
- High-quality drinking water
Disinfect the parts in the following way:
Fill a household pot with enough water to cover all parts. Bring the water to boil. Place the
parts in the household pot and boil them for 5 minutes (Fig. 4). During disinfection with boiling
water, prevent the bottle or other parts from touching the side of the pot. This can cause
irreversible product deformation or damage that Philips cannot be held liable for.
Allow water to cool and gently remove the parts from the water. Place the parts neatly on a
clean paper towel or in a clean drying rack and allow them to air dry. Avoid using cloth towels
to dry the parts because they can carry germs and bacteria that are harmful to your baby.
Find the best cushion for you
Expressing breast milk should be comfortable. Therefore we oer 2 soft exible cushions:
a 19.5 mm massage cushion (supplied with your breast pump) and a 25 mm massage cushion.
For optimal comfort and performance, you should choose the optimal cushion for your
nipples.
19,5 mm: Massage cushion,
25 mm: Massage cushion (not included):
1 Start with the standard 19.5 mm massage cushion supplied with your breast pump. You can
nd the size of the cushion on the cushion itself (Fig. 5).
2 If the cushion is too small, purchase the larger 25 mm cushion (see ‘Ordering accessories’).
A too small cushion can cause pain or less eective expressed (Fig. 6).
Assembling the breast pump
Note: Make sure you have cleaned and sanitized the appropriate parts of the breast pump.
1 Wash your hands thoroughly before you handle the cleaned parts.
Warning: Be careful, the cleaned parts may still be hot. Only start assembling
the breast pump when cleaned parts have cooled down.
Note: You may nd it easier to assemble the breast pump while it is wet.
2 Insert the white valve into the pump body from underneath. Push the valve in as far as
possible (Fig. 7).
3 Screw the pump body clockwise onto the bottle until it is securely xed (Fig. 8).
4 Insert the silicone diaphragm into the pump body from above. Make sure it ts securely
around the rim by pressing down with your ngers to ensure a perfect seal (Fig. 9).
5 Insert the cushion into the funnel-shaped section of the pump body (Fig. 10).
6 Push in the inner part of the cushion as far as possible and make sure that it is perfectly
sealed all around the rim of the pump body (Fig. 11).
12
English

7 Press in between the petals to remove any trapped air (Fig. 12).
Note: Place the cover over the cushion to keep the breast pump clean while you prepare
for expressing.
Warning: Always use the breast pump with a cushion.
8 Insert the adapter into the wall socket and insert the plug at the other end into the motor
unit (Fig. 13).
The adapter reference code is indicated on the bottom of the appliance. Only use the
indicated adapter with the appliance.
- For battery operation (single electric breast pump only), turn the bottom of the motor
unit in the direction indicated by the marks on the bottom (step 1 (Fig. 14)) and remove
it (step 2 (Fig. 14)). Insert four new 1.5V AA batteries (or 1.2V, in case of rechargeable
batteries) into the battery housing. Check the markings on the housing of the battery for
the correct polarity. Reattach the bottom to the motor unit.
Note: A new set of batteries provides 1-3 hours of operating time. Rechargeable batteries
will lose capacity over time and may cause a decrease in operating time.
Note: If you have inserted batteries in the battery housing of the motor unit and plug in
the adapter, the breast pump will run from on electrical power. The batteries cannot be
charged in the unit.
Warning: Do not mix dierent type of batteries.
Warning: Do not mix used and new batteries.
9 Attach the silicone tube and cap onto the diaphragm. Push down the cap until it is securely
in place (Fig. 15).
Using the breast pump
When to express milk
If breastfeeding goes well, it is advisable (unless advised otherwise by your healthcare
professional/breastfeeding advisor) to wait until your milk supply and breastfeeding schedule
are established (normally at least 2 to 4 weeks after giving birth) before you start expressing.
Exceptions:
- If breastfeeding does not go well immediately, expressing regularly can help to establish
and maintain your milk supply.
- If you are expressing milk for your baby to be given in hospital.
- If your breasts are engorged (painful or swollen), you can express a small amount of milk
before or between feeds to ease the pain and to help your baby latch on more easily.
- If you have sore or cracked nipples, you may wish to express your milk until they are healed.
- If you are separated from your baby and wish to continue to breastfeed when you are
reunited, you should express your milk regularly to stimulate your milk supply.
English
13

You need to nd the optimum times of the day to express your milk, for example just before
or after your baby’s rst feed in the morning when your breasts are full, or after a feed if your
baby has not emptied both breasts. If you have returned to work, you may need to express
during a break. Using a breast pump requires practice and it may take several attempts before
you succeed. Fortunately, the Philips Avent electric breast pump is easy to assemble and use
so you will soon get used to expressing with it.
Tips
- Familiarize yourself with the breast pump and how to operate it before you use it for the
rst time.
- Choose a time when you are not in a rush and will not be interrupted.
- A photograph of your baby can help encourage the ‘let-down’ reex.
- Warmth can also help: try to express after a bath or shower, or place a warm cloth or
Philips Avent Thermopad on the breast for a few minutes before you start expressing.
- You may nd it easier to express while your baby is feeding from the other breast,
or immediately after a feed.
- If expressing becomes painful, stop and consult your breastfeeding advisor or healthcare
professional.
Operating the breast pump
1 Wash your hands thoroughly and make sure your breasts are clean.
2 Relax in a comfortable chair (you may wish to use cushions to support your back).
Make sure you have a glass of water nearby.
3 Press the assembled pump body against your breast. Make sure that your nipple is
centered, so that the massage cushion creates an airtight seal (Fig. 16).
For twin electric breast pump users: The twin electric breast pump enables you to express
milk from both breasts at the same time. However, you can also use the appliance to
express from one breast in just the same way. Attach both assembled pump bodies to the
silicone tube and cap. We recommend to place the cover over the other one.
4 Make sure that your nipple ts correctly in the cushion. See for correct size of cushion,
section „Find the best cushion for you“.
5 Press the on/o button (Fig. 18).
- The breast pump automatically starts up in stimulation mode and the on/o button and
the stimulation button light up.
- You begin to feel the suction on your breast.
6 Once your milk starts owing, you can adopt a slower rhythm by pressing the lowest
suction button (Fig. 19).
- This button lights up instead of the stimulation button.
Note: Do not worry if your milk does not ow immediately. Relax and continue pumping.
The rst few times you use the breast pump, you may need to use a higher suction mode
to get your milk owing.
14
English

7 Depending on your own personal comfort, you may wish to use a higher suction mode
that provides deeper suction. You can always return to a lower suction mode (Fig. 20).
You can turn o the breast pump whenever you like by pressing the on/o button (Fig. 21).
Note: You do not need to use all suction modes, only use the modes that are comfortable
for you.
Warning: Always turn o the breast pump before you remove the pump body
from your breast to release the vacuum.
Warning: Do not continue pumping for more than 5 minutes at a time if you do
not succeed in expressing any milk. Try to express at another time during the day.
8 On average, you need to pump for 10 minutes to express 60-125ml (2-4 oz) of breast milk
from one breast. However, this is just an indication and varies from woman to woman.
Note: If you regularly express more than 125ml per session, you can purchase and use a
260ml/9 oz Philips Avent bottle to prevent overlling and spillage.
9 When you have nished expressing, turn o the breast pump (Fig. 21) and carefully remove
the pump body from your breast.
10 Unscrew the bottle from the pump body. You have multiple options:
- Insert a sanitized sealing disc into a sanitized screw ring and screw this onto the bottle (Fig.
22). The expressed milk in the bottle is ready for storage.
- Alternatively, assemble a sanitized nipple and screw ring onto the bottle according to the
instructions (see ‚Feeding‘). Seal the nipple with the dome cap (Fig. 23).
11 Unplug the adapter from the wall outlet to disconnect the appliance from the electrical
power. Unplug the motor unit from the adapter. Unplug the silicone tube and cap from the
silicone diaphragm. For easy storage, wrap the silicone tube around the motor unit and clip
the cap onto the tube (Fig. 24).
12 Clean the other used parts of the breast pump according to the instructions in section
‘Cleaning and sanitizing’.
Storing breast milk
Warning: Only store breast milk collected with a cleaned and sanitized pump to
ensure hygiene.
Breast milk can be stored in the fridge (not in the door) for up to 48 hours. Expressed milk
should be refrigerated immediately. If you store milk in the fridge to add to during the day,
only add milk that has been expressed into a sanitized bottle or storage cup. Breast milk can
be stored in the freezer for up to three months as long as it is kept in either sanitized bottles
tted with a sanitized screw ring and sealing disc or sanitized storage cups. Clearly label the
bottle or storage cup with the date and time of expression and use older breast milk rst. If
you intend to feed your baby with the expressed breast milk within 48 hours, you can store
the breast milk in the fridge in an assembled Philips Avent bottle or storage cup.
English
15

Do’s
- Always refrigerate or freeze expressed milk immediately.
- Only store milk collected with a sanitized breast pump in sanitized bottles.
Don’ts
- Never refreeze thawed breast milk.
- Never add fresh breast milk to frozen breast milk.
Compatibility
The Philips Avent electric breast pump is compatible with Philips Avent bottles in our range
and Philips Avent Storage cups. When you use other Philips Avent bottles, use the same type
of nipple that was supplied with that bottle. For details on how to assemble the nipple and
general cleaning instructions, see section ‚Feeding‘ and section ‚Cleaning‘. These details can
also be found on our website, www.philips.com/support.
- Spare nipples are available separately. Make sure you use a nipple with the correct ow rate
when you feed your baby. To buy accessories or spare parts, visit www.shop.philips.com/
service or go to your Philips dealer. You can also contact the Philips Consumer Care Center
in your country.
- Do not mix Philips Avent Anti-colic bottle parts and nipples with parts of the Philips Avent
Natural bottles. They may not t and could cause leakage or other issues.
- The high-quality plastic Philips Avent Natural bottle is compatible with most Philips Avent
breast pumps, spouts, sealing discs and cup tops.
Feeding
You can feed your baby with breast milk from Philips Avent bottles and storage cups.
For your child‘s safety and health
Warning
Warnings to prevent harm to children:
- Always use bottles and nipples with adult supervision. Do not allow your child to play with
small parts or walk/run while using bottles or cups.
- Never use feeding nipples as a soother, to prevent choking hazard.
- Continuous and prolonged sucking of uids will cause tooth decay.
- Always check the temperature of the food before you feed your baby to prevent burns.
- Throw away any part at the rst signs of damage or weakness.
- Keep all components not in use out of the reach of children.
- Do not alter the product or parts of it in any way. This may result in unsafe functioning of
the product.
16
English

Cautions to avoid damage to the product:
- Do not place in a heated oven, plastic can melt.
- Plastic material properties may be aected by disinfection and high temperatures. This can
aect the t of the dome cap.
- Do not leave a feeding nipple in direct sunlight or heat, or leave in disinfectant for longer
than recommended because this may damage the product.
Before rst use
Before rst use, disassemble all parts, clean and optionally disinfect the bottle. Inspect the
bottle and feeding nipple before each use and pull the feeding nipple in all directions to
prevent a choking hazard. Throw away at the rst signs of damage or weakness.
Cleaning bottles
To ensure hygiene, clean the parts of the bottle mentioned in section ‚Cleaning‘ before each
use. Also clean all parts after each subsequent use. You can optionally disinfect by following
the instructions in section ‚Disinfection (optional)‘ .
Make sure that you wash your hands thoroughly and that the surfaces are clean before
contact with cleaned components. Excessive concentration of detergents may eventually
cause plastic components to crack. Should this occur, replace immediately. Inspect the bottle
and feeding nipple before each use and pull the feeding nipple in all directions to prevent a
choking hazard. Throw away any part at the rst signs of damage or weakness.
Assembling bottles
When you assemble the bottle, make sure you place the dome cap vertically onto the bottle
so that the nipple sits upright (Fig. 25). To remove the dome cap, place your hand over the
dome cap and your thumb in the dimple of the dome cap (Fig. 26). The nipple is easier to
assemble if you wriggle it upwards instead of pulling it up in a straight line (Fig. 27). Make sure
you pull the nipple through until its surface is level with the surface of the screw ring (Fig. 28).
Heating breast milk
If you use frozen breast milk, let it defrost completely before you heat it.
Note: In case of an emergency, you can defrost the milk in a bowl of hot water.
Heat the bottle or storage cup with defrosted or refrigerated breast milk in a bowl of hot water
or in a bottle warmer. Remove the screw ring and sealing disc from the bottle or remove the
lid from the storage cup.
Always stir or shake heated food to ensure even heat distribution and test the temperature
before serving. Take extra care when you heat up food in a microwave as heating food in a
microwave oven may produce localized high temperatures.
English
17

Note: We do not recommend heating breast milk in the microwave because when breast milk
becomes too warm, nutrients and vitamins are damaged.
Note: You can purchase and use Philips Avent bottle warmer to heat up the milk.
Maintenance and storage of bottles
Inspect the bottle and feeding nipple before each use and pull the feeding nipple in all
directions to prevent a choking hazard. Throw away at the rst signs of damage or weakness.
For hygiene reasons, we recommend replacing nipples after 3 months. Keep nipples in a dry,
covered container. When not in use, do not leave the nipples in sunlight or heat, or leave
in disinfectant (‚sterilizing solution‘) for longer than recommended, as this may weaken the
nipple. Do not place in a heated oven. Store the bottles in a dry location.
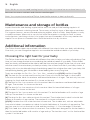
Additional information
The Philips Avent nipples are available with dierent ow rates to help your baby with drinking.
Over time, you can change the nipple to accomodate the individual needs of your baby.
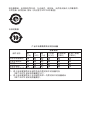
Choosing the right teat for your baby
The Philips Avent teats are available with dierent ow rates to help your baby with drinking. Over
time you can change the teat accommodating the individual needs of your baby. Philips Avent
teats are clearly numbered on the side to indicate ow rate (see image). Make sure you use a teat
with the correct ow rate when you feed your baby. Use a lower ow rate if your baby chokes, is
leaking milk or has trouble adjusting to the drinking speed. Use a higher ow rate if your baby falls
asleep during feeding, gets frustrated or when feeding takes a very long time.
Teats are available for 0m, 0m+, 1m+, 3m+, 6m+, variable ow (I/II/III) and thick feed (Y).
(0) The teat for 0m can be used from day one. Extra soft silicone teat and it is the lowest
ow rate available. Ideal for newborn and breastfed babies of all ages. The teat only has one
opening for uids and the number 0 is shown on the teat.
(1) The teat for 0m+ has an extra soft silicone teat. Ideal for newborn and breastfed babies of
all ages. The number 1 is shown on the teat.
(2) The teat for 1m+ has an extra soft silicone teat. Ideal for breastfed babies of all ages.
The number 2 is shown on the teat.
(3) The teat for 3m+ has an extra soft silicone teat. For bottle fed babies at 3 months of age
and up. The number 3 is shown on the teat.
(4) The teat for 6m+ has a bite resistant silicone teat. The sturdier teat is ideal for bottle fed
babies at 6 months of age and up. The number 4 is shown on the teat.
(I/II/III) Variable ow: has a bite resistant silicone teat. The sturdier teat, with an adjustable
ow rate to babies convenience is ideal for bottle fed babies at 3 months of age and up. The
teat has one slot cut on the top for uid and the markings I, II, III on the edges of the teat.
(Y) Thick feed: has a bite resistant silicone teat. The sturdier teat, designed for thicker feeds is
ideal for bottle fed babies at 6 months of age and up. The teat has one Y cut for uid and the
symbol Y on the teat.
18
English

Note: Every baby is unique and your baby‘s individual needs may vary from the description of
ow rates.
Note: Teat (0) might not be available in your country, please check www.philips.com/avent.
Replacement
Batteries
When using the breast pump (electric breast pump) on batteries, always use four 1.5 AA
batteries (or 1.2V in case of rechargeable batteries). Remove the rechargeable batteries from
the motor unit before charging them.
Remove exhausted batteries and dispose of them safely, see chapter ‘Recycling’. For
instructions on how to replace the batteries, see chapter ‘Preparing for use’.
Recycling
- Do not throw away the product with the normal household waste at the end of its life,
but hand it in at an ocial collection point for recycling. By doing this, you help to preserve
the environment.
- This product contains rechargeable and disposable batteries which shall not be disposed
of with normal household waste.
- Follow your country‘s rules for the separate collection of electrical and electronic products,
and rechargeable and disposable batteries. Correct disposal helps prevent negative
consequences for the environment and human health.
Removing the batteries
Follow the steps below to remove batteries from the appliance (single electric breast pump only).
1 Before removing the batteries, make sure the motor unit is turned o and the adapter is
unplugged.
2 To remove the batteries, turn the bottom of the motor unit in the direction indicated by the
marks on the bottom (step 1) and remove it (step 2 (Fig. 30)).
3 Remove the four 1.5V AA batteries (or 1.2V in case of rechargeable batteries) from the
battery housing.
4 Reattach the bottom to the motor unit.
Ordering accessories
To buy accessories or spare parts, visit www.shop.philips.com/service or go to your Philips
dealer. You can also contact the Philips Consumer Care Center in your country (see the
international warranty leaet for contact details).
English
19

Accessories
Manual breast pump converter
With the manual breast pump converter, you can assemble the manual breast pump.
Before you use the manual breast pump, read the instructions for the electric breast pump
(see chapter ‚Preparing for use‘, section ‚Using the breast pump‘). All instructions for the
electric breast pump also apply to the manual breast pump converter, except the chapters
„Assembling the breast pump“ and „Operating the breast pump“.
Assembling the manual breast pump
Note: Make sure you have cleaned and sanitized the appropriate parts of the breast pump.
1 Wash your hands thoroughly before you handle the cleaned parts.
Warning: Be careful, the cleaned parts may still be hot. Only start assembling
the breast pump when cleaned parts have cooled down.
Note: You may nd it easier to assemble the breast pump while it is wet.
2 Insert the white valve into the pump body from underneath. Push the valve in as far as
possible (Fig. 7).
3 Screw the pump body clockwise onto the bottle until it is securely xed (Fig. 8).
4 Insert the silicone diaphragm into the pump body from above. Make sure it ts securely
around the rim by pressing down with your ngers to ensure a perfect seal (Fig. 9).
5 Attach the handle onto the diaphragm with stem by hooking the hole in the handle over
the end of the stem. Push down the handle onto the pump body until it clicks into place.
6 Insert the massage cushion into the funnel-shaped section of the pump body (Fig. 10).
7 Push in the inner part of the massage cushion as far as possible and make sure that it is
perfectly sealed all around the rim of the pump body (Fig. 11).
8 Press in between the petals to remove any trapped air (Fig. 12).
Note: Place the cover over the massage cushion to keep the breast pump clean while you
prepare for expressing.
Warning: Always use the breast pump with the massage cushion.
Operating the manual breast pump
1 Wash your hands thoroughly and make sure your breasts are clean.
2 Relax in a comfortable chair (you may wish to use cushions to support your back). Make
sure you have a glass of water nearby.
3 Press the assembled pump body against your breast. Make sure that your nipple is
centered, so that the massage cushion creates an airtight seal (Fig. 16).
4 Make sure that your nipple ts correctly in the cushion (see: Find the best cushion for you).
5 Gently start to press down the handle until you feel the suction on your breast. Then allow
the handle to return to its resting position (Fig. 17).
20
English
ページが読み込まれています...
ページが読み込まれています...
ページが読み込まれています...
ページが読み込まれています...
ページが読み込まれています...
ページが読み込まれています...
ページが読み込まれています...
ページが読み込まれています...
ページが読み込まれています...
ページが読み込まれています...
ページが読み込まれています...
ページが読み込まれています...
ページが読み込まれています...
ページが読み込まれています...
ページが読み込まれています...
ページが読み込まれています...
ページが読み込まれています...
ページが読み込まれています...
ページが読み込まれています...
ページが読み込まれています...
ページが読み込まれています...
ページが読み込まれています...
ページが読み込まれています...
ページが読み込まれています...
ページが読み込まれています...
ページが読み込まれています...
ページが読み込まれています...
ページが読み込まれています...
ページが読み込まれています...
ページが読み込まれています...
ページが読み込まれています...
ページが読み込まれています...
ページが読み込まれています...
ページが読み込まれています...
ページが読み込まれています...
ページが読み込まれています...
ページが読み込まれています...
ページが読み込まれています...
ページが読み込まれています...
ページが読み込まれています...
-
 1
1
-
 2
2
-
 3
3
-
 4
4
-
 5
5
-
 6
6
-
 7
7
-
 8
8
-
 9
9
-
 10
10
-
 11
11
-
 12
12
-
 13
13
-
 14
14
-
 15
15
-
 16
16
-
 17
17
-
 18
18
-
 19
19
-
 20
20
-
 21
21
-
 22
22
-
 23
23
-
 24
24
-
 25
25
-
 26
26
-
 27
27
-
 28
28
-
 29
29
-
 30
30
-
 31
31
-
 32
32
-
 33
33
-
 34
34
-
 35
35
-
 36
36
-
 37
37
-
 38
38
-
 39
39
-
 40
40
-
 41
41
-
 42
42
-
 43
43
-
 44
44
-
 45
45
-
 46
46
-
 47
47
-
 48
48
-
 49
49
-
 50
50
-
 51
51
-
 52
52
-
 53
53
-
 54
54
-
 55
55
-
 56
56
-
 57
57
-
 58
58
-
 59
59
-
 60
60


他の言語で
- English: Avent SCF332/32 User manual
関連論文


その他のドキュメント
-
Medela 101034638-2022-03 ユーザーマニュアル
-
Philips AVENT SCF355 ユーザーマニュアル
-
Tommee Tippee Made for Me Double Electric Breast Pump #1162 ユーザーマニュアル
-
Medela Freestyle Instructions For Use Manual
-
Ardo 9904.425 ユーザーマニュアル
-
Tommee Tippee 431211C Electric Bottle Warmer 取扱説明書
-
-
Philips HP3621/02 ユーザーマニュアル
-
Petoneer PF002 ユーザーマニュアル
-
 Petoneer PF007 ユーザーマニュアル
