Tommee Tippee Made for Me Double Electric Breast Pump #1162 ユーザーマニュアル
- タイプ
- ユーザーマニュアル

EN
中文
double electric
breast pump
雙邊電動吸奶器雙邊電動吸奶器
17170820_3
model:1162
0423638

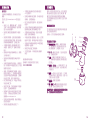
Mum, you’re one of a kind.
Treat yourself like the true wonder you are and let
us support you through your unique breastfeeding
experience with the Made for Me™ range from
Tommee Tippee.
Your Made for Me™ electric breast pump has soft,
cushioned silicone cups that are gentle on your breasts.
And it’s powered by a lightweight, portable power pack
so that you can use it wherever you need to.
Made especially for you because you’re a one o…
Check out the rest of our Made for Me™ range,
designed to help you on your breastfeeding journey.
www.tommeetippee.com.
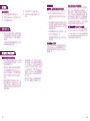
Stu you need to know
Getting started
Dos and Don’ts
How to clean
Putting your pump together
Charge me up - powering your power unit
Using your breast pump
Storing breast milk
Remember
Health and Safety
Advice and FAQs
Device symbols
1
2
3
3
4
5
6
8
9
9
9
11
Contents
EN
使用者須知使用者須知
開始使用開始使用
注意事項注意事項
如何清潔吸奶器如何清潔吸奶器
組裝吸奶器組裝吸奶器
給我充電 -為主機充電給我充電 -為主機充電
如何使用吸奶器如何使用吸奶器
母乳的儲存母乳的儲存
請謹記請謹記
健康和安全健康和安全
常見問題解答常見問題解答
主機上的符號主機上的符號
13
14
15
15
16
17
18
20
21
21
21
23
中文
内容
媽 媽 ,您 是 獨 一 無 二 的媽 媽 ,您 是 獨 一 無 二 的
善待自己,因為您是真正的奇蹟,讓我們通過 善待自己,因為您是真正的奇蹟,讓我們通過
Tommee Tippee的Made for MeTommee Tippee的Made for Me™™系列支援您獨特的母乳餵系列支援您獨特的母乳餵
哺體驗。哺體驗。
您的Made for Me™電動吸奶器有柔軟的矽膠吸乳您的Made for Me™電動吸奶器有柔軟的矽膠吸乳
墊,可以輕柔地包裹您的乳房。吸奶器由一個輕巧便墊,可以輕柔地包裹您的乳房。吸奶器由一個輕巧便
攜式電源供電, 讓您可以在任何地方使用。攜式電源供電, 讓您可以在任何地方使用。
專為您而研製,因為你是獨一無二的……專為您而研製,因為你是獨一無二的……
查看其他查看其他Made for Me™Made for Me™系列的母乳餵哺產品,請瀏覽我們網站: 系列的母乳餵哺產品,請瀏覽我們網站:
www.tommeetippee.comwww.tommeetippee.com

1 2
EN
Stu you need to know...
IMPORTANT
SAFEGUARDS
Please keep this instruction guide
for future reference as it includes
important information.
You can also find these instructions at
tommeetippee.com.
•
To protect against fire, electric shock
and injury to persons, do not immerse
motor unit, USB cable and adapter, or
air tubes in water or other liquid.
•
Do not place the power unit in a
microwave oven or steam steriliser.
•
DO NOT WASH the air tubes. This will
result in bacteria build up and can lead
to pump failure. Washing or sterilising
the air tubes will invalidate the warranty
and will damage the power unit.
•
Do not place the air tubes in a
microwave or electric steam steriliser or
boiling water as they will melt.
•
Misuse of the appliance may result in
the risk of fire, electric shock and/or
personal injury.
•
Do not clean with solvents or
harsh chemicals.
•
This appliance should not be used or
played with by children. Keep the pump,
its air tubes and USB cable out of reach
of children under 8 years old.
•
The appliance can be used by persons
with reduced physical, sensory or
mental capabilities or lack of experience
and knowledge if they have been given
supervision or instruction concerning
use of the appliance in a safe way and
understand the hazards involved.
•
User maintenance, other than cleaning
and sterilising is not required.
•
Do not open the power unit, it contains
no user serviceable parts and will
invalidate the warranty.
•
Do not operate any appliance with a
damaged USB cable or motor casing. If
the appliance malfunctions or has been
damaged please contact
tommeetippee.com.
•
If the damage is from new the unit must
be returned to manufacturer.
•
Do not leave the appliance in
direct sunlight.
•
Do not store below freezing or
above 45°C.
•
If damaged within a retail warranty
period, this appliance should be
exchanged at place of purchase. The
manufacturer will then be made aware.
•
Do not use any accessories other than
those supplied with this appliance.
•
The appliance should not be used
adjacent or stacked with other
equipment as the two appliances may
interfere with each other.
•
Do not allow appliance to come into
contact with oil-based foods (e.g. oil/
tomato based sauces) as staining
will occur.
•
This appliance is a personal care
product and therefore cannot be
returned once opened, unless faulty.
•
Only use the adaptor and USB cable
supplied with this product.
•
Do not use whilst in transit.
For domestic use only - not intended
for commercial or institutional use.
Any questions? Visit our website
tommeetippee.com.
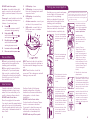
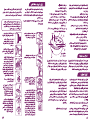
Getting Started
Mum, we know you have a lot to think
about, but can we suggest that you
get to know your breast pump before
you need to start using it? It should
make for a more relaxed experience,
and you’ll soon be an expert at this
(as well as many other new things).
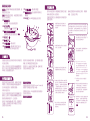
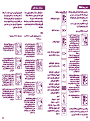
Get to know your breast pump
You may be wondering how both
of your breast pump handsets fit
together.
Don’t worry, it will soon become
second nature.
You can wash these parts:
A. Cup - rounded, soft silicone
part that fits into the horn to sit
comfortably against your breast.
Gently massaging to stimulate
your milk flow.
B. Horn - trumpet shaped part that
supports the cup while you use
the pump.
C. Body – duck-shaped part that you
hold and connects the horn and
cup to your bottle.
D. Duck-bill valve (purple) – small
one-way valve that lets breast milk
into your bottle, but doesn’t let it
back through as you move around.
E. Diaphragm – small, transparent
cup-shaped part that keeps the
“wet” side and the “dry” side of
the breast pump separate. This
makes it a closed pump system.
F. Diaphragm cap – seals to
the diaphragm.
G. Lid (purple) – allows you to
connect the air tube to the pump,
and close the pump handset.
Together, these parts form your
breast pump handset. You have
two of these to form your double
breast pump.
bottle
C
G
F
E
D
A
B
SAVE THESE
INSTRUCTIONS

3 4
DO NOT wash these parts:
Air tubes – two plastic tubes with
purple connectors at each end that
attach your breast pump to the power
unit.
Power unit –
small, portable motor that
powers the massage and expression
features of your breast pump.
A. Power
use to turn pump on and o,
and pause during pumping.
B. Mode button
switch between massage
and expression modes.
C. Double/single pump
switch between double
and single pump modes.
D. Increase suction power
E. Decrease suction power
Dos and Don’ts
How to clean
DO wash your hands with soap and
water and dry thoroughly before
handling your breast pump.
DO thoroughly clean and sterilise
all the parts of your breast pump
that come into contact with milk,
following the instructions below. Do
this before you use it for the first
time and after every use.
Separate each part of each pump
handset and wash in clean soapy
water. Don’t use water that you’ve
used for cleaning other products.
DO NOT wash the air tubes.
Rinse thoroughly with clean water.
You can also wash the pump handset
parts in the top rack of a dishwasher.
Place the purple duck-bill valve in the
cutlery rack or dishwasher basket to
keep it safe.
DON’T wash or sterilise the air tubes.
This can cause bacteria to build up in
the tubes and will damage the power
unit.
DON’T wash, sterilise or heat the
power unit. This is dangerous and will
damage your power unit.
Sterilise all parts of both pump
handsets using either cold water
sterilisation, microwave sterilisation,
boiling water, or electric steam
sterilisation.
DO NOT sterilise the air tubes.
For best results use Tommee Tippee
electric or microwave sterilisers.
If you need to clean the power unit,
USB cable or air tubes, wipe the
outside with a clean damp cloth.
DO NOT wash any of these parts.
F. LED display – timer.
G. LED display – shows mode level,
there are 5 massage levels and 9
expression levels.
H. LED display – shows battery
charge level.
I. Air tube connector –
connect your
air tubes to the power unit here.
J. USB socket – connect this to a
USB power source or adapter
to recharge.
I
J
9. Repeat for the other breast
pump handset.
10. Place the assembled pumps on
a flat surface. Connect one end
of each air tube to the purple
lid of each pump body and the
other to the power unit. The air
tubes go into the two holes at
the front of the unit.
11. Insert the other end of the air
tubes into both sockets on
the front of the power unit. If
you want to use the pump in
single mode only insert the
air tube into the single socket
marked .
Putting your pump together
Each time you use your breast pump,
check all parts of the pump and
power unit for any damage.
Wash your hands with soap and
water and dry thoroughly before
handling your breast pump.
Make sure that all parts of the pump
have been washed, cleaned and
sterilised, and are completely dry.
1. Place the clear diaphragm
in the top of the body and
push down gently to get a
good seal.
2. Place the clear diaphragm
cap over the diaphragm
and push down gently
to seal.
3. Place the purple lid over the
top of the body and turn
it clockwise until it clicks
closed.
4. Push the soft, silicone cup
into the widest part of the
horn and smooth its lip
evenly over the edge.
Work your way all around
the rim to make sure the cup
fits smoothly, evenly and
securely. The two dimples in
the cup should be clear to
allow air into the horn.
5. Now smooth the lip of the
silicone cup around the
narrow end of the horn in
the same way.
6. Push the horn with cup
attached onto the body
until it’s fully engaged and
secure. Turn your pump
handset upside down.
7. Insert the purple
duck-bill valve. Gently
squeeze the sides of the
valve to make sure it’s
open.
8.
Screw in a Tommee
Tippee Closer to Nature
or Advanced Anti-Colic
bottle. This breast pump is
designed to fit all Tommee
Tippee Closer to Nature
and Advanced Anti-Colic
bottles and Pump & Go milk
pouches with adaptor rings
(excludes Tommee Tippee
Closer to Nature glass
bottles).
Once you’ve fitted and used it, you don’t have to
take the silicone cup out of the horn unless milk or
dirt becomes trapped inside. Then you can ease
the edges of the cup from the horn and gently pull
them apart for cleaning.
1
2
3
6
8
7
10
11
1
4
5
SINGLE
DOUBLE

5
Charge me up - powering your power unit
Battery fully charged.
Massage mode – a gentle
massage rhythm that mimics
the way your baby latches
to your nipple to help you
begin to produce milk.
Battery charging.
Level
Massage - 5 levels.
Express - 9 levels.
Low charge - you have up to
15 mins of power left.
Timer - allows you to monitor
how long you have been
pumping for. In pause mode
the timer will stay lit but stop
counting. The power unit will
automatically switch o after
30 minutes.
The power unit for your breast pump
uses a battery similar to the one in your
mobile phone. Charge it up so that you
can power your breast pump anywhere.
You do not need to have your power
unit plugged in to mains power to use
your breast pump. The power unit will
come with some charge in it, but you
should fully charge it before first use.
To charge the power unit
Express mode – regular
pumping action to express
milk.
1.
Connect one end of the USB
cable into your power unit
and the other end into the
supplied adapter.
2.
The LED battery icon will
flash to show that your power
unit is charging. Charge until
all 3 bars are full. Charging
time may vary depending on
voltage and equipment used,
from 3 - 6 hours.
3.
When it’s fully charged all
three of the LED lights will
remain on
.
Double mode – double circle
is visible to show pump is
operating in double mode.
This symbol is not visible in
single mode.
What do the symbols mean?
1
2
3
6
Using your breast pump
You’ve cleaned and assembled your
breast pump, powered up your
power unit. You’re prepped and
ready to go…
The best time to use your breast
pump is after the first feed of the day
(unless your breastfeeding advisor
has told you something dierent).
1.
Hold a pump handset around
the narrow neck of the body.
Hold it in whichever hand
feels most comfortable. As
you use it, you may find it’s
more comfortable to cup
your hand around the bottle.
Do not hold it by the air tube.
2.
Place the soft silicone cup
attached to the horn over
your breast so that it creates
a seal all the way around with
your nipple at the centre
of the hole, you don’t need
to cover the whole of your
areola or breast with the horn,
so don’t force it. It should sit
comfortably. If it doesn’t feel
right, relax and reposition.
3.
Once you’re ready, press
and hold the power button
for a couple of seconds. The
pump will start with a gentle
massage rhythm that mimics
the way your baby latches
on to your nipple to help you
begin to produce milk. It will
give you 10 short pulses and
one longer pump.
4.
Choose whether you want
to use the pump in single or
double mode. Two circles on
the LED display show that
you’ve selected double mode.
If you’re using the double
pump mode, place the second
pump handset over your other
breast as described above, or
into your pumping bra.
5.
After about a minute, the
pump will automatically
move to more powerful
massage settings. If you
want to move on onto a
more powerful setting,
touch the “+” button.
6.
Once you feel or see your milk,
you can switch to Express
mode. This gives you a
more regular and prolonged
pumping action to help you
express milk. Press the mode
selection button once to
switch to Express mode.
7.
To move to a more powerful
and longer express setting,
touch the “+” button. To
move to a less powerful
and shorter express setting,
touch the “-“ button. The
power will automatically
shut o after 30 minutes of
express mode.
Make sure hands are washed and
dried before touching your breast
pump, and breast pump parts are
washed and sterilised.
Get yourself in a comfortable position,
sitting, standing or half-lying.
You
may choose to wear a pumping bra
(available separately) to help keep your
hands free.
The important thing is to
keep the pump handsets vertical while
you hold them against your breasts.
You’ll also need a flat surface nearby
to put the pumps and bottles on when
you’re done.
8. If you want to pause at any
point, briefly touch the
power button. This will
pause the timer as well.
Briefly touch again to
resume pumping.
1
5
4
3
7
2
6
7
8

7 8
When you want to stop expressing
• When your milk is no longer freely
flowing, touch and hold the power
button for a couple of seconds to
turn o the pump.
If using this breast pump is more painful
than when you breast feed, stop using it
immediately.
The soft silicone cup should feel comfortable
against your breast.
When pumping your nipple should sit
comfortably in the center of the silicone
cup and will be extended down the tube
by gentle suction. The pump creates a seal
around your areola and nipple. You do not
need to cover the whole of your areola or
breast with the horn. Do not force your
breast or nipple into the horn.
Don’t tilt the bottle while expressing. Keep
it upright to keep your milk flowing into the
bottle.
You don’t need strong suction to express
milk from just behind your nipple. Use the
mode and power setting that feels most
comfortable for you. This may be dierent at
dierent times of day or at dierent stages
of your breastfeeding experience.
• Disconnect the air tubes from the
purple lids and gently unscrew your
bottles from the pumps.
• You can store your breast milk in this
bottle, by adding a clean sterilised
lid or nipple and hood (see page 8
for storage advice). Or decant it into
another clean, sterilised bottle or
pouch to feed it to your baby.
• When you’ve finished using the
pump, disassemble all the parts and
clean and sterilise as outlined in the
cleaning section on page 3. Don’t
clean or sterilise the air tubes.
• Plug your power unit into a USB
charging point or use the adapter
provided to recharge it ready for
next time.
• If you want to pause during pumping
to change position, or move down
to a lower setting that’s absolutely
fine. It’s okay to remove the pump
from your breast at any time. You can
always come back to it later.
• You can use the built-in timer to
monitor how long you’re expressing
for. The power unit will automatically
shut o after 30 minutes of
expressing.
The illuminated LEDs and quiet pump
unit allow you to use the pump at night
without disturbing others when you want
to keep the lights low.
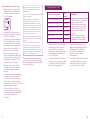
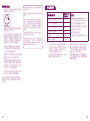
Method of storing milk
Use
within
REMEMBER
Room temperature <25°C 6 hours
• Never defrost or heat breast
milk in a microwave
• Never refreeze breast milk
• Once defrosted, the breast
milk should be kept in the
fridge and used within 12
hours
• Do not boil breast milk
• Throw away any leftover
breast milk after feeding
Refrigerated at 5-10°C 3 days
Refrigerated at 0-4°C 6 days
Refrigerated before freezing 24 hours
Once frozen 6 months
Defrosted before feeding 12 hours
• When you want to freeze breast
milk, allow space at the top of
your bottle for it to expand.
It’s easiest to freeze breast milk
in individual feed quantities of
2-4oz / 60-125ml.
• Your breast milk may separate out
into layers when you store it. Give
it a shake to remix it thoroughly
before feeding your baby.
Storing breast milk
• Thaw frozen breast milk in the
fridge or by standing your bottle
in lukewarm water until it has
reached body temperature.
Or use a Tommee Tippee
bottle warmer.
• If you want to take expressed milk
out and about with you, make
sure it stays cold or frozen until
you need to feed your baby.

9 10
• Unless you’ve been told
otherwise, the best time to try
your breast pump for the first
time is after your baby’s first feed
of the day.
• Make sure you’re in a comfortable
position and try to relax.
• You’re not trying to suck milk
out. It comes from just behind
your nipple. Start with the mode
and power that feels most
comfortable and allows you to
express your milk.
• Using your breast pump
shouldn’t hurt. If it does, try a
gentler setting. Then check your
breasts. If you have any red or
hot areas, stop using the breast
pump and get in touch with your
breastfeeding advisor as soon
as possible.
Advice and FAQs
• Every mum is dierent. You
may only produce a little milk,
or flow freely. You may produce
more milk at dierent times of
the day (morning or evening) or
dierent volumes from one breast
to another. The Tommee Tippee
electric breast pump allows you
to choose dierent settings to
suit you at dierent times.
• Don’t continue using the pump
once your milk has stopped
coming. Give your breasts a
break.
Get comfortable with your breast pump
• Don’t place furniture or other
obstructions on the USB cable or
air tubes, and make sure no one
can step on or trip over them.
Keep them well out of reach
of your baby and any young
children.
DON’T
× Don’t use whilst driving or
operating machinery.
× Don’t use whilst bathing or
showering – it is not waterproof.
× Don’t use whilst sleeping.
× Don’t use in temperatures
below 10°C.
Remember
Health and Safety
• Keep the USB cable and air tubes
away from hot surfaces such
as radiators and central
heating pipes.
× Don’t use if the USB cable or
motor unit is damaged.
× Don’t share your breast pump
with other mums.
× Don’t leave the USB plugged in
when the unit is not charging or
in use.
Why register?
• Get an additional year’s warranty
completely free of charge.
• Get support more quickly as
we’ll already have information
about you.
• You’ll be the first to hear about
any product information updates.
Visit tommeetippee.com/
product-registration to register.
It’s quick and easy.
Register your breast pump
FAQs
Help – there’s no or very little suction.
What can I do?
It’s most likely that there’s some air
getting in somewhere, which means the
pump won’t work properly.
• Check that the air tubes are
connected securely at both ends and
there are no kinks in them.
• Make sure that the soft silicone cup
is securely attached to the horn at
the top and bottom and forms a
comfortable seal around your breast.
Adjust your position if you need to.
• Check the duck-bill valve is clean and
opens easily. Give it a gentle squeeze
if it’s stuck.
• Check the diaphragm and diaphragm
cap are secure and there are no signs
of damage.
Will milk get sucked into the power unit?
No. If you have fitted the diaphragm and
cap properly, each air tube and pump
are separated from your milk and can’t
come into contact with the power unit.
It’s what’s known as a closed pump.
Help, the pump is making a funny sound
Check if you have selected single or
double mode. And that you have the
air tube/s connected correctly. If you
are using a single pump and have the
double mode selected (shown by the
double circle lit up on the LED display),
or have a single air tube attached to
the wrong connector, the pump will run
continuously, and make a noise when
it’s trying to provide suction to the
unattached pump handset. Choose the
correct mode and connection for single
or double pumping.
Why do I have to use a Tommee Tippee
bottle?
The Tommee Tippee Made for Me™
electric breast pump is designed to be
a perfect fit for Tommee Tippee bottles
and pouches (excludes Tommee Tippee
Closer to Nature glass bottles). You
may get leaks and spills if you use other
brands of bottles and containers that
don’t fit correctly.

Rated temperature range: 50°F to 104°F
Rated relative humidity: 10% - 85%
Rated atmospheric Pressure: 850Hpa - 1060Hpa
Long-term storage should be kept in a dry and cool place.
Let us know what you think
We’d love to hear what you think of the
Made for Me™ range. Share your photos,
reviews and tell us about your experiences
on our social channels.
tommeetippee.com
Copyright © Mayborn (UK) Limited 2020.
Made in China.
tommee tippee
helpin
g you
P
ar
e
n
t
O
n
11 12
1. This equipment has been tested and
found to comply with the limits for medical
devices in EN60601-1-2. These limits are
designed to provide reasonable protection
against harmful interference in a typical
medical installation.
2. This equipment generates, uses and can
radiate radio frequency energy and if
not installed and used in a accordance
with the instructions, may cause harmful
interference to other devices in the vicinity.
However, there is no guarantee that
interference will not occur in a particular
installation.
3. If this equipment does cause harmful
interference to other devices, which can
be determined by turning the equipment
o and on, the user is encouraged to try to
correct the interference by one or more of
the following measures:
•
Reorient or relocate the receiving device.
•
Increase the separation between the
equipment.
•
Connect the equipment into an outlet on
a circuit dierent from that to which the
other device(s) are connected.
•
Consult the manufacturer or field service
technician for help.
Compliance with Federal
Communications Commission
Requirements.
The power and voltage
consumed by the device when
pluged into a USB socket.
Voltage 5v=
Power 10W
The product contains a Lithium
Ion Battery.
IP21 Indicates that the unit is
resistant to condensation and
finger entry.
IP21
In some countries this is a
medical appliance and this
indicates that this product
has Applied Parts.
Warning!
Serial number.
The product is double insulated
(Class II Appliance).
Keep the device dry.
Device Symbols
Transport and Storage Condition
Working condition
Temperature: 32°F to 113°F
Humidity: 10% - 85%
Atmospheric pressure: 850Hpa - 1060Hpa

13
14
使用者須知使用者須知
重要警告!
此說明書內有重要資訊,請保留以供日後
參考。
您也可以在tommeetippee.com找到此說
明書
•
為防止火災,觸電和個人傷亡,請勿將
主機、USB線和電源轉換器,或排氣管
浸入水或其他液體中。
•
請勿將主機放在微波爐或蒸汽消毒器
內。
•
請勿清洗排氣管。 這將引致細菌積聚,
從而導致吸奶器發生故障。清洗或消毒
排氣管會使保養失效,並損壞主機。
•
不要將排氣管放入微波爐或電子蒸汽
消毒器,或沸水之中,因會令排氣管
熔化。
•
錯誤使用本產品可能會導致火災,觸電
及/或個人傷亡。
•
請勿使用溶劑或刺激性化學品清洗本
產品。
•
兒童不應使用或把玩本產品。 請將吸奶
器、排氣管和USB線置放在8歲以下兒童
接觸不到的地方。
•
身體、感官或精神能力有殘障、或缺乏
經驗及知識的人士,如果得到有關如何
安全使用本產品的指導或監督,並瞭解
所涉及的危險,則可以使用本產品。
•
除了清潔和消毒之外,本產品不需其他
特別的保養工序。
•
請勿打開主機,它包含使用者不可維修
的部件,並且會使保養失效。
•
請勿操作任何USB線或主機外殼已損壞
的產品。 如果產品出現故障或已損壞,
請聯繫tommeetippee.com
•
如果全新的產品有損壞,請必須將產品
退回至製造商。
•
請勿將此產品置於陽光直射之下。
•
不要將此產品儲存於低於冰點或高於
45°C的環境中。
•
如果在保養期內發生壞損,可與當地代理
商聯絡,安排更換產品。
•
除了本產品提供的配件外,請勿使用其
他配件。
•
此產品不應與其他設備靠近或疊加使用,
因為兩個設備之間可能會相互干擾。
•
不要讓產品與油性食品(如油/番茄醬)
接觸,因為可能會染色。
•
本產品屬於個人護理產品,因此一旦打開
後就不可退回,除非產品本身存在缺陷。
•
本產品僅可與隨包裝附帶的USB電源線及
電源轉換一起使用。
•
請勿在乘坐交通工具時使用。
•
只供家居使用– 不得用於商業或機構
用途。
請妥善保管本說明書。
如有疑問,請到訪我們的官方網站
tommeetippee.com
開始使用開始使用
媽媽,我們知道您非常忙碌,但可以請您在
開始使用您的吸奶器之前先了解它嗎?瞭
解您的吸奶器能讓您獲得更舒適的體驗,
您亦很快會成為這方面的專家 (以及許多其
他新事物)。
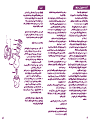
認識您的吸奶器認識您的吸奶器
您可能想知道您的吸奶器的兩個手持部分是
如何互相協調運作的。
別擔心,它們很快就會成為您的習慣。
可以清洗以下組件:可以清洗以下組件:
A.
矽膠吸乳罩杯–矽膠吸乳罩杯– 圓形、柔軟的矽膠組
件,配合喇叭罩,能舒適地貼合乳房。
為您輕輕按摩,以刺激乳汁分泌。
B. 喇叭罩 - 喇叭形的組件,在使用吸奶器
時,支撐吸乳罩杯。
C.
主體 – 主體 – 適合您手握的鴨子形狀的組
件,將喇叭罩和矽膠吸乳罩杯連接到您
的奶瓶上。
D.
鴨嘴閥(紫色)鴨嘴閥(紫色)- 小型單向閥門,讓
母乳可以流入奶瓶內,當您移動時亦
不怕倒流。
E.
隔膜 –隔膜 – 透明小杯形的組件,它阻隔
母乳與排氣管之間的接觸,形成一個
封閉式系統的吸奶器。
F.
隔膜蓋 –隔膜蓋 – 用於密封隔膜。
G.
蓋(紫色)-蓋(紫色)- 讓您將排氣管連接至吸奶
器主體,並使吸奶器得以封閉。
這些部件組合一起就成為您的吸奶器的手持部這些部件組合一起就成為您的吸奶器的手持部
分。 雙邊吸奶器有兩套這樣的部分。分。 雙邊吸奶器有兩套這樣的部分。
奶瓶
C
G
F
E
D
A
B

15
16
請勿清洗以下組件請勿清洗以下組件:
排氣管 -排氣管 -兩端都帶有紫色接頭的塑膠管,連
接吸奶器至主機。
主機 -主機 - 小型便攜式馬達,為吸奶器的按摩及
吸力功能提供動力
A.
電源按鈕電源按鈕
用於開關、停止或暫停吸奶器
B. 模式按钮
切換按摩模式 與吸乳模式
C.
單邊/雙邊吸乳切換按鈕單邊/雙邊吸乳切換按鈕
切換單邊吸乳及雙邊吸乳模式
D. 增加吸力
E.
減小吸力減小吸力
F.
LED顯示螢幕LED顯示螢幕 - 顯示時間
G.
LED顯示螢幕LED顯示螢幕 - 顯示模式和吸力級別,
包含5級按摩模式和9級吸乳模式
在處理吸奶器之前,請用洗手液和水清潔雙
手並徹底擦乾。
在第一次使用之前及每次使用後都需要按
照以下說明,徹底清潔和消毒吸奶器及所
有與乳汁直接接觸的組件。
將吸奶器的各個組件拆開,用清水加清潔
劑清洗。請勿使用清潔過其他產品後剩下
的水清潔吸奶器。無需清洗氣管。
用清水徹底沖洗。
您也可以將吸奶器的組件放在洗碗機的頂
層架子上清洗。請將紫色鴨嘴閥放在餐具
籃或洗碗機洗滌盒中,以免丟失。
使用冷水消毒(消毒片劑/溶液)、微波爐蒸
汽消毒、沸水或電子蒸汽消毒的方式對吸
奶器各件進行消毒。
請勿清洗或消毒排氣管。 這可能導致細菌
積聚, 及可導致吸奶器發生故障。
請勿清洗、消毒或加熱電主機。這會做成
危險及會損壞您的主機。
請勿消毒排氣管請勿消毒排氣管。
為達到最佳效果, 可使用Tommee Tippee消
毒器對可消毒的組件進行消毒。
如需清潔主機、USB線或排氣管, 請用乾淨
的濕布擦拭外部。
請勿清洗這些組件請勿清洗這些組件。
H.
LED顯示螢幕LED顯示螢幕 - 顯示電池電量
I.
排氣管連接口排氣管連接口- 在此處將排氣管與主
機連接
J. USB插口 與USB電源連接進行充電
气管
注意事項注意事項
如何清潔吸奶器如何清潔吸奶器
I
J
每次使用吸奶器時, 請查看吸奶器和主機的
所有組件是否有任何損壞。
在處理吸奶器之前, 請用肥皂和水清潔雙手
並徹底擦乾。
1.
將透明隔膜放在吸奶器主體的頂
部, 然後輕輕向下推, 以達到良好的
密封效果。
2.
將透明隔膜帽放在隔膜上, 然後輕輕
向下按, 以密封隔膜。
3.
將紫色蓋子放在吸奶器主體的頂部,
然後按順時針旋轉, 直至扣緊為止。
4.
將柔軟的矽膠吸乳罩杯推入喇叭罩最
寬的一端, 並將其捲邊均勻地套在喇叭
罩的邊緣上。 沿著喇叭罩的週邊檢查
一圈, 確保吸乳罩杯已平滑、均勻、穩
固地與喇叭罩完全貼合。 吸乳罩杯兩
端的孔洞應該是通透、無障礙的,以使
空氣可以 通暢地進入喇叭罩。
5.
現在以相同的方式將矽膠吸乳罩杯
的捲邊平滑地覆蓋在喇叭罩較窄一
端的邊緣上。
6.
將帶有吸乳罩杯的喇叭罩插入吸奶
器的主體, 直到完全吻合併固定。 再
將您的吸奶器倒轉過來。
7.
插入紫色鴨嘴閥。 輕輕擠壓閥門兩
側, 以確保閥門已打開。
8.
扭上Tommee Tippee Closer To
Nature奶瓶或Advanced 防脹氣奶
瓶。這吸奶器經過特別設計,以配
合所有* Tommee Tippee Closer To
Nature奶瓶、Advanced 防脹氣奶瓶
及 Express & Go 儲奶袋(需配合用轉
接環) 使用。(不包括Closer to Nature
玻璃奶瓶)
9.
以相同的方式組裝另一隻吸奶器
手持部件。
10.
將組裝好的兩個吸奶器手持部件放在
一個平坦的表面上。 將排氣管的一
端連接到吸奶器主體的紫色蓋子上,
另一端連接至主機。 主機前面有兩
個小孔用來連接排氣管。
當您安裝完成並已使用過此吸奶器之後, 便無需將矽膠吸
乳杯罩從喇叭罩中取出, 除非有母乳或污垢卡在吸乳罩杯
和喇叭罩之間。 如果有這種情況發生,您可以沿著吸乳罩
杯的邊緣將它打開, 然後輕輕地將它從喇叭罩上分開, 以
便進行清潔。
確保吸奶器的所有組件都已清洗、清潔和
消毒,並且完全弄乾。
1
2
3
5
6
8
7
10
1
4
組裝吸奶器組裝吸奶器
5
11.
將排氣管的另一端插入主機正面的兩
個插口中。 如果您只想使用單邊吸
乳, 只需將其中一根排氣管插入標有
單邊吸乳符號 的氣管連接口即可。
11
單邊吸乳
雙邊吸乳
6
7
8

17 18
電池已充滿電電池已充滿電
按摩模式–按摩模式–輕柔的按摩節奏, 模仿寶寶
的自然吸吮, 幫助您刺激乳汁分泌。
電池正在充電電池正在充電
低電 -低電 - 剩下的電量最多可供使用
15分鐘。
奶別奶別
按摩 - 5 級
吸乳 - 9 級
計時器 –計時器 – 讓您可以知道吸取母乳的時間。
在暫停模式下, 時間仍會顯示在顯示幕上, 但
會停止計時。 吸乳模式進行30分鐘後, 電源
將自動關上。
吸奶器的主機使用的電池類似於手機中的
電池。 為主機充電後, 儲存的電量就可以
在任何地方為您的吸奶器供電。 不需要將
主機插入主電源都可以使用吸奶器。
主機會自帶一些電量, 但在首次使用前應先
完全充電。
為主機充電為主機充電
這些符號是什麼意思?這些符號是什麼意思?
吸乳模式–– 有規律地吸乳使母乳從
乳房中流出。
1. 將USB線的一端連接到主機,
另一端連接到隨產品提供的電源轉換器
或是大於1A 的USB充電插座, 例如手機
充電器、筆記型電腦、USB行動電源、
車內USB插口或USB充電插座。
請勿在不使用電源轉換器的情況下將
USB 電線直接連接到標準電源插座。
插入USB 插座後, 您便可以立即開始吸
乳。要為主機充電, 請停止吸乳並關上
電源, LED 指示燈將閃動以表示吸奶器
正在充電。
2.
LED電池圖示將會閃動, 表示您的主機
正在充電。 吸奶器在90分鐘內可充
電至80% (最多可供吸乳80分鐘); 最
多可能需要3.5個小時才能將電池充
滿 (最多可供吸乳100分鐘)。
3.
當吸奶器充滿電時, 所有三格LED燈
都會亮起。
雙邊吸乳模式 -雙邊吸乳模式 - 雙圓圈圖示代表吸奶
器正在雙邊吸乳模式下運行。 此符號
在單邊吸乳模式下是不會出現的。
1
2
3
給我充電 -為主機充電給我充電 -為主機充電
您已清潔並組裝好了吸奶器, 並為主機充滿
了電。 您已經完全準備好可以開始了….
使用吸奶器的最佳時間是在當天的第一次哺
乳後 (除非您的母乳餵養顧問給您提出過不
同的建議)。
在觸摸您的吸奶器前,請確保已洗凈雙手
並已擦乾, 而吸奶器各組件已進行了清洗和
消毒。
1.
握住吸奶器主體狹窄的頸部。
用您感覺操作起來最舒服的那隻手
握住。 當您使用它時, 您也可能會發
現用雙手抱住奶瓶更舒服。 請不要
握住排氣管。
2.
將喇叭罩上附著的柔軟矽膠吸乳罩杯
放在乳房上, 使乳頭對準喇叭孔的中
心位置, 乳頭與吸乳罩杯中間要緊站
密封。 不需要用喇叭罩覆蓋整個乳暈
或乳房, 所以不要勉強。 應該讓它舒
服地放在乳房上。 如果感覺不舒服,
請放鬆然後重新置放。
3.
準備好後, 按住電源按鈕幾秒鐘。
吸奶器將從輕柔的按摩節奏開始, 模
仿寶寶吮吸乳頭的方式, 來幫助您開
始分泌乳汁。 它會以10短1長的模式
來為您吸乳。
4.
選擇您要以單邊模式還是雙邊模式使
用吸奶器。 LED顯示幕上的雙圓圈圖
示表示您已選擇雙邊吸乳模式。 如果
您正在使用雙邊吸乳模式, 請依照以
上所述方法, 將第二個吸奶器放在另
一邊乳房上。
5.
大約一分鐘後, 吸奶器將自動切換到
力度更大的按摩模式。 如果想要直
接提升至力度更大的按摩模式, 請
按”+”按鈕。
6.
當您感覺到或看到母乳後, 就可以切換到
吸乳模式了。 這種模式將帶來更頻繁、
更持久的泵送頻率以説明您吸乳。 按模
式選擇按鈕一次, 並切換到吸乳模式。
7.
如果要更換到力度更大且吸力更長的
吸乳模式, 請按”+”按鈕。 如要轉到
力度較小且吸力較短的設置, 請按” -
“按鈕。 吸乳模式進行30分鐘後, 電源
將自動關上。
讓您自己處於一個舒適的姿勢, 您可以選擇
坐著、站著或半躺。 您可以選擇佩戴吸乳
胸衣(另購),以讓您騰出雙手。重要的是,
當您握著吸奶器放在胸前的時候, 務必使吸
奶器保持垂直的狀態。 您的附近還需要有
一個平坦的表面, 讓您結束吸乳後放置吸奶
器和奶瓶。
8. 如果需要暫停吸乳, 請輕觸電源按鈕。
這也將暫停計時。 再次輕觸電源按鈕
則可繼續吸乳。
5
1
7
3
6 2
7
4
8
如何使用吸奶器

19 20
當您想停止吸乳時當您想停止吸乳時
• 當您的母乳不再流出時, 請長按主機上的電
源按鈕幾秒以關上吸奶器。
如果使用此吸奶器吸乳時比平常哺乳時痛, 請
立即停止使用。
柔軟的矽膠吸乳罩杯應該能讓您的乳房感覺
舒適。
吸乳時, 您的乳頭應舒適地位於矽膠吸乳罩杯
的中央, 並在輕柔的吸力牽引之下通過管道向
下延伸。 吸奶器會在您的乳暈和乳頭周圍形
成一圈密封區域。 不需要用喇叭口覆蓋整個
乳暈或乳房。 請不要勉強將乳房或乳頭塞進
喇叭內。
吸乳時請不要使奶瓶傾斜。 請保持垂直狀態,
這樣才能讓母乳流入奶瓶中。
不需要使用很大的吸力來吸乳。 請使用最舒適
的模式和吸力設定。 在同一天之內不同時間
段, 您所需要的設定可能都會不同, 或是在您母
乳餵哺的不同階段也會有所不同。
• 將排氣管與主體紫色蓋子的連接分開, 輕輕
地從吸奶器上扭下奶瓶。
• 您可以在這個奶瓶上加一個乾淨的,經過
消毒的蓋子或者是加上奶嘴及奶瓶蓋,用
來儲存母乳(詳見第8頁的儲存建議。或者
將母乳倒入另一個乾淨的,經過消毒的奶
瓶或儲奶袋中,然後再給寶寶餵奶。
• 使用完吸奶器後請按照第3頁的清洗說明
中,將所有配件拆開, 然後清洗和消毒它
們。 不要清洗或消毒排氣管。
• 將主機接入USB充電接口或包裝內的電源轉
換器進行充電, 為下次使用作好準備。
• 如果您想在吸奶器運作期間暫停以便您可
以更改姿勢, 或者更下調到一個較低的檔位,
這都沒問題。 您可以隨時從乳房上取下吸
奶器, 休息一下, 再回來繼續吸乳。
• 您可以使用內置的計時器來控制吸乳的時
間。 吸乳30分鐘後, 主機將自動停止。
發光的LED燈和寧靜的主機使您在夜間或者光
線不足的時候, 也可以使用吸奶器而不會打擾
到其他人。
儲存母乳的方法 儲存母乳的方法
請在以下時請在以下時
間內使用間內使用
請謹記請謹記
在低於25°C的室溫下時 6小時
• 切勿在微波爐中解凍或加熱母乳
• 切勿在解凍後重新冷凍母乳
• 解凍後, 應將母乳放入冰箱冷藏,
並在12小時內使用
• 不要將母乳煮沸
• 請丟棄任何餵奶後剩下的母乳
在5-10°C之間冷藏時 3天
在0-4°C之間冷藏時 6天
冷凍前進行冷藏時 24小時
冷凍後 6個月
解凍後、餵奶前 12小時
• 當您想要冷凍母乳時, 請在奶瓶預留一
定的空間, 使母乳有空間膨脹。 按每次
的奶量(60-125毫升/ 2-4盎司)為一份
來分開冷凍是最簡便的方法。
• 您的母乳在存儲時可能會分層。 給寶
寶餵奶之前, 請將母乳搖勻。
• 要解凍冷凍的母乳, 可將奶瓶放在冰
箱的冷藏室中解凍, 或將奶瓶放在溫
水中直至升至體溫。或者, 可以使用
Tommee Tippee暖奶器。
• 如果您想攜帶母乳外出, 請確保母乳一
直在冷藏或冷凍的狀態, 直到您需要給
寶寶餵奶時為止。
母乳的儲存母乳的儲存

21 22
• 除非您得到其他建議, 否則, 第一次嘗試
使用吸奶器的最佳時間是在一天中第一
次給寶寶餵奶之後。
• 確認您用一個舒適的姿勢並盡量放鬆。
• 你不需要總想著怎樣把奶吸出來。它
就在你的乳頭後面。 從感覺最舒適的
模式和力度開始, 讓您的母乳自然地
流出。
• 使用吸奶器時不應該有任何疼痛。 如
果有, 請嘗試換一個溫和的吸力。 然後
檢查您的乳房。 如果發現任何泛紅或
發,請停止使用吸奶器並儘快與您的授
乳顧問聯絡。
• 每個媽媽都不一樣,有時您吸出的母
乳不是很多, 也可能有時候會多得溢出
來。 您可能在一天中的某些時間段 (早
上或晚上) 能吸出更多的母乳; 或是其
中一個乳房比另一個乳房能吸出的母
乳更多。 Tommee Tippee 雙邊電動吸
奶器可以讓您在不同時間選擇最適合
您的設定。
• 當母乳不再流出, 請勿繼續使用吸奶
器。 此時, 請讓您的乳房稍作休息。
瞭解並逐漸熟悉您的吸奶器瞭解並逐漸熟悉您的吸奶器
• 請勿在USB線或排氣管上放置傢俱或任
何其他障礙物, 並確保沒有人可以踩到
它們或被它們絆倒。它們要遠離嬰兒
和幼童。
• USB線和排氣管要遠離散熱器和中央加
熱管等發熱設備的表面。
請不要這樣做請不要這樣做
× 不要在駕駛或操作機器時使用。
× 不要在洗澡時使用 - 吸奶器並不防水
× 不要在睡覺時使用。
× 不要在低於10°C的溫度下使用。
× 如果USB線或主機出現壞損, 請勿
使用。
請謹記請謹記
健康和安全
建議與常見問題解答建議與常見問題解答
常見問題解答常見問題解答
請求幫忙- 沒有吸力或吸力不足怎麼辦? 請求幫忙- 沒有吸力或吸力不足怎麼辦?
最有可能的是吸奶器沒有密封,在某處進入了
一些空氣, 這意味著吸奶器無法正常工作了。
• 檢查排氣管兩端的連接是否牢固, 並且沒
有打結。
• 請檢查柔軟的矽膠吸乳罩杯在喇叭口的頂
部和底部的連接處是否牢固穩定, 並能夠在
乳房周圍形成舒適的密封區域。 如有需要,
請調整您的姿勢。
• 檢查鴨嘴閥是否乾淨並且容易打開。 如果
它被卡住, 請輕輕地捏一捏。
• 檢查隔膜和隔膜蓋是否牢固, 沒有任何壞
損的跡象。
母乳會被吸入主機嗎?母乳會被吸入主機嗎?
不會。 Tommee Tippee吸奶器採用的是封閉
式吸奶器, 如果您已正確安裝隔膜和蓋子, 排
氣管和吸奶器會與母乳分開的, 母乳不會與主
機接觸。
求助, 吸奶器發出了奇怪的聲音求助, 吸奶器發出了奇怪的聲音
請檢查您是否選擇了單邊吸乳模式或雙邊吸乳
模式。 然後, 請檢查排氣管是否連接正確。 如
果您只使用了一個吸奶器, 卻選擇了雙邊吸乳
模式 (LED顯示幕上的雙圓圈圖示會出現), 或是
將排氣管連接到了錯誤的接口, 吸奶器會繼續
運行, 並嘗試為未連接的另一邊吸奶器提供吸
力, 因而會發出非正常的響聲。 因此, 請務必為
單邊吸乳或雙邊吸乳選擇正確的模式。
為什麼必須使用Tommee Tippee奶瓶?為什麼必須使用Tommee Tippee奶瓶?
Tommee Tippee Made for Me ™電動吸奶器是
為了配合TommeeTippee 奶瓶和儲奶袋而設計
(Tommee Tippee Closer to Nature 玻璃奶瓶除
外)。如果您使用其他品牌的奶瓶或容器, 很有
可能會出現漏奶或溢灑的問題。

23
主機上的符號主機上的符號
1.
此產品經過測試並符合 EN60601-1-2 醫療器材的限制。
這些限制是為防止典型醫療裝置中有害干擾而提供合
適保護,。
2.
此產品會產生、使用及發出射頻能量, 如果不按照說明安
裝和使用, 可能會對附近其他設備產生有害干擾。但是, 不
能保證在特定安裝下不會產生干擾。
3.
如果此產品對其他設備造成有害干擾, (可以通過開閉設備
來確定), 則用戶可嘗試以下一項或多項措施來糾正干擾 :
• 重新置放接收設備。
• 增加設備之間的距離。
• 將此產品連接至與其他設備不同的電源插座上。
• 請聯絡製造商或維修技師尋求協助。
符合美國FCC認證
此產品插入USB插口時消耗的功率
和電壓
Voltage 5v=
Power 10W
此產品包含鋰離子電池
IP21表示本產品具有防塵及防潑水功能
IP21
在某些國家,此產品是醫療設備。
此表示明該產品有應用部件。
注意!
此產品是雙重絕緣 (Class II)
保持產品乾燥
運輸及儲存條件運輸及儲存條件
操作條件操作條件
溫度:0°C 至 45°C
濕度:10% - 85%
氣壓:850Hpa – 1060Hpa
額定溫度範圍:10°C 至 40°C
額定相對濕度:10% - 85%
額定氣壓:850Hpa - 1060 Hpa
長期保存應存放在乾燥陰涼的地方
編號
tommee tippee
helpin
g you
P
ar
e
n
t
O
n
TM
Mayborn (UK) Limited,
Balliol Business Park,
Newcastle upon Tyne,
NE12 8EW, UK
Copyright © Mayborn (UK) Limited 2020.
Made in China.
tommeetippee.com
讓我們知道您的想法讓我們知道您的想法
我們很想聽聽您對我們很想聽聽您對Made for Me™Made for Me™系列的看法。 系列的看法。
歡迎您將您的照片、評語及體驗通過我們的社交平台告訴我們歡迎您將您的照片、評語及體驗通過我們的社交平台告訴我們。


. ™ Made for Me
Mayborn (UK) Limited,
Balliol Business Park,
Newcastle upon Tyne,
NE12 8EW, UK
a12


a4
ページが読み込まれています...
ページが読み込まれています...
-
 1
1
-
 2
2
-
 3
3
-
 4
4
-
 5
5
-
 6
6
-
 7
7
-
 8
8
-
 9
9
-
 10
10
-
 11
11
-
 12
12
-
 13
13
-
 14
14
-
 15
15
-
 16
16
-
 17
17
-
 18
18
-
 19
19
-
 20
20
-
 21
21
-
 22
22


