
a
p
o
n
m
k
j
i
h
w
v
x
y
z
u
t
s
r
q
b
c
d
f
e
g
l
HR1849
HR1848
HR1847
HR1846
www.philips.com/welcome
User manual
e subject to change without notice
©2013 Koninklijke Philips Electronics N.V.
All rights reserved.
HR1848, HR1849
220V
50Hz
300 W
额定输入功率
飞利浦四合一榨汁机
本产品根据国标 GB4706.1-2005, GB4706.30-
2008制造
本体
中国广东东莞
English
Congratulations on your purchase, and welcome to Philips!
To fully benet from the support that Philips offers, register your product at www.Philips.com/welcome.
1 Important
Safety
Read this user manual carefully before you use this 4-in-1 juicer and save it for future reference.
Danger
• Don't immerse the motor unit of the juicer in water, any other uid, nor rinse it under the tap. Use only a moist
cloth to clean.
Warning
• Check if the voltage indicated on the juicer corresponds to the local power voltage before you connect it.
• Only connect the juicer to a grounded power outlet. Always make sure that the plug is inserted rmly into the
power outlet.
• Do not use the appliance if the plug, the power cord, or other components are damaged.
• Assemble the juicer properly before plugging it into the power outlet.
• Make sure that the damaged power cord is replaced by Philips, a service center authorized by Philips or similarly
qualied persons in order to avoid a hazard.
• If you detect cracks in the lter / rotating sieve or if the lter / rotating sieve is damaged in anyway, do not use
the appliance anymore and contact the nearest Philips service center.
• Avoid touching the sharp blades, especially when you clean them and when the juicer is still connected to
power outlet.
• The appliance is not intended for use by persons (including children) with reduced physical, sensory, or mental
capabilities, or lack of experience and knowledge, unless they have been given supervision or instruction
concerning use of the appliance by a person responsible for their safety.
• Children should be supervised to make sure that they do not play with the juicer.
• Keep the power cord out of the reach of children. Do not let the power cord hang over the edge of the table
or worktop on which the juicer stands.
• Do not plug in the juicer or press any of the buttons on the control panel with wet hands.
• Never use the accessories to turn the juicer on and off.
• Never let the juicer operate unattended.
• Make sure the blade unit is securely fastened to the accessories before you assemble them onto the motor unit.
Caution
• Never use any accessories or parts from other manufacturers or that Philips does not specically recommend. If
you use such accessories or parts, your guarantee becomes invalid.
• Do not remove accessories from the motor unit when the juicer is working.
• Never reach into the jar or bowl with your ngers or an object while the juicer is running.
• Do not exceed the quantities and processing times indicated in the recipe section.
• Unplug the juicer immediately after use, e.g. before unscrewing the jar.
• Avoid touching the sharp blades, especially when the juicer is still connected to power outlet.
• If the blades get stuck, unplug the appliance before removing the ingredients that are blocking the blades by
using a spatula.
• Place the juicer on a stable, horizontal, and level surface.
• Switch off and unplug the juicer from the power supply before you take out and insert any accessories from
the main unit.
• Always let the juicer cool down before you clean or move it.
• Always clean the juicer after use. You can clean the juicer in dishwasher.
• Always unplug the juicer if not used for a longer period.
• This appliance is intended for household use only.
• Make sure all parts are correctly mounted before you switch on the appliance.
• Only use the appliance when both clamps are locked. Unlock the clamps after you have switched off the
appliance and the sieve has stopped rotating.
• Food coloring can discolor components. This is normal and has no impact on use.
Electromagnetic elds (EMF)
This Philips appliance complies with all applicable standards and regulations regarding exposure to electromagnetic elds.
Built-in safety lock
This feature ensures that you can only switch on the appliance if the blender jar and lid, the mill beaker or the chopper
bowl and blade unit (specic types only) are assembled on the motor unit properly.
If the blender jar and lid, the mill beaker or the chopper bowl and blade unit are correctly assembled, the
built-in safety lock will be unlocked.
Overheat protection (HR1849 and HR1848 China only)
This appliance is equipped with overheat protection. If the appliance overheats, it switches off automatically. Unplug the
appliance and let it cool down for 10 minutes. Then put the mains plug back into the wall socket and switch on the
appliance again. Please contact your Philips dealer or an authorized Philips service center if the overheat protection is
activated too often.
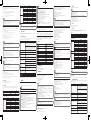
2 Overview
a
Measuring cup
n
Chopper blade unit (HR1846, HR1847, HR1848, and
HR1849 only)
b
Blender jar lid
o
Chopper rubber ring (HR1846, HR1847, HR1848,
and HR1849 only)
c
Filter
p
Chopper beaker (HR1846, HR1847, HR1848, and
HR1849 only)
d
Blender jar
q
Pusher
e
Blender rubber ring
r
Feeding tube
f
Blender blade unit
s
Lid
g
Central base
t
Sieve
h
Juice container
u
Juice collector
i
Juice container cover Spout
v
Locking clips
j
Spout
w
Driving shaft
k
Mill blade unit (HR1847, HR1848, and HR1849 only)
x
Pulp container
l
Mill rubber ring (HR1847, HR1848, and HR1849 only)
y
Switch
m
Mill beaker (HR1847, HR1848, and HR1849 only)
z
Motor unit
3 Before first use
1 Take out all the accessories.
2 Clean the parts of the juicer thoroughly before using the juicer for the rst time (see chapter ‘Cleaning’).
3 Make sure all parts are completely dry before you start using the juicer.
4 Using the juicer
Extracting Juice
The juicer can be used for preparing fresh fruit juices. Pulp, pips and skins will be separated.
Make sure the control switch is off. Then, connect to the power socket.
1 Clean and cut large ingredients into pieces that t into the feeding tube.
2 Turn the control switch to the suggested speed.
3 Put your ingredients through the feeding tube.
4 Push the ingredients gently down with the pusher.
Tips
• Remove stones from cherries, plums, peaches, etc. You do not have to remove cores or seeds from fruits like
melons, apples and grapes.
• Use fresh fruit and vegetables; they contain more juice. Particularly suitable for processing in the juice extractor
are pineapples, beetroots, celery stalks, apples, cucumbers, carrots, spinach, melons, tomatoes, oranges and grapes.
• You do not have to remove thin peels or skins. Only remove thick peels, e.g. those of oranges, pineapples and
uncooked beetroots. Also remove the white pith of citrus fruits because it has a bitter taste.
• When you prepare apple juice, remember that the thickness of the apple juice depends on the apple you are
using. The juicier the apple the thinner the juice. Choose an apple that produces the type of juice you prefer.
• Apple juice turns brown very quickly. You can slow down this process by adding a few drops of lemon juice.
• Fruits that contain starch, such as bananas, papayas, avocados, gs and mangoes are not suitable for processing in
the juice extractor. Use a food processor, blender or bar blender to process these fruits.
• Leaves and leafstalks of e.g. lettuce can also be processed in the juice extractor.
• Drink the juice immediately after you have extracted it. If it is exposed to air for some time, the juice will lose its
taste and nutritional value.
• You can get more juice output if you use softer force to push the fruit and vegetables down.
Notes
• Do not exert too much pressure on the pusher, since this would affect the quality of the end result and it could
even cause the sieve to come to a halt.
• Do not run the juicer continuously for more than 2 minutes. If you have not nished extracting juice, switch the
juicer off, and allow it to cool down to room temperature before you continue processing.
• Do not reach into the sieve through the pulp outlet of the pulp collector.
Blending
The blender is intended for:
• Blending uids, for examples dairy products, sauces, fruit juices, soups, mixed drinks, shakes;
• Mixing soft ingredients, for examples pancake batter or mayonnaise;
• Pureeing cooked ingredients, for example making baby food.
Follow the assembling steps for blending. Remember to install the blender rubber ring before use.
Blending without Filter
1 Mount the the knife unit onto the jar. Fix it by turning it in the direction of the arrow.
2 Turn and lock the blender jar onto the motor unit until it locks into position, and you hear a click sound..
3 Clean and cut large ingredients into pieces, and put them in the blender jar.
4 Press the lid into place.
5 Place the measuring cup into the opening in the lid until it is rmly xed.
6 Make sure the control switch is off. Then, connect to the power socket.
7 Turn the control switch to the suggested speed.
8 Once complete, switch off and unplug. Remove the blender jar from the motor unit.
9 Pour out the drink through the spout of the blender jar.
Notes
• Dry ingredients must not be processed for more than 1 minute.
• While the motor is running, ingredients (for examples: ice cubes and tomatoes) can be added into the blender
through the opening in the lid.
• Make sure to position the sieve of the lid is in front of the spout of the jar for smooth liquid pouring.
• To disassemble the blender, follow the instructions above in reverse order and direction.
• Refer to the end of this user manual for the recommended quantities, speed settings, and processing time.
Blending with Filter
For extra nely blended sauces, fresh fruit juices or soy milk, you can use the lter. All pips and skins will remain in the lter.
1 Mount the the knife unit onto the jar. Fix it by turning it in the direction of the arrow.
2 Turn and lock the blender jar onto the motor unit until it locks into position.
3 Put the lter in the blender jar. Make sure the lter is properly tted on the bottom of the jar.
4 Put the lid in place to x the lter.
5 Put the ingredients, water, or any other liquid in the lter.
6 Put the measuring cup in place and switch on the blender.
7 Select the highest speed and let the appliance run for maximum of 60 seconds.
8 Switch the blender off and remove the blender jar from the motor unit.
9 Pour out the drink through the spout of the blender jar.
Notes
• Never overll the lter. Do not exceed “160g” marking in lter for processing ingredients weight.
• Cut fruits into small pieces, and soak dried ingredients thoroughly, like soy beans, before processing.
• Do not use the lter to process hot ingredients.
Cautions
• Be careful not to exert too much pressure on the handle of the jar.
• Never ll the jar with ingredients that have a temperature of over 60°C.
• Never overll the blender jar above the maximum level indication (1.0 liters) to avoid spillage.
• Always insert the measuring cup into the lid before you start processing.
• Do not run the blender for more than 3 minutes at a time. If you have not nished blending after 3 minutes,
switch the blender off and let it cool down to room temperature before you continue processing.
• Never put your hand or any object in the jar while the blender is running.
• Always set the control knob to 0 before you open the lid.
HR1849_1848_1847_1846_UM_V5.0 3140 035 30205

Features Ingredients Weight | Speed - 2 Time
Milling Coffee 50g 30 sec.
Nuts 50-100g 30 sec
Cheese 50-100g 30 sec
Sesame seeds 50-100g 30 sec
Dry beans 50-100g 30 sec
Chili paste 50g 30 sec
Chopping Garlics 100g 5 x 1 sec.
Cooked eggs 100g 5 x 1 sec.
Meat & sh 100g 5 sec.
Herbs 20g 5 x 1 sec.
Cheese 100g 3 x 5 sec.
Nuts 100g 2 x 10 sec.
Tip
• For crushing ice in blender jar and chopping in chopper, it is suggested to use the pulse to have
a better result. That is to turn the appliance on and off to simulate the pulse effect.
8 Environment
Do not throw away the appliance with normal household waste at the end of its life, but hand it in at an ofcial
collection point for recycling. By doing this, you can help to preserve the environment.
9 Troubleshooting
If you encounter problems when using this juicer, check the following points before requesting service. If you cannot
solve the problem, contact the Philips Consumer Care Center in your country.
Problem Solution
The juicer does not work. The juicer is equipped with a safety system. If the accessories are not
properly connected with the motor unit, the juicer does not work. Check
whether the accessories have been connected in the right way (see the
various sections). Turn off the juicer rst!
This appliance is equipped with overheat protection. If the appliance overheats,
it switches off automatically. Unplug the appliance and let it cool down for 10
minutes. Then put the mains plug back into the wall socket and switch on the
appliance again. (HR1849 and HR1848 China only)
The knife unit/ motor unit is blocked. Turn off the juicer and process a smaller quantity.
The motor unit gives an unpleasant
smell during the rst few times of use.
This is normal for the rst few applications. If the smelling continues, check
the quantity you are processing, the application time, or used speed.
The blender shows leakage. Turn off the juicer. Release the knife unit by turning it anti-clockwise. Check
whether the rubber ring is properly assembled on the knife unit (rest on
at position).
The lid and/or measuring cup of the
blender show leakage.
Make sure the lid is attached properly, and the measuring cup ts well.
The sieve of the juicer makes contact
with the feeding tube or shows a high
vibration during processing.
Turn off the juicer. Check if the sieve is properly connected. The ribs on the
bottom of the sieve should t properly on the motor coupling opening.
Check if the sieve is not damaged. Cracks, ssures, loose grater disc or any
other irregularity may cause malfunction.
The mill / blender / chopper shows a
high vibration, produces a lot of noise
or the blade unit is out of alignment.
Check whether the knife is properly and rmly attached to the beaker.
Check whether the rubber ring is assembled in a correct way.
The mill or chopper leaks. Small amount of leakage is normal.
Make sure the rubber ring is assembled properly. The ring should rest
around all interface, in a at position.
The fruit juice or soy milk contains a
lot of pulp or skins after ltering from
the lter accessory in the blender.
Make sure that the lter is placed properly in the blender jar, the lid is
closed and the measuring cup is inserted in the lid.
简体中文
感谢您的惠顾,欢迎光临飞利浦!
为了您能充分享受飞利浦提供的支持,请在
www.Philips.com/welcome
上注册您的产品。
1 重要信息
安全
使用这款四合一榨汁机前,请仔细阅读本用户手册并妥善保管,以供日后参考。
危险
• 请勿将榨汁机的马达组件浸入水或其它液体中,也不要在自来水下冲洗。只能用湿布清洁。
警告
• 在产品通电之前,请先检查榨汁机上所标的电压与当地的供电电压是否相符。
• 榨汁机只能使用带接地线的插座。务必确保插头牢固插到电源插座上。
• 如果插头、电源线或其它组件受损,请不要使用本产品。
• 正确组装榨汁机后,再将其插入电源插座。
• 如果电源软线损坏,为避免危险,必须由制造厂或其维修部或类似的专职人员来更换。
• 如果发现过滤器
/
旋转滤网有裂缝,或者过滤器
/
旋转滤网出现任何损坏,就不要再使用产品,请与最
近的飞利浦服务中心取得联系。
• 请勿触碰锋利的刀片,特别是在清洗刀片时,以及榨汁机仍然在接通电源的状态下。
• 本产品不适合由肢体不健全、感觉或精神上有障碍或缺乏相关经验和知识的人(包括儿童)使用,
除非有负责他们安全的人对他们使用本产品进行监督或指导。
• 应照看好儿童,确保他们不玩耍该榨汁机。
• 将电源线放在儿童无法接触到的地方。不要将电源线悬挂在放置榨汁机支架的桌子或工作台的边缘上。
• 请勿用浸湿的手插接榨汁机插头或按控制面板上的任何按钮。
• 切勿使用附件切断或接通榨汁机的电源。
• 请勿在无人监视的情况下使用榨汁机。
• 确保刀片组件已牢牢固定在附用杯具上后,方能将它们装在马达装置上。
注意
• 切勿使用由其它制造商生产的,或未经飞利浦特别推荐的任何附件或部件。如果使用此类附件或
部件,您的保修将失效。
• 榨汁机工作时,切勿从马达组件中卸下附件。
• 榨汁机运转时,切勿将手指或其它物体伸入搅拌杯或加工杯中。
• 不要超出食谱部分所示的份量和制作时间。
• 使用后应立即拔下榨汁机的插头,如旋出搅拌杯前。
• 避免触碰刀片,尤其是当榨汁机仍连接在电源插座上时。
• 如果刀片被卡住,请先拔下产品插头,然后使用刮铲清除堵塞刀片的原料。
• 将榨汁机放在稳固、水平且平坦的表面上。
• 从主体上卸下或安装任何附件前,务必关闭榨汁机,并将电源线插头拔下。
• 务必先让榨汁机冷却,才能对其进行清洁或移动。
• 每次使用后应清洁榨汁机。请勿在洗碗机中清洗榨汁机。
• 如果长时间不用,务必拔掉榨汁机插头。
• 本产品仅限家用。
• 开启机器前务必确保所有组件均正确安装。
• 当两个夹板都锁住之后,榨汁机才能使用。在您关闭产品电源,并且滤网已经停止旋转之后,
才能解锁夹板。
• 食物的色素可能会使产品组件变色。出现这种情况很正常,不会影响产品使用。
电磁场 (EMF)
本飞利浦产品符合所有有关暴露于电磁场的适用标准和法规。
内置安全锁
此功能可确保您只有将搅拌杯及杯盖、碾磨杯或切碎杯和刀片组件(仅限特定型号)正确安装在马达装置
上,才可以打开产品。如果搅拌杯及杯盖、碾磨杯或切碎杯和刀片组件安装正确,则内置安全锁将被解锁。
过热保护装置(仅适用于中国销售的 HR1849 和 HR1848)
本产品带有过热保护装置。如果产品过热,它将自动关闭电源。请拔下产品插头,让其冷却
10
分钟。
然后将电源插头重新插回插座,并再次打开产品电源。如果过热保护功能启用得过于频繁,请联系飞利浦
经销商或经授权的飞利浦服务中心。
2 概述
a
量杯
n
切碎器刀片组件(仅限
HR1846
、
HR1847
、
HR1848
和
HR1849
)
b
搅拌杯盖
o
切碎器胶圈(仅限
HR1846
、
HR1847
、
HR1848
和
HR1849
)
c
滤网
p
切碎杯(仅限
HR1846
、
HR1847
、
HR1848
和
HR
1849
)
d
搅拌杯
q
推料棒
e
搅拌杯胶圈
r
进料口
f
搅拌杯刀片组件
s
上盖
g
杯座
t
刀网
h
接汁杯
u
果汁收集盘
i
接汁杯盖
v
搭扣
j
出汁嘴
w
连接头
k
研磨器刀片组件
(仅限
HR1847
、
HR1848
和
HR1849
)
x
果渣桶
l
碾磨
器
胶圈
(仅限
HR1847
、
HR1848
和
HR1849
)
y
旋钮开关
m
研磨
杯
(仅限
HR1847
、
HR1848
和
HR1849
)
z
马达组件
3 首次使用之前
1 取出所有附件。
2 首次使用前,请彻底清洁榨汁机的部件(请参阅“清洁”一章)。
3 使用榨汁机前,请确保所有部件完全干燥。
4 使用榨汁机
榨汁
榨汁机可用于榨取鲜美的果汁。果渣、籽和皮会被分离开来。
确保控制开关已关闭。然后,连接至电源插座。
1 清洗大块原料,将其切成能放入进料口的小块。
2 将控制开关旋至推荐的速度档。
3 通过进料口放入原料。
4 使用推料棒轻轻向下压原料。
提示
• 樱桃、梅子、桃子等水果请先去核,如为西瓜、苹果、葡萄这类的水果,则不必去除果核或渣籽。
• 请使用新鲜水果和蔬菜,它们含有更多水分。菠萝,甜菜根,芹菜梗,苹果,黄瓜,胡萝卜,菠
菜,瓜类,番茄,橙子和葡萄尤其适合用来榨汁。
• 无需去掉薄皮。只有橘子皮、菠萝皮或生甜菜根等蔬果的籽和厚皮才需要事先去掉。柑橘类水果的
橘络含有苦味,同样需要去除。
• 榨苹果汁时,果汁的浓度取决与您所使用的苹果种类。苹果含水量越高,果汁越稀。如需榨出合您
口味的果汁,请选择合适的苹果。
• 苹果汁很快就会变为棕色,加入几滴柠檬汁可减缓该过程。
• 含有淀粉的水果不适合用于榨汁,如香蕉、番木瓜、鳄梨、无花果和芒果。可使用食品加工机,搅
拌机或搅拌棒来处理这些水果。
• 莴苣的叶子和叶柄也可用此榨汁机进行加工。
• 榨汁后请立即饮用。果汁曝露于空气中一段时间后会失去其应有口味和营养价值。
• 推送水果和蔬菜时,使用更轻的力量可获得更多果汁。
注
• 请不要对推料棒施加太大压力,因为这会影响榨汁的质量,甚至可能导致滤网停转。
• 切勿持续运行榨汁机超过
2
分钟。如未完成榨汁,请将其关闭,待其冷却至室温后,再继续使用。
• 切勿将手从果渣桶的开口伸至刀网。
搅拌
此搅拌机适用于:
• 混合液体,例如奶制品、调料、果汁、汤、混合饮料、奶昔等;
• 混合软质原料,例如薄饼面糊或蛋黄酱;
• 捣碎煮熟的原料,例如制作婴儿食品。
按照组装步骤进行搅拌。使用前请安装搅拌杯胶圈。
Grinding
The mill attachment can be used for grinding dry ingredients only.
Follow the assembling steps for grinding dry ingredients. Remember to install the mill rubber ring before use.
Put the ingredients in the beaker.
1 Screw the blade unit onto the beaker. Fix it by turning it in the direction of the arrow.
2 Turn the assembled mill upside down, place and lock it on the motor unit.
3 Turn the control switch to the suggested speed.
4 Once complete, switch off, unlock, and remove the mill from the motor unit.
5 Unscrew the blade unit from the beaker.
Notes
• The mill is not suitable for ice crushing. Use the blender.
• Do not ll the beaker beyond the maximum indication. See the table for the advised quantities.
• Never use the mill for more than 30 seconds without interruption.
• Never ll the mill with hot ingredients.
Chopping
The chopper attachment can be used for chopping ingredients such as nuts, meat, hard cheese, dried fruits, chocolate,
garlic, herbs, dry bread etc.
Follow the assembling steps for chopping. Remember to install the chopper rubber ring before use.
1 Put the ingredients in the beaker.
2 Screw the blade unit onto the beaker. Fix it by turning it in the direction of the arrow.
3 Turn the assembled chopper upside down, place and lock it on the motor unit.
4 Switch the chopper on.
5 When you have nished chopping, switch the chopper off.
6 Unlock and remove the assembled chopper from the motor unit.
7 Unscrew the blade unit from the beaker.
Tips
• Cut large ingredients into pieces approximately 2 cm before processing.
• If the ingredients are not evenly distributed, turn the appliance off. Open the lid and distribute the ingredients
evenly on the surface of the chopper. Turn the appliance on again.
• Never ll the chopper with hot ingredients.
Notes
• The chopper is not suitable for chopping hard ingredients like coffee beans, dry beans, nutmeg and uncooked
rice. Use the mill.
• Do not use the chopper for mixing liquids. Use the blender.
• The cutting edge of the blades are very sharp, avoid touching them.
• Never exceed the maximum quantity. See the table for the advised quantities.
• Never use the chopper for more than 30 seconds without interruption.
5 Cleaning
It is easiest to clean the juicer, its parts and accessories immediately after use.
Notes
• Unplug the juicer before you started cleaning it.
• Wait until the juicer has cooled down sufciently before cleaning it.
• All detachable accessories can be cleaned in dishwasher.
• Clean the motor unit with a moist cloth.
• Do not use scouring pads, abrasive cleaning agents or aggressive liquids such as petrol, alcohol or acetone to
clean the appliance.
1 After you unplug the juicer, detach the used accessories, rubber rings, and parts and clean them in lukewarm
washing up liquid.
2 Rinse all accessories and parts under a tap.
3 To clean the blender jar, pour lukewarm water and some detergent into it.
4 Assemble the lid and the measuring cup, and then let the blender runs for a few seconds.
5 Detach the blender jar, knife unit, and remove the lid and measuring cup. Clean and rinse them as well.
6 For better cleaning, you can use the brush to clean.
6 Storage
1 Keep it in dry places to avoid the sieve, blades get rusty.
2 Plug could be inserted into the main unit for storage.
7 Recipes
With 4-in-1 Juicer, you can experiment endlessly and try out all kind of recipes. You can make delicious juices, shakes,
soups, and sauces in no time at all. To give you an idea of the possibilities, you can go to www.kitchen.philips.com.
For Juicing
Ingredients Weight Speed
Cucumbers/ Spinach/ Melons/ Tomatoes/ Oranges/
Lemon/ Grapes/ Berries
500g 1
Apples/ Carrots/ Pineapples/ Beetroots/ Celery/ Pear 500g 2
For blending, milling, and chopping
Features Ingredients Weight | Speed - 2 Time
Blending Smoothies 1000ml 60 sec.
Shakes & mixed drinks 1000ml 60 sec.
Fruits & vegetables 1000ml 60 sec
Soups 500ml 60 sec
Batters 1000ml 60 sec
Sauces 1000ml 60 sec
Baby food 500ml 60 sec
Ice 6 pieces (approx. 38x30x23mm) 15 x 1sec.
Blending - lter Soy bean milk 160g soaked beans, 450g water 60 sec
无滤网搅拌
1 将刀片组件安装到搅拌杯上,按箭头方向旋转以将其固定。
2 将搅拌杯旋转到马达组件上,直至其锁定到位,此时您可听见“咔哒”一声。
3 清洗大块原料,接着切碎,然后将其放入搅拌杯。
4 将盖子按到位。
5 将量杯放入杯盖的开口,直至牢固固定为止。
6 确保控制开关已关闭。然后,连接至电源插座。
7 将控制开关旋至推荐的速度档。
8 完成后请关闭搅拌机,并将电源插头拔下,然后从马达组件上卸下搅拌杯。
9 通过搅拌杯的杯嘴倒出饮料。
注
• 干原料的加工时间不得超过
1
分钟。
• 马达运转时,可通过杯盖的开口将原料(例如:冰块和西红柿)添加至搅拌机中。
• 为了顺利倒出果汁,上盖滤嘴应正对搅拌杯出汁嘴。
• 如需拆卸搅拌器,请按照以上方法以相反顺序和方向操作。
• 该用户手册尾部给出了建议的食材数量、速度设置和工作时间。
带滤网搅拌
您可以使用滤网制作细腻的混合调味汁、新鲜果汁或豆浆,所有的籽和皮都会留在滤网内。
1 将刀片组件安装到搅拌杯上,按箭头方向旋转以将其固定。
2 将搅拌杯旋转到马达组件上,直至其锁定到位。
3 将过滤网放入搅拌杯。确保将滤网正确装入搅拌杯的底部。
4 将杯盖盖到位以固定滤网。
5 将原料、水或任何其他液体倒入滤网。
6 将量杯塞到位,打开搅拌机。
7 选择最高速度,最多让产品持续运行
60
秒。
8 关闭搅拌机,从马达组件上卸下搅拌杯。
9 通过搅拌杯的杯嘴倒出饮料。
注
• 切勿让倒入滤网的原料过量。滤网的盛装量不可超过“
160g
”。
• 将水果放入过滤网进行加工之前,应切成小块,干原料(如大豆)应先泡软。
• 请勿使用过滤网加工热的物料。
注意
• 注意不要在搅拌杯的手柄上施加过大的压力。
• 切勿将温度超过
60
°
C.
的原料装入搅拌杯。
• 切勿使原料超过搅拌杯的最大刻度(
1
升),以防溢漏。
• 开始加工前,必须将量杯塞入杯盖。
• 切勿让搅拌机一次运行超过
3
分钟。如果
3
分钟后未完成搅拌,请将其关闭
,待其冷却至室温后,
再继续使用。
• 搅拌机运转时,切勿将手或任何其它物体伸入杯内。
• 打开上盖前请将控制开关旋至
0
。
研磨
研磨附件仅可用于研磨干原料。
按照组装步骤研磨干原料。使用前请安装碾磨器胶圈。
1 将原料放入研磨杯。
2 将刀片组件拧到研磨杯上,按箭头方向旋转以将其固定。
3 将组装好的研磨器翻转过来,将其放在马达组件上并锁定。
4 将旋钮开关转至建议的速度档。
5 完成后,关闭机器,从马达组件上拧开并卸下研磨器。
6 从研磨杯上拧下刀片组件。
注
• 碾磨器不能用于粉碎冰块。使用搅拌机。
• 切勿将超过其最大刻度的原料倒入研磨器。有关建议的份量,请参阅表格。
• 切勿让研磨器持续操作超过
30
秒钟。
• 切勿将热原料装入碾磨器中。
切碎
切碎器附件可用来切碎坚果、肉、干酪、水果干、巧克力、大蒜、香草和干面包等原料。
按照组装步骤进行切碎。使用前请安装切碎器胶圈。
1 将物料放入切碎杯中。
2 将刀片组件拧到切碎杯上,按箭头方向旋转以将其固定。
3 将组装好的切碎器翻转过来,将其放在马达组件上并锁定。
4 打开切碎器。
5 切碎完成后,关闭切碎器。
6 从马达组件上拧开并卸下组装的切碎器。
7 从切碎杯上拧下刀片组件。
提示
• 加工前,将大块原料切成约
2
厘米见方。
• 如果原料分布不均,关闭产品。打开杯盖,使原料均匀分布在切碎器的表面上。重新打开产品。
• 切勿将热原料装入切碎器中。
注
• 切碎器不适合用于切碎咖啡豆、干大豆、肉豆蔻和生米等坚硬原料,请使用研磨器。
• 请勿使用切碎器搅拌液体,请使用搅拌机。
• 刀片的刀刃非常锋利,应避免触摸。
• 切勿超过最大加工量。有关建议的份量,请参阅表格。
• 切勿让切碎器持续操作超过
30
秒钟。
5 清洁
使用后立即清洗榨汁机及其部件和附件是非常容易的。
注
• 开始清洗之前,请拔下榨汁机的插头。
• 等到榨汁机完全冷却后再开始清洗。
• 所有可拆卸附件均可在洗碗机中清洗。
• 用湿布清洁马达装置。
• 不要使用钢丝绒、研磨性清洁剂或腐蚀性液体(例如汽油、酒精或丙酮)来清洁产品。
1 拔掉榨汁插头后,卸下用过的附件、橡胶环和各个部件,然后在加有洗涤剂的温水中进行洁洗。
2 在水龙头下冲洗所有附件和部件。
3 向搅拌杯中倒入温水,放入少许清洁剂。
4 装上杯盖和量杯,让榨汁机运行几秒钟。
5 卸下搅拌杯和刀片组件,取下杯盖和量杯,并将它们冲洗干净。
6 使用软质毛刷可获得更佳清洗效果。
6 储存
1 将产品置于干燥环境,以避免刀网和刀片生锈。
2 插头可卷入产品主体储存。
7 食谱
使用四合一榨汁机,您可以不断实验,尝试各种食谱。还可以快速制作各种美味果汁、奶昔、浓汤和调味汁。
欲了解榨汁机的无限可能,您可以浏览我们的网站:
www.kitchen.philips.com
。
榨汁食谱
食材 重量 速度
黄瓜
/
菠菜
/
瓜类
/
番茄
/
橙子
/
柠檬
/
葡萄
/
浆果
500
克
1
苹果
/
胡萝卜
/
菠萝
/
甜菜根
/
芹菜
/
梨
500
克
2
搅拌,研磨,切碎食谱
功能 食材 重量 | 速度 - 2 时间
搅拌 沙冰
1000
毫升
60
秒
奶昔和混合口味饮料
1000
毫升
60
秒
水果和蔬菜
1000
毫升
60
秒
浓汤
500
毫升
60
秒
面糊
1000
毫升
60
秒
调味汁
1000
毫升
60
秒
婴儿食品
500
毫升
60
秒
冰块
6
块(尺寸约为
38x30x23
毫米)
15 x 1
秒
搅拌
-
过滤网 豆奶
160
克泡软的大豆、
450
克水
60
秒
研磨 咖啡豆
50
克
30
秒
坚果
50-100
克
30
秒
奶酪
50-100
克
30
秒
芝麻
50-100
克
30
秒
干豆
50-100
克
30
秒
辣椒酱
50
克
30
秒
切碎 大蒜
100
克
5 x 1
秒
熟鸡蛋
100
克
5 x 1
秒
肉类和鱼类
100
克
5
秒
香草
20
克
5 x 1
秒
奶酪
100
克
3 x 5
秒
坚果
100
克
2 x 10
秒
提示
• 在搅拌杯中碎冰以及在切碎器中处理食物时,建议您使用脉冲方法以获得更佳效果。也就是说,
间歇性开启和关闭机器来模拟脉冲功效。
8 环境
弃置产品时,请不要将其与一般生活垃圾堆放在一起,应将其交给官方指定的回收中心。这样做有利于环保。
9 故障种类和处理方法
如果在使用此榨汁机时遇到问题,请在申请服务之前检查以下事项。如果无法解决问题,请联系您所在国
家
/
地区的飞利浦服务中心。
问题 解决方法
榨汁机不工作。 榨汁机配有安全系统。如果附件与马达组件未正确连接,榨汁机
不会工作。检查是否已按正确方向连接附件(请参阅说明的
各部分)。首先关闭榨汁机!
本产品带有过热保护装置。如果产品过热,它将自动关闭电源。
请拔下产品插头,让其冷却
10
分钟。然后将电源插头重新插回
插座,并再次打开产品电源。(仅适用于中国销售的
HR1849
和
HR1848
)
刀片组件
/
马达组件阻塞。 关闭榨汁机,减少加工量。
马达组件在前几次使用时会发出难闻
的气味。
在前几次使用产品时,这是正常现象。如果气味一直存在,
应检查加工量、所用时间或速度。
搅拌机出现溢漏。 关闭榨汁机。逆时针旋转刀片组件,将其卸下。检查橡胶圈是否
正确组装在刀片组件上(位于平面位置)。
搅拌机的杯盖和
/
或量杯出现溢漏。 确保杯盖已正确盖好。塞入量杯时听到“咔哒”一声。
在加工期间,榨汁机的滤网与进料口
接触或发出高频振动。
关闭榨汁机。检查滤网安放是否正确。滤网底部的凸缘应正确卡
入马达耦合口。
检查滤网是否未损坏。裂纹、裂缝、过滤栅松动或任何其他
不正常情况都能引起故障。
研磨器
/
搅拌机
/
切碎器出现高频振动,
产生很大的噪声或刀片组件对不齐。
检查刀片是否正确且稳固地安装在搅拌杯上。
检查橡胶圈的安装方式是否正确。
研磨器或切碎器泄漏。
少量泄漏是正常现象。
确保正确安装橡胶圈。橡胶圈应处于水平位置,接触到周围所有接面。
水果汁或豆浆在从搅拌机的过滤附件
中过滤后含有大量果渣或果皮。
请确保将过滤网正确放入搅拌杯中,关闭盖子并且将量杯插入盖
子里。
-
 1
1
-
 2
2


他の言語で
- English: Philips HR1848/00 User manual
