Kyosho 31122 取扱説明書

カテゴリー
リモコンのおもちゃ
タイプ
取扱説明書

このマニュアルも適しています

© 2003 KYOSHO CORPORATION
THE FINEST RADIO CONTROL MODELS
R
Specifications are subject to be changed without prior notice!
Technische nderungen sind ohne vorherige AnkŸndigungen mšglich! Les sp cifications peuvent changer sans pr avis!
No. 31122
Required for operation / Das notwendige Zubehšr / Mat riel n cessaire
Radio preparation / Die RC-Anlage / Pr paration de la radio
Before you begin / Bevor Sie beginnen / Avant de commencer
Assembly / Das Bauen / Assemblage
Operating your model safely / Zu Ihrer Sicherheit / Consignes de s curit
Exploded View
Spare parts & Optional parts
2 ~ 3
3
4
5 ~ 28
29 ~ 35
36 ~ 37
38 ~ 41
RADIO CONTROLLED .12-.15 ENGINE POWERED TOURING CAR SERIES
PureTen GP V-ONE S II 4WD
INSTRUCTION MANUAL
UNDER SAFETY PRECAUTIONS
This radio control model is not a toy!
First-time builders should seek the advice of experienced modellers before
beginning assembly and if they do not fully understand any part of the
construction.
Assemble this kit only in places out of childrenÕs reach!
Take enough safety precautions prior to operating this model. You are responsible
for this modelÕs assembly and safe operation!
Always keep this instruction manual ready at hand for quick reference, even after
completing the assembly.
ACHTUNG!
Dieses Modell ist kein Spielzeug!
AnfŠnger sollten mšglichst Rat bei Modellbaukundigen einholen, um das Modell richtig
zusammenzubauen und gefahrlos bedienen zu kšnnen.
Bauen Sie dieses Modell nur au§er Reichweite von Kindern zusammen!
Treffen Sie genŸgend Sicherheitsvorkehrungen, bevor Sie Ihr Modell bedienen! Sie
alleine tragen die Verantwortung fŸr Ihr Modell und dessen gefahrlose Bedienung!
Bitte bewahren Sie diese Dokumentation zur spŠteren Verwendung auf.
ATTENTION!
Ce mod le nÕest pas un jouet!
Si vous tes d butant dans le mod le r duit, prenez conseils aupr s de mod listes con-firm
s afin dÕutiliser votre mod le dans des conditions optimales.
Assemblez ce kit en dehors de la port e de jeunes enfants!
Prenez des pr cautions lors de lÕutilisation. Vous seul tes responsable des volutions
de votre mod le. La soci t KYOSHO ou son distributeur ne peuvent en aucun cas tre
tenus responsables des accidents pouvant survenir lors de lÕutilisation de ce mod le!
Gardez cette notice ˆ port e de main afin de vous y r f rer rapidement.
Before beginning assembly, please read these instructions thoroughly!
Bitte lesen Sie die Anweisungen vor Gebrauch genau durch!
Veuillez attentivement lire les instructions avant lÕemploi!
ESSO Ultraflo Supra
1
BEC
Minimum 2 channel radio with 2 servos.
Eine 2-Kanal BEC Fernlenkanlage mit 2 Servos.
Radio type B.E.C. 2 voies avec 2 servos
For more information on the radio, refer to its instruction manual.
Für mehr Einzelheiten über die RC-Anlage, lesen Sie bitte die
Gebrauchsanweisung der RC-Anlage durch.
Lisez la notice de la radio pour plus d’informations.
Stick-type
Knüppelsteuerung
A manches
Wheel-type
Drehknopfsteuerung
A volant
Battery Box
Batteriehalter
Boîtier à piles
• If a battery box not included with your radio system, one
must be purchased separately.
• Wenn der Batteriehalter schon mit der RC-Anlage geliefert
wird, brau-chen Sie keinen gesondert kaufen.
• S’il est déjà fourni avec l’ensemble radio, il est inutile
d’acheter un boîtier à piles séparé.
Required for engine starting:
Zum Starten von Verbrennungsmotoren benötigtes Zubehör:
Pour faire démarrer le moteur thermique:
19~20mm
38~41mm
Suitable size servos
Passende Servos
Servos compatibles
2
PAINT BRUSH
3
Paints (for painting the body shell)
Farben (zur Lackierung der Karosserie)
Peintures (pour peindre la carrosserie)
POLYCA COLOR
(Brush paints)
(Pinselfarben)
(Peintures à pinceau)
No.2230
MASKING SHEET
No.1947
For safe masking jobs, use this plastic masking
sheet featuring one self-adhesive edge.
KYOSHO SPRAY COLOR
No.76301 ~ 76711
CAUTION: Only use a radio suitable for surface use!
WICHTIG: Benutzen Sie ausschließlich eine 2-Kanal RC-Anlage mit
2 Servos für den Autobereich!
IMPORTANT: N’utilisez qu’une radio 2 voies avec 2 servos pour voitures!
CAUTION: Before using Kyosho Spray Colours, always read the
instructions thoroughly!
WICHTIG: Lesen Sie bitte zuerst die Gebrauchsanleitung der Spray-
farben sorgfältig durch!
IMPORTANT: Avant l’utilisation des Kyosho Spray Colors, lisez atten-
tivement les explications!
AAAA
AAAA AAAA
AA-size Batteries
AA Trockenbatterien
Piles type AA
WARNING: Never use petrol or kerosene!
VORSICHT: Verwenden Sie niemals handelsübliches
Benzin und Diesel!
ATTENTION: N’utilisez jamais ni de l’essence ni du gasoil!
S
P
R
A
Y
C
O
L
O
R
R
K
Y
O
S
H
O
F
U
E
L
P
R
O
F
F
P
A
I
N
T
S
P
R
A
Y
C
O
L
O
R
R
K
Y
O
S
H
O
F
U
E
L
P
R
O
F
F
P
A
I
N
T
2
In case of using reverse switch, refer to instruction
manual included in the radio set.
Beachten Sie die Bedienungsanleitung des Herstellers
des Fernsteuersystems
Pour utiliser les inverseurs de servos, se référer à la
notice de la radio.
FUEL
No.73201
Super Starter Pack
Plug Heater / AC ChargerGlow Fuel Plug Wrench
/ REQUIRED FOR OPERATION / DAS NOTWENDIGE ZUBEHÖR / MATÉRIEL NÉCESSAIRE
4
Tools required
Die notwendigen Werkzeuge
Les outils utilisés
TOOLS INCLUDED
GELIEFERTE WERKZEUGE
OUTILS FOURNIS
Sharp Hobby Knife
Scharfes Bastelmesser
Cutter
1.5mm, 2mm, 2.5mm, 5mm
Hex Wrench
(1.5mm, 2mm, 2.5mm, 5mm)
Sechskantschlüssel
(1.5mm, 2mm, 2.5mm, 5mm)
Clé allen (1.5mm, 2mm, 2.5mm, 5mm)
Phillips Screwdriver (L, M, S)
Kreuzschlitzschraubendreher
Tournevis cruciforme
Needle Nose Pliers
Flachzange
Pinces plates
Awl
Spitzahle
Poinçon
Wire Cutters
Seitenschneider
Pince coupante
Cross Wrench
Kreuzschlüssel
Clé en croix
GREASE
Grease
Fett
Graisse
CAUTION: Handle tools carefully!
WICHTIG: Gehen Sie vorsichtig mit Werkzeugen um!
IMPORTANT: Maniez les outils avec prudence!
3
PO
W
ER
ON
P
O
W
E
R
S
T
.
D
/
R
D
IG
I
TA
L P
R
O
P
O
R
TIO
N
A
L R
A
D
IO
C
O
N
TR
O
L S
Y
S
TE
M
P
E
R
FE
X
K
T-3
S
T
.
T
R
I
M
T
H
.
T
R
I
M
Mo
d
e
l
N
o
.
K
T
-
3
/ RADIO PREPARATION / DIE RC-ANLAGE / PRÉPARATION DE LA RADIO
Set up the radio as explained below.
Bereiten Sie die RC-Anlage wie unten beschrieben vor.
Préparez votre radiocommande comme ci-dessous.
Receiver
Empfänger
Récepteur
Switch
Schalter
Interrupteur
Servo
5
4
3
8
ON
OFF
10
Battery Box
Batteriehalter
Boîtier à piles
1
2
3
4
5
6
7
8
9
10
11
12
3
3
/
1
2
3
4
5
6
7
8
9
10
11
12
Insert AA-size batteries into the
Transmitter.
Extend the Transmitter antenna.
Insert the AA-size dry batteries into
the battery box.
Plug in the battery box.
Unwind the Receiver antenna.
Center the Transmitter trims.
Switch "ON" the Transmitter.
Switch "ON" the Receiver.
Make sure the servos move accord-
ing to your transmitter inputs.
Switch "OFF" the Receiver.
Switch "OFF" the Transmitter.
Retract the Transmitter antenna.
1
2
3
4
5
6
7
8
9
10
11
12
Setzen Sie die AA Batterien in den
Sender ein.
Ziehen Sie die Senderantenne aus.
Setzen Sie die AA Batterien in den
Batteriehalter ein.
Schließen Sie den Batteriehalter an.
Entspulen Sie die Empfängerantenne.
Stellen Sie die Trimmer neutral.
Schalten Sie den Sender an.
Schalten Sie den Empfänger an.
Überprüfen Sie, ob die Servos sich Ihr-
er Richtung entsprechend verhalten.
Schalten Sie den Empfänger aus.
Schalten Sie den Sender aus.
Ziehen Sie die Senderantenne ein.
1
2
3
4
5
6
7
8
9
10
11
12
Installez les piles type AA dans
l’émetteur.
Déployez l’antenne de l’émetteur.
Installez les piles type AA dans le
boîtier à piles.
Ensuite, branchez le boîtier à piles.
Déployez l’antenne du récepteur.
Mettez les trims au neutre.
Mettez l’émetteur sur “ON”.
Mettez le récepteur sur “ON”.
Vérifiez si les servos bougent selon
vos maneuvres sur l’émetteur.
Mettez le récepteur sur “OFF”.
Mettez l’émetteur sur “OFF”.
Rentrez l’antenne de l’émetteur.
1
2
12
Transmitter
Sender
Émetteur
6
9
1
2
12
6
ON
OFF
11
7
9
ON
OFF
11
7
KNIFE EDGE REAMER
REIBAHLE
ALESOIR SPECIAL
No.695101
1 ~ 15mm
No need to pre-drill! Drills neat 1 ~ 15mm holes directly!
Unerläßlich, nützlich! Diese Ahle bohrt Ihnen 1 ~ 15mm
Löcher, einfach und sauber!
Un must! Permet de faire des trous de 1 ~ 15mm sans
effort! Idéal pour les carrosseries.
CURVED SCISSORS & SANDER
LEXANSCHERE
CISEAUX A LEXAN
No.1829
For trimming body shells. Makes cutting curved lines easy!
Schneidet ohne Probleme auch Kurven. Für Karosserien
aus Lexan.
Coupe le long de lignes courbées. Pour les carrosseries.
KYOSHO
KYOSHO Special Glue
No.96154
Instant Glue
Sekundenkleber
Colle cyanoacrylate
Special Glue
/ BEFORE YOU BEGIN / BEVOR SIE BEGINNEN / AVANT DE COMMENCER
1
TP
Lesen Sie folgendes vor dem Zusammenbau aufmerksam durch:
Lesen Sie zuerst die Bauanleitung ganz durch und verstehen Sie
den Aufbau Ihres Modelles.
Überprüfen Sie den Verpackungsinhalt.
Sollten Teile fehlen, wenden Sie sich direkt an Ihren Fachhändler oder an
den Kyosho-Vertreiber in Ihrem Land.
Verwechseln Sie Schrauben sowie kleine Bauteile nicht! Vergleichen Sie
sie vor dem Einbau mit den Darstel-lungen in Originalgröße in den Baustufen.
Beachten Sie beim Festziehen einer Treibschraube folgendes:
Schrauben Sie solange, bis das anzubringende Teil sicher und fest sitzt.
Achten Sie jedoch darauf, daß Sie den Gewindegang im Material nicht überdrehen!
Before assembling, please read the following carefully:
First, read this instruction manual and understand the model’s con--
struction.
Check the contents of this kit.
Should parts be missing, immediately contact the retail shop or your nearest
Kyosho distributor.
Do not take the wrong screw or small part. Compare it to the true-to-
scale dia-gram in each assembly step, then install it.
When tightening a self-tapping (TP) screw:
Even if feeling hard, tighten a TP screw until the part will be securely
attached. However, do not overtighten it as the plastic thread inside the part
may strip!
Avant l’assemblage, veuillez lire les points suivants attentivement:
Lisez d’abord complètement cette notice; ainsi vous aurez un aperçu
du déroulement et pourrez mieux vous orienter.
Vérifiez ensuite le contenu du kit.
Si jamais il y a des pièces manquantes, adressez-vous directement à votre
magazin spécialisé ou au distributeur Kyosho dans votre pays.
Ne confondez pas les vis et les petites pièces! Vérifiez-les à l’aide
des illus-trations dans chaque plage de montage, puis assemblez les.
Lorsque vous serrez une vis autotaraudeuse:
Serrez jusqu’à ce que la pièce à monter soit bien installée. Pourtant, veillez
à ne pas trop la serrer puisque vous risquez d’abîmer le filet dans la pièce.
How to read the instruction manual:
So funktioniert die Bauanleitung:
Comment lire les instruction:
2
No.4, No.5, No.6
Metal Bushing
Metallager
Palier métal
4
King Pin
Achsschenkelbolzen
Vis de fusée
4
6
4
5
5
7
5
Front Suspension
Vordere Aufhängung
Suspension avant
1
Example Exemple Beispiel
A:
B:
C:
No.
No.
D:
A: Numéro de la plage de montage et le nom de
la pièce à assembler.
B: Numéro de référence de la pièce, nom, illu--
stration en grandeur réelle et quantité
utilisée.
C: Toutes les pièces, exceptées les vis, sont
iden-tifiées par un numéro de référence. Pour
l’achat de pièces de rechange, trouvez ce
numéro dans la liste pour pièces de rechange
à la fin de cette notice. Toute à la gauche de
cette même liste, vous trouverez ainsi le
numéro de commande correspondant.
D: Cette notice utilise des icônes dans les
plages de montage. Référez-vous au bas de
A: Die Nummer der Baustufe sowie das zu bau--
ende Teil werden angegeben.
B: Teilenummer, Teilename, Darstellung in
Origi-nalgröße und Anzahl.
C: Die Teilenummer stellt den Bezug zu unserer
Bestellnummer her. Am Ende der Bauanlei--
tung finden Sie eine Ersatzteilliste, die zu der
Teilenummer die entsprechende Bestellnum--
mer liefert.
D: Diese Bauanleitung verwendet verschiedene
Piktogramme, deren Bedeutungen unten auf
jeder Seite erklärt werden.
A: Indicates the number of the assembly step
and the part that will be assembled.
B: Key Number, Part Name, True-to-scale
Diagram, Quantity Used.
C: All parts except screws are identified by key
numbers. For purchasing spare parts, find
the key number of the part needed in the
spare parts list and refer to the left column to
look up the corresponding order number.
D: This instruction manual uses several
symbols. Please note them during the entire
assembly at the bottom of each page.
A
C
C
D
D
B
5 x 10mm
Correct
Richtig
Bon
Wrong
Falsch
Mauvais
4
No.4, No.10
No.3, No.8
No.1, No.3, No.4,
No.8, No.10
68
69
64
66
68
67
13
74
71
3x15mm
2
3 x 15mm
Cap Screw
Inbusschraube
Vis
1
Bremse Kolben Piston frein
Brake Piston
69
1
Bremsewelle Axe frein
Brake Shaft
66
1
19T
Riemenrad Poulie
Pulley
71
2
13
2 x 11mm
Stift Axe 2x11mm
Pin
78
Welle Axe intermédiaire
Spur Gear Shaft
1
approx. 6mm
ca. 6mm
environ 6mm
Gummikleber. / Collez avec de la colle a caoutchouc.
Apply rubber type glue. /
13
73
78
Cut off.
Überschüssiges
Material abschneiden!
Couper à dimension.
"19" Inscription
Aufschrift: 19
Inscrit "19"
Top
Oben
Haut
Note the direction.
Einbaurichtung beachten.
Notez le sens.
3x12mm
3x12mm
4x8mm
E5
80
Belt (Small)
Zahnriemon, Klein
Courroie (Petit)
Rear Differential Assembly
Differentialgetriebe, hinten
Différentiel arrière assemblé
Screw up to
the end.
Einschrauben,
wie dargestellt.
Visser
complètement.
4x8mm
75
48
63
26
26
79
79
64
48
2
48
6x12mm
Ball Bearing
Kugellager
Roulements à billes
2
26
12x18mm
Ball Bearing
Kugellager
Roulements à billes
2
4 x 8mm
Set Screw
Gewindestift
Vis BTR 4x8mm
4
3 x 12mm
TP F/H Screw
SK Treibschraube
Vis TP F/H 3x12mm
1
E5
E-ring
E-Ring E5
Clips 5mm
11
1
75
Ball Bearing Cap
Kugellagerabdeckung
Flasque de roulement a bille
Verwendeter Teilebeutel. / Sachet utilisé.
Part bags used. /
8
Getriebekasten, hinten
Cellule arrière
Rear Bulkhead
9
Getriebekasten, hinten
Cellule arrière
Rear Bulkhead
10
Getriebekasten, hinten
Cellule arrière
Rear Bulkhead
6mm
19
TP
E
Assy
No.3, No.10
No.3, No.5,
No.10
17
2
3 x 12mm
F/H Screw
SK Schraube
Vis F/H 3x12mm
2
3 x 15mm
Cap Screw
Inbusschraube
Vis
2
3 x 12mm
F/H Screw
SK Schraube
Vis F/H 3x12mm
3 x 18mm
Cap Screw
Inbusschraube
Vis
2
3 x 10mm
Cap Screw
Inbusschraube
Vis
In case of using Wide Front Shock Stay.
Bei Verwendung der breiten Dämpferbrücke.
Dans le cas ou vous utilisez le support
d'amortisseurs large.
Front Shock
Stoßdämpfer, vorn
Amortisseurs avant
97
3x10mm
3x12mm
3x12mm
Front Shock
Stoßdämpfer, vorn
Amortisseurs avant
98
3x18mm
3x18mm
Rear Shock
Stoßdämpfer, hinten
Amortisseurs arrière
61
61
100
3x10mm
3x10mm
3x12mm
3x12mm
3x15mm
In case of using Normal Front Shock Stay.
Bei Verwendung der serienmäßigen Dämpferbrücke
Dans le cas ou vous utilisez le support
d'amortisseurs standard.
2
Verwendeter Teilebeutel. / Sachet utilisé.
Part bags used. /
3 x 10mm
TP Screw
LK Treibschr
Vis TP 3x10mm
2
It may not be available with some shape of bodies.
Paßt ggf. nicht bei allen Karosserien
.
Il peut s'averer inutisable avec certaines carrosseries.
21
Front Shock Stay
Vordere Dämpferbrücke
Support amortisseurs avant
22
Rear Shock Stay
Hintere Dämpferbrücke
Support amortisseurs arrière
TP
/
25
36
Lackierung
Peinture
Painting
37
Karrosserie Zubehör
Accessoires
Plastic Parts
Lackieren Sie die Karrosserie von innen mit Kyosho Sprayfarben. / Peingnez la carrosserie avec des peintures en spray de chez Kyosho.
Paint the body shell from the inside using Kyosho spray colors. /
After painting, remove the protective
film from the body shell.
Ziehen Sie den Schutzfilm
von der Karrosserie ab.
Enlevez le film protecteur
de la carrosserie.
Before painting, use a neutral detergent
to remove any oil residues and dirt.
Bevor Sie beginnen, reinigen Sie die Karrosserie
gründlich mit einem milden Haushaltsreiniger.
Avant de peindre, nettoyez la carrosserie
soigneusement avec un produit vaisselle.
Mask the windows from the inside.
Maskieren Sie die Fenster von innen.
Masquez les fenêtres de l’intérieur.
1
4
2
Refer to the pictures on the
box for the color scheme.
Nehmen Sie Bezug auf die
Verpackung, wenn Sie lackieren.
Reportez-vous aux illustrations
sur la boîte.
3
Mask Windows
Abdecken mit Maskierfolie
Caches vitres
Mask Windows
Abdecken mit Maskierfolie
Caches vitres
Double-sided Tape
Doppelseitiges Klebeband
Adhésif double face
Double-sided Tape
Doppelseitiges Klebeband
Adhésif double face
150
150
White
Black
Weiß
Blanc
Schwarz
Noir
No.76301
No.76302
Blue
Schwarz
Noir
No.76324
Black
Schwarz
Noir
Black
Schwarz
Noir
White
Weiß
Blanc
White
Weiß
Blanc
White
Weiß
Blanc
Blue
Blau
Bleu
Blue
Blau
Bleu
3x8mm
2
3 x 8mm
Screw
LK Schraube
Vis 3x8mm
4
3mm
Washer
Scheibe
Rondelle 3mm
2
3mm
Nylon Nut
Kunststoffmutter
Ecrou nylon
3mm
3mm
3mm
3mm
/
27
Safety Precautions
Sicherheitsvorkehrungen
Mesures de sécurité
Die Montage von Tuningteilen
Tendeur de courroie (pièce option)
Always run your car with the body shell fitted!
Avoid changing the running direction too often and too abruptly.
Do not run your car on ground:
• that is overgrown with grass.
• that is muddy, sandy or rocky.
Check all screws, nuts etc. on a regular basis for looseness.
Bedienen Sie Ihr Auto, nur wenn die Karrosserie montiert ist!
Wechseln Sie die Fahrtrichtung nicht zu oft oder zu abrupt.
Vermeiden Sie Gelände, das:
• mit Gras überwachsen ist.
• schlammig, sandig oder steinig ist.
Überprüfen Sie regelmäßig alle Schrauben, Muttern usw. auf festen Sitz.
N’opérez votre voiture que lorsque la carrosserie est montée!
Ne changez pas de direction trop brusquement ou trop fréquemment.
N’opérez pas votre voiture sur du terrain:
• recouvert d’herbe.
• boueux, sableux ou recouvert de pierres.
Vérifiez régulièrement la visserie.
Installation of optional parts
2
2 x 10mm
Cap Screw
Inbusschraube
Vis
2
E3
E-ring
E-Ring E3
Clips 3mm
E3
2x10mm
2x10mm
Ball bearings are optional ! (with optional part no.)
Wahlweise Kugellager (Jeweils mit Best.-Nr.)
Les roulements sont en option. (avec les pièces en option N )
94
BRG003
BRG003
BRG003
MEMO
E
: No.BRG003
ADJUSTMENT
Rear tire grip becomes worse when entering corners.
Gives rear tires more grip when entering corners.
Camber Angle (Large)
Camber Angle (Small)
Steering becomes milder.
Enters corners more aggressively.
Steering Characteristics
Hex Wrench (2.5mm)
Camber Angle (Large)
Camber Angle (Small)
Ride Height
Width approx. 200mm
Camber Angle
(for front & rear
approx. 1°)
Camber Angle
(for front & rear
approx. 1°)
G5 (2mm)
G5 (1.5mm)
G5 (1mm)
Adjust the ride height by changing the guantity and / or type of shock
collars used.
Adjust the steering behaviour by changing the spring tension and / or
type of shock oil.
Adjust the caster by changing the location of the Spacer.
Adjust the camber by tightening or unscrewing the pillow ball.
Caster : approx. 6 Caster : approx. 14
Hex Wrench (2.5mm)
Do not loosen too much since will
Swingshaft fall out.
Generally, the bigger
the caster, the milder
cornering becomes.
Silicone Oil
# 600
(96609)
# 500
(96608)
# 400
(96607)
# 300
(96605)
# 200
(96603)
# 100
(96601)
Spring stiffness
Shock stiffness
Hard Soft
On-road
Shock Spring(S)
Yellow OrangeGreen
Spring stiffness Hard Soft
Steering
characteristics
Sharp MildFront
Rear Grip gets lower. Grip gets higher.
Hard Soft
34 35
35 34
Ride height becomes lower.
Ride height becomes higher.Increasing G5 shock collar width.
Decreasing G5 shock collar width.
1
Shock (1)
2
Shock (2)
3
Caster
4
Camber
Rear Suspension
Front Suspension
< Spring >
< Shock Oil >
< Front >
< Rear >
92491
Toe Angle
Rear toe angle give stability.
approx. 2°
approx. 2°
Adjust camber approx. 1°
53
approx. 5mm
28
2.5mm
200mm
G5
6 14
2.5mm
1
S
34 35
G5
G5
2
2
53
5mm
Model No.KT-3
POWER ON
POWER
ST.D/R
DIGITAL PROPORTIONAL RADIO CONTROL SYSTEM PERFEX KT-3
ST.TRIM TH.TRIM
01
05
CH-2 CH-1
BATT.
Operate your model ONLY in spacious areas
with no people around! Do NOT operate it:
1. on roads!
2. in places where children and many people gather!
3. in residential districts and parks!
4. indoors and in limited space!
* Non-observance may account for personal injury
and property damage!
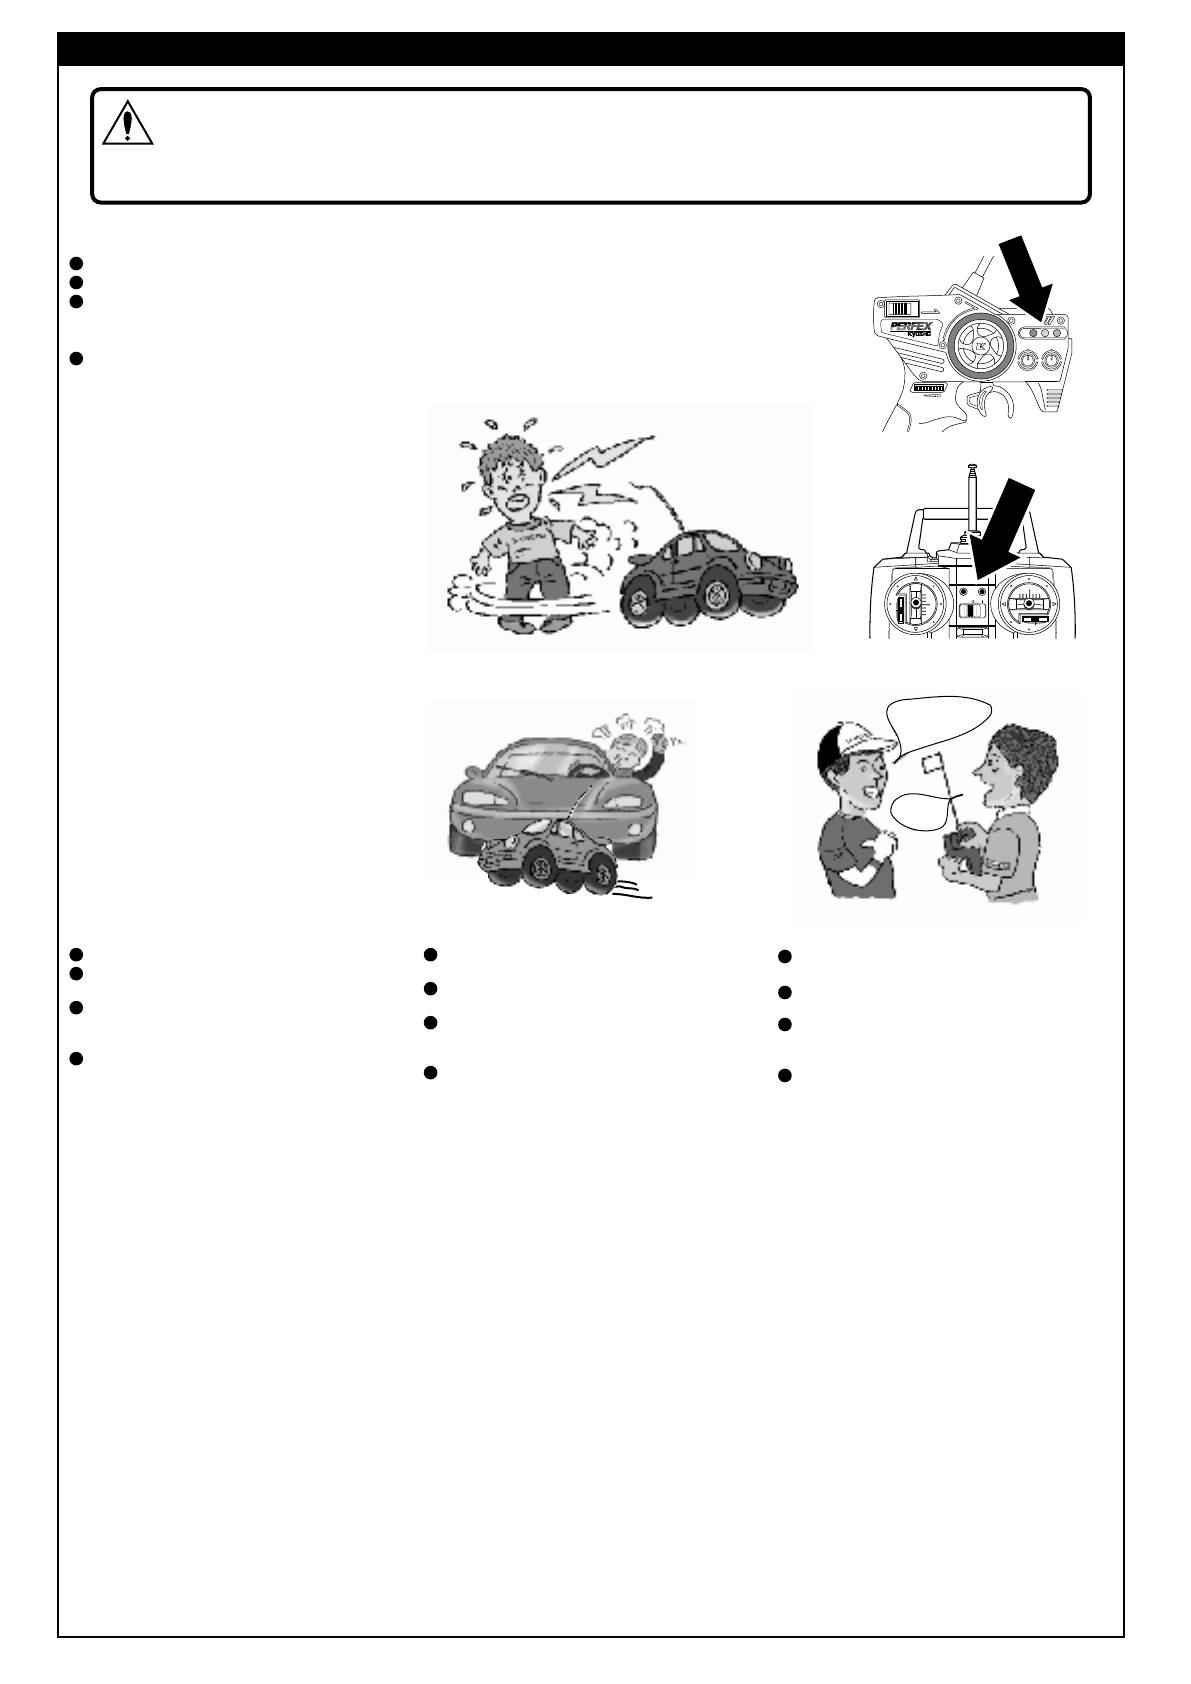
Always check the radio batteries!
Radio reception will be reduced if weak batteries are
used, You may lose control of your car when running
this way and this could lead to accidents.
When the model is behaving strangely . .!
Immediately stop the model and check the reason.
As long as the problem is not cleared, do NOT
operate it! This may lead to further trouble and
unforeseen acci-dents!
WARNING: Do NOT operate the model in the following places and situations: (Non-observance may lead to accidents!)
VORSICHT: Bedienen Sie Ihr Modell niemals an folgenden Orten und unter folgenden Umständen!
ATTENTION: N’utilisez pas votre modèle dans les endroits suivants!
Keep in mind that people around you may
also operate a radio control model!
NEVER share the same frequency with somebody
else at the same time! Signals will be mixed and you
will lose control of your model. This may lead to
accidents!
Bedienen Sie Ihr Modell nur an sicheren und
geräumigen Orten. Bedienen Sie es niemals:
1. auf öffentlichen Straßen!
2. dort, wo sich Leute und Kleinkinder aufhalten!
3. in Wohngebieten und Parks!
4. in engen, begrenzten Orten oder in Räumen!
* Nichtbeachtung kann Verlet-zung von Personen
sowie Sachschäden zur Folge haben!
Überprüfen Sie die Batterien der RC-Anlage!
Sobald die Batterien nachlassen, lassen auch das
Sende- und Empfangvermögen nach. Die Bedienung
Ihres Modelles mit schwachen Batterien kann zum
Ver-lust Ihres Modelles und schweren Unfällen führen!
Wenn Ihr Modell nicht normal funktioniert, . . . :
Unterbrechen Sie die Bedienung augenblicklich und
untersuchen Sie die Ursache. Solange sie nicht
geklärt ist, bedienen Sie niemals Ihr Modell! Das
könn-te schwere Unfälle zur Folge haben!
Bedenken Sie, daß auch andere in Ihrer Umgebung
ein ferngesteuertes Modell bedienen könnten!
Stellen Sie sicher, daß niemand zur selben Zeit die--
selbe Frequenz in Ihrer Umgebung benutzt! Das
kann zum Ver-lust Ihres Model-les sowie zu schweren
Unfällen führen.
Pour éviter tout accident, n’utilisez jamais votre
modèle :
1. à proximité de routes!
2. dans un endroit avec des enfants et promeneurs!
3. à proximité de résidences, d’écoles et d’hôpiteux!
4. à l’intérieur ou dans un endroit étroit!
* Ne pas respecter ces consignes peut entraîner la
perte de votre modèle et avoir des conséquences
fatales.
Quand les piles de la radio sont déchargées:
Si les piles sont insuffisamment chargées, l’émission
et la réception de la radio deviennent faibles.
L’utilisation de votre modèle avec des piles
insuffisamment chargées peut entraîner la perte de
votre modèle ainsi que des accidents graves!
Quand le fonctionnement de votre modèle est étrange:
Arrêtez immédiatement votre modèle et trouvez la
cause. Sinon, vous risquez la perte de votre modèle
ainsi que des accidents graves!
Assurez-vous que personne n’utilise votre fré-
quence au même instant!
N’utilisez jamais la même fréquence que quelqu’un
d’autre. Cela pourrait entraîner la perte de votre
modèle ainsi que des accidents graves!
/ Operating your model safely / Zu Ihrer Sicherheit / Consignes de sécurité
Always run your car with the body shell mounted!
Avoid changing the running direction too often and
too abruptly.
Do not run your car on ground:
• that is overgrown with grass.
• that is muddy, sandy or rocky.
Check all screws, nuts etc. on a regular basis for
looseness.
Bedienen Sie Ihr Auto, nur wenn die Karrosserie
montiert ist!
Wechseln Sie die Fahrtrichtung nicht zu oft oder
zu abrupt.
Vermeiden Sie Gelände, das:
• mit Gras überwachsen ist.
• schlammig, sandig oder steinig ist.
Überprüfen Sie regelmäßig alle Schrauben, Muttern
usw. auf festen Sitz.
N’opérez votre voiture que lorsque la carrosserie
est montée!
Ne changez pas de direction trop brusquement
ou trop fréquemment.
N’opérez pas votre voiture sur du terrain:
• recouvert d’herbe.
• boueux, sableux ou recouvert de pierres.
Vérifiez régulièrement la visserie.
29
/ Operating your model safely / Zu Ihrer Sicherheit / Consignes de sécurité
WARNING: In order to avoid accidents and personal injury, be sure to observe the following:
VORSICHT: Zur Unfall- und Sachschadenvermeidung, beachten Sie bitte auch folgendes:
ATTENTION: Respectez les consignes suivantes afin de faire évoluer votre modèle en toute sécurité:
1.
2.
3.
4.
5.
6.
Do not put fingers or any objects inside rotat-
ing and moving parts!
Right after use, do not touch the engine and
muffler! Danger of burning yourself!
Handling fuel safely:
1. Handle fuel only outdoors!
2. Only use glow fuel for radio control models!
3. Never use fuel indoors or in places with open fires
and sources of heat!
4. Never swallow fuel or let it into your eyes!
5. Store fuel only in cool, dry and dark places out of
children's reach! Tightly shut the cap!
6. Do not dispose of empty fuel cans into a fire! There
is danger of explosion!
Stecken Sie niemals Ihre Finger in bewegende
oder sich drehende Teile.
Nach dem Fahren, fassen Sie niemals den Verbrennungs-
motor und den Schalldämpfer an! Verbrennungsgefahr!
Zum sicheren Gebrauch von Kraftstoff:
1. Kraftstoff nur draußen gebrauchen!
2. Nur Kraftstoff für RC-Modelle gebrauchen!
3. Kraftstoff niemals drinnen oder in der Nähe von
Feuer- und Hitzequellen gebrauchen!
4. Kraftstoff niemals schlucken! Vorsicht auch vor
Kraftstoffspritzer in die Augen!
5. Kraftstoff nur in kühlen, trockenen und dunklen
Orten außer Reichweite von Kindern aufbewaren!
Sorgfältig verschließen!
6. Niemals leere Kanister in ein offenes Feuer werfen!
Explosionsgefahr!
Ne jamais mettre vos doigts dans des parties
en mouvement!
Après utilisage, ne jamais toucher le moteur
et le silencieux! Danger de brûlures!
Consignes de sécurité:
1. Utiliser seulement à l’intérieur!
2. Utiliser seulement pour modèles radio-télécom--
mandés!
3. Ne jamais utiliser à l’intérieur et à proximité d’un
feu ou d’une source de chaleur!
4. Ne jamais avaler! Attention aux projections dans
les yeux!
5. Toujours garder dans un endroit frais, sec et sombre
hors de portée des enfants! Bien visser le capuchon!
6. Ne jamais jeter un bidon vide dans un feu! Danger
d’explosion!
PROHIBITED
VERBOTEN
DEFENDU
PROHIBITED
VERBOTEN
DEFENDU
PROHIBITED
VERBOTEN
DEFENDU
PROHIBITED
VERBOTEN
DEFENDU
30
Glow Plug:
Ignites the compressed air-fuel mixture.
Glühkerze:
Die Glühkerze sorgt für die Zündung
des Treibstoffgemisches.
Bougie à incandescence:
provoque l'explosion du mélange
air-carburant comprimé.
Needle Valve:
Adjusts the amount of fuel
inflow for the mixture.
Düsennadel:
Mit der Düsennadel wird die
Treibstoffmenge reguliert,
die der Motor erhält.
Pointeau:
règle l'arrivée d'essence
dans le carburateur.
Idle Adjustment Screw:
Adjusts the carburetor opening
when idling.
Anschlagschraube für Leerlauf:
Mechanische Justierung für
Leerlaufdrehzahl.
Vis de réglage du ralenti:
règle l'ouverture du carburateur.
Carburetor:
Mixes air and fuel appropriately to control
engine running.
Vergaser:
Der Vergaser regelt das Luft-Treibstoffgemisch.
Carburateur:
mélange l'air et le carburant de manière appropriée.
Recoil Starter:
Starts the engine.
Anreißstarter:
Durch Ziehen am Anreißstarter
wird der Motor gestartet.
Tirrette de démarrage:
assure le démarrage du moteur.
HOW TO HANDLE ENGINES IN GP CARS
ENGINE DESCRIPTION / Der Verbrennungsmotor / Description du moteur
CHECKLIST BEFORE RUNNING / Die Checkliste vor dem Start / Points a verifier avant le demarrage
Throttle Lever:
Adjusts amount of air-fuel mixture
inflow and controls engine rpm.
Drosselküken:
Die Anlenkung des Drosselkükens
wird mit dem Gasservo verbunden.
Levier de gaz:
règle le mélnage air-carburant
et définit le régime moteur.
Engines include many high-precision parts.
If disassembling engines carelessly,
their original performance may be lost!
Ensure all screws are securely tightened.
Ensure all moving parts move without binding.
Are they greased for non-binding movement?
Install an air cleaner. Ensure it is clean and not clogged.
Ensure the fuel lining is proof, with no cracks.
Ensure it is not clogged.
Ensure the muffler and exhaust are damage-free.
Ensure the radio batteries are fresh.
Are they securely installed?
Ensure servos and linkages move without binding.
Ensure the area of operation is safe.
Ensure nobody is on your frequency at the same time.
Assurez-vous que toutes lesvis soien bien serrées.
Assurez-vous que les pièces en mouvement ne cognent rien.
Sont elles bein graissées?
Installez un filtre à air. Assurez-ous qu'il soit propre.
Assurez-vous que les tubes d'arrivée d'essence soient correctement
installés et propres
Assurez-vous que l'échappement ne soit pas endommagé.
Assurez-vous que les batteries soient bien chargées. Sont-elles bien fixées?
Assurez-bous que les servos et leurs connections peuvent être utilisés
sans rien cogner.
Assurez-vous que la piste où vous roule est sûre.
Assurez-vous que personne n'emploie la même fréquence que vous
en même temps.
Überprüfen Sie, ob alle Schrauben festgezogen sind.
Überprüfen Sie, ob alle beweglichen Teile leichtgängig und an
den entsprechenden Stellen gefettet sind.
Ist der Luftfilter richtig montiert?
Achten Sie auf einen knickfreien Verlauf des Treibstoffschlauches im Modell.
Überprüfen Sie, ob der Auspuff fest am Motor montiert ist.
Überprüfen Sie, ob die Akkus / Batterien für die RC-Anlage geladen / frisch sind.
Überprüfen Sie, ob die Servoanlenkungen sich leichtgängig bewegen können.
Achten Sie darauf, daß das Gelände für den Betrieb Ihres Modells geeignet ist.
Achten Sie auf eine Frequenzkontrolle!
Der Motor enthält viele empfindliche Präzisionsteile.
Achten Sie beim Zerlegen und Zusammenbau darauf,
daß Sie alle Teile richtig montieren! Andernfalls kann
der Motor beschädigt werden!
Le moteur est compose de nombreuses pieces de haure
precision. Si vous ne le demontez pas soigneusement.
les perrormances pourraient s'en ressentir!
31
Place the car on top of a stand
with the wheels aloof from the ground.
Bocken Sie das Fahrzeug so auf,
daß sich alle Räder frei drehen können.
Placez votre modèle sur un support,
les roues n'ayant pas
de contact avec le sol.
1
Start the engine as specified in the chapter < ENGINE STARTING >.
Starten Sie den Motor, wie zuvor beschrieben.
Démmarrez le moteur comme indiqué dans le chapitre
'DEMARRAGE DU MOTEUR'
2
Move the throttle control to slow.
Lassen Sie den Motor mit mittlerer Drehzahl und fetter Einstellung laufen.
Baissez le stick de gaz.
Move the throttle trim up, ensuring the engine
will not stall.
Kontrollieren Sie die Drehzahl am Gasknüppel.
Relevez le stick de gaz, pour que lo moteur ne
cale pas.
The break-in is necessary to "prepare" brandnew engines to regular
and smooth running! If you fail to break-in an engine, the lubricating
oil inside does not circulate and the engine will be caked with burns;
running becomes difficult and engine life is shortened.
Neue Motoren müssen generell eingelaufen werden. Ohne diese
Einlaufphase entwickeln die Motoren nicht ihre volle Leistung und
lassen sich nur schwer einstellen. Es besteht eine erhebliche
Beschädigungsgefahr des Motors.
Le redage est necessaire pour preparer les nouveaux moteurs a une
utilisation reguliere et sans problemes. Si bous ne rodezs pas votre moteur,
le graissage de votre moteur ne se fera pas correctement. L'utilisation
sera difficile et la duree de vie de votre moteur en sera raccourgie.
10
Run the engine 10 tanks to complete the break-in.
Nach 10 Tankfüllungen ist der Einlaufprozeß vollendet.
Pour terminer le rodage,faites evoluer votre modele ainsi pendant
10 pleins.
4
1 3/4
The needle valve setting for normal engine running lies between
1 and 3/4 turns screwed out from closed position.
Screwing it further in ,excessive heat may be generated.
Die Düsennadeleinstellung für den normalen Betrieb des Motors l
iegt bei ca. 1,4 Umdrehungen.
LL faut dévisser le pointeau d'1 tour 3/4 (après l'avoir vissé
complètement) pour obtenir un règlage normal du moteur.
D'autres règlages peuvent entrainer une surchauffe du moteur.
5
10 20
Next, continue performing the break-in
while running the car. Always screw in
the needle valve 10 to 20° at a time in
order not to damage the engine.
Lassen Sie nun den Motor beim Betrieb
des Modells weiter einlaufen.
Schließen Sie die Düsennadel mit jeder
Tankfüllung in kleien Schritten,
bis der Motor seine volle Leistung abgibt.
Ensuite,continuez le rodage en fasant evoluer votre modele.
Revissez le pointeau de 10 a 20 chaque fois,
pour ne pas abimer votre moteur.
3
At this moment, do not tighten the needle valve any further.
Regeln Sie mit der Düsennadel den Motor so ein, daß er sehr fett läuft.
A ce moment, ne serrez plus le pointeau.
During the break-in, do not operate the engine with
high rpm! Serious damage may be the result.
Während der Einlaufphase muß der Motor sehr fett
eingestellt sein. Vermeiden Sie hohe Drehzahlen,
Beschädigungsgefahr!
Pendant le rodage,ne faites pas monter le moteur
en regime. Les conséquences pourraient être graves!
CAUTION
WICHTIG
ATTENTION
Needle Valve
Düsennadel
Pointeau
/ BREAK IN / Lassen Sie den Motor einlaufen / Rodage
For stopping the engine, squeeze the air cleaner.
Zum Stoppen des Motors wird der Luftfilter zusammengedrückt.
Pour arreter le moteur,exercez une pression sur le filtre a air.
8
After stopping the engine, first switch off the receiver, then
the transmitter.
Nach Abstellen des Motors erst den Empfänger, dann den
Sender ausschalten.
Après avoir arrêté le moteur, éteignez d'abord le récepteur,
ensuite l'émetteur.
9
OFF
OFF
The engine and muffler get hot! Do not touch
them during and right after operation!
Der Motor und der Auspuff werden sehr heiß.
Nicht berühren, Verletzungsgefahr!
Le moteur et l'echappement sont tres chauds!
Ne les touchez pas pendant ou juste après l'utilisation.
WARNING
VORSICHT
ATTENTION
33
The engine does not start.
Der Motor springt nicht an
Le moteur ne démarre pas
The recoil starter is difficult to pull.
Der Anreißstarter läßt sich
nicht betätigen.
La tirette de demarreur resiste.
Overchoked.
(The cylinder is flooded with fuel.)
Der Brennraum ist mit Treibstoff gefüllt.
Le cylindre est plein de carburant.
The engine starts but
immediately stalls.
Der Motor springt an und
geht wieder aus.
Lemoteur demarre mais
cale immediatement.
Fuel does not get into the carburetor.
Der Motor bekommt keinen Treibstoff
Le carburant n'arrive pas au carburateur
The glow plug is not heated.
Die Glühkerze glüht nicht
Labougie ne chauffe pas
Wrong carburetor setting.
Falsche Vergasereinstellung
Mauvais reglage du carburateur
Push the primer button for priming the carburetor.
Drücken Sie den Pumpknopf, um Treibstoff zu fördern.
Pressez sur un bouton d'amoucage
Check if the glow plug heater is correctly connected.
Überprüfen Sie den Anschluß des Glühkerzenakkus
Verifiez le chauffe bougie
Replace with fresh batteries or recharge the Ni-Cd
battery.
Laden Sie den Glühkerzenakku auf.
Rechargez ou remplacez l'accu de chauffe bougie
Replace with a new glow plug.
Tauschen Sie die Glühkerze.
Remplacez la bougie
Read the instruction manual again and reset.
Nehmen Sie erneut die Grundeinstellung vor.
Relisez le chapitre concernant les règlages du
carburateur.
Remove the glow plug and vigorously pull the recoil
starter to expel excess fuel.
Schrauben Sie die Glühkerze heraus und ziehen Sie
den Anreißstarter kräftig durch, damit überschüssiger
Treibstoff austritt.
Enlevez la bougie et tirez le démarreur pour expulser
l'excédent.
Replace with a new recoil starter.
Tauschen Sie den Anreißstarter aus.
Remplacez la tirette.
Fill in fuel.
Betanken Sie das Modell.
Remplissez se réservoir.
Clean the fuel filter and air cleaner, or replace them.
Reinigen Sie Luft- und Treibstoffilter.
Nettoyez les filtres ou remplacez-les.
Thoroughly cool the engine, unscrew the needle valve
30 and start the engine again.
Lassen Sie den Motor abkühlen, stellen Sie die
Düsennadel etwas fetter.
Laissez le moteur refroidir, dévissez le pointeau d'1/4
de tour et redémarrez.
Replace with a new glow plug.
Tauschen Sie die Glühkerze.
Remplacez la bougie.
Read the instruction manual again and reset.
Nehmen Sie erneut die Grundeinstellung vor.
Relisez le chapitre concernant les règlages de
carburation.
No fuel.
Motor hat keinen Treibstoff.
Pas de carburant.
The fuel filter and air cleaner are clogged.
Treibstoff- oder Luftfilter sind verschmutzt.
Le filtre à air et/ou à carburant sont bouchés
Overheated.
Motor überhitzt.
Température trop élevée.
The glow plug is defective.
Glühkerze defekt.
La bougie est morte.
Wrong carburetor setting.
Falsche Vergasereinstellung.
Mauvais règlage du carbu.
The recoil starter is damaged.
Der Anreißstarter ist defekt.
Le système est endommage.
PROBLEM CAUSE
REMEDY
THE ENGINE DOES NOT START OR IMMEDIATELY STALLS / Der Motor zundet nicht oder geht sofort wieder aus
Le moteur ne demarre pas ou cale immediatement
35
38
No. Part Names
No.
Quantity
FOR JAPANESE MARKET ONLY.
No. Part Names
No.
Quantity
Some of the parts included are not available as spare parts. Purchase
optional parts instead.
200200
SPARE PARTS
500
500
600
600
500
500
400
600
700
400
500
900
600
600
600
400
300
300
300
300
400
400
300
400
2000
500
400
800
350
600
450
300
400
550
500
700
VZ001
VZ002
VZ003
VZ004
VZ005
VZ006
VZ007
VZ008B
VZ009
VZ010
VZ011
VZ012
VZ013
VZ014
VZ015
VZ016
VZ017
VZ018
VZ019
VZ020
VZ021
VZ022
BK
VZ023
VZ030
VZ033
VZ034
VZ035
VZ036
VZ039
VZ040
VZ041
VZ087
VZ038
BS107
BS125
VZ071
Front Bulkhead
Rear Bulkhead
Front Suspension Arm Set
Rear Suspension Arm Set
Front Knockle Arm
Rear Upright
Bumper
Pulley Set
Differential Pulley Set
Drive Washer Set
Shock Stay Set
Differential Gear Set
Wheel Shaft
Swingshaft
Differential Joint
Front Lower Suspention Shaft
Front Upper Suspention Shaft
Rear Lower Suspention Shaft
Front Suspension Plate
Brake Shaft Set
Differential Packing
Urethane Bumper (Black)
Brake Disk
S
Center Parts (for V-One S)
S
Main Chassis (for V-One S)
S
Spur Gear Shaft (for V-One S)
S
Middle Shaft (for V-One S)
S3-396
Drive Belt S3-396
Upper Deck
/
Receiver Box / Plastic Parts
Rod Set
Muffler Stay
46T S
Spur Gear 46T (for V-One S)
Bevel Shaft
Clutch Shoe
192
Drive Belt 192
63 64 65
x 1
23 24
x 1
83 84
x 1
x 8
x 4
70 72 74 75 7673
x 1
77
x 3
71
x 2
2 3 54
88 89
x 1
1
14
x 2
82
x 4
81 86
x 2
36 3938
x 4
41 4342
x 1
30
x 4
28 29
x 1
55 5856
x 1
92
x 2
93 9491
x 1
161
127 123 126124
x 1 x 2
144143
x 2
90
x 1
160
x 1
162 163 164 165 166 167
x 1
12
x 2
106
x 1
105
x 2
7
10 11
x 4 6 9 x 8
97 98
100
99
x 1
101
x 4
31 32 3533
x 2
34
x 4
13 44
x 2
53
x 2
8
13
x 2
50
x 2
E E5
E-ring (E5)
x 1
x 2
E E5
E-ring (E5)
x 2
51
x 2
87
x 2
52
x 1
66 69
x 1
14
x 5
59
x 1
79
x 1
78
x 1
13
x 4
96
x 1
13
x 2
25
x 1
27
x 1
80
x 1
169
x 3
2.6x8mmTP
2.6x8mm TP Flat Head Screw
2x8mmTP
2x8mm TP Bind Screw
3x3mm
3x3mm Set Screw
113
112
x 2
2.6x25mm
2.6x25mm Screw
400
250
300
500
400
300
FT22
FZ74
FZ75
FM317
B
GT5
LA43
Body Mount
9mm
9mm Pillow Ball
9mm
9mm Pillow Ball Nut
10
Servo Saver (10)
Pilot Shaft
5.8mm
5.8mm Ball End
62
x 4
60 61
x 2
22
x 2
46
x 3
45
x 3
104
19 20 21
x 1
107 108 110
x 1
170 171
x 1
18
x 1 set
16
x 12
580LD70
Clutch Bearing
Muffler Joint Pipe
Slick Tire (high grip)
16T
Clutch Bell (16T)
75cc
75cc Fuel Tank
Flywheel
350
800
250
250
92601
BK
OT32
RM11
W5018
5.8mm
5.8mm Ball
AB15
Air Filter (AB15)
O
O-ring Set
130
x 2
850
600
1000
600
92442
92071
92301
92070
45mm
Adjustable Turn Buckle (45mm)
92032
Silent Streak Muffler
92971
Engine Plate
GS15-R
GS15-R Engine (Recoil Starter)
S
Manifold (for V-One S)
Muffler Gasket
74901
-12
109
103
17
x 10
54
x 4
2 set
146
x 5
49
x 8
1200
200
200
W5161
1180
1284
SS
Racing Shock SS
4mm
4mm Flanged Nylon Nut
5.8mm
5.8mm Pillow Ball (Silver)
250
1701
KP/KY
M
Fluorescent Strap (M)
135
x 18
180
1700
KP/KY
S
Fluorescent Strap (S)
134
x 18
500
400
1705
1790
Color Antenna (White)
Color Silicone Tube
133
x 6
128
x 2
250
150
1808
1879
6591
39057
74901
Rod Stopper
Hobby Grease
126
x 5
400
13000
1600
200
1200
111
x 1
102
x 1 set
113
x 5
x 1
x 1 set
129
x 1 set
300
15
x 2
30092051
2x11mm
2x11mm Pin
13
x 10
168
x 1
400
1000
1800
1200
92985
BRG006
BRG008
BRG014
Hard Brake Pads
6x12x4mm) 2
Shield Bearing (6x12x4mm) 2pcs.
12x18x4mm) 2
Shield Bearing (12x18x4mm) 2pcs.
10x15x4mm) 2
Shield Bearing (10x15x4mm) 2pcs.
67
x 4
48
x 2
300
500
92696
92841
Brake Pad
6.8mm
6.8mm Flanged Ball
68
x 2
85
x 10
400
200
ORG05
92638
O P5/
Silicone O-ring (P5/Orange) 10pcs.
Snap Pin
11
x 10
145
x 10
26
x 2
47
x 2
39
No. Part Names
No.
Quantity
1500
1500
4800
4800
1400
3800
3600
3600
500
1800
800
850
1800
900
800
700
700
1500
500
700
2000
800
900
1200
VZW005
VZW006
VZW003
VZW004
56410
71161
73201
73401
80311
80312
80411
87651
94402
96153
96421
96422
SP S
Special Main Chassis (for V-One S)
2 S
2-Speed Transmisson Set (for V-One S)
3500
VZW007
S
Carbon Upper Plate (for V-One S)
V-One
V-One Rear Stabilizer Set
V-One
V-One Front Stabilizer Set
1000
7500
1300
2800
VZW010
VZW011
VZW008
VZW009
Drive Washer Set
Cooling Fan Set
900
VZW014
SP 192
SP Rear Belt (192)
1700
VZW015
VZW019
VZW020
VZW021
VZW028
VZW030
VZW031
VZW032
VZW036
VZW037
VZW038
SP
SP Brake Disk
400
800
1800
2000
1800
6400
1700
2500
3500
1100
1300
1300
1500
1200
92986
Soft Brake Lining
S
Special Roll Bar (for V-One S)
Aluminum Hard Diff Case
Front Oneway Shaft (for V-One S)
Rigid Axle
LSD
LSD Gear Set
Precision Camber Gauge
6V X-FORCE 600
6V X-FORCE 600 NiCd-Battery
Super Starter Pack
BP
BP Fuel Peak Power
74902
GS
GS Glow Plug
Taper Reamer
&
Locking Jig & Wrench
5mm
Ball-Point Hex Wrench 5mm
Maintenance Stand
Loctite (medium strength)
Screw Rescuer
FOR JAPANESE MARKET ONLY.
No. Part Names
No.
Quantity
96405
Power Cleaner
1000
800
450
800
1600
3800
96625
96508
96046
96152
96981
SP
SP Bearing Liquid
HG
HG Joint Grease
6mm
6mm Shim Set
Silicone Seal
Molybdenum Coat
APP02
APP Brake Set
200 200
Handy to drill holes for body mount.
R/C
0.1 0.2 0.3 10
45
Includes 2pcs. Replacement for 15 .
Stops loosing screw
VZW007
Use with VZW007.
VZ079, FM314
Use with VZ079, FM314.
VZW024V
VZW024V
-8
VZW034
-45
64 Ti / 9mm Ball Screw
64 Ti / Middle Shaft
64 Ti / Spur Gear Shaft
64 Ti / Swingshaft (45)
64 Ti / Front Lower Suspention Shaft
64 Ti / Front Upper Suspention Shaft
64 Ti / Rear Lower Suspention Shaft
SP Aluminum Rear Shock Stay
Aluminum Drive Poller & Double Disk Holder
71 73 74
45
87
50
51
53
80
73
96
78
100
Includes 10pcs each 0.1, 0.2, 0.3
For quick charge!
Instant Glue
Support to unscrew.
96154
KYOSHO Special Glue
96155
Kyosho Special Primer (220ml)
For quick charge!
Retrieves potentiality of Bearing.
250cc
Quick Fill Fuel Bottle (250cc)
500cc
Quick Fill Fuel Bottle (500cc)
695036
695037
92415
92491
46mm
Titanium Adjust Rod 46mm
S
On-road Spring Set (S)
, 2
2.4x6x1000mm
15
Use together.
Ni-Cd battery for Receiver
Glow fuel for R/C Engine
120080151
Tire Fitting Tool
180080152
200mm
Toe Angle Gauge (200mm)
Convenient stand for work
OPTIONAL PARTS (1)
80092022
Multi Ride Height Gauge
92050
75cc
Fuel Tank (75cc Plate)
1600
92211
Shock Spring Dial Adjuster
400
92212
Rear Wing Spacer
92213
Fuel Tube
2800
4200
3800
39673
¨
Vespel
¨
Clutch Shoe
VZ068
VZ075
45
Adjustable Rod (45)
V-One
V-One Shock
V-One , 2
V-One , 2
V-One , 2
V-One , 2
V-One , 2
V-One , 2
49
, 2
Includes 2pcs. Replacement for 15 .
15
Use it with following parts.
Replacement for
49
For V-One shock, Includes 2pcs (Hard)
For V-One shock, Includes 2pcs (Medium)
For V-One shock, Includes 2pcs (Soft)
For V-One shock, Includes 2pcs (Medium)
For V-One shock, Includes 2pcs (Hard)
UM128
VZ072
-2517
VZ072
-3017
VZ072
-3517
VZ073
-3516
VZ073
-4016
VZ073
-4516
4.8mm
4.8mm Ball Stud
2.5x1.7
Front Spring (2.5x1.7) Gold
3x1.7
Front Spring (3x1.7) Black
3.5x1.7
Front Spring (3.5x1.7) Silver
3.5x1.6
Rear Spring (3.5x1.6) Gold
4x1.6
Rear Spring (4x1.6) Black
4.5x1.6
Rear Spring (4.5x1.6) Silver
500
3200
400
400
400
400
400
400
400
400
900
500
450
700
VZ077
W0136
W0141
W0154
FM337
9mm
9mm Ball Screw
&
86
, 10
17
, , 10
30
101
, 10
85
20
Upper Rod (20)
5.8mm
5.8mm Hard Ball
3mm
3mm Tapered Washer
6.8mm 3mm
6.8mm Flanged Hard Ball (w/3mm hole)
Replacement for
86
High precision and intencity
Includes 10pcs. Replacement for 17
Includes 10pcs. Replacement for 85
Includes 10pcs. Replacement for 30 101
1300
TSW4
Brake Disk Holder
500
6800
1708
1776
Pit Box
/ 420x240x330mm
Size / 420x240x330mm
Color Antenna (Black Cap)
1000
1000
1000
5000
2000
1000
2500
650
1829
1948
73001
39064
39070
39308
FD49
39648
&
Hobby Shears & Sander
Air Cleaner Oil
BP
Glow Fuel
Tuned Silencer (Nipple)
Manifold (for Side)
CZ
Flywheel CZ
Special Engine Mount
OS
M
Fuel Filter (M)
Handy tool for round cut
Use together for O.S. Engine
82
31 51
67 68 79
40
FOR JAPANESE MARKET ONLY.
200 2002500
1000
2500
1200
2500
1000
2500
1200
39171
CLK DTM
Mercedes CLK DTM Body Shell
, , ,
Body, Decals, Wing Spoiler, Masking Sheet
Body Decals, Sponsor Decals
Body, Decals, Masking Sheet
Body Decals, Sponsor Decals
Body, Decals, Wing Spoiler, Masking Sheet
39171
-1
D2
Sponsor Decal (Mercedes D2)
39172
NSX
Castrol NSX Body Shell
, , ,
39172
-1
NSX
Sponsor Decal (Castrol NSX)
39173
C5-R
Corvette C5-R Body Shell
, , ,
39173
-1
C5-R
Sponsor Decal (Corvette C5-R)
39179
GT-R
CALSONIC SKYLINE GT-R Body Shell
, ,
39179
-1
GT-R
Sponsor Decal (CALSONIC GT-R)
200
400
800
200
1100
1100
1100
92012
BK
24 15 /
Aero 24 Wheel (15-spoke / black)
24mm
92012
-8W
24 15 / 8
Aero 24 Wheel (15-spoke / 8 pcs)
24mm
92013
24M 24mm
Inner Foam 24M (24mm)
24mm
92014
-35B
V M-35MN
V Slick Tire M-35MN
24mm
92014
-30B
V M-30MN
V Slick Tire M-30MN
24mm
92014
-25B
V M-25MN
V Slick Tire M-25MN
24mm
,
2500
2500
2500
1800
39241
VAUXHALL ASTRA Body Shell
, , ,
Body, Decals, Wing Spoiler, Masking Sheet
Body Decals, Sponsor Decals
39241
-1
Sponsor Decal (
VAUXHALL ASTRA
)
,
Body Decals, Sponsor Decals
Sponsor Decal (au CERUMO SUPRA 2002)
*No.39184 Castrol TOM'S SUPRA Body Shell is same as "au CERUMO SUPRA 2002 Body Shell".
,
2500
2000
2000
39242
MUGEN NSX 2002 Body Shell
, , ,
Body, Decals, Wing Spoiler, Masking Sheet
39247
PLUS e TAISAN ADVAN PORSCHE 911 GT3R Body Shell
, , ,
Body, Decals, Wing Spoiler, Masking Sheet
Body Decals, Sponsor Decals
39242
-1
39243
-1
Sponsor Decal (MUGEN NSX 2002)
,
,
,
,
2500
1000
Body, Decals, Masking Sheet, Plastic Parts
Body Decals, Sponsor Decals
39174
ZERO
ZERO McLaren Body Shell
, , ,
39174
-1
ZERO
Sponsor Decal (ZERO McLaren)
,
200
400
400
500
400
400
400
500
1000
1000
1000
92445
B
Color Wheel (mesh / black)
26mm
Width 26mm
400
Color Wheel (mesh / white)
26mm
Width 26mm
Width 24mm
Width 24mm
Width 24mm
Width 24mm
Width 24mm
1100
92014
-40
V M-40MN
V Slick Tire M-40MN
24mm
Width 24mm
1200
1200
1200
92141
-24B
G #24
G Slick Tire #24
24mm
92141
-27B
G #27
G Slick Tire #27
24mm
92141
-30
G #30
G Slick Tire #30
24mm
1200
92141
-33
G #33
G Slick Tire #33
24mm
Width 24mm
Width 24mm
Width 24mm
Width 24mm
1200
92141
-36
G #36
G Slick Tire #36
24mm
Width 24mm
For 24mm width tires.
Width 26mm
Width 26mm
Width 26mm
Width 26mm
Width 26mm
Width 26mm
Width 26mm
Width 26mm
Width 26mm
92445
G
Color Wheel (mesh / gunmetallic)
26mm
92445
S
Color Wheel (mesh/silver chrome)
26mm
92445
KO
Color Wheel (mesh / F.Orange)
26mm
92561
92445
5 /
Wheel (5-spoke / white)
26mm
92561
BK
5 /
Wheel (5-spoke / black)
26mm
92561
G
5 /
Wheel (5-spoke / gold)
26mm
92442
-25
Slick Tire (high grip type)
26mm
92442
-30
Slick Tire (high grip type)
26mm
92442
-40
Slick Tire (high grip type)
26mm
No. Part Names
No.
Quantity
No. Part Names
No.
Quantity No. Part Names
No.
Quantity
No. Part Names
No.
Quantity
200
No. Part Names
No.
Quantity
WHEEL / TIRE
FOR JAPANESE MARKET ONLY.
BODY SHELL
FOR JAPANESE MARKET ONLY.
OPTIONAL PARTS (2)
1600
695019
Differential Gear Torque Gauge
1200
695030
18T V-One
Aluminum Drive Pulley 18T (V-One)
1200
695031
19T V-One
Aluminum Drive Pulley 19T (V-One)
1600
695032
27T V-One
Aluminum Drive Pulley 27T (V-One)
2000
695034
32T V-One
Aluminum Drive Pulley 32T (V-One)
2600
695035
V-One
V-One Brake Bracket & Stiffener
400
92012
W
24 15 /
Aero 24 Wheel (15-spoke / white)
24mm
Width 24mm
Body Decals, Sponsor Decals
Sponsor Decal (ESSO Ultraflo Supra)
*No.39184 Castrol TOM'S SUPRA Body Shell is same as "ESSO Ultraflo Supra Body Shell".
,
39250
-1
200
No. Part Names
No.
Quantity
1000
BRG003
4x8x3mm)
Shield Bearing (4x8x3mm)
695015
Power Universal Shaft
Swing Shaft
2800
900
950
3800
695018
Active Differential Gear Set
2500
74901
-14BL
695015
-1
Wheel Shaft
695015
-2
SP GS-15R
SP Cylinder Head (GS-15R)
Body Decals, Sponsor Decals
Sponsor Decal (PLUS e TAISAN ADVAN PORSCHE 911 GT3R)
,
2200
39247
-1B
2500
39249
CLK DTM 2002 AMG
CLK DTM 2002 AMG Mercedes Body Shell
, , ,
Body, Decals, Wing Spoiler, Masking Sheet
Body Decals, Sponsor Decals
CLK DTM 2002 AMG
Sponsor Decal (CLK DTM 2002 AMG Mercedes)
,
2000
2500
2000
39249
-1
2500
2000
39184
Castrol TOM'S SUPRA Body Shell
, , ,
Body, Decals, Wing Spoiler, Masking Sheet
Body Decals, Sponsor Decals
39184
-1
Sponsor Decal (Castrol TOM'S SUPRA)
,
41
1390
1147
1148
1149
1150
2.6x6 2.6x8 2.6x10 2.6x12
3x6 3x8 3x10 3x12 3x14
3x15 3x16 3x18 3x20
4x15 4x20 4x25
1153
1154
1157
3x6 3x8 3x10
4x8 4x10 4x12
2x8 2x10
1160
1161
1162
1163
1164
3x6 3x12 3x14 3x16
3x3 3x4 3x5 3x10
4x4 4x5 4x8 4x12
5x4 5x5 5x6
5x30 5x40
1171
1172
1174
1175
1177
1178
1179
1180
Flanged Cap Screw
Set Screw
Flanged Nut
1185
1186
1380
E
E-Clips
Nylon Nut
Flanged Nylon Nut
Washer
1381
1382
1383
1384
1385
1386
1387
E10.0
2mm 2.6mm
3mm 4mm
3mm
4mm
2.6mm
3mm
4mm
4mm
2mm 2.6mm 3mm
4mm 5mm
E1.5
E2.0
E2.5
E3.0
E4.0
E5.0
E6.0
E7.0
FOR JAPANESE MARKET ONLY.
1101
1102
1103
1104
1105
1106
2x6 2x8 2x10 2x15 5 each 10 each
10 each
10 pcs
10 pcs
10 each
10 each
10 pcs
10 pcs
10 pcs
10 pcs
10 pcs
10 pcs
10 pcs
2.6x8 2.6x10 2.6x12 2.6x14
3x4 3x6 3x8 3x10 3 x12
3x14 3x16 3x18 3x20
4x6 4x8 4x10 4x12
3x22 3x24 3x26 3x28
5 each
5 each
5 each
5 each
5 each
5 each
5 each
5 each
5 each
5 each
5 each
5 each
2 each
2 each
2 each
2 each
2 each
2 each
2 each
2 each
5 each
5 each
5 each
5 each
5 each
1110
1111
1112
1113
1114
1115
2.6x4 2.6x6 2.6x8 2.6x12
3x4 3x6 3x8 3x10 3x12
3x14 3x16 3x18 3x20
4x6 4x8 4x10 4x12
3x22 3x25 3x28 3x30
4x15 4x18 4x20 4x22
1118
1119
1120
1121
1122
1123
2.6x8 2.6x10 2.6x12 2.6x14
3x6 3x8 3x10 3x12
3x14 3x16 3x18 3x20
4x8 4x10 4x15 4x20
3x22 3x24 3x26 3x28
3x30 3x32 3x34 3x35
1124
1125
1126
1127
1128
1129
1130
1131
2x8 2x10 2x12 2x14
2.6x8 2.6x10 2.6x12 2.6x14
3x8 3x10 3x12 3x14
3x15 3x16 3x18 3x20
3x25 3x30 3x35 3x40
4x10 4x15 4x20
4x25 4x28 4x30
4x35 4x40 4x45
Bind Screw
Flat Head Screw
Cap Screw
Round Head Screw Nut
200 200
200
200
200
150
200
200
200
200
200
200
200
200
200
200
1132
Round Head Self-Tapping Screw
1133
1134
1135
1136
1137
2x4 2x6 2x8 2x10 5 each
5 each
5 each
5 each
5 each
5 pcs
5 pcs
5 pcs
5 pcs
6 pcs
6 pcs
5 each
5 each
5 each
3 each
3 each
3 each
3 each
3 each
5 each
5 each
2 each
2 each
10 each
5 each
5 each
5 each
5 each
2.6x6 2.6x8 2.6x10 2.6x12
3x6 3x8 3x10 3x12 3x14
3x15 3x16 3x18 3x20
3x25 3x30 3x35
2.6x14 2.6x15 2.6x16 2.6x18
Bind Self-Tapping Screw
Flat Head Screw
1140
1141
1142
1143
2.6x6 2.6x8 2.6x10 2.6x12
3x6 3x8 3x10 3x12 3x14
3x15 3x16 3x18 3x20
4x10 4x15 4x18
No.
mm
Size (mm) No.QUANTITY QUANTITY
1165 3x20 3x25 3 each
No.
mm
Size (mm) QUANTITY
Flat Head Self-Tapping Screw
mm
SCREW NUT etc.
Oil
FOR JAPANESE MARKET ONLY.
No. Part Names
Content
600
600
600
600
600
600
600
600
SIL0100
SIL0150
SIL0200
SIL0250
SIL0300
SIL0350
SIL0400
SIL0450
SIL0500
SIL0550
SIL0600
SIL0700
SIL0800
SIL0900
SIL1000
SIL1100
SIL1200
100
Silicone Oil #100
150
Silicone Oil #150
200
Silicone Oil #200
250
Silicone Oil #250
300
Silicone Oil #300
350
Silicone Oil #350
400
Silicone Oil #400
450
Silicone Oil #450
200
For Shock setting
For Shock setting
For Shock setting
For Shock setting
For Shock setting
For Shock setting
For Shock setting
For Shock setting
600
900
Silicone Oil #900 For Shock setting
600
600
600
600
600
500
Silicone Oil #500
550
Silicone Oil #550
600
Silicone Oil #600
700
Silicone Oil #700
800
Silicone Oil #800
For Shock setting
For Shock setting
For Shock setting
For Shock setting
For Shock setting
200
No. Part Names
No.
Quantity
600
600
50000
Silicone Oil #50000
100000
Silicone Oil #100000
For Differential Gear setting
600
40000
Silicone Oil #40000
For Differential Gear setting
600
30000
Silicone Oil #30000
For Differential Gear setting
600
600
600
600
SIL5000
SIL6000
SIL7000
SIL10000
SIL30000
SIL40000
SIL50000
SIL100000
5000
Silicone Oil #5000
6000
Silicone Oil #6000
7000
Silicone Oil #7000
10000
Silicone Oil #10000
For Differential Gear setting
600
600
600
1000
Silicone Oil #1000
1100
Silicone Oil #1100
1200
Silicone Oil #1200
For Shock setting
For Shock setting
For Shock setting
R
THE FINEST RADIO CONTROL MODELS
243-0034 153
046-229-4115
( ) 10 00 18 00
PRINTED IN JAPAN61920305-1
http://www.kyosho.co.jp/
  • Page 1 1
  • Page 2 2
  • Page 3 3
  • Page 4 4
  • Page 5 5
  • Page 6 6
  • Page 7 7
  • Page 8 8
  • Page 9 9
  • Page 10 10
  • Page 11 11
  • Page 12 12
  • Page 13 13
  • Page 14 14
  • Page 15 15
  • Page 16 16
  • Page 17 17
  • Page 18 18
  • Page 19 19
  • Page 20 20
  • Page 21 21
  • Page 22 22
  • Page 23 23
  • Page 24 24
  • Page 25 25
  • Page 26 26
  • Page 27 27
  • Page 28 28
  • Page 29 29
  • Page 30 30
  • Page 31 31
  • Page 32 32
  • Page 33 33
  • Page 34 34
  • Page 35 35
  • Page 36 36
  • Page 37 37
  • Page 38 38
  • Page 39 39
  • Page 40 40
  • Page 41 41

Kyosho 31122 取扱説明書

カテゴリー
リモコンのおもちゃ
タイプ
取扱説明書
このマニュアルも適しています