Tamiya Alpine A110 ユーザーマニュアル

タイプ
ユーザーマニュアル

Tamiya Alpine A110は、M-06S(ショートホイールベース210㎜)、M-08S(ショートホイールベース210㎜)のシャーシに使用できるボディーです。一部塗装済み、加工済みの場合もあります。

穴を開ける際は、ピンバイスで小さな穴を開け、リーマーで指示の大きさに穴を広げます。

ボディを切り取る際は、ハサミとカッターナイフを使い分けるときれいに切り取れます。

ボディを塗装する際は、ポリカーボネート用塗料を内側から使用します。プラスチック部品の塗装にはプラスチック用塗料を使用します。

マーキングを貼る際は、保護フィルムをはがし、ステッカーを番号順に貼ってください。

リヤボディパーツとフロントボディパーツを取り付け、ボディを取り付ければ完成です。

ITEM 51690
51690 Alpine A110 Jaeger Body (11057541)
0722 ©2022 TAMIYA
Some bodies may be pre-painted or have other work already carried out.
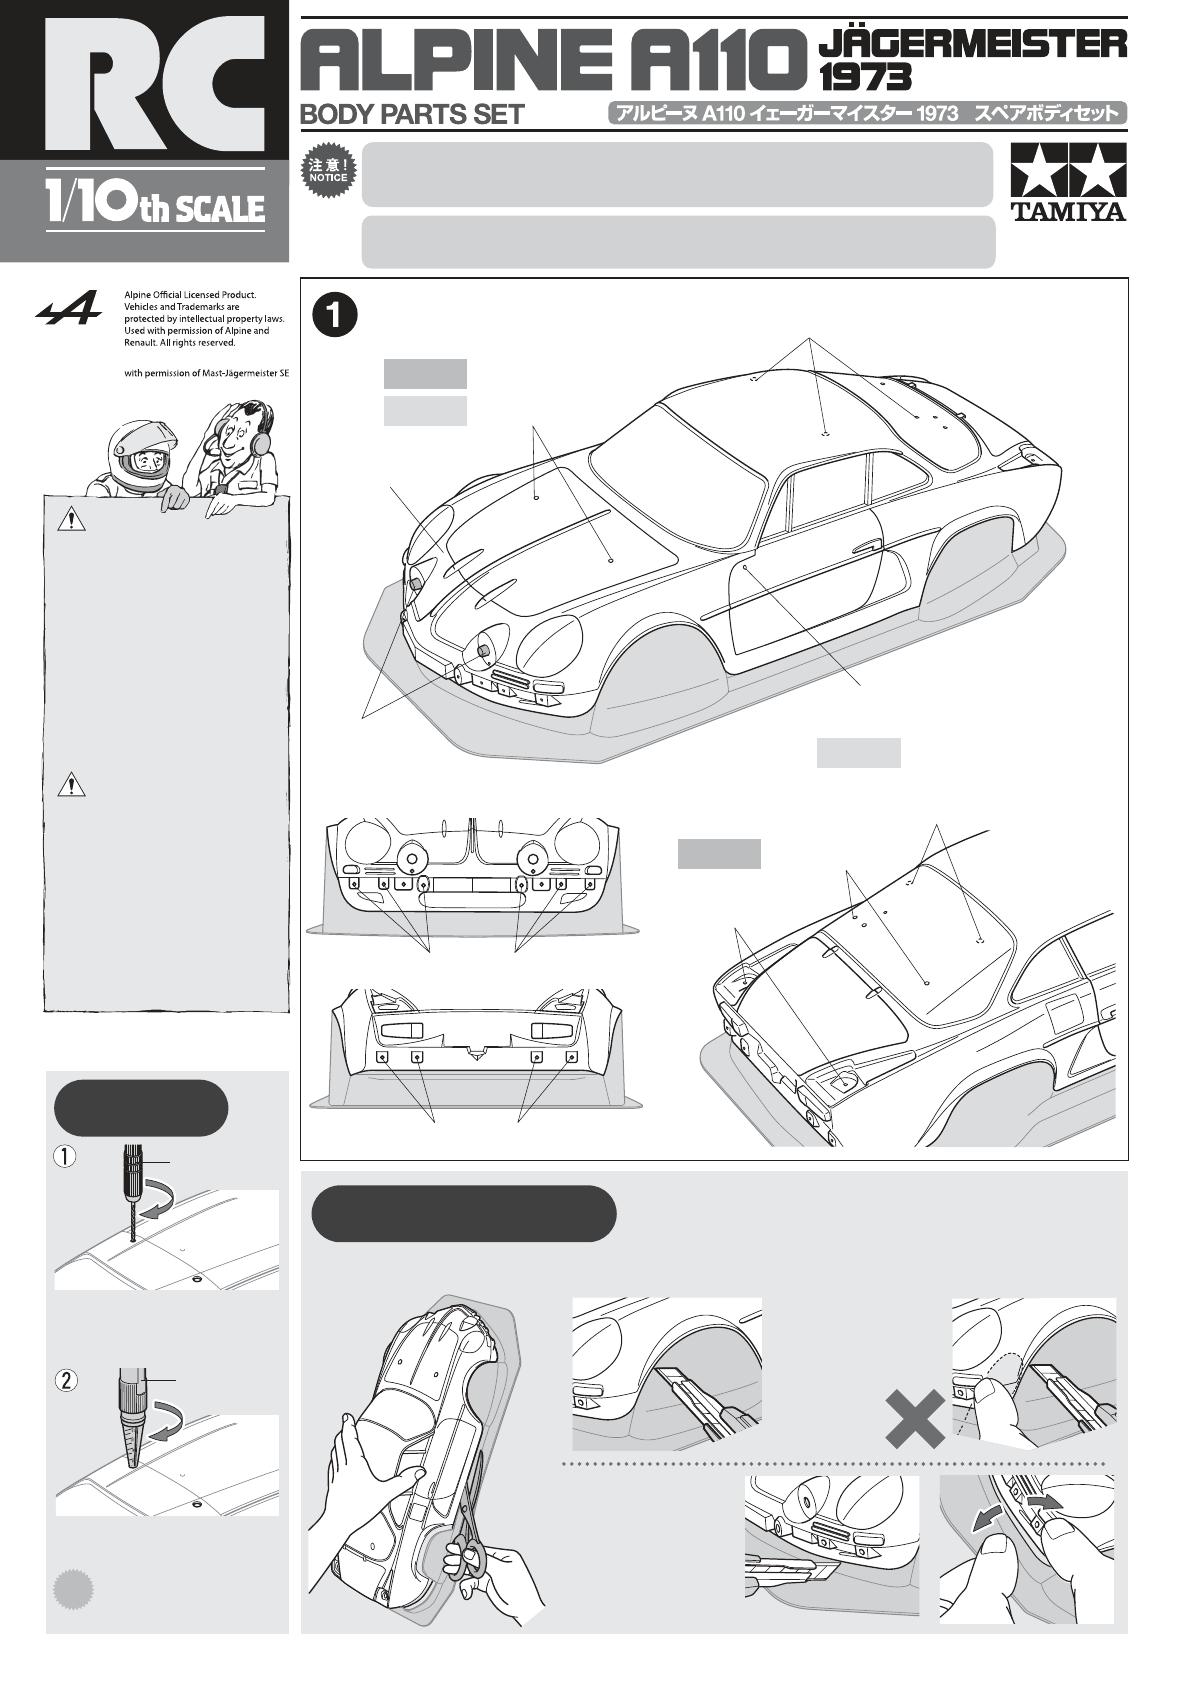
1
Curved sections use a modeling knifeStraight sections – use scissors
Cutting out polycarbonate body parts Use different cutting tools depending upon the section you are working on.
Keep hands and fingers off
of section being cut,
particularly when using a
modeling knife.
When using a modeling knife,
make multiple passes to score the
cut line, then bend and snap off
the unwanted area.
R/C body reamer
Handle tools with care.
Make a pilot hole in the indicated position
using a pin vise and drill bit, etc.
Enlarge hole to desired size using body
reamer.
Pin vise
Tools are not included in set.
CAUTION
Read carefully and fully understand the
instructions before commencing assembly.
When assembling this kit, tools including
knives are used. Extra care should be taken to
avoid personal injury.
Read and follow the instructions sup-
plied with paints and/or cement, if used
(not included in kit).
Keep out of reach of small children. Chil-
dren must not be allowed to put any parts
in their mouths, or pull vinyl bags over their
heads. Sensibly dispose of the leftover
parts immediately.
Making holes
Make 4mm hole.
Make 3mm holes.
Make 3mm holes.
How to make holes
Cut off.
Body
Make 6mm holes.
Make 6mm holes.
Chassis
Make 6.5mm holes.
Chassis
Chassis
Make 6mm holes.
Chassis
Position body on top of chassis, marking antenna position with a marker pen. Make 6mm
hole.
Position body on top of chassis, marking
rear body mount positions with a marker
pen. Make 6.5mm holes.
This body is compatible with the (210mm) short wheelbase M-06S and M-08S chassis.
2
Paint body with Pure orange (PS-62) from inside. Apply thin layer of
spray paint 2-3 times keeping 30cm distance from body.
Wash the body thoroughly with detergent in
order to remove any oil, then rinse well and allow
to air dry.
Preparing body for painting
Cutting out body
Painting body
Cut away.
Cut away.
~ denote masking stickers.
After paint has dried, remove masking stickers from windows, and
paint with Smoke (PS-31) as you wish.
Painting
Cut out masking stickers and mask off window and light areas
from inside.
PS-62 / Pure orange
X-24
/ Clear yellow
LP-48 /
Sparkling silver
TS-98
/ Pure orange
TS-29 /
Semi-gloss black
PS-31 / Smoke
TAMIYA PLASTIC PAINTS
TAMIYA POLYCARBONATE PAINTS
This mark denotes numbers for Tamiya Paint
colors. Paint body from inside using polycarbon-
ate paints. Paint plastic parts (side mirrors, etc.)
using plastic paint.
PS-62
Pure orange
After completion of painting, remove remaining masking stickers
and protective film.
Remove protective film before
applying stickers.
Stickers
Cut along the edges as close as possible
to cut the sticker from the sheet. Cut out
stickers in numbered order to prevent con-
fusion.
Slightly peel away one end of the lining
and position the sticker on the body.
Slowly remove the remaining lining while
checking sticker position. Do not completely
remove lining prior to application as this may
cause unwanted air bubbles and creases.
Markings
351690 Alpine A110 Jaeger Body (11057541)
H11
Tapping screw
Tapping screw
H11
H1
H1
H9
Tapping screw
TS-98
Pure orange
H8
TS-98
Pure orange
H7
Tapping screw
H9
Not used.
Choose from two types of stickers: car
No.102 and No.34. Numbers in ( ) are for car
No.34.
TS-29
Semi-gloss black
TS-29
Semi-gloss black
Attaching rear body parts
Apply stickers in numbered order.
Apply after .
Body
H Parts
J Parts
Masking stickers
Stickers
METAL PARTS BAG
4
Ask your local Tamiya dealer for availability of
the wheels & tires.
Attach the snap pins ensuring the body does not come into
contact with the tires and track surface.
Body attachment position
Attaching body
Snap pin (small)
O-ring
Snap pin
054-283-0003
03-3899-3765
422-8610 3-7
www.tamiya.com/japan/customer/
J6
J5
Double-sided tape (white)
Cut double-sided tape referring to the
diagrams below.
Tapping screw
Apply markings after the
paint (X-24 Clear yellow) dries.
X-24
Clear yellow
H2
J4
LP-48
Sparkling silver
J2
J1
Tapping screw
H1
Snap pin (small)
O-ring
H10
H9 H6
H10
H9
Tapping screw
H5
TS-29
Semi-gloss black
TS-29
Semi-gloss black
TS-29
Semi-gloss black
Double-sided tape
(white)
Headlights
Side mirror
R
R
L
L
Snap pin
Pass antenna.
Snap pin
Snap pin
Snap pin
Cut down protruding body mounts if desired.
Attaching front body parts
Double-sided tape (white)
Trim if part comes
into contact with tire.
ITEM 51690
10005590
10115207
19490057
11057541
50025
50197
50575
51537
84195
AFTER MARKET SERVICE CARD
When purchasing replacement parts, please take or send this
form to your local Tamiya dealer so that the parts required
can be correctly identified. Please note that specifications,
availability and price are subject to change without notice.
Parts code ITEM 51690
10005590 H Parts
10115207 J Parts
19490057 Stickers, Masking Stickers
11057541 Instructions
50025 Double-Sided Tape (White)
50197 Snap Pin (Large x10, Small x5)
50575 2.6x10mm Tapping Screw (x5)
51537 6mm Snap Pin (x15)
84195 3mm O-Ring (Black) (x10)
  • Page 1 1
  • Page 2 2
  • Page 3 3
  • Page 4 4

Tamiya Alpine A110 ユーザーマニュアル

タイプ
ユーザーマニュアル

Tamiya Alpine A110は、M-06S(ショートホイールベース210㎜)、M-08S(ショートホイールベース210㎜)のシャーシに使用できるボディーです。一部塗装済み、加工済みの場合もあります。

穴を開ける際は、ピンバイスで小さな穴を開け、リーマーで指示の大きさに穴を広げます。

ボディを切り取る際は、ハサミとカッターナイフを使い分けるときれいに切り取れます。

ボディを塗装する際は、ポリカーボネート用塗料を内側から使用します。プラスチック部品の塗装にはプラスチック用塗料を使用します。

マーキングを貼る際は、保護フィルムをはがし、ステッカーを番号順に貼ってください。

リヤボディパーツとフロントボディパーツを取り付け、ボディを取り付ければ完成です。

他の言語で