REXING V1 ユーザーマニュアル

カテゴリー
ドライブレコーダー
タイプ
ユーザーマニュアル

このマニュアルも適しています

V1
Quick Start Guide
V1 クイックスタートガイド
Guide de démarrage rapide de la V1
Guida Rapida V1
Guía de inicio rápido V1
V1 Schnellstartanleitung
FR
IT
DE
SP
JP
32
Español
Visión General
Qué hay en la Caja
Resumen de la Cámara
Instalación
Operación Básica
Deutsch
Übersicht
Verpackungsinhalt
Kamera übersicht
Installation
Grundbedienung
Table of Contents
English
Overview
What’s in the Box
Camera Overview
Installation
Basic Operation
日本
概説
本製
品の同梱物
メラ
アイコ
基本操作
Français
Aperçu
Que contient la Boîte
Aperçu de la Caméra
Installation
Opération de Base
Italiano
Descrizione
Nella Confezione
Descrizione Telecamera
Installazione
Funzionamento Base
page
4
5
6
7
12
18
19
20
21
26
32
33
34
35
40
46
47
48
49
54
60
61
62
63
68
74
75
76
77
84
page
54
1. Overview
Thank you for choosing REXING! We hope you
love your
new product as much as we do.
If you need assistance, or have any suggestions to improve it,
please contact us. You can reach us via [email protected] or
call us at (203) 800-4466. Our support team will respond you as
soon as possible.
Always a surprise in Rexing. Check us out here.
https://www.facebook.com/rexingusa/
https://www.instagram.com/rexingdashcam/
https://www.rexingusa.com/support/registration/
1. Rexing V1 Dash Cam
2. Car Charger
3. Dash Cam Mount Plate & 3M Adhesive
4. Mini-USB Cable
5. Cable Management Tool
6. Cable Clips©
7. V1 Quick Start Guide
8. V1 Safety Guide
1.
5.
6. 7. 8.
2. 3. 4.
Facebook Instagram Site
2. What’s in the box
76
3. Camera Overview
1. Micro SD Card Slot
2. Power Button
3. Reset Button
4. Menu Button
5. Mode Button
6. REC (Record) Button *
7. OK (Conrm) Button **
8. MIC (Microphone) Button ***
9. Screen Button
10. Mini-USB Port
11. GPS Logger Port
12. Rear Camera Port (Not Support)
13. Lens Angle Adjustment
* The Camera is recording when the LED is ashing red.
** The Camera is recording when the LED is ashing red. The device charging
or powered on when the LED is solid blue.
*** The device is charging or powered on when the LED is solid blue.
1.
10.
11.
5. 6. 8.
7.
9.
2.
3.
4.
12.
13.
4. Installation
Step 1: Install the Dash Cam
Place the 3M adhesive on the mount and properly orient
the mount square to the roof and hood line of the
vehicle. Important! Ensure the T-interlock on the Mount
is oriented in the correct direction (as shown below).
Firmly press the mount onto the windshield. Wait at least
20 minutes before mounting the camera.
Orientation mount as shown
Step 2: Insert the Memory Card
The Rexing V1 accepts [Class 10/ UHS-1 or higher] Micro SD
memory cards up to 256 GB. You will need to insert a memory
card before you can begin recording. Before inserting or
removing a memory card, rst ensure you’ve powered
down the device.
Gently push the memory card in until you hear a click, and allow
the spring release to push the card out.
98
Step 3: Power the Camera and Format the
Memory Card
Power the camera by connecting the charger to the car cigarette
lighter and camera.
To ensure the V1 records to your memory card properly and
without error. Before you start using a new memory card,
you must format the card within the camera using the
format function. Always backup important data stored on the
memory card before formatting.
To format the memory card, make sure you have inserted
your memory card, then turn on the device by connecting to
a power source. Press REC to stop recording. Then press the
MENU button twice to enter the System Setup Menu. Use the
REC and MIC buttons and go to the Format setting. Press the OK
Button to conrm the selection.
Press the Power
button to turn
the power o
You may now disconnect from power. The camera will shut
down after 3 seconds. The camera should begin recording
automaticially the next time it is powered on.
Press the Menu
button twice
Press the OK
button to conrm
formatting
the card
1110
Step 4: Installing the Camera onto the Windshield
Place the camera on the mount and carefully route the power
cable around the windscreen and tuck in under the trim.
Plug the Car Charger Cable into a 12V DC power outlet or the
car cigarette lighter.
Connect car charger to the camera. The camera will auto-start
recording once powered on.
Plug Mini 5 pin
Connector to
the Dash Cam
Route power
cable to the
Dash Cam
Plug charger into
power outlet or
cigarette lighter
5. Basic Operation
Device Power
The device is automatically powered on when plugged into a
12V accessory socket or cigarette lighter and receives a charge
(i.e.: the vehicle is started.)
To turn the device on manually, press and hold the POWER
button until the welcome screen appears.
The camera will autoatically start recording when powered on.
Press an hold the POWER button
to turn the device on manually
1312
Menu Settings
Power the camera on. If the camear is recording, pres the REC
button to stop recording. Press the MODE button and toggle to
the desired mode.
Press the MENU button once to enter the settings
menu for a Mode. Press the MENU button twice to enter the
System Settings.
System icon
Video Mode icon
Press the Menu button to
select the desired setting
Press the Mode button and toggle
to the desired Mode
Video Recording
The camera will automatically
start recording when the
device receives a charge. The
LED lights and the red dot
will blink when the device
is recording. Press the REC
button to stop recording.
The camera automatically start
recording when powered on
Playback mode
Control playback with these buttons
Video Playback
Playback of videos can
be done on the device or
a computer. Also, if you
have purchased a Rexing
GPS Logger you may play
back the recordings in
a specialized application.
To playback a video on
the device, toggle to the
Playback mode. Use the REC
and MIC buttons to toggle to
the desired video. Press the
OK button to play.
1514
During playback use the OK (pause), MIC (fast forward) and REC
(rewind) buttons to control the video playback.
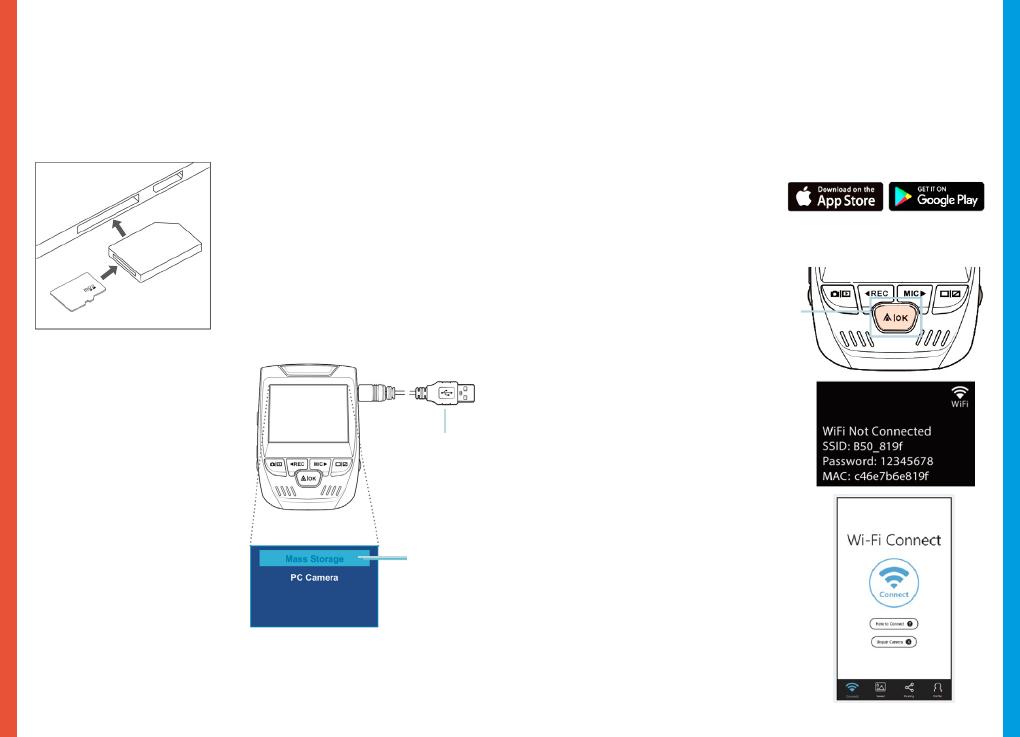
To playback a video on the computer either use an SD card
adapter or connect the device to the computer directly using
the USB to Mini B 5pin male cable.
To playback a video using
an SD card adapter,
remove the memory card and
insert it into an SD card
adapter. Place the adapter in
the computer.
To playback a video
using USB to Mini B
5pin male cable, connect
the USB to Mini B 5pin Male
Cable to the device and
the USB connector to the
computer.
After the device powers
up, press the OK Button to
select Mass Storage.
On the computer, navigate
to device drive. The videos
are stored at: \CARDV\
MOVIE.
Select the video to playback.
Connect USB
connector to
computer
Select Mass
Storage
Parking Monitor
Connect the dash cam to the smart hardwire kit to activate
the parking monitor function (Need to purchase the Smart
Hardware Kit separately. ASIN: B07RN24B7V)
Please visit support.rexingusa.com to watch a video tutorial.
Wi-Fi Connect
Download “Rexing Connect” app from the App Store/Google
Play Store.
1. To access or exit the Wi-Fi
feature, hold down OK.
2. Open Wi-Fi settings on your
phone, nd “SSID:B50 _ XXXX”
from the list, tap to connect.
(Default password: 12345678)
3. Open the Rexing Connect app,
tap “Connect to enter realtime
video streaming page.
4. Once connected, the dash
cam screen will switch to the
camera view and will display
“Wi-Fi Connect” message.
Using the Rexing Connect app, you
can view a live preview of the dash
cam screen, start/stop recording, as
well as view and save your captures
with your mobile device.
For further instruction regarding the
Wi-Fi Connect feature, please visit
www.rexingusa.com/wi-connect/.
1716
GPS Logger
(Need to purchase separately. ASIN: B07BL4NCMD)
When connected to the camera,
it will record the speed and
location of your vehicle as you
drive.
You can then access this
information while playing back
your recordings using the GPS
Video player (For Windows and
Mac, available at rexingusa.com).
Press the MENU button twice
and enter the System Settings.
Toggle to the GPS Speed Unit
setting and select your preferred
speed unit.
After a GPS signal is found, the
screen icon will turn from blue
to green.
Please visit gpsa.rexingusa.com
to watch a video tutorial.
GPS Signal
(not connected)
GPS Signal
(searching)
GPS Signal
(active)
Taking Photos
To take a photo, stop
video recording and toggle
to the Photo Mode.
Press the OK Button to
take a photo.
To view a photo, stop
video recording and toggle
to the Playback Mode.
Press the REC and MIC
Buttons to toggle through
your photos.
To delete a photo,
stop video recording and
toggle to the Playback
Mode and toggle through
the videos and photos to
the one you want to
delete.
Press the MENU button
once and toggle to the
Delete option.
Press the OK Button and
select Delete Current or
Delete All.
Toggle
to the
Playback
mode and
select a
photo to
view
Toggle to
the Delete
option
Choose
the desired
option
1918
1. 概説
REXINGを選でいただきありがとござお客
を気だけてい
ます。サポートが必要な場合、または改善のための提案がありま
したら、是非、ご連絡ください。[email protected]に電子
メールを送ることができます。当社のサポートチームができるだけ
お返事いたしま
常にREXINGでサプライズを。こちらから最新情報をチェックくだ
さい
https://www.facebook.com/rexingusa/
https://www.instagram.com/rexingdashcam/
https://www.rexingusa.com/support/registration/
Facebook Instagram
ホームページ
1. Rexing V1 ドライブレコーダー
2. 車載充電器
3. ドライブレコーダーント3M接着シール
4. ミニUSBケーブル
5. ケーブル管理ツール
6. クリップ
7. V1クイックートイド
8. V1安全ガイ
2. 本製品の同梱物
1.
5.
6.
7. 8.
2. 3. 4.
2120
3. メラ
1. イク SD ット
2. タン
3. ット
4. ニュ
5. ードタン
6. 録画ボ*
7. OK**
8. ***
9. タン
10. ミニUSBポート
11. GPSロガート
12. カメラポートートなし
13. ズ角度調整
* LEDが赤点滅時、は録画中
** LEDが赤点滅時、は録画中LEDが青点灯時、機器
充電中は電源が入っ状態で
*** LEDが青点灯時、機器は充電たは電源が入る状態です
1.
10.
11.
5. 6. 8.
7.
9.
2.
3.
4.
12.
13.
4. 設定
1ドライブレコーダーの設定
3Mをマウントにマウンスクエアを根と
方向重要 ントT-インロック
い方向に置かれ確認い。
マウフロンガラスにしっと押し付けますカメラを取り付
20てく
ントを よう
2挿入
Rexing V1は、最大256GBのマイクロSDメモリカード(Class 10/
UHS-1以上)に対応しています。画を始する前にメモリーカー
を挿入する必要があます
ーカを挿入または取り外す前にまず機器の電源が切
ること確認してく
カチッという音がするまでメモリーカードを静かに押し込みそして
すとスプリン解除されてード取りすことできます。
2322
ップ 3カメラのれて、メモリーードを
しま
充電器車のガー接続電源を入れ
す。
V1カー適切に間違い記録す確実に
使用始め前に初期化機能使用
内で初期化ばなん。初期化す前に
リードに れていタをバックアッ
さい
メモリーカドをするたモリーカードがれてい
を確認た後、電源接続機器の電源を入れ録画ボ
ンを押して録を停止しますそのニュボタンを2押して、
システム メニります。 タンとマイタン使
初期化設定に移動OKボタンを押して選択を認します
して
オフにしま
電源3秒後に電源が切れは次
回電源を入た時、動的に録画が開始
ニュ 2
します
OKして
の初期化
しま
ての
されます
ャン
2524
ップ 4ントガラスメラ
メラウント ントガラス
て配線し、ムのしまい込みます
車載充電器のケー12V DC ントま
ターに差し込みます
車載充電器接続電源を入れ動的に
録画開始
ミニ5ピンコネク
ドライブレコ
ーダーに差し込
みます
ーブル
ドライブレコ
ダーに配線
します
充電器電源
センまたはシガ
イタ
みます
5. 基本操作
器の電力
機器が12Vクセサリソケまたはシガライターに差まれて、
充電がかた時)機器に動的に
ります。
機器の電源を手動で入れめには、の画面が表示さ
タンす。
電源が入自動的録画開始
電源ボ長押機器の電
す。
2726
設定
電源を入れが録画中の場合は、録画
録画を停止モー希望のモー
す。
ニュ 1 して ニュ ニュ
タン2して、システム ります。
シスアイコン
アイコン
ニ ュ タ ン し て 、希
の設定を選択
ードボタンをて、ード
す。
録画
されたら、カメラは自
動的に録画を開始機器
が録画中の時、LEDが点灯
い点が点滅録画
ンを押して、画を止します
電源が入動的に
しま
ード
これらのボタンで 御します
オの
デオの再生は、機器ま
。ま
た、Rexing GPS ロガーを
場合、特殊
で録画を再生
機器ビデ再生
、再
す。 タンとマイ
タ ン 使 し て 、希
す。OKタン
を押し生しま
2928
生中はOK(一時停止)(早送録画(巻使
ビデの再生制御
コンピュでビするにはSDドアダ使
、ま USB使用機器ーターに直接接
す。
SDドアダプタ使
てビ るた
し て 、そ
SDードアダプタします。
アダプタをコンピュ
します。
USB使用
オをするため
USBーブ とコ
す 。機
器に電源が入た後、OKボタ
ンを押レージを選
す。
コンピュで、器ド
イブ します。
は\ICARDV\MOVIE保存
す 。再 る ビ
す。
USB
コンピュター
します
ストレ
ジを選
ニタ
ドライブレコーダーマーハーヤーキ(別途購入す
必要がありまASIN: B07RN24B7Vに接続パーング
ター機能ティにします。
Wi-Fi接続
App Store/Google Play ら「 Rexing Connect」ア
ウンードします。
1. Wi-
Fi機能または
Wi-Fi能を終了するために
OKボタンを長押しします。
2. Wi-Fi
SSID: B50_
XXXX
ワー
12345678)
3. Rexing Connectアプリを開き、
「接続」
ストリ
ります。
4. 接続され
たらドライブレコーダ
ー画面がカメラ表示に切り替
わり、「Wi-Fi接続セー
ジが表示されます。
Rexing Connectアプリを使用する
ドライブレコーダー画面のライブ
プレビュ ーを表示録画を開
始/停止したりモバイル機器を使っ
て、録画を見たり存したりするこ
ができます。
Wi-Fi接続機能の詳しい使い方
いてはwww.rexingusa.com/
wifi-connect/ご覧ださい。***
PCカメラ
マススージ
support.rexingusa.com にアクセスしてチュートリアルビデオをご
ださ
3130
GPSガー
(別途購入必要がASIN:B07BL 4NCMD)
ラに
続する運転中の車の
速度と位置が記録されます
GPSビデオプレーヤーを使
記録を再生ながこれらの
にアクセスすることがで
(WindowsびMacの場
rexingusa.comで入手可能)
ューボンを2回押ステ
設定に入ります。
GPS速度単位の設定に切り替
希望の速度単位を選択し
GPS信号が検出画面のア
イコンが青から緑に変わります
チューアルビデオを見るために
gpsa.rexingusa.comにアクセス
してく
GPS信号(接続
されてい
GPS信号(検
索中)
GPS機能
ィブ
写真を撮る
真を撮るためにはビデオ
停止写真モ
す。
OKボタンを押て写を撮
ります。
写真表示
デオ録画を停止再生モ
す。
ボタンとマイクボタンを
替えます。
写真を削除ためには
デオ録画を停止て再生モー
したいビ
デオと写真に切り替えます。
ューボンを1回押
削除オプションに切り替
えます。
OKボ「現在選
を削除」
「全て削除」選択
ード
に切り替
、表
るため
真を択し
ます
オプ
ョン
替えます
オプ
ション
します
全て削
現在選択いるのを削除
3332
1. Aperçu
Merci
d’avoir choisi REXING! Nous espérons que vous aimez
votre nouveau produit autant que nous.
Si vous avez besoin d’assistance ou avez des suggestions
pour l’améliorer, veuillez nous contacter. Vous pouvez
nous joindre via [email protected]. Notre équipe
d’assistance vous répondra dans les plus brefs délais.
Rexing a toujours une surprise pour vous. Visitez-nous ici.
https://www.facebook.com/rexingusa/
https://www.instagram.com/rexingdashcam/
https://www.rexingusa.com/support/registration/
Facebook Instagram Site
1. Rexing V1 Dash Cam
2. Chargeur de voiture
3. Support de montage de la Dash Cam et
ruban adhésif de 3 m
4. Câble mini-USB
5. Outil de gestion des câbles
6. Câble Clipso
7. Guide de démarrage rapide de la V1
8. Guide de sécurité de la V1
2. Que contient la boîte
1.
5.
6.
7. 8.
2. 3. 4.
3534
3. Aperçu de la Caméra
1. Fente pour carte Micro SD
2. Bouton POWER
3. Bouton RESET
4. Bouton MENU
5. Bouton MODE
6. Bouton REC*
7. Bouton OK**
8. Bouton MIC***
9. Bouton SCREEN
10. Port mini-USB
11. Port de l’enregistreur GPS
12. Port de la caméra arrière (non
pris en charge)
13. Réglage de l’angle de l’objectif
* La caméra enregistre lorsque la LED clignote en rouge.
** La caméra enregistre lorsque la LED clignote en rouge. La caméra est en
charge ou allumée lorsque le voyant est d’un bleu xe.
*** La caméra est en cours de chargement ou sous tension lorsque le voyant
est d’un bleu xe.
1.
10.
11.
5. 6. 8.
7.
9.
2.
3.
4.
12.
13.
4. Installation
Étape 1: Installez la Dash Cam
Placez le ruban de 3 m sur le support et orientez correctement
le carré du support sur la ligne de toit et de capot du véhicule.
Important! Assurez-vous que le verrouillage en T sur le support
est orienté dans la bonne direction.
Appuyez fermement le support sur le pare-brise. Attendez au
moins 20 minutes avant de monter la caméra.
Orientez le support comme indiqué
Étape 2: Insérez la carte mémoire
La Rexing V1 accepte les cartes mémoire Micro SD [Classe 10 /
UHS-1 ou supérieure] jusqu’à 256 Go. Vous devrez insérer une
carte mémoire avant de commencer l’enregistrement. Avant
d’insérer ou de retirer une carte mémoire, assurez-vous
d’abord d’avoir éteint l’appareil.
Poussez doucement la carte mémoire jusqu’à ce que vous
entendiez un clic et laissez le ressort de dégagement pousser la
carte vers l’extérieur.
3736
3: Alimentez la caméra et formatez
la carte mémoire
Alimentez la caméra en connectant le chargeur à l’allume-cigare
de la voiture et à la caméra.
Pour vous assurer que la V1 enregistre sur votre carte mémoire
correctement et sans erreur, avant de commencer à utiliser
une nouvelle carte mémoire, vous devez la formater dans
la caméra à l’aide de la fonction de formatage. Sauvegardez
toujours les données importantes stockées sur la carte mémoire
avant de la formater.
Pour formater la carte mémoire, assurez-vous d’avoir
inséré votre carte mémoire, puis allumez l’appareil en vous
connectant à une source d’alimentation. Appuyez sur le
bouton REC pour arrêter l’enregistrement. Appuyez ensuite
deux fois sur le bouton MENU pour accéder au menu de
conguration du système. Utilisez les boutons REC et MIC et
accédez au paramètre de formatage. Appuyez sur le bouton OK
pour conrmer la sélection.
Appuyez sur le
bouton POWER
pour éteindre
l’appareil
Vous pouvez maintenant vous déconnecter de
l’alimentation. La caméra s’éteindra après 3 secondes. La
caméra devrait commencer à enregistrer automatiquement
la prochaine fois qu’elle sera allumée.
Appuyez deux
fois sur le
bouton MENU
Appuyez sur le
bouton OK pour
conrmer le
formatage de la
carte mémoire
Toutes les dates seront
supprimées
Annuler
3938
Étape 4: Installation de la caméra sur le pare-brise
Placez la caméra sur le support et passez soigneusement le
câble d’alimentation autour du pare-brise et glissez-le sous
la garniture.
Branchez le câble du chargeur de voiture dans une prise de
courant 12 V CC ou dans l’allume-cigare de la voiture.
Connectez le chargeur de voiture à la caméra. La caméra
démarre automatiquement l’enregistrement lorsqu’elle
est allumée.
Branchez le
connecteur Mini
5pin à la Dash Cam
Acheminez le
câble jusqu’à la
Dash Cam
Branchez le
chargeur dans
une prise de
courant ou un
allume-cigare
5. Opération de Base
Mise sous tension de l’appareil
L’appareil est automatiquement mis sous tension lorsqu’il est
branché sur une prise accessoire de 12 V ou un allume-cigare
et reçoit une charge (c’est-à-dire que le véhicule est démarré).
Pour allumer l’appareil manuellement, appuyez sur le bouton
POWER et maintenez-le enfoncé jusqu’à ce que l’écran d’accueil
s’ache.
La caméra démarre automatiquement l’enregistrement
lorsqu’elle est allumée.
Appuyez et maintenez le
bouton POWER pour allumer
l’appareil manuellement
  • Page 1 1
  • Page 2 2
  • Page 3 3
  • Page 4 4
  • Page 5 5
  • Page 6 6
  • Page 7 7
  • Page 8 8
  • Page 9 9
  • Page 10 10
  • Page 11 11
  • Page 12 12
  • Page 13 13
  • Page 14 14
  • Page 15 15
  • Page 16 16
  • Page 17 17
  • Page 18 18
  • Page 19 19
  • Page 20 20
  • Page 21 21
  • Page 22 22
  • Page 23 23
  • Page 24 24
  • Page 25 25
  • Page 26 26
  • Page 27 27
  • Page 28 28
  • Page 29 29
  • Page 30 30
  • Page 31 31
  • Page 32 32
  • Page 33 33
  • Page 34 34
  • Page 35 35
  • Page 36 36
  • Page 37 37
  • Page 38 38
  • Page 39 39
  • Page 40 40
  • Page 41 41
  • Page 42 42
  • Page 43 43
  • Page 44 44
  • Page 45 45

REXING V1 ユーザーマニュアル

カテゴリー
ドライブレコーダー
タイプ
ユーザーマニュアル
このマニュアルも適しています