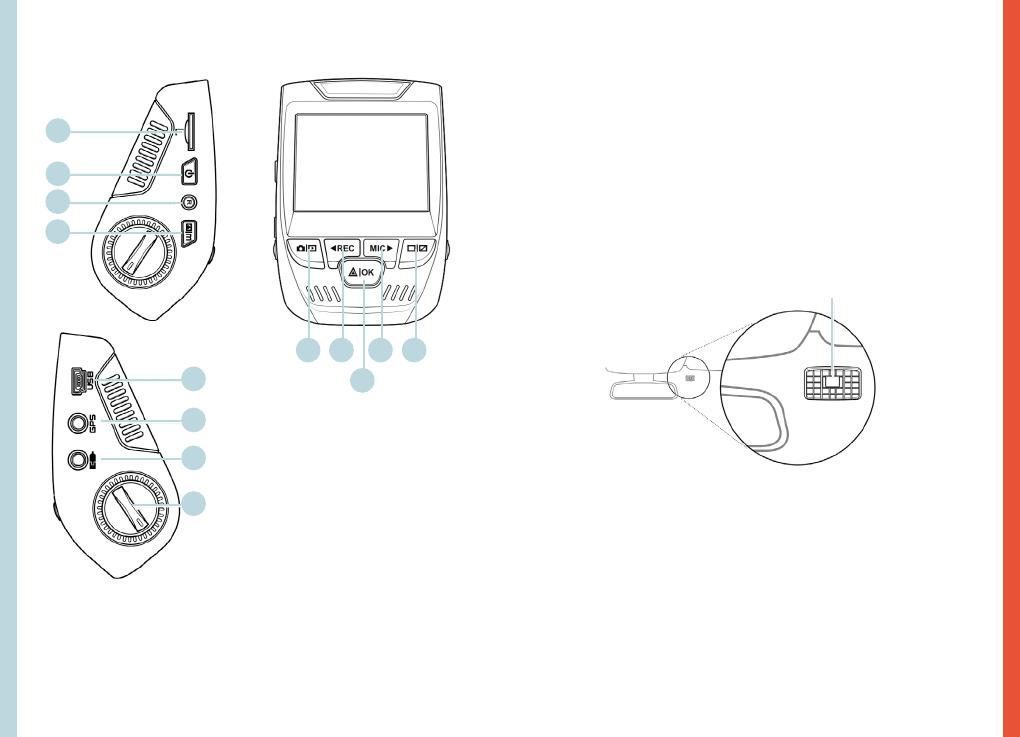
REXING V1 クイックスタートガイド

カテゴリー
ダッシュカム
タイプ
クイックスタートガイド

このマニュアルも適しています

V1 Basic
Quick Start Guide
クイックスタートガイド
32
Table of Contents
English
Overview
What’s in the Box
Camera Overview
Installation
Basic Operation
日本
概説
本製品の同梱物
メラの 概 説
画 面 のアイコ
基本操作
page
4
5
6
7
11
18
19
20
21
25
54
1. Overview
Thank you for choosing REXING! We hope you love your
new product as much as we do.
If you need assistance, or have any suggestions to improve it,
please contact us. You can reach us via [email protected] or
call us at (203) 800-4466. Our support team will respond you as
soon as possible.
Always a surprise in Rexing. Check us out here.
https://www.facebook.com/rexingusa/
https://www.instagram.com/rexingdashcam/
https://www.rexingusa.com/support/registration/
1. Rexing V1 Basic Dash Cam
2. Car Charger
3. Dash Cam Mount Plate & 3M Adhesive
4. Mini-USB Cable
5. Cable Management Tool
6. Cable Clips©
7. V1 Basic Quick Start Guide
8. Safety Guide
1.
5. 6. 7. 8.
2. 3. 4.
Facebook Instagram Site
2. What’s in the box
76
3. Camera Overview
1. Micro SD Card Slot
2. Power Button
3. Reset Button
4. Menu Button
5. Mode Button
6. REC (Record) Button *
7. OK (Conrm) Button **
8. MIC (Microphone) Button ***
9. Screen Button
10. Mini-USB Port
11. GPS Logger Port
12. Rear Camera Port (Not Support)
13. Lens Angle Adjustment
* The Camera is recording when the LED is ashing red.
** The Camera is recording when the LED is ashing red. The device charging
or powered on when the LED is solid blue.
*** The device is charging or powered on when the LED is solid blue.
1.
10.
11.
5. 6. 8.
7.
9.
2.
3.
4.
12.
13.
4. Installation
Step 1: Install the Dash Cam
Place the 3M adhesive on the mount and properly orient
the mount square to the roof and hood line of the
vehicle. Important! Ensure the T-interlock on the Mount
is oriented in the correct direction (as shown below).
Firmly press the mount onto the windshield. Wait at least
20 minutes before mounting the camera.
Orientation mount as shown
Step 2: Insert the Memory Card
The Rexing V1 Basic accepts [Class 10/ UHS-1 or higher]
Micro SD memory cards up to 256 GB. You will need to insert
a memory card before you can begin recording. Before
inserting or removing a memory card, first ensure
you’ve powered down the device.
Gently push the memory card in until you hear a click, and allow
the spring release to push the card out.
98
Step 3: Power the Camera and Format the
Memory Card
Power the camera by connecting the charger to the car cigarette
lighter and camera.
To ensure the V1 Basic records to your memory card
properly and without error. Before you start using a new
memory card, you must format the card within the
camera using the format function. Always backup
important data stored on the memory card before formatting.
To format the memory card, make sure you have inserted
your memory card, then turn on the device by connecting to
a power source. Press REC to stop recording. Then press the
MENU button twice to enter the System Setup Menu. Use the
REC and MIC buttons and go to the Format setting. Press the
OK Button to con irm the selection.
Press the Power
button to turn
the power o
You may now disconnect from power. The camera will shut
down after 3 seconds. The camera should begin recording
automaticially the next time it is powered on.
Press the Menu
button twice
Press the OK
button to conrm
formatting
the card
1110
Step 4: Installing the Camera onto the Windshield
Place the camera on the mount and carefully route the power
cable around the windscreen and tuck in under the trim.
Plug the Car Charger Cable into a 12V DC power outlet or the
car cigarette lighter.
Connect car charger to the camera. The camera will auto-start
recording once powered on.
Plug Mini 5 pin
Connector to
the Dash Cam
Route power
cable to the
Dash Cam
Plug charger into
power outlet or
cigarette lighter
5. Basic Operation
Device Power
The device is automatically powered on when plugged into a
12V accessory socket or cigarette lighter and receives a charge
(i.e.: the vehicle is started.)
To turn the device on manually, press and hold the POWER
button until the welcome screen appears.
The camera will autoatically start recording when powered on.
Press an hold the POWER button
to turn the device on manually
1312
Menu Settings
Power the camera on. If the camear is recording, pres the REC
button to stop recording. Press the MODE button and toggle to
the desired mode.
Press the MENU button once to enter the settings
menu for a Mode. Press the MENU button twice to enter the
System Settings.
System icon
Video Mode icon
Press the Menu button to
select the desired setting
Press the Mode button and toggle
to the desired Mode
Video Recording
The camera will automatically
start recording when the
device receives a charge. The
LED lights and the red dot
will blink when the device
is recording. Press the REC
button to stop recording.
The camera automatically start
recording when powered on
Playback mode
Control playback with these buttons
Video Playback
Playback of videos can
be done on the device or
a computer. Also, if you
have purchased a Rexing
GPS Logger you may play
back the recordings in
a specialized application.
1514
During playback use the OK (pause), MIC (fast forward) and REC
(rewind) buttons to control the video playback.
To playback a video on the computer either use an SD card
adapter or connect the device to the computer directly using
the USB to Mini B 5pin male cable.
To playback a video using
an SD card adapter,
remove the memory card and
insert it into an SD card
adapter. Place the adapter in
the computer.
To playback a video
using USB to Mini B
5pin male cable, connect
the USB to Mini B 5pin Male
Cable to the device and
the USB connector to the
computer.
After the device powers
up, press the OK Button to
select Mass Storage.
On the computer, navigate
to device drive. The videos
are stored at: \CARDV\
MOVIE.
Select the video to playback.
Connect USB
connector to
computer
Select Mass
Storage
Parking Monitor
You can enable the parking monitor function through the
setup option.
To playback a video on
the device, toggle to the
Playback mode. Use the REC
and MIC buttons to toggle to
the desired video. Press the
OK button to play.
1716
GPS Logger
(Need to purchase separately. ASIN: B08CZDXVLJ)
When connected to the camera,
it will record the speed and
location of your vehicle as you
drive.
You can then access this
information while playing back
your recordings using the GPS
Video player (For Windows and
Mac, available at rexingusa.com).
Press the MENU button twice
and enter the System Settings.
Toggle to the GPS Speed Unit
setting and select your preferred
speed unit.
After a GPS signal is found, the
screen icon will turn from blue
to green.
Please visit gpsa.rexingusa.com
to watch a video tutorial.
GPS Signal
(not connected)
GPS Signal
(searching)
GPS Signal
(active)
Taking Photos
To take a photo, stop
video recording and toggle
to the Photo Mode.
Press the OK Button to
take a photo.
To view a photo, stop
video recording and toggle
to the Playback Mode.
Press the REC and MIC
Buttons to toggle through
your photos.
To delete a photo, stop
video recording and
toggle to the Playback
Mode and toggle through
the videos and photos to
the one you want to
delete.
Press the MENU button
once and toggle to the
Delete option.
Press the OK Button and
select Delete Current or
Delete All.
Toggle
to the
Playback
mode and
select a
photo to
view
Toggle to
the Delete
option
Choose
the desired
option
19
18
1. 概説
REXINGを選でいただきありがとござお客
を気だけてい
ます。サポートが必要な場合、または改善のための提案がありま
したら、是非、ご連絡ください。[email protected]に電子
メールを送ることができます。当社のサポートチームができるだけ
お返事いたしま
常にREXINGでサプライズを。こちらから最新情報をチェックくだ
さい
https://www.facebook.com/rexingusa/
https://www.instagram.com/rexingdashcam/
https://www.rexingusa.com/support/registration/
Facebook Instagram ホームページ
1. Rexing V1 Basicドライブレコーダー
2. 車載充電器
3. ドライブレコーダーント3M接着シール
4. ミニUSBケーブル
5. ケーブル管理ツール
6. クリップ
7. V1 Basic クイックートイド
8. 安全ガイ
2. 本製品の同梱物
1.
5. 6. 7. 8.
2. 3. 4.
21
3. メラの 概 説
1. イクSD ット
2. タン
3. ット
4. ニュタン
5. ードタン
6. 録画ボ*
7. OK**
8. ボタ***
9. タン
10. ミニUSBポート
11. GPSロガポート
12. 面カラポートートなし
13. ズ角度調整
* LEDが赤く点滅している時、カメラは録画中です
** LEDが赤く点滅している時、カメラは録画中ですLEDが青く点灯している時、
器は充電中または電源が入っている状態です
*** LEDが青く点灯している時、機器は充電中または電源が入っている状態です
20
1.
10.
11.
5. 6. 8.
7.
9.
2.
3.
4.
12.
13.
4. 設定
1ドライブレコーダーの設定
3Mをマウントにマウンスクエアをに車根とフー
方向重要 T-インック
い方向に置かれ確認い。
マウフロンガラスにしっと押し付けますカメラを取り付
20てく
ントを
2挿入し
Rexing V1 Basicは、最大256GBのマイクロSDメモリカード
(Class 10/UHS-1以上)に対応しています。画を始する前に
メモリーカードを挿入する必要があます
ーカを挿入または取り外す前にまず機器の電源が切
ること確認してく
カチッという音がするまでメモリーカードを静かに押し込みそして
すとスプリン解除されてード取りすことできます。
23
22
3カメラ電源れてメモリード初期
しま
充電器車のガー接続の電源入れ
ます。
V1 Basicーカに適切に間違い記録を確実
。新ーカを使用し始める前に初期化機能を
使用ラ内でカを初期化なければません初期化
る前にリーカードに存されている要なータを常にバック
プしてくだ さい。
メモリーカドをるたモリードれて
確認た後電源に接続機器の電源入れ録画ボ
ンをを停止しますそのニューボタンを2て、
システムメニュりまタンとマイタン使
初期化設定に移動OKボタンを押て選択確認します
電 源 ボ タンして
オフにします
で電源3秒後にの電源が切れは次
回電源を入た時、動的に録画が開始
ニュー ボ2
します
OKして
の初期化
しま
ての
されます
ャン
25
24
ス テップ 4ントガラスメラ
メラウント電 源 ケをフントガラス注 意
て配線し、ムのまいみます
車載充電器のケー12V DC電 源ントまは 車 のガ ー
ターに差し込みます
車載充電器接続電源を入自動的
録画開始
ミニ5ンコネク
タをドライブレコ
コーダーに差し込
ます
ーブル
ドライブレコ
ーダーに配線
します
充電器電源
センまたはシガ
ー ラ イタ ー 差 し
みます
5. 基本操作
器の電力
機器が12Vクセサリソケまたはシガーライまれて、
充電(すなわち、がかた時)機器に動的に
電 源 が 入りす。
機器の電源を手動で入れめには、の画面が表示さ
で 電 源タンす。
電源が入自動的に録画開始
電源ボ長押機器の電
源 を手 動で 入 れす。
26
ーの設定
の電源を入が録画中の場合は録画
録画停止モーを押希望のモーに切
す。
ニュー ボ1回 押してモ ーの 設 定 メニュー に 入ま す。ニュ
タンを2回 押してシステム 設 定ります。
シスアイコン
ードアイコン
ニ ュ 、希
の設定を選択
ードボタンをて、 ード
す。
録画
電されたら、ラは自
動的に録画を開始機器
が録画中の時、LEDが点灯
い点が点滅録画ボ
ンを押して、を停止します
電源が入自動的に録
します ード
これらのボタンで再生を制御します
ビデオの再生
ビデオの再生は機器また
。まRexing GPS ロガーを
購入た場合特殊
ケーで録画を再生でき
ます
27
29
28
生中はOK(一時停止)(早送録画(巻き使
デオの再生制御
コンピュでビオをするSDードアダ使
す る か 、ま た USB使用て機器ーに直接接
す。
SDドアダプタ使
てビオを
し て 、そ
SDードアダプタ します。
アダプタをコンピュ
します。
USB
コンピュター
続しま
ストレ
ジを選
USB使
オをするた
USBーブ機器とコ
。機
器に電源が入た後OKボタ
ンを押てマージを選
択します。
コンピューター上で、器ド
ライをに動します
は\ICARDV\MOVIEに保
択します。
PCカメラ
マススージ
駐車モニター
設定オプションで、駐車監視機能をアクティブにすることができ
ます。
機器でビデオを再生する
ためには、再生モードに
切り替えます。ボタン
とマイボタ使
オに切り替えますOK
ボタンを押て再生します。
31
30
GPSガー
(別途購入する必要があますASIN:B08CZDXVLJ
ラに接続する中の
速度と位置が記録されます
GPSビデオプレーヤーを使
記録を再生ながこれらの
にアクセスすることがで
(WindowsびMacの場
rexingusa.comで入手可能)
ューボンを2回押ステ
設定に入ります。
GPS速度単位の設定に切り替
希望の速度単位を選択し
GPS信号が検出画面のア
イコンが青から緑に変わります
チューアルビデオを見るために
gpsa.rexingusa.comにアクセス
してく
GPS信号(接続
されてい
GPS信号(検
索中)
GPS機能(ア
ィブ )
写真を撮る
真を撮るためにはビデオ
録画停止写真モ
す。
OKボタンを押て写を撮
ります。
写真表示
デオ録画を停止再生モ
す。
ボタンとマイクボタンを
替えます。
写真を削除ためには
デオ録画を停止て再生モー
したいビ
デオと写真に切り替えます。
ューボンを1回押
削除オプションに切り替
えます。
OKボ「現在選
削除」
「全て削除」選択
ード
に切り替
て 、表
るため
真を択し
ます
オプ
ョン
替えます
オプ
ション
します 全て削
現在選択いるのを削除
88
8LMWHIZMGIGSQTPMIW[MXLTEVXSJXLI*''6YPIW3TIVEXMSRMWWYFNIGXXSXLIJSPPS[MRKX[S
GSRHMXMSRW8LMWHIZMGIQE]RSXGEYWILEVQJYPMRXIVJIVIRGIERHXLMWHIZMGIQYWXEGGITt
ER]MRXIVJIVIRGIVIGIMZIHMRGPYHMRKMRXIVJIVIRGIXLEXQE]GEYWIYRHIWMVIHSTIVEXMSR
Changes or modifications not expressly approved by the party responsible for compliance
could void the user's authority to operate this equipment.
  • Page 1 1
  • Page 2 2
  • Page 3 3
  • Page 4 4
  • Page 5 5
  • Page 6 6
  • Page 7 7
  • Page 8 8
  • Page 9 9
  • Page 10 10
  • Page 11 11
  • Page 12 12
  • Page 13 13
  • Page 14 14
  • Page 15 15
  • Page 16 16
  • Page 17 17

REXING V1 クイックスタートガイド

カテゴリー
ダッシュカム
タイプ
クイックスタートガイド
このマニュアルも適しています

他の言語で