ページを読み込んでいます...

WIFI34
User Guide (Android Version)
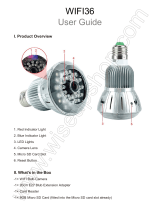
I. Product Overview
1. IR LEDs
2. Camera Lens
3. Set Button
4. Plus Button
5. Micro SD Card Slot
6. Reset Button
7. Power Switch
8. USB Port
9. WIFI Indicator Light
10. Power Indicator Light
11. Battery Charge Indicator Light
12. Rechargeable Backup Battery
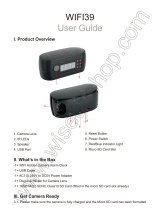
II. What’s in the Box
-1× WIFI Clock Camera
-1× USB Cable
-1× AC110-240V to DC 5V 2A Power Adapter
-1× 8GB Micro SD Card (fitted into the Micro SD card slot already)
-1× Rechargeable Backup Battery
-1× Insulating Film
III. Before You Start
>> Please remove the insulating film for the first use.
3.1. Get Clock Part Ready
3.1.1. Open back cover, plug the clock directly into an outlet AC power supply using the
power adapter included, time display will be lit brightly.
3.1.2. Press the Set Button once and the hour will start flashing, then press the Plus
Button to adjust the current hour.
3.1.3. Press the Set Button once again to save the hour setting and the minute will start
flashing, then press the Plus Button to adjust the current minute.
3.1.4. Press the Set Button to save the minute setting. Press the Plus Button to switch
between 12-hour and 24-hour mode, then press the Set Button once to save the setting.
3.2. Get WIFI Camera Part Ready
3.2.1. Please make sure the camera is fully charged, the Micro SD card has been
formatted already and is securely fitted into the camera’s SD card slot, or it will not work.
We recommend you use a SDHC Class 10 Micro SD card.
3.2.2. Power on the camera by sliding the Power Switch to the ON position. The charging
and power indicator lights will glow solid yellow while the WIFI indicator light will keep
flashing yellow, indicating the camera’s WIFI signal is ready.
IV. Network Setup
4.1. Install the “Camwf” APP on Android Smartphone or Tablet PC
Scan the QR code below to download the “Camwf” APP on your Android smartphone or
tablet PC.
4.2. P2P Connection Setup (LAN Mode)
4.2.1. Go to the WIFI Setting page on your phone or mobile device, connect to the
camera’s WIFI signal named “RT-**********”. Wait for the WIFI to be connected and your
phone status bar will appear WIFI symbol as below:
[Note]:
If the camera’s WIFI signal cannot be found after a long time, please see Q1 on the FAQ
page at the end of this user guide for detailed solutions.
4.2.2. Run the “Camwf” APP.
4.2.3. Add the camera to the “Camwf” APP as below:
Tap + symbol at the top right corner > Search for the camera > Tap the camera’s UID >
Tap OK.
4.2.4. If the camera shows “Online” on the home page, it means the camera’s P2P (LAN)
setup is successful, and the camera has entered into LAN mode. You can view live or
record video in P2P mode.
[Note]:
In this mode, you can only view video locally, within 15 meters (49ft) open range.
Tips: On the live video screen, you can gently put your index finger and thumb on the
screen then slide in and outward directions on a specific area to zoom in and out.
4.3. Remote View Setup (WAN Mode)
>> Before remote view setup, please make sure that the camera is successfully added to
the APP in the P2P (LAN) mode and it's online.
4.3.1. Launch the “Camwf” APP.
4.3.2. Follow the steps below to set up remote view function:
Step 1: On the home page, tap the gear icon and then choose “Camera setting” in the
popup window.
Step 2: On the “Advanced Setting” page, tap “Manage Wi-Fi networks” at the “WIFI
Setting” section.
Step 3: From a list of available networks in the area, select your desired WIFI hotspot to
enroll the camera in.
Step 4: Tap “OK” to complete the remote view setup. The camera will reboot automatically
and ring twice softly in 8 seconds.
How to check if remote view function works?
1. Exit the “Camwf” APP.
2. Back to the WIFI setting page on your phone or mobile device, exit your phone or
mobile device from the current WIFI network, enroll your phone or mobile device in
another WIFI hotspot, or you can turn off the WIFI function, enable your mobile network
data instead.
3. Make sure your smartphone or tablet PC has Internet access and launch the “Camwf”
APP again. If the camera shows “Online” on the home page, it means the remote view
setup is complete and the camera has entered into WAN mode. Now you can view live or
recorded video remotely from any location.
[Note]:
When the camera tinkles twice, it means the WIFI configuration is successful. If the camera
shows “Connect Fail” on the page and beeps twice, it means the WIFI configuration is failed and the
camera will go back to P2P mode automatically in 1 minute; you need to set up all over again.
V. Motion Detection Recording Setup
>> Please make sure the camera is successfully added to the APP and it's online before
you start.
5.1. Launch the “Camwf” APP.
5.2. Tap the gear icon on the home page and then choose “Camera Setting” in the
popup window.
5.3. On the “Advanced Setting” page, choose motion detection sensitivity then select
“Alarm” recording mode.
5.4. Tap “OK” to complete the Motion Detection Video Recording setting.
5.5. When a movement is detected, the camera will record a video automatically to the
local Micro SD card. Back to the home page, tap the gear icon and choose “SDCard
Record” to check out the video footage based on motion detection.
Tips: If the camera is in WAN mode, the video footage might show a black screen on your
phone during playback because of slow broadband network.
[Note]:
Video Resolution: 1920×1080P Not Optional Video Format: AVI
VI. Recording Video Directly to Smartphone or Tablet PC
>> Please make sure the camera is successfully added to the APP and it's online before
you start.
6.1. Launch the “Camwf” APP. Tap the camera icon to get into the live video screen.
6.2. Tap the Remote Video Recording Button once to start or stop recording video.
The video files will be saved on your phone or mobile device's flash memory. These video
footage will come without audio.
6.3. Check out the video files.
Option 1: On the live video page, you can tap the gallery icon to check out the image
and video files.
Option 2: Back to the home page, you can tap the gear icon then choose “View
Snapshot” in the popup window to check out the image and video files.
[Note]:
Video Resolution: 640x360 Not Optional Video Format: MP4
VII. Recording Video to Local Micro SD Card Continuously
>> Please make sure the camera is successfully added to the APP and it's online before
you start.
7.1. Launch the “Camwf” APP.
7.2. Tap the gear icon on the home page then choose “Camera setting” in the popup
window.
7.3. Turn off “Motion Detection” function and choose “Full Time” recording mode instead.
7.4. Tap “OK” to complete the SD card recording setting and the camera will start
recording video to the Micro SD card continuously.
7.5. Back to the home page, tap the gear icon and then choose “SDCard Record” to
check out the video files saved in the Micro SD card.
Tips: If the camera is in WAN mode, the video footage might show a black screen on your
phone or mobile device during the playback because of slow broadband network.
[Note]:
1). A video clip will be generated and saved every 3 minutes automatically.
2). The camera can record video for 4 hours continuously with the backup battery.
VIII. Resetting
If for any reason the clock camera stops working or isn’t working properly, you can reset
the camera to restore it back to normal operation.
Option: When the camera is powered on, press and hold the Reset Button for 8 seconds
and the camera will tick 3 times. The camera’s WIFI signal named “RT-*******” will appear
on your phone or mobile device’s WIFI setting page again in a minute or so.
IX. Renaming Camera & Changing Password
>> Please make sure the camera is successfully added to the APP and it's online before
you start.
9.1. Launch the APP “Camwf”.
9.2. Rename the camera as below:
Step 1: Tap the gear icon on the home page and then choose “Account Setting” in the
popup window.
Step 2: Clear the default name and type in names like Home, Office, etc.
Step 3: Tap “OK” to confirm the change.
9.3. Change the password as below:
Step 1: Back to the home page, tap the gear icon and then choose “Camera setting”
in the popup window.
Step 2: On the “Advanced Setting” page, tap “Modify Security Code” at the “Security
Code Setting” section.
Step 3: Type in the default password “888888”, then enter a new password and re-enter
it, finally tap “OK” to save the change.
X. Charging Backup Battery
10.1. Put the backup battery in place then connect the camera to an outlet AC power
supply using the power adapter and USB cable provided.
10.2. The battery charge indicator light will glow solid yellow during the charging process.
10.3. It will take 4 hours to obtain a full charge for the backup battery.
10.4. The battery charge indicator light will turn off when the backup battery is fully
charged.
Frequently Asked Questions
Q1: Why Camera WIFI signal is not appearing on my WIFI page?
A1: There are 4 solutions to this problem:
1. Take out the backup battery, plug the camera into an outlet power supply using the
USB cable and DC5V 2.0A power adapter provided. Wait 2 minutes for the WIFI signal
SSID to appear.
2. Reset the camera (See VIII), then wait for the WIFI signal SSID to show up.
3. Keep your phone or mobile device within the camera’s WIFI hotspot range, refreshing
the WIFI signal page. It may take up to 2 minutes for the hotspot to become recognizable
on your phone or mobile device's WIFI setting page.
4. Shut off your phone or mobile device’s WIFI function for a while, then turn it on to
search again.
Q2: The camera won’t show up in the application Camwf?
A2: Ensure your phone or mobile device is still connecting to the camera’s WIFI signal
and your camera is powered by the outlet power supply or the back-up battery is fully
charged.
Q3: Why live video screen shows up black and a searching circle spins in center
but nothing ever displays?
A3: If the camera connected WIFI speed is low, wait 10-30 seconds for live video to
appear. Or you can exit the live video screen and get into the screen again in a minute.
Q4: Why does the video footage have no image but noise during playback on my
PC computer?
A4: When the camera is in low battery during video recording process, this happens. So
if you need the camera to record full time, we suggest you charge the camera using the
DC5V 2.0A power adapter and USB cable included during the video recording process.
Q5: Even though I keep the camera charged, the WIFI signal still drops?
A5: Make sure that you use our DC5V 2.0A power adapter provided to charge the
camera. If the power adapter is lower than DC5V 2.0A, say, DC5V 1.0A, the camera’s
WIFI signal will be unstable and keep dropping. Plus, we don’t recommend you connect
the camera directly to your PC computer for charging, because the current output will not
be enough for the camera to run normally.
Q6: The camera is not holding my Wifi settings and continues to show that the
camera is offline?
A6: Make sure the camera is inside the range of good WIFI signal. Or if you are using the
backup battery, check if the power adapter is connected properly for long time use.
Q7: Will the camera still work if the power goes out?
A7: If the camera is in P2P (LAN) mode, the camera can still work and record video as
long as the backup battery provides power for the camera to run. If the camera is in WAN
mode, it will not work until power is restored and the Internet access is available.
Q8: How to add the camera to more devices?
A8: Make sure that camera is in WAN mode already. Then launch the “Camwf” APP on your
other Android devices, tap “+” icon, scan the QR code on the back of the camera for camera’s
UID and password. Or input the camera UID (a unique combination of numbers and letters
specific to your camera) and password. Finally, tap “OK” to add the camera to the APP.
Q9: What to do if I forget my password?
A9: You will have to reset the device to factory settings (See VIII) and re-add the camera.
Q10: The camera does not record any video to the Micro SD card?
A10: Power off the camera, take out the Micro SD card, format the SD card, then insert it
to the SD card slot to try again.
Q11: How many mobile devices can connect to the camera at the same time?
A11: No limit.
Q12: How many cameras are supported on the mobile application?
A12: No limit.
Q13: How to turn on the IR LEDs?
A13: When the illumination is below 10 lux, the IR LEDs will be turned on automatically.
The IR distance is 2 meters (6.5ft).
Q14: How to play back the video saved in the Micro SD card?
A14: Use a card reader to read and play back the video on your PC computer. Or use the
“Camwf” APP to play back (See 7.5)
Q15: Is there any PC client software I can use on my windows PC computer?
A15: PC client software download link:
http://www.wiseupshop.com/download?name=WIFI34&Submit=++++++++
Q16: Why is time display not stable, always blinking?
A16: Because the backup battery is low or the outlet power supply is not connected
properly.

I. Product Overview
1. IR LEDs
2. Camera Lens
3. Set Button
4. Plus Button
5. Micro SD Card Slot
6. Reset Button
7. Power Switch
8. USB Port
9. WIFI Indicator Light
10. Power Indicator Light
11. Battery Charge Indicator Light
12. Rechargeable Backup Battery
II. What’s in the Box
-1× WIFI Clock Camera
-1× USB Cable
-1× AC110-240V to DC 5V 2A Power Adapter
-1× 8GB Micro SD Card (fitted into the Micro SD card slot already)
-1× Rechargeable Backup Battery
-1× Insulating Film
III. Before You Start
>> Please remove the insulating film for the first use.
3.1. Get Clock Part Ready
3.1.1. Open back cover, plug the clock directly into an outlet AC power supply using the
power adapter included, time display will be lit brightly.
3.1.2. Press the Set Button once and the hour will start flashing, then press the Plus
Button to adjust the current hour.
3.1.3. Press the Set Button once again to save the hour setting and the minute will start
flashing, then press the Plus Button to adjust the current minute.
3.1.4. Press the Set Button to save the minute setting. Press the Plus Button to switch
between 12-hour and 24-hour mode, then press the Set Button once to save the setting.
3.2. Get WIFI Camera Part Ready
3.2.1. Please make sure the camera is fully charged, the Micro SD card has been
formatted already and is securely fitted into the camera’s SD card slot, or it will not work.
We recommend you use a SDHC Class 10 Micro SD card.
3.2.2. Power on the camera by sliding the Power Switch to the ON position. The charging
and power indicator lights will glow solid yellow while the WIFI indicator light will keep
flashing yellow, indicating the camera’s WIFI signal is ready.
IV. Network Setup
4.1. Install the “Camwf” APP on Android Smartphone or Tablet PC
Scan the QR code below to download the “Camwf” APP on your Android smartphone or
tablet PC.
4.2. P2P Connection Setup (LAN Mode)
4.2.1. Go to the WIFI Setting page on your phone or mobile device, connect to the
camera’s WIFI signal named “RT-**********”. Wait for the WIFI to be connected and your
phone status bar will appear WIFI symbol as below:
[Note]:
If the camera’s WIFI signal cannot be found after a long time, please see Q1 on the FAQ
page at the end of this user guide for detailed solutions.
4.2.2. Run the “Camwf” APP.
4.2.3. Add the camera to the “Camwf” APP as below:
Tap + symbol at the top right corner > Search for the camera > Tap the camera’s UID >
Tap OK.
4.2.4. If the camera shows “Online” on the home page, it means the camera’s P2P (LAN)
setup is successful, and the camera has entered into LAN mode. You can view live or
record video in P2P mode.
[Note]:
In this mode, you can only view video locally, within 15 meters (49ft) open range.
Tips: On the live video screen, you can gently put your index finger and thumb on the
screen then slide in and outward directions on a specific area to zoom in and out.
4.3. Remote View Setup (WAN Mode)
>> Before remote view setup, please make sure that the camera is successfully added to
the APP in the P2P (LAN) mode and it's online.
4.3.1. Launch the “Camwf” APP.
4.3.2. Follow the steps below to set up remote view function:
Step 1: On the home page, tap the gear icon and then choose “Camera setting” in the
popup window.
Step 2: On the “Advanced Setting” page, tap “Manage Wi-Fi networks” at the “WIFI
Setting” section.
Step 3: From a list of available networks in the area, select your desired WIFI hotspot to
enroll the camera in.
Step 4: Tap “OK” to complete the remote view setup. The camera will reboot automatically
and ring twice softly in 8 seconds.
How to check if remote view function works?
1. Exit the “Camwf” APP.
2. Back to the WIFI setting page on your phone or mobile device, exit your phone or
mobile device from the current WIFI network, enroll your phone or mobile device in
another WIFI hotspot, or you can turn off the WIFI function, enable your mobile network
data instead.
3. Make sure your smartphone or tablet PC has Internet access and launch the “Camwf”
APP again. If the camera shows “Online” on the home page, it means the remote view
setup is complete and the camera has entered into WAN mode. Now you can view live or
recorded video remotely from any location.
[Note]:
When the camera tinkles twice, it means the WIFI configuration is successful. If the camera
shows “Connect Fail” on the page and beeps twice, it means the WIFI configuration is failed and the
camera will go back to P2P mode automatically in 1 minute; you need to set up all over again.
V. Motion Detection Recording Setup
>> Please make sure the camera is successfully added to the APP and it's online before
you start.
5.1. Launch the “Camwf” APP.
5.2. Tap the gear icon on the home page and then choose “Camera Setting” in the
popup window.
5.3. On the “Advanced Setting” page, choose motion detection sensitivity then select
“Alarm” recording mode.
5.4. Tap “OK” to complete the Motion Detection Video Recording setting.
5.5. When a movement is detected, the camera will record a video automatically to the
local Micro SD card. Back to the home page, tap the gear icon and choose “SDCard
Record” to check out the video footage based on motion detection.
Tips: If the camera is in WAN mode, the video footage might show a black screen on your
phone during playback because of slow broadband network.
[Note]: Video Resolution: 1920×1080P Not Optional Video Format: AVI
VI. Recording Video Directly to Smartphone or Tablet PC
>> Please make sure the camera is successfully added to the APP and it's online before
you start.
6.1. Launch the “Camwf” APP. Tap the camera icon to get into the live video screen.
6.2. Tap the Remote Video Recording Button once to start or stop recording video.
The video files will be saved on your phone or mobile device's flash memory. These video
footage will come without audio.
6.3. Check out the video files.
Option 1: On the live video page, you can tap the gallery icon to check out the image
and video files.
Option 2: Back to the home page, you can tap the gear icon then choose “View
Snapshot” in the popup window to check out the image and video files.
[Note]:
Video Resolution: 640x360 Not Optional Video Format: MP4
VII. Recording Video to Local Micro SD Card Continuously
>> Please make sure the camera is successfully added to the APP and it's online before
you start.
7.1. Launch the “Camwf” APP.
7.2. Tap the gear icon on the home page then choose “Camera setting” in the popup
window.
7.3. Turn off “Motion Detection” function and choose “Full Time” recording mode instead.
7.4. Tap “OK” to complete the SD card recording setting and the camera will start
recording video to the Micro SD card continuously.
7.5. Back to the home page, tap the gear icon and then choose “SDCard Record” to
check out the video files saved in the Micro SD card.
Tips: If the camera is in WAN mode, the video footage might show a black screen on your
phone or mobile device during the playback because of slow broadband network.
[Note]:
1). A video clip will be generated and saved every 3 minutes automatically.
2). The camera can record video for 4 hours continuously with the backup battery.
VIII. Resetting
If for any reason the clock camera stops working or isn’t working properly, you can reset
the camera to restore it back to normal operation.
Option: When the camera is powered on, press and hold the Reset Button for 8 seconds
and the camera will tick 3 times. The camera’s WIFI signal named “RT-*******” will appear
on your phone or mobile device’s WIFI setting page again in a minute or so.
IX. Renaming Camera & Changing Password
>> Please make sure the camera is successfully added to the APP and it's online before
you start.
9.1. Launch the APP “Camwf”.
9.2. Rename the camera as below:
Step 1: Tap the gear icon on the home page and then choose “Account Setting” in the
popup window.
Step 2: Clear the default name and type in names like Home, Office, etc.
Step 3: Tap “OK” to confirm the change.
9.3. Change the password as below:
Step 1: Back to the home page, tap the gear icon and then choose “Camera setting”
in the popup window.
Step 2: On the “Advanced Setting” page, tap “Modify Security Code” at the “Security
Code Setting” section.
Step 3: Type in the default password “888888”, then enter a new password and re-enter
it, finally tap “OK” to save the change.
X. Charging Backup Battery
10.1. Put the backup battery in place then connect the camera to an outlet AC power
supply using the power adapter and USB cable provided.
10.2. The battery charge indicator light will glow solid yellow during the charging process.
10.3. It will take 4 hours to obtain a full charge for the backup battery.
10.4. The battery charge indicator light will turn off when the backup battery is fully
charged.
Frequently Asked Questions
Q1: Why Camera WIFI signal is not appearing on my WIFI page?
A1: There are 4 solutions to this problem:
1. Take out the backup battery, plug the camera into an outlet power supply using the
USB cable and DC5V 2.0A power adapter provided. Wait 2 minutes for the WIFI signal
SSID to appear.
2. Reset the camera (See VIII), then wait for the WIFI signal SSID to show up.
3. Keep your phone or mobile device within the camera’s WIFI hotspot range, refreshing
the WIFI signal page. It may take up to 2 minutes for the hotspot to become recognizable
on your phone or mobile device's WIFI setting page.
4. Shut off your phone or mobile device’s WIFI function for a while, then turn it on to
search again.
Q2: The camera won’t show up in the application Camwf?
A2: Ensure your phone or mobile device is still connecting to the camera’s WIFI signal
and your camera is powered by the outlet power supply or the back-up battery is fully
charged.
Q3: Why live video screen shows up black and a searching circle spins in center
but nothing ever displays?
A3: If the camera connected WIFI speed is low, wait 10-30 seconds for live video to
appear. Or you can exit the live video screen and get into the screen again in a minute.
Q4: Why does the video footage have no image but noise during playback on my
PC computer?
A4: When the camera is in low battery during video recording process, this happens. So
if you need the camera to record full time, we suggest you charge the camera using the
DC5V 2.0A power adapter and USB cable included during the video recording process.
Q5: Even though I keep the camera charged, the WIFI signal still drops?
A5: Make sure that you use our DC5V 2.0A power adapter provided to charge the
camera. If the power adapter is lower than DC5V 2.0A, say, DC5V 1.0A, the camera’s
WIFI signal will be unstable and keep dropping. Plus, we don’t recommend you connect
the camera directly to your PC computer for charging, because the current output will not
be enough for the camera to run normally.
Q6: The camera is not holding my Wifi settings and continues to show that the
camera is offline?
A6: Make sure the camera is inside the range of good WIFI signal. Or if you are using the
backup battery, check if the power adapter is connected properly for long time use.
Q7: Will the camera still work if the power goes out?
A7: If the camera is in P2P (LAN) mode, the camera can still work and record video as
long as the backup battery provides power for the camera to run. If the camera is in WAN
mode, it will not work until power is restored and the Internet access is available.
Q8: How to add the camera to more devices?
A8: Make sure that camera is in WAN mode already. Then launch the “Camwf” APP on your
other Android devices, tap “+” icon, scan the QR code on the back of the camera for camera’s
UID and password. Or input the camera UID (a unique combination of numbers and letters
specific to your camera) and password. Finally, tap “OK” to add the camera to the APP.
Q9: What to do if I forget my password?
A9: You will have to reset the device to factory settings (See VIII) and re-add the camera.
Q10: The camera does not record any video to the Micro SD card?
A10: Power off the camera, take out the Micro SD card, format the SD card, then insert it
to the SD card slot to try again.
Q11: How many mobile devices can connect to the camera at the same time?
A11: No limit.
Q12: How many cameras are supported on the mobile application?
A12: No limit.
Q13: How to turn on the IR LEDs?
A13: When the illumination is below 10 lux, the IR LEDs will be turned on automatically.
The IR distance is 2 meters (6.5ft).
Q14: How to play back the video saved in the Micro SD card?
A14: Use a card reader to read and play back the video on your PC computer. Or use the
“Camwf” APP to play back (See 7.5)
Q15: Is there any PC client software I can use on my windows PC computer?
A15: PC client software download link:
http://www.wiseupshop.com/download?name=WIFI34&Submit=++++++++
Q16: Why is time display not stable, always blinking?
A16: Because the backup battery is low or the outlet power supply is not connected
properly.

I. Product Overview
1. IR LEDs
2. Camera Lens
3. Set Button
4. Plus Button
5. Micro SD Card Slot
6. Reset Button
7. Power Switch
8. USB Port
9. WIFI Indicator Light
10. Power Indicator Light
11. Battery Charge Indicator Light
12. Rechargeable Backup Battery
II. What’s in the Box
-1× WIFI Clock Camera
-1× USB Cable
-1× AC110-240V to DC 5V 2A Power Adapter
-1× 8GB Micro SD Card (fitted into the Micro SD card slot already)
-1× Rechargeable Backup Battery
-1× Insulating Film
III. Before You Start
>> Please remove the insulating film for the first use.
3.1. Get Clock Part Ready
3.1.1. Open back cover, plug the clock directly into an outlet AC power supply using the
power adapter included, time display will be lit brightly.
3.1.2. Press the Set Button once and the hour will start flashing, then press the Plus
Button to adjust the current hour.
3.1.3. Press the Set Button once again to save the hour setting and the minute will start
flashing, then press the Plus Button to adjust the current minute.
3.1.4. Press the Set Button to save the minute setting. Press the Plus Button to switch
between 12-hour and 24-hour mode, then press the Set Button once to save the setting.
3.2. Get WIFI Camera Part Ready
3.2.1. Please make sure the camera is fully charged, the Micro SD card has been
formatted already and is securely fitted into the camera’s SD card slot, or it will not work.
We recommend you use a SDHC Class 10 Micro SD card.
3.2.2. Power on the camera by sliding the Power Switch to the ON position. The charging
and power indicator lights will glow solid yellow while the WIFI indicator light will keep
flashing yellow, indicating the camera’s WIFI signal is ready.
IV. Network Setup
4.1. Install the “Camwf” APP on Android Smartphone or Tablet PC
Scan the QR code below to download the “Camwf” APP on your Android smartphone or
tablet PC.
4.2. P2P Connection Setup (LAN Mode)
4.2.1. Go to the WIFI Setting page on your phone or mobile device, connect to the
camera’s WIFI signal named “RT-**********”. Wait for the WIFI to be connected and your
phone status bar will appear WIFI symbol as below:
[Note]:
If the camera’s WIFI signal cannot be found after a long time, please see Q1 on the FAQ
page at the end of this user guide for detailed solutions.
4.2.2. Run the “Camwf” APP.
4.2.3. Add the camera to the “Camwf” APP as below:
Tap + symbol at the top right corner > Search for the camera > Tap the camera’s UID >
Tap OK.
4.2.4. If the camera shows “Online” on the home page, it means the camera’s P2P (LAN)
setup is successful, and the camera has entered into LAN mode. You can view live or
record video in P2P mode.
[Note]:
In this mode, you can only view video locally, within 15 meters (49ft) open range.
Tips: On the live video screen, you can gently put your index finger and thumb on the
screen then slide in and outward directions on a specific area to zoom in and out.
4.3. Remote View Setup (WAN Mode)
>> Before remote view setup, please make sure that the camera is successfully added to
the APP in the P2P (LAN) mode and it's online.
4.3.1. Launch the “Camwf” APP.
4.3.2. Follow the steps below to set up remote view function:
Step 1: On the home page, tap the gear icon and then choose “Camera setting” in the
popup window.
Step 2: On the “Advanced Setting” page, tap “Manage Wi-Fi networks” at the “WIFI
Setting” section.
Step 3: From a list of available networks in the area, select your desired WIFI hotspot to
enroll the camera in.
Step 4: Tap “OK” to complete the remote view setup. The camera will reboot automatically
and ring twice softly in 8 seconds.
How to check if remote view function works?
1. Exit the “Camwf” APP.
2. Back to the WIFI setting page on your phone or mobile device, exit your phone or
mobile device from the current WIFI network, enroll your phone or mobile device in
another WIFI hotspot, or you can turn off the WIFI function, enable your mobile network
data instead.
3. Make sure your smartphone or tablet PC has Internet access and launch the “Camwf”
APP again. If the camera shows “Online” on the home page, it means the remote view
setup is complete and the camera has entered into WAN mode. Now you can view live or
recorded video remotely from any location.
[Note]:
When the camera tinkles twice, it means the WIFI configuration is successful. If the camera
shows “Connect Fail” on the page and beeps twice, it means the WIFI configuration is failed and the
camera will go back to P2P mode automatically in 1 minute; you need to set up all over again.
V. Motion Detection Recording Setup
>> Please make sure the camera is successfully added to the APP and it's online before
you start.
5.1. Launch the “Camwf” APP.
5.2. Tap the gear icon on the home page and then choose “Camera Setting” in the
popup window.
5.3. On the “Advanced Setting” page, choose motion detection sensitivity then select
“Alarm” recording mode.
5.4. Tap “OK” to complete the Motion Detection Video Recording setting.
5.5. When a movement is detected, the camera will record a video automatically to the
local Micro SD card. Back to the home page, tap the gear icon and choose “SDCard
Record” to check out the video footage based on motion detection.
Tips: If the camera is in WAN mode, the video footage might show a black screen on your
phone during playback because of slow broadband network.
[Note]:
Video Resolution: 1920×1080P Not Optional Video Format: AVI
VI. Recording Video Directly to Smartphone or Tablet PC
>> Please make sure the camera is successfully added to the APP and it's online before
you start.
6.1. Launch the “Camwf” APP. Tap the camera icon to get into the live video screen.
6.2. Tap the Remote Video Recording Button once to start or stop recording video.
The video files will be saved on your phone or mobile device's flash memory. These video
footage will come without audio.
6.3. Check out the video files.
Option 1: On the live video page, you can tap the gallery icon to check out the image
and video files.
Option 2: Back to the home page, you can tap the gear icon then choose “View
Snapshot” in the popup window to check out the image and video files.
[Note]:
Video Resolution: 640x360 Not Optional Video Format: MP4
VII. Recording Video to Local Micro SD Card Continuously
>> Please make sure the camera is successfully added to the APP and it's online before
you start.
7.1. Launch the “Camwf” APP.
7.2. Tap the gear icon on the home page then choose “Camera setting” in the popup
window.
7.3. Turn off “Motion Detection” function and choose “Full Time” recording mode instead.
7.4. Tap “OK” to complete the SD card recording setting and the camera will start
recording video to the Micro SD card continuously.
7.5. Back to the home page, tap the gear icon and then choose “SDCard Record” to
check out the video files saved in the Micro SD card.
Tips: If the camera is in WAN mode, the video footage might show a black screen on your
phone or mobile device during the playback because of slow broadband network.
[Note]:
1). A video clip will be generated and saved every 3 minutes automatically.
2). The camera can record video for 4 hours continuously with the backup battery.
VIII. Resetting
If for any reason the clock camera stops working or isn’t working properly, you can reset
the camera to restore it back to normal operation.
Option: When the camera is powered on, press and hold the Reset Button for 8 seconds
and the camera will tick 3 times. The camera’s WIFI signal named “RT-*******” will appear
on your phone or mobile device’s WIFI setting page again in a minute or so.
IX. Renaming Camera & Changing Password
>> Please make sure the camera is successfully added to the APP and it's online before
you start.
9.1. Launch the APP “Camwf”.
9.2. Rename the camera as below:
Step 1: Tap the gear icon on the home page and then choose “Account Setting” in the
popup window.
Step 2: Clear the default name and type in names like Home, Office, etc.
Step 3: Tap “OK” to confirm the change.
9.3. Change the password as below:
Step 1: Back to the home page, tap the gear icon and then choose “Camera setting”
in the popup window.
Step 2: On the “Advanced Setting” page, tap “Modify Security Code” at the “Security
Code Setting” section.
Step 3: Type in the default password “888888”, then enter a new password and re-enter
it, finally tap “OK” to save the change.
X. Charging Backup Battery
10.1. Put the backup battery in place then connect the camera to an outlet AC power
supply using the power adapter and USB cable provided.
10.2. The battery charge indicator light will glow solid yellow during the charging process.
10.3. It will take 4 hours to obtain a full charge for the backup battery.
10.4. The battery charge indicator light will turn off when the backup battery is fully
charged.
Frequently Asked Questions
Q1: Why Camera WIFI signal is not appearing on my WIFI page?
A1: There are 4 solutions to this problem:
1. Take out the backup battery, plug the camera into an outlet power supply using the
USB cable and DC5V 2.0A power adapter provided. Wait 2 minutes for the WIFI signal
SSID to appear.
2. Reset the camera (See VIII), then wait for the WIFI signal SSID to show up.
3. Keep your phone or mobile device within the camera’s WIFI hotspot range, refreshing
the WIFI signal page. It may take up to 2 minutes for the hotspot to become recognizable
on your phone or mobile device's WIFI setting page.
4. Shut off your phone or mobile device’s WIFI function for a while, then turn it on to
search again.
Q2: The camera won’t show up in the application Camwf?
A2: Ensure your phone or mobile device is still connecting to the camera’s WIFI signal
and your camera is powered by the outlet power supply or the back-up battery is fully
charged.
Q3: Why live video screen shows up black and a searching circle spins in center
but nothing ever displays?
A3: If the camera connected WIFI speed is low, wait 10-30 seconds for live video to
appear. Or you can exit the live video screen and get into the screen again in a minute.
Q4: Why does the video footage have no image but noise during playback on my
PC computer?
A4: When the camera is in low battery during video recording process, this happens. So
if you need the camera to record full time, we suggest you charge the camera using the
DC5V 2.0A power adapter and USB cable included during the video recording process.
Q5: Even though I keep the camera charged, the WIFI signal still drops?
A5: Make sure that you use our DC5V 2.0A power adapter provided to charge the
camera. If the power adapter is lower than DC5V 2.0A, say, DC5V 1.0A, the camera’s
WIFI signal will be unstable and keep dropping. Plus, we don’t recommend you connect
the camera directly to your PC computer for charging, because the current output will not
be enough for the camera to run normally.
Q6: The camera is not holding my Wifi settings and continues to show that the
camera is offline?
A6: Make sure the camera is inside the range of good WIFI signal. Or if you are using the
backup battery, check if the power adapter is connected properly for long time use.
Q7: Will the camera still work if the power goes out?
A7: If the camera is in P2P (LAN) mode, the camera can still work and record video as
long as the backup battery provides power for the camera to run. If the camera is in WAN
mode, it will not work until power is restored and the Internet access is available.
Q8: How to add the camera to more devices?
A8: Make sure that camera is in WAN mode already. Then launch the “Camwf” APP on your
other Android devices, tap “+” icon, scan the QR code on the back of the camera for camera’s
UID and password. Or input the camera UID (a unique combination of numbers and letters
specific to your camera) and password. Finally, tap “OK” to add the camera to the APP.
Q9: What to do if I forget my password?
A9: You will have to reset the device to factory settings (See VIII) and re-add the camera.
Q10: The camera does not record any video to the Micro SD card?
A10: Power off the camera, take out the Micro SD card, format the SD card, then insert it
to the SD card slot to try again.
Q11: How many mobile devices can connect to the camera at the same time?
A11: No limit.
Q12: How many cameras are supported on the mobile application?
A12: No limit.
Q13: How to turn on the IR LEDs?
A13: When the illumination is below 10 lux, the IR LEDs will be turned on automatically.
The IR distance is 2 meters (6.5ft).
Q14: How to play back the video saved in the Micro SD card?
A14: Use a card reader to read and play back the video on your PC computer. Or use the
“Camwf” APP to play back (See 7.5)
Q15: Is there any PC client software I can use on my windows PC computer?
A15: PC client software download link:
http://www.wiseupshop.com/download?name=WIFI34&Submit=++++++++
Q16: Why is time display not stable, always blinking?
A16: Because the backup battery is low or the outlet power supply is not connected
properly.

I. Product Overview
1. IR LEDs
2. Camera Lens
3. Set Button
4. Plus Button
5. Micro SD Card Slot
6. Reset Button
7. Power Switch
8. USB Port
9. WIFI Indicator Light
10. Power Indicator Light
11. Battery Charge Indicator Light
12. Rechargeable Backup Battery
II. What’s in the Box
-1× WIFI Clock Camera
-1× USB Cable
-1× AC110-240V to DC 5V 2A Power Adapter
-1× 8GB Micro SD Card (fitted into the Micro SD card slot already)
-1× Rechargeable Backup Battery
-1× Insulating Film
III. Before You Start
>> Please remove the insulating film for the first use.
3.1. Get Clock Part Ready
3.1.1. Open back cover, plug the clock directly into an outlet AC power supply using the
power adapter included, time display will be lit brightly.
3.1.2. Press the Set Button once and the hour will start flashing, then press the Plus
Button to adjust the current hour.
3.1.3. Press the Set Button once again to save the hour setting and the minute will start
flashing, then press the Plus Button to adjust the current minute.
3.1.4. Press the Set Button to save the minute setting. Press the Plus Button to switch
between 12-hour and 24-hour mode, then press the Set Button once to save the setting.
3.2. Get WIFI Camera Part Ready
3.2.1. Please make sure the camera is fully charged, the Micro SD card has been
formatted already and is securely fitted into the camera’s SD card slot, or it will not work.
We recommend you use a SDHC Class 10 Micro SD card.
3.2.2. Power on the camera by sliding the Power Switch to the ON position. The charging
and power indicator lights will glow solid yellow while the WIFI indicator light will keep
flashing yellow, indicating the camera’s WIFI signal is ready.
IV. Network Setup
4.1. Install the “Camwf” APP on Android Smartphone or Tablet PC
Scan the QR code below to download the “Camwf” APP on your Android smartphone or
tablet PC.
4.2. P2P Connection Setup (LAN Mode)
4.2.1. Go to the WIFI Setting page on your phone or mobile device, connect to the
camera’s WIFI signal named “RT-**********”. Wait for the WIFI to be connected and your
phone status bar will appear WIFI symbol as below:
[Note]:
If the camera’s WIFI signal cannot be found after a long time, please see Q1 on the FAQ
page at the end of this user guide for detailed solutions.
4.2.2. Run the “Camwf” APP.
4.2.3. Add the camera to the “Camwf” APP as below:
Tap + symbol at the top right corner > Search for the camera > Tap the camera’s UID >
Tap OK.
4.2.4. If the camera shows “Online” on the home page, it means the camera’s P2P (LAN)
setup is successful, and the camera has entered into LAN mode. You can view live or
record video in P2P mode.
[Note]:
In this mode, you can only view video locally, within 15 meters (49ft) open range.
Tips: On the live video screen, you can gently put your index finger and thumb on the
screen then slide in and outward directions on a specific area to zoom in and out.
4.3. Remote View Setup (WAN Mode)
>> Before remote view setup, please make sure that the camera is successfully added to
the APP in the P2P (LAN) mode and it's online.
4.3.1. Launch the “Camwf” APP.
4.3.2. Follow the steps below to set up remote view function:
Step 1: On the home page, tap the gear icon and then choose “Camera setting” in the
popup window.
Step 2: On the “Advanced Setting” page, tap “Manage Wi-Fi networks” at the “WIFI
Setting” section.
Step 3: From a list of available networks in the area, select your desired WIFI hotspot to
enroll the camera in.
Step 4: Tap “OK” to complete the remote view setup. The camera will reboot automatically
and ring twice softly in 8 seconds.
How to check if remote view function works?
1. Exit the “Camwf” APP.
2. Back to the WIFI setting page on your phone or mobile device, exit your phone or
mobile device from the current WIFI network, enroll your phone or mobile device in
another WIFI hotspot, or you can turn off the WIFI function, enable your mobile network
data instead.
3. Make sure your smartphone or tablet PC has Internet access and launch the “Camwf”
APP again. If the camera shows “Online” on the home page, it means the remote view
setup is complete and the camera has entered into WAN mode. Now you can view live or
recorded video remotely from any location.
[Note]:
When the camera tinkles twice, it means the WIFI configuration is successful. If the camera
shows “Connect Fail” on the page and beeps twice, it means the WIFI configuration is failed and the
camera will go back to P2P mode automatically in 1 minute; you need to set up all over again.
V. Motion Detection Recording Setup
>> Please make sure the camera is successfully added to the APP and it's online before
you start.
5.1. Launch the “Camwf” APP.
5.2. Tap the gear icon on the home page and then choose “Camera Setting” in the
popup window.
5.3. On the “Advanced Setting” page, choose motion detection sensitivity then select
“Alarm” recording mode.
5.4. Tap “OK” to complete the Motion Detection Video Recording setting.
5.5. When a movement is detected, the camera will record a video automatically to the
local Micro SD card. Back to the home page, tap the gear icon and choose “SDCard
Record” to check out the video footage based on motion detection.
Tips: If the camera is in WAN mode, the video footage might show a black screen on your
phone during playback because of slow broadband network.
[Note]: Video Resolution: 1920×1080P Not Optional Video Format: AVI
VI. Recording Video Directly to Smartphone or Tablet PC
>> Please make sure the camera is successfully added to the APP and it's online before
you start.
6.1. Launch the “Camwf” APP. Tap the camera icon to get into the live video screen.
6.2. Tap the Remote Video Recording Button once to start or stop recording video.
The video files will be saved on your phone or mobile device's flash memory. These video
footage will come without audio.
6.3. Check out the video files.
Option 1: On the live video page, you can tap the gallery icon to check out the image
and video files.
Option 2: Back to the home page, you can tap the gear icon then choose “View
Snapshot” in the popup window to check out the image and video files.
[Note]:
Video Resolution: 640x360 Not Optional Video Format: MP4
VII. Recording Video to Local Micro SD Card Continuously
>> Please make sure the camera is successfully added to the APP and it's online before
you start.
7.1. Launch the “Camwf” APP.
7.2. Tap the gear icon on the home page then choose “Camera setting” in the popup
window.
7.3. Turn off “Motion Detection” function and choose “Full Time” recording mode instead.
7.4. Tap “OK” to complete the SD card recording setting and the camera will start
recording video to the Micro SD card continuously.
7.5. Back to the home page, tap the gear icon and then choose “SDCard Record” to
check out the video files saved in the Micro SD card.
Tips: If the camera is in WAN mode, the video footage might show a black screen on your
phone or mobile device during the playback because of slow broadband network.
[Note]:
1). A video clip will be generated and saved every 3 minutes automatically.
2). The camera can record video for 4 hours continuously with the backup battery.
VIII. Resetting
If for any reason the clock camera stops working or isn’t working properly, you can reset
the camera to restore it back to normal operation.
Option: When the camera is powered on, press and hold the Reset Button for 8 seconds
and the camera will tick 3 times. The camera’s WIFI signal named “RT-*******” will appear
on your phone or mobile device’s WIFI setting page again in a minute or so.
IX. Renaming Camera & Changing Password
>> Please make sure the camera is successfully added to the APP and it's online before
you start.
9.1. Launch the APP “Camwf”.
9.2. Rename the camera as below:
Step 1: Tap the gear icon on the home page and then choose “Account Setting” in the
popup window.
Step 2: Clear the default name and type in names like Home, Office, etc.
Step 3: Tap “OK” to confirm the change.
9.3. Change the password as below:
Step 1: Back to the home page, tap the gear icon and then choose “Camera setting”
in the popup window.
Step 2: On the “Advanced Setting” page, tap “Modify Security Code” at the “Security
Code Setting” section.
Step 3: Type in the default password “888888”, then enter a new password and re-enter
it, finally tap “OK” to save the change.
X. Charging Backup Battery
10.1. Put the backup battery in place then connect the camera to an outlet AC power
supply using the power adapter and USB cable provided.
10.2. The battery charge indicator light will glow solid yellow during the charging process.
10.3. It will take 4 hours to obtain a full charge for the backup battery.
10.4. The battery charge indicator light will turn off when the backup battery is fully
charged.
Frequently Asked Questions
Q1: Why Camera WIFI signal is not appearing on my WIFI page?
A1: There are 4 solutions to this problem:
1. Take out the backup battery, plug the camera into an outlet power supply using the
USB cable and DC5V 2.0A power adapter provided. Wait 2 minutes for the WIFI signal
SSID to appear.
2. Reset the camera (See VIII), then wait for the WIFI signal SSID to show up.
3. Keep your phone or mobile device within the camera’s WIFI hotspot range, refreshing
the WIFI signal page. It may take up to 2 minutes for the hotspot to become recognizable
on your phone or mobile device's WIFI setting page.
4. Shut off your phone or mobile device’s WIFI function for a while, then turn it on to
search again.
Q2: The camera won’t show up in the application Camwf?
A2: Ensure your phone or mobile device is still connecting to the camera’s WIFI signal
and your camera is powered by the outlet power supply or the back-up battery is fully
charged.
Q3: Why live video screen shows up black and a searching circle spins in center
but nothing ever displays?
A3: If the camera connected WIFI speed is low, wait 10-30 seconds for live video to
appear. Or you can exit the live video screen and get into the screen again in a minute.
Q4: Why does the video footage have no image but noise during playback on my
PC computer?
A4: When the camera is in low battery during video recording process, this happens. So
if you need the camera to record full time, we suggest you charge the camera using the
DC5V 2.0A power adapter and USB cable included during the video recording process.
Q5: Even though I keep the camera charged, the WIFI signal still drops?
A5: Make sure that you use our DC5V 2.0A power adapter provided to charge the
camera. If the power adapter is lower than DC5V 2.0A, say, DC5V 1.0A, the camera’s
WIFI signal will be unstable and keep dropping. Plus, we don’t recommend you connect
the camera directly to your PC computer for charging, because the current output will not
be enough for the camera to run normally.
Q6: The camera is not holding my Wifi settings and continues to show that the
camera is offline?
A6: Make sure the camera is inside the range of good WIFI signal. Or if you are using the
backup battery, check if the power adapter is connected properly for long time use.
Q7: Will the camera still work if the power goes out?
A7: If the camera is in P2P (LAN) mode, the camera can still work and record video as
long as the backup battery provides power for the camera to run. If the camera is in WAN
mode, it will not work until power is restored and the Internet access is available.
Q8: How to add the camera to more devices?
A8: Make sure that camera is in WAN mode already. Then launch the “Camwf” APP on your
other Android devices, tap “+” icon, scan the QR code on the back of the camera for camera’s
UID and password. Or input the camera UID (a unique combination of numbers and letters
specific to your camera) and password. Finally, tap “OK” to add the camera to the APP.
Q9: What to do if I forget my password?
A9: You will have to reset the device to factory settings (See VIII) and re-add the camera.
Q10: The camera does not record any video to the Micro SD card?
A10: Power off the camera, take out the Micro SD card, format the SD card, then insert it
to the SD card slot to try again.
Q11: How many mobile devices can connect to the camera at the same time?
A11: No limit.
Q12: How many cameras are supported on the mobile application?
A12: No limit.
Q13: How to turn on the IR LEDs?
A13: When the illumination is below 10 lux, the IR LEDs will be turned on automatically.
The IR distance is 2 meters (6.5ft).
Q14: How to play back the video saved in the Micro SD card?
A14: Use a card reader to read and play back the video on your PC computer. Or use the
“Camwf” APP to play back (See 7.5)
Q15: Is there any PC client software I can use on my windows PC computer?
A15: PC client software download link:
http://www.wiseupshop.com/download?name=WIFI34&Submit=++++++++
Q16: Why is time display not stable, always blinking?
A16: Because the backup battery is low or the outlet power supply is not connected
properly.

I. Product Overview
1. IR LEDs
2. Camera Lens
3. Set Button
4. Plus Button
5. Micro SD Card Slot
6. Reset Button
7. Power Switch
8. USB Port
9. WIFI Indicator Light
10. Power Indicator Light
11. Battery Charge Indicator Light
12. Rechargeable Backup Battery
II. What’s in the Box
-1× WIFI Clock Camera
-1× USB Cable
-1× AC110-240V to DC 5V 2A Power Adapter
-1× 8GB Micro SD Card (fitted into the Micro SD card slot already)
-1× Rechargeable Backup Battery
-1× Insulating Film
III. Before You Start
>> Please remove the insulating film for the first use.
3.1. Get Clock Part Ready
3.1.1. Open back cover, plug the clock directly into an outlet AC power supply using the
power adapter included, time display will be lit brightly.
3.1.2. Press the Set Button once and the hour will start flashing, then press the Plus
Button to adjust the current hour.
3.1.3. Press the Set Button once again to save the hour setting and the minute will start
flashing, then press the Plus Button to adjust the current minute.
3.1.4. Press the Set Button to save the minute setting. Press the Plus Button to switch
between 12-hour and 24-hour mode, then press the Set Button once to save the setting.
3.2. Get WIFI Camera Part Ready
3.2.1. Please make sure the camera is fully charged, the Micro SD card has been
formatted already and is securely fitted into the camera’s SD card slot, or it will not work.
We recommend you use a SDHC Class 10 Micro SD card.
3.2.2. Power on the camera by sliding the Power Switch to the ON position. The charging
and power indicator lights will glow solid yellow while the WIFI indicator light will keep
flashing yellow, indicating the camera’s WIFI signal is ready.
IV. Network Setup
4.1. Install the “Camwf” APP on Android Smartphone or Tablet PC
Scan the QR code below to download the “Camwf” APP on your Android smartphone or
tablet PC.
4.2. P2P Connection Setup (LAN Mode)
4.2.1. Go to the WIFI Setting page on your phone or mobile device, connect to the
camera’s WIFI signal named “RT-**********”. Wait for the WIFI to be connected and your
phone status bar will appear WIFI symbol as below:
[Note]:
If the camera’s WIFI signal cannot be found after a long time, please see Q1 on the FAQ
page at the end of this user guide for detailed solutions.
4.2.2. Run the “Camwf” APP.
4.2.3. Add the camera to the “Camwf” APP as below:
Tap + symbol at the top right corner > Search for the camera > Tap the camera’s UID >
Tap OK.
4.2.4. If the camera shows “Online” on the home page, it means the camera’s P2P (LAN)
setup is successful, and the camera has entered into LAN mode. You can view live or
record video in P2P mode.
[Note]:
In this mode, you can only view video locally, within 15 meters (49ft) open range.
Tips: On the live video screen, you can gently put your index finger and thumb on the
screen then slide in and outward directions on a specific area to zoom in and out.
4.3. Remote View Setup (WAN Mode)
>> Before remote view setup, please make sure that the camera is successfully added to
the APP in the P2P (LAN) mode and it's online.
4.3.1. Launch the “Camwf” APP.
4.3.2. Follow the steps below to set up remote view function:
Step 1: On the home page, tap the gear icon and then choose “Camera setting” in the
popup window.
Step 2: On the “Advanced Setting” page, tap “Manage Wi-Fi networks” at the “WIFI
Setting” section.
Step 3: From a list of available networks in the area, select your desired WIFI hotspot to
enroll the camera in.
Step 4: Tap “OK” to complete the remote view setup. The camera will reboot automatically
and ring twice softly in 8 seconds.
How to check if remote view function works?
1. Exit the “Camwf” APP.
2. Back to the WIFI setting page on your phone or mobile device, exit your phone or
mobile device from the current WIFI network, enroll your phone or mobile device in
another WIFI hotspot, or you can turn off the WIFI function, enable your mobile network
data instead.
3. Make sure your smartphone or tablet PC has Internet access and launch the “Camwf”
APP again. If the camera shows “Online” on the home page, it means the remote view
setup is complete and the camera has entered into WAN mode. Now you can view live or
recorded video remotely from any location.
[Note]:
When the camera tinkles twice, it means the WIFI configuration is successful. If the camera
shows “Connect Fail” on the page and beeps twice, it means the WIFI configuration is failed and the
camera will go back to P2P mode automatically in 1 minute; you need to set up all over again.
V. Motion Detection Recording Setup
>> Please make sure the camera is successfully added to the APP and it's online before
you start.
5.1. Launch the “Camwf” APP.
5.2. Tap the gear icon on the home page and then choose “Camera Setting” in the
popup window.
5.3. On the “Advanced Setting” page, choose motion detection sensitivity then select
“Alarm” recording mode.
5.4. Tap “OK” to complete the Motion Detection Video Recording setting.
5.5. When a movement is detected, the camera will record a video automatically to the
local Micro SD card. Back to the home page, tap the gear icon and choose “SDCard
Record” to check out the video footage based on motion detection.
Tips: If the camera is in WAN mode, the video footage might show a black screen on your
phone during playback because of slow broadband network.
[Note]:
Video Resolution: 1920×1080P Not Optional Video Format: AVI
VI. Recording Video Directly to Smartphone or Tablet PC
>> Please make sure the camera is successfully added to the APP and it's online before
you start.
6.1. Launch the “Camwf” APP. Tap the camera icon to get into the live video screen.
6.2. Tap the Remote Video Recording Button once to start or stop recording video.
The video files will be saved on your phone or mobile device's flash memory. These video
footage will come without audio.
6.3. Check out the video files.
Option 1: On the live video page, you can tap the gallery icon to check out the image
and video files.
Option 2: Back to the home page, you can tap the gear icon then choose “View
Snapshot” in the popup window to check out the image and video files.
[Note]:
Video Resolution: 640x360 Not Optional Video Format: MP4
VII. Recording Video to Local Micro SD Card Continuously
>> Please make sure the camera is successfully added to the APP and it's online before
you start.
7.1. Launch the “Camwf” APP.
7.2. Tap the gear icon on the home page then choose “Camera setting” in the popup
window.
7.3. Turn off “Motion Detection” function and choose “Full Time” recording mode instead.
7.4. Tap “OK” to complete the SD card recording setting and the camera will start
recording video to the Micro SD card continuously.
7.5. Back to the home page, tap the gear icon and then choose “SDCard Record” to
check out the video files saved in the Micro SD card.
Tips: If the camera is in WAN mode, the video footage might show a black screen on your
phone or mobile device during the playback because of slow broadband network.
[Note]:
1). A video clip will be generated and saved every 3 minutes automatically.
2). The camera can record video for 4 hours continuously with the backup battery.
VIII. Resetting
If for any reason the clock camera stops working or isn’t working properly, you can reset
the camera to restore it back to normal operation.
Option: When the camera is powered on, press and hold the Reset Button for 8 seconds
and the camera will tick 3 times. The camera’s WIFI signal named “RT-*******” will appear
on your phone or mobile device’s WIFI setting page again in a minute or so.
IX. Renaming Camera & Changing Password
>> Please make sure the camera is successfully added to the APP and it's online before
you start.
9.1. Launch the APP “Camwf”.
9.2. Rename the camera as below:
Step 1: Tap the gear icon on the home page and then choose “Account Setting” in the
popup window.
Step 2: Clear the default name and type in names like Home, Office, etc.
Step 3: Tap “OK” to confirm the change.
9.3. Change the password as below:
Step 1: Back to the home page, tap the gear icon and then choose “Camera setting”
in the popup window.
Step 2: On the “Advanced Setting” page, tap “Modify Security Code” at the “Security
Code Setting” section.
Step 3: Type in the default password “888888”, then enter a new password and re-enter
it, finally tap “OK” to save the change.
X. Charging Backup Battery
10.1. Put the backup battery in place then connect the camera to an outlet AC power
supply using the power adapter and USB cable provided.
10.2. The battery charge indicator light will glow solid yellow during the charging process.
10.3. It will take 4 hours to obtain a full charge for the backup battery.
10.4. The battery charge indicator light will turn off when the backup battery is fully
charged.
Frequently Asked Questions
Q1: Why Camera WIFI signal is not appearing on my WIFI page?
A1: There are 4 solutions to this problem:
1. Take out the backup battery, plug the camera into an outlet power supply using the
USB cable and DC5V 2.0A power adapter provided. Wait 2 minutes for the WIFI signal
SSID to appear.
2. Reset the camera (See VIII), then wait for the WIFI signal SSID to show up.
3. Keep your phone or mobile device within the camera’s WIFI hotspot range, refreshing
the WIFI signal page. It may take up to 2 minutes for the hotspot to become recognizable
on your phone or mobile device's WIFI setting page.
4. Shut off your phone or mobile device’s WIFI function for a while, then turn it on to
search again.
Q2: The camera won’t show up in the application Camwf?
A2: Ensure your phone or mobile device is still connecting to the camera’s WIFI signal
and your camera is powered by the outlet power supply or the back-up battery is fully
charged.
Q3: Why live video screen shows up black and a searching circle spins in center
but nothing ever displays?
A3: If the camera connected WIFI speed is low, wait 10-30 seconds for live video to
appear. Or you can exit the live video screen and get into the screen again in a minute.
Q4: Why does the video footage have no image but noise during playback on my
PC computer?
A4: When the camera is in low battery during video recording process, this happens. So
if you need the camera to record full time, we suggest you charge the camera using the
DC5V 2.0A power adapter and USB cable included during the video recording process.
Q5: Even though I keep the camera charged, the WIFI signal still drops?
A5: Make sure that you use our DC5V 2.0A power adapter provided to charge the
camera. If the power adapter is lower than DC5V 2.0A, say, DC5V 1.0A, the camera’s
WIFI signal will be unstable and keep dropping. Plus, we don’t recommend you connect
the camera directly to your PC computer for charging, because the current output will not
be enough for the camera to run normally.
Q6: The camera is not holding my Wifi settings and continues to show that the
camera is offline?
A6: Make sure the camera is inside the range of good WIFI signal. Or if you are using the
backup battery, check if the power adapter is connected properly for long time use.
Q7: Will the camera still work if the power goes out?
A7: If the camera is in P2P (LAN) mode, the camera can still work and record video as
long as the backup battery provides power for the camera to run. If the camera is in WAN
mode, it will not work until power is restored and the Internet access is available.
Q8: How to add the camera to more devices?
A8: Make sure that camera is in WAN mode already. Then launch the “Camwf” APP on your
other Android devices, tap “+” icon, scan the QR code on the back of the camera for camera’s
UID and password. Or input the camera UID (a unique combination of numbers and letters
specific to your camera) and password. Finally, tap “OK” to add the camera to the APP.
Q9: What to do if I forget my password?
A9: You will have to reset the device to factory settings (See VIII) and re-add the camera.
Q10: The camera does not record any video to the Micro SD card?
A10: Power off the camera, take out the Micro SD card, format the SD card, then insert it
to the SD card slot to try again.
Q11: How many mobile devices can connect to the camera at the same time?
A11: No limit.
Q12: How many cameras are supported on the mobile application?
A12: No limit.
Q13: How to turn on the IR LEDs?
A13: When the illumination is below 10 lux, the IR LEDs will be turned on automatically.
The IR distance is 2 meters (6.5ft).
Q14: How to play back the video saved in the Micro SD card?
A14: Use a card reader to read and play back the video on your PC computer. Or use the
“Camwf” APP to play back (See 7.5)
Q15: Is there any PC client software I can use on my windows PC computer?
A15: PC client software download link:
http://www.wiseupshop.com/download?name=WIFI34&Submit=++++++++
Q16: Why is time display not stable, always blinking?
A16: Because the backup battery is low or the outlet power supply is not connected
properly.

I. Product Overview
1. IR LEDs
2. Camera Lens
3. Set Button
4. Plus Button
5. Micro SD Card Slot
6. Reset Button
7. Power Switch
8. USB Port
9. WIFI Indicator Light
10. Power Indicator Light
11. Battery Charge Indicator Light
12. Rechargeable Backup Battery
II. What’s in the Box
-1× WIFI Clock Camera
-1× USB Cable
-1× AC110-240V to DC 5V 2A Power Adapter
-1× 8GB Micro SD Card (fitted into the Micro SD card slot already)
-1× Rechargeable Backup Battery
-1× Insulating Film
III. Before You Start
>> Please remove the insulating film for the first use.
3.1. Get Clock Part Ready
3.1.1. Open back cover, plug the clock directly into an outlet AC power supply using the
power adapter included, time display will be lit brightly.
3.1.2. Press the Set Button once and the hour will start flashing, then press the Plus
Button to adjust the current hour.
3.1.3. Press the Set Button once again to save the hour setting and the minute will start
flashing, then press the Plus Button to adjust the current minute.
3.1.4. Press the Set Button to save the minute setting. Press the Plus Button to switch
between 12-hour and 24-hour mode, then press the Set Button once to save the setting.
3.2. Get WIFI Camera Part Ready
3.2.1. Please make sure the camera is fully charged, the Micro SD card has been
formatted already and is securely fitted into the camera’s SD card slot, or it will not work.
We recommend you use a SDHC Class 10 Micro SD card.
3.2.2. Power on the camera by sliding the Power Switch to the ON position. The charging
and power indicator lights will glow solid yellow while the WIFI indicator light will keep
flashing yellow, indicating the camera’s WIFI signal is ready.
IV. Network Setup
4.1. Install the “Camwf” APP on Android Smartphone or Tablet PC
Scan the QR code below to download the “Camwf” APP on your Android smartphone or
tablet PC.
4.2. P2P Connection Setup (LAN Mode)
4.2.1. Go to the WIFI Setting page on your phone or mobile device, connect to the
camera’s WIFI signal named “RT-**********”. Wait for the WIFI to be connected and your
phone status bar will appear WIFI symbol as below:
[Note]:
If the camera’s WIFI signal cannot be found after a long time, please see Q1 on the FAQ
page at the end of this user guide for detailed solutions.
4.2.2. Run the “Camwf” APP.
4.2.3. Add the camera to the “Camwf” APP as below:
Tap + symbol at the top right corner > Search for the camera > Tap the camera’s UID >
Tap OK.
4.2.4. If the camera shows “Online” on the home page, it means the camera’s P2P (LAN)
setup is successful, and the camera has entered into LAN mode. You can view live or
record video in P2P mode.
[Note]:
In this mode, you can only view video locally, within 15 meters (49ft) open range.
Tips: On the live video screen, you can gently put your index finger and thumb on the
screen then slide in and outward directions on a specific area to zoom in and out.
4.3. Remote View Setup (WAN Mode)
>> Before remote view setup, please make sure that the camera is successfully added to
the APP in the P2P (LAN) mode and it's online.
4.3.1. Launch the “Camwf” APP.
4.3.2. Follow the steps below to set up remote view function:
Step 1: On the home page, tap the gear icon and then choose “Camera setting” in the
popup window.
Step 2: On the “Advanced Setting” page, tap “Manage Wi-Fi networks” at the “WIFI
Setting” section.
Step 3: From a list of available networks in the area, select your desired WIFI hotspot to
enroll the camera in.
Step 4: Tap “OK” to complete the remote view setup. The camera will reboot automatically
and ring twice softly in 8 seconds.
How to check if remote view function works?
1. Exit the “Camwf” APP.
2. Back to the WIFI setting page on your phone or mobile device, exit your phone or
mobile device from the current WIFI network, enroll your phone or mobile device in
another WIFI hotspot, or you can turn off the WIFI function, enable your mobile network
data instead.
3. Make sure your smartphone or tablet PC has Internet access and launch the “Camwf”
APP again. If the camera shows “Online” on the home page, it means the remote view
setup is complete and the camera has entered into WAN mode. Now you can view live or
recorded video remotely from any location.
[Note]:
When the camera tinkles twice, it means the WIFI configuration is successful. If the camera
shows “Connect Fail” on the page and beeps twice, it means the WIFI configuration is failed and the
camera will go back to P2P mode automatically in 1 minute; you need to set up all over again.
V. Motion Detection Recording Setup
>> Please make sure the camera is successfully added to the APP and it's online before
you start.
5.1. Launch the “Camwf” APP.
5.2. Tap the gear icon on the home page and then choose “Camera Setting” in the
popup window.
5.3. On the “Advanced Setting” page, choose motion detection sensitivity then select
“Alarm” recording mode.
5.4. Tap “OK” to complete the Motion Detection Video Recording setting.
5.5. When a movement is detected, the camera will record a video automatically to the
local Micro SD card. Back to the home page, tap the gear icon and choose “SDCard
Record” to check out the video footage based on motion detection.
Tips: If the camera is in WAN mode, the video footage might show a black screen on your
phone during playback because of slow broadband network.
[Note]:
Video Resolution: 1920×1080P Not Optional Video Format: AVI
VI. Recording Video Directly to Smartphone or Tablet PC
>> Please make sure the camera is successfully added to the APP and it's online before
you start.
6.1. Launch the “Camwf” APP. Tap the camera icon to get into the live video screen.
6.2. Tap the Remote Video Recording Button once to start or stop recording video.
The video files will be saved on your phone or mobile device's flash memory. These video
footage will come without audio.
6.3. Check out the video files.
Option 1: On the live video page, you can tap the gallery icon to check out the image
and video files.
Option 2: Back to the home page, you can tap the gear icon then choose “View
Snapshot” in the popup window to check out the image and video files.
[Note]:
Video Resolution: 640x360 Not Optional Video Format: MP4
VII. Recording Video to Local Micro SD Card Continuously
>> Please make sure the camera is successfully added to the APP and it's online before
you start.
7.1. Launch the “Camwf” APP.
7.2. Tap the gear icon on the home page then choose “Camera setting” in the popup
window.
7.3. Turn off “Motion Detection” function and choose “Full Time” recording mode instead.
7.4. Tap “OK” to complete the SD card recording setting and the camera will start
recording video to the Micro SD card continuously.
7.5. Back to the home page, tap the gear icon and then choose “SDCard Record” to
check out the video files saved in the Micro SD card.
Tips: If the camera is in WAN mode, the video footage might show a black screen on your
phone or mobile device during the playback because of slow broadband network.
[Note]:
1). A video clip will be generated and saved every 3 minutes automatically.
2). The camera can record video for 4 hours continuously with the backup battery.
VIII. Resetting
If for any reason the clock camera stops working or isn’t working properly, you can reset
the camera to restore it back to normal operation.
Option: When the camera is powered on, press and hold the Reset Button for 8 seconds
and the camera will tick 3 times. The camera’s WIFI signal named “RT-*******” will appear
on your phone or mobile device’s WIFI setting page again in a minute or so.
IX. Renaming Camera & Changing Password
>> Please make sure the camera is successfully added to the APP and it's online before
you start.
9.1. Launch the APP “Camwf”.
9.2. Rename the camera as below:
Step 1: Tap the gear icon on the home page and then choose “Account Setting” in the
popup window.
Step 2: Clear the default name and type in names like Home, Office, etc.
Step 3: Tap “OK” to confirm the change.
9.3. Change the password as below:
Step 1: Back to the home page, tap the gear icon and then choose “Camera setting”
in the popup window.
Step 2: On the “Advanced Setting” page, tap “Modify Security Code” at the “Security
Code Setting” section.
Step 3: Type in the default password “888888”, then enter a new password and re-enter
it, finally tap “OK” to save the change.
X. Charging Backup Battery
10.1. Put the backup battery in place then connect the camera to an outlet AC power
supply using the power adapter and USB cable provided.
10.2. The battery charge indicator light will glow solid yellow during the charging process.
10.3. It will take 4 hours to obtain a full charge for the backup battery.
10.4. The battery charge indicator light will turn off when the backup battery is fully
charged.
Frequently Asked Questions
Q1: Why Camera WIFI signal is not appearing on my WIFI page?
A1: There are 4 solutions to this problem:
1. Take out the backup battery, plug the camera into an outlet power supply using the
USB cable and DC5V 2.0A power adapter provided. Wait 2 minutes for the WIFI signal
SSID to appear.
2. Reset the camera (See VIII), then wait for the WIFI signal SSID to show up.
3. Keep your phone or mobile device within the camera’s WIFI hotspot range, refreshing
the WIFI signal page. It may take up to 2 minutes for the hotspot to become recognizable
on your phone or mobile device's WIFI setting page.
4. Shut off your phone or mobile device’s WIFI function for a while, then turn it on to
search again.
Q2: The camera won’t show up in the application Camwf?
A2: Ensure your phone or mobile device is still connecting to the camera’s WIFI signal
and your camera is powered by the outlet power supply or the back-up battery is fully
charged.
Q3: Why live video screen shows up black and a searching circle spins in center
but nothing ever displays?
A3: If the camera connected WIFI speed is low, wait 10-30 seconds for live video to
appear. Or you can exit the live video screen and get into the screen again in a minute.
Q4: Why does the video footage have no image but noise during playback on my
PC computer?
A4: When the camera is in low battery during video recording process, this happens. So
if you need the camera to record full time, we suggest you charge the camera using the
DC5V 2.0A power adapter and USB cable included during the video recording process.
Q5: Even though I keep the camera charged, the WIFI signal still drops?
A5: Make sure that you use our DC5V 2.0A power adapter provided to charge the
camera. If the power adapter is lower than DC5V 2.0A, say, DC5V 1.0A, the camera’s
WIFI signal will be unstable and keep dropping. Plus, we don’t recommend you connect
the camera directly to your PC computer for charging, because the current output will not
be enough for the camera to run normally.
Q6: The camera is not holding my Wifi settings and continues to show that the
camera is offline?
A6: Make sure the camera is inside the range of good WIFI signal. Or if you are using the
backup battery, check if the power adapter is connected properly for long time use.
Q7: Will the camera still work if the power goes out?
A7: If the camera is in P2P (LAN) mode, the camera can still work and record video as
long as the backup battery provides power for the camera to run. If the camera is in WAN
mode, it will not work until power is restored and the Internet access is available.
Q8: How to add the camera to more devices?
A8: Make sure that camera is in WAN mode already. Then launch the “Camwf” APP on your
other Android devices, tap “+” icon, scan the QR code on the back of the camera for camera’s
UID and password. Or input the camera UID (a unique combination of numbers and letters
specific to your camera) and password. Finally, tap “OK” to add the camera to the APP.
Q9: What to do if I forget my password?
A9: You will have to reset the device to factory settings (See VIII) and re-add the camera.
Q10: The camera does not record any video to the Micro SD card?
A10: Power off the camera, take out the Micro SD card, format the SD card, then insert it
to the SD card slot to try again.
Q11: How many mobile devices can connect to the camera at the same time?
A11: No limit.
Q12: How many cameras are supported on the mobile application?
A12: No limit.
Q13: How to turn on the IR LEDs?
A13: When the illumination is below 10 lux, the IR LEDs will be turned on automatically.
The IR distance is 2 meters (6.5ft).
Q14: How to play back the video saved in the Micro SD card?
A14: Use a card reader to read and play back the video on your PC computer. Or use the
“Camwf” APP to play back (See 7.5)
Q15: Is there any PC client software I can use on my windows PC computer?
A15: PC client software download link:
http://www.wiseupshop.com/download?name=WIFI34&Submit=++++++++
Q16: Why is time display not stable, always blinking?
A16: Because the backup battery is low or the outlet power supply is not connected
properly.

WIFI34
Benutzerhandbuch (Android-Version)
I. Produktübersicht
1. IR LEDs
2. Kameraobjektiv
3. Set-Taste
4. Plus-Taste
5. Mikro-Sd-Einbauschlitz
6. Reset-Taste
7. Netzschalter
8. USB-Anschluss
9. WIFI Indikator Licht
10. Betriebsanzeigelampe
11. Akku-Ladekontrollleuchte
12. Wiederaufladbare Backup-Batterie
II. Was ist in der Box
-1 × WIFI Uhr Kamera
-1 × USB-Kabel
-1 × AC110-240V bis DC 5V 2A Netzteil
-1 × 8GB Micro SD Card (bereits in den Micro SD Kartensteckplatz eingebaut)
-1 × Wiederaufladbare Akku
-1 × Isolierfolie
III. Bevor du anfängst
>> Bitte entfernen Sie den Isolierfilm zum ersten Gebrauch.
3.1. Holen Sie sich Uhr Teil bereit
3.1.1. Öffnen Sie die rückseitige Abdeckung, stecken Sie die Uhr direkt in eine Steckdose
Wechselstromversorgung mit dem mitgelieferten Netzteil, die Zeitanzeige leuchtet hell.
3.1.2. Drücken Sie einmal die Set-Taste und die Stunde beginnt zu blinken, und drücken
Sie dann die Plus-Taste, um die aktuelle Stunde einzustellen.
3.1.3. Drücken Sie erneut die Set-Taste, um die Stunden-Einstellung zu speichern, und
die Minute beginnt zu blinken, und drücken Sie dann die Plus-Taste, um die aktuelle
Minute einzustellen.
3.1.4. Drücken Sie die Set-Taste, um die Minuteneinstellung zu speichern. Drücken Sie
die Plus-Taste, um zwischen 12-Stunden- und 24-Stunden-Modus umzuschalten, und
drücken Sie dann einmal die Set-Taste, um die Einstellung zu speichern.
3.2 Holen Sie sich WIFI Kamera Teil bereit
3.2.1. Bitte stellen Sie sicher, dass die Kamera voll aufgeladen ist, die Micro SD-Karte
wurde bereits formatiert und ist sicher in den SD-Kartensteckplatz der Kamera
eingepasst, oder es funktioniert nicht. Wir empfehlen Ihnen, eine SDHC Class 10 Micro
SD Karte zu verwenden.
3.2.2. Schalten Sie die Kamera ein, indem Sie den Netzschalter auf ON schieben. Die
Lade- und Kontrollleuchten leuchten leuchtend gelb, während die WIFI-Kontrollleuchte
gelb blinkt, was bedeutet, dass das WIFI-Signal der Kamera bereit ist.
IV. Netzwerkeinrichtung
4.1. Installiere die "Camwf" APP auf Android Smartphone oder Tablet PC
Scannen Sie den QR-Code unten, um die "Camwf" APP auf Ihrem Android-Smartphone
oder Tablet PC herunterzuladen.
4.2. P2P-Verbindungsaufbau (LAN-Modus)
4.2.1. Gehen Sie auf die WIFI-Einstellungsseite auf Ihrem Telefon oder Mobilgerät,
verbinden Sie das WIFI-Signal der Kamera mit dem Namen "RT - **********". Warten Sie,
bis das WIFI angeschlossen ist und Ihre Telefonstatusleiste erscheint als WIFI-Symbol
wie folgt:
[Hinweis]:
Wenn das WIFI-Signal der Kamera nach langer Zeit nicht gefunden werden kann,
siehe Q1 auf der FAQ-Seite am Ende dieser Bedienungsanleitung für detaillierte Lösungen.
4.2.2. Führen Sie die "Camwf" APP.
4.2.3. Füge die Kamera zum "Camwf" APP wie folgt hinzu:
Tippen Sie auf + Symbol rechts oben> Suche nach der Kamera> Tippen Sie auf die UID
der Kamera> Tippen Sie auf OK.
4.2.4. Wenn die Kamera auf der Homepage "Online" anzeigt, bedeutet dies, dass das
P2P (LAN) Setup der Kamera erfolgreich ist und die Kamera in den LAN-Modus
eingegeben wurde. Sie können Live- oder Videoaufnahmen im P2P-Modus anzeigen.
[Hinweis]:
In diesem Modus können Sie nur Video lokal, innerhalb von 15 Metern (49ft) offenen
Bereich anzeigen.
Tipps: Auf dem Live-Video-Bildschirm können Sie sanft Ihren Zeigefinger und Daumen
auf den Bildschirm dann nach innen und nach außen Richtungen auf einem bestimmten
Bereich zu vergrößern und verkleinern.
4.3 Remote View Setup (WAN-Modus)
>> Bevor Sie das Setup der Fernbedienung vornehmen, stellen Sie bitte sicher, dass die
Kamera der APP im P2P-Modus (LAN) erfolgreich hinzugefügt wurde und es online ist.
4.3.1. Starten Sie die "Camwf" APP.
4.3.2. Gehen Sie folgendermaßen vor, um die Remote View-Funktion einzurichten:
Schritt 1: Tippen Sie auf der Startseite auf das Zahnradsymbol und wählen Sie im
Popup-Fenster die Option "Kameraeinstellung".
Schritt 2: Tippen Sie auf der Seite "Erweiterte Einstellung" auf "Verwalten von
Wi-Fi-Netzwerken" im Abschnitt "WIFI-Einstellung".
Schritt 3: Wählen Sie aus einer Liste der verfügbaren Netzwerke im Bereich den
gewünschten WIFI-Hotspot aus, um die Kamera einzuschreiben.
Schritt 4: Tippen Sie auf "OK", um das Setup der Remote-Ansicht abzuschließen. Die
Kamera startet automatisch und klingelt zweimal sanft in 8 Sekunden.
Wie kann man überprüfen, ob die Remote View Funktion funktioniert?
1. Beenden Sie die "Camwf" APP.
2. Zurück zur WIFI-Einstellungsseite auf Ihrem Telefon oder Mobilgerät beenden Sie Ihr
Telefon oder Mobilgerät aus dem aktuellen WIFI-Netzwerk, registrieren Sie Ihr Telefon
oder Mobilgerät in einem anderen WIFI-Hotspot, oder Sie können die WIFI-Funktion
deaktivieren, Ihr Mobiltelefon aktivieren Netzwerkdaten stattdessen
3. Stellen Sie sicher, dass Ihr Smartphone oder Tablet PC Internet-Zugang hat und
starten Sie die "Camwf" APP wieder. Wenn die Kamera auf der Homepage "Online"
anzeigt, bedeutet dies, dass das Remote-View-Setup abgeschlossen ist und die Kamera
in den WAN-Modus eingegeben wurde. Jetzt können Sie live oder aufgezeichnetes Video
von jedem Ort aus fern sehen.
[Hinweis]:
Wenn die Kamera zweimal kippt, bedeutet dies, dass die WIFI-Konfiguration erfolgreich
ist. Wenn die Kamera "Connect Fail" auf der Seite anzeigt und zweimal ertönt, bedeutet dies, dass
die WIFI-Konfiguration fehlgeschlagen ist und die Kamera in 1 Minute wieder in den P2P-Modus
zurückkehrt. Du musst noch einmal aufstehen.
V. Bewegungserkennung Aufnahme Setup
>> Bitte stellen Sie sicher, dass die Kamera erfolgreich zur APP hinzugefügt wird und es
ist online, bevor Sie beginnen.
5.1. Starten Sie die "Camwf" APP.
5.2. Tippen Sie auf das Getriebe-Symbol auf der Homepage und wählen Sie im
Popup-Fenster "Kameraeinstellung".
5.3. Wählen Sie auf der Seite "Erweiterte Einstellung" die Bewegungserkennungsempfindlichkeit
aus und wählen Sie dann den Aufnahmemodus "Alarm".
5.4 Tippen Sie auf "OK", um die Motion Detection Video Recording-Einstellung abzuschließen.
5.5 Wenn eine Bewegung erkannt wird, nimmt die Kamera automatisch ein Video auf die lokale
Micro SD-Karte auf. Zurück zur Homepage tippen Sie auf das Zahnradsymbol und wählen Sie
"SDCard Record", um das Videomaterial auf der Grundlage der Bewegungserkennung zu
überprüfen.
Tipps: Wenn sich die Kamera im WAN-Modus befindet, kann das Videomaterial während
der Wiedergabe einen schwarzen Bildschirm auf Ihrem Telefon anzeigen, da langsames
Breitbandnetzwerk vorhanden ist.
[Anmerkung]:
Videoauflösung: 1920 × 1080P Nicht optional Videoformat: AVI
VI. Video direkt auf Smartphone oder Tablet PC aufnehmen
>> Bitte stellen Sie sicher, dass die Kamera erfolgreich zur APP hinzugefügt wird und es
ist online, bevor Sie beginnen.
6.1. Starten Sie die "Camwf" APP. Tippen Sie auf das Kamerasymbol, um in den
Live-Videobildschirm zu gelangen.
6.2. Tippen Sie einmal auf die Fernbedienung, um das Video aufzunehmen oder zu
beenden. Die Videodateien werden auf dem Flash-Speicher des Telefons oder des
Mobilgeräts gespeichert. Diese Videomaterial wird ohne Audio kommen.
6.3. Schauen Sie sich die Videodateien an.
Option 1: Auf der Live-Videoseite kannst du auf das Galeriesymbol tippen, um die
Bild- und Videodateien auszuprobieren.
Option 2: Zurück zur Homepage kannst du auf das Zahnradsymbol tippen und dann
"Ansicht Schnappschuss" im Popup-Fenster wählen, um die Bild- und Videodateien
auszuprobieren.
[Anmerkung]:
Videoauflösung: 640x360 Nicht optional Videoformat: MP4
VII. Aufnehmen von Video auf lokale Micro SD Karte Kontinuierlich
>> Bitte stellen Sie sicher, dass die Kamera erfolgreich zur APP hinzugefügt wird und es
ist online, bevor Sie beginnen.
7.1. Starten Sie die "Camwf" APP.
7.2 Tippen Sie auf das Getriebe-Symbol auf der Homepage und wählen Sie dann
"Kamera-Einstellung" im Popup-Fenster.
7.3 Schalten Sie die "Motion Detection" -Funktion aus und wählen Sie stattdessen den
"Full Time" -Aufzeichnungsmodus.
7.4 Tippen Sie auf "OK", um die SD-Kartenaufzeichnungseinstellung abzuschließen, und
die Kamera startet kontinuierlich die Aufnahme von Video auf die Micro SD-Karte.
7,5. Zurück zur Startseite tippen Sie auf das Zahnradsymbol und wählen dann "SDCard
Record", um die auf der Micro SD Karte gespeicherten Videodateien auszuchecken.
Tipps: Wenn sich die Kamera im WAN-Modus befindet, zeigt das Videomaterial während
der Wiedergabe einen schwarzen Bildschirm auf Ihrem Telefon oder Mobilgerät während
des langsamen Breitbandnetzes.
[Hinweis]:
1). Ein Videoclip wird alle 3 Minuten automatisch generiert und gespeichert.
2). Die Kamera kann Video für 4 Stunden kontinuierlich mit der Backup-Batterie aufnehmen.
VIII. Zurücksetzen
Wenn aus irgendeinem Grund die Uhrkamera aufhört zu arbeiten oder nicht richtig
funktioniert, kannst du die Kamera zurücksetzen, um sie wieder in den normalen Betrieb
zurückzusetzen.
Option: Wenn die Kamera eingeschaltet ist, halten Sie die Reset-Taste für 8 Sekunden
gedrückt und die Kamera dreht 3 Mal. Das WIFI-Signal der Kamera mit dem Namen "RT
- *******" erscheint auf Ihrer Telefon- oder Mobiltelefon-WIFI-Einstellungsseite in einer
Minute oder so.
IX. Umbenennen Kamera & Passwort ändern
>> Bitte stellen Sie sicher, dass die Kamera erfolgreich zur APP hinzugefügt wird und es
ist online, bevor Sie beginnen.
9.1. Starten Sie die APP "Camwf".
9.2. Benennen Sie die Kamera wie folgt um:
Schritt 1: Tippen Sie auf das Getriebe-Symbol auf der Homepage und wählen Sie im
Popup-Fenster die Option "Kontoeinstellung".
Schritt 2: Löschen Sie den Standardnamen und geben Sie Namen wie Home, Office usw.
ein.
Schritt 3: Tippen Sie auf "OK", um die Änderung zu bestätigen.
9.3. Ändern Sie das Passwort wie folgt:
Schritt 1: Zurück zur Homepage tippen Sie auf das Zahnradsymbol und wählen dann
im Popup-Fenster die Option "Kameraeinstellung".
Schritt 2: Tippen Sie auf der Seite "Erweiterte Einstellung" auf "Sicherheitscode ändern"
im Abschnitt "Sicherheitscode-Einstellung".
Schritt 3: Geben Sie das Standardpasswort "888888" ein, geben Sie dann ein neues
Passwort ein und geben Sie es erneut ein. Tippen Sie dann auf "OK", um die Änderung zu
speichern.
X. Ladungssicherungsbatterie
10.1. Setzen Sie die Reservebatterie ein und schließen Sie die Kamera an eine
Steckdose an. Stromversorgung mit dem Netzteil und dem mitgelieferten USB-Kabel.
10.2 Die Batterieladeanzeige leuchtet während des Ladevorgangs fest gelb.
10.3 Es dauert 4 Stunden, um eine volle Ladung für die Backup-Batterie zu erhalten.
10.4 Die Batterieladeanzeige leuchtet, wenn der Akku vollständig aufgeladen ist.
Häufig gestellte Fragen
Q1: Warum wird das WIFI-Signal der Kamera nicht auf meiner WIFI-Seite angezeigt?
A1: Es gibt 4 Lösungen für dieses Problem:
1. Nehmen Sie die Pufferbatterie heraus, stecken Sie die Kamera in eine Steckdose mit
dem USB-Kabel und dem mitgelieferten Netzteil DC5V 2.0A. Warten Sie 2 Minuten, bis
das WIFI-Signal SSID erscheint.
2. Setzen Sie die Kamera zurück (siehe VIII) und warten Sie dann, bis das WIFI-Signal
SSID angezeigt wird.
3. Halten Sie Ihr Telefon oder Mobilgerät in der WIFI-Hotspot-Reihe der Kamera und
erfrischen die WIFI-Signalseite. Es kann bis zu 2 Minuten dauern, bis der Hotspot auf der
Telefon- oder Mobiltelefon-WIFI-Einstellungsseite erkennbar wird.
4. Schalten Sie die WIFI-Funktion Ihres Telefons oder des Mobilgeräts für eine Weile aus,
und schalten Sie es dann wieder ein.
Q2: Die Kamera wird in der Anwendung Camwf nicht angezeigt?
A2: Vergewissern Sie sich, dass Ihr Telefon oder Mobilgerät immer noch mit dem
WIFI-Signal der Kamera verbunden ist und Ihre Kamera mit der Steckdose versorgt wird
oder der Backup-Akku vollständig aufgeladen ist.
Q3: Warum Live-Video-Bildschirm zeigt sich schwarz und ein Suchkreis dreht sich in
der Mitte, aber nichts zeigt jemals?
A3: Wenn die Kamera mit der WIFI-Geschwindigkeit verbunden ist, warten Sie 10-30
Sekunden, bis das Live-Video erscheint. Oder du kannst den Live-Videobildschirm
verlassen und gleich wieder in den Bildschirm kommen.
Q4: Warum hat das Videomaterial während der Wiedergabe auf meinem PC-Computer
kein Bild?
A4: Wenn sich die Kamera während des Videoaufzeichnungsprozesses im Akku befindet,
geschieht dies. Also, wenn Sie die Kamera benötigen, um Vollzeit aufzunehmen, empfehlen
wir Ihnen, die Kamera mit dem DC5V 2.0A Netzteil und USB-Kabel während des
Video-Aufnahmeprozesses aufzuladen.
Q5: Auch wenn ich die Kamera geladen habe, fällt das WIFI-Signal immer noch ab?
A5: Vergewissern Sie sich, dass Sie unseren DC5V 2.0A Netzadapter verwenden, um die
Kamera zu laden. Wenn der Netzadapter niedriger als DC5V 2.0A ist, sagen wir, DC5V 1.0A,
wird das WIFI-Signal der Kamera instabil sein und weiter fallen lassen. Plus, wir empfehlen
Ihnen nicht, die Kamera direkt an Ihren PC-Computer zum Aufladen anzuschließen, da die
aktuelle Ausgabe nicht ausreicht, damit die Kamera normal läuft.
Q6: Die Kamera hält meine Wifi-Einstellungen nicht und zeigt weiter, dass die Kamera
offline ist?
A6: Stellen Sie sicher, dass die Kamera im Bereich des guten WIFI-Signals liegt. Oder
wenn Sie die Ersatzbatterie verwenden, überprüfen Sie, ob das Netzteil für längere Zeit
richtig angeschlossen ist.
Q7: Wird die Kamera noch arbeiten, wenn die Stromversorgung erlischt?
A7: Wenn sich die Kamera im P2P-Modus befindet, kann die Kamera immer noch
arbeiten und Videos aufnehmen, solange die Backup-Batterie Strom für die Kamera
liefert. Wenn sich die Kamera im WAN-Modus befindet, funktioniert das nicht, bis die
Stromversorgung wiederhergestellt ist und der Internetzugang verfügbar ist.
Q8: Wie füge ich die Kamera zu mehr Geräten hinzu?
A8: Vergewissern Sie sich, dass sich die Kamera bereits im WAN-Modus befindet. Dann
starten Sie die "Camwf" APP auf Ihrem anderen Android-Geräte, tippen Sie auf "+"
-Symbol, scannen Sie den QR-Code auf der Rückseite der Kamera für die UID und das
Passwort der Kamera. Oder geben Sie die Kamera UID (eine eindeutige Kombination
von Zahlen und Buchstaben für Ihre Kamera) und Passwort. Schließlich tippen Sie auf
"OK", um die Kamera zur APP hinzuzufügen.
Q9: Wenn ich mein Passwort vergessen habe?
A9: Sie müssen das Gerät auf die Werkseinstellungen zurücksetzen (siehe VIII) und die
Kamera erneut hinzufügen.
Q10: Die Kamera nimmt kein Video auf die Micro SD-Karte auf?
A10: Schalten Sie die Kamera aus, nehmen Sie die Micro SD-Karte heraus, formatieren Sie die
SD-Karte und legen Sie sie dann in den SD-Kartensteckplatz ein, um es erneut zu versuchen.
Q11: Wie viele mobile Geräte können gleichzeitig an die Kamera angeschlossen werden?
A11: Keine Begrenzung.
Q12: Wie viele Kameras werden auf der mobilen Applikation unterstützt?
A12: Keine Begrenzung.
Q13: Wie schalte ich die IR-LEDs ein?
A13: Wenn die Beleuchtung unter 10 Lux liegt, werden die IR-LEDs automatisch
eingeschaltet. Der IR-Abstand beträgt 2 Meter (6,5ft).
Q14: Wie kann ich das auf der Micro SD-Karte gespeicherte Video wiedergeben?
A14: Verwenden Sie einen Kartenleser, um das Video auf Ihrem PC zu lesen und
wiederzugeben. Oder benutze die "Camwf" APP zum Abspielen (siehe 7.5)
F15: Gibt es irgendeine PC-Client-Software, die ich auf meinem Windows PC-Computer
verwenden kann?
A15: PC-Client-Software-Download-Link:
Http://www.wiseupshop.com/download?name=WIFI34&Submit=++++++++
F16: Warum ist die Zeitanzeige nicht stabil, blinkt immer?
A16: Da die Backup-Batterie leer ist oder die Steckdose nicht ordnungsgemäß angeschlossen
ist.

I. Produktübersicht
1. IR LEDs
2. Kameraobjektiv
3. Set-Taste
4. Plus-Taste
5. Mikro-Sd-Einbauschlitz
6. Reset-Taste
7. Netzschalter
8. USB-Anschluss
9. WIFI Indikator Licht
10. Betriebsanzeigelampe
11. Akku-Ladekontrollleuchte
12. Wiederaufladbare Backup-Batterie
II. Was ist in der Box
-1 × WIFI Uhr Kamera
-1 × USB-Kabel
-1 × AC110-240V bis DC 5V 2A Netzteil
-1 × 8GB Micro SD Card (bereits in den Micro SD Kartensteckplatz eingebaut)
-1 × Wiederaufladbare Akku
-1 × Isolierfolie
III. Bevor du anfängst
>> Bitte entfernen Sie den Isolierfilm zum ersten Gebrauch.
3.1. Holen Sie sich Uhr Teil bereit
3.1.1. Öffnen Sie die rückseitige Abdeckung, stecken Sie die Uhr direkt in eine Steckdose
Wechselstromversorgung mit dem mitgelieferten Netzteil, die Zeitanzeige leuchtet hell.
3.1.2. Drücken Sie einmal die Set-Taste und die Stunde beginnt zu blinken, und drücken
Sie dann die Plus-Taste, um die aktuelle Stunde einzustellen.
3.1.3. Drücken Sie erneut die Set-Taste, um die Stunden-Einstellung zu speichern, und
die Minute beginnt zu blinken, und drücken Sie dann die Plus-Taste, um die aktuelle
Minute einzustellen.
3.1.4. Drücken Sie die Set-Taste, um die Minuteneinstellung zu speichern. Drücken Sie
die Plus-Taste, um zwischen 12-Stunden- und 24-Stunden-Modus umzuschalten, und
drücken Sie dann einmal die Set-Taste, um die Einstellung zu speichern.
3.2 Holen Sie sich WIFI Kamera Teil bereit
3.2.1. Bitte stellen Sie sicher, dass die Kamera voll aufgeladen ist, die Micro SD-Karte
wurde bereits formatiert und ist sicher in den SD-Kartensteckplatz der Kamera
eingepasst, oder es funktioniert nicht. Wir empfehlen Ihnen, eine SDHC Class 10 Micro
SD Karte zu verwenden.
3.2.2. Schalten Sie die Kamera ein, indem Sie den Netzschalter auf ON schieben. Die
Lade- und Kontrollleuchten leuchten leuchtend gelb, während die WIFI-Kontrollleuchte
gelb blinkt, was bedeutet, dass das WIFI-Signal der Kamera bereit ist.
IV. Netzwerkeinrichtung
4.1. Installiere die "Camwf" APP auf Android Smartphone oder Tablet PC
Scannen Sie den QR-Code unten, um die "Camwf" APP auf Ihrem Android-Smartphone
oder Tablet PC herunterzuladen.
4.2. P2P-Verbindungsaufbau (LAN-Modus)
4.2.1. Gehen Sie auf die WIFI-Einstellungsseite auf Ihrem Telefon oder Mobilgerät,
verbinden Sie das WIFI-Signal der Kamera mit dem Namen "RT - **********". Warten Sie,
bis das WIFI angeschlossen ist und Ihre Telefonstatusleiste erscheint als WIFI-Symbol
wie folgt:
[Hinweis]:
Wenn das WIFI-Signal der Kamera nach langer Zeit nicht gefunden werden kann,
siehe Q1 auf der FAQ-Seite am Ende dieser Bedienungsanleitung für detaillierte Lösungen.
4.2.2. Führen Sie die "Camwf" APP.
4.2.3. Füge die Kamera zum "Camwf" APP wie folgt hinzu:
Tippen Sie auf + Symbol rechts oben> Suche nach der Kamera> Tippen Sie auf die UID
der Kamera> Tippen Sie auf OK.
4.2.4. Wenn die Kamera auf der Homepage "Online" anzeigt, bedeutet dies, dass das
P2P (LAN) Setup der Kamera erfolgreich ist und die Kamera in den LAN-Modus
eingegeben wurde. Sie können Live- oder Videoaufnahmen im P2P-Modus anzeigen.
[Hinweis]:
In diesem Modus können Sie nur Video lokal, innerhalb von 15 Metern (49ft) offenen
Bereich anzeigen.
Tipps: Auf dem Live-Video-Bildschirm können Sie sanft Ihren Zeigefinger und Daumen
auf den Bildschirm dann nach innen und nach außen Richtungen auf einem bestimmten
Bereich zu vergrößern und verkleinern.
4.3 Remote View Setup (WAN-Modus)
>> Bevor Sie das Setup der Fernbedienung vornehmen, stellen Sie bitte sicher, dass die
Kamera der APP im P2P-Modus (LAN) erfolgreich hinzugefügt wurde und es online ist.
4.3.1. Starten Sie die "Camwf" APP.
4.3.2. Gehen Sie folgendermaßen vor, um die Remote View-Funktion einzurichten:
Schritt 1: Tippen Sie auf der Startseite auf das Zahnradsymbol und wählen Sie im
Popup-Fenster die Option "Kameraeinstellung".
Schritt 2: Tippen Sie auf der Seite "Erweiterte Einstellung" auf "Verwalten von
Wi-Fi-Netzwerken" im Abschnitt "WIFI-Einstellung".
Schritt 3: Wählen Sie aus einer Liste der verfügbaren Netzwerke im Bereich den
gewünschten WIFI-Hotspot aus, um die Kamera einzuschreiben.
Schritt 4: Tippen Sie auf "OK", um das Setup der Remote-Ansicht abzuschließen. Die
Kamera startet automatisch und klingelt zweimal sanft in 8 Sekunden.
Wie kann man überprüfen, ob die Remote View Funktion funktioniert?
1. Beenden Sie die "Camwf" APP.
2. Zurück zur WIFI-Einstellungsseite auf Ihrem Telefon oder Mobilgerät beenden Sie Ihr
Telefon oder Mobilgerät aus dem aktuellen WIFI-Netzwerk, registrieren Sie Ihr Telefon
oder Mobilgerät in einem anderen WIFI-Hotspot, oder Sie können die WIFI-Funktion
deaktivieren, Ihr Mobiltelefon aktivieren Netzwerkdaten stattdessen
3. Stellen Sie sicher, dass Ihr Smartphone oder Tablet PC Internet-Zugang hat und
starten Sie die "Camwf" APP wieder. Wenn die Kamera auf der Homepage "Online"
anzeigt, bedeutet dies, dass das Remote-View-Setup abgeschlossen ist und die Kamera
in den WAN-Modus eingegeben wurde. Jetzt können Sie live oder aufgezeichnetes Video
von jedem Ort aus fern sehen.
[Hinweis]:
Wenn die Kamera zweimal kippt, bedeutet dies, dass die WIFI-Konfiguration erfolgreich
ist. Wenn die Kamera "Connect Fail" auf der Seite anzeigt und zweimal ertönt, bedeutet dies, dass
die WIFI-Konfiguration fehlgeschlagen ist und die Kamera in 1 Minute wieder in den P2P-Modus
zurückkehrt. Du musst noch einmal aufstehen.
V. Bewegungserkennung Aufnahme Setup
>> Bitte stellen Sie sicher, dass die Kamera erfolgreich zur APP hinzugefügt wird und es
ist online, bevor Sie beginnen.
5.1. Starten Sie die "Camwf" APP.
5.2. Tippen Sie auf das Getriebe-Symbol auf der Homepage und wählen Sie im
Popup-Fenster "Kameraeinstellung".
5.3. Wählen Sie auf der Seite "Erweiterte Einstellung" die Bewegungserkennungsempfindlichkeit
aus und wählen Sie dann den Aufnahmemodus "Alarm".
5.4 Tippen Sie auf "OK", um die Motion Detection Video Recording-Einstellung abzuschließen.
5.5 Wenn eine Bewegung erkannt wird, nimmt die Kamera automatisch ein Video auf die lokale
Micro SD-Karte auf. Zurück zur Homepage tippen Sie auf das Zahnradsymbol und wählen Sie
"SDCard Record", um das Videomaterial auf der Grundlage der Bewegungserkennung zu
überprüfen.
Tipps: Wenn sich die Kamera im WAN-Modus befindet, kann das Videomaterial während
der Wiedergabe einen schwarzen Bildschirm auf Ihrem Telefon anzeigen, da langsames
Breitbandnetzwerk vorhanden ist.
[Anmerkung]: Videoauflösung: 1920 × 1080P Nicht optional Videoformat: AVI
VI. Video direkt auf Smartphone oder Tablet PC aufnehmen
>> Bitte stellen Sie sicher, dass die Kamera erfolgreich zur APP hinzugefügt wird und es
ist online, bevor Sie beginnen.
6.1. Starten Sie die "Camwf" APP. Tippen Sie auf das Kamerasymbol, um in den
Live-Videobildschirm zu gelangen.
6.2. Tippen Sie einmal auf die Fernbedienung, um das Video aufzunehmen oder zu
beenden. Die Videodateien werden auf dem Flash-Speicher des Telefons oder des
Mobilgeräts gespeichert. Diese Videomaterial wird ohne Audio kommen.
6.3. Schauen Sie sich die Videodateien an.
Option 1: Auf der Live-Videoseite kannst du auf das Galeriesymbol tippen, um die
Bild- und Videodateien auszuprobieren.
Option 2: Zurück zur Homepage kannst du auf das Zahnradsymbol tippen und dann
"Ansicht Schnappschuss" im Popup-Fenster wählen, um die Bild- und Videodateien
auszuprobieren.
[Anmerkung]:
Videoauflösung: 640x360 Nicht optional Videoformat: MP4
VII. Aufnehmen von Video auf lokale Micro SD Karte Kontinuierlich
>> Bitte stellen Sie sicher, dass die Kamera erfolgreich zur APP hinzugefügt wird und es
ist online, bevor Sie beginnen.
7.1. Starten Sie die "Camwf" APP.
7.2 Tippen Sie auf das Getriebe-Symbol auf der Homepage und wählen Sie dann
"Kamera-Einstellung" im Popup-Fenster.
7.3 Schalten Sie die "Motion Detection" -Funktion aus und wählen Sie stattdessen den
"Full Time" -Aufzeichnungsmodus.
7.4 Tippen Sie auf "OK", um die SD-Kartenaufzeichnungseinstellung abzuschließen, und
die Kamera startet kontinuierlich die Aufnahme von Video auf die Micro SD-Karte.
7,5. Zurück zur Startseite tippen Sie auf das Zahnradsymbol und wählen dann "SDCard
Record", um die auf der Micro SD Karte gespeicherten Videodateien auszuchecken.
Tipps: Wenn sich die Kamera im WAN-Modus befindet, zeigt das Videomaterial während
der Wiedergabe einen schwarzen Bildschirm auf Ihrem Telefon oder Mobilgerät während
des langsamen Breitbandnetzes.
[Hinweis]:
1). Ein Videoclip wird alle 3 Minuten automatisch generiert und gespeichert.
2). Die Kamera kann Video für 4 Stunden kontinuierlich mit der Backup-Batterie aufnehmen.
VIII. Zurücksetzen
Wenn aus irgendeinem Grund die Uhrkamera aufhört zu arbeiten oder nicht richtig
funktioniert, kannst du die Kamera zurücksetzen, um sie wieder in den normalen Betrieb
zurückzusetzen.
Option: Wenn die Kamera eingeschaltet ist, halten Sie die Reset-Taste für 8 Sekunden
gedrückt und die Kamera dreht 3 Mal. Das WIFI-Signal der Kamera mit dem Namen "RT
- *******" erscheint auf Ihrer Telefon- oder Mobiltelefon-WIFI-Einstellungsseite in einer
Minute oder so.
IX. Umbenennen Kamera & Passwort ändern
>> Bitte stellen Sie sicher, dass die Kamera erfolgreich zur APP hinzugefügt wird und es
ist online, bevor Sie beginnen.
9.1. Starten Sie die APP "Camwf".
9.2. Benennen Sie die Kamera wie folgt um:
Schritt 1: Tippen Sie auf das Getriebe-Symbol auf der Homepage und wählen Sie im
Popup-Fenster die Option "Kontoeinstellung".
Schritt 2: Löschen Sie den Standardnamen und geben Sie Namen wie Home, Office usw.
ein.
Schritt 3: Tippen Sie auf "OK", um die Änderung zu bestätigen.
9.3. Ändern Sie das Passwort wie folgt:
Schritt 1: Zurück zur Homepage tippen Sie auf das Zahnradsymbol und wählen dann
im Popup-Fenster die Option "Kameraeinstellung".
Schritt 2: Tippen Sie auf der Seite "Erweiterte Einstellung" auf "Sicherheitscode ändern"
im Abschnitt "Sicherheitscode-Einstellung".
Schritt 3: Geben Sie das Standardpasswort "888888" ein, geben Sie dann ein neues
Passwort ein und geben Sie es erneut ein. Tippen Sie dann auf "OK", um die Änderung zu
speichern.
X. Ladungssicherungsbatterie
10.1. Setzen Sie die Reservebatterie ein und schließen Sie die Kamera an eine
Steckdose an. Stromversorgung mit dem Netzteil und dem mitgelieferten USB-Kabel.
10.2 Die Batterieladeanzeige leuchtet während des Ladevorgangs fest gelb.
10.3 Es dauert 4 Stunden, um eine volle Ladung für die Backup-Batterie zu erhalten.
10.4 Die Batterieladeanzeige leuchtet, wenn der Akku vollständig aufgeladen ist.
Häufig gestellte Fragen
Q1: Warum wird das WIFI-Signal der Kamera nicht auf meiner WIFI-Seite angezeigt?
A1: Es gibt 4 Lösungen für dieses Problem:
1. Nehmen Sie die Pufferbatterie heraus, stecken Sie die Kamera in eine Steckdose mit
dem USB-Kabel und dem mitgelieferten Netzteil DC5V 2.0A. Warten Sie 2 Minuten, bis
das WIFI-Signal SSID erscheint.
2. Setzen Sie die Kamera zurück (siehe VIII) und warten Sie dann, bis das WIFI-Signal
SSID angezeigt wird.
3. Halten Sie Ihr Telefon oder Mobilgerät in der WIFI-Hotspot-Reihe der Kamera und
erfrischen die WIFI-Signalseite. Es kann bis zu 2 Minuten dauern, bis der Hotspot auf der
Telefon- oder Mobiltelefon-WIFI-Einstellungsseite erkennbar wird.
4. Schalten Sie die WIFI-Funktion Ihres Telefons oder des Mobilgeräts für eine Weile aus,
und schalten Sie es dann wieder ein.
Q2: Die Kamera wird in der Anwendung Camwf nicht angezeigt?
A2: Vergewissern Sie sich, dass Ihr Telefon oder Mobilgerät immer noch mit dem
WIFI-Signal der Kamera verbunden ist und Ihre Kamera mit der Steckdose versorgt wird
oder der Backup-Akku vollständig aufgeladen ist.
Q3: Warum Live-Video-Bildschirm zeigt sich schwarz und ein Suchkreis dreht sich in
der Mitte, aber nichts zeigt jemals?
A3: Wenn die Kamera mit der WIFI-Geschwindigkeit verbunden ist, warten Sie 10-30
Sekunden, bis das Live-Video erscheint. Oder du kannst den Live-Videobildschirm
verlassen und gleich wieder in den Bildschirm kommen.
Q4: Warum hat das Videomaterial während der Wiedergabe auf meinem PC-Computer
kein Bild?
A4: Wenn sich die Kamera während des Videoaufzeichnungsprozesses im Akku befindet,
geschieht dies. Also, wenn Sie die Kamera benötigen, um Vollzeit aufzunehmen, empfehlen
wir Ihnen, die Kamera mit dem DC5V 2.0A Netzteil und USB-Kabel während des
Video-Aufnahmeprozesses aufzuladen.
Q5: Auch wenn ich die Kamera geladen habe, fällt das WIFI-Signal immer noch ab?
A5: Vergewissern Sie sich, dass Sie unseren DC5V 2.0A Netzadapter verwenden, um die
Kamera zu laden. Wenn der Netzadapter niedriger als DC5V 2.0A ist, sagen wir, DC5V 1.0A,
wird das WIFI-Signal der Kamera instabil sein und weiter fallen lassen. Plus, wir empfehlen
Ihnen nicht, die Kamera direkt an Ihren PC-Computer zum Aufladen anzuschließen, da die
aktuelle Ausgabe nicht ausreicht, damit die Kamera normal läuft.
Q6: Die Kamera hält meine Wifi-Einstellungen nicht und zeigt weiter, dass die Kamera
offline ist?
A6: Stellen Sie sicher, dass die Kamera im Bereich des guten WIFI-Signals liegt. Oder
wenn Sie die Ersatzbatterie verwenden, überprüfen Sie, ob das Netzteil für längere Zeit
richtig angeschlossen ist.
Q7: Wird die Kamera noch arbeiten, wenn die Stromversorgung erlischt?
A7: Wenn sich die Kamera im P2P-Modus befindet, kann die Kamera immer noch
arbeiten und Videos aufnehmen, solange die Backup-Batterie Strom für die Kamera
liefert. Wenn sich die Kamera im WAN-Modus befindet, funktioniert das nicht, bis die
Stromversorgung wiederhergestellt ist und der Internetzugang verfügbar ist.
Q8: Wie füge ich die Kamera zu mehr Geräten hinzu?
A8: Vergewissern Sie sich, dass sich die Kamera bereits im WAN-Modus befindet. Dann
starten Sie die "Camwf" APP auf Ihrem anderen Android-Geräte, tippen Sie auf "+"
-Symbol, scannen Sie den QR-Code auf der Rückseite der Kamera für die UID und das
Passwort der Kamera. Oder geben Sie die Kamera UID (eine eindeutige Kombination
von Zahlen und Buchstaben für Ihre Kamera) und Passwort. Schließlich tippen Sie auf
"OK", um die Kamera zur APP hinzuzufügen.
Q9: Wenn ich mein Passwort vergessen habe?
A9: Sie müssen das Gerät auf die Werkseinstellungen zurücksetzen (siehe VIII) und die
Kamera erneut hinzufügen.
Q10: Die Kamera nimmt kein Video auf die Micro SD-Karte auf?
A10: Schalten Sie die Kamera aus, nehmen Sie die Micro SD-Karte heraus, formatieren Sie die
SD-Karte und legen Sie sie dann in den SD-Kartensteckplatz ein, um es erneut zu versuchen.
Q11: Wie viele mobile Geräte können gleichzeitig an die Kamera angeschlossen werden?
A11: Keine Begrenzung.
Q12: Wie viele Kameras werden auf der mobilen Applikation unterstützt?
A12: Keine Begrenzung.
Q13: Wie schalte ich die IR-LEDs ein?
A13: Wenn die Beleuchtung unter 10 Lux liegt, werden die IR-LEDs automatisch
eingeschaltet. Der IR-Abstand beträgt 2 Meter (6,5ft).
Q14: Wie kann ich das auf der Micro SD-Karte gespeicherte Video wiedergeben?
A14: Verwenden Sie einen Kartenleser, um das Video auf Ihrem PC zu lesen und
wiederzugeben. Oder benutze die "Camwf" APP zum Abspielen (siehe 7.5)
F15: Gibt es irgendeine PC-Client-Software, die ich auf meinem Windows PC-Computer
verwenden kann?
A15: PC-Client-Software-Download-Link:
Http://www.wiseupshop.com/download?name=WIFI34&Submit=++++++++
F16: Warum ist die Zeitanzeige nicht stabil, blinkt immer?
A16: Da die Backup-Batterie leer ist oder die Steckdose nicht ordnungsgemäß angeschlossen
ist.
/