Philips HD2145/62は、忙しい方や料理初心者の方に最適な、多機能な調理器です。炊飯、煮込み、炒めもの、蒸し料理など、幅広い料理をボタン一つで作ることができます。また、タイマー機能や保温機能も搭載しているので、料理の時間を気にせず、温かい料理を楽しむことができます。さらに、お手入れも簡単で、食器洗い機にも対応しています。
Philips HD2145/62でできること:
- 炊飯:白米、玄米、炊き込みご飯など、さまざまなご飯を炊くことができます。
- 煮込み:カレー、シチュー、肉じゃがなど、時間をかけて煮込む料理も簡単に作れます。
- 炒めもの:野菜炒め、チャーハン、麻婆豆腐など、中華料理もおいしく作れます。
- 蒸し料理:野菜、魚、肉などをヘルシーに蒸すことができます。
- タイマー機能:

EN User manual 1 ZH-T 使用手冊 27
HD2145


3
EN
English
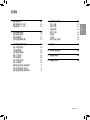
Contents
1 Important
4
Power failure backup
function
7
Electromagnetic elds
(EMF)
7
2 Your All-in-One cooker
8
What’s in the box
8
Product overview
9
Control panel overview
10
3 Using your All-in-One
cooker
11
Before rst use
11
Functions overview
12
Preparations before
cooking
13
Pressure cooking
14
Adding ingredient
16
Multi-cooking
17
Sauce thickening
18
Preset time for delayed
cooking
19
Setting up child lock
19
Setting up My Favourite
menu
20
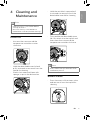
4 Cleaning and
Maintenance
21
Inner lid
21
Steam valve
21
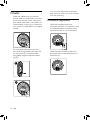
Floater
22
Pressure regulator
22
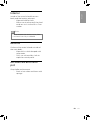
Interior
23
Exterior
23
Accessories and inner pot
23
5 Recycling
24
6 Guarantee and service
24
7 Specications
24
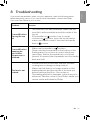
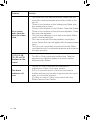
8 Troubleshooting
25

4
EN
1 Important
Read this safety leaet carefully before
you use the appliance and save it for
future reference.
Danger
•
The appliance must not
be immersed.
Warning
•
This appliance is intended
to be used in household
and similar applications
such as:
•
sta kitchen areas
in shops, oces
and other working
environments;
•
farm houses;
•
by clients in hotels,
motels and other
residential type
environments;
•
bed and breakfast type
environments.
•
This appliance is not
intended for use by
persons (including
children) with reduced
physical, sensory or
mental capabilities,
or lack of experience
and knowledge, unless
they have been given
supervision or instruction
concerning use of the
appliance by a person
responsible for their
safety.
•
Children should be
supervised to ensure that
they do not play with the
appliance.
•
If the power cord set
is damaged, it must
be replaced by a cord
set available from the
manufacturer.
•
The appliance is not
intended to be operated
by means of an external
timer or a separate
remote-control system.
•
The pressure regulator
should be checked
regularly to ensure that
they are not blocked.
•
The container must not
be opened until the
pressure has decreased
suciently.
•
WARNING: Make sure to
avoid liquid spillage on
the power connector to
avoid a potential hazard.

5
EN
English
•
WARNING: Always follow
the instructions and use
the appliance properly to
avoid potential injury.
•
Use a clean and soft cloth
to clean the surfaces in
contact with food.
•
Only connect the
appliance to a grounded
power outlet. Always
make sure that the plug
is inserted rmly into the
power outlet.
•
Do not use the appliance
if the plug, the power
cord, the inner pot, the
sealing ring, or the main
body is damaged.
•
Do not let the power cord
hang over the edge of the
table or worktop on which
the appliance stands.
•
Make sure the heating
element, the temperature
sensor, and the outside
of the inner pot are clean
and dry before you put
the plug in the power
outlet.
•
Do not plug in the
appliance or turn the
control knob with wet
hands.
•
Make sure the power
socket is clean and dry
before you plug in the
appliance.
•
Do not use the appliance
if too much air or steam
is leaking from under the
top lid.
Caution
•
CAUTION: Surface of
the heating element is
subject to residual heat
after use.
•
Never use any
accessories or parts from
other manufacturers or
that Philips does not
specically recommend. If
you use such accessories
or parts, your guarantee
becomes invalid.
•
Do not expose the
appliance to high
temperatures, nor place
it on a working or still hot
stove or cooker.
•
Do not expose the
appliance to direct
sunlight.

6
EN
•
Place the appliance on
a stable, horizontal, and
level surface.
•
Do not move the
appliance by the top lid.
•
When pressure is being
released from the
pressure regulator valve,
hot steam or liquid will be
ejected. Keep hands and
face away from the steam
vent.
•
Always put the inner pot
in the appliance before
you put the plug in the
power outlet and switch
it on.
•
Do not place the inner
pot directly over an open
re to cook food.
•
Do not use the inner pot
if it is deformed.
•
Make sure that the
sealing ring is clean and
in good condition.
•
The accessible surfaces
may become hot
when the appliance is
operating. Take extra
caution when touching
the surfaces.
•
Beware of hot steam
coming out of the oating
valve and pressure
regulator valve during
cooking or when you
open the lid. Keep hands
and face away from the
appliance to avoid the
steam.
•
Do not lift and move
the appliance while it is
operating.
•
Do not exceed the
maximum water level
indicated in the inner pot
to prevent overow.
•
Do not place the cooking
utensils inside the pot
while cooking.
•
Only use the cooking
utensils provided. Avoid
using sharp utensils.
•
To avoid scratches, it is
not recommended to
cook ingredients with
crustaceans, shellsh and
meats with protruding
bones. Remove the hard
shells or excessive bone
before cooking.
•
Do not place a magnetic
substance on the lid. Do
not use the appliance
near a magnetic
substance.

7
EN
English
•
Visit www.philips.com/
support to download the
user manual.
Power failure backup
function
This appliance has a backup function
that reserves the status before a power
failure.
•
If the power failure occurs during
a cooking process, and the power
supply is resumed within 30 minutes,
the countdown of the cooking time
continues where it is left o.
•
If the power failure occurs when the
appliance is at preset mode, and the
power supply is resumed within
30 minutes, the countdown of the
preset time continues where it is left o.
•
If the power supply is not resumed
within 30 minutes, the appliance
might not continue with the previous
working process, but stay in standby
mode.
Electromagnetic elds
(EMF)
This Philips appliance complies with all
applicable standards and regulations
regarding exposure to electromagnetic
elds.
•
Always let the appliance
cool down to room
temperature before you
clean or move it.
•
Always clean the
appliance after use.
The detachable
inner lid, including its
components can be put
into the dishwasher for
clean, but other parts
of the appliance can
not be washed in the
dishwasher.
•
Always unplug the
appliance if not used for a
longer period.
•
If the appliance is
used improperly or for
professional or semi-
professional purposes, or
if it is not used according
to the instructions in
this safety leaet, the
guarantee becomes
invalid and Philips refuses
liability for any damage
caused.

8
EN
2 Your All-in-One cooker
Congratulations on your purchase, and welcome to Philips!
To fully benet from the support that Philips oers, register your product at
www.Philips.com/welcome.
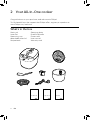
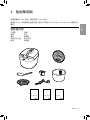
What’s in the box
Main unit Steaming plate
Inner Pot Rice&Soup ladle
Measuring cup Power cord
detachable inner lid User manual
Recipe book Warranty card
www.philips.com/welcome
User Manual
www.philips.com/welcome
Warranty
www.philips.com/welcome
Recipe Book

9
EN
English
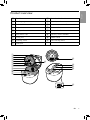
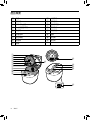
Product overview
a Top lid j Water level indication
b
Sealing ring
k
Control panel
c Detachable inner lid l Temperature controller
d Cap nuts m Power socket
e Safety valve n Lid open button
f Anti-block cap o Lid lock/unlock handle
g Fixing nut p Steam valve
h Floating valve q Pressure regulator
i Inner pot
n
q
p
o
m
l
j
k
h
i
g
a
d
e
b
c
f

10
EN
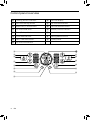
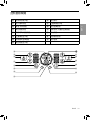
Control panel overview
r Cooking process indicator z Pressure display
s Sauce thickening button { Lid unlocked indicator
t Keep warm/Cancel button | Pressure selection button
u
My favourite button
}
Reheat/child lock button
v Timer/Delayed button ~ Start button
w Lid locked indicator Add ingredient button
x Menu selection button € Display panel
y My favourite indicator
t
s
r
u
w
x
v
y
}
|
z
~
{

11
EN
English
3 Using your All-
in-One cooker
Before rst use
1
Remove all packaging materials
from the appliance.
2
Take out all the accessories from
the inner pot.
3
Clean the parts of the All-in-One
cooker thoroughly before using it for
the rst time (see chapter "Cleaning
and Maintenance").
Note
•
Make sure all parts are completely dry
before you start using the All-in-One
cooker.
•
Make sure the inner pot is in proper
contact with the heating element.

12
EN
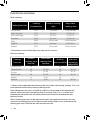
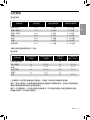
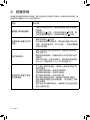
Functions overview
Multi-cooking
Cooking function
Cooking
temperature
Default cooking
time
Adjustable
cooking time
Sauté/Sear*
150°C 2 minutes 2-59 minutes
Slow cook low
70°C 8 hours 2-12 hours
Slow cook high
90°C
6 hours
2-12 hours
Pot roast
90°C 6 hours 2-12 hours
Bake
126°C 45 minutes 10-59 minutes
Yoghurt
40°C
8 hours 6-12 hours
Reheat
105°C 10 minutes 10-59 minutes
*The preheat time of Sauté/Sear may take up to 5 minutes.
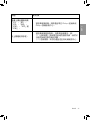
Pressure cooking
Cooking
function
Default
cooking time
(minute)
Adjustable
cooking time
(minute)
Default
pressure (kPa)
Adjustable
pressure
regulating
range(kPa)
Risotto/Rice
14 \ 30 \
Soup/Lentils
20 20-59 50 20-50
Poultry
15 12-59 40 20-70
Beef/Lamb
30 30-59 60 20-70
Steam**
8 3-20 10 \
Manual
5 2-59 20 20-70
**Steam will be released intermittently from the steam valve during cooking. This is to
have optimal airow and to ensure cooking result.
Note: When pressure starts to build up, the All-in-One cooker will automatically
release steam from the inner pot through the steam valve. This is to make sure
temperature controller can accurately sense and control the temperature and
pressure inside.
Note: Cooking pressure can be adjusted to reach your preferred texture. You may
increase the cooking pressure to have an even more tender result, or decrease the
cooking pressure if you nd the texture to be too soft.

13
EN
English
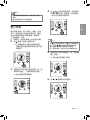
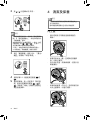
2
Press the lid open button to open
the top lid.
3
Take out the inner pot from the All-
in-One cooker.
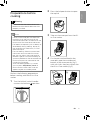
4
Put the pre-washed food in the
inner pot, wipe the outside and
bottom of the inner pot dry (g 1)
with soft cloth, then put it back into
the All-in-One cooker (g 2).
1 2
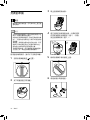
Preparations before
cooking
Warning
•
Make sure that the steam valve is not
blocked and the detachable inner lid is
properly installed.
Note
•
Do not ll the inner pot with food and
liquid less than the minimum of the
water level indications, or more than the
maximum of the water level indications.
•
For food that expands (such as beans or
dried foods) during cooking, do not ll
the inner pot with more than 1/2 full of
food and liquid.
•
For rice cooking, follow the water level
indications on the inside of the inner
pot. You can adjust the water level for
dierent types of rice and according to
your own preference. Do not exceed the
maximum quantities indicated on the
inside of the inner pot.
•
After the cooking process is started,
you can press Keep Warm/Canel to
terminate the current work, and the
appliance goes to standby mode.
Perform the following preparations
before cooking with the All-in-One
cooker:
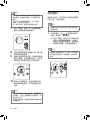
1
Turn the lid lock/unlock handle
counter clockwise to position.

14
EN
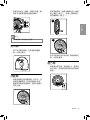
2
Tap to choose one of the pressure
cooking functions.
» The chosen cooking function
lights up, the default pressure
keeping time and pressure are
displayed on the screen.
3
To set a dierent pressure keeping
time, tap Timer/Delayed, Cooking
time lights up.
» The pressure keeping time
blinks.
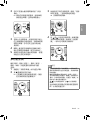
4
Tap / to set the cooking time.
For the cooking time adjustable
range, refer to adjustable cooking
time in Chapter "Functions
overview".
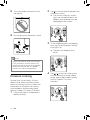
5
Turn the handle clockwise to lock
the top lid.
6
Put the plug into the power socket.
2
1
Note
•
Make sure the outside of the inner pot
is dry and clean, and that there is no
foreign residue on the heating element.
•
Make sure the inner pot is in proper
contact with the heating element.
Pressure cooking
Risotto/Rice, Soup/Lentils, Poultry,
Beep/Lamb, Steam and Manual are
pressure cooking functions. About the
information of the pressure cooking
time and pressure regulating range,
refer to Chapter "Functions Overview".
1
Follow the steps in "Preparations
before cooking".

15
EN
English
7
Tap and hold Start for 3 seconds,
the All-in-One cooker starts working
in the selected mode.
8
When the All-in-One cooker
reaches the cooking pressure,
the pressure keeping time starts
countdown.
9
When the pressure keeping time
has elapsed, the All-in-One cooker
beeps and releases the pressure
automatically. Keep your hands and
face away from the hot steam and
steam valve.
10
The All-in-One cooker automatically
switches to keep warm mode after
pressure is released completely. You
can unlock and open the top lid.
Note
•
The pressure will be released
automatically after the cooking
completes. You can open the lid when
it shows no pressure on the screen and
the lid unlocked indicator blinks.
•
After the cooking process is nished,
unplug the All-in-One cooker from the
electrical outlet.
Tips
•
Tap to adjust the time by hours,
tap to adjust the time by minutes.
Tap and hold / to fast forward or
fast backward time.
•
The cooking time is not adjustable for
Risotto/Rice.
•
Tap Keep warm/Cancel button to cancel
cooking time setting.
5
To set a dierent cooking pressure,
tap Pressure button.
» The pressure blinks on the screen.
6
Tap / to choose the pressure
you need.
Note
•
You may increase the cooking pressure
to achieve an even more tender result
according to your preference, while
decrease the cooking pressure if you nd
the texture to be too soft.
•
Only the pressure level for the following
functions are adjustable: Soup/Lentils,
Poultry, Beef/Lamb and Manual.
•
Tap Keep warm/Cancel to cancel the
pressure setting.

16
EN
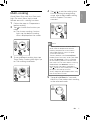
2
You can also tap Add ingredient
anytime during pressure maintain
process.
» The current cooking process
pauses, the All-in-One cooker
beeps and starts to release
pressure.
3
When pressure is released
completely, the lid unlocked
indicator on the cooking process
indicator blinks and the All-in-One
cooker beeps. You can open the
top lid to add more ingredients you
want.
4
Close the lid and turn the handle
clockwise to lock it. The pressure
cooking program will resume
cooking until it nishes.
5
If you don’t add the ingredients in
two minutes, it will resume to the
previous cooking process.
Adding ingredient
With this function, you can open the lid
during pressure cooking process and
add more ingredients.
Note
•
The Add ingredient function is not
available for the Risotto/Rice and Sauce
thickening functions.
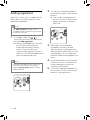
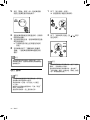
1
In standby mode, tap / to
choose the function you need, and
then tap Add ingredient.
» Tap and hold Start for 3 seconds
to start the cooking process.
When the remaining cooking
time is 10 minutes left, the
current cooking process pauses,
the All-in-One cooker beeps and
starts to release pressure.
Note
•
If the pressure cooking time is less than
10 minutes, you use this function by
tapping Add ingredient directly during
cooking process.

17
EN
English
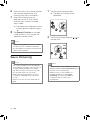
Multi-cooking
Saucè/Sear, Slow cook low, Slow cook
high, Pot roast, Bake, Yoghurt and
Reheat are multi- cooking functions.
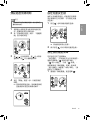
1
Follow the steps in "Preparations
before cooking".
2
Tap to choose the function you
need.
» The chosen cooking function
lights up, the default cooking
time is displayed on the screen.
3
To set a dierent cooking time, tap
Timer/Delay, Cooking time lights up.
» The cooking time blinks.
4
Tap / to set the cooking time.
For the cooking time regulating
range, refer to adjustable cooking
time in Chapter "Functions
overview".
Note
•
Cooking time will start to count down
once internal temperature reaches
cooking temperature as outlined in
adjustable cooking time in Chapter
"Functions overview".
•
There is preheat time for Sauté/Sear
mode (up to 5 minutes). Insert your food
once the "Maintain" status is reached
on the cooking process indicator and
the timer starts to count down. Inserting
food before the "Maintain" status is
reached will slow down the process.
•
Tap to adjust the time by hours, tap
to adjust the time by minutes.
•
Always keep the top lid open when using
the Saucè/Sear function.
5
Tap and hold Start for 3 seconds,
the All-in-One cooker starts working
in the selected mode.

18
EN
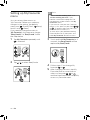
1
Tap Sauce thickening button.
» The default cooking time is
displayed.
2
Tap Timer/Delayed and tap / to
set the time.
Note
•
When the All-in-One cooker is in warm-
keeping mode, tap Sauce thickening, the
function starts immediately.
•
When the All-in-One cooker is in
standby mode, rstly tap Sauce
thickening, and then tap Start for
3 seconds, the function starts
immediately.
6
When the All-in One cooker reaches
the cooking temperature, the
cooking time starts countdown.
7
When the cooking time has
elapsed, the All-in-One cooker
automatically switches to keep
warm mode.
» The Keep warm indicator on the
cooking process indicator lights
up.
8
Tap Reheat/Child lock in standby
mode, the All-in-One cooker will
operate in reheat mode.
Note
•
When using the reheat function, close
and lock the lid, if the pressure builds
up, the cooker will automatically release
steam during cooking.
Sauce thickening
Note
•
The Sauce thickening function applies
to all cooking functions, you can use it in
standby mode or keep warm mode.
•
The default time is 8 minutes, you can
set the time from 5 to 15 minutes.
•
When the Sauce thickening function
is working, tap Keep warm/Cancel to
cancel.
•
When using this function, keep the lid
open.

19
EN
English
4
Tap Start for 3 seconds to conrm
the preset time.
» When preset time is elapsed, the
All-in-One cooker starts working
in the selected cooking mode
automatically.
Setting up child lock
To protect your child from using the
appliance, or to avoid unexpected
operations during cooking, you can set
up the child lock function.
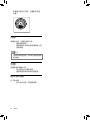
1
Tap and hold for 3 seconds
activate child lock.
3S
» The other buttons are not
responsive.
2
Tap and hold for 3 seconds again
to deactivate child lock.
Preset time for delayed
cooking
Note
•
The preset timer is not available only
in Sautè/Sear, Sauce thickening and
Reheat.
1
Follow the steps of pressure
cooking or multi-cooking, choose
the cooking function you need.
2
Tap Timer/Delayed twice, the Delay
start indicator lights up.
3
Tap / to set time. Tap to
adjust the time by hours, tap to
adjust the time by minutes.

20
EN
Setting up My Favourite
menu
You can set any three menus as
"My Favourite". Before you make any
changes to the setting, the default
menus are " -Risotto/Rice", " -Soup/
Lentils" and " -Steam".
If you need to change the menu in
"My Favourite", for instance to change
"Soup/Lentils" to "Beef/Lamb", follow
the steps below.
1
Tap My Favourite repeatedly until
is selected.
3S
2
Tap / to select Beef/Lamb.
Note
•
Refer to "Set the cooking time" and
"Set the cooking pressure" if you
need to customize the program. The
new program will be saved in the "My
Favourite" menu.
•
If you want to save your own favourite
menus, 1) rst, press any No. from ,
or . 2) second, select the menu you
preferred from the menu list.
3) third, adjust your preferred cooking
time and pressure. 4) then press and
hold "My Favourite" button to save it.
3
Touch and hold My Favourite for 3
seconds, the Soup/Lentils will be
replaced by Beef/Lamb.
3S
4
Follow steps 1-3 to change My
favourite or .
5
After changing the menu, tap My
Favourite once or more times to
select my favourite , or
and then tap Start button to quickly
access my favourite menu.
ページが読み込まれています...
ページが読み込まれています...
ページが読み込まれています...
ページが読み込まれています...
ページが読み込まれています...
ページが読み込まれています...
ページが読み込まれています...
ページが読み込まれています...
ページが読み込まれています...
ページが読み込まれています...
ページが読み込まれています...
ページが読み込まれています...
ページが読み込まれています...
ページが読み込まれています...
ページが読み込まれています...
ページが読み込まれています...
ページが読み込まれています...
ページが読み込まれています...
ページが読み込まれています...
ページが読み込まれています...
ページが読み込まれています...
ページが読み込まれています...
ページが読み込まれています...
ページが読み込まれています...
ページが読み込まれています...
ページが読み込まれています...
ページが読み込まれています...
ページが読み込まれています...
-
 1
1
-
 2
2
-
 3
3
-
 4
4
-
 5
5
-
 6
6
-
 7
7
-
 8
8
-
 9
9
-
 10
10
-
 11
11
-
 12
12
-
 13
13
-
 14
14
-
 15
15
-
 16
16
-
 17
17
-
 18
18
-
 19
19
-
 20
20
-
 21
21
-
 22
22
-
 23
23
-
 24
24
-
 25
25
-
 26
26
-
 27
27
-
 28
28
-
 29
29
-
 30
30
-
 31
31
-
 32
32
-
 33
33
-
 34
34
-
 35
35
-
 36
36
-
 37
37
-
 38
38
-
 39
39
-
 40
40
-
 41
41
-
 42
42
-
 43
43
-
 44
44
-
 45
45
-
 46
46
-
 47
47
-
 48
48


Philips HD2145/62は、忙しい方や料理初心者の方に最適な、多機能な調理器です。炊飯、煮込み、炒めもの、蒸し料理など、幅広い料理をボタン一つで作ることができます。また、タイマー機能や保温機能も搭載しているので、料理の時間を気にせず、温かい料理を楽しむことができます。さらに、お手入れも簡単で、食器洗い機にも対応しています。
Philips HD2145/62でできること:
- 炊飯:白米、玄米、炊き込みご飯など、さまざまなご飯を炊くことができます。
- 煮込み:カレー、シチュー、肉じゃがなど、時間をかけて煮込む料理も簡単に作れます。
- 炒めもの:野菜炒め、チャーハン、麻婆豆腐など、中華料理もおいしく作れます。
- 蒸し料理:野菜、魚、肉などをヘルシーに蒸すことができます。
- タイマー機能:
他の言語で
- English: Philips HD2145/62 User manual