12
en ENGLISH
1. Declaration of Conformity
On our own responsibility, we hereby declare
type and serial number *1), meets all relevant
requirements of directives *2) and standards *3).
Technical documents for *4) - see page 3.
The rotary and chipping hammers are suited, with
appropriate accessories, for working with hammer
drill bits and chisels in concrete, stone and similar
materials and with core bits in tiles and similar, as
well as drilling without impact in metal, wood, etc
and for screwdriving.
The user bears sole responsibility for any damage
caused by inappropriate use.
Generally accepted accident prevention
regulations and the enclosed safety information
must be observed.
3. General Safety Information
For your own protection and for the
protection of your power tool, pay
attention to all parts of the text that are
marked with this symbol!
WARNING – Reading the operating
instructions will reduce the risk of injury.
WARNING Read all safety warnings and
instructions. Failure to follow all safety
warnings and instructions may result in electric
Keep all safety instructions and information
for future reference.
Pass on your power tool only together with these
documents.
4. Special Safety Instructions
Wear ear protectors. Exposure to noise can cause
hearing loss.
Use the additional handle supplied with the
tool. Loss of control can cause personal injury.
Hold the power tool by the insulated gripping
surfaces when performing an operation where
the cutting accessory may contact hidden
wiring or its own cord. A cutting accessory
contacting a “live” wire may make exposed metal
parts of the power tool “live” and could give the
operator an electric shock.
Always work with the additional handle correctly
installed.
Always hold the machine with both hands at
the intended handles, take a secure stance and
concentrate on the work.
Always wear protective goggles, gloves, and sturdy
shoes when working with this tool.
Ensure that the spot where you wish to work is free
of power cables, gas lines or water pipes (e.g.
using a metal detector).
machine immediately.
Do not touch the rotating tool!
Secure the workpiece to prevent slipping or rotation
(e.g. by securing with screw clamps).
Remove chips and similar material only with the
machine at a standstill.
Caution must be exercised when driving screws into
hard materials (driving screws with metric or imperial
threads into steel)! The screw head may break or a
high reverse torque may build up on the handle.
Pull the plug out of the socket before making
any adjustments, changing tools, carrying out
maintenance or cleaning.
Avoid inadvertent starts by always unlocking the
switch when the plug is removed from the mains
socket or whenever the power fails.
A damaged or cracked additional handle must be
replaced. Never operate a machine with a defective
additional handle.
Safety clutch: f the tool jams or catches, the power
supply to the motor is restricted. Due to the strong
force which can arise, always hold the machine
with both hands using the handles provided, stand
securely and concentrate.
Reducing dust exposure:
Some of the dust created using this power
tool may contain chemicals known to cause
cancer, allergic reaction, respiratory disease,
birth defects or other reproductive harm. Some
examples of these chemicals are: Lead from
lead- based paints, crystalline silica from bricks
and cement and other masonry products, arsenic
and chromium from chemically-treated lumber,
hard wood like oak or beech, metals, asbestos.
The risk from exposure to such substance will
depends on how long you or bystanders are being
exposed.
Do not let particles enter the body.
To reduce your exposure to these substances:
work in a well ventilated area, and work with
approved safety equipment, such as dust masks
particles.
Observe the relevant guidelines for your material,
occupational health and safety regulations,
disposal).
Collect the particles generated at the source, avoid
deposits in the surrounding area.
Use suitable accessories for special work. In this
way, fewer particles enter the environment in an
uncontrolled manner.
Original operating instructions
13
ENGLISH en
Use a suitable extraction unit.
Reduce the exposure to dust with the following:
- do not direct the escaping particles and the
exhaust air stream at yourself or nearby persons
or on dust deposits.
-
- Ensure good ventilation of the workplace and
keep clean using a vacuum cleaner. Sweeping
or blowing stirs up dust.
- Vacuum or wash the protective clothing. Do not
blow, beat or brush.
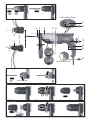
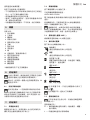
5. Overview
See page 2.
1 SDS chuck
2 Tool lock
3 Chuck lock
4 Keyless chuck *
5 Sleeve keyless chuck *
6 Spindle
7 Additional handle
8 Depth stop
9 Lock
10 Switch button (for changing the operating
mode)
11 Electronic signal indicator *
12 Speed preselection wheel *
13 Rotation selector switch
14 Lock button
15 Trigger switch
* depending on equipment/not in scope of delivery
6. Initial Operation
Before plugging in, check that the rated mains
voltage and mains frequency, as stated on the
type plate match your power supply.
Always install an RCD with a maximum trip
current of 30 mA upstream.
6.1 Assembly of the additional handle
For safety reasons, always use the additional
handle supplied.
Open the clamping ring by turning the side handle
(7) counter-clockwise. Push the additional handle
onto the collar of the machine. Insert the depth stop
(8). Securely tighten the additional handle at the
angle required for the application.
7. Initial Operation
7.1 Depth Stop Setting
Loosen the additional handle (7). Set the depth
stop (8) to the desired drilling depth and retighten
additional handle (7).
7.2
Press the trigger switch (15) to switch on the machine.
The speed can be changed using the trigger switch.
UHEV 2860-2 Quick:
The electronic soft start means that the machine
accelerates continuously up to the pre-selected
speed.
For continuous operation, the trigger button can be
locked using the lock button (14). Press the trigger
switch again to stop the machine.
In continuous operation, the machine
continues running if it is forced out of your
hands. Therefore, always hold the machine with
both hands using the handles provided, stand
securely and concentrate.
7.3 Select speed (only for UHE...)
Select the optimal speed at the thumbwheel (12)
depending on the application.
7.4 Operating mode selection
Press the lock (9) and turn the thumbwheel (10).
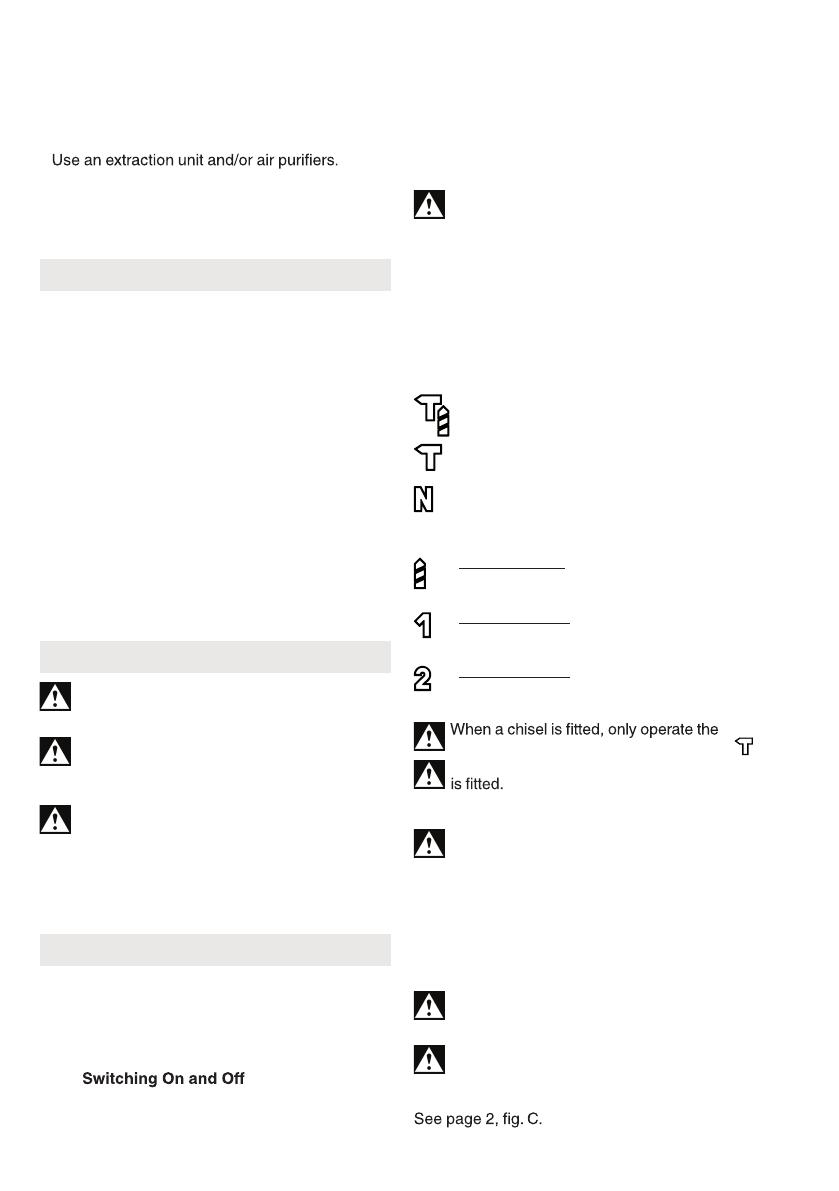
Hammer drilling
(Set only when using the hammer chuck (1) )
Chiselling
(Set only when using the hammer chuck (1) )
Setting chisel position
Tu rn the chisel in the desired position. Then
select “Chiselling” to secure the chisel and
prevent it from twisting.
Only for KHE...:
Drilling
(high torque)
Only for UHE ...:
Drilling 1st gear
(high torque)
Only for UHE ...:
Drilling 2nd gear (high speed)
machine in the chiselling operating mode .
Avoid levering with the machine when a chisel
7.5 Selection of direction of rotation
Only activate the rotation selector switch (13)
when the motor has completely stopped.
Select direction of rotation:
R = clockwise rotation (for drilling, hammer
drilling, chiselling, drive in screws)
L = anti-clockwise rotation (for the removal of
screws)
7.6 Drill chuck change
Ensure a clean spindle (6) when changing the
chuck. Apply a light coating of grease to the
spindle. (Special grease: Order No.: 6.31800)
Only attach the Metabo chuck provided.
Removing the chuck:


 1
1
 2
2
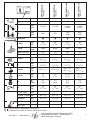 3
3
 4
4
 5
5
 6
6
 7
7
 8
8
 9
9
 10
10
 11
11
 12
12
 13
13
 14
14
 15
15
 16
16


