1 2
Published 05/2020 Printed in Vietnam
© 2019 KORG INC. www.korg.com
EFGSJ 2
Owner’s manual (En) .................... p. 2, 3, 5
Manuel d’utilisation (Fr) .............. p. 2, 5, 9
Bedienungsanleitung (De) ........... S. 2, 5, 11
Manual del usuario (Es) ............... p. 2, 5, 13
取扱説明書
(Ja) .................................. p. 2, 5, 15
保証規定(必ずお読みください)
本保証書は、保証期間中に本製品を保証するもので、付属品類(ヘッドホンなど)は保証の対象に
なりません。保証期間内に本製品が故障した場合は、保証規定によって無償修理いたします。
1. 本保証書の有効期間はお買い上げ日より1か年です。
2. 次の修理等は保証期間内であっても有償となります。
・消耗部品(電池、スピーカー、真空管、フェーダーなど)の交換。 ・お取扱い方法が不適当のため
に 生 じ た 故 障 。 ・ 天 災( 火 災 、浸 水 等 )に よっ て 生 じ た 故 障 。 ・ 故 障 の 原 因 が 本 製 品 以 外 の 他 の
機 器 に あ る 場 合 。 ・ 不 当 な 改 造 、調 整 、部 品 交 換 な ど に より 生 じ た 故 障 ま た は 損 傷 。 ・ 保 証 書
にお買い上げ日、販売店名が未記入の場合、または字句が書き替えられている場合。 ・本保証
書の提示がない場合。
尚、当社が修理した部分が再度故障した場合は、保証期間外であっても、修理した日より3か月
以内 に 限り無 償 修 理いたします。
3. 本保証書は日本国内においてのみ有効です。
ThiswarrantyisvalidonlyinJapan.
4. お客様が保証期間中に移転された場合でも、保証は引き続きお使いいただけます。詳しくは、
お客様相談窓口までお問い合わせください。
5. 修理、運送費用が製品の価格より高くなることがありますので、あらかじめお客様相談窓口へ
ご相談ください。発送にかかる費用は、お客様の負担とさせていただきます。
6. 修理中の代替品、商品の貸し出し等は、いかなる場合においても一切行っておりません。
本製品の故障、または使用上生じたお客様の直接、間接の損害につきましては、弊社は一切の責
任を負いかねますのでご了承ください。
本保証書は、保証規定により無償修理をお約束するためのもので、これよりお客様の法律上の
権 利 を 制 限す るも の で はありませ ん 。
■お願い
1. 保証書に販売年月日等の記入がない場合は無効となります。記入できないときは、お買い上
げ年月日を証明できる領収書等と一 緒に保管してください。
2. 保証書は再発行致しませんので、紛失しないように大切に保管してください。
Nu:Tekt: NTS-1 digital kit
保証書
本保証書は、保証規定により無償修理をお約束するものです。
お買い上げ日 年 月 日
販売店名
アフターサービス
修理または商品のお取り扱いについてのご質問、ご相談は、お客様相談窓口へお問い合わせくだ
さい。
お客様相談窓口
PHS等一部の電話ではご利用できません。固定電話または携帯電話からおかけくだ
さい。
受付時間: 月曜~金曜 10:00~17:00(祝祭日、窓口休業日を除く)
サービス・センター:〒168-0073東京都杉並区下高井戸1-15-10
En
Precautions During Assembly
•
Beforeassembly,dischargethestaticelectricityfromyourbodyby
touchingthegroundwireofagroundeddeviceorsimilarmethods.
Failuretodosowillcauseamalfunction.
•
Carefullyhandlethecircuitboardstoavoidinjuriesthatcould
beinadvertentlycausedbyprotrudingparts.Inaddition,besure
towashyourhandswithsoapwhennishedwiththeassembly
procedure.
•
Besuretoalignscrewsproperlybeforetighteningthem.Inaddi-
tion,becarefulnottotightenscrewswithexcessiveforceorover
tightenthem,otherwisethepartsmaybedamaged.
•
Provideasufcientlylargeworkspacetocompletetheassembly
procedure,andprepareworkmatssopartswillnotbescratched.
•
Carefullyhandletheincludedscrewssotheywillnotbelost.In
addition,donotusescrewsotherthanthoseincludedforassem-
bly,anddonotusetheincludedscrewsforanyotherpurpose.
Checking package contents
Beforebeginningtheassemblyprocess,makesurethatallofthe
partsareavailable.Extrascrewsareincluded.Usethemasspares.
Ifanypartismissingordamaged,contactyourlocalKorgdistributor.
Fr
Prudence durant le montage
•
Avantlemontage,déchargezl’électricitéstatiquedevotrecorps
entouchantleldemassed’unappareilreliéàlaterreouvia
d’autresméthodessimilaires.Lenon-respectdecetteconsigne
entraîneraundysfonctionnement.
•
Maniezlescartesdescircuitsavecsoinpouréviterlesblessures
quipourraientêtrecauséesparaccidentpardespiècesprotubé-
rantes.Deplus,veillezàlavervosmainsavecdusavonlorsque
vousavezterminélaprocédured’assemblage.
•
Veillezàalignerlesviscorrectementavantdelesserrer.Deplus,
faitesattentionànepasserrerlesvisenexerçantuneforce
excessiveetànepastroplesserrer,carlespiècespourraientêtre
endommagées.
•
Organisezunespacedetravailsufsantpoureffectuerlaprocé-
dured’assemblage,etpréparezdestapisdetravailpournepas
rayerlespièces.
•
Maniezlesvisfournisavecsoinandenepaslesperdre.Deplus,
n’utilisezpasd’autresvisqueceuxfournispourl’assemblage,et
n’utilisezpaslesvisfournisàd’autresns.
Vérifier le contenu de l’emballage
Avantdedémarrerleprocessusd’assemblage,vériezquetoutesles
piècessontprésentes.Desvissupplémentairessontfournis.Utili-
sezlesencasdebesoinderemplacement.Sidespiècesmanquentou
sontendommagées,contactezvotredistributeurKorglocal.
De
Vorsicht beim Zusammenbau
•
LeitenSievorderMontagestatischeElektrizitätvonIhremKörper
ab,indemSiedenErdungsdrahteinesgeerdetenElektrogeräts
berühren,oderdurcheinähnlichesVerfahren.Andernfallskann
eineFehlfunktioneintreten.
•
GehenSiemitdenPlatinensorgfältigum,umVerletzungendurch
hervorstehendeTeilezuvermeiden.WaschenSieIhreHändenach
BeendigungderMontagemitSeife.
•
StellenSiesicher,dassdieSchraubenvordemFestziehenkor-
rektausgerichtetsind.AchtenSieaußerdemdarauf,dieSiedie
SchraubenwedermitübermäßigerKraftfestziehennochüberdre-
hen,daandernfallsTeilebeschädigtwerdenkönnen.
•
SorgenSiefürdieMontagefüreineausreichendgroßeArbeitsä-
cheundverwendenSieArbeitsmatten,umKratzerandenTeilen
zuvermeiden.
•
AchtenSiedarauf,dasskeinedermitgeliefertenSchraubenverlo-
rengehen.VerwendenSiezurMontageausschließlichdiemitge-
liefertenSchrauben.VerwendenSiediemitgeliefertenSchrauben
nichtfürandereZwecke.
Überprüfung des Packungsinhalts
StellenSiesicher,dassalleTeilevorhandensind,bevorSiemitder
Montagebeginnen.ZusätzlicheSchraubenderPackungbei.Sie
dienenalsErsatz.WendenSiesichbeifehlendenoderbeschädigten
TeilenanIhrenKorg-HändlervorOrt.
Es
Precaución durante el ensamblaje
•
Antesdelmontaje,descarguelaelectricidadestáticadesucuerpo
tocandoelcabledetierradeundispositivoconectadoatierrao
métodosimilar.Denohacerlo,seproduciráunfallodefunciona-
miento.
•
Manejeconcuidadolastarjetasdecircuitosparaevitarlaslesio-
nesquepodríanserprovocadasinvoluntariamenteporpartes
salientes.Además,asegúresedelavarselasmanosconjabón
cuandohayaterminadoconelprocedimientodemontaje.
•
Asegúresedealinearadecuadamentelostornillosantesde
apretarlos.Además,tengacuidadodenoapretarlostornilloscon
fuerzaexcesivaoapretarlosdemasiado,yaquedelocontrario
podríandañarselaspiezas.
•
Dispongaunespaciodetrabajosucientementegrandeparacom-
pletarelprocedimientodemontaje,yprepareesterillasdetrabajo
paraquelaspiezasnoserayen.
•
Manejeconcuidadolostornillosincluidosparaquenosepierdan.
Además,noutilicetornillosdistintosalosincluidosparaelmonta-
je,ynoutilicelostornillosincluidosparaningúnotron.
Comprobación del contenido del paquete
Antesdecomenzarelprocesodemontaje,asegúresedequetodas
laspiezasestándisponibles.Seincluyentornillosdesobra.Utilícelos
comorepuestos.Sialgunapiezafaltaoestádañada,póngaseencon-
tactoconsuproveedorlocalKorg.
Ja
組み立て時の注意
・あらかじ め 、アース がとれて い る 機 器 のアース 線 に 触 れる な どして、体
の静電気を逃がしておいてください。故障の原因になります。
・基板を取り扱うときに、部品の突起などでケガをしないように注意し
てください。また作業後は、必ず石けんで手を洗ってください。
・必ず垂直にネジが入るように締め付けてください。また、無理に締め
付けたり強く締めすぎたりすると、部品が破損する恐れがありますの
で注意してください。
・余裕をもって作業を行うために広めの作業スペースを確保し、キズが
付かないように作業用マットなどを用意してください。
・ネジを紛失しないように取り扱いに注意してください。また、付属の
ネジ以 外を使 用して組み立てたり、付属のネジを他 の目的に使 用し
ないでください。
パーツの確認
組み立てる前にすべてのパーツが揃っていることを確認してください。ネジは
多めに入っています。予備としてお使いください。
もし不足しているパーツや破 損しているパーツが ありましたら、お 客 様相 談
窓口までお問い合わせください。
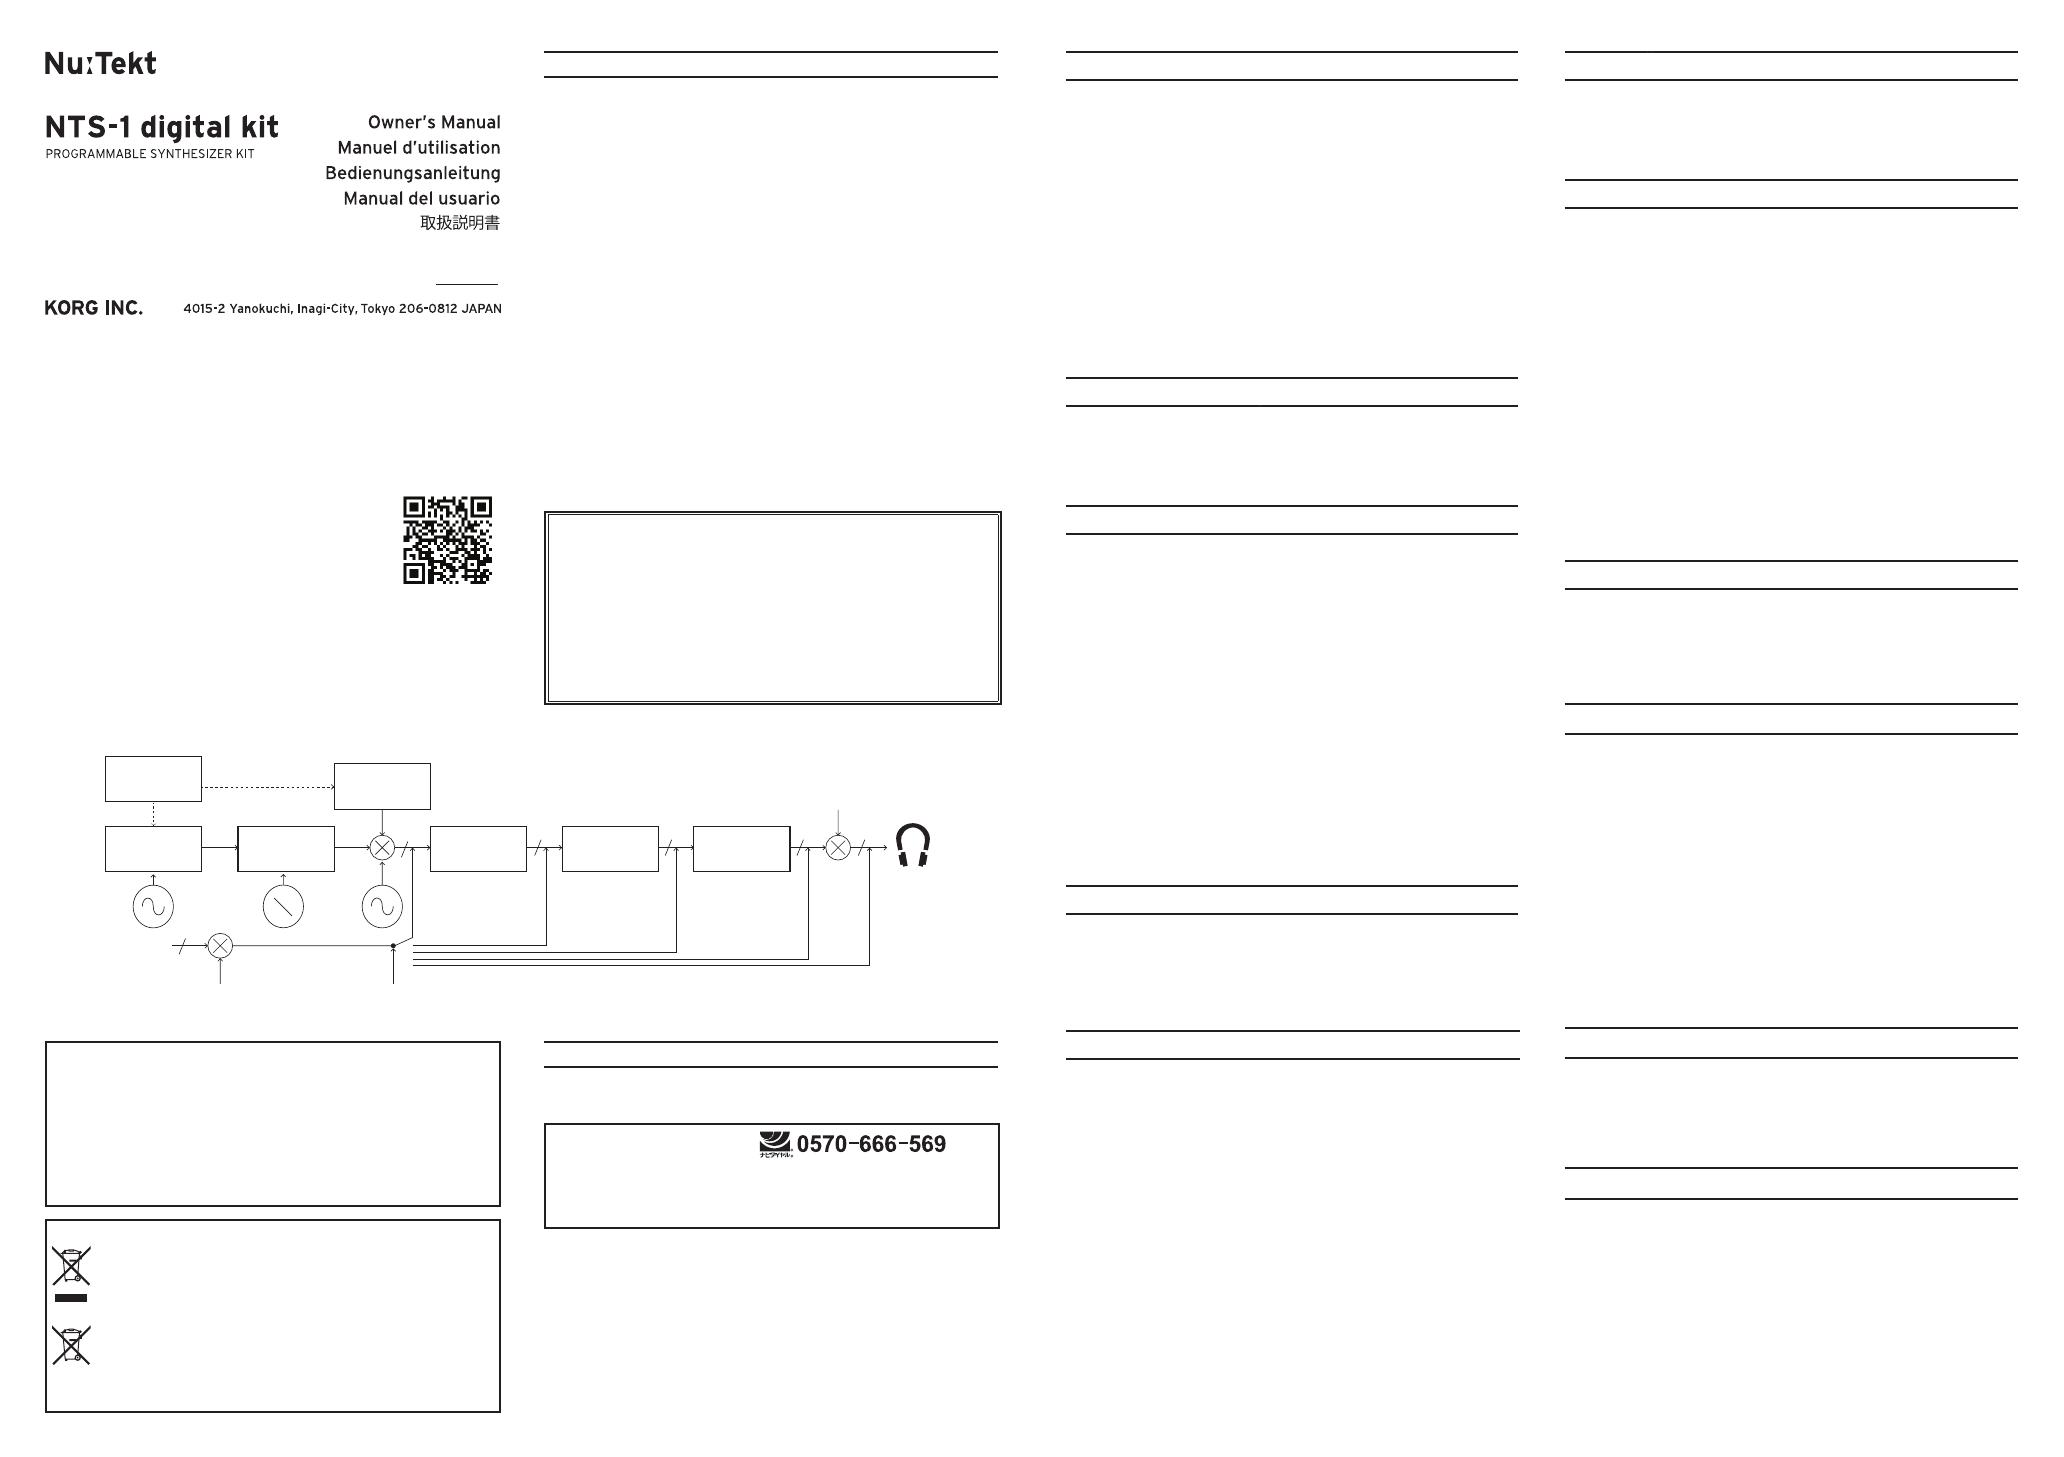
仕様
鍵盤:リボン鍵盤、音源システム:1オシレーター、1マルチ・モード・フィ
ルター、1EG、3LFO、エフェクト:MOD(CHORUS、ENSEMBLE、PHASER、
FLANGER)、REVERB、DELAY、入出力端子:ヘッドホン端子(3.5mmス
テレ オ・ミニ・フォ ーン・ジャ ッ ク )、オ ー デ ィ オ・イ ン 端 子( 3 . 5 m m ス テレ
オ ・ ミ ニ ・フ ォ ー ン ・ ジ ャ ッ ク )、S Y N C I N 端 子( 3 . 5 m m T R S ミ ニ・フ ォ ー ン ・
ジャック、最大入力レベル20V)、SYNCOUT端子(3.5mmTRSミニ・フォー
ン・ジャック、出力レベル5V)、MIDIIN端子(3.5m m T R S ミ ニ ・フ ォ ー ン ・
ジ ャ ッ ク )、U S B 端 子( m i c r o B t y p e )、電源: U S B バ ス 電 源 方 式 、消費電
流
: 5 0 0 m A 以 下、外形寸法(W
×
D
×
H ): 1 2 9 m m
×
78mm
×
39mm、
質量
:124g、付属品: U S B ケ ー ブ ル 、取 扱 説 明 書
* 仕様および外 観は、改 良のため予 告なく変 更することがあります。
2 2 2 2
VOLUME
EG
FILTEROSC MOD DELAYREVERB
TRIM
INPUT
ROUTE
ARP
2
2
IMPORTANT NOTICE TO CONSUMERS
Thisproducthasbeenmanufacturedaccordingtostrictspecificationsandvolt-
agerequirementsthatareapplicableinthecountryinwhichitisintendedthat
thisproductshouldbeused.Ifyouhavepurchasedthisproductviatheinternet,
throughmailorder,and/orviaatelephonesale,youmustverifythatthisproduct
isintendedtobeusedinthecountryinwhichyoureside.
WARNING:Useofthisproductinanycountryotherthanthatforwhichitis
intendedcouldbedangerousandcouldinvalidatethemanufacturer’sordistribu-
tor’swarranty.Pleasealsoretainyourreceiptasproofofpurchaseotherwiseyour
productmaybedisqualifiedfromthemanufacturer’sordistributor’swarranty.
Notice regarding disposal (EU only)
Whenthis“crossed-outwheeledbin”symbolisdisplayedontheproduct,
owner’smanual,battery,orbatterypackage,itsignifiesthatwhenyou
wishtodisposeofthisproduct,manual,packageorbatteryyoumustdo
soinanapprovedmanner.Donotdiscardthisproduct,manual,package
orbatteryalongwithordinaryhouseholdwaste.Disposinginthecorrect
mannerwillpreventharmtohumanhealthandpotentialdamagetothe
environment.Sincethecorrectmethodofdisposalwilldependonthe
applicablelawsandregulationsinyourlocality,pleasecontactyourlocal
administrativebodyfordetails.Ifthebatterycontainsheavymetalsin
excessoftheregulatedamount,achemicalsymbolisdisplayedbelowthe
“crossed-outwheeledbin”symbolonthebatteryorbatterypackage.
ThevideoassemblytutorialfortheNTS-1digital
kitisavailablehere:
Letutorielvidéodemontagedukitdesynthé
numériqueNTS-1estdisponibleici:
DasVideo-TutorialzumZusammenbaudesNTS-
1DigitalKitsndenSiehier:
ElvídeoexplicativosobreelmontajedelNTS-1
digitalkitestádisponibleaquí:
QRコードを読み取ると、NTS-1digitalkitの組み立て動画のページへアクセ
スで きます。
For more information:
https://www.korg.com/nts_1/


