ATOMRC HP171-0002 ユーザーマニュアル

タイプ
ユーザーマニュアル

ATOMRC HP171-0002は、FPVドローンの操縦を簡単かつ楽しくする革新的なドローンゴーグルです。

ATOMRC の革新的なFPC(Field Programmable Chip)を搭載し、5インチのLCDスクリーンを備え、1280×720ピクセルの高解像度でFPV映像を表示することができます。また、高品質のカメラやジンバルを接続して、滑らかな映像を撮影することも可能です。

また、ATOMRC HP171-0002は、最大8kmの範囲でFPV映像を送信することができるため、広範囲にわたる飛行を楽しむことができます。さらに、FPV映像を録画して、後で再生することも可能です。

ATOMRC HP171-0002は、FPVドローンの操縦を簡単かつ楽しくする革新的なドローンゴーグルです。このゴーグルを使用することで、より

User Manual
Killer Whale
www.atomrc.com/pages/download
Introduction/简
Specications/规
1
1200mm翼展的双发中型固定翼,经典的FPV固定翼动⼒布局,⽆遮挡的FPV相机安装
②主机翼的快拆结构简单稳定可靠的软连接结构,在空中遇到连续颠簸时,也不⽤担⼼快拆插座的
连接不稳定。组装完成后,也可快速拆装,出⻔⻜⾏⽅便携带。
线持9⼨
,DJI⾼便
④双垂尾和襟翼的设计,尾部预留了专属的相机位置,为尾拍⻜机追逐镜头提供更好的后视⻆。
同时也增加⻜⾏时候的⽅向控制性能,同时更易于降落。
装Gopro hero 9的容Gopro hero 5/6/7安
the killer whale is 1200mm wingspan twin motor xed wing.
The main wing can be quickly disassembled and assembled for easy carrying.
Exclusive installation positions for the ight controller , VTX, antenna, and battery compartment,
which are easy to install and organize. max support 9inch propeller.
The double vertical tails are directly behind the propellers, which increase the control performance
of the aircraft rudder and make it easier to land.
Supports Gopro hero 9 and is compatible with hero 5/6/7 installation on the head or rear.
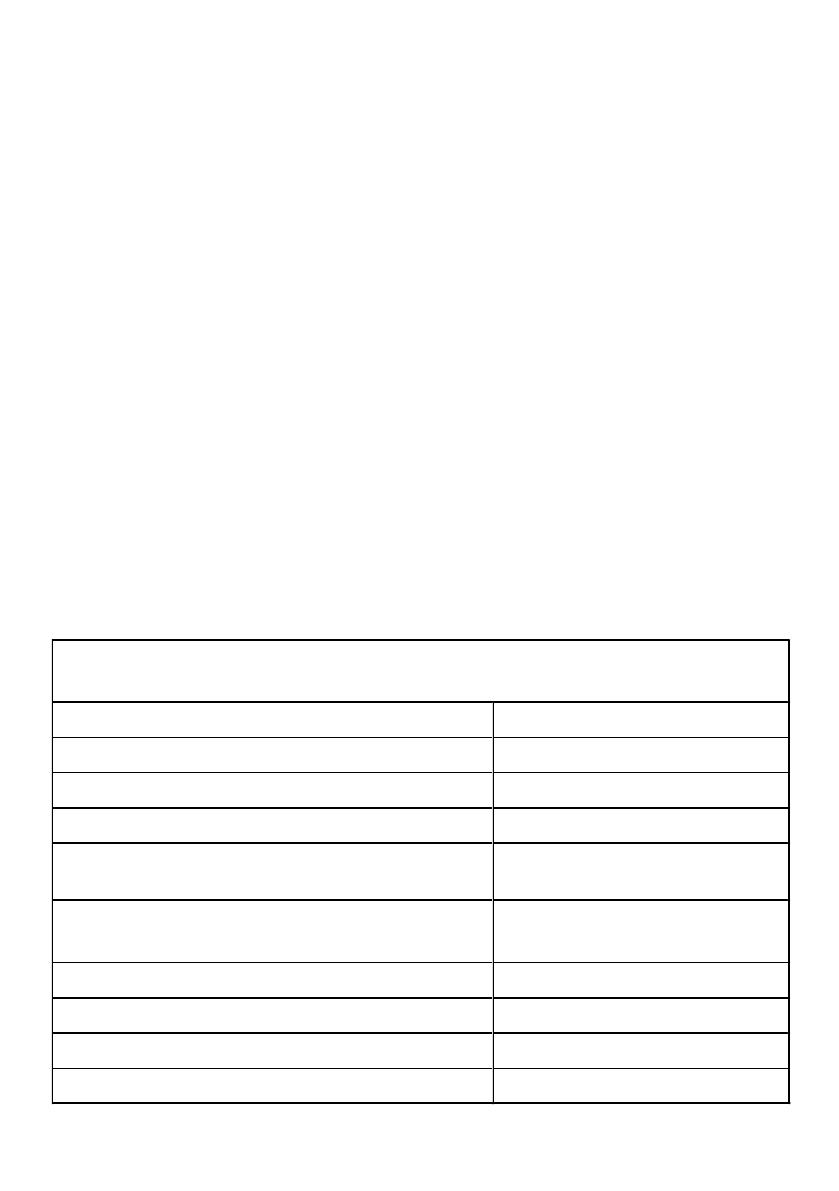
Wingspan/翼展: 1255mm
Length/⻓度: 890mm
WingArea/翼⾯积: 21d㎡
Material/材料: EPP
Servo Specs/基础⻜⾏舵机:
9g Servo*300mm*5Pcs
Flap Servo/襟翼舵机:
9g Servo*200mm*2Pcs
(包含1个反向舵机)
Recommend Motor/推荐电机: 2306~2212
Recommend ESC/推荐电调: 30A 2~4S
Recommend Propeller/推荐螺旋桨: 7040-3
Recommned Battery/推荐电池: 21700 2p4s
Killer Whale Specifications/⻁
Version Description/
2
A:Fuselage
DMotor hatch cover
G:Bottom hatch cover
BWING
左右机翼
E:Wing wiring cover
线
H Top hatch cover
CFront hatch cover
盖*2
I:Rudder
FLanding gear cover
JTail
KIT Contents
A B C
DE
I J
F G H
K
KGopro hatch cover
*4
LNose
L
3
KIT Lite Installation/KIT Lite安装指南
1
2
将机身⽊⽚和图传固定⽊⽚、安装到机身上。
Install the Nuts on the tail, VTX mount on the fuselage.
VTX/图
将固定摄像头的碳⽚安装到机头。将相机固定⽊⽚安装到机头。
Install the carbon plate mount for camera.
将圆形磁铁、舱盖扣、⽊⽚、⽅形磁铁安装到机身上。
将⽅形磁铁安装到机身前⾯。
Install the magnet, hatch lock, wood plate on the fuselage.
3
4
将磁铁、舱盖⽊⽚安装到盖⼦上。
Install the magnet on each hatch cover.
4
5
5
6
Install the Nuts and motor mount on the wing.
舵⻆和舵⻆碳杆,安装⾄各个舵⾯。
Install the control horn on each control surface.
KIT/PNP/FPV Installation/安装指南
1
将舵机安装到垂尾、平尾,居中调试后,安装拉杆。粘合左右垂尾
Install the servo and push rods, then install the rudder.
500mm
70mm
30mm
15mm
2
起落架孔位尺⼨
Landing gear mounting hole position
3
将舵机安装到左右机翼上,居中调试后,安装拉杆。粘合翼尖。
Install the Motor, ESC, servo and push rods, and install the wing tip.
2
线联 穿
线线
Install the quick detatch wire with rubber ring, plug the servo, ESC
to the wire. then wire the Power distribution board.
4
安装发动机舱盖、安装快拆尾翼。
Install the , and install the and Tail.Motor hatch cover Rudder
6
'
ATOMRC KWPDBV2 /集线板安装说明
7
ESC/油
LED or Other/LED
Aileron Servo/副
Flap Servo/襟
LED or Other/LED
Flap Servo/襟
Aileron Servo/副
ESC/油
线使
5V In,
使15V BEC
The signal on the wing is parallel on the PDB, the PDB need
external 5V BEC to power the servo.
5V IN
Aileron
Flap
Motor
5V IN
A1
GND
F1
M1
GND
GND
5V
5V
A2
GND
F2
GND
GND
5V
5V
M2
-
+
GND
GND
GND
AUX1AUX1
AUX2
KWPDB V2
AUX
5V IN
Aileron
Flap
Motor
5V IN
A1
GND
F1
M1
GND
GND
5V
5V
A2
GND
F2
GND
GND
5V
5V
M2
-
+
GND
GND
GND
AUX1AUX1
AUX2
KWPDB V2
AUX
ESC 接线图 /电线
ESC Information/
1.The ESC included with the model has a safe start.If the motor battery is
connected to the ESC and the throttle stick is not in the low throttle or o
position,the motor will not start untill the throttle stick is moved to the low
throttle or oposition.
2.Power on the ESC(The ESC must connect to the motor and Receiver).
The motor will emit a series of beeps, after the beeps, set the the throttle
stick the the minimum, the motor will emit a series beep again. now the ESC
calibration is done.
1.
电调输出不会启动。
2.
100
+
-
G5V
s
MOTOR
VCC/GND
5V3AOutput 5V3A
Throttle
Throttle GND
Voltage input/: 2~4S Lipo
Max Current/最: 35A
Output/Built in 5V 3A BEC/内5V 3A BEC
Throttle calibration /电调油⻔校准
8
1.Hold button 3 seconds into setting mode.
2.In setting mode. short press the button to change band.
3.Then hold button 3 seconds into CH setting mode, short press button to change CH.
4.Hold button 3 second to get into Power setting mode, there is short bar on LED, short
press to switch power, 1 bar means 200mW, 2 bar means 800mW, 3 bar means 1500mW.
1.
2.
3.再次⻓按按键三秒钟,进⼊频道切换模式,短按按键切换频道。
4.200mw,两条
800mw, 三条为1500mw
Please download the latest user manual at
www.atomrc.com/pages/download
GND
VIDEO
5V
AU DIO
VI DEO
GN D
5V O UT
GN D
VCC
Please make sure antenna is installed before power on, otherwise the VTX will fried!!!
线线!!!
Band
Channel
1
2
3
4
5
6
7
8
Band A
5865
5845
5825
5805
5785
5765
5745
5725
Band B
5733
5752
5771
5790
5809
5828
5847
5866
Band E
5705
5685
5665
5645
5885
5905
5925
5945
Airwave/FS
5740
5760
5780
5800
5820
5840
5860
5880
Race Band
5658
5695
5732
5769
5806
5843
5880
5917
L Band
5362
5399
5436
5473
5510
5547
5584
5621
Voltage input/: 2~6S Lipo Power/: 200/800/1500mw Switchable
Power consumption/: 9V 1.1A Frequency/:5.3~5.9Ghz
VTX Tx15 Uermanual/
Tx15 Wiring Tx15线Diagram/
Tx15 /Tx15Specs
VTX Setting/
  • Page 1 1
  • Page 2 2
  • Page 3 3
  • Page 4 4
  • Page 5 5
  • Page 6 6
  • Page 7 7
  • Page 8 8
  • Page 9 9
  • Page 10 10

ATOMRC HP171-0002 ユーザーマニュアル

タイプ
ユーザーマニュアル

ATOMRC HP171-0002は、FPVドローンの操縦を簡単かつ楽しくする革新的なドローンゴーグルです。

ATOMRC の革新的なFPC(Field Programmable Chip)を搭載し、5インチのLCDスクリーンを備え、1280×720ピクセルの高解像度でFPV映像を表示することができます。また、高品質のカメラやジンバルを接続して、滑らかな映像を撮影することも可能です。

また、ATOMRC HP171-0002は、最大8kmの範囲でFPV映像を送信することができるため、広範囲にわたる飛行を楽しむことができます。さらに、FPV映像を録画して、後で再生することも可能です。

ATOMRC HP171-0002は、FPVドローンの操縦を簡単かつ楽しくする革新的なドローンゴーグルです。このゴーグルを使用することで、より

他の言語で