Hitachi G 18SW Handling Instructions Manual
- カテゴリー
- パワーツール
- タイプ
- Handling Instructions Manual
このマニュアルも適しています

Disc Grinder
디스크그라인더
Máy mài góc
เครื่องเจียรไฟฟา
G 18SW
•
G 23SW
Handling Instructions
취급 설명서
Hướng dẫn sử dụng
คูมือการใชงาน
Read through carefully and understand these instructions before use.
본 설명서를 자세히 읽고 내용을 숙지한 뒤 제품을 사용하십시오.
Đọc kỹ và hiểu rõ các hướng dẫn này trước khi sử dụng.
โปรดอานโดยละเอียดและทําความเขาใจกอนใชงาน

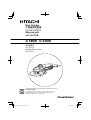
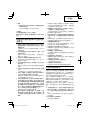
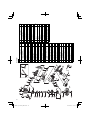
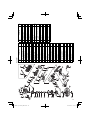
1
1
5
4
2
6
7
8
8
!
0
9
3
@
0
%
$
#
^
&
38
8 mm
17 mm
AB
15° – 30°
1
2
3
English
한국어
Vietnamese
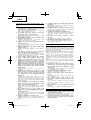
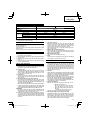
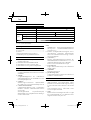
1
Brush cap
브러시 캡
Nắp chổi than
2
Socket for side
handle
사이드 핸들용 소켓
Khe lắp tay nắm phụ
3
Push button
(Spindle lock)
푸시 버튼
(스핀들 잠금 장치)
Nút bấm
(Khóa hãm trục)
()
4
Spindle
스핀들
Cần trục
5
Screw
나사
Tuốc nơ vít
6
Hexagonal bar
wrench
육각 렌치 바
Cơ lê vặn bát giác
7
Wheel guard
숫돌 보호대
Ốp chắn bánh mài
8
Wheel washer
숫돌 와셔
Vòng đệm bánh mài
9
Depressed center
wheel
연삭 숫돌
Bánh mài lõm giữa
0
Wheel nut
휠너트
Khớp nối bánh mài
!
Wrench
렌치
Chìa vặn đai ốc
@
Diamond wheel
다이아몬드 숫돌
Đinh ốc
#
Side handle
사이드 핸들
Tay nắm phụ
$
Lock button
잠금 버튼
Nút hãm
%
Switch
스위치
Công tắc
^
Wear limit
마모 한도
Giới hạn mài mòn
&
No. of carbon brush
카본 브러시 번호
Mã số chổi than

English
2
GENERAL SAFETY RULES
WARNING!
Read all instructions
Failure to follow all instructions listed below may result
in electric shock, fi re and/or serious injury.
The term “power tool” in all of the warnings listed
below refers to your mains operated (corded) power
tool or battery operated (cordless) power tool.
SAVE THESE INSTRUCTIONS
1) Work area
a) Keep work area clean and well lit.
Cluttered and dark areas invite accidents.
b) Do not operate power tools in explosive
atmospheres, such as in the presence of
fl ammable liquids, gases or dust.
Power tools create sparks which may ignite the
dust of fumes.
c) Keep children and bystanders away while
operating a power tool.
Distractions can cause you to lose control.
2) Electrical safety
a) Power tool plugs must match the outlet.
Never modify the plug in any way.
Do not use any adapter plugs with earthed
(grounded) power tools.
Unmodifi ed plugs and matching outlets will
reduce risk of electric shock.
b) Avoid body contact with earthed or grounded
surfaces such as pipes, radiators, ranges and
refrigerators.
There is an increased risk of electric shock if your
body is earthed or grounded.
c) Do not expose power tools to rain or wet
conditions.
Water entering a power tool will increase the risk
of electric shock.
d) Do not abuse the cord. Never use the cord for
carrying, pulling or unplugging the power tool.
Keep cord away from heat, oil, sharp edges or
moving parts.
Damaged or entangled cords increase the risk of
electric shock.
e) When operating a power tool outdoors, use an
extension cord suitable for outdoor use.
Use of a cord suitable for outdoor use reduces
the risk of electric shock
f) Recommendation for the use of a residual current
device with a rate current of 30 mA or less.
3) Personal safety
a) Stay alert, watch what you are doing and use
common sense when operating a power tool.
Do not use a power tool while you are tired
or under the infl uence of drugs, alcohol or
medication.
A moment of inattention while operating power
tools may result in serious personal injury.
b) Use safety equipment. Always wear eye
protection.
Safety equipment such as dust mask, non-skid
safety shoes, hard hat, or hearing protection used
for appropriate conditions will reduce personal
injuries.
c) Avoid accidental starting. Ensure the switch is in
the off position before plugging in.
Carrying power tools with your fi nger on the
switch or plugging in power tools that have the
switch on invites accidents.
d) Remove any adjusting key or wrench before
turning the power tool on.
A wrench or a key left attached to a rotating part
of the power tool may result in personal injury.
e) Do not overreach. Keep proper footing and
balance at all times.
This enables better control of the power tool in
unexpected situations.
f) Dress properly. Do not wear loose clothing or
jewellery. Keep your hair, clothing and gloves
away from moving parts.
Loose clothes, jewellery or long hair can be
caught in moving parts.
g) If devices are provided for the connection of dust
extraction and collection facilities, ensure these
are connected and properly used.
Use of these devices can reduce dust related
hazards.
4) Power tool use and care
a) Do not force the power tool. Use the correct
power tool for your application.
The correct power tool will do the job better and
safer at the rate for which it was designed.
b) Do not use the power tool if the switch does not
turn it on and off.
Any power tool that cannot be controlled with the
switch is dangerous and must be repaired.
c) Disconnect the plug from the power source
before making any adjustments, changing
accessories, or storing power tools.
Such preventive safety measures reduce the risk
of starting the power tool accidentally.
d) Store idle power tools out of the reach of children
and do not allow persons unfamiliar with the
power tool or these instructions to operate the
power tool.
Power tools are dangerous in the hands of
untrained users.
e) Maintain power tools. Check for misalignment or
binding of moving parts, breakage of parts and
any other condition that may affect the power
tools operation.
If damaged, have the power tool repaired before
use.
Many accidents are caused by poorly maintained
power tools.
f) Keep cutting tools sharp and clean.
Properly maintained cutting tools with sharp
cutting edges are less likely to bind and are easier to
control.
g) Use the power tool, accessories and tool bits
etc., in accordance with these instructions and
in the manner intended for the particular type
of power tool, taking into account the working
conditions and the work to be performed.
Use of the power tool for operations different
from intended could result in a hazardous
situation.
5) Service
a) Have your power tool serviced by a qualifi ed
repair person using only identical replacement
parts.
This will ensure that the safety of the power tool
is maintained.
PRECAUTION
Keep children and infi rm persons away.
When not in use, tools should be stored out of reach of
children and infi rm persons.

3
English
SAFETY WARNINGS COMMON FOR GRINDING
OR ABRASIVE CUTTING-OFF OPERATIONS
a) This power tool is intended to function as a grinder
or cut-off tool. Read all safety warnings, instructions,
illustrations and specifi cations provided with this
power tool.
Failure to follow all instructions listed below may
result in electric shock, fi re and/or serious injury.
b) Operations such as sanding, wire brushing or
polishing are not recommended to be performed
with this power tool.
Operations for which the power tool was not
designed may create a hazard and cause personal
injury.
c) Do not use accessories which are not specifi cally
designed and recommended by the tool
manufacturer.
Just because the accessory can be attached to your
power tool, it does not assure safe operation.
d) The rated speed of the accessory must be at least
equal to the maximum speed marked on the power
tool.
Accessories running faster than their rated speed
can break and fl y apart.
e) The outside diameter and the thickness of your
accessory must be within the capacity rating of your
power tool.
Incorrectly sized accessories cannot be adequately
guarded or controlled.
f) The arbour size of wheels, fl anges, backing pads or
any other accessory must properly fi t the spindle of
the power tool.
Accessories with arbour holes that do not match the
mounting hardware of the power tool will run out of
balance, vibrate excessively and may cause loss of
control.
g) Do not use a damaged accessory. Before each use
inspect the accessory such as abrasive wheels for
chips and cracks, backing pad for cracks, tear or
excess wear, wire brush for loose or cracked wires.
If power tool or accessory is dropped, inspect for
damage or install an undamaged accessory. After
inspecting and installing an accessory, position
yourself and bystanders away from the plane of
the rotating accessory and run the power tool at
maximum no-load speed for one minute.
Damaged accessories will normally break apart
during this test time.
h) Wear personal protective equipment. Depending on
application, use face shield, safety goggles or safety
glasses. As appropriate, wear dust mask, hearing
protectors, gloves and workshop apron capable of
stopping small abrasive or workpiece fragments.
The eye protection must be capable of stopping
fl ying debris generated by various operations. The
dust mask or respirator must be capable of fi ltrating
particles generated by your operation. Prolonged
exposure to high intensity noise may cause hearing
loss.
i) Keep bystanders a safe distance away from work
area. Anyone entering the work area must wear
personal protective equipment.
Fragments of workpiece or of a broken accessory
may fl y away and cause injury beyond immediate
area of operation.
j) Hold power tool by insulated gripping surfaces only,
when performing an operation where the cutting
accessory may contact hidden wiring or its own
cord.
Cutting accessory contacting a”live” wire may make
exposed metal parts of the power tool “live” and
shock the operator.
k) Position the cord clear of the spinning accessory.
If you lose control, the cord may be cut or snagged
and your hand or arm may be pulled into the spinning
accessory.
l) Never lay the power tool down until the accessory
has come to a complete stop.
The spinning accessory may grab the surface and
pull the power tool out of your control.
m) Do not run the power tool while carrying it at your
side.
Accidental contact with the spinning accessory could
snag your clothing, pulling the accessory into your
body.
n) Regularly clean the power tool’s air vents.
The motor’s fan will draw the dust inside the housing
and excessive accumulation of powdered metal may
cause electrical hazards.
o) Do not operate the power tool near fl ammable
materials.
Sparks could ignite these materials.
p) Do not use accessories that require liquid coolants.
Using water or other liquid coolants may result in
electrocution or shock.
KICKBACK AND RELATED WARNINGS
Kickback is a sudden reaction to a pinched or snagged
rotating wheel, backing pad, brush or any other
accessory. Pinching or snagging causes rapid stalling
of the rotating accessory which in turn causes the
uncontrolled power tool to be forced in the direction
opposite of the accessory’s rotation at the point of the
binding.
For example, if an abrasive wheel is snagged or
pinched by the workpiece, the edge of the wheel that
is entering into the pinch point can dig into the surface
of the material causing the wheel to climb out or kick
out. The wheel may either jump toward or away from
the operator, depending on direction of the wheel’s
movement at the point of pinching. Abrasive wheels
may also break under these conditions.
Kickback is the result of power tool misuse and/or
incorrect operating procedures or conditions and can be
avoided by taking proper precautions as given below.
a) Maintain a fi rm grip on the power tool and position
your body and arm to allow you to resist kickback
forces. Always use auxiliary handle, if provided, for
maximum control over kickback or torque reaction
during start-up.
The operator can control torque reactions or kickback
forces, if proper precautions are taken.
b) Never place your hand near the rotating accessory.
Accessory may kickback over your hand.
c) Do not position your body in the area where power
tool will move if kickback occurs.
Kickback will propel the tool in direction opposite to
the wheel’s movement at the point of snagging.
d) Use special care when working corners, sharp edges
etc. Avoid bouncing and snagging the accessory.
Corners, sharp edges or bouncing have a tendency
to snag the rotating accessory and cause loss of
control or kickback.
e) Do not attach a saw chain woodcarving blade or
toothed saw blade.
Such blades create frequent kickback and loss of
control.

English
4
SAFETY WARNINGS SPECIFIC FOR GRINDING
AND ABRASIVE CUTTING-OFF OPERATIONS
a) Use only wheel types that are recommended for
your power tool and the specifi c guard designed for
the selected wheel.
Wheels for which the power tool was not designed
cannot be adequately guarded and are unsafe.
b) The guard must be securely attached to the power
tool and positioned for maximum safety, so the least
amount of wheel is exposed towards the operator.
The guard helps to protect operator from broken
wheel fragments and accidental contact with wheel.
c) Wheels must be used only for recommended
applications. For example: do not grind with the
side of cut-off wheel.
Abrasive cut-off wheels are intended for peripheral
grinding, side forces applied to these wheels may
cause them to shatter.
d) Always use undamaged wheel fl anges that are of
correct size and shape for your selected wheel.
Proper wheel fl anges support the wheel thus
reducing the possibility of wheel breakage. Flanges
for cut-off wheels may be different from grinding
wheel fl anges.
e) Do not use worn down wheels from larger power
tools.
Wheel intended for larger power tool is not suitable
for the higher speed of a smaller tool and may
burst.
ADDITIONAL SAFETY WARNINGS SPECIFIC
FOR ABRASIVE CUTTING-OFF OPERATIONS
a) Do not “jam” the cut-off wheel or apply excessive
pressure. Do not attempt to make an excessive
depth of cut.
Overstressing the wheel increases the loading and
susceptibility to twisting or blinding of the wheel
in the cut and the possibility of kickback or wheel
breakage.
b) Do not position your body in line with and behind
the rotating wheel.
When the wheel, at the point of operation, is moving
away from your body, the possible kickback may
propel the spinning wheel and the power tool directly
at you.
c) When wheel is binding or when interrupting a cut
for any reason, switch off the power tool and hold
the power tool motionless until the wheel comes to
a complete stop. Never attempt to remove the cut-
off wheel from the cut while the wheel is in motion
otherwise kickback may occur.
Investigate and take corrective action to eliminate
the cause of wheel binding.
d) Do not restart the cutting operation in the workpiece.
Let the wheel reach full speed and carefully reenter
the cut.
The wheel may bind, walk up or kickback if the power
tool is restarted in the workpiece.
GENERAL SAFETY INSTRUCTIONS FOR
GRINDERS
– Check that speed marked on the wheel is equal to or
greater than the rated speed of the grinder;
– Ensure that the wheel dimensions are compatible
with the grinder;
– Abrasive wheels shall be stored and handled with
care in accordance with manufacturer’s instructions;
– Inspect the grinding wheel before use, do not use
chipped, cracked or otherwise defective products;
– Ensure that mounted wheels and points are fi tted in
accordance with the manufacturer’s instructions;
– Ensure that blotters are used when they are provided
with the bonded abrasive product and when they are
required;
– Ensure that the abrasive product is correctly mounted
and tightened before use and run the tool at no-
load for 30 s in a safe position, stop immediately if
there is considerable vibration or if other defects are
detected. If this condition occurs, check the machine
to determine the cause;
– If a guard is equipped with the tool never use the tool
without such a guard;
– Do not use separate reducing bushings or adapters
to adapt large hole abrasive wheels;
– For tools intended to be fi tted with threaded hole
wheel, ensure that the thread in the wheel is long
enough to accept the spindle length;
– Check that the work piece is properly supported;
– Do not use cutting off wheel for side grinding;
– Ensure that sparks resulting from use do not create
a hazard e.g. do not hit persons, or ignite fl ammable
substances;
– Ensure that ventilation openings are kept clear when
working in dusty conditions, if it should become
necessary to clear dust, fi rst disconnect the tool
from the mains supply (use non metallic objects) and
avoid damaging internal parts;
– Always use eye and ear protection. Other personal
protective equipment such as dust mask, gloves,
helmet and apron should be worn;
– Pay attention to the wheel that continues to rotate
after the tool is switched off.

5
English
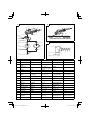
SPECIFICATIONS
Model G18SW G23SW
Voltage (by areas)
*1
(110V, 120V, 220V, 230V, 240V)
Input
*1
2200 W
No-load speed 8500/min 6600/min
Outer dia. 180 mm 230 mm
Wheel Inner dia. 22.23 mm
Peripheral speed 80 m/s
Weight
*2
4.4 kg
*1 Be sure to check the nameplate on product as it is subject to change by areas.
*2 Weight: Only main body
STANDARD ACCESSORIES
(1) Wrench.........................................................................1
(2) Hexagonal bar wrench ...............................................1
(3) Side handle..................................................................1
Depressed center wheels are not provided as standard
accessories.
Standard accessories are subject to change without
notice.
APPLICATIONS
○ Removal of casting fi n and fi nishing of various
types of steel, bronze and aluminum materials and
castings.
○ Grinding of welded sections or sections cut by means
of a cutting torch.
○ Grinding of synthetic resins, slate, brick, marble,
etc.
○ Cutting of synthetic concrete, stone, brick, marble
and similar materials.
PRIOR TO OPERATION
1. Power source
Ensure that the power source to be utilized conforms
to the power requirements specifi ed on the product
nameplate.
2. Power switch
Ensure that the power switch is in the OFF position.
If the plug is connected to a receptacle while the
power switch is in the ON position, the power tool
will start operating immediately, which could cause
a serious accident.
3. Extension cord
When the work area is removed from the power
source, use an extension cord of suffi cient thickness
and rated capacity. The extension cord should be
kept as short as practicable.
4. Fitting and adjusting the wheel guard
The wheel guard is a protective device to prevent
injury should the depressed center wheel shatter
during operation. Ensure that the guard is properly
fi tted and fastened before commencing grinding
operation. By slightly loosening the setting screw,
the wheel guard can be turned and set at any desired
angle for maximum operational effectiveness.
Ensure that the setting screw is thoroughly tightened
after adjusting the wheel guard.
CAUTION
When using a abrasive cutting wheel, be sure
to remove the standard accessory wheel guard
and attach the wheel guard with side guard (sold
separately).
5. Ensure that the depressed center wheel to be utilized
is the correct type and free of cracks or surface
defects. Also ensure that the depressed center wheel
is properly mounted and the wheel nut is securely
tightened, Refer to the section on “Depressed Center
Wheel Assembly”
6. Conducting a trial run
Ensure that the abrasive products is correctly
mounted and tightened before use and run the tool
at no-load for 30 seconds in a safe position, stop
immediately if there is considerable vibration or if
other defects are detected.
If this condition occurs, check the machine to
determine the cause.
7. Confi rm the spindle lock mechanism
Confi rm that the spindle lock is disengaged by
pushing push button two or three times before
switching the power tool on (See Fig. 1).
8. Fixing the side handle
Screw the side handle into the gear cover.
9. RCD
The use of a residual current device with a rated
residual current of 30mA or less at all times is
recommended.
PRACTICAL GRINDER APPLICATION
1. Pressure
To prolong the life of the machine and ensure a fi rst
class fi nish, it is important that the machine should
not be overloaded by applying too much pressure.
In most applications, the weight of the machine
alone is suffi cient for effective grinding. Too much
pressure will result in reduced rotational speed,
inferior surface fi nish, and overloading which could
reduce the life of the machine.
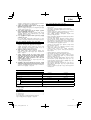
2. Grinding angle
Do not apply the entire surface of the depressed
center wheel to the material to be ground. As shown
in Fig. 2, the machine should be held at an angle of
15° – 30° so that the external edge of the depressed
center wheel contacts the material at an optimum
angle.

English
6
3. To prevent a new depressed center wheel from
digging into the workpiece, initial grinding should
be performed by drawing the grinder across the
workpiece toward the operator (Fig. 2 direction B).
Once the leading edge of the depressed center wheel
is properly abraded, grinding may be conducted in
either direction.
4. Switch operation
Switch ON: Push the locking button forward and
then press the switch lever.
* For continuous use, press the switch
lever. The switch lever is locked by
pushing the locking button forward
once again.
(*Subject to change depending on
area.)
Switch OFF: Press and release the switch lever.
5. Precautions immediately after fi nishing operation
After switching off the machine, do not put it
down until the depressed center wheel has come
to a complete stop. Apart from avoiding serious
accidents, this precaution will reduce the amount of
dust and swarf sucked into the machine.
CAUTIONS
○ Check that the work piece is properly supported.
○ Ensure that ventilation openings are kept clear when
working in dusty conditions.
If it should become necessary to clear dust, fi rst
disconnect the tool from the mains supply (use non-
metallic objects) and avoid damaging internal parts.
○ Ensure that sparks resulting from use do not create
a hazard e.g. do not hit persons, or ignite fl ammable
substances.
○ Always use eye and ear protection.
Other personal protective equipment such as dust
mask, gloves, helmet and apron should be worn
when necessary.
If in doubt, wear the protective equipment.
○ When the machine is not use, the power source
should be disconnected.
ASSEMBLING AND DISASSEMBLING THE
DEPRESSED CENTER WHEEL
CAUTION Be sure to switch OFF and disconnect the
attachment plug from the receptacle to avoid
a serious accident.
1. Assembling (Fig. 1)
(1) Turn the machine upside down so that the spindle is
facing upward.
(2) Mount the wheel washer onto the spindle.
(3) Fit the protruding part of the depressed center wheel
or diamond wheel onto the wheel washer.
(4) Screw the wheel nut onto the spindle.
(For diamond wheel assembling, use the wheel nut
with the convex side against the diamond wheel.)
(5) Insert the push button to prevent rotation of the
spindle, and tighten the wheel nut with the accessory
wrench, as shown in Fig.1.
2. Disassembling
Follow the above procedures in reverse.
CAUTIONS
○ Confi rm that the depressed center wheel is mounted
fi rmly.
○ Confi rm that the push button is disengaged by
pushing push button two or three times before
switching the power tool on.
MAINTENANCE AND INSPECTION
1. Inspecting the depressed center wheel
Ensure that the depressed center wheel is free of
cracks and surface defects.
2. Inspecting the mounting screws
Regularly inspect all mounting screws and ensure
that they are properly tightened. Should any of the
screws be loose, retighten them immediately. Failure
to do so could result in serious hazard.
3. Inspecting the carbon brushes (Fig. 3)
The motor employs carbon brushes which are
consumable parts.
When they become worn to or near the “wear limit”,
it could result in motor trouble. When an auto-
stop carbon brush is equipped, the motor will stop
automatically.
At that time, replace both carbon brushes with new
ones which have the same carbon brush numbers
shown in the fi gure. In addition, always keep carbon
brushes clean and ensure that they slide freely within
the brush holders.
4. Replacing carbon brushes
Disassemble the brush caps with a slotted-head
screwdriver. The carbon brushes can then be easily
removed.
5. Maintenance of the motor
The motor unit winding is the very “heart” of the
power tool. Exercise due care to ensure the winding
does not become damaged and/or wet with oil or
water.
6. Service parts list
CAUTION
Repair, modifi cation and inspection of Hitachi Power
Tools must be carried out by an Hitachi Authorized
Service Center.
This Parts List will be helpful if presented with the
tool to the Hitachi Authorized Service Center when
requesting repair or other maintenance.
In the operation and maintenance of power tools, the
safety regulations and standards prescribed in each
country must be observed.
MODIFICATIONS
Hitachi Power Tools are constantly being improved
and modifi ed to incorporate the latest technological
advancements.
Accordingly, some parts may be changed without
prior notice.
NOTE:
Due to HITACHI’s continuing program of research and
development, the specifi cations herein are subject to
change without prior notice.

7

8

9

10
○
○
○
○

11
○
○
○
○
○
○
○

한국어
12
일반적인 안전 수칙
경고!
설명서를 자세히 읽으십시오.
설명서의 내용에 따르지 않을 시에는 감전 사고나 화재가 발
생할 수 있으며 심각한 부상을 입을 수도 있습니다.
아래에 나오는 ‘전동 툴’이란 용어는 플러그를 콘센트에
연결해 유선 상태로 사용하는 제품 또는 배터리를 넣어 무선
상태로 사용하는 제품을 가리킵니다.
설명서의 내용을 숙지하십시오.
1) 작업 공간
a) 작업 공간을 깨끗하게 청소하고 조명을 밝게 유지하
십시오.
작업 공간이 정리되어 있지 않거나 어두우면 사고가
날 수 있습니다.
b) 인화성 액체나 기체 또는 먼지 등으로 인해 폭발 위
험이 있는 환경에서는 전동 툴을 사용하지 마십시오.
전동 툴을 사용하다 보면 불꽃이 튀어서 먼지나 기체
에 불이 붙을 수 있습니다.
c) 어린이를 비롯하여 사용자 외에는 작업장소에 접근
하지 못하도록 하십시오.
주의가 산만해지면 문제가 생길 수 있습니다.
2) 전기 사용시 주의사항
a) 전동 툴 플러그와 콘센트가 일치해야 합니다.
플러그를 절대로 변형하지 마십시오.
접지된 전동 툴에는 어댑터 플러그를 사용하지 마십
시오.
플러그를 변형하지 않고 알맞은 콘센트에 꽂아 사용
하면, 감전 위험을 줄일 수 있습니다.
b) 파이프, 라디에이터, 레인지, 냉장고 등 접지된 표면
에 몸이 닿지 않도록 주의하십시오.
작업자의 몸이 접지되면, 감전될 위험이 있습니다.
c) 전동 툴에 비를 맞히거나 젖은 상태로 두지 마십시
오.
물이 들어가면 감전될 위험이 있습니다.
d) 코드를 조심해서 다루십시오. 전동 툴을 들거나 당기
거나 콘센트에서 뽑으려고 할 때 코드를 잡아당기면
안 됩니다.
열, 기름, 날카로운 물건, 움직이는 부품 등으로부터
코드를 보호하십시오.
코드가 파손되거나 엉키면 감전될 위험이 높아집니
다.
e) 실외에서 전동 툴을 사용할 때는 실외 용도에 적합한
연장선을 사용하십시오.
실외 용도에 적합한 코드를 사용해야 감전 위험이 줄
어듭니다.
f) 30 mA 이하의 정격 전류를 갖는 잔여 전류 장치를
사용하기 위한 권고.
3) 사용자 주의사항
a) 전동 툴을 사용할 때는 작업에 정신을 집중하고, 상
식의 범위 내에서 사용하십시오.
약물을 복용하거나 알코올을 섭취한 상태 또는 피곤
한 상태에서는 전동 툴을 사용하지 마십시오.
전동 툴을 사용할 때 주의가 흐트러지면 심각한 부상
을 입을 수 있습니다.
b) 안전 장비를 사용하십시오. 항상 눈 보호 장구를 착
용해야 합니다.
먼지 보호 마스크, 미끄럼 방지 신발, 안전모, 청각 보
호 장비 등을 사용하면 부상을 줄일 수 있습니다.
c) 전동 툴이 갑자기 작동되지 않도록 합니다. 플러그를
꽂기 전에 스위치가 ‘OFF’ 위치에 있는지 확인하십
시오.
손가락을 스위치에 접촉한 채 전동 툴을 들거나 스위
치가 켜진 상태로 플러그를 꽂으면 사고가 날 수 있습
니다.
d) 전원을 켜기 전에 조정 키 또는 렌치를 반드시 제거
해야 합니다.
전동 툴의 회전 부위에 키 또는 렌치가 부착되어 있으
면, 부상을 입을 수 있습니다.
e) 작업 대상과의 거리를 잘 조절하십시오. 알맞은 발판
을 사용하고 항상 균형을 잡고 있어야 합니다.
그렇게 하면 예기치 못한 상황에서도 전동 툴을 잘 다
룰 수 있습니다.
f) 알맞은 복장을 갖추십시오. 헐렁한 옷이나 장신구를
착용하면 안 됩니다. 머리카락, 옷, 장갑 등을 움직이
는 부품으로부터 보호하십시오.
헐렁한 옷이나 장신구, 긴 머리카락이 부품에 딸려 들
어갈 수도 있습니다.
g) 분진 추출 및 집진 장비에 연결할 수 있는 장치가 제
공되는 경우, 그러한 장치가 잘 연결되어 있고 제대로
작동하는지 확인하십시오.
이러한 장치를 사용하면, 먼지와 관련된 사고를 줄일
수 있습니다.
4) 전동 툴 사용 및 관리
a) 전동 툴을 아무 곳에나 사용하지 마십시오. 용도에
알맞은 전동 툴을 사용하십시오.
적절한 전동 툴을 사용하면, 정상 속도로 안전하고 효
과적으로 작업을 수행할 수 있습니다.
b) 스위치를 눌렀을 때 전동 툴이 켜지거나 꺼지지 않으
면 사용하지 마십시오.
스위치로 작동시킬 수 없는 전동 툴은 위험하므로, 수
리를 받아야 합니다.
c) 전동 툴을 조정하거나 부속품을 바꾸거나 보관할 때
는 반드시 전원에서 플러그를 빼야 합니다.
이러한 안전 조치를 취해야 전동 툴이 갑자기 켜지는
위험을 피할 수 있습니다.
d) 사용하지 않는 전동 툴은 어린이의 손이 닿지 않는
곳에 보관하고, 사용법을 잘 모르는 사람이 사용하지
못하도록 하십시오.
전동 툴은 미숙련자가 다루기에는 매우 위험한 물건
입니다.
e) 전동 툴을 잘 관리하십시오. 움직이는 부품이 잘못
결합되어 있거나 꽉 끼어 움직이지 못하게 되어 있지
않은지 점검하십시오. 또한 전동 툴의 작동에 영향을
미칠 수 있는 기타 파손이 없는지 확인하십시오.
파손된 부분이 있는 경우, 사용하기 전에 수리하십시
오.
전동 툴을 제대로 관리하지 못해서 생기는 사고가 많
습니다.
f) 절삭 툴은 날카롭고 청결한 상태로 관리하십시오.
절삭 날을 날카로운 상태로 잘 관리하면, 원활하게
잘 움직이며 다루기도 훨씬 편합니다.
g) 설명서를 참조하여 전동 툴과 부속품, 툴 비트 등을
사용하십시오. 또한 작업 환경과 수행할 작업의 성격
을 고려해서 알맞은 종류의 전동 툴을 선택하고, 적
절한 방식으로 사용하십시오.
원래 목적과 다른 용도로 전동 툴을 사용하면 위험한
사고가 날 수 있습니다.
5) 서비스
a) 자격을 갖춘 전문가에게 서비스를 받고, 항상 원래
부품과 동일한 것으로 교체해야 합니다.
그렇게 하면 전동 툴을 보다 안전하게 사용할 수 있습
니다.
주의사항
어린이나 노약자가 가까이 오지 못하도록 하십시오.
전동 툴을 사용하지 않을 때는 어린이나 노약자의 손이 닿지
않는 곳에 보관해야 합니다.

13
한국어
연삭 및 절단 연삭 작업에 공통으로 적용되는 안전
경고
a) 이 전동 툴은 그라인더 또는 절단기로 기능하도록
고안되었습니다. 이 전동 툴과 함께 제공된 모든 안전
경고, 지침, 그림 및 규격을 읽으십시오.
아래에 열거한 모든 지침을 따르지 않을 경우 감전, 화재
및/또는 중상이 발생할 수 있습니다.
b) 이 전동 툴로 샌딩, 와이어 브러싱 또는 연마와 같은
작업을 수행하는 것은 권장되지 않습니다.
전동 툴을 지정된 용도 이외로 조작할 경우 위험과
상해가 유발될 수 있습니다.
c) 툴 제조업체가 구체적으로 지정 및 권장하지 않은
부속품을 사용하지 마십시오.
부속품이 전동 툴에 장착될 수 있다고 해서 반드시
안전한 조작이 보장되는 것은 아닙니다.
d) 부속품의 정격 속도는 최소한 전동 툴에 표시된 최고
속도와 같아야 합니다.
정격 속도보다 더 빨리 작동하는 부속품은 파손되어
조각이 튈 수 있습니다.
e) 부속품의 외경과 두께는 전동 툴의 정격 용량의 범위
내에 있어야 합니다.
잘못된 크기의 부속품은 적절하게 보호 또는 제어될 수
없습니다.
f) 숫돌, 플랜지, 지지 패드 또는 모든 기타 부속품의 축
크기는 전동 툴의 스핀들에 적합해야 합니다.
축 구멍이 전동 툴의 장착 하드웨어와 일치하지 않는
부속품은 균형을 잃은 상태로 작동하고, 과도하게
진동하여 제어하지 못하게 될 수 있습니다.
g) 손상된 부속품은 사용하지 마십시오. 매번 사용하기
전에 연마 숫돌과 같은 부속품에 흠과 균열이 있는지
검사하고, 지지 패드의 균열, 파열 또는 과도한 마모
여부를 검사하고, 와이어 브러시의 와이어가 느슨하거나
균열이 있는지 검사하십시오. 전동 툴 또는 부속장치가
떨어진 경우, 손상 여부를 검사하거나 손상되지 않은
부속품을 장착하십시오. 부속품을 검사 및 장착한 후,
사용자 및 주변 작업자들은 회전 부속품의 평면에서
떨어져 있고 전동 툴을 일분 동안 최고 무부하 속도로
작동해야 합니다.
손상된 부속품은 일반적으로 이 시험 시간 동안
부서집니다.
h) 개인보호장구를 착용하십시오. 용도에 따라 안면
보호대, 안전 고글 또는 보안경을 착용하십시오. 적합한
경우, 방진 마스크, 귀마개, 장갑, 작은 마멸 파편
또는 작업물 파편을 막아 주는 작업장용 에이프런을
착용하십시오.
보안대는 여러 조작에 의해서 생성되는 날아다니는
찌꺼기로부터 눈을 보호합니다. 방진 마스크 또는
마스크는 조작에 의해서 생성되는 입자들을 걸러줄 수
있어야 합니다. 고강도 소음에 장시간 노출되면 청력을
상실할 수 있습니다.
i) 주변 작업자들을 작업 영역으로부터 안전한 거리만큼
떨어져 있게 하십시오. 작업 영역에 들어오는 사람은
누구나 개인보호장구를 착용해야 합니다.
작업물 파편 또는 부서진 부속품의 파편이 날아다녀
직접적인 작업 영역 밖의 사람에게 상해를 입힐 수
있습니다.
j) 절단 부속품이 숨어 있는 전선 또는 자체의 코드와
접촉할 수 있는 경우 작업을 수행할 때 절연된 고정면으로
전동 툴을 잡으십시오.
"전기가 흐르는" 전선과 접촉하는 절단 부속품은 전통
툴의 노출된 금속부에 "전기가 흐르게" 하여 조작자를
감전시킬 수 있습니다.
k) 코드를 회전 부속품이 없는 곳에 놓으십시오.
통제력을 상실할 경우, 코드가 절단되거나 찢어질 수
있으며 손이나 팔이 회전 부속품에 빨려 들어갈 수
있습니다.
l) 전동 툴을 부속품이 완전히 정지할 때까지 절대로 내려
놓지 마십시오.
회전 부속품이 표면을 잡아 전동 툴을 당겨 사용자가
통제력을 상실할 수 있습니다.
m) 전동 툴을 옆에 들고 있는 상태에서 작동하지 마십시오.
회전 부속품과 우발적으로 접촉할 경우 옷이 찢어져서
부속품에 의해 상해를 입을 수 있습니다.
n) 전동 툴의 에어 벤트를 정기적으로 청소하십시오.
모터의 팬이 하우징 내의 먼지를 끌어당기게 되며 금속
가루가 과도하게 쌓일 경우 전기적 위험이 유발될 수
있습니다.
o) 전동 툴을 가연성 물질과 가까이에서 사용하지
마십시오.
불꽃 때문에 가연성 물질에 불이 붙을 수 있습니다.
p) 액체 냉각제가 필요한 부속품을 사용하지 마십시오.
물 또는 기타 액체 냉각제를 사용하면 감전사 또는
감전이 발생할 수 있습니다.
반동 및 관련 경고
반동은 눌리거나 걸린 회전 숫돌, 지지 패드, 브러시 또는
기타의 부속품에 대한 갑작스러운 반응입니다. 눌리거나
걸리면 회전 부속품이 갑자기 정지하고 이로 인해 통제력이
상실된 전동 툴이 부속품 장착 시의 부속품 회전 방향과
반대 방향으로 강제로 회전합니다.
예를 들어, 연마 숫돌이 작업물에 의해 걸리거나 눌릴 경우,
눌리는 지점에 들어가는 숫돌의 가장자리가 작업물의
표면을 파고 들어 숫돌이 위로 올라가거나 반동할 수
있습니다. 눌리는 지점의 숫돌의 운동 방향에 따라 숫돌이
조작자쪽으로 움직이거나 조작자와 반대 방향으로 움직일
수 있습니다. 연마 숫돌도 이러한 조건에서는 부서질 수
있습니다.
반동은 전동 툴의 오용 및/또는 올바르지 않은 조작 절차
또는 조건의 결과이며 아래와 같은 적절한 주의사항을
준수하여 방지할 수 있습니다.
a) 전동 툴을 세게 잡고 몸과 팔을 반동력을 저지하는
위치에 두십시오. 시동 중에 반동 또는 토크 반작용을
최대한 통제하도록 항상 보조 핸들(제공된 경우)을
사용하십시오.
조작자는 적절한 예방 조치를 취할 경우 토크 반작용
또는 반동력을 제어할 수 있습니다.
b) 손을 회전 부속품 가까이에 절대로 놓지 마십시오.
부속품이 손 위로 반동할 수 있습니다.
c) 반동할 경우 전동 툴이 이동하는 공간에 몸을 두지
마십시오.
반동은 툴을 걸릴 때의 숫돌의 이동 방향과 반대
방향으로 밀어냅니다.
d) 구석, 날카로운 가장자리 등을 가공할 때 특히
주의하십시오. 부속품이 튀어오르거나 걸리지 않게
하십시오.
구석이 날카로운 가장자리를 가공하거나 부속품이
튀어오르면 부속품이 걸리게 되어 통제 상실 또는
반동이 유발됩니다.
e) 톱 체인 목재조각 날 또는 톱니형 톱날을 장착하지
마십시오.
이러한 날들은 잦은 반동과 통제 상실을 유발합니다.
연삭 및 절단 연삭 작업에만 적용되는 안전 경고
a) 전동 툴에 권장되는 종류의 숫돌과 선택한 숫돌에
지정된 보호대만 사용하십시오.
전동 툴에 사용되도록 지정되지 않은 숫돌은 올바른
보호대로 보호될 수 없으며 안전하지 않습니다.
b) 보호대를 전동 툴에 단단히 고정하고 최대의 안전성이
유지되는 위치에 놓아 최소량의 숫돌이 조작자에게
노출되게 해야 합니다.

한국어
14
보호대는 조작자를 부서진 숫돌 파편으로부터 보호하고
숫돌에 우연히 접촉하는 것을 방지합니다.
c) 숫돌은 권장 용도로만 사용해야 합니다. 예: 절단 숫돌의
측면으로 연삭하지 마십시오.
절단 연삭 숫돌은 횡축 연삭용이기 때문에 측면에 힘을
가하면 부서질 수 있습니다.
d) 항상 선택한 숫돌에 적합한 크기와 모양의 손상되지
않은 숫돌 플랜지를 사용하십시오.
올바른 숫돌 플랜지는 숫돌을 지지하여 숫돌 파손의
가능성을 줄입니다. 절단 숫돌의 플랜지는 연삭 숫돌
플랜지와 다를 수 있습니다.
e) 더 큰 전동 툴에서 사용되어 마모로 인해 작아진 숫돌을
사용하지 마십시오.
더 큰 전동 툴에 사용되도록 지정된 숫돌은 더 높은
속도의 더 작은 툴에 적합하지 않으며 깨질 수 있습니다.
절단 연삭 작업에만 적용되는 추가 안전 경고
a) 절단 숫돌을 "걸리게" 하거나 과도한 압력을 가하지
마십시오. 과도한 깊이로 절단하려 하지 마십시오.
숫돌에 과도한 힘을 가하면 숫돌이 받는 부하가 커져
숫돌이 절단부에 끼어 비틀리거나 고착될 가능성 및
반동 또는 파손의 가능성이 높아집니다.
b) 몸을 회전 숫돌 옆과 뒤에 두지 마십시오.
작동 시점에 숫돌이 몸과 반대쪽으로 움직일 경우,
반동으로 인해 회전 숫돌과 전동 툴이 사용자쪽으로
밀릴 수 있습니다.
c) 숫돌이 고착되어 있을 때 또는 절단이 모종의 이유로
중단될 때, 전동 툴을 끄고 숫돌이 완전히 정지할 때까지
전동 툴을 정지 상태로 두십시오. 숫돌이 움직이는
상태에서 절단 숫돌을 제거하려고 하지 마십시오.
반동이 발생할 수 있습니다.
숫돌 고착 원인을 조사한 후 시정 조치를 취해 숫돌
고착의 원인을 제거하십시오.
d) 작업물에서 절단 조작을 재시작하지 마십시오. 숫돌을
최대 속도 로 작 동한 후 절단 을 주 의 하 여 재 시 작 하 십시 오 .
전동 툴을 작업물에서 재시작할 경우 숫돌이 고착되거나
튀어 오르거나 반동할 수 있습니다.
미니 그라인더를 위한 일반 안전 지침
- 숫돌에 표시된 속도가 그라인더의 정격 속도 이상인지
확인하십시오.
- 숫돌 치수가 그라인더와 호환되는지 확인하십시오.
- 연마 숫돌은 제조업체의 지침에 따라 주의하여 보관 및
취급해야 합니다.
- 사용하기 전에 연마 숫돌을 검사하십시오. 조각나거나
금가거나 결함있는 제품은 사용하지 마십시오.
- 장착 숫돌과 장착점이 제조업체의 지침에 따라
일치하는지 확인하십시오.
- 접합식 연마 제품과 함께 제공되고 필요할 경우 블라터가
사용되는지 확인하십시오.
- 사용 전에 연마 제품을 올바르게 장착하고 조였는지
확인하고 공구를 무부하 상태에서 안전 위치에서 30초
동안 작동시킨 다음 상당한 진동이 있거나 다른 결함이
감지될 경우 즉시 정지시키십시오. 이러한 조건이 발생할
경우 기계를 점검하여 원인을 찾으십시오.
- 보호대가 공구에 장착된 경우 절대로 공구를 보호대
없이 사용하지 마십시오.
- 별도의 축소 부싱 또는 어댑터를 사용하여 커다란
구멍의 연마 숫돌에 끼우지 마십시오.
- 공구에 나사식 구멍이 있는 숫돌을 장착하려는
경우 숫돌의 나사산 길이가 주축 길이와 일치하는지
확인하십시오.
- 작업물이 올바르게 지지되는지 확인하십시오.
- 측면 연삭을 위해 절단 숫돌을 사용하지 마십시오.
- 숫돌 사용 중에 발생하는 불꽃이 위험을 일으키지
않도록, 즉 사람에게 튀지 않게 또는 인화성 물질을
발화시키지 않게 하십시오.
- 먼지가 많은 환경에서 작업할 때에는 통기구가 막히지
않게 하십시오. 먼지를 제거할 필요가 있을 경우 우선
공구를 전원에서 분리하고(비금속성 물체를 사용) 내부
부품이 손상되지 않게 하십시오.
- 항상 보안경과 귀마개를 사용하십시오. 방진 마스크,
장갑, 헬멧 및 에이프런과 같은 다른 개인보호장구를
착용해야 합니다.
- 공구를 끈 뒤에도 숫돌이 몇 초 동안 계속 회전하므로
주의하십시오.
사양
모델 G18SW G23SW
전압(지역별로 차이가 있음)*
1
(110 V, 120 V, 220 V, 230 V, 240 V)
소비 전력*
1
2200 W
무부하 속도 8500/분 6600/분
숫돌
외경 x 구멍 직경
180 mm 230 mm
내경
22.23 mm
원주 속도 80 m/s
중량*
2
4.4 kg
*1 지역별로 차이가 있을 수 있으므로, 제품 명판의 기재내용을 반드시 확인하십시오.
*2 중량: 본체만
기본 부속품
(1) 렌치 ..........................................................1
(2) 육각 렌치 바 ................................................1
(3) 사이드 핸들 .................................................1
연삭 숫돌은 표준 부속품으로 제공되지 않습니다.
기본 부속품은 예고 없이 변경될 수 있습니다.

15
한국어
너무 많은 응력을 가하면 회전 속도가 감소하고 표면 마
감 품질이 저하되고, 과부하로 인해 기계 수명이 감소될
수 있습니다.
2. 연삭 각도
연삭 숫돌의 전체 표면을 연삭재에 대지 마십시오. 그림
2과 같이 기계를 15도-30도의 각도로 고정해 연삭 숫돌
의 바깥쪽 가장자리가 연삭재와 최적의 각도로 접촉하게
해야 합니다.
3. 새 연삭 숫돌이 작업물에 구멍을 내는 것을 방지하기 위
해서, 그라인더를 작업물 전체에 걸쳐 조작자쪽으로 끌
어 초기 연삭을 수행해야 합니다(그림 2 방향 B). 연삭
숫돌의 선도 가장자리가 올바르게 마멸되면, 연삭을 어
느 한 방향으로 수행할 수 있습니다.
4. 스위치 작동
스위치 ON: 잠금 버튼을 앞으로 밀고 스위치 레버를
누르십시오.
* 계속 사용하려면 스위치 레버를
누르십시오. 잠금 버튼을 한 번 더 앞으로
밀면 스위치 레버가 잠깁니다.
(*지역에 따라 변경 가능.)
스위치 OFF: 스위치 레버를 눌렀다 놓으십시오.
5. 조작 완료 직후의 주의사항
전동 툴을 끈 뒤에도 숫돌이 계속 회전합니다.
기계를 끈 후 연삭 숫돌이 완전히 정지할 때까지 기계를
내려 놓지 마십시오. 이러한 주의사항을 준수하면 심각
한 사고를 방지할 수 있을 뿐 아니라 기계로 흡입되는 분
진 및 부스러기의 양이 줄어듭니다.
주의
○ 작업물이 올바르게 지지되는지 확인하십시오.
○ 분진이 날리는 조건에서 작업할 때 통기구가 막히지
않았는지 확인하십시오.
분진을 제거할 필요가 있을 경우, 우선 전동 툴을 주전원
공급장치에서 분리하여(비금속성 물체 사용) 내장
부품의 손상을 방지하십시오.
○ 전동 툴을 사용할 때 발생하는 불꽃이 사람에게 튀거나
인화물질을 점화시키는 것과 같은 위험이 발생하지
않도록 주의하십시오.
○ 항상 보안경 및 귀마개를 착용하십시오.
필요한 경우 방진 마스크, 장갑, 헬멧, 에이프런과 같은
다른 개인 보호 장구를 착용해야 합니다.
의심스러운 경우 보호 장구를 착용하십시오.
○ 기계를 사용하지 않을 때, 전원을 분리해야 합니다.
연삭 숫돌의 조립 및 분해
주의
반드시 스위치를 끄고 연결 플러그를 콘센트에서 분리해
심각한 사고를 방지하십시오.
1. 조립(그림 1)
(1) 기계를 거꾸로 세워 스핀들이 위를 향하게 합 니다.
(2) 숫돌 와셔의 교차형 플랫을 스핀들의 V자형 부분과
정렬한 후 장착합니다.
(3) 연삭 숫돌 또는 다이아몬드 숫돌의 돌출부를 숫돌 와셔
위에 장착하십시오.
(4) 숫돌 너트를 스핀들 위에 돌려 끼웁니다.
(다이아몬드 숫돌 조립의 경우, 볼록한 쪽을 다이아몬드
숫돌에 대고 숫돌 너트를 사용하십시오.)
(5) 푸시 버튼을 삽입하여 스핀들의 회전을 방지하고 휠
너트를 부속품 렌치로 조이십시오(그림 1 참조).
2. 분해
위의 절차를 역순으로 실시합니다.
주의
○ 연삭 숫돌을 제대로 장착했는지 확인하십시오.
○ 전동 툴을 켜기 전에 푸시 버튼을 두세 번 눌러 푸시
버튼이 작동 해제되었는지 확인하십시오.
용도
○ 주조 찌꺼기의 제거, 다양한 종류의 철, 구리, 알루미늄
소재 및 주조품의 마감 작업
○ 용접 단면 또는 절단 토치를 이용한 s 연삭
○ 합성수지, 슬레이트, 벽돌, 대리석 등의 연마
○ 합성 콘크리트, 석재, 벽돌, 대리석 및 비슷한 재료의
절단
사용 전 주의사항
1. 전원
사용 전원이 제품 명판에 표시된 전원 요건과 부합하는지
확인하십시오.
2. 전원 스위치
전원 스위치가 ‘OFF’ 위치에 있는지 확인하십시오.
전원 스위치가 ‘ON’ 위치에 있는 상태로 플러그를 꽂
으면, 제품이 갑자기 작동하기 시작해서 심각한 사고가
날 수 있습니다.
3. 연장선
작업 공간에 전원이 없으면, 두께가 충분한 정격 용량의
연장선을 사용하십시오. 연장선은 가능한 한 짧을수록
좋습니다.
4. 숫돌 보호대의 장착과 조정
숫돌 보호대는 연삭 숫돌이 조작 중에 분쇄될 경우 부상
을 방지하기 위한 보호 장치입니다. 연삭 작업을 시작하
기 전에 숫돌 보호대를 올바르게 장착하여 조였는지 확
인하십시오.
설정 나사를 살짝 풀면 숫돌 보호대를 돌려 원하는 각도
로 설정해 최대의 동작 효과를 얻을 수 있습니다. 숫돌 보
호대를 조정한 후 설정 나사를 제대로 조였는지 확인하십
시오.
주의
연마 절삭 숫돌을 사용할 때 반드시 표준 부속품 숫돌 보
호대를 제거하고 측면 보호대가 있는 숫돌 보호대(별매
품)를 장착하십시오.
5. 사용할 연삭 숫돌이 올바른 종류이고 균열 또는 표면 결
함이 없는지 확인하십시오. 또한 연삭 숫돌이 올바르게
장착되어 있고 숫돌 너트를 완전하게 조였는지 확인하십
시오. “연삭 숫돌 어셈블리” 단원을 참조하십시오.
6. 시험 조작 수행
사용 전에 연삭 제품을 올바르게 장착하고 조였는지
확인한 후 툴을 30초 동안 안전한 위치에서 무부하
상태로 조작합니다. 상당한 진동이 있을 경우 또는
결함이 감지될 경우 즉시 조작을 멈춥니다.
이러한 상황이 발생할 경우 기계를 점검해 원인을 파악합
니다.
7. 스핀들 잠금 장치 확인
전동 툴을 켜기 전에 푸시 버튼을 두 번 또는 세번 눌
러 스핀들 잠금 장치가 해제되는지 확인하십시오
(그림 1 참조).
8. 측면 핸들 장착
측면 핸들을 기어 커버에 돌려 끼웁니다.
9. RCD
항상 정격 잔류 전류가 30mA 미만인 누전 차단기를 사
용하는 것이 좋습니다.
그라인더 응용 작업
1. 압력
기계 수명을 연장하고 우수한 마감 품질을 유지하려면 기
계에 너무 많은 응력을 가해 기계에 과부하를 주지 않아
야 합니다. 대다수 응용 작업에서 기계 중량만으로도 효
과적 연삭을 하기에 충분합니다.

한국어
16
관리 및 검사
1. 연삭 숫돌 검사
연삭 숫돌이 균열 및 표면 결함이 없는지 확인하십시오.
2. 부착 나사 검사
정기적으로 모든 부착 나사를 검사하고 잘 고정되어 있는
지 확인합니다. 느슨한 나사가 있는 경우, 즉시 꽉 조여야
합니다. 그렇게 하지 않으면 심각한 사고가 날 수 있습니
다.
3. 카본 브러시 검사(그림 3)
모터에는 소모성 부품인 카본 브러시가 장착되어
있습니다.
"마모 한계"까지 또는 그것에 가깝게 마모될 경우 모터
고장을 유발할 수 있습니다. 자동 정지 카본 브러시가
장착된 경우 모터가 자동으로 정지합니다.
이때 두 카본 브러시 모두를 그림에 표시된 카본 브러시
번호를 갖는 새 카본 브러시로 교환하십시오. 또한
카본 브러시를 항상 청결하게 하여 브러시 홀더 내에서
자유롭게 움직이게 하십시오.
4. 카본 브러시 교체
일자 드라이버로 브러시 캡을 분해하십시오. 그런 다음
카본 브러시를 쉽게 제거할 수 있습니다.
5. 모터 관리
모터부 권선은 전동 툴의 ‘심장부’입니다. 권선이 손상
되거나 물 또는 기름에 젖지 않도록 주의를 기울여야 합
니다.
6. 서비스 부품 정보
주의
Hitachi 전동 툴의 수리, 변경 및 검사는 반드시 공식
Hitachi 서비스 센터를 통해서 해야 합니다.
공식 Hitachi 서비스 센터에 수리 또는 기타 점검을 요청
할 때 툴과 함께 부품 정보를 제공하면 도움이 됩니다.
전동 툴을 사용하거나 점검할 때는 각국의 안전 수칙 및
규정을 준수해야 합니다.
변경
Hitachi 전동 툴은 개선 및 수정을 통해 끊임없이 최신
기술 발전을 반영하고 있습니다.
따라서 일부 부품(코드 번호 및/또는 디자인)은 사전 예
고 없이 변경될 수 있습니다.
참고
HITACHI는 지속적인 연구개발 프로그램을 진행하고
있으므로, 본 설명서의 사양은 사전 예고 없이 변경될 수
있습니다.

17
Tiếng Việt
CÁC NGUYÊN TẮC AN TOÀN CHUNG
CẢNH BÁO!
Đọc kỹ tất cả hướng dẫn
Việc không tuân theo mọi hướng dẫn được liệt kê dưới đây
có thể dẫn đến bị điện giật, cháy và/hoặc bị chấn thương
nghiêm trọng.
Thuật ngữ "dụng cụ điện” có trong tất cả các cảnh báo dưới
đây đề cập đến dụng cụ điện (có dây) điều khiển b
ằng tay
hoặc dụng cụ điện (không dây) vận hành bằng pin.
GHI NHỚ CÁC HƯỚNG DẪN NÀY
1) Khu vực làm việc
a) Giữ khu vực làm việc sạch và đủ ánh sáng.
Khu vực làm việc tối tăm và bừa bộn dễ gây tai nạn.
b) Không vận hành dụng dụ điện trong khu vực
dễ cháy nổ, chẳng hạn như nơi có chất lỏng dễ
cháy, khí đốt hoặc bụi khói.
Các dụng dụ
điện tạo tia lửa nên có thể làm bụi khói
bén lửa.
c) Không để trẻ em và những người không phận sự
đứng gần khi vận hành dụng dụ điện.
Sự phân tâm có thể khiến bạn mất kiểm soát.
2) An toàn về điện
a) Phích cắm dụng cụ điện phải phù hợp với ổ cắm.
Không bao giờ được cải biến phích cắm dưới
mọi hình thức. Không
được sử dụng phích tiếp
hợp với dụng cụ điện nối đất (tiếp đất).
Phích cắm nguyên bản và ổ cắm điện đúng loại sẽ
giảm nguy cơ bị điện giật.
b) Tránh để cơ thể tiếp xúc với các bề mặt nối đất
hoặc tiếp đất như đường ống, lò sưởi, bếp ga và
tủ lạ
nh.
Có nhiều nguy cơ bị điện giật nếu cơ thể bạn nối
hoặc tiếp đất.
c) Không để các dụng cụ điện tiếp xúc với nước
mưa hoặc ẩm ướt.
Nước thấm vào dụng cụ điện sẽ làm tăng nguy cơ bị
điện giật.
d) Không được lạm dụng dây dẫn điện. Không bao
giờ nắ
m dây để xách, kéo hoặc rút dụng cụ điện.
Để dây cách xa nơi có nhiệt độ cao, trơn trượt,
vật sắc cạnh hoặc bộ phận chuyển động.
Dây bị hư hỏng hoặc rối sẽ làm tăng nguy cơ bị điện
giật.
e) Khi vận hành dụng cụ điện ở ngoài trời, hãy sử
dụng dây nối thích hợp cho việc sử dụng ngoài
trời.
Sử dụng dây nối ngoài trời thích hợp làm giảm nguy
cơ bị điện giật.
f) Khuyến nghị khi sử dụng thiết bị ngắt dòng điện
dư với dòng điện định mức nhỏ hơn hoặc bằng
30 mA.
3) An toàn cá nhân
a) Luôn cảnh giác, quan sát những gì bạn đang làm
và phán đoán theo kinh nghiệm khi vận hành
dụng dụ điện.Không được sử dụng dụng cụ
điện
khi mệt mỏi hoặc dưới ảnh hưởng của rượu, ma
túy hoặc dược phẩm.
Một thoáng mất tập trung khi vận hành dụng cụ điện
có thể dẫn đến chấn thương cá nhân nghiêm trọng.
b) Sử dụng thiết bị bảo hộ. Luôn đeo kính bảo vệ
mắt.
Trang thiết bị bảo hộ như khẩu trang, giày an toàn
chống trượt, nón bảo hộ
, hoặc dụng cụ bảo vệ tai
được sử dụng trong các điều kiện thích hợp sẽ làm
giảm nguy cơ thương tích cá nhân.
c) Tránh để máy khởi động bất ngờ. Đảm bảo công
tắc ở vị trí tắt trước khi cắm điện.
Đặt ngón tay trên công tắc khi xách dụng cụ điện hoặc
cắm điện lúc công tắc ở vị trí bật rất dễ dẫ
n đến tai nạn.
d) Tháo mọi khóa điều chỉnh hoặc chìa vặn đai ốc ra
trước khi bật dụng cụ điện.
Chìa vặn đai ốc hoặc chìa khóa còn cắm trên một bộ
phận quay của dụng dụ điện có thể gây thương tích
cá nhân.
e) Không với tay quá xa. Luôn luôn đứng vững và
cân bằng.
Điều này giúp kiểm soát dụng cụ điện trong tình
huống bất ngờ tố
t hơn.
f) Trang phục phù hợp. Không mặc quần áo rộng
lùng thùng hoặc đeo trang sức. Giữ tóc, quần áo
và găng tay tránh xa các bộ phận chuyển động.
Quần áo rộng lùng thùng, đồ trang sức hoặc tóc dài
có thể bị cuốn vào các bộ phận chuyển động.
g) Nếu có các thiết bị đi kèm để nối máy hút bụi và
các phụ tùng chọn lọc khác, hãy đảm bảo các
thiết bị này được nối và sử dụng
đúng cách.
Việc sử dụng các thiết bị này có thể làm giảm độc hại
do bụi gây ra.
4) Sử dụng và bảo dưỡng dụng cụ điện
a) Không được ép máy hoạt động quá mức. Sử
dụng đúng loại dụng cụ điện phù hợp với công
việc của bạn.
Dụng cụ điện đúng chủng loại sẽ hoàn thành công
việc tốt và an toàn hơ
n theo đúng tiêu chí mà máy
được thiết kế.
b) Không sử dụng dụng cụ điện nếu công tắc
không tắt hoặc bật được.
Bất kỳ dụng cụ điện nào không thể điều khiển được
bằng công tắc đều rất nguy hiểm và phải được sửa
chữa.
c) Luôn rút phích cắm ra khỏi nguồn điện trước khi
điều chỉnh, thay phụ tùng, hoặc c
ất dụng cụ điện.
Những biện pháp ngăn ngừa như vậy giúp giảm
nguy cơ dụng cụ điện khởi động bất ngờ.
d) Cất giữ dụng cụ điện không sử dụng ngoài tầm
tay trẻ em và không được cho người chưa quen
sử dụng dụng cụ điện hoặc chưa đọc hướng dẫn
sử dụng này vậ
n hành dụng cụ điện.
Dụng cụ điện rất nguy hiểm khi ở trong tay người
chưa được đào tạo cách sử dụng.
e) Bảo dưỡng dụng cụ điện. Kiểm tra đảm bảo các
bộ phận chuyển động không bị xê dịch hoặc mắc
kẹt, các bộ phận không bị rạn nứt và kiểm tra các
điều kiện khác có thể ảnh hưở
ng đến quá trình
vận hành máy. Nếu bị hư hỏng, phải sửa chữa
dụng cụ điện trước khi sử dụng.
Nhiều tai nạn xảy ra do bảo quản dụng dụ điện kém.
f) Giữ các dụng cụ cắt sắc bén và sạch sẽ.
Dụng cụ cắt có cạnh cắt bén được bảo quản đúng
cách sẽ ít khi bị kẹt và dễ điều khi
ển hơn.
g) Sử dụng dụng cụ điện, phụ tùng và đầu cài v.v...
đúng theo những chỉ dẫn này và tập trung vào
loại dụng cụ điện cụ thể, lưu ý đến điều kiện làm
việc và công việc phải thực hiện.
Vận hành dụng cụ điện khác với mục đích thiết kế có
thể dẫn đến các tình huống nguy hiểm.
5) Bả
o dưỡng
a) Đem dụng cụ điện của bạn đến thợ sửa chữa
chuyên nghiệp để bảo dưỡng, chỉ sử dụng các
phụ tùng đúng chủng loại để thay thế.
Điều này giúp đảm bảo duy trì tính năng an toàn của
dụng cụ điện.
PHÒNG NGỪA
Giữ trẻ em và những người không phận sự tránh xa
dụng cụ.
Khi không sử dụ
ng, các dụng cụ điện phải được cất giữ
tránh xa tầm tay trẻ em và người không phận sự.

Tiếng Việt
18
CẢNH BÁO AN TOÀN CHUNG CHO QUÁ TRÌNH
VẬN HÀNH MÁY MÀI HOẶC MÁY MÀI CẮT
a) Dụng cụ điện này được chế tạo với chức năng như
dụng cụ mài hoặc cắt. Đọc kỹ tất cả cảnh báo an
toàn, hướng dẫn, minh họa và thông số kỹ thuật
kèm theo dụng cụ điện này.
Việc không tuân theo mọi hướng dẫn được liệt kê bên
dưới có thể gây điện giật, cháy, và/hoặc chấn thương
nghiêm trọng.
b) Không được sử
dụng dụng cụ điện này cho các hoạt
động như chà nhám, đánh bóng bằng bàn chổi sắt
hoặc đánh bóng.
Các hoạt động vốn không thuộc chức năng thiết kế của
dụng cụ có thể gây nguy hiểm và dẫn đến chấn thương
cá nhân.
c) Không sử dụng các phụ tùng không được thiết kế
chuyên biệt và không được nhà sản xuất dụng cụ
khuyên dùng.
Phụ tùng cho dù có thể lắp khít vào d
ụng cụ điện cũng
không có nghĩa là nó sẽ hoạt động an toàn.
d) Tốc độ danh định của phụ tùng phải bằng hoặc lớn
hơn tốc độ tối đa ghi trên dụng cụ điện.
Phụ tùng có thể bị vỡ và văng xa nếu chạy nhanh hơn
tốc độ danh định của chúng.
e) Đường kính ngoài và độ dày của phụ tùng phải nằm
trong giới hạn công su
ất của dụng cụ điện.
Phụ tùng có kích thước không đúng có thể sẽ không
được bảo vệ và kiểm soát thích đáng.
f) Kích thước trục chính của bánh mài, mặt bích, tấm
đỡ hoặc bất kỳ phụ tùng nào khác phải vừa khít với
cần trục của dụng cụ điện.
Các phụ tùng có lỗ trục chính không khớp với phần cứng
lắp ráp của dụng cụ đi
ện sẽ khiến dụng cụ mất cân
bằng, rung quá mức và có thể gây mất kiểm soát.
g) Không sử dụng phụ tùng đã hỏng. Trước mỗi lần sử
dụng phải kiểm tra lại phụ tùng, chẳng hạn như xem
bánh mài có mảnh vụn và vết nứt không, tấm đỡ có
vết nứt, rách hay mòn quá mức không, chổi kim loại
có bị lỏng hoặc bị đứt dây không. Nếu làm rớt dụng
c
ụ điện hay phụ tùng, hãy kiểm tra xem máy có bị
hư hỏng không, hoặc lắp phụ tùng còn nguyên vào.
Sau khi kiểm tra và lắp ráp phụ tùng, bạn và những
người xung quanh nên tránh xa mặt phẳng quay của
phụ tùng và bật máy ở tốc độ không tải tối đa trong
vòng một phút.
Phụ tùng hư hỏng thường bị vỡ thành từng mảnh trong
thời gian chạy thử này.
h) Mặc thiết bị bảo hộ cá nhân. Tùy thuộc vào từ
ng loại
công việc mà sử dụng mặt nạ, kính bảo hộ hoặc kính
an toàn. Khi cần, nên mang mặt nạ chống bụi, miếng
bảo vệ tai, găng tay và tấm chắn có khả năng ngăn
chặn các mảnh vụn gia công hoặc bột mài nhỏ.
Dụng cụ bảo vệ mắt phải có khả năng ngăn mảnh vỡ
bay ra từ nhiều loại hoạt động khác nhau. Mặt nạ ho
ặc
khẩu trang chống bụi phải có khả năng lọc các hạt nhỏ
phát sinh từ quá trình vận hành. Tiếp xúc lâu với tiếng ồn
ở cường độ cao có thể gây mất thính lực.
i) Giữ những người không phận sự tránh xa khu vực
làm việc với khoảng cách an toàn. Bất kỳ ai vào khu
vực làm việc đều phải mặc thiết bị bảo hộ cá nhân.
Những mảnh vỡ của phôi gia công hoặc phụ
tùng bị bể
có thể văng xa và gây chấn thương bên ngoài khu vực
vận hành trực tiếp.
j) Chỉ cầm dụng cụ điện ở phần tay cầm cách điện khi
thực hiện công việc mà phụ tùng cắt có thể tiếp xúc
với các dây điện ngầm hoặc dây của chính dụng cụ.
Phụ tùng cắt khi tiếp xúc với dây dẫn “có điện” có thể làm
cho các bộ phận kim loại hở của dụng cụ trở thành “có
điện” và gây giật điện cho người vận hành.
k) Đặt dây tránh xa phụ tùng đang quay.
Nếu bạn mất kiểm soát, dây sẽ có thể bị cắt hoặc vướng
vào, và tay hoặc cánh tay của bạn sẽ bị kéo vào phụ
tùng đang quay.
l) Không bao giờ đặt dụng cụ
điện xuống cho đến khi
phụ tùng ngừng hoạt động hẳn.
Phụ tùng đang quay có thể găm vào bề mặt và kéo dụng
cụ điện ra khỏi tầm kiểm soát của bạn.
m) Không bật dụng cụ điện khi bạn đang cầm bên
người.
Vô tình chạm vào phụ tùng đang quay có thể làm quần
áo bị vướng vào, kéo phụ tùng về người bạn.
n) Thường xuyên làm sạch lỗ
thông gió của dụng cụ
điện.
Quạt của động cơ sẽ hút bụi vào bên trong vỏ máy và
việc tích tụ quá nhiều bột kim loại có thể gây tại nạn về
điện.
o) Không vận hành dụng cụ gần các vật liệu dễ cháy.
Tia lửa điện có thể bắt vào các vật liệu này gây cháy.
p) Không sử dụng các phụ tùng cần có chất làm mát
dạng lỏng.
Sử dụng nướ
c hoặc chất làm mát dạng lỏng khác có thể
gây giật điện hoặc sốc.
LỰC GIẬT LÙI VÀ CẢNH BÁO LIÊN QUAN
Lực giật lùi là phản ứng bất ngờ do bánh mài, tấm đỡ, chổi
hoặc bất kỳ phụ tùng khác đang quay bị kẹt hoặc vướng.
Phụ tùng đang quay bị kẹt hoặc vướng có thể ngừng đột
ngột, việc này sẽ làm cho dụng cụ điện vốn đã mất kiểm
soát bị bật về hướng ngược với hướng quay của phụ tùng
tạ
i điểm bị kẹt.
Ví dụ, nếu bánh mài bị vướng hoặc kẹt vào phôi gia công,
cạnh của bánh mài đang ở chỗ kẹt có thể cắm vào bề mặt
vật liệu làm cho bánh mài nảy lên hoặc văng ra. Bánh mài có
thể nảy ra xa hoặc hướng về người vận hành, tùy vào hướng
chuyển động của bánh mài tại điểm bị kẹt. Bánh mài cũng
có thể bị vỡ trong những đi
ều kiện này.
Lực giật lùi xảy ra do sử dụng sai dụng cụ và/hoặc quy trình
hoặc điều kiện vận hành không chính xác và có thể tránh
được bằng cách thực hiện các biện pháp phòng ngừa thích
hợp liệt kê bên dưới.
a) Cầm chắc dụng đụ điện và định vị cơ thể cũng như
cánh tay sao cho có thể cản được lực giật lùi. Luôn
sử dụng tay cầm phụ, nếu có, để
kiểm soát tối đa lực
giật lùi hoặc phản lực mô men xoắn khi khởi động.
Người vận hành có thể kiểm soát phản lực mô men xoắn
hoặc lực giật lùi nếu thực hiện các biện pháp phòng
ngừa thích hợp.
b) Không bao giờ đặt tay gần phụ tùng đang quay.
Phụ tùng có thể giật lùi về tay bạn.
c) Không đứng trong khu vực mà dụng cụ điện sẽ
chuyển động n
ếu xảy ra lực giật lùi.
Lực giật lùi sẽ đẩy dụng cụ theo hướng ngược với hướng
chuyển động của bánh mài tại điểm bị kẹt.
d) Đặc biệt chú ý khi làm việc với các góc, cạnh sắt,
v.v... Tránh làm nảy và kẹt phụ tùng.
Các góc, cạnh sắt hoặc gờ nổi có xu hướng làm kẹt phụ
tùng đang quay và gây mất kiểm soát hoặc tạo lực giật
lùi.
e) Không lắ
p lưỡi cưa xích, dao khắc gỗ hoặc lưỡi cưa
có răng.
Những lưỡi này thường xuyên tạo ra lực giật lùi và gây
mấy kiểm soát.

19
Tiếng Việt
CẢNH BÁO AN TOÀN DÀNH RIÊNG CHO HOẠT
ĐỘNG MÀI VÀ MÀI CẮT ĐỨT
a) Chỉ sử dụng loại bánh mài được khuyên dùng cho
dụng cụ của bạn và tấm chắn bảo vệ riêng được
thiết kế cho bánh mài đã chọn.
Bánh mài không được thiết kế chuyên biệt cho dụng cụ
điện này sẽ không được bảo vệ thích đáng và không an
toàn.
b) Tấm chắn bảo vệ phải được lắp khít vào dụng cụ
điện và định vị để đảm bảo an toàn cao nhấ
t, sao cho
phần tấm chắn lộ ra ngoài hướng về người vận hành
là nhỏ nhất.
Tấm chắn giúp bảo vệ người vận hành khỏi bị mảnh vụn
của bánh mài bể vỡ văng trúng và tránh vô tình tiếp xúc
với bánh mài.
c) Chỉ sử dụng bánh mài cho các ứng dụng được
khuyến nghị. Ví dụ: không mài bằng cạnh của bánh
mài cắt.
Bánh mài cắt được sử dụng cho mục đích mài cạ
nh
biên, các lực bên tác dụng vào những bánh mài này có
thể làm cho bánh mài bị vỡ.
d) Luôn sử dụng mặt bích bánh mài còn tốt, kích thước
và hình dạng phù hợp với bánh mài mà bạn đã chọn.
Mặt bích bánh mài phù hợp sẽ đỡ được bánh mài, do đó
làm giảm nguy cơ làm vỡ bánh mài. Mặt bích dành cho
bánh mài cắt có thể khác với mặt bích bánh mài nhẵn.
e) Không sử dụng bánh mài đã mòn của các dụng cụ
điện lớn hơn.
Bánh mài dùng cho các dụng cụ điệ
n lớn hơn không
thích hợp với tốc độ cao hơn của dụng cụ nhỏ hơn và có
thể bị vỡ.
CẢNH BÁO AN TOÀN BỔ SUNG DÀNH RIÊNG
CHO CÁC HOẠT ĐỘNG MÀI CẮT
a) Không “kẹp chặt” bánh mài cắt hoặc tác dụng lực
quá lớn. Không cố tạo ra vết cắt quá sâu.
Ấn bánh mài quá mạnh sẽ tăng lực tải và dễ làm xoắn
hoặc kẹt bánh mài vào vết cắt, cũng như có thể gây ra
lực giật lùi hoặc vỡ bánh mài.
b) Không đứng phía sau hoặc thẳng hàng với bánh mài
đang quay.
Khi bánh mài đang quay dịch chuyển ra xa bạn, lực giật
lùi tiềm ẩn có thể đẩy bánh mài đang quay và dụ
ng cụ
điện hướng thẳng vào bạn.
c) Khi bánh mài bị kẹt hoặc khi ngừng cắt vì lý do nào
đó, hãy ngắt điện dụng cụ và giữ máy đứng yên đến
khi bánh mài ngừng hoàn toàn. Không cố rút bánh
mài cắt ra khỏi vết cắt khi bánh mài còn đang quay,
nếu không sẽ làm phát sinh lực giật lùi.
Kiểm tra và tiến hành khắc phục để loại bỏ nguyên nhân
gây kẹt bánh mài.
d) Không bắt đầu lại hoạt động cắt trên phôi gia công.
Hãy đợi bánh mài
đạt tốc độ tối đa và cẩn thận đặt
lại vào vết cắt.
Bánh mài có thể bị kẹt, nảy lên hoặc giật lùi nếu khởi
động lại dụng cụ điện ngay trên phôi gia công.
CẢNH BÁO AN TOÀN CHUNG DÀNH CHO MÁY
MÀI
– Kiểm tra để đảm bảo tốc độ ghi trên bánh mài bằng hoặc
lớn hơn tốc độ danh định của máy mài;
– Đảm bảo rằng kích thước bánh mài tương thích với máy
mài;
– Bánh mài nhám phải được cất giữ và xử lý cẩn thận theo
hướng dẫn của nhà sản xuất;
– Kiểm tra bánh mài nhẵn trước khi sử dụng, không dùng
các sản phẩm mẻ, nứt hoặc có khiếm khuyết khác;
– Đảm bảo r
ằng bánh mài lắp ráp và các tiếp điểm được
ráp đúng hướng dẫn của nhà sản xuất;
– Đảm bảo sẽ sử dụng các bản đệm nếu chúng được
cung cấp kèm theo sản phẩm mài gắn kết và khi cần
thiết;
– Đảm bảo sản phẩm mài được lắp ráp và siết chặt đúng
cách trước khi sử dụng và chạy máy không tải khoảng
30 giây ở khu vực an toàn, ngừng máy ngay nếu th
ấy
máy rung đáng kể hoặc phát hiện khiếm khuyết gì khác.
Nếu xảy ra tình trạng trên, hãy kiểm tra dụng cụ để xác
định nguyên nhân;
– Nếu dụng cụ được trang bị tấm chắn bảo vệ thì không
bao giờ được vận hành dụng cụ thiếu tấm chắn bảo vệ;
– Không được sử dụng ống nối hoặc đầu nối tiếp chuyển
riêng để lắp với bánh mài nhám lỗ
lớn.
– Đối với các dụng cụ được thiết kế sao cho khớp với
bánh mài lỗ ren, hãy đảm bảo sao cho ren của bánh mài
đủ dài để tương thích với chiều dài cần trục;
– Kiểm tra đảm bảo phôi gia công được đỡ đúng cách;
– Không sử dụng bánh cắt để mài biên;
– Đảm bảo rằng tia lửa điện phát ra do sử dụng dụng cụ
không gây nguy hiểm, ví dụ như không bắn vào người,
không bắ
t lửa với các chất dễ cháy;
– Đảm bảo rằng các lỗ thông gió luôn sạch sẽ khi làm việc
trong điều kiện bụi bẩn, nếu cần lau sạch bụi, trước tiên
phải ngắt dụng cụ khỏi nguồn điện chính (sử dụng vật
phi kim) và tránh làm hỏng các bộ phận bên trong;
– Luôn đeo bảo vệ mắt và tai. Phải mang các thiết bị bảo
hộ cá nhân như mặt nạ ch
ống bụi, găng tay, mũ bảo
hiểm và tấm chắn;
– Cẩn thận chú ý các bánh mài vẫn đang quay sau khi đã
tắt dụng cụ.
ページが読み込まれています...
ページが読み込まれています...
ページが読み込まれています...
ページが読み込まれています...
ページが読み込まれています...
ページが読み込まれています...
ページが読み込まれています...
ページが読み込まれています...
ページが読み込まれています...
ページが読み込まれています...
ページが読み込まれています...
ページが読み込まれています...
-
 1
1
-
 2
2
-
 3
3
-
 4
4
-
 5
5
-
 6
6
-
 7
7
-
 8
8
-
 9
9
-
 10
10
-
 11
11
-
 12
12
-
 13
13
-
 14
14
-
 15
15
-
 16
16
-
 17
17
-
 18
18
-
 19
19
-
 20
20
-
 21
21
-
 22
22
-
 23
23
-
 24
24
-
 25
25
-
 26
26
-
 27
27
-
 28
28
-
 29
29
-
 30
30
-
 31
31
-
 32
32


Hitachi G 18SW Handling Instructions Manual
- カテゴリー
- パワーツール
- タイプ
- Handling Instructions Manual
- このマニュアルも適しています
関連論文
-
Hitachi PDA-100K Handling Instructions Manual
-
Hikoki G10SQ ユーザーマニュアル
-
-
Hikoki G14DMR ユーザーマニュアル
-
-
-
Hikoki G12S2 ユーザーマニュアル
-
-
Hitachi PDA-100D Handling Instructions Manual