
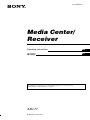
3-254-400-11(1)
XAV-77
Media Center/
Receiver
Operating Instructions
GB
CT
© 2003 Sony Corporation
For installation and connections, see the supplied Installation/Connections manual.

2

3
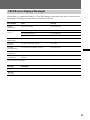
Table of Contents
Features .................................................................................................................... 4
Precautions ............................................................................................................... 5
Getting Started
Preparations ............................................................................................................. 6
Location of Controls ................................................................................................ 8
Basic Operation
Listening to Radio or CD/MD/”MG Memory Stick”............................................. 10
Watching TV/Other Video Components................................................................ 12
Setting a Security Code......................................................................................... 14
Setting the Clock.................................................................................................... 16
Advanced Operation
FM/AM Reception
Reading the monitor and display
window......................................................17
Storing stations automatically
— Best Tuning Memory (BTM) ..............19
Storing stations manually ..........................21
Assigning a name to a station
(Station Memo) .........................................22
Searching for a station by name (List) ......24
CD/MD/”MG Memory Stick” Playback
Reading the monitor and display
window......................................................25
Repeat playback ..........................................27
Shuffle playback ..........................................28
Labeling a CD - Disc Memo (CD unit with
the CUSTOM FILE function)..................29
Locating a disc by name (List)................... 31
TV/Other Video Components
Storing channels ..........................................32
Selecting the screen mode ..........................33
Sound Settings
Dynamic Soundstage Organizer (DSO) ...34
Using the equalizer (EQ7) ..........................35
Adjusting the sound characteristics
(BAS/TRE/BAL/FAD/SUB) .................37
Setting the low-pass filter (LPF) ................38
Setting the high-pass filter (HPF)..............39
Setting the sound level for connected AUX
components...............................................40
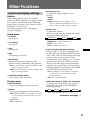
Other Functions
Sound and display settings ........................41
Using the rotary commander..................... 44
Other Features
Additional Information
Card remote commander precautions......46
About the liquid crystal display (LCD)
panel .......................................................... 46
Replacing the lithium battery .................... 46
If movement of the monitor has been
impeded during the monitor setting.....47
Dismounting the unit..................................47
Troubleshooting................................... 49
Specifications ....................................... 52

4
Features
Welcome!
Thank you for purchasing this Sony Media Center/Receiver. Before operating the unit,
please read this manual thoroughly and retain it for future reference.
7-inch in-dash motorized TFT monitor
Innovative in-dash monitor design allows the unit to be mounted in a single DIN slot. At
the touch of a button, a 7-inch wide-aspect-ratio screen slides out, for comfortable TV or
DVD viewing. (Sony TV tuner unit and DVD changer are optionally available.)
Sony bus control and FM/AM tuner
The built-in FM/AM tuner as well as an optional Sony CD/MD changer and MG Memory
Stick system-up player can be conveniently operated from the unit. The XAV-77 is the ideal
centerpiece for a sophisticated car audio/video system.
Built-in amp with 45 watts × 4
In spite of its compact size, the XAV-77 has 4 powerful amplifier channels delivering 45
watts each, for effortless music reproduction.
DSO creates a virtual soundstage
The DSO (Dynamic Soundstage Organizer) developed by Sony improves the listening
experience by creating a soundstage with “virtual speakers”. These are located right out
front, not buried in the lower part of the doors. The result is clearer, more transparent
sound.
EQ7 frequency curves
7 preprogrammed equalizer curves for various types of music can be selected at the press
of a button. In addition, you can fine-tune each curve by adjusting the signal level in 7
frequency bands, to create your very own sound.
2 A/V inputs and 1 rear monitor output
Additional to optional TV tuner unit, up to 2 optional A/V devices can be connected
simultaneously.

5
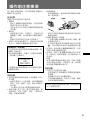
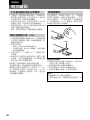
Precautions
To avoid the risk of injury or accident, read
the following precautions before installing
and operating the unit.
On safety
Comply with the Traffic Laws in your
country.
•
While driving
–You must not watch or operate the monitor. It
may lead to distraction and cause an accident.
Park your car in a safe place to watch the
monitor and operate the unit.
•
While operating
– Do not insert your hands, fingers or foreign object
into the unit while the monitor is functioning. It
may cause injury or damage to the unit.
– Keep small articles out of the reach of children.
•
If your car was parked in direct sunlight resulting
in a considerable rise in temperature inside the car,
allow the unit to cool off before operating it.
Watching TV/video pictures
The TV/video pictures appear only after
you park the car and set the parking brake.
When the car starts moving, the TV/video
pictures automatically disappear after
displaying the following caution.
PICTURE OFF
FOR
YOUR SAFETY
Do not operate equipment connected to
the TV tuner unit or watch the monitor
while driving.
On installation
•
We recommend this unit should be installed by a
qualified technician or service personnel
– If you try to install this unit by yourself, refer to
the supplied “Installation/Connections” manual
and read it carefully. Make sure to install this
unit properly.
– Improper installation may cause battery drain or
a short circuit.
•
If the unit does not work properly, check the
connections first (refer to the supplied
“Installation/Connections” manual). If everything
in order, check the fuse.
•
Replacing the fuse
– When replacing the fuse, be sure to use only a
fuse of the same rating (ampere rating).
5
– Using a different fuse or bridging the contacts
with wire can lead to serious damage.
•
Protect unit surface from damage
– Do not expose the unit surface to chemicals such
as insecticide, hair spray, insect repellent, etc.
– Do not leave rubber or plastic materials in
contact with the unit for a long time. Otherwise
the finish of the unit may be impaired, or
deformation may occur.
•
When installing, be sure to turn the ignition key to
off position. If the ignition is on and try to install
this unit may cause battery drain or a short circuit.
•
When installing, be sure not to damage any car
parts such as pipes, tubes, fuel tank or wiring by
using a drill. It can cause a fire or an accident.
•
Moisture condensation
If the ambient temperature of the unit changes
rapidly, moisture condensation may occur inside
the display window. Simply wait for a while, until
the moisture evaporates and the unit returns to
normal.
Installing location
•
Do not install this unit where:
– the driver’s view will be obstructed when the
monitor is in either open or close position.
– the operation of the car or the airbag system will
be obstructed.
– It will obstruct the operation of the vehicle,
especially the steering wheel, shift lever or brake
pedal.
If you have any questions or problems concerning
your unit, please consult your nearest Sony dealer.
Fuse
Fuse

6
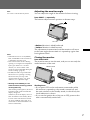
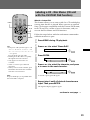
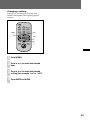
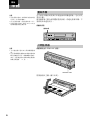
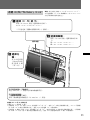
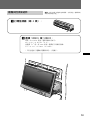
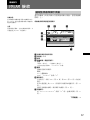
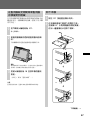
Preparations
Resetting the unit
Before operating the unit for the first time, or after
replacing the car battery or changing the connections, you
must reset the unit.
Use a pointed object such as a ball point pen to push the
Reset button. To avoid the possibility of damage, you
should not use a needle or push the button too strongly.
Push Reset
R
ese
t
bu
tt
on
DI
SC
SEEK
SOURCE MODE AT T
OFF
OPEN/
CLOSE
.>
VOL
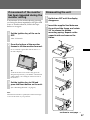
Opening up the monitor
Press OPEN/CLOSE on the monitor.
O
PEN
/C
L
OS
E
The monitor slides out of the main unit, and the picture
comes on.
Notes
• When the Reset button is pushed, the
time and all stored settings are lost and
will have to be reprogrammed.
• The reset procedure takes about 10
seconds after the Reset button is
pushed.
• When the reset procedure is completed,
press OPEN/CLOSE and verify that
the monitor opens up properly.
Notes
• The card remote commander cannot be
used for opening up or closing the
monitor.
• If movement of the monitor during
opening or closing has been impeded
by the gear shift lever or another
obstacle, see “If movement of the
monitor has been impeded during the
monitor setting” (page 47).
Getting Started

7
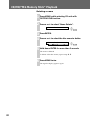
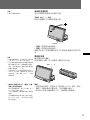
Adjusting the monitor angle
You can adjust the angle of the monitor for best viewing.
Press ANGLE –/+ repeatedly.
The buttons adjust monitor position in discrete steps.
AN
G
LE
–
/+
–
+ button: Monitor is tilted backward.
– button: Monitor is tilted forward.
The adjustment is memorized, and the monitor will move
to the same angle the next time it is opened up again after
having been closed.
Closing the monitor
Press OPEN/CLOSE.
The monitor retracts into the unit, and you can use only the
audio functions of the unit.
O
PEN
/C
L
OS
E
O
FF
Shutting down
• If you press OFF on the card remote commander while
the monitor is opened up, the sound is turned off, and
the unit switches to the standby mode, in which only the
clock indication is shown.
• If you set the ignition key of the car to OFF, power to the
unit is automatically turned off.*
Note
Do not move the monitor by hand.
* Warning when installing in a car
without an ACC (accessory) position
on the ignition key
After turning off the ignition, be sure to
hold down OFF on the unit until the
display disappears.
Otherwise, the clock display does not
turn off and this causes battery drain.
To turn on the unit when it is turned
off, press SOURCE on the unit. (You
cannot turn on the unit with the card
remote commander.)
Notes
• When the monitor is closed, MENU,
LIST, and ENTER on the card remote
commander cannot be used.
• If movement of the monitor during
opening or closing has been impeded
by the gear shift lever or another
obstacle, see “If movement of the
monitor has been impeded during the
monitor setting” (page 47).
• If OPEN/CLOSE was pressed while
the monitor was opening or closing,
the monitor may not stop at the
original angle. In such a case, press
ANGLE –/+ to adjust the angle.

8
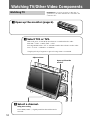
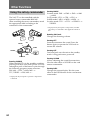
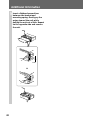
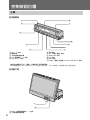
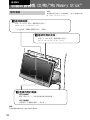
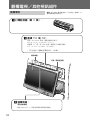
Location of Controls
Main unit
Monitor closed
1
1
3
3
2
2
4
4
5
5
6
6
7
7
8
8
9
9
0
0
qa
q
1 DISC –/+ buttons
2 Reset button
3 Sensor for card remote commander
4 VOL (volume adjust) –/+ buttons
5 SEEK/AMS –/+ buttons
1 ANGLE (monitor angle adjust) –/+ buttons
2 Sensor for card remote commander
6 Display window
7 OFF (Standby/Power off) button*
8 OPEN/CLOSE button
9 ATT button
0 MODE button
qa SOURCE (Power on/Radio/CD/MD/VIDEO or TV)
button
Monitor opened up
1
1
2
2
* Warning when installing in a car without an ACC (accessory) position on the ignition key
After turning off the ignition, be sure to hold down OFF on the unit until the display disappears.
Otherwise, the clock display does not turn off and this causes battery drain.

9
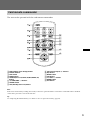
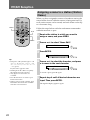
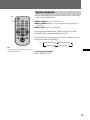
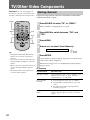
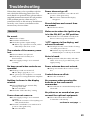
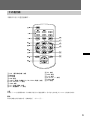
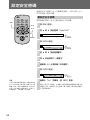
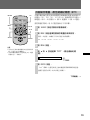
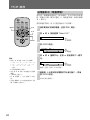
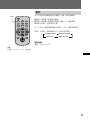
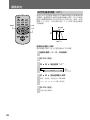
Card remote commander
The unit can be operated with the card remote commander.
1
1
2
2
3
3
4
4
5
5
6
6
7
7
8
8
9
9
0
q
a
q
d
q
s
q
f
q
g
1 DSPL (display mode change) button
2 Number buttons
3 DSO button
4 MENU button
5 SOURCE (Power on/Radio/CD/MD/VIDEO/TV)
button
6 B/b SEEK/AMS –/+ buttons
7 SOUND button
8 OFF (Standby/Power off) button
9 VOL (volume adjust) +/– buttons
0 EQ7 button
qa MODE button
qs LIST button
qd V/v DISC +/– buttons
qf ENTER button
qg ATT button
Note
If the unit is turned off by holding down OFF, it cannot be operated with the card remote commander unless SOURCE
on the unit is pressed to activate the unit first.
Tip
See “Replacing the lithium battery” for details on how to replace the battery (page 46).

10
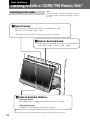
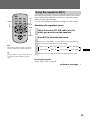
Listening to Radio or CD/MD/”MG Memory Stick”
Basic Operation
Listening to the radio
3 Select desired station.
Using auto tuning
Press SEEK/AMS –/+ lightly until the desired station is received.
Using manual tuning
For details, see “Storing stations manually” (page 21).
O
P
E
N
/
C
L
O
SE
A
T
T
2 Select desired band.
With each press of MODE, the selection is switched in the
order: FM1 t FM2 t FM3 t AM1 t AM2.
Tip
The power antenna will extend automatically while you select the radio reception.
Note
Listening to radio or CD/MD/”MG Memory Stick” is
possible regardless of the monitor setting (opened or
closed).
1 Select tuner.
With each press of SOURCE, the selection is switched in the order:
FM/AM t CD* t MD*/MS* t TV*.
*
Displayed only if respective optional component is connected.

11
O
P
E
N
/
C
L
O
SE
A
T
T
Listening to CD/MD/”MG
Memory Stick”
Preparation: To listen to CDs, MDs, or “MG Memory
Sticks” on this unit, an optional Sony CD/MD changer
and/or MG Memory Stick system-up player must be
connected to the connection box.
1 Select CD, MD, or MS.
With each press of the SOURCE button, the selection is switched in the order:
FM/AM t CD* t MD*/MS* t TV*.
*
Displayed only if respective optional component is connected.
3 Select a
disc.
Press V or v on
the card remote
commander to
select a disc
(page 9).
Adjust volume
2 Select changer.
With each press of the MODE button, the
selection is switched in the order:
CD: CD1 t CD2 t CD3 t ...
MD: MD1 t MD2 t MD3 t ...
Locating a desired spot (manual search)
Hold down SEEK/AMS –/+ and release it at the desired spot.
Locating the start of a track
(Automatic Music Sensor [AMS])
Press SEEK/AMS –/+ lightly once for each track you want to skip.
Cautions when connecting MGS-X1 and MD unit(s)
This unit recognizes MGS-X1 as an MD unit.
• When you want to play MGS-X1, press SOURCE to select “MS” or “MD.” If “MS” appears in the source display,
MGS-X1 starts to play. If “MD” appears in the source display, press MODE to select “MS”, to start playback.
• When you want to play an MD unit, press SOURCE to select “MD” or “MS.” If your desired MD unit appears in the
source display, it starts to play. If “MS” or another MD unit appears in the source display, press MODE to select
your desired MD unit, to start playback.

12
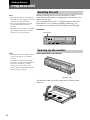
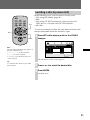
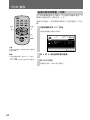
Watching TV/Other Video Components
Watching TV
Preparation: To view TV programs on this unit, an
optional Sony TV tuner unit must be connected to the
connection box.
1 Open up the monitor (page 6).
D
IS
C
SO
U
R
CE
SE
E
K
MODE
A
T
T
OF
F
OPEN/
CLOSE
.
>
VOL
2 Select TV1 or TV2.
With each press of SOURCE, the selection is switched in the order:
FM/AM t CD* t MD*/MS* t TV*.
Pressing MODE when “TV” is selected switches the selection in the order:
TV1* t TV2* t VIDEO1 t VIDEO2.
*
Displayed only if respective optional component is connected.
3 Select a channel.
Using auto tuning
Press SEEK/AMS –/+ lightly until the desired channel is
received.
Open up/Close the
monitor
Adjust volume

13
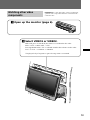
1 Open up the monitor (page 6).
2 Select VIDEO1 or VIDEO2.
With each press of SOURCE, the selection is switched in the order:
FM1 t CD* t MD*/MS* t TV*.
Pressing MODE when “TV” is selected switches the selection in the order:
TV1* t TV2* t VIDEO1 t VIDEO2.
*
Displayed only if respective optional component is connected.
ANG
LE
O
P
E
N
/
CL
O
SE
SE
E
K
E
A
T
T
.
VOL
Watching other video
components
Preparation: To view other video sources on this unit,
optional video components must be connected to the
connection box.
D
IS
C
SO
U
R
CE
SE
E
K
MODE
A
T
T
OF
F
OPEN/
CLOSE
.
>
VOL

14
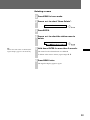
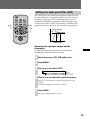
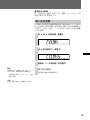
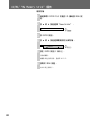
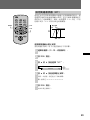
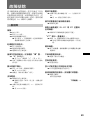
Setting a Security Code
By setting a security code (password consisting of a 4-digit
number), you can prevent use of the unit by persons other
than the owner.
To set a security code
Follow the steps below with the card remote commander
while the monitor is open.
1
Press MENU.
2
Press V or v to select “Code Edit”.
C ode Edi t
3
Press ENTER.
C ode Edi t
Code :
4
Press V or v to select a numeral.
5
Press b to move to the next digit.
6
Repeat steps 4 - 5 until all digits are input.
7
Press ENTER.
C ode Edi t
Yes :No
8
While the indication “Yes” is flashing, press
ENTER.
The security code is now set. When a security code is set, an
indication requesting input of the security code appears on
the display window when the unit is connected to the
battery after having been disconnected from the battery for a
long period of time.
Note
The security code input function operates
only when the unit is turned on after the
unit was disconnected from battery and
any electrical charge remaining in the
unit has been completely dissipated.
If the unit is turned on again after a brief
interval while there is still a remaining
charge, the normal clock indication will
be shown and security code input is not
required.
ENTER
MEN
U
V/v
B/b

15
To delete the security code
In step 2 on “To set a security code”, select “Code Delete”
and then proceed the remaining steps until step 7.
Entering the security code
When a security code is set, an indication requesting input
of the security code appears on the display window when
the unit is connected to the battery after having been
disconnected from the battery for a long period of time (see
“Note” on the preceding page). Input the code with the
card remote commander as follows.
1
Press V or v to select a number.
2
Press b to move to the next digit.
3
Repeat steps 1 - 2 until all digits are input.
4
Press ENTER.
The clock indication now appears on the display window.
Tip
If the entered security code is not correct,
the indication “CODE ERR” flashes* and
the unit returns to the input standby
condition.
* “Code Error” flashes on the monitor
when the monitor is open.
Note
The security code is not erased also when
the Reset button is pressed.

16
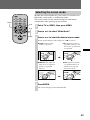
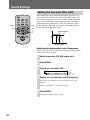
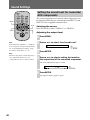
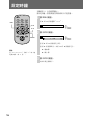
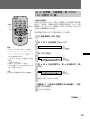
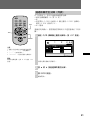
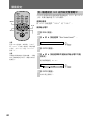
Setting the Clock
This unit uses 12-hour time indication.
To set the clock, use the card remote commander while the
monitor is open.
1
Press MENU.
Press V or v to select “Clock”.
Clock
2
Press ENTER.
Clock
1:00
1 Press V or v to set the hours.
2 Press b to move to the minutes, and press V or v to set
the minutes.
V: increases the value
v: decreases the value
3
Press ENTER.
The regular display appears again.
ENTER
MEN
U
V/v
B/b
Tip
When “Dual Information” is set to “on”,
the time is always displayed (page 41).

17
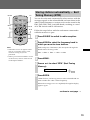
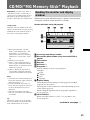
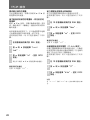
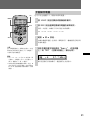
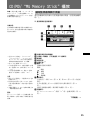
Reading the monitor and display
window
Information on the selected source is shown on the monitor
or display window (when monitor is closed).
Monitor indication during radio reception
New
Age
1 0:30
DSO EQ7
M1F
AIONTST
ST
LOUD
No.
6977MHz
.
1
4
5
6
7
23
1 Source type and frequency band
2 Preset number (1 - 6)
3 Frequency
4 Station memo (name of station, etc.)
Notes
• Up to 8 characters. (Only upper-case characters are available.)
• “••••••••” appears when no name assigned.
5 Pictograms
Various settings are shown as pictograms.
Example)
ST: Stereo reception
LOUD: “Loudness” is set to “on”
6 Graphics display
Normally, the current settings for DSO (page 34) and EQ7
(page 35) are shown here.
Pressing LIST on the card remote commander brings up a list
of stored stations (page 24).
While setting the equalizer curve, the graphic equalizer is
shown (page 36).
7 Clock indication
When “Dual Information” is set to “on”, the time is also
shown (page 41).
FM/AM Reception
Standby mode
When the unit is in standby mode with
only the clock indication shown, pressing
SOURCE shows the selected source on
the monitor or the display window.
Note
When the monitor is open, DSPL on the
card remote commander cannot be used
during radio reception.
Advanced Operation
continue to next page t

18
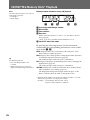
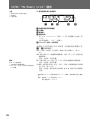
FM/AM Reception
Display window indication during radio reception
12 3
1 Source type and frequency band
2 Preset number (1 - 6)
3 Frequency/clock/ATT status/station name
When “Dual Information” is set to “on”, the time is
shown here (page 41).
“ATT” is shown constantly while attenuation is on.
By pressing the following buttons on the card remote
commander, the corresponding information can be called
up in fields 1 - 3.
DSPL: Displays the name stored by the Station Memo function
(page 22).
DSO: Displays the virtual speakers setting by the DSO (Dynamic
Soundstage Organizer) function (page 34).
The setting changes with each press of the button.
EQ7: Displays the preprogrammed equalizer curve setting by the
EQ7 function (page 35).
The setting changes with each press of the button.
SOUND: Displays the sound characteristics (bass, treble, balance,
fader and subwoofer) settings (page 37).
The displayed setting item changes with each press of the
button, and B or b can be used to change the setting.
Notes
The following information is not shown
on the display window:
• List display
• Menu display

19
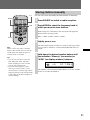
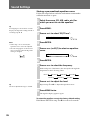
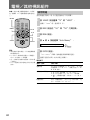
Storing stations automatically — Best
Tuning Memory (BTM)
You can have the unit automatically select stations with the
strongest signals in the selected band and store these in the
order of their frequency. 6 stations each can be stored in the
FM1, FM2, FM3, AM1, and AM2 bands, resulting in a total
of 18 FM stations and 12 AM stations.
Follow the steps below with the card remote commander
while the monitor is open.
1
Press SOURCE to switch to radio reception.
2
Press MODE to select the frequency band in
which you want to store stations.
With each press of the button, the unit cycles through the
bands in the following order:
FM1 t FM2 t FM3 t AM1 t AM2
3
Press MENU.
4
Press V or v to select “BTM” (Best Tuning
Memory).
BTM
5
Press ENTER.
“BTM” flashes, and strong stations in the selected band are
memorized in the order of their frequency.
When the storing process is completed, the regular display
appears again.
ENTER
MEN
U
M
O
D
E
SO
UR
CE
V/v
B/b
1-
6
Notes
• When there are not enough broadcast
stations or when the signal is weak,
automatic storing may not be
performed.
• When a preset station number is shown
on the monitor, stations will be stored
in subsequent numbers.
continue to next page t

20
FM/AM Reception
To listen to stored stations
In radio reception, press the number buttons
or V and v to select the desired station.
When you cannot receive stored
stations, such as when driving in a
different area
Lightly press B or b. The unit automatically
searches for a station and stops when one is
found. Continue this process until you have
found a station you want to listen to.
If the station search stops very often, you can
restrict the search to strong stations only, by
selecting the local mode as follows.
Follow the steps below with the card remote
commander while the monitor is open.
1
Press MENU in radio reception.
2
Press V or v to select “Local Seek”.
3
Press b to select “on”, and press
ENTER.
You can now search for local stations by
lightly pressing B or b.
To return to normal reception
Select “off” in step 3.
When there is noise during stereo
reception
Selecting mono reception as follows may
improve the sound.
Follow the steps below with the card remote
commander while the monitor is open.
1
Press MENU in FM radio reception.
2
Press V or v to select “Mono”.
3
Press b to select “on”, and press
ENTER.
To return to normal reception
Select “off” in step 3.
Automatically adjusting reception
bandwidth (IF Auto mode)
When reception conditions deteriorate while
listening to a stereo broadcast, automatic
bandwidth limiting may result in a switch to
mono. You can enable stereo reception also
under such conditions.
Follow the steps below with the card remote
commander while the monitor is open.
1
Press MENU in FM radio reception.
2
Press V or v to select “IF”.
3
Press b to select “Wide”, and press
ENTER.
Note
When “IF Auto” is set to “Wide”, there may be increased
noise during reception.
ページが読み込まれています...
ページが読み込まれています...
ページが読み込まれています...
ページが読み込まれています...
ページが読み込まれています...
ページが読み込まれています...
ページが読み込まれています...
ページが読み込まれています...
ページが読み込まれています...
ページが読み込まれています...
ページが読み込まれています...
ページが読み込まれています...
ページが読み込まれています...
ページが読み込まれています...
ページが読み込まれています...
ページが読み込まれています...
ページが読み込まれています...
ページが読み込まれています...
ページが読み込まれています...
ページが読み込まれています...
ページが読み込まれています...
ページが読み込まれています...
ページが読み込まれています...
ページが読み込まれています...
ページが読み込まれています...
ページが読み込まれています...
ページが読み込まれています...
ページが読み込まれています...
ページが読み込まれています...
ページが読み込まれています...
ページが読み込まれています...
ページが読み込まれています...
ページが読み込まれています...
ページが読み込まれています...
ページが読み込まれています...
ページが読み込まれています...
ページが読み込まれています...
ページが読み込まれています...
ページが読み込まれています...
ページが読み込まれています...
ページが読み込まれています...
ページが読み込まれています...
ページが読み込まれています...
ページが読み込まれています...
ページが読み込まれています...
ページが読み込まれています...
ページが読み込まれています...
ページが読み込まれています...
ページが読み込まれています...
ページが読み込まれています...
ページが読み込まれています...
ページが読み込まれています...
ページが読み込まれています...
ページが読み込まれています...
ページが読み込まれています...
ページが読み込まれています...
ページが読み込まれています...
ページが読み込まれています...
ページが読み込まれています...
ページが読み込まれています...
ページが読み込まれています...
ページが読み込まれています...
ページが読み込まれています...
ページが読み込まれています...
ページが読み込まれています...
ページが読み込まれています...
ページが読み込まれています...
ページが読み込まれています...
ページが読み込まれています...
ページが読み込まれています...
ページが読み込まれています...
ページが読み込まれています...
ページが読み込まれています...
ページが読み込まれています...
ページが読み込まれています...
ページが読み込まれています...
ページが読み込まれています...
ページが読み込まれています...
ページが読み込まれています...
ページが読み込まれています...
ページが読み込まれています...
ページが読み込まれています...
ページが読み込まれています...
ページが読み込まれています...
-
 1
1
-
 2
2
-
 3
3
-
 4
4
-
 5
5
-
 6
6
-
 7
7
-
 8
8
-
 9
9
-
 10
10
-
 11
11
-
 12
12
-
 13
13
-
 14
14
-
 15
15
-
 16
16
-
 17
17
-
 18
18
-
 19
19
-
 20
20
-
 21
21
-
 22
22
-
 23
23
-
 24
24
-
 25
25
-
 26
26
-
 27
27
-
 28
28
-
 29
29
-
 30
30
-
 31
31
-
 32
32
-
 33
33
-
 34
34
-
 35
35
-
 36
36
-
 37
37
-
 38
38
-
 39
39
-
 40
40
-
 41
41
-
 42
42
-
 43
43
-
 44
44
-
 45
45
-
 46
46
-
 47
47
-
 48
48
-
 49
49
-
 50
50
-
 51
51
-
 52
52
-
 53
53
-
 54
54
-
 55
55
-
 56
56
-
 57
57
-
 58
58
-
 59
59
-
 60
60
-
 61
61
-
 62
62
-
 63
63
-
 64
64
-
 65
65
-
 66
66
-
 67
67
-
 68
68
-
 69
69
-
 70
70
-
 71
71
-
 72
72
-
 73
73
-
 74
74
-
 75
75
-
 76
76
-
 77
77
-
 78
78
-
 79
79
-
 80
80
-
 81
81
-
 82
82
-
 83
83
-
 84
84
-
 85
85
-
 86
86
-
 87
87
-
 88
88
-
 89
89
-
 90
90
-
 91
91
-
 92
92
-
 93
93
-
 94
94
-
 95
95
-
 96
96
-
 97
97
-
 98
98
-
 99
99
-
 100
100
-
 101
101
-
 102
102
-
 103
103
-
 104
104


他の言語で
- English: Sony XAV-77 Operating instructions
関連論文
その他のドキュメント
-
Philips HTB4150B/98 ユーザーマニュアル
-
Cambridge Audio TV2 (V2) クイックスタートガイド
-
Ruark Audio R3 Compact Music System ユーザーマニュアル
-
VDO TR7311U-OR 取扱説明書
-
DGM LTV-3211D ユーザーマニュアル
-
Denso TN0020A ユーザーマニュアル
-
Yamaha T-7 取扱説明書
-
Denso TN0035B ユーザーマニュアル
-
Kenwood Car Satellite Radio System KCA-R71FM ユーザーマニュアル
-
BBC Bircher CleanSwitch Basic ユーザーマニュアル