

1
Contents
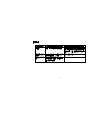
Introduction .................................................................................................... 2
Warnings and cautions .........................................................…...................... 3
Main unit descriptions ............................................................…..................... 6
Television Installation ..................................................................................... 8
Function Description of Key on Remote Control .........…………….…........... 10
The OSD menus .........……………………………….......................…............ 17
Troubleshooting ............................................................................................ 24
Display Mode ............................................…................................................. 26
Specifications ................................................................................................ 27
Note: All information in this manual may change from time to time without prior notice.

2
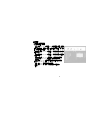
Introduction
Thank you very much for your purchase of our LCD TV. It serves as a normal color TV and PC Monitor. To enjoy
your set to the full from the very beginning, read this manual carefully and keep it handy for ready reference.
Installation
Locate the receiver in the room where direct light does not strike the screen.
Total darkness or a reflection on the picture screen can cause eyestrain.
Soft and indirect lighting is recommended for comfortable viewing.
Allow enough space between the receiver and the wall to permit ventilation.
Avoid excessively warm locations to prevent possible damage to the cabinet or premature component failure.
This TV receiver can be connected to AC 100~240 Volts. 50/60 Hz. Never connect to DC supply or any other
power supply.
Do not install the receiver in a location near heat sources such as radiator, air ducts, direct sunlight, or in a place
somewhere like close compartment and close area.
Do not cover the ventilation openings when using the set.
Caution
Never tamper with any components inside your set, or any other adjustment controls not mentioned
in this manual. The LCD panel is a very high technology product with over 900000 thin film
transistors. Occasionally, a few non-active pixels may appear on the screen as a fixed point of blue,
green or red. Please note that this does not affect the performance of your product.

3
Warnings and cautions
Warning
High voltages are used in the operation of this product.
Do not remove the back cover of the cabinet. Refer servicing to
qualified service personnel.
Warning
To prevent fire or electrical shock hazard, do not expose the main
unit to rain or moisture.
Warning
Do not drop or push objects into the television cabinet slots or
openings. Never spill any kind of liquid on the television receiver.

4
Warnings and cautions
Caution
If the television is to be built into a compartment or
similarly enclosed, the minimum distances must
be
maintained. Heat build-up can reduce the service
life of your television, and can also be dangerous.
Caution
Never stand on, lean on, push suddenly the product
or its stand. You should pay special attention to
children.
Caution
Do not place the main unit on an unstable cart stand,
shelf or table. Serious injury to an individual, and
damage to the television, may result if it should fall.

5
Warnings and cautions
Caution
When the product is not used for an extended period of time, it is
advisable to disconnect the AC power cord from the AC outlet.
Caution
Avoid exposing the main unit to direct sunlight and other source of the
heat. Do not stand the television receiver directly on other product
which give off heat. E. g. video cassette players, audio amplifiers. Do
not block the ventilation holes in the back cover. Ventilation is essential
to prevent failure of electrical component. Do not squash power supply
cord under the main unit.
Caution
The LCD panel used in this product is made of glass. Therefore, it can
break when the product is dropped or applied with impact. Be careful
not to be injured by broken glass pieces in case the LCD panel breaks.

6
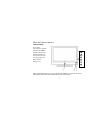
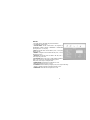
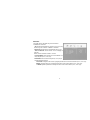
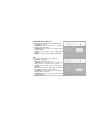
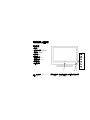
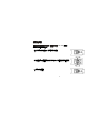
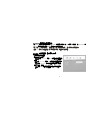
Main unit descriptions
Control location
1.Power button
2. SOUCRE button ( TV/AV )
3. MENU button (MENU)
4.Program down button ( P -)
5. Program up button ( P+ )
6. Volume down button (V-)
7. Volume up button ( V+ )
8.Power indicator
9.Remote sensor
Note: As mentioned upon, item 1,2,3,4,5,6,7 are the local control key, respectively we can find
certain button which has the same control function on the remote control.
2
3
4
5
6
7
●
TV/AV
●
MENU
●
P -
●
P+
●
V-
●
V+
1 8 9

7
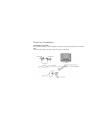
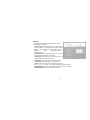
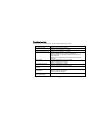
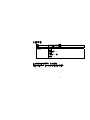
Main unit descriptions
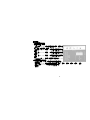
Control location
1. AC IN: AC switch and AC power cord socket.
2. HDMI1/ HDMI2: HDMI input socket.
3. VGA: VGA(D-Sub 15pin) input socket.
4. SCART1/ SCART2: SCART input socket.
5. S-VIDEO: S-Video input socket.
6. YPBPR: YPbPr input socket.
7. VIDEO: Video input socket.
8. L / R: Audio Left / Right input socket (for Video / S-Video / YPbPr )
9. PC AUDIO IN: PC Audio input socket (for PC / HDMI )
10. ANT: Antenna input socket (75
Ω)
Y PB PR
AC IN HDMI1 HDMI2 VGA SCART1 S-VIDEO
Video L R
PC ANT SCART2
Audio in

8
Television Installation
Connect antenna or video facility
1.Use 75Ω coaxial cable plug or 300-75Ω impedance converter to plug in antenna input terminal on the rear of the
cabinet.
2.Connect the video facility to the audio, video in jack on the rear of the cabinet.

9
Television Installation
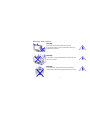
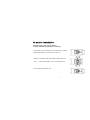
The remote control uses two 1.5V AAA batteries.
For battery installation and replacement are as following:
1. Turn the remote control unit upside down. Press down the grip of battery
compartment and slide the color in the direction of the arrow.
2. Install two new batteries, make sure that battery polarity matches with
the “+”, “-”marks inside the battery. Or not it could damage the unit.
3. Close the battery compartment covers.

10
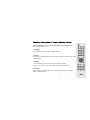
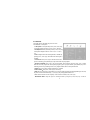
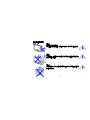
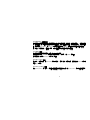
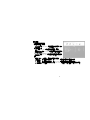
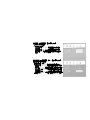
Function Description of Key on Remote Control
The location and function of key in the remote control are as the following picture:
(PN: SMC-OTH-3211RC01)
1. [ POWER ]
Turn on and off, carry out the function of standby and turn-on.
2. [ MUTE ]
Press the key, sound output will be muted. Press [MUTE] key again, or Volume Up, the sound
volume will return.
3. [ SLEEP ]
Press [SLEEP] key, then the auto turn-off time will change as following:
OFF→15→30→45→60→OFF among which OFF means to quit this function.
4. [ NICAM ]
While watching TV program, switch modes of sound processing NICAM of the program.
MONO→STEREO→MONO

11
5. [ DISPLAY ]
Display the following information:
(1) The current program number or signal source.
(2) The stereo mode.
6. [ SCART ]
Press the key to switch to the SCART mode, Press [SCART] key again to the SCART2 mode.
7. [ ZOOM ]
Switch the size of the picture in the sequence as following:
FULL→ZOOM→NORMAL→PANORAMA→AUTO→FULL
8. [ NR ]
Press the key to switch Noise Reduction mode:
MIDDLE→STRONG→OFF→WEAK→MIDDLE
9. [ HDMI ]
Press the key to switch to the HDMI mode, Press [HDMI] key again to the HDMI2 mode.
10. [ 0 ] ~ [ 9 ]
Digital key [0]~[9] key, According to the current program digits. The selecting range of the program is 1~200.

12
11. [ -/-- ]
Numeric digits select:
- 1 digit mode
-- 2 digit mode
--- 3 digit mode
12. [ RETURN ]
Jump back to the previous program or source.
13. [ PICTURE ]
Press [PICTURE] key, then picture will change as follows:
STANDARD→DYNAMIC→SOFT→PERSONAL.
Press [PICTURE] key once the current picture setup will be shown.
14. [ SOUND ]
Press [SOUND] key, then sound will change as follows:
STANDARD→NEWS→MUSIC→PERSONAL.
Press [SOUND] key once the current sound setup will be shown.

13
15. [ SOURCE ]
Press [ Source ], signal source changes as following:
PC→HDMI→HDMI2→TV→AV →SVIDEO→SCART→SCART2→YPBPR
Press [ CH- /CH+] key to select above source. Press [VOL-/VOL+] key to enter.
16. [ PREVIEW ]
Press [PREVIEW] key to enter preview mode, and again to play program, you can select your program
by the [VOL-/VOL+] or [CH-/CH+] key, press [MENU] key to play normally and quit preview mode.
17. [ MENU]
Enter or quit each menu page.
18. [ CH- ] / [ CH+ ]
While not in the mode of TV, Press [CH-/CH+] key to switch to the television mode. On TV mode is next
channel selection.
Down or up in menu.
19. [ VOL- ] / [ VOL+ ]
When MUTE is OFF, decrease or increase sound volume, range is 0~100. When MUTE is ON, press [VOL+] key
is to quit mute mode and increase sound volume.
Decrease or increase the relevant value in menu.

14
20. [ RED ] (for Teletext)
It carries out the function of red key while in the mode of text.
21. [ GREEN ] (for Teletext)
It carries out the function of green key while in the mode of text.
22. [ YELLOW ] (for Text)
It carries out the function of yellow key while in the mode of text.
23. [ CYAN ] (for Teletext)
It carries out the function of cyan key while in the mode of text.
24. [ INDEX ] (for Teletext)
While entering the mode of text, press this key to return to the index page.
25. [ CANCEL ] (for Teletext)
When a page is selected in the mode of text, it may take some time before it becomes available, press the [CANCEL]
key will return to the TV mode.
When the required page is found, the page number will appear at the top of the TV picture, press the [CANCEL] key
to return to the mode of text for you to browse this page.

15
26. [ SIZE ] (for Teletext)
While entering the mode of text, it is used to change the display scale of text.
27. [ SUBPAGE ] (for Teletext)
If already entered text mode via [TXT/CC] key, this key functions as sub-page. After pressing this key, 4 digit key
of sub-page number should be entered next.
If sub-page is not displayed in a short time, you can press [CANCEL] key to back to the picture.
System will automatically display the sub-page if it is found lately. Press this key again to back to normal text mode.
28. [ HOLD ] (for Teletext)
To keep the current text display not be refreshed, press it again will cancel this state.
29. [ REVEAL ] (for Teletext)
Open / close some hidden information in the current text page.
30. [ TXT/CC ] (for Teletext)
Switch TV into text mode. Or press [TXT/CC] key to quit text mode while in the text mode.

16
31. [ SIZE ] (for PIP)
While entering the mode of PIP, it is used to change the display scale of sub-window.
32. [ POSITION ] (for PIP)
While entering the mode of PIP, it is used to adjust the horizontal and vertical position of sub-window.
33. [ SOUND ] (for PIP)
While entering the mode of PIP, it is used to change the audio out mode of main or sub-window.
34. [ SWAP ] (for PIP)
While entering the mode of PIP, it is used to change the video out mode of sub-window.
35. [ ON/OFF ] (for PIP)
Press [ ON/OFF ] key, to enter or quit the PIP mode.

17
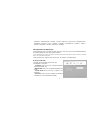
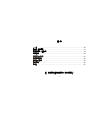
The OSD menus
OSD adjustment in TV, AV, S-VIDEO, YPBPR, SCART mode:
. Press [MENU] key and you can get the OSD menu. Press [VOL-/VOL+] key and you can select different
sub-menus, five classes altogether. Press [CH-] key to enter the sub-menu.
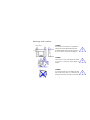
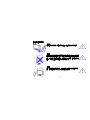
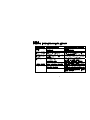
PICTURE
1. The right picture is the sketch map of the picture menu.
2. The definition of each option:
. PICTURE MODE: Set the picture preset to STANDARD→
DYNAMIC→SOFT→PERSONAL→STANDARD by using
the [VOL- / VOL+] key.
. CONTRAST: Change the value of contrast with the [VOL- /
VOL+] key in rang of 0 to 100.
. BRIGHTNESS: Change the value of brightness with the
[VOL- / VOL+] key in rang of 0 to 100.
. HUE: will only show when the color system is NTSC.
. SATURATION: Change the value of color with the [VOL- /
VOL+] key in rang of 0 to 100.
. SHARPNESS: Change the value of sharpness with the [VOL- / VOL+] key in rang of 0 to 100.
. COLOR TONE: Set the color temperature preset to STANDARD
→WARM→COOL→STANDARD by
using the [VOL- / VOL+] key.
. SCALE: Set the picture size preset to FULL→ZOOM→NORMAL→PANORAMA→AUTO→FULL by using
the [VOL- / VOL+] key.

18
SOUND
1. The right picture is the sketch map of the sound menu.
2. The definition of each option:
. SOUND MODE: Set the sound mode in the sequence of
STANDARD→NEWS→MUSIC→PERSONAL→STANDARD
by using the [VOL- / VOL+] key.
. BASS: Change the value of bass with the [VOL- / VOL+] key
rang of 0 to 100.
. TREBLE: Change the value of treble with the [VOL- / VOL+]
key rang of 0 to 100.
. BALANCE: Change the value of balance with the [VOL- /
VOL+] key rang of 0 to 100.
. EQUALIZER: Press [VOL+] key to enter equalizer sub-menu,
Press [ CH- /CH+] key to select above frequency options.
Press [VOL-/VOL+] key to change the value.
. SUBWOOFER: Set the function of subwoofer on or off.
. AV C: Setup the function of AVC on or off.
. LOUDNESS: Set the loudness by using the [VOL-/VOL+] key as following:
MODE1→MODE2→MODE3→MODE4→MODE5→OFF .
. SUPERBASS: Set the function of super bass on or off.

19
ADVANCE
1. The right picture is the sketch map of the sound menu.
2. Introduction to each item:
. NR: Set the Noise Reduction by using the [VOL-/VOL+] key
as following: OFF
→WEAK→MIDDLE→STRONG .
. Blue Screen: Set the function of blue background on or off.
. TTX LANGUAGE: Set the function of TTX Language as
following:
WEST
→EAST RUSSIAN→RABIC→FARSI.
. AUTO FORMAT: Set the function of AUTO FORMAT on or
off by using the [VOL- / VOL+] key.
. MULTIWIN: Preview function setup. Press [ VOL+] key to
enter MULTIWIN sub-menu:
a. COLUMN: Change the max columns of program pictures shown on the screen with the [VOL- / VOL+] key.
b. ROW: Change the max rows of program pictures shown on the screen with the [VOL- / VOL+] key.
c. TIMER: Adjust the update time of each picture shown on the screen with the [VOL- / VOL+] key.
ページが読み込まれています...
ページが読み込まれています...
ページが読み込まれています...
ページが読み込まれています...
ページが読み込まれています...
ページが読み込まれています...
ページが読み込まれています...
ページが読み込まれています...
ページが読み込まれています...
ページが読み込まれています...
ページが読み込まれています...
ページが読み込まれています...
ページが読み込まれています...
ページが読み込まれています...
ページが読み込まれています...
ページが読み込まれています...
ページが読み込まれています...
ページが読み込まれています...
ページが読み込まれています...
ページが読み込まれています...
ページが読み込まれています...
ページが読み込まれています...
ページが読み込まれています...
ページが読み込まれています...
ページが読み込まれています...
ページが読み込まれています...
ページが読み込まれています...
ページが読み込まれています...
ページが読み込まれています...
ページが読み込まれています...
ページが読み込まれています...
ページが読み込まれています...
ページが読み込まれています...
ページが読み込まれています...
ページが読み込まれています...
ページが読み込まれています...
ページが読み込まれています...
ページが読み込まれています...
-
 1
1
-
 2
2
-
 3
3
-
 4
4
-
 5
5
-
 6
6
-
 7
7
-
 8
8
-
 9
9
-
 10
10
-
 11
11
-
 12
12
-
 13
13
-
 14
14
-
 15
15
-
 16
16
-
 17
17
-
 18
18
-
 19
19
-
 20
20
-
 21
21
-
 22
22
-
 23
23
-
 24
24
-
 25
25
-
 26
26
-
 27
27
-
 28
28
-
 29
29
-
 30
30
-
 31
31
-
 32
32
-
 33
33
-
 34
34
-
 35
35
-
 36
36
-
 37
37
-
 38
38
-
 39
39
-
 40
40
-
 41
41
-
 42
42
-
 43
43
-
 44
44
-
 45
45
-
 46
46
-
 47
47
-
 48
48
-
 49
49
-
 50
50
-
 51
51
-
 52
52
-
 53
53
-
 54
54
-
 55
55
-
 56
56
-
 57
57
-
 58
58


