
HD4496, HD4494
4222.200.0298.2.indd 1 15-12-09 13:08

2
4222.200.0298.2.indd 2 15-12-09 13:08

3
A
B
C
D
E
F
I
H
G
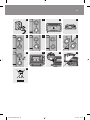
1
4222.200.0298.2.indd 3 15-12-09 13:08

4
4222.200.0298.2.indd 4 15-12-09 13:08

6
한국어 12
18
繁體中文 25
简体中文 31
4222.200.0298.2.indd 5 15-12-09 13:08

6
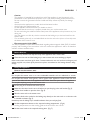
Congratulations on your purchase and welcome to Philips! To fully benet from the support that
Philips offers, register your product at www.philips.com/welcome.
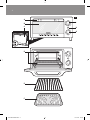
Door handle
Glass window
Crumb removal door
Heating element
Detachable wire rack
Non-stick baking tray
Timer knob
Power-on light
Temperature selector
Read this user manual carefully before you use the appliance and save it for future reference.
- Do not let any water or other liquid enter the toaster oven to prevent electric shock.
- Never immerse the toaster oven in water or splash water onto it to prevent electric shock.
- If you use the aluminium foil to wrap food to be cooked, make sure it does not come into
contact with the heating elements to avoid a re hazard.
- Do not put oil on the baking tray when you use it to avoid a re hazard.
- Check if the voltage indicated on the appliance corresponds to the local mains voltage before
you connect the appliance.
- Do not use the appliance if the plug, the mains cord or the appliance itself is damaged.
- If the mains cord is damaged, you must have it replaced by Philips, a service centre authorised by
Philips or similarly qualied persons in order to avoid a hazard.
- Do not let the mains cord hang over the edge of the table or worktop on which the
appliance stands.
- Keep the mains cord away from hot surfaces.
- The temperature of accessible surfaces may be high when the appliance is operating (e.g. areas
indicated with = ).
- Only connect the appliance to an earthed wall socket.
- This appliance is not intended for use by persons (including children) with reduced physical,
sensory or mental capabilities, or lack of experience and knowledge, unless they have been given
supervision or instruction concerning use of the appliance by a person responsible for their
safety.
- Children should be supervised to ensure that they do not play with the appliance.
- Never let the appliance operate unattended.
- Never connect this appliance to a timer switch in order to avoid a hazardous situation.
- Do not place the toaster oven on or near combustible materials such as a tablecloth or curtain.
- Do not place the toaster oven against a wall or against other appliances. Leave at least 5cm free
space on the sides and rear of the appliance and at least 10cm free space above the appliance.
Do not place anything on top of the toaster oven.
- Immediately unplug the toaster oven if the food being cooked starts to smoke or burn. Keep
the toaster oven door closed in such a case to prevent air from entering the toaster oven, as
this would cause ames to are up. Wait for the ames to extinguish and the smoke emission to
stop before you open the door.
4222.200.0298.2.indd 6 15-12-09 13:08

- This appliance is intended for household use only. If the appliance is used improperly or for
professional or semi-professional purposes or if it is not used according to the instructions in
the user manual, the guarantee becomes invalid and Philips refuses any liability for damage
caused.
- Always place the appliance on a stable, level and horizontal surface.
- Always unplug the appliance after use.
- Let the appliance cool down before you handle or clean it.
- Make sure that the crumb tray is properly closed when you use the toaster oven.
- Do not touch the glass window and the metal parts of the appliance, as they become very hot
during use.
- Use oven gloves or a thick dry cloth to remove the hot baking tray or the hot food from the
toaster oven.
- Do not directly place oily or marinaded food on the wire rack as the juice or oil can drip onto
the heater which cause to burn.
This Philips appliance complies with all standards regarding electromagnetic elds (EMF). If handled
properly and according to the instructions in this user manual, the appliance is safe to use based on
scientic evidence available today.
1 Remove any stickers and wipe the body of the appliance with a moist cloth.
2 Clean the wire rack and the baking tray in warm water with some washing-up liquid.
Note: Let the toaster oven heat up for about 5 minutes without the wire rack and/or the baking tray and
without any food in it, to burn off any dust that may have accumulated on the heating elements during
storage.
1 Place the appliance on a stable, level and horizontal surface.
Do not place the toaster oven on or near combustible materials such as a tablecloth or curtain.
Do not place the toaster oven against a wall or against other appliances. Leave at least 5cm free
space on the sides and rear of the appliance and at least 10cm free space above the appliance.
Do not place anything on top of the toaster oven.
2 Put the plug in an earthed wall socket (Fig. 2).
3 Make sure the timer knob is set to 0 before you put the plug in the wall socket (Fig. 3).
4 Pull the door handle to open the door (Fig. 4).
5 Place the wire rack in the toaster oven.
6 Place the food to be cooked on the baking tray, directly on the wire rack or on the wire rack
in suitable cookware (Fig. 5).
Note: Always use the baking tray or suitable cookware when you cook juicy food.
7 Set the temperature selector to the required cooking temperature. (Fig. 6)
For cooking temperatures, see the cooking guide at the end of this user manual.
8 Set the timer knob to the required cooking time. (Fig. 7)
7
4222.200.0298.2.indd 7 15-12-09 13:08

For cooking times, see the cooking guide at the end of this user manual.
The maximum cooking time that can be set is 30 minutes for type HD4494 and 45 minutes for type
HD4496.
, The power-on light goes on (Fig. 8).
Note: To set a cooking time of less than 5 minutes, turn the timer knob past the 5-minute indication (1)
and then turn it back to the required time (2). (Fig. 9)
, When the set cooking time has elapsed, you hear a bell and the appliance switches off
automatically (Fig. 10).
9 If you want to remove food from the toaster oven or if you want to stop cooking before the
end of the preset cooking time, turn the timer knob to 0 to switch off the appliance (Fig. 3).
If there is still food in the toaster oven that needs to be cooked, turn the timer knob to the required
cooking time again.
Be careful: the wire rack and/or the baking tray and the cooked food are hot! Use oven gloves or
a thick dry cloth to remove the hot food and the hot wire rack or baking tray from the toaster
oven.
See section ‘How to use the toaster oven’.
Note: It is not necessary to preheat the toaster oven.
1 Place the slices of bread side by side on the wire rack. To toast a single slice, place it in the
centre of the wire rack (Fig. 11).
The toaster oven can toast up to 4 slices of bread at a time. Use the wire rack for toasting bread.
2 Set the temperature selector to the required temperature. (Fig. 6)
For cooking temperatures, see the cooking guide at the end of this user manual.
If you want to warm up pastries, select a low temperature.
3 Set the timer knob to the required cooking time (Fig. 7).
For cooking times, see the cooking guide at the end of this user manual.
Note: During toasting, some condensation may form on the glass window of the door. This is normal and
is caused by moisture in the food. It does not affect the toasting process.
See section ‘How to use the toaster oven’.
Note: It is not necessary to preheat the toaster oven.
1 If you want to brown or crisp food toppings such as cheese and breadcrumbs to cook a
gratin, put the food in suitable cookware or on the baking tray.
2 Place the cookware or the baking tray on the wire rack in the toaster oven.
3 Set the temperature selector to the required temperature. (Fig. 6)
For cooking temperatures, see the cooking guide at the end of this user manual.
4 Set the timer knob to the required cooking time. (Fig. 7)
For cooking times, see the cooking guide at the end of this user manual.
Note: Keep an eye on the food to make sure that it does not get overcooked.
5 When the result is satisfactory, turn the timer knob to 0 and remove the food.
See section ‘How to use the toaster oven’.
8
4222.200.0298.2.indd 8 15-12-09 13:08

1 Remove all paper and plastic wrappings from the food.
2 Put the food to be defrosted on the baking tray.
3 Place the baking tray on the wire rack in the toaster oven.
4 Set the temperature selector to 80°C.
5 Set the timer knob to the cooking time for foil-wrapped food (see the cooking guide).
6 Leave the food in the oven until it is defrosted.
The time required depends on the food type and food size.
7 When the food is defrosted, turn the timer knob to 0 and remove the defrosted food.
To avoid defrosted food from going bad, it should be refrigerated or fully cooked after defrosting.
See section ‘How to use the toaster oven’.
1 Set the temperature selector to the required cooking temperature (Fig. 6).
For cooking temperatures, see the cooking guide at the end of this user manual.
2 Set the timer knob to 5 minutes to preheat the toaster oven.
3 Place the food on the baking tray and place the baking tray on the wire rack in the preheated
toaster oven.
4 Set the timer knob to the required cooking time.
For cooking times, see the cooking guide at the end of this user manual.
Tip: To prevent the food from browning too quickly, cover it with aluminium foil during the last few
minutes of cooking. Neatly tuck the loose ends of the foil round the edges of the baking tray.
Make sure the aluminium foil does not touch the heating elements to avoid a re hazard.
See section ‘How to use the toaster oven’.
1 Set the temperature selector to the required cooking temperature (Fig. 6)
For cooking temperatures, see the cooking guide at the end of this user manual.
2 Set the timer knob to 5 minutes to preheat the toaster oven.
3 Place the baking tin or the baking tray with the food to be baked on the wire rack in the
preheated toaster oven.
4 Set the timer knob to the required cooking time (Fig. 7).
For cooking times, see the cooking guide at the end of this user manual.
Note: Keep an eye on the food to make sure that it does not get overcooked.
Tip: To prevent the food from browning too quickly, cover it with aluminium foil during the last few
minutes of cooking. Neatly tuck the loose ends of the foil round the edges of the baking tray.
Make sure the aluminium foil does not touch the heating elements to avoid a re hazard.
1 Set the timer knob to 0.
2 Remove the plug from the wall socket.
3 Let the appliance cool down before you handle or clean it.
9
4222.200.0298.2.indd 9 15-12-09 13:08

Never use scouring pads, abrasive cleaning agents or aggressive liquids such as petrol or acetone
to clean the appliance.
Never immerse the toaster oven in water or splash water onto it to prevent electric shock.
1 Set the timer knob to 0, remove the plug from the wall socket and let the appliance cool
down completely.
2 Wipe the inside and outside of the toaster oven with a moist cloth.
3 Unhook the wire rack and clean it in warm water with some washing-up liquid. Wipe it dry
with a cloth before you put it back into the toaster oven (Fig. 12).
4 Clean the baking tray in warm water with some washing-up liquid or in the dishwasher. If
food particles or juices have caked onto the tray, let it soak in hot water for a while before
you start cleaning it.
5 To remove crumbs, turn the appliance on its back and push the crumb removal door down
to remove it. Then wipe away the crumbs with a dry or moist cloth. (Fig. 13)
Make sure that the wire rack and the baking tray are dry before you put them back into the
toaster oven.
Always close the crumb removal door before you use the appliance again.
Make sure the appliance is completely dry before you use it again.
- Do not throw away the appliance with the normal household waste at the end of its life, but
hand it in at an ofcial collection point for recycling. By doing this, you help to preserve the
environment (Fig. 14).
If you need service or information or if you have a problem, please visit the Philips website at
www.philips.com or contact the Philips Consumer Care Centre in your country (you nd its phone
number in the worldwide guarantee leaet). If there is no Consumer Care Centre in your country,
go to your local Philips dealer.
This chapter summarises the most common problems you could encounter with the appliance. If
you are unable to solve the problem with the information below, contact the Consumer Care
Centre in your country.
Problem Solution
The toaster oven does not
work.
Make sure the plug is properly inserted into the wall socket.
If the plug is in the wall socket and the appliance still does not
work, the electronic system is malfunctioning. Have the appliance
examined and repaired by Philips or a service centre authorised
by Philips.
I want to interrupt the
cooking process.
Turn the timer knob to 0 to switch off the toaster oven.
10
4222.200.0298.2.indd 10 15-12-09 13:08

Problem Solution
I want to change the
temperature during cooking.
Turn the temperature selector to set a different temperature
range, from 0 to 230°C.
The food is not well-cooked. Follow the instructions on the package of the food or follow the
suggestions in the cooking guide.
Make sure you have choosen an appropriate size of baking tin to
bake food. Always keep an eye on the food during the baking
process.
The power-on light goes on
and off frequently during
cooking.
The heating element switches on an off during use to maintain
the set cooking temperature. This is normal.
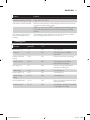
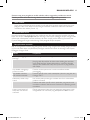
Type of food
(quantity)
Cooking time
(minutes)
Temperature in
c°C
Recommendations
Toast/rolls (1-4) 2-4 230 Use wire rack
Gratin (1) 4-6 230 Use baking tray or suitable
cookware
Frozen fried food
(250g)
5-20 230 Follow instructions on package
Frozen pizza (1) 10-16 220 Use baking tray and follow
instructions on package
Hot dog (3-5) 4-5 200 Pierce or slit hot dogs before
cooking; use baking tray
Steak (200g) 9-15 230 Use baking tray
Hamburger (2-4) 6-10 230 Use baking tray
Chicken wings
(200g)
10-15 200 Use baking tray
Foil-wrapped food 10-16 230 Make sure that foil does not touch
heating elements.
Cookies (4 pcs) 10-14 180 Use baking tray; follow instructions
on package or in recipe
11
4222.200.0298.2.indd 11 15-12-09 13:08

12
제품 소개
필립스 제품을 구입해 주셔서 감사합니다! 필립스가 드리는 지원 혜택을 받으실 수
있도록 www.philips.co.kr에서 제품을 등록하십시오.
각 부의 명칭 (그림 1)
도어 손잡이
유리창
빵 부스러기 제거 도어
열판
분리형 석쇠
논스틱 베이킹 받침대
타이머 스위치
전원 표시등
온도 선택기
중요사항
본 제품을 사용하기 전에 이 사용 설명서를 주의 깊게 읽고 나중에 참조할 수 있도록 잘
보관하십시오.
위험
- 물이나 다른 액체가 토스터 오븐에 들어가지 않도록 하십시오. 감전 사고의 위험이
있습니다.
- 절대로 토스터 오븐을 물에 담그거나 토스터 오븐에 물이 튀지 않도록 하십시오.
감전 사고의 위험이 있습니다.
- 조리할 음식을 알루미늄 호일로 싼 경우, 알루미늄 호일이 전열선에 닿지 않았는지
확인하십시오. 화재의 위험이 있습니다.
- 제품 사용 시 요리용 받침대에 기름을 넣지 마십시오. 화재의 위험이 있습니다.
경고
- 제품에 전원을 연결하기 전에, 제품에 표시된 전압과 사용 지역의 전압이 일치하는지
확인하십시오.
- 만약 플러그나 전원 코드 또는 제품이 손상되었을 경우에는 제품을 사용하지
마십시오.
- 전원 코드가 손상된 경우, 안전을 위해 필립스 서비스 센터 또는 필립스 서비스
지정점에 의뢰하여 교체하십시오.
- 제품이 올려져 있는 식탁이나 조리대의 가장자리로 전원 코드가 흘러내리지 않도록
하십시오.
- 전원 코드가 제품의 뜨거운 표면에 닿지 않도록 하십시오.
- 제품이 작동하는 동안 손이 닿는 표면의 온도가 매우 높을 수 있습니다(예: = 표시
부분).
- 제품은 반드시 접지된 벽면 콘센트에 연결하십시오.
- 신체적인 감각 및 정신적인 능력이 떨어지거나 경험과 지식이 풍부하지 않은 사용자(
어린이 포함)는 혼자 제품을 사용하지 말고 제품 사용과 관련하여 안전에 책임질 수
있도록 지시사항을 충분히 숙지한 사람의 지도와 도움을 받으십시오.
- 어린이가 제품을 가지고 놀지 못하도록 지도해 주십시오.
- 제품이 작동 중일 때는 자리를 비우지 마십시오.
- 위험한 상황이 발생하지 않도록 이 제품을 타이머 스위치에 연결하지 마십시오.
- 토스터 오븐을 식탁보 또는 커튼과 같은 가연성 물질 위에 올려놓거나 근처에 두지
마십시오.
- 토스터 오븐이 벽 또는 다른 물건과 닿지 않도록 하십시오. 제품의 측면과 후면은
최소한 5cm, 제품의 위쪽으로는 최소한 10cm 정도의 여유공간을 남겨 두십시오.
토스터 오븐 위에 아무 것도 올려 놓지 마십시오.
- 조리 중인 음식에서 연기가 나거나 타기 시작하면 즉시 토스터의 플러그를
뽑으십시오. 이때 토스터 오븐의 도어를 닫아두십시오. 토스터 오븐 내부로 공기가
한국어
4222.200.0298.2.indd 12 15-12-09 13:08

들어가면 불이 붙을 위험이 있습니다.불꽃이 작아지고 연기가 줄어들어 멈출 때까지
기다린 후 도어를 여십시오.
주의
- 본 제품은 가정용입니다. 제품을 부적절하게 사용하거나 사업장이나 준사업장에서
사용하는 경우, 또는 사용 설명서에 따라 이용하지 않는 경우, 보증 서비스를 받을 수
없으며 필립스는 이로 인해 발생한 피해에 대해 책임을 지지 않습니다.
- 항상 제품을 안정적이고 평평하며 수평인 곳에 두십시오.
- 사용 후 반드시 전원 코드를 뽑으십시오.
- 제품을 작동하거나 세척하기 전에 열을 식히십시오.
- 토스터 오븐을 사용할 때 빵 부스러기 받침대가 제대로 닫혔는지 확인하십시오.
- 토스터 오븐의 사용 도중 유리창과 금속 부분이 매우 뜨거우니 만지지 마십시오.
- 토스터 오븐에서 뜨거운 요리용 받침대 또는 뜨거운 음식을 꺼낼 때 오븐 장갑이나
두툼한 마른 천을 사용하십시오.
- 즙이나 기름이 히터에 떨어져 화재를 일으킬 수 있으므로 기름이나 간에 재운
음식을 직접 석쇠 위에 놓지 마십시오
전자기장(EMF)
이 필립스 제품은 전자기장(EMF)과 관련된 모든 기준을 준수합니다. 이 사용 설명서의
지침에 따라 적절하게 취급할 경우 이 제품은 안전하게 사용할 수 있으며 이는
현재까지의 과학적 증거에 근거하고 있습니다.
최초 사용 전
1 제품에 부착되어 있는 스티커를 모두 제거하고 몸체를 젖은 천으로 닦아주십시오.
2 소량의 세제를 푼 따뜻한 물에서 요리용 받침대를 세척하십시오.
참고: 토스터에 석쇠 및 요리용 받침대와 음식을 넣지 않은 상태에서 토스터 오븐을 5분
정도 가열해 주십시오. 이렇게 하면 보관 중에 전열선에 쌓여있을 수 있는 먼지를 모두
태워 없앱니다.
제품 사용
토스터 오븐 사용 방법
1 제품을 안정적이고 평평하며 수평인 곳에 두십시오.
토스터 오븐을 식탁보 또는 커튼과 같은 가연성 물질 위에 올려놓거나 근처에 두지
마십시오.
토스터 오븐이 벽 또는 다른 물건과 닿지 않도록 하십시오. 제품의 측면과 후면은 최소한
5cm, 제품의 위쪽으로는 최소한 10cm 정도의 여유공간을 남겨 두십시오.
토스터 오븐 위에 물건을 올려 놓지 마십시오.
2 전원 플러그를 벽면 콘센트에 꽂으십시오 (그림 2).
3 플러그를 벽면 콘센트에 꽂기 전에 타이머 스위치를 “0”에 맞추었는지
확인하십시오 (그림 3).
4 도어 손잡이를 당겨 문을 여십시오 (그림 4).
5 토스터 오븐 안에 석쇠를 놓으십시오.
6 요리할 음식을 요리용 받침대, 석쇠 위에 직접 놓거나 적당한 용기에 넣어 석쇠 위에
놓으십시오 (그림 5).
참고: 즙이 많은 음식을 조리하는 경우 항상 요리용 받침대나 적당한 용기를
사용하십시오.
7 온도 선택기를 필요한 요리 온도에 맞추십시오. (그림 6)
요리 온도는 이 설명서 마지막 부분의 조리법을 참조하십시오.
8 필요한 조리 시간을 설정하십시오. (그림 7)
조리 시간은 이 설명서 마지막 부분의 조리법을 참조하십시오.
한국어 13
4222.200.0298.2.indd 13 15-12-09 13:08

최대 조리 시간은 HD4494의 경우 30분, HD4496의 경우 45분까지 설정할 수
있습니다.
, 전원 표시등이 켜집니다 (그림 8).
참고: 조리 시간을 5분 이내로 설정하려면 (1) 타이머 스위치를 “5”분 표시가
지나도록 돌렸다가 (2) 다시 필요한 시간으로 되돌리십시오. (그림 9)
, 설정한 조리 시간이 경과하면 표시음이 나면서 제품이 자동으로 꺼집니다 (그림 10).
9 미리 설정한 조리 시간이 경과하기 전에 토스터 오븐에서 음식을 꺼내거나 작동을
중단하려는 경우, 타이머 스위치를 “0”으로 돌리면 전원이 꺼집니다 (그림 3).
토스터 오븐에 들어있는 음식을 더 조리하고 싶으면 타이머 스위치를 필요한 조리
시간으로 다시 맞추십시오.
석쇠 및 요리용 받침대와 조리된 음식은 뜨거우니 조심하십시오! 토스터 오븐에서
뜨거운 요리용 받침대 또는 뜨거운 음식을 꺼낼 때 오븐 장갑이나 두툼한 마른 천을
사용하십시오.
토스트
‘토스터 오븐 사용 방법’란을 참조하십시오.
참고: 토스터 오븐을 예열할 필요가 없습니다.
1 빵 조각을 석쇠에 나란히 놓습니다. 한 조각만 구울 경우 빵 조각을 석쇠의 중앙에
놓으십시오 (그림 11).
토스터 오븐은 한 번에 4조각의 빵을 구울 수 있습니다. 빵을 구울 때에는 석쇠를
사용하십시오.
2 온도 선택기를 필요한 온도에 맞추십시오. (그림 6)
요리 온도는 이 설명서 마지막 부분의 조리법을 참조하십시오.
파이를 데우려면, 낮은 온도를 선택하십시오.
3 필요한 조리 시간을 설정하십시오 (그림 7).
조리 시간은 이 설명서 마지막 부분의 조리법을 참조하십시오.
참고: 토스터 작동 중, 도어 유리창에 물방울이 맺힐 수 있습니다. 이것은 음식에 있는
수분에 의한 정상적인 현상이며, 조리 과정에 영향을 미치지 않습니다.
노릇하게 굽기/바삭하게 굽기
’토스터 오븐 사용 방법’란을 참조하십시오.
참고: 토스터 오븐을 예열할 필요가 없습니다.
1 치즈나 빵가루와 같은 토핑을 노릇하고 바삭하게 구워 그라탕 요리를 만드는 경우,
음식을 적당한 용기 또는 요리용 받침대에 담습니다.
2 요리용 받침대를 토스터 오븐 안의 석쇠 위에 놓으십시오.
3 온도 선택기를 필요한 온도에 맞추십시오. (그림 6)
요리 온도는 이 설명서 마지막 부분의 조리법을 참조하십시오.
4 필요한 조리 시간을 설정하십시오. (그림 7)
조리 시간은 이 설명서 마지막 부분의 조리법을 참조하십시오.
참고: 음식이 타지 않도록 주의깊게 지켜보십시오.
5 원하는 만큼 구워졌으면 음식을 꺼내고 타이머 스위치를 “0”으로 돌리십시오.
해동
’토스터 오븐 사용 방법’란을 참조하십시오.
1 음식을 싼 종이 및 비닐 포장지를 제거하십시오.
2 해동할 음식을 요리용 받침대에 놓으십시오.
3 요리용 받침대를 토스터 오븐 안의 석쇠 위에 놓으십시오.
4 온도 선택기를 80°C로 맞추십시오
5 타이머 스위치를 사용하여 호일로 싼 음식의 조리 시간을 설정하십시오(조리법
참조).
한국어14
4222.200.0298.2.indd 14 15-12-09 13:08

6 음식이 해동될 때까지 오븐 안에 들어있는 음식을 그대로 두십시오.
필요한 시간은 음식의 종류와 크기에 따라 달라집니다.
7 원하는 만큼 구워졌으면 타이머 스위치를 “0”으로 돌리고 해동된 음식을
꺼내십시오.
해동된 음식이 상하는 것을 방지하려면 해동 직후 냉장하거나 완전히 조리하십시오.
석쇠 굽기
’토스터 오븐 사용 방법’란을 참조하십시오.
1 온도 선택기를 필요한 요리 온도에 맞추십시오 (그림 6).
요리 온도는 이 설명서 마지막 부분의 조리법을 참조하십시오.
2 타이머 스위치를 “5”분으로 맞추고 토스터 오븐을 예열하십시오.
3 음식을 요리용 받침대에 놓고 예열된 토스터 오븐 안의 석쇠 위에 요리용 받침대를
놓으십시오.
4 필요한 조리 시간을 설정하십시오.
조리 시간은 이 설명서 마지막 부분의 조리법을 참조하십시오.
도움말: 음식의 겉이 너무 빨리 노릇해지는 것을 방지하려면, 마지막 몇 분 동안 음식을
알루미늄 호일에 싸십시오. 요리용 받침대 가장자리의 지저분한 부분을 잘 접어서
정돈하십시오.
알루미늄 호일이 전열선에 닿지 않는지 확인하십시오. 화재의 위험이 있습니다.
베이킹
’토스터 오븐 사용 방법’란을 참조하십시오.
1 온도 선택기를 필요한 요리 온도에 맞추십시오 (그림 6).
요리 온도는 이 설명서 마지막 부분의 조리법을 참조하십시오.
2 타이머 스위치를 “5”분으로 맞추고 토스터 오븐을 예열하십시오.
3 구울 음식을 놓은 요리용 그릇 또는 요리용 받침대를 예열된 토스터 오븐에
놓으십시오.
4 필요한 조리 시간을 설정하십시오 (그림 7).
조리 시간은 이 설명서 마지막 부분의 조리법을 참조하십시오.
참고: 음식이 타지 않도록 주의깊게 지켜보십시오.
도움말: 음식의 겉이 너무 빨리 노릇해지는 것을 방지하려면, 마지막 몇 분 동안 음식을
알루미늄 호일에 싸십시오. 요리용 받침대 가장자리의 지저분한 부분을 잘 접어서
정돈하십시오.
알루미늄 호일이 전열선에 닿지 않는지 확인하십시오. 화재의 위험이 있습니다.
사용 후
1 타이머 스위치를 “0”에 맞추십시오.
2 벽면 콘센트에서 플러그를 뽑으십시오.
3 제품을 작동하거나 세척하기 전에 열을 식히십시오.
청소
제품을 세척할 때 수세미, 연마성 세제나 휘발유, 아세톤과 같은 강력 세제를 사용하지
마십시오.
절대로 토스터 오븐을 물에 담그거나 토스터 오븐에 물이 튀지 않도록 하십시오. 감전
사고의 위험이 있습니다.
1 타이머 스위치를 “0”에 맞춘 후, 벽면 콘센트에서 플러그를 뽑고 제품의 열을
완전히 식히십시오.
2 토스터 오븐의 내부 및 외부를 젖은 천으로 닦으십시오.
한국어 15
4222.200.0298.2.indd 15 15-12-09 13:08

3 석쇠를 분리하여 소량의 세제를 푼 따뜻한 물에서 세척하십시오. 천으로 물기를 닦은
후 토스터 오븐 내 제자리에 놓으십시오 (그림 12).
4 요리용 받침대를 소량의 세제를 푼 따뜻한 물 또는 식기세척기에서 세척하십시오.
음식물 조각 또는 즙이 받침대에 눌어붙은 경우 청소하기 전에 받침대를 뜨거운 물에
잠시 담가 두십시오.
5 빵 부스러기를 제거하려면, 제품을 뒤로 돌리고 빵 부스러기 제거 도어를 눌러
떼어내십시오. 그 다음, 빵 부스러기를 마른 천이나 젖은 천으로 닦으십시오. (
그림 13)
석쇠와 요리용 받침대가 마른 상태인지 확인한 후 토스터 오븐 내 제자리에 놓으십시오.
제품을 사용하기 전에는 반드시 빵 부스러기 제거 도어를 닫으십시오.
다시 사용하기 전에 물기가 완전히 말랐는지 확인하십시오.
환경
- 수명이 다 된 제품은 일반 가정용 쓰레기와 함께 버리지 마시고 지정된 재활용 수거
장소에 버리십시오. 이런 방법으로 환경 보호에 동참하실 수 있습니다 (그림 14).
품질 보증 및 서비스
보다 자세한 정보가 필요하시거나, 사용상의 문제가 있을 경우에는 필립스전자 홈페이지
(www.philips.co.kr)를 방문하시거나 필립스 고객 상담실로 문의하십시오. 전국
서비스센터 안내는 제품 보증서를 참조하십시오. *(주)필립스전자: (02)709-1200 *
고객 상담실: (080)600-6600(수신자부담)
문제 해결
이 란은 제품을 사용하면서 가장 일반적으로 경험하게 되는 문제와 그 해결 방법을
제시합니다. 발생한 문제를 아래 정보로 해결할 수 없는 경우에는 필립스 고객 상담실로
문의하십시오.
문제점 해결책
토스터 오븐이 작동하지
않습니다.
벽면 콘센트에 플러그를 제대로 연결했는지 확인하십시오.
플러그가 벽면 콘센트에 연결되어 있는데도 제품이 작동하
지 않으면, 전기 시스템에 결함이 발생한 것입니다. 필립스
서비스 센터나 서비스 지정점에서 제품을 검사 또는 수리하
십시오.
조리 도중에 작동을 중
단하고 싶습니다.
타이머 스위치를 “0”으로 돌리면 토스터 오븐의 전원이
꺼집니다.
조리 도중에 온도를 변
경하고 싶습니다.
온도 선택기를 0에서 230°C 사이의 다른 온도 범위에 맞
추십시오.
음식이 제대로 익혀지지
않았습니다.
음식 포장 용기에 적혀있는 지시 사항 또는 조리법에 나와있
는 제안사항에 따라 조리해보십시오.
제빵하기 전에 적절한 크기의 오븐 용기를 선택하십시오. 제
빵 과정 중에는 항상 음식을 지켜보십시오.
제빵하는 동안 전원 표
시등이 켜졌다 꺼졌다를
반복합니다.
사용하는 동안 제빵 온도를 유지하기 위해 열판이 수시로 켜
졌다 꺼집니다. 이는 정상적인 현상입니다.
한국어16
4222.200.0298.2.indd 16 15-12-09 13:08

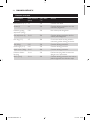
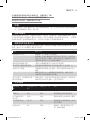
조리법
음식 유형 (수
량)
조리시간 (분)
온도(c°C)
권장사항
토스트/롤빵(1-
4조각)
2-4 230 석쇠 사용
그라탕 (1접시) 4-6 230 요리용 받침대 또는 적당한 용기
사용
튀김 (250g) 5-20 230 포장 용기의 지시 사항에 따름
냉동 피자 (1) 10-16 220 요리용 받침대 사용. 포장 용기의
지시 사항 또는 조리법 참고
핫도그 (3-5개) 4-5 200 조리 전에 핫도그에 구멍을 내거나
칼집 내기. 요리용 받침대 사용
스테이크(
200g)
9-15 230 요리용 받침대 사용
햄버거 (2-4개) 6-10 230 요리용 받침대 사용
닭봉 (200g) 10-15 200 요리용 받침대 사용
호일로 싼 음식 10-16 230 호일이 전열선에 닿지 않도록 주의
하십시오.
쿠키(4 조각) 10-14 180 요리용 받침대 사용. 포장 용기의
지시 사항 또는 조리법 참고
한국어 17
4222.200.0298.2.indd 17 15-12-09 13:08

18
Tahniah atas pembelian anda, dan selamat datang ke Philips! Untuk mendapat manfaat sepenuhnya
daripada sokongan yang ditawarkan oleh Philips, daftarkan produk anda di www.philips.com/
welcome.
Pemegang pintu
Tingkap kaca
Pintu pengeluaran serdak
Elemen pemanasan
Rak dawai boleh tanggal
Dulang pembakar tidak melekat
Tombol pemasa
Lampu penghidup kuasa
Pemilih suhu
Baca manual pengguna ini dengan teliti sebelum anda menggunakan perkakas dan simpan untuk
rujukan masa depan.
- Jangan biarkan sebarang air atau cecair lain masuk ke dalam ketuhar pemangganguntuk
mengelakkan daripada kejutan elektrik.
- Jangan sekali-kali tenggelamkan ketuhar pemanggang di dalam air atau memercikkan air ke atas
air untuk mengelakkan daripada kejutan elektrik.
- Jika anda menggunakan kerajang aluminium untuk membalut makanan yang hendak dimasak,
pastikan ia tidak bersentuhan dengan elemen pemanasan untuk mengelakkan daripada bahaya
kebakaran.
- Jangan jangan letak minyak di atas dulang pembakar semasa menggunakannya untuk mengelakkan
daripada bahaya kebakaran.
- Periksa sama ada voltan yang ditunjukkan pada perkakas sepadan dengan voltan sesalur kuasa
setempat sebelum anda menyambungkan perkakas.
- Jangan gunakan perkakas jika plag, kord sesalur kuasa atau perkakas itu sendiri rosak.
- Jika kord sesalur rosak, ia mesti digantikan oleh Philips, pusat servis yang dibenarkan oleh Philips
atau pihak yang telah diluluskan bagi mengelakkan bahaya.
- Jangan biarkan kord sesalur utama tergantung dari tepi meja atau permukaan ruang kerja tempat
perkakas itu diletakkan.
- Jauhkan kord dari permukaan yang panas.
- Suhu permukaan yang dapat dicapai mungkin tinggi apabila perkakas sedang beroperasi (cth.
kawasan yang bertanda = ).
- Sambungkan perkakas hanya ke soket dinding yang terbumi.
- Perkakas ini tidak dimaksudkan untuk digunakan oleh orang (termasuk kanak-kanak) yang kurang
upaya dari segi zikal, deria atau mental, atau kurang berpengalaman dan pengetahuan, kecuali
mereka diawasi atau diberi arahan berkenaan penggunaan perkakas ini oleh orang yang
bertanggungjawab atas keselamatan mereka.
- Kanak-kanak hendaklah diselia untuk memastikan mereka tidak bermain dengan perkakas ini.
- Jangan sekali-kali biarkan perkakas beroperasi tanpa diawasi.
- Jangan sambungkan perkakas ini dengan suis pemasa untuk mengelakkan situasi yang berbahaya.
- Jangan letak ketuhar pembakar di atas atau dekat dengan bahan yang mudah terbakar seperti
alas meja atau langsir.
4222.200.0298.2.indd 18 15-12-09 13:08

- Jangan sandarkan ketuhar pemanggang pada dinding atau perkakasa lain. Berikan sekurang-
kurangnya jarak sebanyak 5cm di sisi dan belakang perkakas dan sekurang-kurangnya 10cm di
atas perkakas.
- Cabut plag ketuhar pemanggangserta merta jika makanan yang sedang dimasak mula
mengeluarkan asap atau terbakar. Biarkan pintu ketuhar pemanggangtertutup dalam keadaan
demikian untuk mencegah udara daripada masuk ke dalam pemanggang ketuhar, kerana ini akan
menyebabkan nyalaan memarak. Tunggu sehingga nyalaan padam dan pengeluaran asap berhenti
sebelum anda membuka pintunya.
- Perkakas ini bertujuan untuk kegunaan dalam rumah sahaja. Jika perkakas ini disalahgunakan atau
untuk tujuan profesional atau semiprofesional atau jika ia digunakan tidak mengikut arahan yang
terdapat dalam manual pengguna, jaminan menjadi tidak sah dan Philips tidak menerima
tanggungjawab bagi apa-apa kerosakan yang berlaku.
- Sentiasa letakkan perkakas pada permukaan yang stabil, rata dan mendatar.
- Cabutkan plag perkakas setiap kali selepas digunakan.
- Biarkan perkakas menjadi sejuk sebelum anda mengendalikannya atau membersihkannya.
- Pastikan dulang serdak roti ditutup dengan sempurna sepanjang anda menggunakan ketuhar
pembakar.
- Jangan sentuh tingkap kaca dan bahagian-bahagian logam perkakas, kerana ia menjadi sangat
panas apabila digunakan.
- Gunakan sarung tangan ketuar atau kain kering tebal untuk mengeluarkan dulang pembakar yang
panas atau makanan panas dari ketuhar pembakar roti.
- Jangan letakkan makanan berminyak atau yang diperap langsung di atas rak dawai kerana air
perapan atau minyak boleh menitis ke atas pemanas lalu menyebabkan ia terbakar.
Perkakas Philips ini mematuhi semua piawai yang berhubung dengan medan elektromagnet (EMF).
Jika dikendalikan dengan betul dan mematuhi arahan dalam manual pengguna ini, perkakas selamat
untuk digunakan menurut bukti saintik yang boleh didapati pada masa ini.
1 Tanggalkan apa-apa pelekat dan kesatkan jasad perkakas dengan kain lembap.
2 Bersihkan rak dawai dan dulang pembakar dengan air suam dan sedikit cecair pencuci pinggan
mangkuk.
Nota: Biarkan ketuhar pemanggangmemanas selama kira-kira 5 minit tanpa rak dawai dan/atau dulang
pembakar dan tanpa sebarang makanan di dalamnya, untuk membakarkan apa-apa debu yang
mungkin telah terkumpul pada elemen pemanasan semasa penyimpanan.
1 Letakkan perkakas pada permukaan yang stabil, rata dan mendatar.
Jangan letak ketuhar pembakar di atas atau dekat dengan bahan yang mudah terbakar seperti alas
meja atau langsir.
Jangan sandarkan ketuhar pemanggang pada dinding atau perkakasa lain. Berikan sekurang-
kurangnya jarak sebanyak 5cm di sisi dan belakang perkakas dan sekurang-kurangnya 10cm di atas
perkakas.
Jangan letak apa-apa di atas pemanggang ketuhar.
2 Masukkan plag ke dalam soket dinding yang dibumikan (Gamb. 2).
19
4222.200.0298.2.indd 19 15-12-09 13:08

3 Pastikan tombol pemasa ditetapkan pada 0 sebelum anda memasukkan plag ke dalam soket
dinding (Gamb. 3).
4 Tarik pemegang pintu untuk membuka pintu (Gamb. 4).
5 Letakkan rak dawai di dalam pemanggang ketuhar.
6 Letak makanan yang hendak dimasak di atas dulang pembakar, langsung di atas rak dawai atau
di atas rak dawai dalam alat memasak yang sesuai (Gamb. 5).
Nota: Sentiasa gunakan dulang pembakar atau alat memasak yang sesuai apabila anda memasak
makanan yang banyak airnya.
7 Tetapkan pemilih suhu kepada suhu memasak yang diperlukan. (Gamb. 6)
Untuk maklumat mengenai suhu memasak, lihat panduan memasak di hujung manual pengguna ini.
8 Tetapkan tombol pemasa pada masa memasak yang dikehendaki. (Gamb. 7)
Untuk maklumat mengenai masa memasak, lihat panduan memasak di hujung manual pengguna ini.
Masa memasak maksimum yang boleh ditetapkan ialah 30 minit untuk jenis HD4494 dan 45 minit
untuk jenis HD4496.
, Lampu kuasa hidup menyala (Gamb. 8).
Nota: Untuk menetapkan masa memasak kurang daripada 5 minit, putarkan tombol pemasa melepasi
penunjuk 5 minit (1) dan kemudian putarkan balik kepada masa yang diperlukan (2). (Gamb. 9)
, Apabila masa memasak yang ditetapkan telah berlalu, anda akan mendengar bunyi loceng dan
perkakas akan dimatikan secara automatik (Gamb. 10).
9 Jika anda hendak mengeluarkan makanan daripada ketuhar pemanggangatau jika anda hendak
berhenti memasak sebelum akhir masa memasak yang ditetapkan, putarkan tombol pemasa
ke 0 untuk mematikan perkakas (Gamb. 3).
Jika masih terdapat makanan di dalam ketuhar pemanggangyang perlu dimasak, putarkan tombol
pemasa untuk menetapkan masa memasak yang dikehendaki semula.
Berhati-hati: rak dawai dan/atau dulang pembakar dan makanan yang dimasak panas! Gunakan
sarung tangan ketuhar atau kain kering yang tebal untuk mengeluarkan makanan yang panas atau
dulang pembakar daripada pemanggang ketuhar.
Lihat bahagian ‘Cara untuk menggunakan ketuhar pembakar roti’.
Nota: Tidak perlu untuk memanaskan dahulu ketuhar pembakar roti.
1 Letak kepingan roti sebelah menyebelah di atas rak dawai. Untuk membakar sekeping roti,
letakkannya di tengah rak dawai (Gamb. 11).
Ketuhar pemanggang boleh membakar sehingga 4 keping roti pada satu-satu masa. Gunakan rak
dawai untuk membakar roti.
2 Tetapkan pemilih suhu kepada suhu yang diperlukan. (Gamb. 6)
Untuk maklumat mengenai suhu memasak, lihat panduan memasak di hujung manual pengguna ini.
Jika anda hendak memanaskan pastri, pilih suhu yang rendah.
3 Tetapkan tombol pemasa pada masa memasak yang dikehendaki (Gamb. 7).
Untuk maklumat mengenai masa memasak, lihat panduan memasak di hujung manual pengguna ini.
Nota: Semasa memanggang, sedikit penyejatan mungkin terbentuk di atas kaca tingkap pada pintu. Ini
adalah perkara biasa dan disebabkan oleh lembapan di dalam makanan. Ia tidak menjejaskan proses
memanggang.
20
4222.200.0298.2.indd 20 15-12-09 13:08
ページが読み込まれています...
ページが読み込まれています...
ページが読み込まれています...
ページが読み込まれています...
ページが読み込まれています...
ページが読み込まれています...
ページが読み込まれています...
ページが読み込まれています...
ページが読み込まれています...
ページが読み込まれています...
ページが読み込まれています...
ページが読み込まれています...
ページが読み込まれています...
ページが読み込まれています...
ページが読み込まれています...
ページが読み込まれています...
ページが読み込まれています...
ページが読み込まれています...
ページが読み込まれています...
ページが読み込まれています...
-
 1
1
-
 2
2
-
 3
3
-
 4
4
-
 5
5
-
 6
6
-
 7
7
-
 8
8
-
 9
9
-
 10
10
-
 11
11
-
 12
12
-
 13
13
-
 14
14
-
 15
15
-
 16
16
-
 17
17
-
 18
18
-
 19
19
-
 20
20
-
 21
21
-
 22
22
-
 23
23
-
 24
24
-
 25
25
-
 26
26
-
 27
27
-
 28
28
-
 29
29
-
 30
30
-
 31
31
-
 32
32
-
 33
33
-
 34
34
-
 35
35
-
 36
36
-
 37
37
-
 38
38
-
 39
39
-
 40
40


