Tefal OF677E70 ユーザーマニュアル

タイプ
ユーザーマニュアル
NC00122320 - 03/14 - UNO XL
JPM & Associés • marketing-design-communication
www.tefal.com
Uno xl electronic
Turnspit
EN
ZH
KO
ID
TH
VI
3
A Interior light
B Non-stick walls
C Convection fan
D Heating elements
E Double glass door
F Control panel
F1 Left rotating knob
F2 Manual mode selector
F3 Oven temperature selector
F4 Cooking time selector
F5 Keep warm
F6 Delayed start
F7 LCD screen
F7a Cooking settings
F7b Keep warm
F7c Delayed start
F7d Temperature
F7e Time display
F7f Temperature unit
F7g Weight
F8 Start cooking
F9 Stop/change during cooking
F10 Automatic menu selection
F11 Food weight selection/child safety
F12 Right rotating knob
G Turnspit kit (1 rack, 2 forks, 2 turnspit frames,
1 rod, 1 baking tray)
H Non-stick tray
I Reversible grill
J Drip tray
BEFORE USE
Unpacking
1 2 3 4
Turn the box over so it is upside down. Open the box - g.1, remove the accessories - g.2 and to
make it easier to unpack turn the packaging and contents gently over - g.3. Remove the box and
lift off the polystyrene protection - g.4.
Installation
6
Using a damp cloth, wipe the interior and exterior of the appliance and dry it - g.5.
Wash all the accessories in warm soapy water. Rinse and dry thoroughly - g.6. Place the drip tray
back in the oven underneath the lower heating elements - g.7.
DESCRIPTION
EN
ZH
KO
ID
MS
TH
VI
4
Slide-in crumb tray
11
Slide the crumb tray into the oven above the lower element - g.7. Leave the crumb tray in place
while the appliance is in operation - g.8.
Do not touch the crumb tray during use or immediately afterwards. Always give it time to cool
down - g.9.
Remember to empty the crumb tray after each use - g.10-11.
Shelf position
7
5
3
1
8
6
4
2
For all functions of your appliance the position of the shelf has a major
impact on cooking results.
Your oven has 4 heights for positioning the shelf. However, as the shelf is
reversible, it is possible to obtain 8 different positions.
Place your dish in the centre of the shelf at the required height.
Do not place any container directly on the inner heating element.
Setting the time
13
14
15
16
17
18
After plugging in the oven - g.12, the digital display automatically shows the time as « 00:00 » with
the hours flashing - g.13. Set the hour using the left rotating knob - g.14. Validate by pressing the
clock button - g.15. The minutes will then flash automatically - g.16. Set the minutes using the left
rotating knob - g.17. Validate by pressing the clock button again - g.18.
To change the time press and hold the clock button for a few seconds.
WARNING! Do not confuse the clock button and the delayed start button .
5
Slide-in crumb tray
11
Slide the crumb tray into the oven above the lower element - g.7. Leave the crumb tray in place
while the appliance is in operation - g.8.
Do not touch the crumb tray during use or immediately afterwards. Always give it time to cool
down - g.9.
Remember to empty the crumb tray after each use - g.10-11.
Shelf position
7
5
3
1
8
6
4
2
For all functions of your appliance the position of the shelf has a major
impact on cooking results.
Your oven has 4 heights for positioning the shelf. However, as the shelf is
reversible, it is possible to obtain 8 different positions.
Place your dish in the centre of the shelf at the required height.
Do not place any container directly on the inner heating element.
Setting the time
13
14
15
16
18
After plugging in the oven - g.12, the digital display automatically shows the time as « 00:00 » with
the hours flashing - g.13. Set the hour using the left rotating knob - g.14. Validate by pressing the
clock button - g.15. The minutes will then flash automatically - g.16. Set the minutes using the left
rotating knob - g.17. Validate by pressing the clock button again - g.18.
To change the time press and hold the clock button for a few seconds.
WARNING! Do not confuse the clock button and the delayed start button .
First use while empty
Before first use the oven must be operated while empty for 20 minutes to remove any
possible manufacturing residue.
19
20
21
22
23
The oven is now plugged in and the time has been set. Press « mode » - g.19. Select « convection »
cooking mode using the left rotating knob - g.20. The « convection » logo
should appear on
the LCD screen - g.21. Validate by pressing « mode » again - g.22.
23
24
240°C
25
26
27
28
29
20 min
30
31
32
The temperature flashes - g.23. Select the temperature: 240° using the left rotating knob -
g.24. Validate by pressing « temperature » - g.25. The hours will flash - g.26. Leave the hours
at 0. Validate by pressing the clock button - g.27. The minutes will flash- g.28. Set the minutes:
20 minutes using the left rotating knob - g.29. Validate by pressing the clock button again - g.30
- g.31. Press
once to stop cooking - g.32.
OK
20 min
35
On first use, some smoke may escape from the oven - g.33. This is normal and will gradually
disappear with use. After 20 minutes the oven will beep and then stop automatically - g.34.
Leave the appliance to cool - g.35.
EN
ZH
KO
ID
MS
TH
VI
6
AUTOMATIC MODE
Using the programmed menus
36
37
38
36
The oven is plugged in and the time set. Press « menu » - g.36. The menu and the cooking time
will flash - g.37. Select your menu using the right rotating knob - g.38. Press « menu » again to
validate - g.39.
40
41
42 43
The weight will flash - g.40. Select the weight (see table describing the automatic menu modes)
using the right rotating knob - g.41 and validate by pressing the « weight » button - g.42. The
cooking time is automatically displayed according to the validated weight.
To program a delayed start or keep warm mode see the appropriate chapters.
Press
once to start cooking - g.43.
The cooking chart is for information purposes. Depending on your tastes, cooking can be continued
in manual mode.
At the end of cooking the oven will beep and stop automatically - g.44-45-46.
7
Description of programmed menus*
Weight Kg 0,5 0,6 0,7 0,8 0,9 1,0 1,1 1,2 1,3 1,4 1,5 1,6 1,7 1,8 1,9 2,0 2,1 2,2 2,3 2,4 2,5
Program Mode
Shelf
height
T°C Selection Time in minutes
P01
Beef
rare
5 220
0,5 -
2,5 kg
24 27 30 33 37 40 43 46 49 52 54 57 60 62 65 67 70 72 75 77 79
P02
Beef
medium
5 180
0,5 -
2,5 kg
40 42 44 47 49 52 54 57 59 61 64 66 69 71 73 76 78 81 83 86 88
P03
Veal 3 180
0,5 -
2,5 kg
57 62 67 72 77 81 86 90 94 99 103 107 110 114 118 121 125 128 131 134 137
P04
Pork 4 180
0,5 -
2,5 kg
79 84 89 94 98 102 106 109 112 115 117 119 121 123 124 125 126 126 126 126 125
P05
Poultry 4 200
0,5 -
2,5 kg
39 44 48 52 56 60 64 67 70 73 76 79 81 84 86 88 90 91 93 94 95
P06
Lamb 2 180
0,5 -
2,5 kg
64 69 74 79 84 88 92 96 100 103 107 107 113 115 118 120 122 124 125 127 128
P07
Fish
large
2 200
0,5 -
2,5 kg
27 28 29 30 32 33 35 36 38 40 42 44 46 49 51 54 57 60 63 66 69
P08
Fish
small
4 190
0,5 -
2,5 kg
26 27 28 28 29 30 31 32 33 34 35 36 38 39 41 42 44 45 47 48 50
P09
Frozen
chips
6 220 0,5 kg
33
P10
Chicken
nuggets
4 210
0,5 -
0,8 kg
29 30 37 43
Cooking
C1 C2 C3
Program Mode
Shelf
height
T°C Size Time in minutes
P11
Frozen
pizza
5 210
C1 = Small
C2 =
Medium
C3 = Large
13 20 26
P12
Fresh
pizza
3 210
C1 = Small
C2 =
Medium
C3 = Large
12 14 23
P13
Pies 5 / 4 240
C1 = Small
C2 =
Medium
C3 = Large
30 33 39
P14
Gratinated
dishes
4 220
C1 = Small
C2 =
Medium
C3 = Large
45 54 83
P15
Cookies 5 180
1 setting 15
P16
Brownie 3 200
C1 = Small
C2 =
Medium
C3 = Large
16 34 40
P17
Chicken TB 240
55 58 60 61 62 64 67 71 88 94 100
P18
Roastbief TB 240
32 34 36 37 38 39 40 41 42 43 45 48
P19
Roast pork TB 240
43 54 58 62 65 69 72 73 74 75 76 78
Menus P01 to P08 allow you to select the weight of your food from 0.5 to 2.5 kg.
Menu P10 allows you to select between 0.5 and 0.8 kg of chicken nuggets.
Menus P11 to P14 and P16 offer 3 selections: C1 = Small, C2 = Medium and C3 = Large.
NOTE! There is only one selection possible for menus P09 and P15.
* The cooking chart is for information purposes only and is not to be taken as a reference.
EN
ZH
KO
ID
MS
TH
VI
8
MANUAL MODE
Description of manuals menus
Natural convection (or conventional oven): Natural convection (or conventional
oven): the heat is generated by the oven’s upper and lower elements. This traditional
cooking mode is suitable for cooking meat, fish and puddings.
Grill (upper element): the heat is generated by the oven’s upper element. This can be
used for traditional grilling/barbecuing and also to brown dishes.
Defrost: this special function operates the fan at the rear of the oven in order to reduce
the defrosting time of the ingredients that you put in your oven, without any risk of
them being cooked. The temperature cannot be changed in defrost mode.
Fan oven: the heat is generated then blown around by a fan located at the rear of the
oven which guarantees exceptionally even cooking anywhere in the oven. The blowing
around of the air allows your food to be cooked evenly.
Turnspit: Oven rotisserie for all types of meat and poultry.
For conventional, grill and convection modes, the temperature can be set at between 100°C
and 240°C.
Using the manuals menus
48
49
50
51
The oven is plugged in and the time set.
Place the shelf at the required height. Place the tray with the food in the oven - g.47 and close the
door. Press « mode » - g.48. The cooking mode will flash - g.49. Select the cooking mode using
the left rotating knob - g.50. Validate by pressing « mode » again - g.51.
9
MANUAL MODE
Description of manuals menus
Natural convection (or conventional oven): Natural convection (or conventional
oven): the heat is generated by the oven’s upper and lower elements. This traditional
cooking mode is suitable for cooking meat, fish and puddings.
Grill (upper element): the heat is generated by the oven’s upper element. This can be
used for traditional grilling/barbecuing and also to brown dishes.
Defrost: this special function operates the fan at the rear of the oven in order to reduce
the defrosting time of the ingredients that you put in your oven, without any risk of
them being cooked. The temperature cannot be changed in defrost mode.
Fan oven: the heat is generated then blown around by a fan located at the rear of the
oven which guarantees exceptionally even cooking anywhere in the oven. The blowing
around of the air allows your food to be cooked evenly.
Turnspit: Oven rotisserie for all types of meat and poultry.
For conventional, grill and convection modes, the temperature can be set at between 100°C
and 240°C.
Using the manuals menus
48
49
50
51
The oven is plugged in and the time set.
Place the shelf at the required height. Place the tray with the food in the oven - g.47 and close the
door. Press « mode » - g.48. The cooking mode will flash - g.49. Select the cooking mode using
the left rotating knob - g.50. Validate by pressing « mode » again - g.51.
52
53
54
56
The temperature will flash - g.52. Select the temperature using the left rotating knob - g.53.
57
PLEASE NOTE: the temperature cannot be changed in defrost mode.
Validate by pressing « temperature » - g.54. The cooking time will flash - g.55 :
set the time by turning the left rotating knob - g.56, validate by pressing the
clock button - g.57.
58
59
60 61
The minutes will flash - g.58 Set the minutes by turning the left rotating knob - g.59, validate by
pressing the clock button again - g.60. The maximum cooking time is 3h59.
To program a delayed start or keep warm mode see the appropriate chapters.
Press
once to start cooking - g.61.
At the end of the cooking time, the oven will beep and stop automatically - g.62-63-64.
EN
ZH
KO
ID
MS
TH
VI
10
Using the turnspit function
65
66
67
68
To install the turnspit, place the two turnspit frames on the rack - g.65-66-67. Then place the tray
on the rack - g.68.
69
70
Place string around the meat and poultry before
skewering. Slide the skewers into the poultry - g.69, then
slide the two forks on to the skewers (with the points
facing outwards) - g.70.
71
72
73
Put the skewered poultry on the frame placed on the rack - g.71 and check that the skewer is
slotted into the frame so that it remains stable - g.72-73.
74
Slide all parts into the oven, making sure that the skewer is firmly placed in the
appropriate slot - g.74.
Then follow the previous instructions for the manual setting to start « turnspit »
cooking. - g.47 à 61.
IMPORTANT! For optimal cooking in turnspit mode, the thermostat must be set to 240°C
and the door must be closed.
IMPORTANT! When cooking certain dishes, steam may escape via the door: this is perfectly
normal.
11
Tableau de cuisson : mode manuel*
Program Mode Level Preheat T °C Time
Pie
4 0 233°C 37 min
Fruit cake
3 10 185°C 45 min
Quiche
4 0 233°C 37 min
Clafoutis
4 10 193°C 45 min
Sponge
cake
4 10 185°C 23 min
4 10 185°C 25 min
Roast pork
(1 kg)
5 0 193°C 1 h 20 min
* The cooking chart is for information purposes only and is not to be taken as a reference.
CHANGE DURING COOKING
75
Press
once - g.75. Change your program (cooking
mode, temperature and/or cooking time), press
once
to validate and start cooking again - g.76.
STOPPING COOKING
77
To stop cooking, press and hold
- g.77 until the appliance switches to
standby mode.
EN
ZH
KO
ID
MS
TH
VI
12
DELAYED START
The delayed start function allows you to program the start of cooking from 5 minutes to 24 hours
later.
WARNING! Do not confuse the delayed start button and the clock button .
78
79
80
81
82
83
84
The cooking mode, time and temperature have already been set using manual mode or the
programmed menu mode (see appropriate chapters on programming). Press the « delayed start
» button
- g.78. The « delayed start » pictogram and the clock will flash - g.79. Set the
cooking start time using the left rotating knob - g.80. Validate by pressing the « delayed start »
button again - g.81. The « delayed start » pictogram will then appear on the screen. This
means that the delayed start program has been entered correctly - g.82. Press
once to start
cooking - g.83. When the timer has started, the two points separating the hours and minutes will
flash - g.84. This display allows you to be sure that the program has started.
PLEASE NOTE! When a delayed start has begun it is normal for the oven light not to come
on until cooking starts.
KEEP WARM
85
86
87
88
89
90
13
DELAYED START
The delayed start function allows you to program the start of cooking from 5 minutes to 24 hours
later.
WARNING! Do not confuse the delayed start button and the clock button .
79
80
81
82
84
The cooking mode, time and temperature have already been set using manual mode or the
programmed menu mode (see appropriate chapters on programming). Press the « delayed start
» button
- g.78. The « delayed start » pictogram and the clock will flash - g.79. Set the
cooking start time using the left rotating knob - g.80. Validate by pressing the « delayed start »
button again - g.81. The « delayed start » pictogram will then appear on the screen. This
means that the delayed start program has been entered correctly - g.82. Press
once to start
cooking - g.83. When the timer has started, the two points separating the hours and minutes will
flash - g.84. This display allows you to be sure that the program has started.
PLEASE NOTE! When a delayed start has begun it is normal for the oven light not to come
on until cooking starts.
KEEP WARM
86
87
88
89
The cooking parameters have been set. Press the « keep warm » button - g.85. The « keep warm »
pictogram
and the clock will flash - g.86. Set the required time for keeping the oven warm
using the left rotating knob - g.87. Validate by pressing the « keep warm » button again - g.88
- g.89. Press
once to start cooking - g.90. At the end of cooking, the oven will automatically
switch to « keep warm » mode.
N.B : The two delayed start and keep warm functions can be combined.
N.B: It is possible to set the keep warm function while cooking is in progress (see chapter
on changes during cooking).
PLEASE NOTE! Keep warm mode cannot be used with defrost mode.
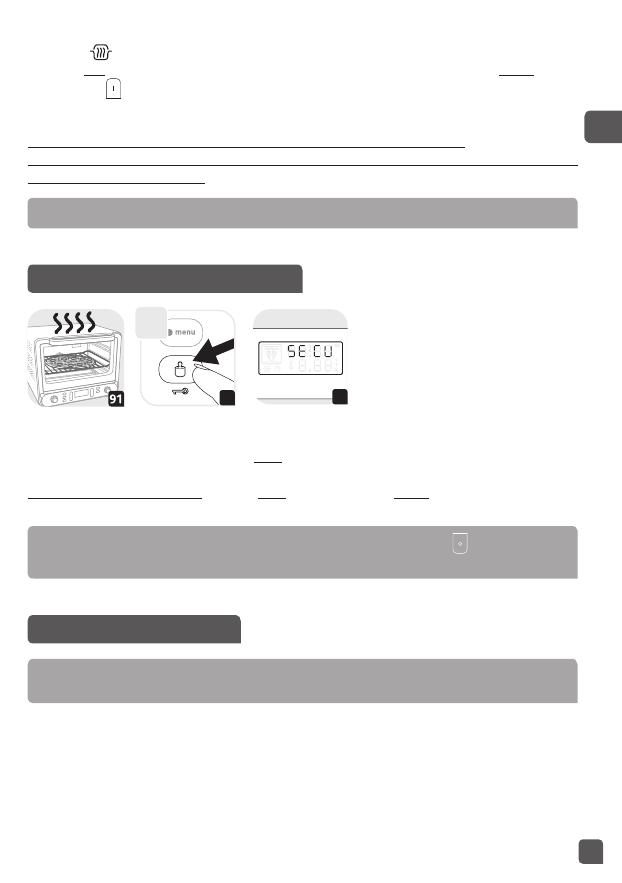
LOCKING CONTROL PANEL
92
2-3
sec.
93
This safety feature prevents any change to the cooking settings by children under 8 years of age
who should not use this appliance unless continuous supervision by a responsible adult is given.
After starting cooking - g.91, press and hold the weight button - g.92. SECU will then appear on
the screen - g.93 and will disappear after a few seconds. The control panel is now locked.
To unlock the control panel, press and hold the weight button again. SECU will be displayed on
the screen and will disappear after a few seconds. The control panel is now unlocked.
PLEASE NOTE! When the control panel locking is activated, the button is still accessible
but the control panel remains locked. To access the other keys, unlock the control panel.
GENERAL REMARKS
PLEASE NOTE! If no action is carried out for 30 seconds the oven automatically goes into
standby mode.
EN
ZH
KO
ID
MS
TH
VI
14
TROUBLESHOOTING GUIDE
ERROR CODE CAUSES SOLUTIONS
ERR1 Faulty temperature probe
Consult an After-Sales
Service Centre.
ERR2 Electrical problem
Consult an After-Sales
Service Centre.
ERR3, ERR4
Temperature regulation
problem
Consult an After-Sales
Service Centre.
CLEANING AND CARE
Do not allow grease to build up on the appliance.
Before any maintenance, cleaning or storage unplug the appliance and allow it to cool down -
g.94-95. Do not use any harsh cleaning products (especially oven cleaning products and
metal or abrasive scouring pads) - g.96-97. To clean the outside of the appliance simply wipe
over with a sponge - g.98.
Clean the door, non-stick or lacquered surfaces and the glass components
with a damp sponge dipped in a gentle soap solution - g.99.
Do not use cleaning products intended for metal (for stainless steel, copper,
etc.).
Your oven has non-stick walls which can easily be cleaned with soapy water.
All accessories can be cleaned with soapy water.
15
WHAT NOT TO DO
NOTES
______________________________________________________________________________
______________________________________________________________________________
______________________________________________________________________________
______________________________________________________________________________
______________________________________________________________________________
______________________________________________________________________________
______________________________________________________________________________
______________________________________________________________________________
______________________________________________________________________________
______________________________________________________________________________
______________________________________________________________________________
______________________________________________________________________________
______________________________________________________________________________
EN
ZH
KO
ID
MS
TH
VI
16
A 內璧燈
B 易潔內壁
C 熱風對流風扇
D 發熱線
E 雙重玻璃門
F 控制面板
F1 左旋轉按鈕
F2 手動模式選擇
F3 烹調溫度選擇
F4 烹調時間選擇
F5 保溫
F6 延遲開始
F7 LCD顯示屏
F7a 烹調模式
F7b 保溫
F7c 延遲開始
F7d 溫度
F7e 時間顯示
F7f 溫度裝置
F7g 重量
F8 烹調開始
F9 烹調過程中停止/更改(停止)
F10 動菜單選擇
F11 食物重量/兒童安全選擇
F12 右旋轉按鈕
G 旋轉燒烤組件(1.網架,2.燒烤叉,2.旋轉
燒烤支架,1.旋轉竿,1.焗盤)
H 易潔
I 兩面用網架
J 碎屑盤
首次使用之前
拆封
1 2 3 4
將包裝盒翻轉 打開包裝盒 - g.1, 取出配 - g.2 以及為便於拆封,輕輕地翻轉包裝及其內
裝物- g.3拿掉包裝盒並去除塑膠保護封套- g.4
安裝
6
用濕布擦洗設備的內部和外部,並擦乾- g.5在溫熱的肥皂水中清洗所有的配件。仔細沖洗
並擦乾 - g.6 將碎屑盤放到底部發熱線的下面 - g.7
說明
17
首次使用之前
拆封
2
3
4
將包裝盒翻轉 打開包裝盒 - g.1, 取出配 - g.2 以及為便於拆封,輕輕地翻轉包裝及其內
裝物- g.3拿掉包裝盒並去除塑膠保護封套- g.4
安裝
6
用濕布擦洗設備的內部和外部,並擦乾- g.5在溫熱的肥皂水中清洗所有的配件。仔細沖洗
並擦乾 - g.6 將碎屑盤放到底部發熱線的下面 - g.7
碎屑盤
11
將碎屑盤滑入爐並放到底部發熱線的下面 g.7設備運行期間,將碎屑盤放置於其應屬位
- g.8使用期間或剛剛使用完時請勿觸碰碎屑盤讓其冷卻片刻 - g.9 每次使用之後,
請將碎屑盤清空 - g.10-11
網架位置
7
5
3
1
8
6
4
2
你可利用放置網架的位置來配合不同功能,以達致最佳烹調效果。
爐有4個高度用以放置網架。但是,由於網架是可反轉的,因此可以
有8個不同的位置。
選定放置網架的高度,再將碟子放在網架中央位置。
請勿將容器直接放置在內部發熱線上。
設定時間
13
14
15
16
17
18
接通爐的電源後 - g.12, 顯示器會動顯示時間為“00:00”,而小時的顯示會閃動 - g.13。
旋轉按鈕調校小時 - g.14 按“時鐘”按鈕使之生效 - g.15 然後,分鐘的顯示會自動閃動 -
g.16
旋轉按鈕調校分鐘- g.17再次按“時鐘”按鈕使之生效 - g.18
如需更改時間,長按“時鐘”按鈕數秒。
注意請勿混淆時鐘按鈕 和延遲開始按鈕
EN
ZH
KO
ID
MS
TH
VI
18
首次空載使用
首次使用之前,為清除可能存在的制造時遺下的殘留物,必須讓您的爐空載運轉
20
分鐘。
19
20
21
22
23
接通爐電源並調校時間。
按“模式”按鈕- g.19 旋轉按鈕選擇“熱風對流”烹調模式 - g.20 “熱風對流”的標誌
必須出現在LCD顯示屏上 - g.21 再次按“模式”按鈕使之生效效- g.22
23
24
240°C
25
26
27
28
29
20 min
30
31
32
溫度的顯示閃爍 - g.23選擇溫度旋轉按鈕選擇
240°C
- g.24按“溫度”按鈕使之生效
- g.25 小時的顯示閃動 - g.26. 設定小時為
0
按“時鐘”按鈕使之生效 - g.27 分鐘的顯示閃
- g.28. 設定分鐘旋轉按鈕選擇
20
分鐘 - g.29。 再次按“時鐘”按鈕使之生效 - g.30 -
g.31
一下以停止烹調 - g.32
OK
20 min
35
首次使用時,蒸汽可能會從爐中溢出 - g.33 這種現象是正常的,並會在使用過程中逐漸
消失。
20
分鐘之後,爐會發出聲響,並自動停止 - g.34 讓設備冷卻- g.35
19
動模式
使用預設選單
36
37
38
36
接通爐電源並調校時間。按“選單”按鈕 - g.36 選單和烹飪時間的顯示會閃動 - g.37。以
旋轉按鈕選擇選單 - g.38 再次按“選單”按鈕使之生效- g.39
40
41
42 43
重量的顯示會閃動- g.40 以右旋轉按鈕選擇重量(請參考預設選單模式列表)- g.41 以及
按“重量”按鈕使之生效 - g.42烹飪時間會根據生效的重量自動顯示。
關於延遲開始或保溫模式設定,請參考相應的章節。
一下開始烹調 - g.43
烹調列表只供參考。可根據個人口味,使用手動模式繼續烹調。
烹調結束時,爐會發出聲響,並自動停止- g.44-45-46
EN
ZH
KO
ID
MS
TH
VI
  • Page 1 1
  • Page 2 2
  • Page 3 3
  • Page 4 4
  • Page 5 5
  • Page 6 6
  • Page 7 7
  • Page 8 8
  • Page 9 9
  • Page 10 10
  • Page 11 11
  • Page 12 12
  • Page 13 13
  • Page 14 14
  • Page 15 15
  • Page 16 16
  • Page 17 17
  • Page 18 18
  • Page 19 19
  • Page 20 20
  • Page 21 21
  • Page 22 22
  • Page 23 23
  • Page 24 24
  • Page 25 25
  • Page 26 26
  • Page 27 27
  • Page 28 28
  • Page 29 29
  • Page 30 30
  • Page 31 31
  • Page 32 32
  • Page 33 33
  • Page 34 34
  • Page 35 35
  • Page 36 36
  • Page 37 37
  • Page 38 38
  • Page 39 39
  • Page 40 40
  • Page 41 41
  • Page 42 42
  • Page 43 43
  • Page 44 44
  • Page 45 45
  • Page 46 46
  • Page 47 47
  • Page 48 48
  • Page 49 49
  • Page 50 50
  • Page 51 51
  • Page 52 52
  • Page 53 53
  • Page 54 54
  • Page 55 55
  • Page 56 56
  • Page 57 57
  • Page 58 58
  • Page 59 59
  • Page 60 60
  • Page 61 61
  • Page 62 62
  • Page 63 63
  • Page 64 64
  • Page 65 65
  • Page 66 66
  • Page 67 67
  • Page 68 68
  • Page 69 69
  • Page 70 70
  • Page 71 71
  • Page 72 72
  • Page 73 73
  • Page 74 74
  • Page 75 75
  • Page 76 76
  • Page 77 77
  • Page 78 78
  • Page 79 79
  • Page 80 80
  • Page 81 81
  • Page 82 82
  • Page 83 83
  • Page 84 84
  • Page 85 85
  • Page 86 86

Tefal OF677E70 ユーザーマニュアル

タイプ
ユーザーマニュアル