
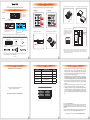
產品示意圖與配件表
v1.3 (Dec. 2017)
SAS 12G
Power 1
Power 2
前視圖
背視圖
SATA 15Pin 電源輸入埠
硬碟讀寫燈
SAS 連接埠
FAN
Power 1
Power 2
SAS 6G
硬碟托盤手把
硬碟卡榫按鍵
風扇
風扇連接埠
SATA 15Pin 電源輸入埠
風扇連接埠
風扇 SAS 連接埠
iT4300-U6iT4300-U5/S3
(iT4300-S3 不支援 SAS 硬碟)
打開包裝外盒後,包裝內容應包含下列組件 :
請先確認相關配件與產品本身是否有受損或是缺少配件,若有任何疑問,請與您的經銷商或業務人員聯絡。
iT4300 系列主體 x1
Mini SAS 內接 6G TO 4 Port SATA 連接線
(for iT4300-S3) x1
Mini SAS 6G 內對內連接線
(for iT4300-U5) x1
Mini SAS 12G 內對內連接線
(for iT4300-U6) x1
產品配件表
快速安裝導引 x1 螺絲及鑰匙 x4
內部設定,請勿使用
硬體安裝硬體安裝
請參照下列步驟,完成iT4300系列的硬體安裝 :
Unlock
Lock
1. 解開硬碟托盤鎖。 2. 按下硬碟卡榫按鍵。
3. 抽出硬碟托盤組。
4. 將 2.5 吋硬碟安裝在硬碟托盤上。
8. 硬體安裝完成。一旦開啟電腦,您的作業系統會自動辨識所裝置好的硬碟。如果
您的硬碟是必須被格式化的,請依照電腦的作業系統進行硬碟格式化步驟。當完
成硬碟格式化後,硬碟便可以進行資料讀寫。
7. 將主體安裝於電腦
機殼上的CD-ROM
位置,請使用配件
零件包的螺絲固
定,並連接產品所
附的連接線。
iT4300
iT4300
Mini SAS
內接 6G TO
4 Port SATA
連接線
SAS
連接線
SATA
連接埠
SAS卡
請確實將電源線
插進正確的位置
注意事項:
5. 鎖上附件包內的螺絲。 6. 將硬碟托盤安裝回 iT4300 系列產品。
燈號說明(iT4300-U5 / S3)
使用SATA硬碟時 (iT4300-U5/S3)
使用SAS硬碟時 (iT4300-U5)
註:依據使用的SAS擴充卡會有不同的燈號狀態。
燈號說明(iT4300-U6)
產品使用注意事項
感謝您使用 銳銨科技股份有限公司 的產品。
本手冊裡的資訊在出版前雖然已經被詳細確認,但實際產品規格將已出貨時為準;
任何的產品規格或相關資訊更新,請您直接上 www.RAIDON.com.tw 網站查詢,
或直接與您的業務聯絡窗口聯繫,本公司將不另行通知。
如果您對 銳銨科技 的產品有任何疑問,或是想獲得最新產品訊息、使用手冊或韌
體,請您聯絡[email protected],我們將儘速回覆您。
本說明相關產品內容歸 銳銨科技股份有限公司 版權所有
若想得到較佳的使用效能與選購硬碟的便利性,建議使用規格及廠牌相同的 2.5 吋硬碟。
請確保使用的硬碟是不含壞軌的,以避免當其中一顆硬碟發生故障時,可能導致系統當機
或所有資料遺失。
iT4300 系列允許裝載使用 SAS 或 SATA 硬碟下,還是建議您先確認您所使用的 mini-SAS
擴充卡是否有向下兼容 SATA 硬碟;另外,其系統處理效能表現將依 mini-SAS 或 SATA
硬碟而異。
當您需要關閉或移除 iT4300 系列時,務必透過您所操作的作業系統中執行硬碟安全移除
後,方可進行電源關閉的動作。
當系統運作時,請勿任意移除任何一顆硬碟,以免導致資料遺失。
強烈建議除了使用 iT4300 系列的資料儲存功能外,請針對重要資料備份到另一個儲存裝
置上或遠端備份,雙重備份您重要的資料。若您儲存在 iT4300 系列的資料損毀或遺失,
RADION 將不負任何的責任。
1.
2.
3.
4.
5.
6.
狀態 硬碟燈號 蜂鳴器
硬碟閒置 藍燈 / 紫燈 恆亮
( 註 )
─ ─
資料存取 紫燈閃爍 ─ ─
無硬碟 ─ ─ ─ ─
風扇故障 ─ ─ 鳴叫
溫度過高 ( ≧ 55° C) ─ ─ 鳴叫
狀態 硬碟燈號 蜂鳴器
硬碟閒置 藍燈恆亮 ─ ─
資料存取 綠燈閃爍 ─ ─
無硬碟 ─ ─ ─ ─
風扇故障 ─ ─ 鳴叫
溫度過高 ( ≧ 55° C) ─ ─ 鳴叫
狀態 硬碟燈號 蜂鳴器
硬碟閒置 藍燈恆亮 ─ ─
資料存取 藍燈閃爍 ─ ─
硬碟移除
紫燈恆亮 鳴叫
風扇故障 藍燈恆亮 鳴叫
溫度過高 ( ≧ 55° C) 藍燈恆亮 鳴叫
注意:硬碟位置 0 一定要安裝硬碟。
硬碟位置 0
硬碟位置 1
硬碟位置 2
硬碟位置 3
注意事項

Product Diagrams and Contents of Product Package
Front View
Rear View
15-pin Power Connector
HDD Access Indicator
SAS Connector
FAN
Power 1
Power 2
SAS 6G
HDD Tray Handle
HDD Tray Key Lock
And Tray Open Button
Cooling Fan
3-pin Fan
Connector
15-pin Power Connector
3-pin Fan Connector
Cooling Fan SAS Connector
iT4300-U6iT4300-U5/S3
(iT4300-S3 dosen´t support SAS hard drives)
After you open the outer package, make sure that the following items are contained in the package:
Please make sure that you do not have any damaged or in short parts. For any question, please
contact to local distributor or retailer for further assistance.
Mini SAS Internal 6G TO 4 Port SATA Cable
(for iT4300-S3) x1
Mini SAS 6G Internal Cable
(for iT4300-U5) x1
Mini SAS 12G Internal Cable
(for iT4300-U6) x1
Contents of Product Package
iT4300 Series Device x1
Quick Installation Guide x1 Screws and key x4
Manufacturer settings
iT4300 Series Quick Installation Guide
硬體安裝Hardware Installation
Please follow the instructions below to complete the iT4300 series installation.
Unlock
Lock
1. 解開硬碟托盤鎖。 2. 按下硬碟卡榫按鍵。
1. Unlock the hard drive tray lock.
2. Press down the button for hard drive clamp.
7. Install device into one of the
CD-ROM bays with screws from
the accessory kit. Then properly
connect SATA/SAS cable and
DC cable from your system to
the device.
5. Secure screws from the screw kit in 4 positions. 6. Refit the hard drive tray into the iT4300 series.
Please make sure
your power cable
is well connected.
Warning:
iT4300
iT4300
Mini SAS
Internal 6G
TO 4 Port
SATA Cable
SAS
Cable
SATA
Port
SAS Card
Power
Supply
Motherboard
8. Power on your system after hardware installation is completed, and your operating system
will automatically detect the hard drives from booting. Then follow the steps from your
operating system to partition and format the drives when necessary, device will be ready to
use once the format is completed.
Precautions Before Application
The product allows the user to simultaneously utilize two hard drives manufactured
by different companies. However, if the user expects better efficiency, we strongly
recommend the users to use hard drives manufactured by the same manufacturer.
Please ensure that the hard drives are free of bad tracks before using, otherwise, it
may cause system crash in turn resulting in data loss.
Although iT4300 Series allows you to install either SAS or SATA drives, it is recommended to
check the whether mini-SAS host adapter you´re using is downward compatible with SATA
drives. Also note that the throughput performance may vary if SAS and SATA drive are installed.
Whenever turning off or unplugging the iT4300 Series from your computer system
becomes necessary, always remember to safely remove it from your operating
system first.
When the iT4300 Series is connected to the computer system, it´s prohibited to
remove, insert or swap the harddrive while data transfer is being performed.
It is highly recommended for users to back up important data contained within the
drives of the iT4300 Series on a regular basis or whenever the user feels necessary
to a remote or a separate storage device. RAIDON will not be responsible for any
lost of data caused during the use of the iT4300 Series or the recovery of the data
lost.
1.
2.
3.
4.
5.
6.
Thank you for choosing this RAIDON product.
The information provided in this manual was checked before publication, but the actual product specifica-
tions may have changed before shipping; Latest product specifications and updates can be found at
www.RAIDON.com.tw or through your sales representative. No separate notifications will be provided by
our company.
If you have any questions about RAIDON products or would like to receive the latest product information,
instruction manuals, or firmware, please contact [email protected] for assistance.
All product-related content in this manual are copyrighted by RAIDON TECHNOLOGY, INC.
LED Instruction(iT4300-U5 / S3) LED Instruction(iT4300-U6)
When Using SATA Hard Drives (iT4300-U5/U6/S3)
When Using SAS Hard Drives (iT4300-U5/U6)
Note: While using a different SAS Interface Adapter, the LED
Indication might be with a different light set.
Status HDD Status Light Buzzer
HDD idle Blue light always on ─ ─
Data access Blue light flashing ─ ─
HDD removed Purple light always on Yes
Fan failure Blue light always on Yes
Overheat
( ≧ 505°C) Blue light always on Yes
Precautions
NOTE: A hard disk must be installed at HDD location 0.
Hard Disk
Location 0
Hard Disk
Location 1
Hard Disk
Location 2
Hard Disk
Location 3
SAS 12G
Power 1
Power 2
v1.3 (Dec. 2017)
-
 1
1
-
 2
2


