
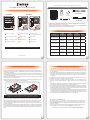
前視圖 背視圖
ST4-U5+ ST4-U6
打開包裝外盒後,包裝內容應包含下列組件 :
產品示意圖與配件表
產品使用注意事項
ST4 SAS
系列
硬碟讀取燈A
硬碟抽取盒把手B
硬碟抽取盒鑰匙孔C
電源指示燈D
系統指示燈E
Mini-SAS 連接埠F
防竊鎖孔G
風扇H
風扇轉速切換按鈕(預設為高轉速)I
靜音開關
J
電源開關
電源插座
ST4 SAS 系列可以同時安裝不同型號以及容量的四顆硬碟,如果 4 顆硬碟沒有全部安裝也可
以使用,之後再隨個人需求增加硬碟的數量。
在 ST4 SAS 系列允許裝載使用 SAS 或 SATA 硬碟下,還是建議您先確認您所使用的
Mini-SAS 擴充卡是否有向下兼容 SATA 硬碟; 另外,其系統處理效能表現將依 Mini-SAS 或
SATA 硬碟而異。
在安裝新硬碟到 ST4 SAS 系列之前,請先確認硬碟是沒有壞軌而且是沒有故障的,以避免資
料受損。
當您需要關閉或移除 ST4 SAS 系列時,務必透過您所操作的作業系統中執行硬碟安全移除
後,方可進行電源關閉的動作。
當系統運作時,請勿任意移除任何顆硬碟,以免導致資料遺失。
如你希望將 ST4 系列搭配軟體或硬體 RAID 功能使用時,請先瞭解並注意你所要使用 RAID
層次及配件的特性與限制。
強烈建議除了使用 ST4 SAS 系列的資料儲存功能外,請針對重要資料備份到另個儲存裝
置上或遠端備份,雙重備份您重要的資料。若您儲存在 ST4 SAS 系列的資料損毀或遺失,
STARDOM 將不負任何的責任。
1.
2.
3.
4.
5.
6.
7.
注意:不建議使用不同廠牌,或是同廠牌不同型號的硬碟,避免影響效能。
請參照以下步驟完成硬體安裝:
硬體安裝
1. 當你打開包裝後,首先請先檢查產品主體以及附件是不是有毀損或是短缺情形,如果發生產品主體
及附件短缺,請立刻與您的供應商聯絡。
2. 將主機置放於平穩空間上,並確認散熱風扇沒有被擋住,且四周有適當的散熱空間。 (請避免接近
水源或是其他容易造成產品損傷的環境)
3. 請使用零件包中所附的頂針插入鑰匙孔,開啟硬碟抽取盒把手便將抽取盒取出。
4. 將硬碟安裝到抽取盒上,並以零件包內附的螺絲加以固定,以避免不必要的移動對硬碟造成傷害。
5. 硬碟安裝完成後,請將抽取盒平移放入主機內,並關上把手。
6. 請依據您欲使用的介面,從附件包中選擇相對應的連接線,將
ST4 SAS 系列
背面連接埠與電腦主
機相對應介面埠連接。
7. AC Power 電源線與
ST4 SAS 系列
主機連接好,並將接頭接上電源插座後開機。
8. 開機後,您的作業系統將會自動辨識到儲存容量;待辨識成功後,請依據您所需的儲存格式,將系
統依照作業系統的指示完成格式化。待硬盤格式化完成後,便可直接使用
ST4 SAS 系統
。
ST4 SAS 系列
主體 x1
產品配件表
Mini-SAS 連接線(6G) x1
for ST4-U5+
for ST4-U6
電源線 x1
快速安裝
導引 x1
螺絲及鑰匙
Mini-SAS 連接線(12G) x1
燈號說明
感謝您使用 銳銨科技股份有限公司 的產品。
本手冊裡的資訊在出版前雖然已經被詳細確認,但實際產品規格將已出貨時為準;任何的產品規格或
相關資訊更新,請您直接上 www.STARDOM.com.tw 網站查詢,或直接與您的業務聯絡窗口聯繫,
本公司將不另行通知。
如果您對 銳銨科技 的產品有任何疑問,或是想獲得最新產品訊息、使用手冊或韌體,請您聯絡
[email protected],我們將儘速回覆您。
本說明相關產品內容歸 銳銨科技股份有限公司 版權所有
V1.2 (Jan. 2018)
狀態 電源指示燈 系統指示燈 硬碟狀態燈 蜂鳴器
無硬碟 藍燈恆亮
— —
紫燈恆亮
— —
硬碟故障 藍燈恆亮 紅燈閃爍 紫燈恆亮 YES
資料存取 藍燈恆亮
— —
藍燈閃爍
— —
硬碟閒置 藍燈恆亮
— —
藍燈恆亮
— —
風扇故障
藍燈恆亮 紅燈閃爍 藍燈恆亮 YES
過熱
藍燈恆亮 紅燈閃爍 藍燈恆亮 YES
本產品是採用低噪音的電源供應器,當通電時的
負載未達50%,電源供應器的風扇會暫停轉動。
請先確認相關配件與產品本身是否有受損或是缺少配件,若有任何疑問,請與您的經銷
商或業務人員聯絡。
請前往官網-產品資料下載頁面 (http://www.stardom.com.tw/STARDOM2016/
download.php) 下載驅動程式以及其餘相關資源。
˙
˙

ST4 SAS Series Quick Setup Guide
The following items should be inside the package upon opening:
Product Illustration and Parts List
HDD access lightA
HDD enclosure handleB
HDD enclosure keyholeC
Power status lightD
System status lightE
Mini-SAS portF
Anti-theft lockG
FanH
Fan speed switch
(set to "High" by default)
I
Mute switch
J
Power switch
K
Power socket
L
Important Notice
The ST4 SAS Series allows you to install up to 4 hard drives of different models and
capacities. They are not required to simultaneously have all 4 hard drives installed in order
for the system unit to operate. You may use one first and add more drives later accordingly
to your preference.
Although ST4 SAS Series allows you to install either SAS or SATA drives, it is recommend-
ed to check whether the mini-SAS host adapter you’re using is downward compatible with
SATA drives. Also note that the throughput performance may vary if SAS and SATA drive
are installed.
Please make sure that the hard drives are free from bad blocks or defects prior to
installation in order to avoid system crashes or data loss.
Whenever turning off or unplugging the ST4 SAS Series from your computer system
becomes necessary, always remember to safely remove it from your operating system
first.
When the ST4 SAS Series is connected to the computer system, it’s prohibited to remove,
insert or swap the hard drive while data transfer is being performed.
If you will be incorporating either software or hardware RAID functionality to operate with
the ST4 SAS Series, it is important to understand the RAID level and its component that
will be incorporated and the precautions to take as each RAID level and component may
function differently and contains various limitations.
It is highly recommended for users to back up important data contained within the drives of
the ST4 SAS Series on a regular basis or whenever the user feels necessary to a remote
or a separate storage device. STARDOM will not be responsible for any lost of data caused
during the use of the ST4 SAS Series or the recovery of the data lost.
1.
2.
3.
4.
5.
6.
7.
ST4 SAS Series
body x1
Product Parts List
Mini-SAS cable (6G) x1
for ST4-U5+
for ST4-U6
Power Cord x1
Quick Setup
Guide x1
Screws
and keys
Mini-SAS cable (12G) x1
The Indication of HDD Status
Hardware Installation
Thank you for choosing this RAIDON product.
The information provided in this manual was checked before publication, but the actual product
specifications may have changed before shipping; Latest product specifications and updates can be
found at www.STARDOM.com.tw or through your sales representative. No separate notifications will be
provided by our company.
If you have any questions about RAIDON products or would like to receive the latest product information,
instruction manuals, or firmware, please contact [email protected] for assistance.
All product-related content in this manual are copyrighted by RAIDON TECHNOLOGY, INC.
Please follow the steps below to complete the ST4 SAS Series hardware setup process:
5. Once the hard disk is installed, slide the enclosure into the system and close the handle.
6. Select the appropriate cable from the accessories pack depending on the interface. Connect
the ST4 SAS Series backplate connection port to the corresponding port on the computer.
7. Connect the AC Power cable to the ST4 SAS Series. Plug the connector into the power socket
then start the system.
8. Your operating system will automatically detect available capacity once the device finishes booting.
Once the device has been detected, please follow instructions given by the operating system and
format the system. Once the hard disk has been formatted, the ST4 SAS Series system can be
used.
Note: Please avoid using hard disk drives from different manufacturers or different
models from the same manufacturer as this may impact system performance.
1. When you open the package, please immediately check the product and included parts for any
damage or missing parts. If there is a problem with the product or included parts please contact
your supplier immediately.
2. Place the device on a flat, even surface. Make sure that the cooling fan is not blocked and there
is sufficient surrounding space for cooling. (Keep away from water or other environments that
may cause product damage).
3. Please insert the pin included with the parts pack into the keyhole to release the HDD enclosure
handle and remove the HDD enclosure.
4. Place the hard disk in the HDD enclosure and secure it in place with the included screws; this
will prevent damage to the hard disk from external vibration.
Status
Power
Status Light
System
Status light
HDD
Status Light
Buzzer
No HDD detected
Blue light
Always on
— —
Purple light
Always on
— —
HDD failure
Blue light
Always on
Red light
Flashing
Purple light
Always on
YES
Data access
Blue light
Always on
— —
Blue light
Flashing
— —
HDD idle
Blue light
Always on
— —
Blue light
Always on
— —
Fan failure
Blue light
Always on
Red light
Flashing
Blue light
Always on
YES
Overheat
Blue light
Always on
Red light
Flashing
Blue light
Always on
YES
Front View Rear View
ST4-U5+ ST4-U6
This products uses a low-noise Switching Power Supply. Its built-in fan will
temporary stop while the total power consumption is below 50% of the full load.
Please check the product and accessories for any defect or missing parts. If you have any
questions, please contact your product supplier.
Please visit the official website - Download page (https://www.stardom.com.tw/STARDOM2016/
download.php) to download drivers and other related resources.
˙
˙
V1.2 (Jan. 2018)
-
 1
1
-
 2
2

