
VP-D381(
i
)
VP-D382(
i
)
VP-D382H
VP-D384
VP-D385(
i
)
數位視訊攝
錄放影機
使用者手冊
想像可能
感謝您購買Samsung 產品
。
要獲得更為全面的服務、
請透過以下網站註冊產品
www.samsung.com/global/register
Digital Video
Camcorder
user manual
imagine the possibilities
Thank you for purchasing this Samsung product.
To receive more complete service, please register
your product at
www.samsung.com/global/register

ii_ English
臺灣 _ii
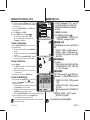
miniDV
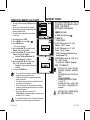
攝錄放影機的主要功能
使用IEEE1394數位資料傳輸功能
透過結合 IEEE 1394(i.LINK
™
:i.LINK
是一系列資料傳輸通訊協定和內部連
接系統、通常用於傳遞 DV 資料)高速
資料傳輸連接埠、可以將動態和相片
影像傳輸到電腦、以便製作或編輯各
種影像。
用於傳輸數位影像資料的USB介面
(
僅適用於
VP-D385( i ))
您可以使用 USB 介面將影像傳輸到電
腦、而不需要附加介面卡。
錄影帶上的錄影帶相片錄製
錄影帶相片錄製使得在錄影帶上錄製相
片影像成為可能。
680K像素CCD
(
僅適用於
VP-D385( i ))
您的攝錄放影機配備一台 680K 像素
CCD。可將相片影像錄製到記憶卡上。
1200
倍數位縮放
可以讓您將影像放大至其原始大小的
1200 倍
聲訊增強
透過逼真立體聲和聲訊效果功能提供
更強大的音效。
彩色
TFT LCD
高解析度彩色
TFT LCD
可為您提供明
亮、清晰影像、同時具有立即檢視錄
影畫面的功能。
數位影像防手震功能
(DIS)
DIS
可補償因手持拍攝時手抖而引起
的影像晃動、尤其是在較高的放大倍
數下。
各種視訊效果
視訊效果可添加各種特殊效果、讓所
拍攝的影像別具一格。
背光補償
(BLC)
BLC
功能可以補償您所錄製的主體背
後的明亮背景。
Program AE
程式自動曝光可以讓您改變快門速度
和光圈、以適合所拍攝的場景 / 動作
類型。
高功能縮放鏡頭
高功能縮放鏡頭可以讓使用者清楚地
將主體放大至 34 倍。
數位靜態相機功能
(
僅適用於
VP-D385( i ))
您可以使用記憶卡輕鬆地錄製和
播放標準相片影像。
您可以使用
USB
介面將標準相片
影像從記憶卡傳輸到電腦。
將影像錄製移至記憶卡
(
僅適用於
VP-D385( i ))
動態影像錄製可將視訊錄製到記憶卡。
MMC/SD
卡插槽
(
僅適用於
VP-D385( i ))
MMC/SD
卡插槽能夠使用
MMC
(多媒體卡)和
SD
卡。
•
•
新MINIDV攝錄放影機的功能
key features of your
miniDV camcorder
Digital Data Transfer Function with
IEEE1394
By incorporating the IEEE 1394
(i.LINK™: i.LINK is a serial data
transfer protocol and interconnectivity
system, used to transmit DV data)
high speed data transport port, both
moving and photo images can be
transferred to a PC, making it possible
to produce or edit various images.
USB Interface for Digital Image
Data Transfer (VP-D385( i ) only)
You can transfer images to a PC
using the USB interface without an
add-on card.
Tape Photo Recording on a Tape
Tape photo
recording makes it
possible to record a photo image
on a tape.
800K pixel CCD (VP-D385( i ) only)
Your camcorder incorporates a 800K
pixel CCD. Photo images can be
recorded to a memory card.
1200x Digital Zoom
Allows you to magnify an image up to
1200 times its original size.
Audio Enhancement
Provides more powerful sound with the
Real Stereo and Audio Effect features.
Colour TFT LCD
A high-resolution colour TFT LCD
gives you clean, sharp images as
well as the ability to review your
recordings immediately.
Digital Image Stabilizer (DIS)
The DIS compensates for any hand
shaking, reducing unstable images
particularly at high magnication.
Various Visual Effects
The Visual Effects allow you to give
your lms a special look by adding
various special effects.
Back Light Compensation (BLC)
The BLC function compensates for a
bright background behind a subject
you're recording.
Program AE
The Program AE enables you to alter
the shutter speed and aperture to suit
the type of scene/action to be lmed.
High Power Zoom Lens
Power Zoom lens allows users to
magnify the subject clearly up to 34x.
Digital Still Camera Function
(VP-D385( i ) only)
Using memory card, you can
easily record and playback
standard photo images.
You can transfer standard photo
images on the memory card to
your PC using the USB interface.
Moving Image Recording on a
Memory Card (VP-D385( i ) only)
Moving image recording makes
it possible to record video onto a
memory card.
MMC/SD card slot (VP-D385( i ) only)
MMC/SD card slot can use MMC
(Multi Media Cards) and SD cards.
•
•
FEATURES OF YOUR NEW MINIDV CAMCORDER

臺灣 _iii
iii_ English
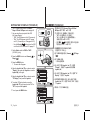
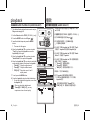
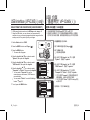
安全警告
本使用者手冊中圖示和標誌的含義:
警告
表示有造成死亡或嚴重傷害的危險。
注意
表示有潛在的人員傷害或材料損毀之危險。
注意
在使用攝錄放影機時、要降低火災、爆炸、觸電或
人身傷害的危險、請遵循下面這些基本安全注意事
項:
表示可能有助於操作攝錄放影機的提示或參考頁。
在此提供這些警告圖示可避免對您及他人造成傷害。
請嚴格遵循。在閱讀本部分之後、請將其妥善保管以供日後參考。
注意事項
警告!
此攝錄放影機應總是與帶有保護接地連接的交流電源插座連接。
不應將電池放在太陽底下或火爐旁邊等高熱地方。
•
•
注意
若沒有正確更換電池、將會有爆炸的危險。
請使用相同類型的電池來更換
要從本機主電源斷開本裝置、必須從主電源插座上拔下插頭、因此
主電源插頭應該易於操作。
safety warnings
What the icons and signs in this user manual mean :
WARNING
Means that death or serious personal injury is a risk.
CAUTION
Means that there is a potential risk for personal
injury or material damage.
CAUTION
To reduce the risk of re, explosion, electric shock,
or personal injury when using your camcorder,
follow these basic safety precautions:
Means hints or referential pages that may be helpful
when operating the camcorder.
These warning signs are here to prevent injury to you and others.
Please follow them explicitly. After reading this section, keep it in a
safe place for future reference.
precautions
Warning!
This camcorder should always be connected to an AC outlet
with a protective grounding connection.
Batteries shall not be exposed to excessive heat such as
sunshine, re or the like.
•
•
Caution
Danger of explosion if battery is incorrectly replaced.
Replace only with the same or equivalent type.
To disconnect the apparatus from the mains, the plug must be
pulled out from the mains socket, therefore the mains plug shall
be readily operable.

iv_ English
臺灣 _iv
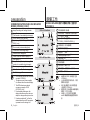
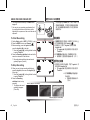
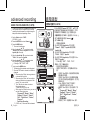
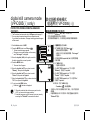
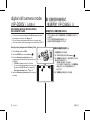
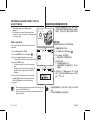
有關清潔磁頭的注意事項
若要確保正常錄製清晰相片、請經常清潔磁頭。
若出現馬賽克失真、或僅顯示藍色螢幕、視訊磁頭可能骯髒。
若發生此情況、請使用乾式清潔磁帶來清潔視訊磁頭。
請勿使用濕式清潔帶。它可能會損壞視訊磁頭。
•
•
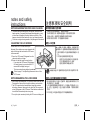
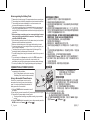
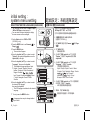
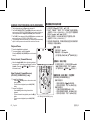
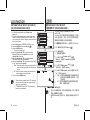
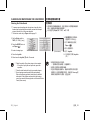
請小心旋轉
LCD
螢幕、如圖所示。過度旋轉可能
導致連接
LCD
螢幕和攝錄放影機的鉸鏈內部損毀。
1.
請用手指開啟
LCD
螢幕與攝錄放影機呈 90 度
角。
2.
將它旋轉至錄製或播放的最佳角度。
-
如果您將
LCD
螢幕旋轉 180 度至面向前、
您可以關閉面朝外的
LCD
螢幕。
-
這樣在播放操作時會比較方便。
如需關於調整
LCD
螢幕的亮度和色彩的資訊、請參閱第 31 頁。
調整
LCD
螢幕
注意事項和安全說明
有關
LCD
螢幕和鏡頭的注意事項
陽光直射會損壞
LCD
螢幕、透鏡內部。請僅在光線微弱的情況下拍
攝太陽的相片、譬如黃昏
LCD
螢幕是採用高精密技術製造的。
LCD
螢幕上可能會出現一些小
點(紅色、藍色或綠色)。這些小點屬於正常現象、不會影嚮錄製的
影像。
切勿以握住
LCD
螢幕或電池組的方式拿起攝錄放影機。
•
•
•
notes and safety
instructions
NOTES REGARDING THE VIDEO HEAD CLEANING
To ensure normal recording and a clear picture, clean the video
heads regularly. If a square block-shape distorts playback, or only
a blue screen is displayed, the video heads may be dirty. If this
happens, clean the video heads with a dry type cleaning cassette.
Do not use a wet-type cleaning cassette. It may damage the video heads.
•
•
NOTES REGARDING THE LCD SCREEN
Direct sunlight can damage the LCD screen, the inside of the the Lens.
Take pictures of the sun only in low light conditions, such as at dusk.
The LCD screen has been manufactured using high precision
technology. However, there may be tiny dots (red, blue or green in
colour) that appear on the LCD screen. These dots are normal and
do not affect the recorded picture in any way.
Do not pick up the camcorder by holding the LCD screen or battery pack.
•
•
•
Please rotate the LCD screen carefully as
illustrated. Over rotation may cause damage to the
inside of the hinge that connects the LCD screen
to the camcorder.
1.
Open the LCD screen 90 degrees from the
camcorder with your nger
.
2. Rotate it to the best angle to record or play.
- If you rotate the LCD screen 180 degrees so
it is facing forward, you can close the LCD
screen with the display facing out.
- This is convenient during playback operations.
Refer to page 31 to adjust brightness and colour of the
LCD screen.
ADJUSTING THE LCD SCREEN
請小心旋轉
導致連接
1.
2.
- This is convenient during playback operations.
AV
DV
B
A
T
T
.
M
E
N
U
W
T
M
O
D
E
PO
W
E
R
C
H
G

臺灣 _v
v_ English
維修和更換零件
切勿嘗試自行維修本攝錄放影機。
打開或移除機蓋可能會讓您暴露在危險電壓或其他危險中。
請讓合格的專業技術人員進行維修。
在需要更換零件時、請確保維修技術人員使用製造商指定的更換零
件、其特性與原始零件相同。
未經授權的更換可能會導致火災、觸電或其他危險。
有關攝錄放影機的注意事項
切勿將攝錄放影機暴露在高溫下(超過
60 °C
或
140 °F
)。
例如、在陽光下停放的車內或陽光直射之下。
切勿讓攝錄放影機受潮。將攝錄放影機遠離雨水、海水、以及任何
其他形態的濕氣。
若攝錄放影機受潮、將會損壞。本機受潮所導致的損壞有時可能無
法修理。
突然升高的氣溫將導致本攝錄放影機內部形成濕氣凝結。
- 當您將攝錄放影機從寒冷的地方帶入溫暖的地方(如、冬天時從
戶外帶入室內)。
- 當您將攝錄放影機從涼爽的地方帶入炎熱的地方(如、夏天時從
室內帶出戶外)。
若啟動
(DEW) 保護功能、請將攝錄放影機放在乾燥溫暖的室內
至少兩個小時、並打開錄影帶座和取出電池組。
要從本機主電源斷開本裝置、必須從主電源插座上拔下插頭、因此
主電源插頭應該易於操作。
•
•
•
•
•
•
•
•
•
•
有關著作權的注意事項
若要確保正常錄製清晰相片、請經常清潔磁頭。若出現馬賽克失真、或
僅顯示藍色螢幕、視訊磁頭可能骯髒。若發生此情況、請使用乾式清潔
磁帶來清潔視訊磁頭。
NOTICES REGARDING COPYRIGHT
To ensure normal recording and a clear picture, clean the video heads
regularly. If a square block-shape distorts playback, or only a blue
screen is displayed, the video heads may be dirty. If this happens,
clean the video heads with a dry type cleaning cassette.
SERVICING & REPLACEMENT PARTS
Do not attempt to service this camcorder yourself.
Opening or removing covers may expose you to dangerous voltage or
other hazards.
Refer all servicing to qualied service personnel.
When replacement parts are required, be sure the service technician has
used replacement parts specied by the manufacturer and having the
same characteristics as the original part.
Unauthorised substitutions may result in re, electric shock or other hazards.
NOTES REGARDING CAMCORDER
Do not leave the camcorder exposed to high temperatures (above 60 °C or
140 °F). For example, in a parked car in the sun or exposed to direct sunlight.
Do not let the camcorder get wet. Keep the camcorder away from rain,
sea water, and any other form of moisture. If the camcorder gets wet, it
may get damaged. Sometimes a malfunction due to exposure to liquids
cannot be repaired.
A sudden rise in atmospheric temperature may cause condensation to
form inside the camcorder.
- When you move the camcorder from a cold location to a warm
location (e.g. from outside to inside during the winter.)
- When you move the camcorder from a cool location to a hot location
(e.g. from inside to outside during the summer.)
If the
(DEW) protection feature is activated, leave the camcorder for
at least two hours in a dry, warm room with the cassette compartment
opened and the battery pack removed.
To disconnect the apparatus from the mains, the plug must be pulled out
from the mains socket, therefore the mains plug shall be readily operable.
•
•
•
•
•
•
•
•
•
•

02_ English
臺灣 _02
目錄
了解您的MINIDV攝
錄放影機
06
準備工作
12
起始設定:系統選
單設定
24
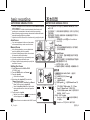
06 您的 miniDV 攝錄放影機的隨附物
件
07 正視圖和左視圖
08 左視圖
09 右視圖和頂視圖
10 後視圖和底視圖
11 使用遙控器(僅適用於
VP-D382
( i )
/D382H/D385
( i )
)
12 使用手提帶和透鏡蓋
13 安裝鈕扣電池
14 使用電池組
17 連接電源
18
miniDV 攝錄放影機的基本操作
19
Camera/Player 模式下的螢幕指示器
20
M.Cam/M.Player 模式下的螢幕指示
器(僅適用於
VP-D385( i )
)
21 使用顯示 ( )按鈕
22 使用
Joystick
22 使用
Joystick 操作快速選單
24 設定時鐘 (Clock set)
25 設定無線遙控器接收 (Remote)
( 僅適用於
VP-D382
( i )
/D382H/
D385
( i )
)
26 設定嗶聲 (Beep Sound)
27 設定快門聲音 (Shutter Sound)
28 選擇
OSD 語言 (Language)
29 檢視示範畫面 (
Demonstration)
contents
GETTING TO KNOW
YOUR MINIDV
CAMCORDER
06
PREPARATION
12
INITIAL SETTING :
SYSTEM MENU
SETTING
24
06 What is included with your miniDV
camcorder
07 Front & left view
08 Left side view
09 Right & top view
10 Rear & bottom view
11 Using the remote control
(VP-D382
( i )
/D382H/D385
( i )
only)
12 Using the hand strap & lens cover
13 Installing the button-type battery
14 Using the battery pack
17 Connecting a power source
18
Basic miniDV camcorder operation
19 Screen indicators in Camera/
Player modes
20
Screen indicators in M.Cam/M.Player
modes (VP-D385( i ) only)
21 Using the display ( ) button
22 Using the joystick
22 Handling quick menus with the
joystick
24 Setting the clock (Clock set)
25 Setting the wireless remote
control acceptance (Remote)
(VP-D382( i )/D382H/D385( i ) only)
26 Setting the beep sound
(Beep Sound)
27 Setting the shutter sound
(Shutter Sound)
28 Selecting the OSD language
(Language)
29 Viewing the demonstration
(Demonstration)

臺灣 _03
03_ English
起始設定:顯示選
單設定
基本錄製
34
進階錄製
44
30 設定導向圖 (Guideline)
31 調整
LCD 螢幕 (LCD Bright/LCD
Colour)
32
顯示日期/時間 (Date/Time)
33 設定電視螢幕顯示 (TV display)
34 插入/彈出錄影帶
34 各種錄製技巧
35 進行您的第一次錄製
36
初學者可輕鬆地進行錄製
(EASY.Q 模式)
37 放大和縮小
38
快速搜尋所需的場景(設定零記憶)
( 僅適用於
VP-D382( i )/
D382H/
D385( i ))
39 使用遙控器自行錄製(設定
Self
Timer)(僅適用於 VP-D382
( i )
/
D382H/
D385( i ))
40 檢視和搜尋錄製
41 使用淡化開啟和關閉功能
42
Auto focus / manual focus
43
設定 shutter speed 和 exposure
44
選擇錄製模式和音訊模式(錄製模
式和音訊模式)
45
消除風聲 (WindCut Plus)
46 選擇逼真立體聲功能 (Real Stereo)
47
設定程序自動曝光 (Program AE)
49 設定白平衡 (White Balance)
51 套用視訊效果 (
Visual Effect)
53 設定 16:9 寬螢幕模式 (
16:9 wide)
54 使用望遠微距 (
Macro)
INITIAL SETTING :
DISPLAY MENU
SETTING
BASIC RECORDING
34
ADVANCED
RECORDING
44
30 Setting the guideline (Guideline)
31 Adjusting the
LCD screen
(LCD Bright/LCD Colour)
32
Displaying the date/time (Date/Time)
33 Setting the tv display (TV display)
34 Inserting / ejecting a cassette
34 Various recording techniques
35 Making your rst recording
36
Recording with ease for beginners
(EASY.Q mode)
37 Zooming in and out
38 Searching quickly for a desired
scene (Setting the zero memory)
(VP-D382( i )/D382H/D385( i ) only)
39 Self record using the remote control
(Setting the Self Timer)
(VP-D382( i )/D382H/D385( i ) only)
40 Reviewing and searching a recording
41 Using the fade on and off
42 Auto focus / manual focus
43
Setting the shutter speed & exposure
44
Selecting the record mode & audio
mode (Rec Mode & Audio Mode)
45
Cutting off wind noise (WindCut Plus)
46 Selecting the real stereo function
(Real Stereo)
47
Setting the program ae (Program AE)
49 Setting the white balance
(White Balance)
51 Applying visual effects
(Visual Effect)
53 Setting the 16:9 wide mode
(16:9 Wide)
54 Using the tele macro (
Macro)

04_ English
臺灣 _04
55 設定數位影像防手震功能 (DIS)
56 使用背光補償模式 (
BLC)
57 使用數位縮放來放大和縮小 (
Digital
Zoom)
58 使用彩色夜景 (
C.Nite)
59 使用燈 (
Light)(僅適用於
VP-D382
( i )
/D382H/D384/D385
( i ))
60 在雙面錄影帶相片錄製上錄製相片影
像
61 在錄影帶上搜尋相片影像
(Photo Search)
62
在 LCD 螢幕上播放錄影帶
63
播放機模式中的各項功能
65 配音( 僅適用於 VP-D382
( i )/D382H/D385( i ))
66
配音後的聲訊播放 (Audio Select)
67 Audio effect
68 設定 AV IN/OUT (AV IN/OUT)
(僅適用於 VP-D381i/D382i/D385i)
69 在電視螢幕上播放的錄影帶
71 將攝錄放影機錄影帶複製到視訊錄影
帶上
72 使用
VOICE+ 功能
73 將電視節目或錄影帶錄製(複製)到
攝錄放影機錄影帶
(僅適用於 VP-D381i/D382i/D385i)
74 使用記憶卡(可用記憶卡)
(未提供)
75 記憶卡中的資料夾與檔案結構
77 設定檔案編號 (
File No.)
78 拍攝記憶卡上的相片影像 (
JPEG)
79 檢視相片影像 (
JPEG)
80
保護以防止意外刪除 (Protect)
81 刪除相片影像和動態影像 (Delete)
播放
62
連接
68
數位靜態相機模式
(僅適用於
VP-D385( i ))
74
目錄
55 Setting the digital image stabilizer
(DIS)
56 Using back light compensation mode
(BLC)
57 Zooming in and out with digital zoom
(Digital Zoom)
58 Using the colour nite (
C.Nite)
59 Using the light (Light)
(VP-D382
( i )
/D382H/D384/D385
( i )
only)
60 Recording a photo image on a tape
-tape photo recording
61 Searching for a photo image on a
tape (Photo Search)
62
Playing back a tape on the LCD screen
63
Various functions while in Player mode
65 Audio dubbing
(VP-D382( i )/D382H/D385( i ) only)
66
Dubbed audio playback (Audio Select)
67 Audio effect
68 Setting the AV in/out (AV In/Out)
(VP-D381i/D382i/D385i only)
69 Tape playing back on a
TV screen
71 Copying a camcorder tape onto a
video tape
72 Using the
VOICE
+
function
73
Recording (copying) a TV programme
or video tape onto a camcorder tape
(VP-D381i/D382i/D385i only)
74 Using a memory card (usable
memory card) (not supplied)
75 Structure of folders and les on the
memory card
77 Setting the le number (File No.)
78 Taking a photo image (
JPEG) on the
memory card
79 Viewing photo images (
JPEG)
80
Protection from accidental erasure
(Protect)
81
Deleting photo images and
moving images (Delete)
PLAYBACK
62
CONNECTION
68
DIGITAL STILL
CAMERA MODE
(VP-D385( i ) ONLY)
74
contents

臺灣 _05
05_ English
83 格式化記憶卡 (Format)
84 錄製記憶卡上的影片影像 (MPEG)
86 播放記憶卡上的動態影像 (
MPEG)
(M.Play 選擇)
87 將錄影帶中的影像錄製成相片影像
88 將錄影帶中的相片影像複製到記憶卡
(Photo Copy)
89 標記要列印的影像 (
Print Mark)
90 列印相片 – 使用 pictbridge
TM
92 傳輸 ieee1394 (I.Link)-DV 標準資料
連接
94 使用 USB 介面
96 選擇
USB 裝置 (USB Connect)
97 安裝軟體(
DV Media Pro 程式)
98 連接至電腦
100 完成錄製後
100 可用錄影帶
101 清潔和維護攝錄放影機
102 在國外使用
miniDV 攝錄放影機
103 故障排除
105 設定選單項目
107
PICTBRIDGE™
(僅適用於
VP-D385( i ))
IEEE1394資料傳輸
USB 介面(僅適用於
VP-D385( i ))
94
維護
100
故障排除
規格
83
Formatting a memory card (Format)
84 Recording moving images (MPEG)
on a memory card
86
Playing the moving images (MPEG)
on a memory card (M.Play select)
87 Recording an image from a tape as a
photo image
88 Copying a photo image from a tape to
a memory card
(Photo Copy)
89
Marking images for printing (Print Mark)
90 Printing your pictures - using the
pictbridge
TM
92 Transferring ieee1394 (I.Link) -
DV standard data connections
94 Using USB Interface
96 Selecting the
USB device
(USB Connect)
97 Installing the software
(DV Media Pro programme)
98 Connecting to a
PC
100 After nishing a recording
100 Usable cassette tapes
101 Cleaning and maintaining the cam
-
corder
102
Using your miniDV camcorder abroad
103 Troubleshooting
105 Setting menu items
107
PICTBRIDGE™
(VP-D385( i ) ONLY)
IEEE 1394 DATA
TRANSFER
USB INTERFACE
(VP-D385( i ) ONLY)
94
MAINTENANCE
100
TROUBLESHOOTING
SPECIFICATIONS

06_ English
臺灣 _06
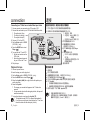
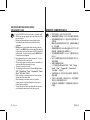
您的
MINIDV
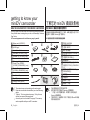
攝錄放影機的隨附物件
您的新數位視訊攝錄放影機隨附了以下配件。如果包裝盒中遺失了任何
這些項目、請聯絡 Samsung 客戶服務中心。
✪
每個項目的實際外形都可能因機型而異。
內地視銷售地區的不同而有所不同。
部件與配件可從您當地的
Samsung
代理商選購。
*(可選):此為可選購的配件。 要購買、請與您就近的
Samsung 經銷商聯絡。
不隨附記憶卡。請參閱第 74 頁以了解記憶卡與
miniDV
攝錄
放影機相容的資訊。
•
•
•
•
了解您的
miniDV
攝錄放影機
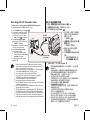
1
電池組 (
IA-BP80W
)
2
交流電源適配器
( 型號 :
AA-E9
)
3
聲訊 / 視訊纜線
4
USB
纜線(僅適用於
VP-D385( i ))
5
軟體
CD
(僅適用於
VP-D385( i ))
6
使用者手冊
7
遙控器的鈕扣電池 ( 型號 :CR2025)
(僅適用於
VP-D382( i )/D382H/D385
( i ))
8
遙控器(僅適用於
VP-D382( i )
/D382H/D385(
i
))
9
鏡頭護蓋
10
透鏡蓋帶子
11
錄影帶 *( 可選 )
12
攜帶套 * ( 可選 )
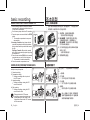
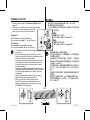
WHAT IS INCLUDED WITH YOUR MINIDV CAMCORDER
Your new Digital Video camcorder comes with the following accessories.
If any of these items is missing from your box, call Samsung’s Customer
Care Centre.
✪
The exact appearance of each item may vary by model.
getting to know your
miniDV camcorder
The contents may vary depending on the sales region.
Parts and accessories are available at your local Samsung
dealer.
*(Option) : This is an optional accessory. To buy this one,
contact your nearest Samsung dealer.
A memory card is not included. See page 74 for memory
cards compatible with your miniDV camcorder.
•
•
•
•
1
Battery pack (IA-BP80W )
2
AC power adapter
(AA-E9 type)
3
Audio/Video Cable
4
USB cable (VP-D385( i ) only)
5
Software CD (VP-D385(
i
) only)
6
User manual
7
Button-type Battery for Remote
Control (Type: CR2025)
(VP-D382( i )/D382H/D385( i ) only)
8
Remote Control
(VP-D382( i )/D382H/D385( i ) only)
9
Lens cover
10
Lens Cover Strap
11
Tape* (Option)
12
Carrying Case* (Option)
1 2 3
4 5 6
7 8 9
10 11 12

臺灣 _07
07_ English
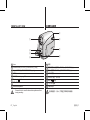
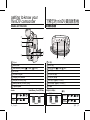
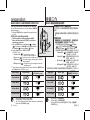
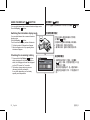
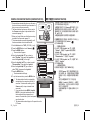
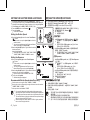
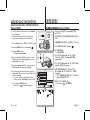
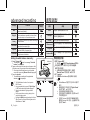
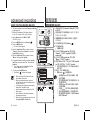
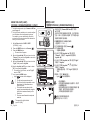
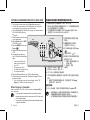
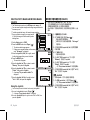
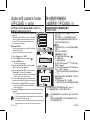
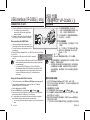
正視圖和左視圖
1
鏡頭
2
遙控感應窗(僅適用於
(VP-D382( i )/D382H/D385( i ))
3
燈(僅適用於
VP-D382
( i )
/D382H/D384/D385
( i ))
4
OPEN
開關
5
EASY Q
按鈕
➥
第 36 頁
6
顯示 ( ) 按鈕
7
TFT LCD
螢幕
8
內置麥克風
在錄製過程中、請小心不要蓋住內部麥克風和鏡頭。
注意
FRONT & LEFT VIEW
1
Lens
2
Remote sensor (VP-D382( i )/D382H/D385( i ) only)
3
Light (VP-D382
( i )
/D382H/D384/D385
( i )
only)
4
OPEN switch
5
EASY Q button
➥
page 36
6
Display ( ) button
7
TFT LCD screen
8
Internal microphone
Be careful not to cover the internal microphone and lens
during recording.
CAUTION
OPEN
5
6
7
8
1
2
3
4

08_ English
臺灣 _08
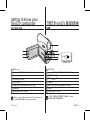
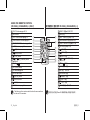
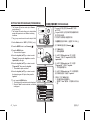
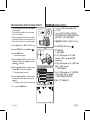
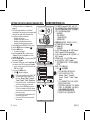
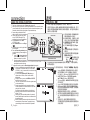
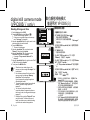
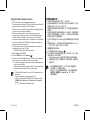
左視圖
了解您的
miniDV
攝錄放影機
使用
LCD
螢幕淡出功能關閉
LCD
面板時、
Joystick
(
/
/
/
) 功能會倒退操作。
1
MENU
按鈕
2
Joystick
(
/
/
/
/ 選擇 ),
(W/T)
➥
第 23 頁
3
錄製開始 / 停止按鈕
4
插孔蓋(
AV/DV
插孔)
5
內置喇叭
6
選擇 (
CARD-TAPE
) 開關(僅適用於
VP-D385(
i
))
7
電池組
8
電池釋放閂 (
BATT.
) 開關
LEFT SIDE VIEW
getting to know your
miniDV camcorder
When you close LCD panel with the LCD screen facing out,
Joystick (
/
/
/
) function works reversely.
1
MENU button
2
Joystick (
/
/
/
/ Select), (W/T) switch
➥
page 23
3
Recording start/stop button
4
Jack cover (AV/DV jack)
5
Built-in speaker
6
Select (CARD-TAPE) switch (VP-D385(
i
) only)
7
Battery pack
8
Battery release (BATT.) switch
A
V
DV
B
A
T
T
.
M
E
N
U
W
T
M
O
D
E
PO
W
ER
C
H
G
5
7
4
1
2
3
8
6
BA
TT
.
C
H
G
MODE
TAPECARD
(VP-D385(
i
) only)

臺灣 _09
09_ English
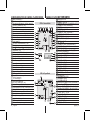
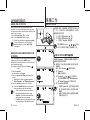
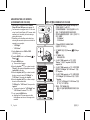
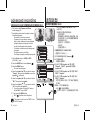
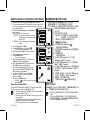
右視圖和頂視圖
1
縮放 (
W/T
) / 音量 (
VOL
) 杆
2
PHOTO
按鈕
➥
第 60、78 頁
3
錄製開始 / 停止按鈕
4
POWER
開關
5
插孔蓋(
DC IN
、
USB
(僅適用於
VP-D385(
i
)
) 插孔)
6
錄影帶座護蓋
7
手提帶
RIGHT & TOP VIEW
1
Zoom(W/T) / Volume (VOL) lever
2
PHOTO button
➥
page 60,78
3
Recording start/stop button
4
POWER switch
5
Jack cover (DC IN, USB (VP-D385(
i
) only) jack)
6
Cassette compartment cover
7
Hand strap
M
O
D
E
AV
D
V
PO
W
ER
C
H
G
VOL
4
5
6
7
1
2
3

10_ English 臺灣 _10
getting to know your
miniDV camcorder
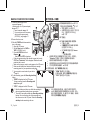
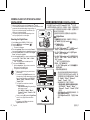
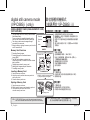
REAR & BOTTOM VIEW
1
AV jack
2
MODE button
3
Mode indicator (Camera ( ) / Player ( ) mode)
4
DC IN Jack
5
DV (IEEE1394) jack
6
Charging (CHG) indicator
7
USB jack (VP-D385(
i
) only)
8
Memory card slot (VP-D385(
i
) only)
9
Tripod receptacle
後視圖和底視圖
1
AV 插孔
2
MODE 按鈕
3
模式指示器(相機 ( ) / 播放機 ( ) 模式 )
4
DC IN 插孔
5
DV (IEEE1394) 插孔
6
充電 (CHG) 指示器
7
USB 插孔(僅適用於 VP-D385( i ))
8
記憶卡插槽(僅適用於
VP-D385(
i
)
)
9
三腳架
了解您的 miniDV 攝錄放影機
98
可用記憶卡(2GB 最大)
僅適用於
VP-D385
(
i
)
MMC/SD
插孔
VP-D385(
i
)
AV DV DC IN USB
VP-D381( i )
/
D382( i )
/D382H/D384
AV DV DC IN
Jacks
VP-D385(
i
)
AV DV DC IN USB
VP-D381( i )
/
D382( i )
/D382H/D384
AV DV DC IN
AV
MODE
DC IN
DV
POWER
CHG
1
4
5
6
7
3
2
Usable Memory Cards (2GB Max)
VP-D385
(
i
)
only
MMC/SD

臺灣 _11
11_ English
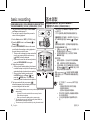
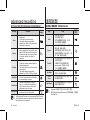
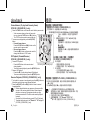
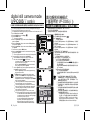
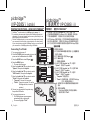
使用遙控器
(
僅適用於
VP-D382( i )/D382H/D385( i ))
1
PHOTO
按鈕
➥
第 60,78 頁
2
REC
按鈕
3
SELF TIMER
按鈕
➥
第 39 頁
4
ZERO MEMORY
按鈕
➥
第 38 頁
5
PHOTO SEARCH
按鈕
➥
第 61 頁
6
A.DUB
按鈕
➥
第 65 頁
7
(
FF
) 按鈕
8
(
REW
) 按鈕
9
(
PLAY
) 按鈕
10
(-) / (+) (播放)按鈕
➥
第 64 頁
11
顯示
( )
按鈕
12
W/T
(縮放)按鈕
13
X2
按鈕
➥
第 64 頁
14
DATE/TIME
按鈕
15
(慢動作)按鈕
16
(暫停)按鈕
17
(停止)按鈕
18
F. ADV
按鈕
➥
第 64 頁
遙控器上的按鈕與
miniDV
攝錄放影機上的按鈕功能相同。
USING THE REMOTE CONTROL
(VP-D382( i )/D382H/D385( i ) ONLY)
1
PHOTO button
➥
page 60,78
2
REC button
3
SELF TIMER button
➥
page 39
4
ZERO MEMORY button
➥
page 38
5
PHOTO SEARCH button
➥
page 61
6
A.DUB button
➥
page 65
7
(FF)
b
utton
8
(REW)
b
utton
9
(PLAY)
b
utton
10
(-) / (+) (Direction) button
➥
page 64
11
Display
( )
button
12
W/T (Zoom) button
13
X2
button
➥
page 64
14
DATE/TIME button
15
(
S
LOW) button
16
(PAUSE)
b
utton
17
(STOP)
b
utton
18
F. ADV button
➥
page 64
The buttons on the remote control function the same as those
on the miniDV camcorder.
1
2
3
4
5
6
7
8
9

12_ English
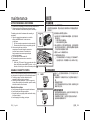
臺灣 _12
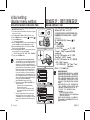
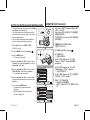
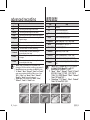
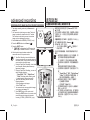
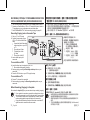
開始拍攝之前、確定正確調整手提帶是非常重要的。
手提帶可以讓您:
將攝錄放影機固定在穩定安全的位置。
將手放在能輕鬆操作
錄製開始 / 停止
按鈕、
PHOTO
按鈕和
縮放
杆
的位置。
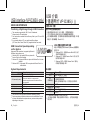
手帶
調整手提帶
1.
將手提帶穿入攝錄放影機前方的手
提帶扣、並拉至帶扣的末端。
2.
將您的手穿過手提帶、然後調整適
合的長度。
3.
合上手提帶。
透鏡蓋
裝上透鏡蓋
4.
使用透鏡蓋帶子連接透鏡蓋、如圖
所示。
5.
將透鏡蓋帶子連接到手提帶、然後
依照手提帶所述步驟進行調整。
6.
合上手提帶。
完成操作後安裝透鏡蓋
按下透鏡蓋兩邊的按鈕、然後將它蓋在攝錄放影機的
鏡頭上。
•
•
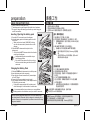
準備工作
使用手提帶和鏡頭護蓋
本節提供關於使用此
miniDV
攝錄放影機的資訊:例如:如何使用提供
的配件、如何充電及如何在各個模式下設定操作和螢幕指示器。
It is very important to ensure that the hand strap has been correctly
adjusted before you begin your recording.
The hand strap enables you to:
Hold the camcorder in a stable, comfortable position.
Put your hand in a position where you can easily operate the
Recording start/stop button, PHOTO button, and the Zoom lever.
Hand Strap
Adjusting the Hand Strap
1. Insert the hand strap into the hand
strap hook on the front side of the
camcorder and pull its end through
the hook.
2. Insert your hand into the hand strap and adjust its length for your
convenience.
3. Close the hand strap.
Lens Cover
Attaching the Lens Cover
4. Hook up the lens cover with the
lens cover strap as illustrated.
5. Hook up the lens cover strap to the
hand strap, and adjust it following
the steps as described for the hand strap.
6. Close the hand strap.
Installing the Lens Cover after Operation
Press buttons on both sides of the lens cover, then
attach it to the camcorder lens.
•
•
preparation
USING THE HAND STRAP & LENS COVER
This section provides information on using this miniDV camcorder: such
as how to use the provided accessories, how to charge the battery, how
to set up the operation and screen indicators in each mode.
OPEN
手帶
調整手提帶
1.
2.
1 2 3
透鏡蓋
裝上透鏡蓋
4.
5.
6.
the steps as described for the hand strap.
4 5 6

臺灣 _13
13_ English
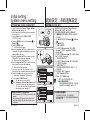
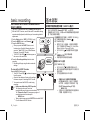
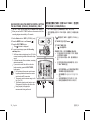
安裝鈕扣電池
遙控器的鈕扣電池安裝 ( 僅適用於
VP-D382( i )/D382H
/
D385( i )
)
1.
將鈕扣電池座沿著箭頭方向拉出。
2.
將鈕扣電池放入鈕扣電池座、正極 ( )
端向上。
3.
重新插入鈕扣電池座中
有關紐扣電池的注意事項
如果沒有正確更換鈕扣電池、將會有爆炸的危險。請使用相同類型
的電池來更換。
切勿使用鑷子或其他金屬工具取出電池。這樣可能會引起短路。
切勿充電、拆解、加熱或將電池浸泡在水中、以防爆炸危險。
將鈕扣電池存放在兒童無法接觸的地方。如果吞下電池,請
即刻尋求醫療救助。
•
•
•
警告
INSTALLING THE BUTTON-TYPE BATTERY
Button-type battery installation
for the remote control
(VP-D382( i )/D382H
/
D385( i ) only)
1. Pull out the button-type battery holder
toward the direction of the arrow.
2. Position the button-type battery in the
button-type battery holder, with the
positive ( ) terminal face up.
3. Reinsert the button-type battery holder.
Precaution regarding the button-type battery
There is a danger of explosion if button-type battery is incorrectly
replaced. Replace only with the same or equivalent type.
Do not pick up the battery using tweezers or other metal tools. This
will cause a short circuit.
Do not recharge, disassemble, heat or immerse the battery in water
to avoid the risk of explosion.
Keep the button-type Battery out of reach of children.
Should a battery be swallowed, seek medical attention
immediately.
•
•
•
WARNING
遙控器的鈕扣電池安裝 ( 僅適用於
VP-D382
1.
2.
3.

14_ English
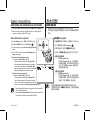
臺灣 _14
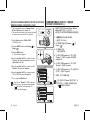
僅使用
IA-BP80W
電池組。
電池組在購買時可能已經有少量電量。
在使用
miniDV
攝錄放影機之前一定要為電池組充電。
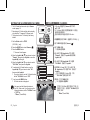
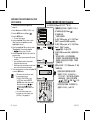
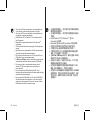
插入/彈出電池組
1.
按如圖所示方式打開
LCD
螢幕。
2.
將電池組插入電池組插槽中、直到輕輕卡入到位。
放置攝錄放影機時、確保文字標誌 (
SAMSUNG
) 面朝
外、如圖所示。
3. 滑動 BATT. 釋放開關、並取出電池組。
按如圖所示方向輕輕滑動
BATT.
釋放開關。
額外的電池組可從您當地的
Samsung
代理商選
購。
若長時間不使用
miniDV
攝錄放影機、請從
miniDV
攝錄放影機中取出電池組。
•
•
電池組充電
1.
向下滑動
POWER
開關以關閉電源。
2.
在攝錄放影機中裝上電池組。
3.
打開插孔護蓋、然後將
AC
電源適配器連接到
DC
IN
插孔。
4.
將
AC
電源適配器連接到牆上插座。
5.
在完成充電後、從攝錄放影機的
DC IN
插孔斷開
AC
電源適配器。
如果將電池組留在攝錄放影機內、即使電源開關關閉、
電池組仍然會放電。
建議您購買一個或多個額外的電池組、這樣可連續
使用您的
miniDV
攝錄放影機。
•
•
•
•
•
•
使用電池組
準備工作
請僅使用
Samsung
認可的電池組。切勿使用其他廠家的電池。
否則、將會導致過熱、火災或爆炸的危險。
由於使用未經批準的電池而導致的問題、
Samsung
概不負責。
Use the IA-BP80W battery pack only.
The battery pack may be charged a little at the time of purchase.
Be sure to charge the battery pack before you start using your
miniDV camcorder.
Inserting / Ejecting the battery pack
1. Open the LCD screen as shown in the diagram.
2. Insert the battery pack into the battery pack slot until it
softly clicks.
Make sure that word mark (SAMSUNG) is facing
out while the camcorder is placed as shown in the
diagram.
3. Slide the BATT. release switch and pull out the
battery pack.
Gently slide the BATT. release switch in the direction
as shown in the diagram.
Additional battery packs are available at your
local Samsung dealer.
If the miniDV camcorder will not be in use for a
while, remove the battery pack from the miniDV
camcorder.
•
•
Charging the Battery Pack
1.
Slide the POWER switch downwards to turn off the power.
2. Insert the battery pack to the camcorder.
3. Open the jack cover and connect the AC power adaptor
to the DC IN jack.
4. Connect the AC power adaptor to a wall socket.
5. Once charged, disconnect the AC power adaptor from the
DC IN jack on your camcorder.
Even with the power switched off, the battery pack
will still discharge if it is left inserted in the camcorder.
It is recommended that you purchase one or more additional
battery packs to allow continuous use of your miniDV camcorder.
•
•
•
•
•
•
USING THE BATTERY PACK
Use only Samsung-approved battery packs. Do not use batteries from
other manufacturers. Otherwise, there is a danger of overheating, re or
explosion. Samsung is not responsible for problems occured due to using
unapproved batteries.
preparation
插入/彈出電池組
1.
2.
3.
電池組充電
1.
2.
3.
4.
5.
P
O
W
E
R
B
A
T
T
.
P
O
W
E
R
B
A
T
T
.
P
O
W
E
R
C
H
B
A
T
T
.
BATT.
P
O
W
E
R
C
H
B
A
T
T
.
Insert
Eject

臺灣 _15
15_ English
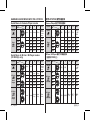
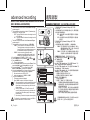
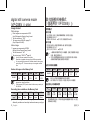
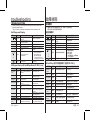
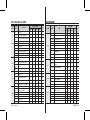
完全充電電池組的充電、錄製和播放時間(無縮放操作、
LCD
開啟等)
表中顯示的測得時間基於型號
VP-D385( i )
。
(
VP-D381( i )/D382( i )/D382H/D384/D385( i )
的時間幾乎相
同。)
時間僅供參考。表中顯示的數字為在
Samsung
測試環境下測
量、並可能會因實際使用情況而異。
在寒冷的環境溫度下、錄製時間會急速縮短。操作說明中提供
的連續錄製時間是根據在
25 °C (77 °F)
溫度下使用完全充電的
電池組所測得的結果。由於環境溫度和條件會經常改變、因此
剩餘的電池時間可能會與說明中提供的大約連續錄製時間有所
不同。
•
•
•
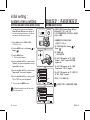
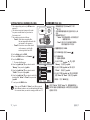
充電指示器
LED 的顏色標示電源或充電的狀態。
如果電池組完全充滿、充電指示燈會呈綠色。
如果您正在給電池充電、則充電指示燈會呈
橙色。
如果電池包充電時發生錯誤、則充電指示燈
會呈橙色閃爍。
•
•
•
充電時間 錄製時間
IA-BP80W
大約
1 小時 20 分鐘
大約
1 小時 20 分鐘
電池
時間
Charging, Recording Times with a fully charged
battery pack (with no zoom operation, LCD
open, etc.)
Measured times shown in the table are based on model VP-D385( i )
.
(Times for VP-D381(
i
)/D382(
i
)/D382H/D384/D385(
i
) are almost
the same.)
The time is only for reference. Figures shown in the table are
measured under Samsung’s test environment, and may differ from
your actual use.
The recording time shortens dramatically in a cold
environment.
The continuous recording times in the operating
instructions are measured using a fully charged battery pack at
25 °C (77 °F). As the environmental temperature and conditions
vary, the remaining battery time may differ from the approximate
continuous recording times given in the instructions.
•
•
•
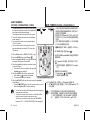
Charging indicator
The colour of the LED indicates the power or
charging state.
If the battery pack has been fully charged, the
charge indicator is green.
If you are charging the battery, the colour of the
charge indicator is orange.
If an error occurs while the battery pack in
charging, the charging indicator blinks orange.
•
•
•
Charging time Recording time
IA-BP80W
Approx.
1hr 20min
Approx.
1hr 20min
Battery
Time
充電指示器
LED 的顏色標示電源或充電的狀態。
•
•
•
AV
MODE
DC IN
DV
POWER
CHG
P
OWER
CHG
<Charging indicator>

16_ English
臺灣 _16
準備工作
可用的連續錄製時間視以下情況而定:
您使用的電池組類型和容量。
周圍環境的溫度。
是否經常使用縮放功能。
使用類型(攝錄放影機
/
相機
/
具備
LCD
螢幕等)。
建議您準備數個備用電池。
要檢查剩餘的電池電量、可按住
顯示
( )
按鈕。
➥
第
21
頁
充電時間因剩餘電池電量而異。
•
•
•
•
•
•
•
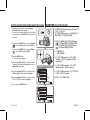
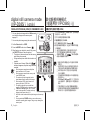
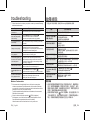
電池電量顯示
電池容量顯示可指出電池組的剩餘電量。
a. 完全充電
b. 用完 20~40%
c. 用完 40~80%
d. 用完 80~95%
e. 完全用完(閃爍)
(攝錄放影機就快關閉、請儘快更換電池。)
電池組管理
電池組必須在介於
0 °C (32 °F)
和
40°C (104 °F)
的環境溫度下重
新充電。
若在溫度低於
0 °C (32 °F)
的地方使用電池組、或者電池組長時間
處於溫度高於
40°C (104 °F)
的地方、電池組的使用壽命和容量將
會減少、即使它已經完全充電。
切勿將電池組放在靠近熱源的地方(如火或曖器)。
切勿拆開、擠壓或加熱電池組。
切勿讓電池組的
+
正極和
–
負極端形成短路。這可能導致電池組
漏液、發出熱量、引起過熱或火災。
•
•
•
•
•
preparation
The amount of continuous recording time
available depends on:
The type and capacity of the battery pack you are using.
Ambient temperature.
How often the zoom function is used.
Type of use (camcorder/camera/With LCD screen etc.)
It is recommended that you have several batteries available.
To check the remaining battery charge, press and hold the
Display ( ) button.
➥
page 21
The charging time will vary depending on the remaining
battery level.
•
•
•
•
•
•
•
Battery Level Display
The battery level display indicates the amount of power remaining in
the battery pack.
a. Fully charged
b. 20~40% used
c. 40~80% used
d. 80~95% used
e. Completely used (Blinking)
(The Camcorder will turn off soon, change the
battery as soon as possible.)
Battery Pack Management
The battery pack should be recharged in an environment between 0
°C (32 °F) and 40°C (104 °F).
The life and capacity of the battery pack will be reduced if it is used
in temperatures below 0 °C (32 °F) or left in temperatures above 40
°C (104 °F) for a long period of time, even when it is fully recharged.
Do not put the battery pack near any heat source (i.e. re or a heater).
Do not disassemble, apply pressure to, or heat the battery pack.
Do not allow the + and – terminals of the battery pack to be short-
circuited. It may cause leakage, heat generation, induce overheating
or re.
•
•
•
•
•
(Blinking)
ページが読み込まれています...
ページが読み込まれています...
ページが読み込まれています...
ページが読み込まれています...
ページが読み込まれています...
ページが読み込まれています...
ページが読み込まれています...
ページが読み込まれています...
ページが読み込まれています...
ページが読み込まれています...
ページが読み込まれています...
ページが読み込まれています...
ページが読み込まれています...
ページが読み込まれています...
ページが読み込まれています...
ページが読み込まれています...
ページが読み込まれています...
ページが読み込まれています...
ページが読み込まれています...
ページが読み込まれています...
ページが読み込まれています...
ページが読み込まれています...
ページが読み込まれています...
ページが読み込まれています...
ページが読み込まれています...
ページが読み込まれています...
ページが読み込まれています...
ページが読み込まれています...
ページが読み込まれています...
ページが読み込まれています...
ページが読み込まれています...
ページが読み込まれています...
ページが読み込まれています...
ページが読み込まれています...
ページが読み込まれています...
ページが読み込まれています...
ページが読み込まれています...
ページが読み込まれています...
ページが読み込まれています...
ページが読み込まれています...
ページが読み込まれています...
ページが読み込まれています...
ページが読み込まれています...
ページが読み込まれています...
ページが読み込まれています...
ページが読み込まれています...
ページが読み込まれています...
ページが読み込まれています...
ページが読み込まれています...
ページが読み込まれています...
ページが読み込まれています...
ページが読み込まれています...
ページが読み込まれています...
ページが読み込まれています...
ページが読み込まれています...
ページが読み込まれています...
ページが読み込まれています...
ページが読み込まれています...
ページが読み込まれています...
ページが読み込まれています...
ページが読み込まれています...
ページが読み込まれています...
ページが読み込まれています...
ページが読み込まれています...
ページが読み込まれています...
ページが読み込まれています...
ページが読み込まれています...
ページが読み込まれています...
ページが読み込まれています...
ページが読み込まれています...
ページが読み込まれています...
ページが読み込まれています...
ページが読み込まれています...
ページが読み込まれています...
ページが読み込まれています...
ページが読み込まれています...
ページが読み込まれています...
ページが読み込まれています...
ページが読み込まれています...
ページが読み込まれています...
ページが読み込まれています...
ページが読み込まれています...
ページが読み込まれています...
ページが読み込まれています...
ページが読み込まれています...
ページが読み込まれています...
ページが読み込まれています...
ページが読み込まれています...
ページが読み込まれています...
ページが読み込まれています...
ページが読み込まれています...
ページが読み込まれています...
ページが読み込まれています...
-
 1
1
-
 2
2
-
 3
3
-
 4
4
-
 5
5
-
 6
6
-
 7
7
-
 8
8
-
 9
9
-
 10
10
-
 11
11
-
 12
12
-
 13
13
-
 14
14
-
 15
15
-
 16
16
-
 17
17
-
 18
18
-
 19
19
-
 20
20
-
 21
21
-
 22
22
-
 23
23
-
 24
24
-
 25
25
-
 26
26
-
 27
27
-
 28
28
-
 29
29
-
 30
30
-
 31
31
-
 32
32
-
 33
33
-
 34
34
-
 35
35
-
 36
36
-
 37
37
-
 38
38
-
 39
39
-
 40
40
-
 41
41
-
 42
42
-
 43
43
-
 44
44
-
 45
45
-
 46
46
-
 47
47
-
 48
48
-
 49
49
-
 50
50
-
 51
51
-
 52
52
-
 53
53
-
 54
54
-
 55
55
-
 56
56
-
 57
57
-
 58
58
-
 59
59
-
 60
60
-
 61
61
-
 62
62
-
 63
63
-
 64
64
-
 65
65
-
 66
66
-
 67
67
-
 68
68
-
 69
69
-
 70
70
-
 71
71
-
 72
72
-
 73
73
-
 74
74
-
 75
75
-
 76
76
-
 77
77
-
 78
78
-
 79
79
-
 80
80
-
 81
81
-
 82
82
-
 83
83
-
 84
84
-
 85
85
-
 86
86
-
 87
87
-
 88
88
-
 89
89
-
 90
90
-
 91
91
-
 92
92
-
 93
93
-
 94
94
-
 95
95
-
 96
96
-
 97
97
-
 98
98
-
 99
99
-
 100
100
-
 101
101
-
 102
102
-
 103
103
-
 104
104
-
 105
105
-
 106
106
-
 107
107
-
 108
108
-
 109
109
-
 110
110
-
 111
111
-
 112
112
-
 113
113


