Flashforge P01 ユーザーガイド

タイプ
ユーザーガイド

Flashforge P01は、家庭向けや趣味での利用に最適な3Dプリンターです。使いやすいインターフェースと、様々な機能を搭載しており、3Dプリンティング初心者でも簡単に操作できます。

Flashforge P01の主な機能は以下の通りです。

  • Wi-Fi接続で簡単に印刷: Flashforge P01は、Wi-Fiに接続することで、スマートフォンやタブレットから印刷データをワイヤレスで送信することができます。これにより、パソコンがなくても3Dプリンターを使用することができます。
  • タッチスクリーンで操作が簡単: Flashforge P01は、タッチスクリーンを搭載しており、操作が簡単です。直感的なインターフェースで、初心者でも迷うことなく操作することができます。
  • 様々なフィラメントに対応: Flashforge P01は、PLA、ABS、PETGなど、様々なフィラメントに対応しています。これにより、様々な用途に合わせた3Dプリントを行うことができます。
  • **高精
快速启动指南
Adventurer 4 Series / 冒险家4 系列
Quick Start Guide
EN/CN/DE/FR/-A01
本手册仅适用于闪铸科技 冒险家4 系列 3D打印机
This guide is only applicable to FLASHFORGE Adventurer 4 Series 3D printer
WARNING
注意事项 1. Do not remove the wrapping around the nozzle.
2. Hot! Avoid touching the heating nozzle in operation.
3. Moving parts in printer may cause injury. Do not
wear gloves or other sources of entanglement in
operation.
1. 切勿去除包裹在喷嘴处的耐高温材料。
2. 高温危险!打印机喷嘴在工作时会被加热,操作时请避免
接触!
3. 可动部件可能会造成卷入挤压和切割伤害。操作机器时请
不要配带手套或缠绕物。
EN P01 / CN P07 / DE P13 / FR P19 / P25
Adventurer 4 Series Quick Start Guide
01
5. Filament intake cover
7. Platform base
9. Touch screen
4. Spool holder
1. Power switch
2. Power socket
8. Build plate
6. Front cover
20. Camera(AD4)
13. Filament guide tube joint
15. Fan for cooling model
11. Ethernet input
12. Extruder
10. USB
16. Fan for cooling extruder
21. Air filter(AD4)
17. Buckle 18. Air duct
3. Filament cover
19. Nozzle
14. Cable slot
1
2
3
4
5
9
10
78
6
11
12
20
13
14
15
16
17
18
19
21
Component Introduction
Adventurer 4 lite features a glass platform
with no camera and no air filter.
3D Printer Filament After-Sales
Service Card
Screwdriver
0.4-265 Nozzle
AD4 Equipped)
Quick Start Guide Unclogging
Pin Tool
Power Cable
Grease
Allen Wrench
Filament Guide
Tube Joint
Leveling Card
Packing Specification
02
快速启动指南
Adventurer 4 Series / 冒险家4 系列
Quick Start Guide
EN/CN/DE/FR/ -A01
本手册仅适用于闪铸科技 冒险家4 系列 3D打印机
This guide is only applicable to FLASHFORGE Adventurer 4 Series 3D printer
WARNING
注意事项 1. Do not remove the wrapping around the nozzle.
2. Hot! Avoid touching the heating nozzle in operation.
3. Moving parts in printer may cause injury. Do not
wear gloves or other sources of entanglement in
operation.
1. 切勿去除包裹在喷嘴处的耐高温材料。
2. 高温危险!打印机喷嘴在工作时会被加热,操作时请避免
接触!
3. 可动部件可能会造成卷入挤压和切割伤害。操作机器时请
不要配带手套或缠绕物。
EN P01 / CN P0 7 / DE P13 / FR P 19 / P25
Scraper
(AD4 Lite Equipped)
Glue
(AD4 Lite Equipped)
USB Disk
(AD4 Equipped)
The equipment has been leveled and calibrated before
delivery, but due to transportation or other influences,
the distance between nozzle and platform may change.
It is recommended to conduct [Calibration] after
unpacking.
This step is optional, please refer to the interface
function introduction before operation.
Find the FlashPrint installation package in the USB disk and select the version
corresponding to your system to install.
Or you can download it from https://www.flashforge.com/download-center.
Software Installation
Preparation of Device
1.Connect to power.
Connect cable to printer;
turn on the switch, the
screen lights up.
Power Switch
Print
03
2. Load Filament: open the filament cover on the right side, insert the filament into
the filament intake, push filament into the feeding wheel until some resistance is
felt. Please make sure filaments are in the feeding wheel. Tap
[Prepare]-[Filament]-[Load]. Follow the instruction, filament coming out of the
nozzle indicates a success.
When the user wants to use
the browser to view images,
the printer and PC must be
in an intranet (that is, the
printer and PC connect to
the same router).
IP Address
IP Port:
192 . . . :168 2122 8899
Auto-scan
Connection
Connect
Note
04
3.Model File Transfer
Method 1: Wi-Fi Connection
Tap [Settings]-[Network]-[WIFI], operate according to the instruction. Open
FlashPrint, click [Print], then click [Machine Type], select [FlashForge Adventurer 4 /
4 Lite]. You can try to enter the IP address or scan it automatically. The IP address
can be viewed in [settings] - [about].
Import stl or obj file into the slicer; after slicing, the printer will heat up and start
printing automatically.
Method 2: USB Device
Files can be read in USB disk. Insert USB disk and select the files to print.
05
06
4.Model Removal
Adventurer 4: Take out the removable build plate, and bend the plate to
get the model
Adventurer 4 Lite : Use the Scraper to take out the model
Nozzle and build plate are still hot after finishing printing, please wait for them to
cool down before you operate.
It is recommended to take the plate to the outside of the equipment for model
removal, otherwise the model debris will remain in the equipment. Please keep
the inside of the printer clean.
Note
冒险家4 快速启动指南
07
5. 送丝盖板
7. 平台底座
9. 触
4. 料盘架
1. 电源开关
2. 电源插座
8. 平台板
6. 前门
20. 摄像头(AD4)
13.气管接头
15. 模型冷却风扇
11. 网口
12. 喷头
10. USB
16. 喷头冷却风扇
21. 空气过滤(AD4)
17. 卡扣
18. 导风嘴
3. 丝盘门
19. 喷
14. 排线
1
2
3
4
5
9
10
78
6
11
12
20
13
14
15
16
17
18
19
21
整机介绍
Adventurer 4 lite 为玻璃平台,无摄像头,
无空气过滤。
3D打印机 3D打印耗材 售后服务卡
十字螺丝刀0.4-265喷嘴
AD4 配置)
快速启动指南 通针
电源线
润滑脂
内六角扳手
气管接头
调平卡
U盘(AD4 配置)
铲刀(AD4 Lite 配备) 胶水(AD4 Lite 配备)
装箱清单
08
快速启动指南
Adventurer 4 Series / 冒险家4 系列
Quick Start Guide
EN/CN/DE/FR/ -A01
本手册仅适用于闪铸科技 冒险家4 系列 3D打印机
This guide is only applicable to FLASHFORGE Adventurer 4 Series 3D printer
WARNING
注意事项 1. Do not remove the wrapping around the nozzle.
2. Hot! Avoid touching the heating nozzle in operation.
3. Moving parts in printer may cause injury. Do not
wear gloves or other sources of entanglement in
operation.
1. 切勿去除包裹在喷嘴处的耐高温材料。
2. 高温危险!打印机喷嘴在工作时会被加热,操作时请避免
接触!
3. 可动部件可能会造成卷入挤压和切割伤害。操作机器时请
不要配带手套或缠绕物。
EN P01 / CN P0 7 / DE P13 / FR P 19 / P25
设备出厂经过调平校准,但由于运输等情况,喷嘴与平台间距
可能发生变化,建议在开箱后进行一次【喷头校准】。
此步骤非完全必要操作。具体操作根据界面指引。
方法一:在U盘中找到FlashPrint软件安装包,选择对应的系统版本进行安装。
方法二:从官方网站 www.sz3dp.com 下载最新的切片软件。
注:官网可下载到最新的切片软件。
软件安装
设备预准备
1.连接电源。
通过电源线连接电源与打印机;
开启开关,屏幕点亮。
电源开关
首次打印
09
2.安装丝料:打开右侧耗材门,将丝料插入进丝口,推入送丝轮内,感受到一定阻力即可。
请务必确认丝料已经推入送丝轮。点击屏幕准备-丝料-进丝。按屏幕指示操作,待喷嘴吐出丝
料说明进丝完成。
打印机连接的网络和电脑连接的
网络必须在同一网段中,否则无
法连接成功。
注意事项
IP地址
IP端口:
192 . . . :168 2122 8899
自动扫描
连接机器
连接机器
10
3.传输文件
方式一:传输WiFi
点击设备的设置-网络-WiFi,按屏幕提示连接即可;打开FlashPrint,点击菜单中的打印按
钮,选择冒险家4/ 4 Lite连接机器;可通过输入IP地址或自动扫描的方式,IP地址可在设备设
置-关于中查看。
将stl或obj 文件导入到切片软件中;进行切片,软件切片完成后,打印机进行加温等工作,准
备完成后自动开始打印。
方式二:U盘打印
设备也可通过U盘打印,将切片好的文件保存至U 盘,将U盘插入到设备,选择对应文件点击
打印。
4.打印后模型移除
直接取出平台柔性钢板,折弯平台即可取下模型。
11
12
4.打印后模型移除
注意事项
打印完成时,喷嘴和打印平台仍处于高温状态,建议冷却后操作。
模型移除建议将平台板拿到设备外部再进行移除,否则模型碎屑容易留在设备腔体内,建议保
持腔体清洁。
冒险家4: 直接取出平台柔性钢板,折弯平台即可取下模型
冒险家4 Lite :使用铲刀移除模型
Adventurer 4 Kurzanleitung
13
5. Filamenteinzugsabdeckung
7. Plattformsockel
9.Touchscreen
4. Spulenhalter
1. Netzschalter
2. Steckdose
8. Konstruktionsplattform
6. Frontblende
20. Kamera(AD4)
13. Filamentführung-Rohrverbindung
15. Gebläse für die Modellkühlung
11. Ethernet-Eingang
12. Extruder
10. USB
16. Gebläse für die Extruderkühlung
21. Luftfilter(AD4)
17. Spange Luftkanal 18. Luftkanal
3. Filamentabdeckung
19. Düse
14. Kabelschlitz Gebläse für die Modellkühlung
1
2
3
4
5
9
10
78
6
11
12
20
13
14
15
16
17
18
19
21
Vorstellung der Komponenten
Adventurer 4 lite ist eine Glasplattform
ohne Kamera und ohne Luftfilter.
3D-Drucker Filament Kundendienstkarte
Schraubendreher
Düse 0,4-265
AD4 Ausstattung)
Kurzanleitung Reinigungsstif
twerkzeug
Stromkabel
Fett
Innensechskantschlü
ssel
Filamentführung-
Rohrverbindung
Nivellierkarte
Verpackung
14
快速启动指南
Adventurer 4 Series / 冒险家4 系列
Quick Start Guide
EN/CN/DE/FR/ -A01
本手册仅适用于闪铸科技 冒险家4 系列 3D打印机
This guide is only applicable to FLASHFORGE Adventurer 4 Series 3D printer
WARNING
注意事项 1. Do not remove the wrapping around the nozzle.
2. Hot! Avoid touching the heating nozzle in operation.
3. Moving parts in printer may cause injury. Do not
wear gloves or other sources of entanglement in
operation.
1. 切勿去除包裹在喷嘴处的耐高温材料。
2. 高温危险!打印机喷嘴在工作时会被加热,操作时请避免
接触!
3. 可动部件可能会造成卷入挤压和切割伤害。操作机器时请
不要配带手套或缠绕物。
EN P01 / CN P0 7 / DE P13 / FR P 19 / P25
Abstreifer(AD4 Lite
Ausstattung)
Leim (AD4 Lite
Ausstattung)
USB-Festplatte
(AD4 Ausstattung)
Das Gerät wurde vor der Auslieferung nivelliert und
kalibriert, allerdings kann sich die Distanz zwischen,
Düse und Plattform infolge von Transport- oder anderen
Einflüssen verändern.Es wird empfohlen, dass Sie nach
dem Auspacken eine [Kalibrierung] durchführen.
Es handelt sich um eine optionalen Schritt; weitere
Informationen entnehmen Sie bitte der Beschreibung für
die entsprechende Funktion.
Suchen Sie das FlashPrint-Installationspaket auf dem USB-Wechseldatenträger und
wählen Sie für die Installation die entsprechende Version für Ihr System.
Sie können das Paket auch hier herunterladen:
https://www.flashforge.com/download-center.
Software-Installation
Vorbereitung des Gerätes
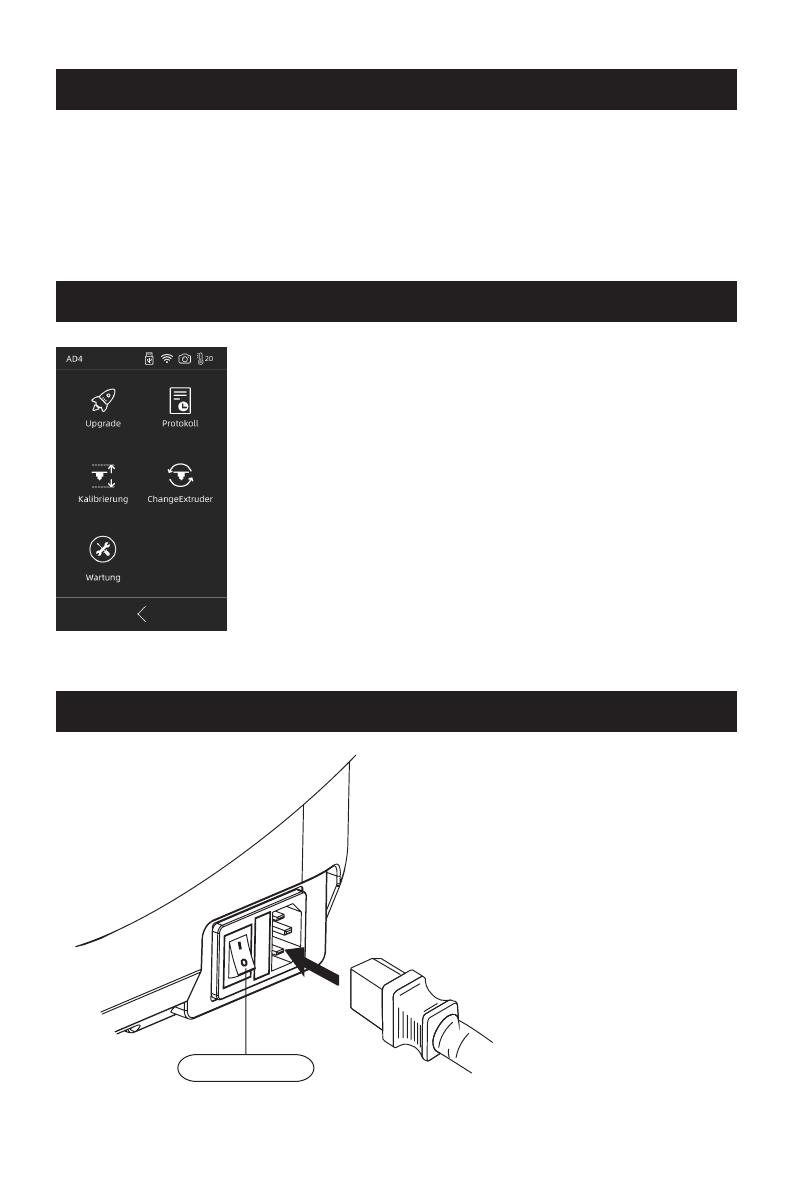
1. Mit der Stromversorgung verbinden.
Verbinden Sie das Kabel mit
dem Druck, betätigen Sie
den Netzschalter. Das
Display leuchtet auf.
Netzschalter
Drucken
15
2. Filament laden: Öffnen Sie die Filamentabdeckung auf der rechten Seite, führen
Sie das Filament in die Aufnahme ein. Drücken Sie das Filament in das Zuführrad, bis
Sie Widerstand spüren. Die Filamente müssen in das Zuführrad eingelegt sein.
Berühren Sie [Vorbereiten]-[Strang]-[Laden]. Befolgen Sie die Anweisungen. Sobald
Filament aus der Düse austritt, ist der Vorgang erfolgreich abgeschlossen.
IP Address
IP Port:
192 . . . :168 2122 8899
Auto-scan
Connection
Connect
Für die Ansicht der Bilder im
Browser müssen Drucker und
PC mit dem Internet
verbunden sein (d.h.,
Drucker und PC sind mit
demselben Router
verbunden).
Hinweis
16
3.Übertragung der Modelldatei
Methode 1: WLAN-Verbindung
Berühren Sie [Einstellungen]-[Netzwerk]-[WIFI] und befolgen Sie die Anweisungen.
Öffnen FlashPrint. Tippen Sie auf [Drucken] > [Gerätetyp] und auf [Flashforge
Adventurer 4 / 4 Lite]. Sie können auch die IP-Adresse eingeben oder automatisch
nach dem Gerät suchen (Scan). Die IP-Adresse finden Sie unter [Einstellungen] - [Über].
Importieren Sie die stl- oder obj-Datei in den Slicer. Nach dem Slicen erfolgt der
Aufwärmvorgang. Dann startet der Druckvorgang automatisch.
Methode 2: USB-Gerät
Die Dateien können vom USB-Wechseldatenträger eingelesen werden. Verbinden Sie
den USB-Wechseldatenträger und wählen Sie die Dateien für den Druck aus.
17
18
4. Modell herausnehmen
Nach dem Druckvorgang sind Düse und Konstruktionsplatte noch heiß. Warten Sie
bitte, bis beide abgekühlt sind, bevor Sie fortfahren.
Es wird empfohlen, die Platte aus dem Gerät nehmen, um das Modell zu lösen.
Sonst bleiben Rückstände des Modells im Gerät zurück. Das Innere des Druckers
muss stets sauber sein.
Hinweis
Adventurer 4: Nehmen Sie die Bauplatte heraus und biegen Sie die
Platte, um das Modell zu lösen
Adventurer 4 Lite: Verwenden des Werkzeugs zum Entfernen des Modells
Adventurer 4 Guide rapide
19
5. Couvercle de l’entrée de
filament
7. Support du plateau
9.Ecran tactile
4. Support de bobine
1. Interrupteur
2. Prise de courant
8. Plateau
6. Couvercle avant
20. Caméra(AD4)
13. Joint du tige de guidage de filament
15. Ventilateur pour le refroissement du modèle
11. Entrée Ethernet
12. Extrudeuse
10. USB
16. Ventilateur pour le refroissement de
l’extrudeuse
21. Filtre à air(AD4)
17. Boucle 18. Conduite d’air
3. Couvercle de filament
19. Buse
14. Fente de câble
1
2
3
4
5
9
10
78
6
11
12
20
13
14
15
16
17
18
19
21
Présentation des composants
Adventurer 4 lite est une plateforme en
verre, sans caméra et sans filtration d’air.
  • Page 1 1
  • Page 2 2
  • Page 3 3
  • Page 4 4
  • Page 5 5
  • Page 6 6
  • Page 7 7
  • Page 8 8
  • Page 9 9
  • Page 10 10
  • Page 11 11
  • Page 12 12
  • Page 13 13
  • Page 14 14
  • Page 15 15
  • Page 16 16
  • Page 17 17
  • Page 18 18
  • Page 19 19
  • Page 20 20
  • Page 21 21
  • Page 22 22
  • Page 23 23
  • Page 24 24
  • Page 25 25
  • Page 26 26
  • Page 27 27
  • Page 28 28
  • Page 29 29
  • Page 30 30
  • Page 31 31
  • Page 32 32

Flashforge P01 ユーザーガイド

タイプ
ユーザーガイド

Flashforge P01は、家庭向けや趣味での利用に最適な3Dプリンターです。使いやすいインターフェースと、様々な機能を搭載しており、3Dプリンティング初心者でも簡単に操作できます。

Flashforge P01の主な機能は以下の通りです。

  • Wi-Fi接続で簡単に印刷: Flashforge P01は、Wi-Fiに接続することで、スマートフォンやタブレットから印刷データをワイヤレスで送信することができます。これにより、パソコンがなくても3Dプリンターを使用することができます。
  • タッチスクリーンで操作が簡単: Flashforge P01は、タッチスクリーンを搭載しており、操作が簡単です。直感的なインターフェースで、初心者でも迷うことなく操作することができます。
  • 様々なフィラメントに対応: Flashforge P01は、PLA、ABS、PETGなど、様々なフィラメントに対応しています。これにより、様々な用途に合わせた3Dプリントを行うことができます。
  • **高精