
GC7700 series
Always here to help you
Register your product and get support at
www.philips.com/welcome


3

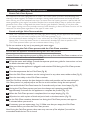
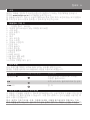
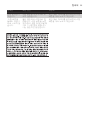
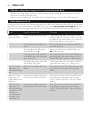
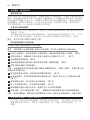
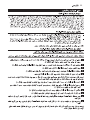
IMPORTANT
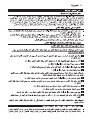
- Perform the Calc-Clean process regularly for great steam performance and a prolonged lifetime of
your appliance (Fig. 1).
- Recommended water to use: distilled or demineralised water (Fig. 2).
IMPORTANT
- Effectuez régulièrement la procédure de détartrage pour maintenir une excellente production de
vapeur et prolonger la durée de vie de votre appareil (g. 1).
- Recommandation pour l’eau à utiliser : eau distillée ou déminéralisée (g. 2).
PENTING
- Lakukan proses Calc-Clean secara berkala untuk performa penguapan yang baik dan
memperpanjang masa pakai alat Anda (Gbr. 1).
- Air yang disarankan: air suling atau tanpa campuran mineral (Gbr. 2).
중요사항
- 뛰어난 스팀 성능과 제품의 수명 연장을 위해서는 석회질을 정기적으로 제거하십시오
(그림 1).
- 권장 용수: 증류수 또는 정수된 물 (그림 2)
PENTING
- Lakukan proses Pembersihan Kerak dengan kerap untuk prestasi stim yang hebat dan
memanjangkan jangka hayat perkakas anda (Gamb. 1).
- Jenis air yang disyorkan: air suling atau air yang dinyahgalian (Gamb. 2).
IMPORTANTE
- Execute o processo Calc-Clean regularmente para um óptimo desempenho de vapor e uma vida
útil prolongada do seu aparelho (g. 1).
- Água recomendada para utilização: água destilada ou desmineralizada (g. 2).
ขอสำ�คัญ
- ทำ�ขั้นตอนขจัดคร�บตะกรันอย�งสมเสมอเพื่อประสิทธิภ�พไอนที่ดียิ่งกว� และยืดอ�ยุก�รใชง�นของเครื่อง (รูปที่ 1)
- นที่แนะนำ�ใหใช: นกลั่นหรือนปร�ศจ�กแรธ�ตุ (รูปที่ 2)
1 2


6
Introduction
Congratulations on your purchase and welcome to Philips! To fully benet from the support that
Philips offers, register your product at www.philips.com/welcome.
Read this user manual, the important information leaet, and the quick start guide on the packaging
carefully before you use the appliance. Save them for future reference.
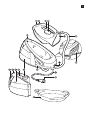
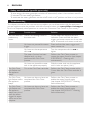
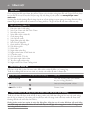
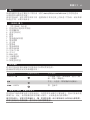
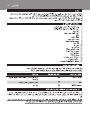
General description (Fig. 3)
1 ’Iron ready’ light
2 Calc-Clean button with Calc-Clean light
3 Steam trigger
4 Temperature dial
5 Heel
6 Supply hose
7 Cord storage facility
8 On/off switch
9 Carry lock
10 Mains cord
11 Mains plug
12 Hose storage compartment
13 Detachable water tank
14 Filling hole
15 MAX indication
16 Water tank release button
17 Water tank handle
18 Smart Calc-Clean container
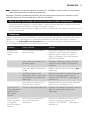
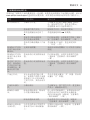
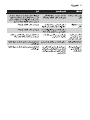
Setting the temperature
To set the required ironing temperature, turn the temperature dial to the appropriate position.
The appliance adjusts the steam automatically, depending on the ironing temperature set.
Temperature setting Automatic steam setting Fabric type
SYNTH to 1
Synthetic fabrics (e.g., acetate, acrylic,
nylon, polyamide).
2
Wool, viscose, polyester and silk.
3 to LINEN
Cotton, linen
Recommended water to use: distilled or demineralised water
Your appliance has been designed to be used with tap water. If you live in an area with hard water,
fast scale build-up may occur. It is therefore recommended to use distilled or demineralised water to
prolong the lifetime of your appliance.
Do not add perfume, water from the tumble dryer, vinegar, ironing aids, chemically descaled
water or other chemicals, as they may cause water spitting, brown staining or damage to your
appliance.
ENGLISH

IMPORTANT - Cleaning and maintenance
Smart Calc-Clean System
Your appliance has been designed with a Smart Calc-Clean system to ensure that descaling and
cleaning is done regularly. This helps to maintain a strong steam performance and avoids dirt and
stains coming out of the soleplate over time. To ensure that the cleaning process is performed, the
steam generator gives regular reminders. Besides that, a second defence step to protect the steam
generator from scale is integrated: the steam function gets disabled if descaling is not done after
1 hour steam ironing once the reminder came up. After descaling is done, the steam function will be
restored. This takes place regardless of the type of water used.
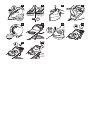
Sound and light Calc-Clean reminder
- After 1 to 3 months of use, the Calc-Clean light starts ashing and the appliance starts beeping
to indicate that you have to perform the Calc-Clean process (Fig. 4).
- You can continue steam ironing for 1 hour while the Calc-Clean light ashes and the appliance
beeps. After 1 hour, the steam function is automatically disabled. You have to perform the
Calc-Clean process before you can continue steam ironing. (Fig. 5)
Tip: You can continue to dry iron by not pressing the steam trigger.
Performing the Calc-Clean process with the Calc-Clean container
Do not leave the appliance unattended during the Calc-Clean process.
Caution: Do not interrupt the process by lifting the iron up from the Calc-Clean container, as hot
water and steam will come out of the soleplate.
1 Fill up the water tank halfway. Consult the separate quick start guide for instructions on how
to detach the water tank (Fig. 6).
2 Make sure that the appliance is plugged in and switched ON during the Calc-Clean process
(Fig. 7).
3 Turn the temperature dial to Calc-Clean (Fig. 8).
4 Place the Calc-Clean container on the ironing board or any other even, stable surface (Fig. 9).
5 Place the iron stably on the Calc-Clean container.
Note: The Calc-Clean container has been designed to collect scale particles and hot water during the
Calc-Clean process. It is perfectly safe to rest the iron on this container during the entire process.
6 Press and hold the Calc-Clean button for 2 seconds until you hear short beeps (Fig. 10).
7 During the Calc-Clean process, you hear short beeps and a pumping sound. Wait
approximately 2 minutes for the appliance to complete the process (Fig. 11).
8 When the Calc-Clean process is completed, the iron stops beeping (Fig. 12).
9 Wipe the iron with a piece of cloth and put it back on the base station (Fig. 13).
10 As the Calc-Clean container becomes hot during the Calc-Clean process, wait approx.
5 minutes before you touch it.
11 If necessary, you can repeat steps 1 to 11. Make sure that you empty the Calc-Clean
container before you start the Calc-Clean process.
Note: During the Calc-Clean process, clean water may come out of the soleplate if no scale has
accumulated inside the iron. This is normal.
ENGLISH 7

Safety auto-off mode (specic types only)
- To save energy, the steam generator switches off automatically when it has not been used for
15 minutes. The ‘iron ready’ light ashes.
- To reactivate the steam generator, set the on/off switch to ‘off’ position and then to ‘on’ position.
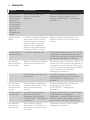
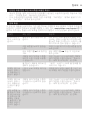
Troubleshooting
This chapter summarises the most common problems you could encounter with the appliance. If
you are unable to solve the problem with the information below, visit www.philips.com/support
for a list of frequently asked questions or contact the Consumer Care Centre in your country.
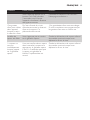
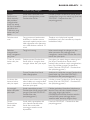
Problem Possible cause Solution
The iron does not
produce any
steam.
There is not enough water in
the water tank.
Fill the water tank beyond the MIN
indication. Press and hold the steam
trigger until steam comes out. It may take
up to 30 seconds until steam comes out.
You have not pressed the steam
trigger.
Press and hold the steam trigger until
steam comes out.
You have set the temperature
dial to 1.
Turn the temperature dial to 2 or
higher.
The steam function has been
disabled until you have
performed the Calc-Clean
process.
Perform the Calc-Clean process to
restore the steam function (see chapter
‘IMPORTANT - Cleaning and
maintenance’).
You have not placed the water
tank in the appliance properly.
Slide the water tank into the appliance
until it locks into place (‘click’).
The Calc-Clean
light ashes and
the appliance
beeps.
This is the Calc-Clean reminder. Perform the Calc-Clean process within
1 hour after the Calc-Clean reminder is
given.
The Calc-Clean
light ashes and/or
the appliance
beeps.
You have not done or have not
completed the Calc-Clean
process.
Perform the Calc-Clean process to
enable the steam function again
(see chapter ‘IMPORTANT - Cleaning
and maintenance’).
The Calc-Clean
light ashes and
the appliance
beeps every time I
press the steam
trigger. No steam
comes out of the
soleplate.
You have not done or have not
completed the Calc-Clean
process.
Perform the Calc-Clean process to
enable the steam function again
(see chapter ‘IMPORTANT - Cleaning
and maintenance’).
ENGLISH8

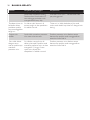
Problem Possible cause Solution
The appliance has
switched off.
The safety auto-off function was
activated. This happens
automatically when the steam
generator has not been used or
the steam trigger has not been
pressed for more than
15 minutes.
Set the on/off switch to ‘off’ position and
then to ‘on’ position.
The appliance
produces a loud
pumping sound.
The water tank is empty. Fill the water tank with water and press
the steam trigger until the pumping
sound becomes softer and steam comes
out of the soleplate.
Water droplets
come out of the
soleplate.
After the Calc-Clean process,
remaining water may drip out of
the soleplate.
Wipe the soleplate dry with a piece of
cloth. If the Calc-Clean light still ashes
and the appliance still beeps, perform the
Calc-Clean process (see chapter
‘IMPORTANT - Cleaning and
maintenance’).
The Calc-Clean process has not
been completed.
You have to perform the Calc-Clean
process again (see chapter ‘IMPORTANT
- Cleaning and maintenance’).
Dirty water and
impurities come
out of the
soleplate.
Impurities or chemicals present
in the water have deposited in
the steam vents and/or soleplate.
Perform the Calc-Clean process regularly
(see chapter ‘IMPORTANT - Cleaning
and maintenance’).
Water ushes out
of the soleplate.
You have accidentally started the
Calc-Clean process (see chapter
‘IMPORTANT - Cleaning and
maintenance’).
Switch off the appliance. Then switch it
back on again. Turn the temperature dial
to the desired temperature setting
instead of CÁLC CLEAN. Let the iron
heat up until the ‘iron ready’ light lights up
steadily.
The Calc-Clean
process does not
start.
You have not set the
temperature dial to Calc-Clean
or you have not waited for the
iron to heat up.
See chapter ‘IMPORTANT - Cleaning and
maintenance’.
You have not pressed the Calc-
Clean button for 2 seconds until
the appliance started beeping.
See chapter ‘IMPORTANT - Cleaning and
maintenance’.
There are water
droplets visible in
the appliance
when I detach the
water tank.
Water comes from the water
path between the water tank
and stand. This is normal.
These water droplets are harmless. If you
want, you can wipe away the water
droplets with a dry cloth.
ENGLISH 9

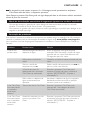
Problem Possible cause Solution
Steam output is
low.
You do not press the steam
trigger continuously.
Keep the steam trigger pressed
continuously when you move the iron
over the fabric.
Steam does not
come out
immediately when
I press the steam
trigger.
Water is converted into steam
in the soleplate. When you press
the steam trigger, it will take 1 to
2 seconds until steam is
generated and released. This is
normal.
Keep the steam trigger pressed
continuously when you move the iron
over the fabric.
ENGLISH10

11
Introduction
Félicitations pour votre achat et bienvenue dans l’univers Philips ! Pour proter pleinement de
l’assistance Philips, enregistrez votre produit sur le site à l’adresse suivante : www.philips.com/
welcome.
Lisez attentivement ce mode d’emploi, la brochure « Informations importantes » et le guide de
démarrage rapide sur l’emballage avant d’utiliser l’appareil et conservez-le pour une consultation
ultérieure.
Description générale (g. 3)
1 Voyant « Fer prêt »
2 Bouton Calc-Clean avec voyant Calc-Clean
3 Gâchette vapeur
4 Thermostat
5 Talon
6 Cordon d’arrivée de la vapeur
7 Rangement du cordon
8 Bouton marche/arrêt
9 Verrouillage du fer
10 Cordon d’alimentation
11 Cordon d’alimentation
12 Compartiment de rangement du cordon
13 Réservoir d’eau amovible
14 Orice de remplissage
15 Niveau MAX
16 Bouton de libération du réservoir d’eau
17 Poignée du réservoir d’eau
18 Réservoir anticalcaire intelligent
Réglage de la température
Réglez la température de repassage recommandée en tournant le thermostat sur la position
adéquate.
L’appareil ajuste la vapeur automatiquement, en fonction du réglage de température de repassage.
Réglage de
température
Réglage de vapeur
automatique
Type de tissu
SYNTH à 1
Fibres synthétiques (par ex. acétate,
acrylique, nylon, polyamide).
2
Laine, viscose, polyester et soie.
3 à LIN
Coton, lin
Recommandation pour l’eau à utiliser : eau distillée ou déminéralisée
Votre appareil a été conçu pour être utilisé avec l’eau du robinet. Si vous habitez dans une région où
l’eau est calcaire, des dépôts peuvent se former rapidement. Il est dès lors recommandé d’utiliser de
l’eau distillée ou déminéralisée an de prolonger la durée de vie de votre appareil.
N’ajoutez pas de parfum, d’eau provenant du sèche-linge, de vinaigre, de produits d’aide au
repassage ou d’autres agents chimiques dans le réservoir d’eau car ils peuvent entraîner des
projections d’eau, des taches marron ou des dommages à votre appareil.
FRANÇAIS

IMPORTANT - Nettoyage et entretien
Système anticalcaire intelligent
Votre appareil a été pourvu d’un système anticalcaire intelligent an d’assurer un détartrage et un
nettoyage réguliers et, ainsi, maintenir des performances élevées de vapeur et éviter que saletés et
taches s’échappent de la semelle au l du temps. Pour garantir l’exécution du procédé de nettoyage,
l’appareil indique des rappels réguliers. Outre cela, une deuxième étape de défense pour la
protection de l’appareil contre le calcaire est intégrée : la fonction vapeur est désactivée si le
détartrage n’est pas effectué dans un délai d’1 heure de repassage à la vapeur à compter du rappel.
Une fois le détartrage effectué, la fonction vapeur est restaurée. Ceci se produit indépendamment
du type d’eau utilisé.
Rappel sonore et visuel de détartrage
- Après 1 à 3 mois d’utilisation, le voyant Calc-Clean commence à clignoter et l’appareil
commence à émettre des signaux sonores pour indiquer que vous devez exécuter le traitement
anticalcaire (g. 4).
- Vous pouvez poursuivre le repassage à la vapeur pendant 1 heure à partir du moment où le
voyant Calc-Clean clignote et l’appareil émet de signaux sonores. Une fois ce délai écoulé, la
fonction vapeur est automatiquement désactivée. Vous devez alors exécuter le traitement
anticalcaire avant de pouvoir poursuivre le repassage à la vapeur. (g. 5)
Conseil : Vous pouvez continuer à repasser à sec en n’appuyant pas sur la gâchette vapeur.
Exécution du traitement anticalcaire avec le réservoir anticalcaire
Ne laissez pas l’appareil sans surveillance pendant le traitement anticalcaire.
Attention : N’interrompez pas le processus en relevant le fer du réservoir anticalcaire car de
l’eau chaude et de la vapeur sortent de la semelle.
1 Remplissez le réservoir d’eau à la moitié. Consultez le guide de mise en route pour plus
d’instructions sur la façon de retirer le réservoir d’eau (g. 6).
2 Assurez-vous que l’appareil est branché et allumé pendant le traitement anticalcaire (g. 7).
3 Réglez le thermostat sur Calc-Clean (g. 8).
4 Placez le réservoir anticalcaire intelligent sur la planche à repasser ou sur une autre surface
plane et stable (g. 9).
5 Placez le fer de manière stable sur le réservoir anticalcaire.
Remarque : Le réservoir anticalcaire a été conçu pour recueillir les particules de calcaire et l’eau chaude
pendant le traitement anticalcaire. Il est parfaitement sûr de laisser le fer posé sur ce réservoir durant
toute l’opération.
6 Maintenez enfoncé le bouton Calc-Clean pendant 2 secondes jusqu’à ce que de brefs signaux
sonores retentissent (g. 10).
7 Pendant le traitement anticalcaire, vous entendez de brefs signaux sonores et un bruit de
pompe. Patientez environ 2 minutes que l’appareil termine le processus (g. 11).
8 Lorsque le traitement anticalcaire est terminé, le fer cesse d’émettre des signaux sonores
(g. 12).
9 Essuyez le fer avec un chiffon et replacez-le sur la base (g. 13).
10 Le réservoir anticalcaire devenant chaud pendant le traitement anticalcaire, patientez environ
5 minutes avant de le toucher.
FRANÇAIS12

11 Si nécessaire, vous pouvez répéter les étapes 1 à 11. Veillez à vider le réservoir anticalcaire
avant de commencer le traitement anticalcaire.
Remarque : Pendant le traitement anticalcaire, de l’eau propre peut s’écouler de la semelle si aucun
résidu de calcaire ne s’est accumulé dans le fer. Ceci est normal.
Mode d’arrêt automatique de sécurité (certains modèles uniquement)
- Pour économiser l’énergie, la centrale vapeur s’éteint automatiquement lorsqu’elle n’a pas été
utilisée pendant 15 minutes. Le voyant « Fer prêt » clignote.
- Pour réactiver la centrale vapeur, réglez le bouton marche/arrêt sur la position d’arrêt, puis sur la
position de marche.
Dépannage
Cette rubrique présente les problèmes les plus courants que vous pouvez rencontrer avec votre
appareil. Si vous ne parvenez pas à résoudre le problème à l’aide des informations ci-dessous,
rendez-vous sur www.philips.com/support pour consulter les questions fréquemment posées,
ou contactez le Service Consommateurs de votre pays.
Problème Cause possible Solution
L’appareil ne
produit pas de
vapeur.
Il n’y a pas assez d’eau dans le
réservoir d’eau.
Remplissez le réservoir d’eau au-delà de
l’indication MIN. Maintenez enfoncé la
gâchette vapeur jusqu’à ce que de la
vapeur s’échappe, ce qui peut prendre
jusqu’à 30 secondes.
Vous n’avez pas appuyé sur la
gâchette vapeur.
Maintenez la gâchette vapeur enfoncée
jusqu’à ce que la vapeur s’échappe de
l’appareil.
Vous avez réglé le thermostat
sur 1.
Réglez le thermostat sur la position 2 ou
supérieure.
La fonction vapeur reste
désactivée jusqu’à ce que vous
ayez effectué la procédure de
détartrage.
Effectuez la procédure de détartrage pour
réactiver la fonction vapeur (voir le
chapitre « IMPORTANT - Nettoyage et
entretien »).
Vous avez mal positionné le
réservoir dans l’appareil.
Repositionnez le réservoir dans l’appareil
jusqu’à ce qu’il s’enclenche (clic).
Le voyant Calc-
Clean clignote et
l’appareil émet
des signaux
sonores.
Ceci est le rappel de détartrage. Exécutez le traitement anticalcaire dans un
délai d’1 heure après le rappel de
détartrage.
Le voyant Calc-
Clean clignote et/
ou l’appareil
émet des signaux
sonores.
Vous n’avez pas exécuté ou
terminé le traitement
anticalcaire.
Exécutez le traitement anticalcaire pour
réactiver la fonction vapeur (voir le
chapitre « IMPORTANT - Nettoyage et
entretien »).
FRANÇAIS 13

Problème Cause possible Solution
Le voyant Calc-
Clean clignote et
l’appareil émet
des signaux
sonores chaque
fois que j’appuie
sur la gâchette
vapeur. Aucune
vapeur ne
s’échappe de la
semelle.
Vous n’avez pas exécuté ou
terminé le traitement
anticalcaire.
Exécutez le traitement anticalcaire pour
réactiver la fonction vapeur (voir le
chapitre « IMPORTANT - Nettoyage et
entretien »).
L’appareil s’est
éteint.
La fonction d’arrêt automatique
était activée. Cela se produit
automatiquement lorsque la
centrale vapeur n’a pas été
utilisée ou que la gâchette
vapeur n’a pas été actionnée
pendant plus de 15 minutes.
Réglez le bouton marche/arrêt sur la
position d’arrêt, puis sur la position de
marche.
Le fer produit un
bruit de pompe.
Le réservoir d’eau est vide. Remplissez le réservoir d’eau avec de l’eau
et appuyez sur la gâchette vapeur jusqu’à
ce que le bruit de pompe s’atténue et que
de la vapeur s’échappe de la semelle.
Des gouttes
d’eau s’écoulent
de la semelle.
Après le traitement anticalcaire,
de l’eau peut s’écouler de la
semelle.
Essuyez la semelle à l’aide d’un chiffon. Si le
voyant Calc-Clean continue de clignoter et
si l’appareil continue d’émettre des signaux
sonores, exécutez le traitement anticalcaire
(voir le chapitre « IMPORTANT -
Nettoyage et entretien »).
Le traitement anticalcaire n’est
pas terminé.
Vous devez exécuter à nouveau le
traitement anticalcaire (voir le chapitre
« IMPORTANT - Nettoyage et
entretien »).
De l’eau sale et
des impuretés
s’écoulent de la
semelle.
Des impuretés ou dépôts de
calcaire se sont formés sur les
évents à vapeur et/ou la
semelle.
Exécutez régulièrement le traitement
anticalcaire (voir le chapitre
« IMPORTANT - Nettoyage et
entretien »).
De l’eau s’écoule
de la semelle.
Vous avez accidentellement
démarré le traitement
anticalcaire (voir le chapitre
« IMPORTANT - Nettoyage et
entretien »).
Éteignez l’appareil, puis rallumez-le. Réglez
le thermostat sur le réglage de
température souhaité, et non sur CALC
CLEAN. Laissez le fer chauffer jusqu’à ce
que le voyant « Fer prêt » reste allumé.
Le traitement
anticalcaire ne
démarre pas.
Vous n’avez pas réglé le
thermostat sur Calc-Clean ou
vous n’avez pas attendu que le
fer chauffe.
Consultez le chapitre « IMPORTANT -
Nettoyage et entretien ».
FRANÇAIS14

Problème Cause possible Solution
Vous n’avez pas appuyé sur le
bouton Calc-Clean pendant
2 secondes jusqu’à ce que
l’appareil commence à émettre
des signaux sonores.
Consultez le chapitre « IMPORTANT -
Nettoyage et entretien ».
Des gouttes
d’eau sont visibles
dans l’appareil
lorsque je retire
le réservoir d’eau.
De l’eau s’écoule du circuit
d’écoulement entre le réservoir
d’eau et le support. Ce
phénomène est normal.
Ces gouttelettes d’eau sont sans danger.
Si vous le souhaitez, vous pouvez essuyer
les gouttes d’eau avec un chiffon sec.
Le débit de
vapeur est faible.
Vous n’appuyez pas en continu
sur la gâchette vapeur.
Gardez le déclencheur de vapeur enfoncé
de manière continue lorsque vous
déplacez le fer sur le tissu.
La vapeur ne
sort pas
immédiatement
lorsque j’appuie
sur la gâchette
vapeur.
L’eau est transformée en vapeur
dans la semelle. Lorsque vous
appuyez sur la gâchette vapeur,
il faut 1 à 2 secondes pour que
la vapeur soit générée et
libérée. Ce phénomène est
normal.
Gardez le déclencheur de vapeur enfoncé
de manière continue lorsque vous
déplacez le fer sur le tissu.
FRANÇAIS 15

16
Pendahuluan
Selamat atas pembelian Anda dan selamat datang di Philips! Untuk memanfaatkan sepenuhnya
dukungan yang ditawarkan Philips, daftarkan produk Anda di www.philips.com/welcome.
Baca petunjuk pengguna ini, pamet informasi penting, dan panduan cepat pada kemasan dengan
saksama sebelum Anda menggunakan alat ini. Simpanlah untuk referensi jika dibutuhkan kelak.
Gambaran umum (Gbr. 3)
1 Lampu ‘iron ready’
2 Tombol Calc-Clean dengan lampu Calc-Clean
3 Pemicu uap
4 Putaran suhu
5 Tumit
6 Selang pasokan
7 Tempat penyimpanan kabel
8 Sakelar on/off
9 Pengunci saat membawa
10 Kabel listrik
11 Steker listrik
12 Tempat penyimpanan selang
13 Tangki air lepas-pasang
14 Lubang pengisian
15 Tanda MAX
16 Tombol pelepas tangki air
17 Gagang tangki air
18 Wadah Smart Calc-Clean
Menyetel suhu
Setel suhu penyetrikaan yang diperlukan dengan memutar putaran suhu ke posisi yang sesuai.
Alat menyesuaikan uap secara otomatis, bergantung pada setelan suhu penyetrikaan.
Setelan suhu Setelan uap otomatis Jenis kain
SYNTH ke 1
Kain sintetis (mis. asetat, akrilik, nilon,
poliamida).
2
Wol, viskose, poliester dan sutra.
3 ke LINEN
Katun, linen
Air yang disarankan: air suling atau tanpa campuran mineral
Alat Anda dirancang untuk digunakan dengan air keran. Jika Anda tinggal di area dengan kesadahan
air yang tinggi, kerak akan cepat terbentuk. Karena itu, disarankan untuk menggunakan air suling atau
tanpa campuran mineral untuk memperpanjang masa pakai alat Anda.
Jangan tambahkan parfum, air dari pengering pakaian, cuka, kanji, zat pembersih kerak, pelicin
pakaian, air bebas kerak dengan proses kimia, atau bahan kimia lain, karena dapat menyebabkan
semburan air, noda coklat, atau kerusakan pada alat.
INDONESIA

PENTING - Membersihkan dan pemeliharaan
Sistem Smart Calc-Clean
Alat Anda telah didesain dengan sistem Smart Calc-Clean untuk memastikan bahwa pembersihan
kerak dan pencucian dilakukan secara berkala. Hal ini membantu mempertahankan kinerja uap yang
kuat dan menghindari kotoran dan noda keluar dari tapak setrika seiring berjalannya waktu. Untuk
memastikan proses pembersihan dilakukan, pembuat uap memberikan peringatan secara berkala.
Selain itu, langkah pertahanan kedua untuk melindungi pembuat uap dari kerak diintegrasikan: fungsi
uap dinonaktifkan jika pembersihan kerak tidak dilakukan setelah 1 jam penyetrikaan dengan uap
setelah pengingat dibunyikan. Setelah pembersihan kerak selesai, fungsi uap kembali dapat digunakan.
Hal ini tetap berjalan tanpa memperhatikan jenis air yang digunakan.
Suara dan lampu pengingat Calc-Clean
- Setelah 1 hingga 3 bulan penggunaan, lampu Calc-Clean mulai berkedip dan alat berbunyi bip
untuk menandakan bahwa Anda harus menjalankan proses Calc-Clean (Gbr. 4).
- Anda bisa terus melanjutkan penyetrikaan uap selama 1 jam saat lampu Calc-Clean berkedip
dan alat berbunyi bip. Setelah 1 jam, fungsi uap dinonaktifkan secara otomatis. Anda harus
menjalankan proses Calc-Clean sebelum penyetrikaan uap bisa dilanjutkan. (Gbr. 5)
Tip: Anda bisa melanjutkan dengan penyetrikaan kering dengan tidak menekan pemicu uap.
Menjalankan proses Calc-Clean dengan wadah Calc-Clean
Jangan meninggalkan alat tanpa pengawasan selama proses Calc-Clean.
Perhatian: Jangan menghambat proses dengan mengangkat setrika dari wadah Calc-Clean, karena
air panas dan uap akan keluar dari tapak setrika.
1 Isi tangki air hingga setengahnya. Lihat panduan cepat terpisah untuk petunjuk tentang cara
melepas tangki air (Gbr. 6).
2 Pastikan bahwa alat dicolokkan ke stopkontak dan disetel ke posisi ON selama proses
Calc-Clean (Gbr. 7).
3 Setel putaran suhu ke Calc-Clean (Gbr. 8).
4 Letakkan wadah Calc-Clean di atas meja setrika atau di atas permukaan datar stabil lainnya
(Gbr. 9).
5 Letakkan setrika dengan stabil di wadah Calc-Clean.
Catatan: Wadah Calc-Clean dirancang untuk mengumpulkan partikel kerak dan air panas selama proses
Calc-Clean. Setrika akan aman diletakkan pada wadah ini selama proses berlangsung.
6 Tekan dan tahan tombol Calc-Clean selama 2 detik hingga Anda mendengar bunyi bip singkat
(Gbr. 10).
7 Selama berlangsungnya proses Calc-Clean, Anda mendengar bunyi bip singkat dan suara
memompa. Tunggu hingga 2 menit hingga alat menyelesaikan proses (Gbr. 11).
8 Ketika proses Calc-Clean selesai, setrika berhenti berbunyi bip (Gbr. 12).
9 Seka setrika dengan selembar kain dan letakkan kembali ke dudukannya (Gbr. 13).
10 Karena wadah Calc-Clean akan memanas selama proses Calc-Clean, tunggu sekitar 5 menit
sebelum Anda menyentuhnya.
INDONESIA 17

11 Bila perlu, Anda dapat mengulang langkah 1 hingga 11. Pastikan Anda mengosongkan wadah
Calc-Clean sebelum Anda memulai proses Calc-Clean.
Catatan: Selama proses Calc-Clean, air bersih mungkin keluar dari tapak setrika jika tidak ada kerak
yang menumpuk di dalam setrika. Ini normal.
Mode pengaman mati-otomatis (hanya tipe tertentu)
- Untuk menghemat energi, pembuat uap dimatikan secara otomatis bila tidak digunakan selama
15 menit. Lampu ‘iron ready’ berkedip.
- Untuk mengaktifkan pembuat uap kembali, setel sakelar on/off ke posisi ‘off’ lalu ke posisi ‘on’.
Mengatasi masalah
Bab ini merangkum berbagai masalah paling umum yang mungkin Anda temui pada alat Anda. Jika
Anda tidak dapat mengatasi masalah dengan informasi di bawah, kunjungi www.philips.com/
support untuk daftar pertanyaan yang sering diajukan atau hubungi Pusat Layanan Pelanggan di
negara Anda.
Masalah Kemungkinan penyebab: Solusi
Setrika tidak
mengeluarkan
uap sama sekali.
Air dalam tangki tidak cukup. Isi tangki air di atas tanda MIN. Tekan dan
tahan pemicu uap hingga uap keluar.
Mungkin perlu waktu 30 detik hingga uap
keluar.
Anda belum menekan pemicu
uap.
Tekan dan tahan pemicu uap hingga uap
keluar.
Anda sudah menyetel putaran
suhu ke 1.
Setel putaran suhu ke 2 atau yang lebih
tinggi.
Fungsi uap sudah dinonaktifkan
hingga proses Calc-Clean selesai
dilakukan.
Lakukan proses Calc-Clean untuk
memulihkan fungsi uap (lihat bab
‘PENTING - Membersihkan dan
pemeliharaan’).
Anda belum memasang tangki
air dengan benar pada alat.
Geser tangki air ke dalam alat hingga
terkunci di tempatnya (terdengar bunyi
‘klik’).
Lampu Calc-
Clean berkedip
dan alat berbunyi
bip.
Ini adalah pengingat Calc-Clean. Lakukan proses Calc-Clean dalam waktu
1 jam setelah pengingat Calc-Clean
muncul.
Lampu Calc-
Clean berkedip
dan/atau alat
berbunyi bip.
Anda belum melakukan atau
menyelesaikan proses Calc-
Clean.
Lakukan proses Calc-Clean untuk
mengaktifkan fungsi uap lagi (lihat bab
‘PENTING - Membersihkan dan
pemeliharaan’).
INDONESIA18

Masalah Kemungkinan penyebab: Solusi
Lampu Calc-
Clean berkedip
dan alat berbunyi
bip setiap kali
saya menekan
pemicu uap. Tidak
ada uap yang
muncul dari tapak
setrika.
Anda belum melakukan atau
menyelesaikan proses Calc-
Clean.
Lakukan proses Calc-Clean untuk
mengaktifkan fungsi uap lagi (lihat bab
‘PENTING - Membersihkan dan
pemeliharaan’).
Alat mati. Fungsi pengaman mati-otomatis
diaktifkan. Ini terjadi secara
otomatis saat pembuat uap tidak
digunakan atau pemicu uap tidak
ditekan selama 15 menit.
Setel sakelar on/off ke posisi ‘off’ lalu ke
posisi ‘on’.
Alat
mengeluarkan
bunyi
pemompaan yang
keras.
Tangki air kosong. Isi ulang tangki air dengan air dan tekan
pemicu uap hingga suara pompa melemah
dan uap keluar dari tapak setrika.
Air menetes dari
tapak setrika.
Setelah proses Calc-Clean, air
yang tersisa mungkin menetes
dari tapak setrika.
Lap tapak setrika dengan kain kering. Jika
lampu Calc-Clean tetap berkedip dan alat
masih berbunyi bip, lakukan proses
Calc-Clean (lihat bab ‘PENTING -
Membersihkan dan pemeliharaan’).
Proses Calc-Clean belum
diselesaikan.
Anda harus menjalankan proses
Calc-Clean lagi (lihat bab ‘PENTING
- Membersihkan dan pemeliharaan’).
Air kotor dan
kotoran keluar
dari tapak setrika.
Kotoran atau bahan kimia yang
terkandung di dalam air sudah
mengendap di lubang uap dan/
atau pada tapak setrika.
Lakukan proses Calc-Clean secara berkala
(lihat bab ‘PENTING - Membersihkan dan
pemeliharaan’).
Air keluar dari
tapak setrika.
Anda secara tidak sengaja
menjalankan proses Calc-Clean
(lihat bab ‘PENTING -
Membersihkan dan
pemeliharaan’).
Matikan alat. Lalu hidupkan lagi. Setel
putaran suhu ke setelan suhu yang
diinginkan, alih-alih disetel ke CÁLC
CLEAN. Biarkan setrika memanas hingga
lampu ‘iron ready’ terus menyala.
Proses Calc-
Clean tidak
dimulai.
Anda belum menyetel putaran
suhu ke Calc-Clean atau Anda
belum menunggu hingga setrika
memanas.
Lihat bab ‘PENTING - Membersihkan dan
pemeliharaan’.
Anda belum menekan tombol
Calc-Clean selama 2 detik hingga
alat mulai berbunyi bip.
Lihat bab ‘PENTING - Membersihkan dan
pemeliharaan’.
INDONESIA 19

Masalah Kemungkinan penyebab: Solusi
Terdapat tetesan
air pada alat
ketika saya
melepas tangki air.
Air keluar dari jalur air antara
tangki air dan dudukan. Hal ini
normal.
Tetesan air ini tidak berbahaya. Jika mau,
Anda bisa menyekanya dengan kain kering.
Keluaran uap
rendah.
Anda tidak terus menekan
pemicu uap.
Tetap tekan pemicu uap saat Anda
menggerakkan setrika di atas kain.
Uap tidak
langsung keluar
setelah saya
melepaskan
pemicu uap.
Air diubah menjadi uap di tapak
setrika. Saat Anda menekan
pemicu uap, diperlukan waktu
sekitar 1 hingga 2 detik sampai
uap terkumpul dan
dikeluarkan. Ini adalah hal yang
normal.
Tetap tekan pemicu uap saat Anda
menggerakkan setrika di atas kain.
INDONESIA20
ページが読み込まれています...
ページが読み込まれています...
ページが読み込まれています...
ページが読み込まれています...
ページが読み込まれています...
ページが読み込まれています...
ページが読み込まれています...
ページが読み込まれています...
ページが読み込まれています...
ページが読み込まれています...
ページが読み込まれています...
ページが読み込まれています...
ページが読み込まれています...
ページが読み込まれています...
ページが読み込まれています...
ページが読み込まれています...
ページが読み込まれています...
ページが読み込まれています...
ページが読み込まれています...
ページが読み込まれています...
ページが読み込まれています...
ページが読み込まれています...
ページが読み込まれています...
ページが読み込まれています...
ページが読み込まれています...
ページが読み込まれています...
ページが読み込まれています...
ページが読み込まれています...
ページが読み込まれています...
ページが読み込まれています...
ページが読み込まれています...
ページが読み込まれています...
ページが読み込まれています...
ページが読み込まれています...
ページが読み込まれています...
ページが読み込まれています...
ページが読み込まれています...
ページが読み込まれています...
ページが読み込まれています...
ページが読み込まれています...
ページが読み込まれています...
ページが読み込まれています...
ページが読み込まれています...
ページが読み込まれています...
-
 1
1
-
 2
2
-
 3
3
-
 4
4
-
 5
5
-
 6
6
-
 7
7
-
 8
8
-
 9
9
-
 10
10
-
 11
11
-
 12
12
-
 13
13
-
 14
14
-
 15
15
-
 16
16
-
 17
17
-
 18
18
-
 19
19
-
 20
20
-
 21
21
-
 22
22
-
 23
23
-
 24
24
-
 25
25
-
 26
26
-
 27
27
-
 28
28
-
 29
29
-
 30
30
-
 31
31
-
 32
32
-
 33
33
-
 34
34
-
 35
35
-
 36
36
-
 37
37
-
 38
38
-
 39
39
-
 40
40
-
 41
41
-
 42
42
-
 43
43
-
 44
44
-
 45
45
-
 46
46
-
 47
47
-
 48
48
-
 49
49
-
 50
50
-
 51
51
-
 52
52
-
 53
53
-
 54
54
-
 55
55
-
 56
56
-
 57
57
-
 58
58
-
 59
59
-
 60
60
-
 61
61
-
 62
62
-
 63
63
-
 64
64


