
GC6700 series
© 2017 Koninklijke Philips N.V.
All rights reserved
4239 001 07091
>75% recycled paper
>75% papier recyclé
User Manual
사용 설명서
Manual pengguna
คู่มือผู้ใช้
Hướng dẫn sử dụng
用户手册
使用手冊

2x
2 min.
2
31
6
10
14
18 19 20 21
22 23 24
15 16 17
11 12 13
7 8 9
4 5
8 9
10
11
12
14
13
43 5 6
7
21


6
Introduction
Congratulations on your purchase and welcome to Philips! To fully benet from the support that
Philips oers, register your product at www.philips.com/welcome.
Read this user manual, the important information leaet, and the quick start guide carefully before
you use the appliance. Save them for future reference.
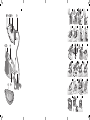
Product overview (Fig. 1)
1 Soleplate
2 ‘Iron ready’ light
3 CALC-CLEAN button with light
4 Steam trigger/Steam boost
5 Temperature dial
6 Water supply hose
7 Heel
8 Water tank lling door
9 Carry lock release button (GC6730 series only)
10 Iron platform
11 On/o switch
12 Mains cord with plug
13 Water supply hose and mains cord storage compartment
14 Smart Calc-Clean container
Exclusive technology from Philips
Compact ProVelocity technology
This technology delivers continuous steam that penetrates deeply to remove creases easily. At the
same time, it keeps the appliance more compact and lighter than traditional steam generators, for
easier storage.
Preparing for use
Type of water to use
This appliance has been designed to be used with tap water. However, if you live in an area with hard
water, fast scale build-up may occur. Therefore, it is recommended to use distilled or demineralized
water to prolong the lifetime of the appliance.
Warning: Do not use perfumed water, water from the tumble dryer, vinegar, starch,
descaling agents, ironing aids, chemically descaled water or other chemicals, as they
may cause water spitting, brown staining or damage to your appliance.
Filling the water tank
Fill the water tank before every use or when the water level in the water tank drops below the
minimum level. You can rell the water tank at any time during use.
1 Open the water tank lling door (Fig. 2).
2 Fill the water tank up to the MAX indication (Fig. 3).
3 Close the water tank lling door (‘click’).
English

7
Using the appliance
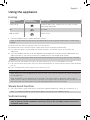
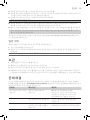
Ironing
Temperature
setting
Automatic
steam setting
Fabric type
SYNTH to ● Synthetic fabrics (e.g., acetate, acrylic, nylon, viscose,
polyamide, polyester)
●●
Silk, wool
●●● to LINEN Cotton, linen
1 Place the appliance on a stable and even surface.
Note: In order to ensure safe ironing we recommend to always place the base on a stable ironing
board.
2 Make sure that there is enough water in the water tank.
3 Remove the mains cord and water supply hose from the storage compartment.
4 Put the mains plug in an earthed wall socket and press the on/o switch to switch on the
appliance.
5 Turn the temperature dial to set the appropriate temperature according to the table above. The
appliance adjusts the steam automatically depending on the temperature chosen.
Note: refer to the garment label for recommended temperature setting. Do not iron non-ironable
fabrics.
6 Wait until the ‘iron ready’ light lights up continuously (Fig. 4). This takes about 2 minutes.
7 For GC6730 series only: press the carry lock release button to unlock the iron from the iron platform
(Fig. 5).
8 Press and hold the steam trigger to start ironing (Fig. 6).
Warning: Never direct steam at people.
Note: When you use the appliance for the rst time, it may take 30 seconds for steam to come out
of the appliance.
Note: The pump is activated each time you press the steam trigger. It produces subtle rattling
sound, which is normal. When there is no water in the water tank, the pump sound is louder. Fill up
the water tank with water when the water level drops below the minimum level.
Steam boost function
1 Press the steam trigger twice quickly to release a powerful boost of steam for 3 seconds (Fig. 7).
Note: it is recommended to use the steam boost function only for stubborn crease.
Vertical ironing
Warning: Hot steam is emitted from the iron. Never attempt to remove wrinkles
from a garment while someone is wearing it (Fig. 8). Do not apply steam near your or
someone else’s hand.
English

8
You can use the steam iron in vertical position to remove wrinkles from hanging fabrics.
1 Hold the iron in vertical position, press the steam trigger and touch the garment lightly with the
soleplate and move the iron up and down (Fig. 9).
Auto shut-o
- The appliances enters the standby mode if it has not been used for 15 minutes. The “iron ready”
light starts to ash.
- To activate the appliance again, press the steam trigger. The appliance starts to heat up again.
- The appliance switches o automatically if it has not been used for another 10 minutes after it
enters the standby mode. The “iron ready” light goes o.
Warning: Never leave the appliance unattended when it is connected to the mains.
Always unplug the appliance after use.
Cleaning and maintenance
Smart Calc-Clean System
Your appliance has been designed with a Smart Calc-Clean system to ensure that descaling and
cleaning is done regularly. This helps to maintain a strong steam performance and prevents dirt and
stains coming out of the soleplate over time. To ensure that the cleaning process is performed, the
appliance gives regular reminders.
Sound and light Calc-Clean reminder
After 1 to 3 months of use, the Calc-Clean light starts ashing and the appliance starts beeping to
indicate that you have to perform the Calc-Clean process (Fig. 10).
Besides that, a second defense step to protect the appliance from scale is integrated: the steam
function gets disabled if descaling is not done (Fig. 11). After descaling is done, the steam function will
be restored. This takes place regardless of the type of water used.
Note: The Calc-Clean process can be performed at any time, even when the sound and light reminder
is not activated yet.
Performing the Calc-Clean process with the Calc-Clean
container
Warning: Do not leave the appliance unattended during the Calc-Clean process.
Caution: Always perform the Calc-Clean process with the Calc-Clean container. Do not interrupt
the process by lifting the iron up from the Calc-Clean container, as hot water and steam will come
out of the soleplate.
1 Fill up the water tank halfway (Fig. 12).
Note: Make sure that the appliance is plugged in and switched ON during the Calc-Clean process.
2 Place the Calc-Clean container on the ironing board or any other even, stable surface (Fig. 13).
3 Place the iron stably on the Calc-Clean container (Fig. 14).
4 Press and hold the CALC-CLEAN button for 2 seconds until you hear short beeps (Fig. 15).
English

9
Note: The Calc-Clean container has been designed to collect scale particles and hot water during
the Calc-Clean process. It is perfectly safe to rest the iron on this container during the entire
process.
5 During the Calc-Clean process, you hear short beeps and a pumping sound (Fig. 16).
6 Wait approximately 2 minutes for the appliance to complete the process (Fig. 17). When the
Calc-Clean process is completed, the iron stops beeping and the CALC-CLEAN light stops ashing.
7 Wipe the iron with a piece of cloth and put it back on the base station (Fig. 18).
Caution: The iron is hot.
8 As the Calc-Clean container becomes hot during the Calc-Clean process, wait about 5 minutes
before you touch it. Then carry the Calc-Clean container to the sink, empty it and store it for future
use (Fig. 19).
9 If necessary, you can repeat steps 1 to 8. Make sure that you empty the Calc-Clean container
before you start the Calc-Clean process.
Note: During the Calc-Clean process, clean water may come out of the soleplate if no scale has
accumulated inside the iron. This is normal.
For more information on how to carry out the Calc-Clean process, refer to the videos in this link:
http://www.philips.com/descaling-iron.
Cleaning the soleplate
To properly maintain your appliance, clean it regularly.
1 Clean the appliance with a moist cloth.
2 To easily and eectively remove stains, let the soleplate heat up and move the iron over a moist
cloth (Fig. 20).
Tip: Clean the soleplate regularly to ensure smooth gliding.
Storage
1 Switch o the appliance and unplug it.
2 Pour the water out of the water tank into the sink (Fig. 21).
3 Fold the mains cord and water supply hose together. Push them into the storage compartment
(Fig. 22).
4 For GC6730 series only: push the carry lock release button to lock the iron onto the iron platform
(Fig. 23). You can carry the appliance by the handle of the iron when it is locked onto the iron
platform (Fig. 24).
Troubleshooting
This chapter summarizes the most common problems you could encounter with the appliance. If you
are unable to solve the problem with the information below, visit www.philips.com/support for a list
of frequently asked questions or contact the Consumer Care Center in your country.
English

10
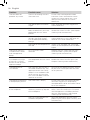
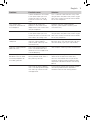
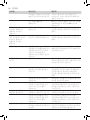
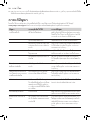
Problem Possible cause Solution
The iron does not
produce any steam.
There is not enough water in
the water tank.
Fill the water tank beyond the MIN
indication. Press and hold the steam
trigger until steam comes out. It may
take up to 30 seconds until steam
comes out.
You did not press the steam
trigger.
Press and hold the steam trigger until
steam comes out.
The steam function has
been disabled until you have
performed the Calc-Clean
process.
Perform the Calc-Clean process to
restore the steam function. (see chapter
'Cleaning and maintenance')
At the start of your ironing
session, the steam trigger
has not been pressed long
enough.
Press and hold the steam trigger until
steam comes out. It may take up to 30
seconds until steam comes out.
You have set the temperature
dial to ●.
Steam is not available at ●. To use the
steam, set the temperature dial to ●● or
higher.
The light of the CALC-
CLEAN button ashes
and the appliance
beeps.
This is the Calc-Clean
reminder.
Perform the Calc-Clean after the Calc-
Clean reminder is given (see chapter
‘Cleaning and maintenance’).
No steam comes out of
the soleplate, the light
of the CALC-CLEAN
button ashes and the
appliance beeps.
You have not done or have
not completed the Calc-Clean
process.
Perform the Calc-Clean process to
enable the steam function again (see
chapter ‘Cleaning and maintenance’).
The appliance has
switched o.
The auto shut-o function is
activated automatically. The
appliance enters the standy
mode if it has not been used
for 15 minutes and switches
o if it has not been used for
another 10 minutes.
To swith on the appliance again, set the
on/o switch to “o” position and then
to “on” position.
The appliance produces
a loud pumping sound.
The water tank is empty. Fill the water tank with water and press
the steam trigger until the pumping
sound becomes softer and steam comes
out of the soleplate.
Water droplets come out
of the soleplate.
After the Calc-Clean process
remaining water may drip out
of the soleplate.
Wipe the soleplate dry with a piece of
cloth. If the Calc-Clean light still ashes
and the appliance still beeps, perform
the Calc-Clean process (see chapter
‘Cleaning and maintenance’).
The Calc-Clean process has
not been completed.
You have to perform the Calc-Clean
process again (see chapter ‘Cleaning and
maintenance’).
English

11
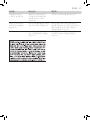
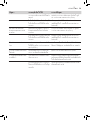
Problem Possible cause Solution
Steam condenses into water
in the hose when you use
steam for the rst time or
have not used it for a long
time.
This is normal. Hold the iron away from
the garment and press the steam trigger.
Wait until steam instead of water comes
out of the soleplate.
Dirty water and
impurities come out of
the soleplate.
Impurities or chemicals
present in the water have
deposited in the steam vents
and/or soleplate.
Perform the Calc-Clean process
regularly (see chapter ‘Cleaning and
maintenance’).
Steam condenses into water
in the hose when you use
steam for the rst time or have
not used it for a long time.
This is normal. Hold the iron away from
the garment and press the steam trigger.
Wait until steam instead of water comes
out of the soleplate.
Water ushes out of the
soleplate.
You have accidentally started
the Calc-Clean process
(see chapter 'Cleaning and
maintenance').
Switch o the appliance. Then switch it
back on again. Let the iron heat up until
the ‘iron ready’ light lights up steadily.
The Calc-Clean process
does not start.
You have not pressed the
CALC-CLEAN button for 2
seconds until the appliance
started beeping.
See chapter ‘Cleaning and maintenance’.
The ironing board cover
becomes wet, or there
are water droplets on
the oor/garment.
Steam has condensed on the
ironing board cover after a
long ironing session.
Replace the ironing board cover if the
foam or felt material has worn out.
You can also add an extra layer of felt
material under the ironing board cover
to prevent condensation on the ironing
board.
You have an ironing board
that is not designed to cope
with the high steam rate of
the appliance.
Put an extra layer of felt material under
the ironing board cover to prevent
condensation on the ironing board.
English

12
한국어
소개
필립스 제품을 구입해 주셔서 감사합니다! 필립스에서 제공하는 지원 혜택을 받으시려면
www.philips.com/welcome에서 제품을 등록해 주십시오.
본 제품을 사용하기 전에 이 사용자 설명서와 중요 정보 책자, 요약 설명서를 주의 깊게 읽고 나중에 참조할 수
있도록 이 설명서를 보관하십시오.
제품 개요(그림 1)
1 열판
2 '다림질 준비' 표시등
3 표시등이 있는 석회질 제거 버튼
4 스팀 버튼/순간 스팀
5 온도 다이얼
6 급수 호스
7 받침대
8 물탱크 물 주입구 뚜껑
9 이동용 고정장치 해제 버튼(GC6730 시리즈만 해당)
10 다리미 플랫폼
11 on/o(켜짐/꺼짐) 스위치
12 플러그 전원 코드
13 급수 호스 및 전원 코드 보관함
14 스마트 석회질 제거 용기
필립스의 독점적 기술
컴팩트
ProVelocity
기술
이 기술은 깊숙이 침투하여 주름을 쉽게 제거하는 연속 스팀을 분사합니다. 그와 동시에 기존 스팀 다리미에
비해 작고 가벼워져 보관이 용이합니다.
사용 준비
사용할
물의
종류
이 제품은 수돗물을 사용하도록 제작되었습니다. 그러나 사용 지역의 수돗물이 경수일 경우, 석회질이 더 빨리
축적될 수 있습니다. 이럴 경우 증류수 또는 탈염수를 사용하면 제품의 수명이 연장됩니다.
경고: 향수, 회전식 건조기의 물, 식초, 풀, 석회질 제거제, 다림질 보조제, 이물질 제거용 화학
약품이나 기타 화학 용품을 넣지 마십시오. 물이 튀거나 갈색 얼룩이 생기거나 제품이 손상될 수
있습니다.
물탱크
채우기
사용하기 전에, 또는 물의 양이 최소량 표시 이하인 경우에 항상 물탱크에 물을 채워주십시오. 다림질하는
도중에 언제나 물탱크의 물을 보충할 수 있습니다.
1 물탱크의 물 주입구 뚜껑을 여십시오(그림 2).

13
한국어
2 물탱크의 MAX 표시선까지 물을 채우십시오(그림 3).
3 물탱크의 물 주입구 뚜껑을 닫으십시오(‘딸깍’ 소리가 남).
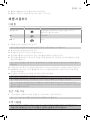
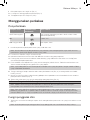
제품 사용하기
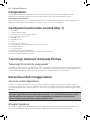
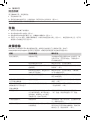
다림질
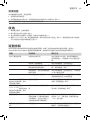
온도 설정 자동 스팀 설정 섬유 종류
합성섬유~● 합성섬유(예: 아세테이트, 아크릴, 나일론, 비스코스,
폴리아미드, 폴리에스테르)
●●
실크, 모직
●●●~마 면, 마
1 제품을 안전하고 평평한 곳에 두십시오.
참고: 안전한 다림질을 위해 받침대는 항상 안정적인 다림판에 놓는 것이 좋습니다.
2 물 탱크에 물이 충분한지 확인하십시오.
3 보관함에서 전원 코드와 급수 호스를 꺼내십시오.
4 전원 플러그를 벽면 콘센트에 꽂고 전원 스위치를 눌러 제품의 전원을 켜십시오.
5 온도 조절기를 돌리면서 위 표에 따라 적당한 온도를 설정하십시오. 선택한 온도에 따라 제품에서 스팀을
자동으로 조절합니다.
참고: 권장 온도 설정은 의류 세탁 표시를 참조하십시오. 다림질이 불가능한 섬유에는 다리미를 사용하지
마십시오.
6 '다림질 준비' 표시등이 켜진 상태로 유지될 때까지 기다리십시오(그림 4). 이 과정에는 약 2분이 걸립니다.
7 GC6730 시리즈만 해당: 다리미 플랫폼에서 다리미의 잠금을 해제하려면 이동용 고정장치 해제 버튼을
누르십시오(그림 5).
8 다림질을 시작하려면 스팀 버튼을 누른 채로 기다립니다(그림 6).
경고: 절대 사람을 향해 스팀을 분사하지 마십시오.
참고: 제품을 처음 사용하는 경우 제품에서 스팀이 나오는 데 30초 정도 소요될 수 있습니다.
참고: 스팀 버튼을 누를 때마다 펌프가 작동합니다. 미세하게 덜거덕거리는 소리가 날 수 있는데 이는
정상적인 현상입니다. 물 탱크에 물이 없으면 펌프 소리가 더 커집니다. 물의 양이 최소량 표시 이하인 경우
물탱크에 물을 채워주십시오.
순간
스팀
기능
1 스팀 버튼을 두 번 빠르게 누르면 강력한 순간 스팀이 3초간 나옵니다(그림 7).
참고: 순간 스팀 기능은 주름이 심한 경우에만 사용하는 것이 좋습니다.
수직
다림질
경고: 다리미에서 뜨거운 스팀이 나옵니다. 사람이 의복을 착용한 상태에서 다림질을 하지
마십시오(그림 8). 본인 또는 주위 사람 손 근처에 스팀을 분사하지 마십시오.
스팀 다리미를 수직 방향으로 사용하여 걸려 있는 옷감의 주름을 제거할 수 있습니다.

14
한국어
1 다리미를 수직으로 들고 스팀 버튼을 눌러 열판을 옷감에 살짝 대고 다리미를 위, 아래로 움직이십시오
(그림 9).
자동
전원
차단
기능
- 제품을 15분 동안 사용하지 않으면 대기 모드로 전환됩니다. "다림질 준비" 표시등이 깜빡이기 시작합니다.
- 제품을 다시 작동하려면 스팀 버튼을 누르십시오. 제품이 다시 예열되기 시작합니다.
- 대기 모드로 전환된 후 다시 10분 동안 사용하지 않으면 제품이 자동으로 꺼집니다. "다림질 준비" 표시등이
꺼집니다.
경고: 제품이 전원에 연결된 상태에서는 자리를 절대 비우지 마십시오. 사용 후 반드시 전원 코드를
뽑으십시오.
세척 및 유지관리
스마트 석회질 제거 시스템
제품에는 석회질 제거 및 청소가 정기적으로 이루어졌는지 확인하는 스마트 석회질 제거 시스템이 내장되어
있습니다. 이를 통해 강력한 스팀 성능을 유지하고 오랜 기간 사용해도 열판에 먼지와 얼룩이 생기는 것을
방지합니다. 청소 과정이 수행되었는지 확인하기 위해 제품에서는 석회질 제거에 대한 정기적 알림 기능을
제공합니다.
사운드
및
석회질
제거
표시등
알림
사용 1~3개월 후 석회질 제거 표시등이 깜빡이기 시작하며 제품에서 신호음을 울려 석회질 제거 작업을
수행해야 한다는 것을 알려줍니다(그림 10).
나아가 제품에 석회질이 쌓이지 않도록 하는 두 번째 보호 단계가 내장되어 있습니다. 석회질 제거를 수행하지
않으면 스팀 기능이 작동하지 않습니다(그림 11). 석회질 제거를 마치면 스팀 기능이 회복됩니다. 이는 사용한
물 종류에 상관없이 동일하게 작동합니다.
참고: 사운드 및 표시등 알림이 아직 작동하지 않은 경우에도 언제든지 석회질 제거 과정을 수행할 수
있습니다.
석회질
제거
용기를
사용하여
석회질
제거
작업
수행
경고: 석회질 제거를 하는 동안 자리를 비우지 마십시오.
주의: 석회질 제거 작업을 수행할 때는 항상 석회질 제거 용기를 사용하십시오. 석회질 제거 작업 중에 다리미를
석회질 제거 용기 위로 들어 올리면 뜨거운 물과 증기가 열판 밖으로 나오게 되므로 주의하십시오.
1 물 탱크를 절반만 채웁니다(그림 12).
참고: 석회질 제거를 하는 동안 제품이 전원에 연결되어 있고 전원 스위치가 켜져 있는지 확인하십시오.
2 석회질 제거 용기를 다림판 또는 평평하고 안정적인 곳에 놓습니다(그림 13).
3 다리미를 석회질 제거 용기에 안정되게 놓습니다(그림 14).
4 짧은 신호음이 울릴 때까지 석회질 제거 버튼을 2초 동안 길게 누릅니다(그림 15).
참고: 석회질 제거 용기는 석회질 제거 작업 중에 석회질 입자 및 뜨거운 물을 모으기 위한 용도로
설계되었습니다. 제거 작업 중에는 다리미를 용기 위에 올려놓아도 안전합니다.

15
한국어
5 석회질 제거 작업 동안 짧은 신호음과 펌프 소리가 납니다(그림 16).
6 석회질 제거 과정이 완료될 때까지 2분 정도 기다리십시오(그림 17). 석회질 제거 과정이 완료되면 다리미의
신호음이 멈추고 석회질 제거 표시등이 깜빡임을 멈춥니다.
7 천으로 다리미를 닦은 다음 다시 받침대 위에 두십시오(그림 18).
주의: 다리미가 뜨껍습니다.
8 석회질 제거 용기는 석회질 제거 작업이 진행되면 뜨거워지므로 약 5분 후에 만지십시오. 석회질 제거
용기를 싱크대로 가져가 비우고 다음 번 사용을 위해 보관하십시오(그림 19).
9 필요 시 1~8단계를 반복할 수 있습니다 석회질 제거 작업을 시작하기 전에 석회질 제거 용기를 비우십시오.
참고: 석회질 제거 작업 중에 다리미 내부에 축적된 석회질이 없는 경우 열판 밖으로 깨끗한 물이 나오게
됩니다. 이는 정상적인 현상입니다.
석회질 제거 작업을 수행하는 방법에 대한 자세한 내용은 http://www.philips.com/descaling-iron 링크에
있는 동영상을 참조하십시오.
열판
세척
제품의 적절한 유지관리를 위해서는 정기적으로 세척해야 합니다.
1 젖은 천으로 제품을 닦아주십시오.
2 손쉽게 그리고 효과적으로 얼룩을 제거하려면, 열판을 예열시켜 다리미를 젖은 천으로 문질러 주십시오
(그림 20).
팁: 정기적으로 열판을 닦아 매끄러운 활주력을 유지하십시오.
보관
1 제품 전원을 끄고 전원 코드를 뽑으십시오.
2 물탱크에 있는 물을 모두 싱크대에 버리십시오(그림 21).
3 전원 코드와 급수 호스를 모두 접으십시오. 보관함에 넣으십시오(그림 22).
4 GC6730 시리즈만 해당: 다리미 플랫폼에 다리미를 고정하려면 이동용 고정장치 해제 버튼을 누르십시오
(그림 23). 다리미 플랫폼에 고정되어 있는 경우 다리미의 손잡이를 잡고 제품을 옮길 수 있습니다(그림 24).
문제 해결
이 란은 제품을 사용하면서 일반적으로 경험하게 되는 문제와 그 해결 방법을 제시합니다. 아래의 정보로도
문제를 해결할 수 없는 경우
www.philips.com/support
를 방문하여 자주 묻는 질문(FAQ) 목록을 참조하거나
해당 지역의 필립스 고객 상담실로 문의하십시오.
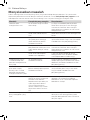
문제점 예상 원인 해결책
다리미에서 스팀이 나오지
않습니다.
물탱크의 물이 충분하지
않습니다.
MIN 표시선 위로 물탱크에 물을
채우십시오. 스팀이 나올 때까지 스팀
버튼을 길게 누르십시오. 스팀이 나올
때까지 30초 정도 걸릴 수 있습니다.
스팀 버튼을 누르지 않았습니다. 스팀이 나올 때까지 스팀 버튼을 길게
누르십시오.
석회질 제거 작업을 수행할
때까지 스팀 기능을 사용할 수
없습니다.
스팀 기능을 회복하려면 석회질 제거 작업을
수행하십시오. ('세척 및 유지관리'란 참조)

16
한국어
문제점 예상 원인 해결책
다림질을 시작할 때 스팀 버튼을
충분히 길게 누르지 않았습니다.
스팀이 나올 때까지 스팀 버튼을 길게
누르십시오. 스팀이 나올 때까지 30초 정도
걸릴 수 있습니다.
온도 조절기를 ●으로
맞췄습니다.
●에서는 스팀을 사용할 수 없습니다. 스팀을
사용하려면 온도 조절기를 ●● 이상으로
맞추십시오.
석회질 제거 버튼의
표시등이 깜빡이거나
제품에서 신호음이
울립니다.
이것이 바로 석회질 제거
알림입니다.
석회질 제거 알림이 발생하면 석회질 제거
작업을 수행하십시오('세척 및 유지관리'란
참조).
열판에서 스팀이 나오지
않고 석회질 제거 버튼의
표시등이 깜빡이며
제품에서 신호음이
울립니다.
석회질 제거 작업을 수행하지
않았거나 완료하지 않았습니다.
스팀 기능을 다시 사용하려면 석회질 제거
작업을 수행하십시오('세척 및 유지관리'란
참조).
제품의 전원이 꺼졌습니다. 자동 전원 차단 기능이 자동으로
작동했습니다. 제품을 15분 동안
사용하지 않으면 대기 모드로
전환되고, 다시 10분 동안
사용하지 않으면 제품의 전원이
꺼집니다.
제품의 전원을 다시 켜려면 전원 스위치를
'O(꺼짐)' 위치로 놓았다가 다시 'On(켜짐)'
위치로 놓으십시오.
제품에서 펌프 소리가 크게
납니다.
물탱크가 비어 있습니다. 물탱크에 물을 채운 다음 펌프 소리가
약해지고 열판에서 스팀이 나올 때까지 스팀
버튼을 계속 누르고 계십시오.
열판에서 물이 떨어집니다. 석회질 제거 작업을 마친 후
열판에서 남은 물이 떨어질 수
있습니다.
천으로 열판을 닦아 건조시키십시오. 여전히
석회질 제거 표시등이 깜빡이고 제품에서
신호음이 울리는 경우에는 석회질 제거
작업을 수행하십시오('세척 및 유지관리'란
참조).
석회질 제거 작업이 완료되지
않았습니다.
석회질 제거 작업을 다시 수행해야 합니다('
세척 및 유지관리'란 참조).
스팀을 처음 사용할 경우 또는
오랫동안 사용하지 않은 경우
스팀이 호스 안에서 물로
응축됩니다.
이는 정상적인 현상입니다. 다리미를
옷감으로부터 멀리 들고 스팀 버튼을 누른
다음 열판에서 물 대신 스팀이 나올 때까지
기다리십시오.
열판에서 더러운 물이나
불순물이 떨어집니다.
스팀 분사구 또는 열판에
이물질이나 물때가 낀 것입니다.
석회질 제거 작업을 주기적으로
수행하십시오('세척 및 유지관리'란 참조).
스팀을 처음 사용할 경우 또는
오랫동안 사용하지 않은 경우
스팀이 호스 안에서 물로
응축됩니다.
이는 정상적인 현상입니다. 다리미를
옷감으로부터 멀리 들고 스팀 버튼을 누른
다음 열판에서 물 대신 스팀이 나올 때까지
기다리십시오.
열판에서 물이 나옵니다. 실수로 석회질 제거 작업을
시작했습니다('세척 및 유지관리'
란 참조).
제품 전원을 끄십시오. 그 다음 다시 전원을
켜십시오. '다림질 준비' 표시등이 계속 켜져
있을 때까지 다리미를 예열하십시오.

17
한국어
문제점 예상 원인 해결책
석회질 제거 작업이
시작되지 않았습니다.
제품에서 신호음이 울리기
시작할 때까지 석회질 제거
버튼을 2초 동안 누르지
않았습니다.
'세척 및 유지관리'란을 참조하십시오.
다림판 덮개가 젖거나
바닥/옷감에 물방울이
떨어집니다.
장시간 다림질을 할 경우 다림판
덮개 위에 스팀이 응축됩니다.
폼 또는 펠트 소재가 낡은 경우 다림판
덮개를 교체하십시오. 다림판 덮개 아래에
펠트 소재를 한 겹 추가해도 다림판의
응결을 방지할 수 있습니다.
가지고 있는 다림판이 다리미의
높은 스팀량을 견디지 못할 수
있습니다.
다림판 덮개 아래에 펠트 소재를 한 겹
추가해도 다림판의 응결을 방지할 수
있습니다.

18
Bahasa Melayu
Pengenalan
Tahniah atas pembelian anda dan selamat menggunakan Philips! Untuk mendapat manfaat
sepenuhnya daripada sokongan yang ditawarkan oleh Philips, daftarkan produk anda di
www.philips.com/welcome.
Baca manual pengguna ini, risalah maklumat penting dan panduan permulaan ringkas dengan teliti
sebelum anda menggunakan perkakas. Simpan untuk rujukan masa hadapan.
Gambaran keseluruhan produk (Raj. 1)
1 Plat tapak
2 Lampu ‘seterika sedia’
3 Butang CALC-CLEAN dengan lampu
4 Picu stim/Penggalak stim
5 Tombol suhu
6 Hos bekalan air
7 Tumit
8 Penutup isian tangki air
9 Butang pelepas kunci pembawa (siri GC6730 sahaja)
10 Platform seterika
11 Suis hidup/mati
12 Kord sesalur kuasa dengan plag
13 Ruang penyimpanan hos bekalan air dan kord sesalur kuasa
14 Bekas Sistem Pembersihan Kerak
Teknologi eksklusif daripada Philips
Teknologi ProVelocity yang padat
Teknologi ini menyalurkan stim berterusan yang menembusi jauh ke dalam baju untuk menghilangkan
kedutan dengan mudah. Pada masa yang sama, teknologi ini memastikan perkakas lebih padat dan
ringan berbanding dengan penjana stim tradisional untuk penyimpanan yang mudah.
Bersedia untuk menggunakan
Jenis air untuk digunakan
Perkakas ini telah direka bentuk untuk digunakan dengan air paip. Akan tetapi, jika anda tinggal di
kawasan yang mempunyai air liat, pembentukan kerak yang cepat mungkin akan berlaku. Oleh sebab
itu, anda disyorkan untuk menggunakan air suling atau air tanpa mineral untuk memanjangkan hayat
perkakas.
Amaran: Jangan gunakan air berwangian, air dari mesin pengering pakaian, cuka, kanji,
agen penanggal kerak, bahan bantu penyeterikaan, air yang dinyahkerak secara kimia
atau bahan kimia lain, kerana ini boleh menyebabkan air berdetus, kesan kotoran
berwarna perang atau kerosakan pada perkakas anda.
Mengisi tangki air
Isi tangki air sebelum setiap penggunaan atau apabila aras air di dalam tangki jatuh di bawah aras
minimum. Anda boleh mengisi semula tangki air pada bila-bila masa semasa menyeterika.

19
Bahasa Melayu
1 Buka penutup isian tangki air (Raj. 2).
2 Isi tangki air sehingga penunjuk MAX (Raj. 3).
3 Tutup penutup isian tangki air (‘klik’).
Menggunakan perkakas
Penyeterikaan
Tetapan suhu Tetapan stim
automatik
Jenis fabrik
SINTETIK hingga ● Kain sintetik (contohnya, asetat, akrilik, nilon, viskos,
poliamida, poliester)
●●
Sutera, wul
●●● hingga LINEN Kain kapas, linen
1 Letakkan perkakas pada permukaan yang stabil dan rata.
Nota: Untuk memastikan penyeterikaan yang selamat, kami mengesyorkan agar anda sentiasa
meletakkan tapak pada papan seterika yang stabil.
2 Pastikan air di dalam tangki air mencukupi.
3 Keluarkan kord sesalur kuasa dan hos bekalan air dari ruang penyimpanan.
4 Pasang plag sesalur kuasa ke dalam soket dinding yang dibumikan dan tekan suis hidup/mati
untuk menghidupkan perkakas.
5 Putar tombol suhu kepada suhu yang sesuai mengikut jadual di atas. Perkakas melaraskan stim
secara automatik bergantung pada suhu yang dipilih.
Nota: rujuk label pakaian untuk mengetahui tetapan suhu yang disyorkan. Jangan seterika fabrik
yang tidak boleh diseterika.
6 Tunggu sehingga lampu ‘seterika sedia’ menyala berterusan (Raj. 4). Ini mengambil masa lebih
kurang 2 minit.
7 Untuk siri GC6730 sahaja: tekan butang pelepas kunci pembawa untuk membuka kunci seterika
pada platform seterika (Raj. 5).
8 Tekan dan tahan picu stim untuk memulakan penyeterikaan (Raj. 6).
Amaran: Jangan sekali-kali menghalakan stim kepada sesiapa.
Nota: Apabila anda menggunakan perkakas ini buat kali pertama, perkakas akan mungkin
mengambai masa selama 30 saat untuk mengeluarkan stim.
Nota: Pam akan diaktifkan setiap kali anda menekan picu stim. Anda akan mendengar bunyi
berdetar yang perlahan, ini perkara biasa. Apabila tiada air di dalam tangki air, bunyi pam akan
menjadi lebih kuat. Isi tangki air apabila aras air di dalam tangki jatuh di bawah aras minimum.
Fungsi penggalak stim
1 Tekan picu stim dua kali dengan cepat untuk mengeluarkan pancutan stim yang kuat selama 3 saat
(Raj. 7).
Nota: anda disyorkan agar menggunakan fungsi penggalak stim untuk kedutan degil sahaja.

20
Bahasa Melayu
Penyeterikaan menegak
Amaran: Stim panas akan keluar dari seterika. Jangan cuba menghilangkan kedutan
baju yang sedang dipakai (Raj. 8). Jangan kenakan stim berdekatan tangan anda atau
orang lain.
Anda boleh menggunakan seterika stim dalam keadaan menegak untuk menghilangkan kedutan baju
yang digantung.
1 Pegang seterika dalam kedudukan menegak, tekan picu stim dan sentuhkan plat tapak pada
pakaian dengan lembut sambil menggerakkannya ke atas dan bawah (Raj. 9).
Pematian auto
- Perkakas ini akan beralih kepada mod siap sedia jika tidak digunakan selama 15 minit. Lampu
“seterika sedia” akan mula bernyala.
- Untuk mengaktifkan perkakas sekali lagi, tekan picu stim. Perkakas mula menjadi panas sekali lagi.
- Perkakas akan dimatikan secara automatik jika tidak digunakan selama 10 minit lagi selepas beralih
kepada mod siap sedia. Lampu “seterika sedia” akan mati.
Amaran: Jangan biarkan perkakas tanpa dijaga apabila disambungkan pada sesalur
kuasa. Cabut plag perkakas setiap kali selepas digunakan.
Pembersihan dan penyelenggaraan
Sistem Pembersihan Kerak Pintar
Perkakas anda telah direka bentuk dengan sistem Pembersihan Kerak Pintar untuk memastikan
pembersihan dan penanggalan kerak dilakukan dengan tetap. Ini membantu mengekalkan prestasi
stim yang kuat dan mengelakkan habuk serta kotoran keluar dari plat tapak dari masa ke masa. Untuk
memastikan proses pembersihan dilakukan, perkakas akan memberikan peringatan berkala.
Peringatan bunyi dan lampu Pembersihan Kerak
Selepas penggunaan selama 1 hingga 3 bulan, lampu Pembersihan Kerak akan mula bernyala dan
perkakas akan mula mengeluarkan bunyi bip yang menandakan anda perlu melakukan proses
Pembersihan Kerak (Raj. 10).
Selain itu, langkah keselamatan kedua untuk melindungi perkakas daripada kerak telah disepadukan:
fungsi stim akan dinyahdayakan jika penanggalan kerak tidak dilakukan (Raj. 11). Selepas penanggalan
kerak dilakukan, fungsi stim akan dipulihkan. Ini berlaku tanpa mengambil kira jenis air yang
digunakan.
Nota: Proses Pembersihan Kerak boleh dilakukan pada bila-bila masa, walaupun peringatan bunyi
dan lampu belum diaktifkan lagi.
Melakukan proses Pembersihan Kerak dengan bekas
Pembersihan Kerak
Amaran: Jangan tinggalkan perkakas tanpa dijaga sewaktu proses Pembersihan Kerak.
Awas: Lakukan proses Pembersihan Kerak dengan bekas Pembersihan Kerak sahaja. Jangan ganggu
proses dengan mengangkat seterika dari bekas Pembersihan Kerak, kerana air panas dan stim akan
keluar dari plat tapak.

21
Bahasa Melayu
1 Isi separuh tangki air (Raj. 12).
Nota: Pastikan palam perkakas dimasukkan dan perkakas DIHIDUPKAN sewaktu proses
Pembersihan Kerak.
2 Letakkan bekas Pembersihan Kerak pada papan seterika atau lain-lain permukaan yang stabil dan
rata (Raj. 13).
3 Letakkan seterika dengan stabil pada bekas Pembersihan Kerak (Raj. 14).
4 Tekan dan tahan butang CALC-CLEAN selama 2 saat sehingga anda mendengar bunyi bip singkat
(Raj. 15).
Nota: Bekas Pembersihan Kerak telah direka bentuk untuk mengumpulkan partikel kerak dan
air panas sewaktu proses Pembersihan Kerak. Anda boleh meletakkan seterika pada bekas ini
sewaktu proses tersebut kerana ini selamat.
5 Sewaktu proses Pembersihan Kerak, anda akan mendengar bunyi bip singkat dan bunyi pam (Raj.
16).
6 Tunggu lebih kurang 2 minit untuk perkakas melengkapkan proses tersebut (Raj. 17). Apabila proses
Pembersihan Kerak selesai, seterika akan berhenti berbunyi bip dan lampu CALC-CLEAN akan
berhenti bernyala.
7 Lap seterika dengan kain dan letakkannya kembali di stesen pangkalan (Raj. 18).
Awas: Seterika panas.
8 Apabila bekas Pembersihan Kerak menjadi panas sewaktu proses Pembersihan Kerak, tunggu kira-
kira 5 minit sebelum anda menyentuhnya. Kemudian, bawa bekas Pembersihan Kerak ke singki,
kosongkannya dan simpan untuk penggunaan masa hadapan (Raj. 19).
9 Jika perlu, anda boleh mengulangi langkah 1 hingga 8. Pastikan anda mengosongkan bekas
Pembersihan Kerak sebelum memulakan proses Pembersihan Kerak.
Nota: Sewaktu proses Pembersihan Kerak, air yang bersih mungkin keluar dari plat tapak jika tiada
kerak yang terkumpul di dalam seterika. Ini perkara biasa.
Untuk mendapatkan maklumat lanjut tentang cara melakukan proses Pembersihan Kerak, rujuk video
dalam pautan ini: http://www.philips.com/descaling-iron.
Membersihkan plat tapak
Untuk menyelenggarakan perkakas anda dengan betul, bersihkan perkakas dengan kerap.
1 Bersihkan perkakas dengan kain lembap.
2 Untuk menghilangkan kotoran dengan mudah dan berkesan, biarkan plat tapak menjadi panas dan
gerakkan seterika pada kain lembap (Raj. 20).
Petua: Bersihkan plat tapak dengan kerap untuk memastikan peluncuran yang licin.
Penyimpanan
1 Matikan perkakas dan cabut plagnya.
2 Tuangkan air keluar dari tangki air ke dalam sink (Raj. 21).
3 Lipat kord sesalur kuasa dan hos bekalan air bersama-sama. Simpan di dalam ruang penyimpanan
(Raj. 22).
4 Untuk siri GC6730 sahaja: tekan butang pelepas kunci pembawa untuk membuka kunci seterika
pada platform seterika (Raj. 23). Anda boleh membawa seterika menggunakan pemegang seterika
apabila dikunci pada platform seterika (Raj. 24).

22
Bahasa Melayu
Menyelesaikan masalah
Bab ini meringkaskan masalah paling lazim yang anda hadapi dengan perkakas. Jika anda tidak
dapat menyelesaikan masalah dengan maklumat di bawah, lawati www.philips.com/support untuk
mendapatkan senarai soalan lazim atau hubungi Pusat Layanan Pelanggan di negara anda.
Masalah Penyebab yang mungkin Penyelesaian
Seterika tidak
menghasilkan stim.
Air di dalam tangki air tidak
mencukupi.
Isi tangki air melebihi penunjuk MIN.
Tekan dan tahan picu stim sehingga
stim keluar. Perkakas akan mungkin
mengambil masa selama 30 saat untuk
mengeluarkan stim.
Anda tidak menekan picu
stim.
Tekan dan tahan picu stim sehingga stim
keluar.
Fungsi stim telah
dinyahdayakan sehingga
anda melakukan proses
Pembersihan Kerak.
Lakukan proses Pembersihan Kerak
untuk memulihkan fungsi stim. (lihat bab
‘Pembersihan dan penyelenggaraan’)
Pada permulaan sesi
penyeterikaan anda, picu stim
tidak ditekan dengan cukup
lama.
Tekan dan tahan picu stim sehingga
stim keluar. Perkakas akan mungkin
mengambil masa selama 30 saat untuk
mengeluarkan stim.
Anda telah menetapkan
tombol suhu kepada ●.
Tiada stim pada tetapan ●. Untuk
menggunakan stim, tetapkan tombol
suhu kepada ●● atau lebih tinggi.
Lampu butang CALC-
CLEAN berkelip dan
perkakas mengeluarkan
bunyi bip.
Ini ialah peringatan
Pembersihan Kerak.
Lakukan proses Pembersihan Kerak
selepas peringatan Pembersihan Kerak
diberikan (lihat bab ‘Pembersihan dan
penyelenggaraan’).
Stim tidak keluar dari
plat tapak, lampu
butang CALC-CLEAN
berkelip dan perkakas
mengeluarkan bunyi bip.
Anda tidak melakukan atau
belum melengkapkan proses
Pembersihan Kerak.
Lakukan proses Pembersihan Kerak
untuk mendayakan fungsi stim sekali
lagi (lihat bab ‘Pembersihan dan
penyelenggaraan’).
Perkakas telah mati. Fungsi pematian automatik
diaktifkan secara automatik.
Perkakas akan beralih
kepada mod siap sedia jika
tidak digunakan selama
15 minit dan dimatikan
secara automatik jika tidak
digunakan selama 10 minit
lagi.
Untuk mengaktifkan semula perkakas,
tetapkan suis hidup/mati kepada
kedudukan “mati”, kemudian kepada
kedudukan “hidup”.
Perkakas mengeluarkan
bunyi mengepam yang
kuat.
Tangki air kosong. Isi semula tangki air dengan air dan
tekan picu stim sehingga bunyi pam
menjadi lebih perlahan dan stim keluar
dari plat tapak.
ページが読み込まれています...
ページが読み込まれています...
ページが読み込まれています...
ページが読み込まれています...
ページが読み込まれています...
ページが読み込まれています...
ページが読み込まれています...
ページが読み込まれています...
ページが読み込まれています...
ページが読み込まれています...
ページが読み込まれています...
ページが読み込まれています...
ページが読み込まれています...
ページが読み込まれています...
ページが読み込まれています...
ページが読み込まれています...
ページが読み込まれています...
ページが読み込まれています...
ページが読み込まれています...
ページが読み込まれています...
ページが読み込まれています...
ページが読み込まれています...
-
 1
1
-
 2
2
-
 3
3
-
 4
4
-
 5
5
-
 6
6
-
 7
7
-
 8
8
-
 9
9
-
 10
10
-
 11
11
-
 12
12
-
 13
13
-
 14
14
-
 15
15
-
 16
16
-
 17
17
-
 18
18
-
 19
19
-
 20
20
-
 21
21
-
 22
22
-
 23
23
-
 24
24
-
 25
25
-
 26
26
-
 27
27
-
 28
28
-
 29
29
-
 30
30
-
 31
31
-
 32
32
-
 33
33
-
 34
34
-
 35
35
-
 36
36
-
 37
37
-
 38
38
-
 39
39
-
 40
40
-
 41
41
-
 42
42


