EPOMAKER EP64 ユーザーガイド

タイプ
ユーザーガイド
QUICK S T A R T GUIDEEN
Should you require more assistance please email us at support@epomaker.com
60%Triple-mode Hot-swappable MechanicalKeyboard
Manufacturer: Shenzhen Changyun Technology Co., Ltd.
Address: Seventh Floor, Kai Daer Building, No.168 Tongsha Road,
Xili Street, Nanshan Disctrict, Shenzhen,Guangdong, CN
Email: support@epomaker.com
Web: www.epomaker.com
Made in China RoHS
COMPLIANT
Created by Heipi
from the Noun Project
EPOMAKER EP64
EN
EN
WINDOWS SHORTCUT
FN + ESC
FN + 1
F1
FN + 2@
F2
FN + 3#
F3
FN + 4$
F4
FN + 5%
F5
FN + 6^
F6
FN + 7&
FN + 8*
F8
FN + T
Prtsc
FN + Y
Scrlk
FN + U
Pause
FN + G
Insert
FN + H
Home
FN + J
PgUp
FN + B
Delete
FN + N
End
FN + M
PgDn
FN + WIN
Lock WIN Key
FN + L_CTRL
Secondary
Key Mode
FN + SPACEBAR
Battery Check
FN + Z/X/C
Toggle to Layer 1/2/3
FN + 9(
F9
FN + 0)
F10
FN + -_
F11
FN + SHIFT+ESC
~
FN + V
Check Layer
(HOLD 3S)
FN+BACKSPACE
(HOLD 3S)
Reset the Keyboard
FN + Q
Short Press to Switch to BT1;
Long Press to Pair Devices
FN + W
Short Press to Switch to BT2;
Long Press to Pair Devices
FN + E
Short Press to Switch to BT3
Long Press to Pair Devices
FN + R
Short Press to Switch to 2.4G Mode;
Long Press to Pair Devices
FN + A
Wired Mode
FUNCTION KEY COMBINATIONS
PAIRING BLUETOOTH
Toggle the switch in the back to ON to make sure that the keyboard
is under the Wireless mode
1. Hold Fn+Q/W/E for 3-5 seconds till the indicators flashes fast in red/green/blue,
the keyboard is ready to pair.
2. Turn on your Bluetooth device and find ‘EP64 BT3.0’ or ‘EP64 BT5.0’, then
connect. When the keyboard is connected to the Bluetooth device, the light on the
Q/W/E key stops flashing and the connection is done.
3. Press Fn+Q/W/E to toggle between the Bluetooth devices 1/2/3.
Toggle the switch in the back to ON to make sure that the keyboard
is under the Wireless mode
PAIRING WIRELESS 2.4GHZ
1. Short press the FN+R key combination, the backlight will flash blue 3 times, the
keyboard will enter 2.4G mode
2. Long press FN+R key combination for 3-5 seconds to enter pairing mode, R
indicator will flash white, plug in the receiver, after successful pairing, R indicator will
be on for 2 seconds and then go out, successful connection
CHANGE RGB EFFECTS
Press Fn + I/O/P to switch the RGB effects of your Epomaker EP64 keyboard.
MAC SHORTCUT
FN + =+
F12
FN + ESC
FN + 1
Screen Brightness -
FN + 2@
Screen Brightness +
FN + 3#
Task
FN + 4$
Control Pad
FN + 5%
FN + 6^
FN + 7&
Previous Track
FN + 8*
Play/Pause
LIGHT EFFECTS
FN + O
RGB Effects 7-12
FN + P
RGB Effects 13-18
FN + ,<
Backlights Brightness +
FN + .>
Backlights Brightness -
Change Dynamic
RGB Direction
FN + I
Efectos RGB 1-6
Toggle RGB Colors
FN + ;:
FN + ‘”
FN + [{
Backlights Speed -
FN + ]}
Backlights Speed +
FN + 9(
Next Track
FN + 0)
Mute
FN + -_
Volume -
FN + SHIFT+ESC
~
FN + =+
Volume +
EN
EN
WIRED MODE
Press Fn+A, the whole keyboard flashes red three times, and the keyboard enters to
the wired mode successfully.
CHECK BATTERY
Hold Fn+Spacebar, the keys from 1! to 0) lights up to show the battery percentage; for
example, if the keys from 1! to 6^ light up when holding Fn+Spacebar, it means that
the battery life is currently 60%; if keys of 1!-0) light up, battery life is 100%.
CHECK LAYER
Hold Fn+V (HOLD 3S), the indicators of Z/X/C light up to show at which layer the
keyboard is; for example, if the keys of X light up when holding Fn+V, it means
that the keyboard is in layer 2.
CHARGING INDICATOR LIGHT (UNDERNEATH THE SPACEBAR)
Charging: Red light keeps on
Charged: Light off
SPECS
KEYSAMOUNT: 64Keys
STABILIZERTYPE: Plate-mounted
CASE MATERIAL: ABS Plastic
PLATE MATERIAL: Steel
PCBTYPE: 3/5-pin HotswapPCB
BATTERYCAPACITY: 2000mAh
CONNECTIVITY: Type-CWired, 2.4&BluetoothWireless
ANTI-GHOSTKEY: NKROinallmodes
COMPATIBILITY: WINDOWS/MAC
DIMENSION: 293x103x41mm
WEIGHT: Around0.6kg
SECONDARY KEY MODE
When the mode is on, the L_Ctrl indicator light up in white, and the keys
are input as followed:
ESC = `
1! = F1
2@ = F2
3# = F3
4$ = F4
5% = F5
6^ = F6
7& = F7
8* = F8
9( = F9
0) = F10
-_ = F11
=+ = F12
T = PrtSc
Y = ScrLk
U = Pause
G = Insert
H = Home
J = PgUp
B = Del
N = End
M = PgDn
T E CHNICAL AS SIS T ANCE
REP L A C I N G K E Y C APS AND S W I T CHES
For technical assistance, please email to
support@epomaker.com with your purchase order number
and a detailed description of your issue.
We normally respond to enquiries within 24 hours. If you
purchased your keyboard from a distributor or not from any
additional help.
WARRANTY
EPOMAKER’s Warranty covers any factory defects that
doesn’t cover any damage that may occur from normal
wear and tear. If your product is defective we will send you
a replacement unit. Replacement units might require you
to send the defective unit back to Epomaker.
We provide a 1 year warranty for our products when
bought from our website (EPOMAKER.com). Your item will
not be covered by your 1 year warranty if the inspection
by the original product, these include: Changing internal
components, Assembling and reassembling the product,
Replacing Batteries, etc.
stores. You do not have a warranty with us if you bought
the item from another reseller or likewise. Please contact
the store that you bought your product from to resolve
issues.
C O MMUNI T Y FOR U M S
https://discord.gg/2q3Z7C2
Join our community and learn together with
other keyboard enthusiasts.
EN
https://www.reddit.com/r/Epomaker/
Logo
Switch Shaft
The Switch Puller tool aligns Vertically to the Switch to
unclip the plastic securing the switch to the plate.
Example of a switch
as seen from top
after you remove the
keycap to prepare for
switch removal.
Mechanical
Switch
Switch Puller Keycap Puller
For a full guide on how to remove keycaps and switches scan the QR Code or type in your
browser:
https://epomaker.com/blogs/guides/diy-guide-how-to-remove-and-replace-your-mechanical-keyboard-
switches
Included
Tools
1. Grab your Switch Removal Tool and align the gripping teeth
vertically (on the Y-Axis) at the center of the switch, as shown in
the example graphic above.
2. Grab the switch with the Switch Puller and apply pressure until the
switch releases itself from the plate.
3. Using firm but gentle force pull the switch away from the keyboard
using a vertical motion.
Remove Switches
1. Check that all the switch metallic pins are perfectly straight and clean.
2. Align the switch vertically to have the Gateron logo facing north. The
pins should align themselves to the keyboard PBC.
3. Press the switch down until you hear a click. This means your switch
clips have attached themselves to the keyboard plate.
4. Inspect the switch to ensure it’s properly attached to your keyboard,
and test it.
Install Switches
Note: If the key doesn’t work its possible you may have bent one of the switches while installing it. Pull the switch out and repeat the process.
Pins may be damaged beyond repair and need replacement if this process is not done correctly. Never apply excessive force when replacing
keycaps or switches. If you cannot remove or install keycaps or switches please contact customer service as soon as possible to avoid
damage to the keyboard due to operating errors.
Please be gentle. Be sure the
pins are aligned with the slots.
Before installing switches, be sure the pins are clean and straight.
Push Straight
Down
EPOMAKER
QUICK - S T A R T ANLEITUN G DE
Sollten Sie weitere Hilfe benötigen, senden Sie uns bitte eine E-Mail an support@epomaker.com
60% Triple-Mode Hot-Swap-fähige mechanische Tastatur
Manufacturer: Shenzhen Changyun Technology Co., Ltd.
Address: Seventh Floor, Kai Daer Building, No.168 Tongsha Road,
Xili Street, Nanshan Disctrict, Shenzhen,Guangdong, CN
Email: support@epomaker.com
Web: www.epomaker.com
Made in China RoHS
COMPLIANT
Created by Heipi
from the Noun Project
EPOMAKER EP64
DE
WINDOWS ABKÜRZUNG
FN + ESC
FN + 1
F1
FN + 2@
F2
FN + 3#
F3
FN + 4$
F4
FN + 5%
F5
FN + 6^
F6
FN + 7&
F7
FN + 8*
F8
FN + T
Prtsc
FN + Y
Scrlk
FN + U
Pause
FN + G
Insert
FN + H
Home
FN + J
PgUp
FN + B
Delete
FN + N
End
FN + M
PgDn
FN + WIN
Schloss WIN Schlüssel
FN + L_CTRL
Secondary
Key Mode
FN + SPACEBAR
Batteriekontrolle
FN + Z/X/C
Umschalten auf Ebene 1/2/3
FN + V
Schicht prüfen
FN + 9(
F9
FN + 0)
F10
FN + -_
F11
FN + SHIFT+ESC
~
FN+BACKSPACE
(3S HALTEN)
Zurücksetzen
der Tastatur
FN + Q
Kurz drücken, um zu BT1 zu wechseln;
Lang drücken, um Geräte zu koppeln
FN + W
Kurz drücken, um zu BT2 zu wechseln;
Lang drücken, um Geräte zu koppeln
FN + E
Kurz drücken, um zu BT3zu wechseln;
Lang drücken, um Geräte zu koppeln
FN + R
Kurz drücken, um in den
2.4G-Modus zu wechseln;
Lang drücken, um Geräte zu koppeln
FN + A
Verdrahteter Modus
FUNKTIONSTASTEN-KOMBINATIONEN
BLUETOOTH-KOPPLUNG
Schalten Sie den Schalter auf der Rückseite auf ON, um sicherzustellen,
dass sich die Tastatur im Wireless-Modus befindet.
1. Halten Sie Fn+Q/W/E für 3-5 Sekunden gedrückt, bis die Anzeigen schnell
rot/grün/blau blinken, dann ist die Tastatur bereit für die Kopplung.
2. Schalten Sie Ihr Bluetooth-Gerät ein und suchen Sie "EP64 BT3.0" oder "EP64
BT5.0", dann verbinden Sie es. Wenn die Tastatur mit dem Bluetooth-Gerät verbunden
ist, hört das Licht an der Q/W/E-Taste auf zu blinken und die Verbindung ist
hergestellt.
3. Drücken Sie Fn+Q/W/E, um zwischen den Bluetooth-Geräten 1/2/3 umzuschalten.
PAIRING WIRELESS 2.4GHZ
RGB-EFFEKTE ÄNDERN
Drücken Sie Fn + I/O/P, um die RGB-Effekte Ihrer Epomaker EP64-Tastatur
umzuschalten.
MAC ABKÜRZUNG
FN + =+
F12
FN + ESC
FN + 1
Bildschirmhelligkeit -
FN + 2@
Bildschirmhelligkeit +
FN + 3#
Aufgabe
FN + 4$
Steuerkreuz
FN + 5%
FN + 6^
FN + 7&
Vorheriger Titel
FN + 8*
Wiedergabe/Pause
LICHTEFFEKTE
FN + O
RGB-Effekte 7-12
FN + P
RGB-Effekte 13-18
FN + ,<
Hintergrundbeleuchtung
Helligkeit +
FN + .>
Hintergrundbeleuchtung
Helligkeit -
Dynamisch ändern
RGB-Richtung
FN + I
Efectos RGB 1-6
RGB-Farben umschalten
FN + ;:
FN + ‘”
FN + [{
Hintergrundbeleuchtung
Geschwindigkeit -
FN + ]}
Hintergrundbeleuchtung
Geschwindigkeit +
FN + 9(
Nächster Track
FN + 0)
Stummschalten
FN + -_
Band -
FN + SHIFT+ESC
~
FN + =+
Band +
(HOLD 3S)
Schalten Sie den Schalter auf der Rückseite auf ON, um sicherzustellen,
dass sich die Tastatur im Wireless-Modus befindet.
1. Drücken Sie kurz die Tastenkombination FN+R, die Hintergrundbeleuchtung blinkt 3
Mal blau, die Tastatur wechselt in den 2.4G-Modus
2. Drücken Sie lange die Tastenkombination FN+R für 3-5 Sekunden, um in den
Pairing-Modus zu gelangen, die R-Anzeige blinkt weiß, schließen Sie den Empfänger
an, nach erfolgreichem Pairing leuchtet die R-Anzeige für 2 Sekunden auf und erlischt
dann, erfolgreiche Verbindung
DE
VERDRAHTETER MODUS
Fn+A drücken, die gesamte Tastatur blinkt dreimal rot, und die Tastatur schaltet
erfolgreich in den kabelgebundenen Modus.
BATTERIE PRÜFEN
Wenn Sie Fn+Spacebar gedrückt halten, leuchten die Tasten von 1! bis 0) auf, um
den Prozentsatz der Batterieleistung anzuzeigen; wenn beispielsweise die Tasten von
1! bis 6^ aufleuchten, wenn Sie Fn+Spacebar gedrückt halten, bedeutet dies, dass die
Batterieleistung derzeit 60% beträgt; wenn die Tasten von 1!-0) aufleuchten, beträgt
die Batterieleistung 100%.
SCHICHT PRÜFEN
Wenn Sie Fn+V (HOLD 3S) gedrückt halten, leuchten die Anzeigen von Z/X/C auf,
um anzuzeigen, auf welcher Ebene sich die Tastatur befindet; wenn z. B. die
Tasten von X aufleuchten, wenn Sie Fn+V gedrückt halten, bedeutet dies, dass
sich die Tastatur auf Ebene 2 befindet.
LADEKONTROLLLEUCHTE (UNTER DER LEERTASTE)
Aufladen: Rotes Licht leuchtet weiter
Geladen: Licht aus
SPEZIALIEN
SCHLÜSSEL AMOUNT: 64Keys
STABILISATOR-TYP: Plattenmontiert
MATERIAL DES GEHÄUSES: ABS-Kunststoff
MATERIAL DER PLATTE: Stahl
PCB-TYP: 3/5-Pin Hotswap PCB
BATTERIEKAPAZITÄT: 2000mAh
VERBINDLICHKEIT: Typ-C kabelgebunden, 2.4 & Bluetooth kabellos
ANTI-GHOST-SCHLÜSSEL: NKRO in allen Modi
KOMPATIBILITÄT: WINDOWS/MAC
ABMESSUNG: 293x103x41mm
GEWICHT: Etwa 0,6 kg
MODUS SEKUNDÄRSCHLÜSSEL
Wenn der Modus aktiviert ist, leuchtet die L_Ctrl-Anzeige weiß, und die
Tasten werden wie folgt eingegeben:
ESC = `
1! = F1
2@ = F2
3# = F3
4$ = F4
5% = F5
6^ = F6
7& = F7
8* = F8
9( = F9
0) = F10
-_ = F11
=+ = F12
T = PrtSc
Y = ScrLk
U = Pause
G = Insert
H = Home
J = PgUp
B = Del
N = End
M = PgDn
T E CHNISCHE BIJS TAND
TOET S K APJES EN SCHAKE L AARS V E R V ANGEN
Voor technische bijstand stuurt u een e-mail naar
support@epomaker.com met uw bestelnummer en een
gedetailleerde beschrijving van uw probleem.
Normaal gesproken beantwoorden wij uw vragen binnen
24 uur. Als u uw toetsenbord bij een distributeur of niet bij
rechtstreeks contact met hen op voor eventuele aanvullende
hulp.
GARANTI E
De garantie van EPOMAKER dekt alle fabrieksfouten die
van invloed kunnen zijn op de goede werking van uw
aankoop. Het dekt geen schade die kan ontstaan door
normale slijtage. Als uw product defect is, sturen wij u een
vervangend apparaat. Voor vervanging kan het nodig zijn
dat u het defecte apparaat terugstuurt naar Epomaker.
Wij bieden 1 jaar garantie op onze producten bij aankoop
via onze website (EPOMAKER.com). Uw item zal niet
worden gedekt door uw 1 jaar garantie als de inspectie
enig teken van wijziging of veranderingen toont die niet
worden ondersteund door het originele product, deze
omvatten: Het veranderen van interne onderdelen, Het in
elkaar zetten en opnieuw in elkaar zetten van het product,
Het vervangen van Batterijen, enz.
Wir decken den Artikel NUR ab, wenn er in unseren
Garantie bei uns, wenn Sie den Artikel bei einem anderen
Händler oder ähnlichem gekauft haben. Bitte kontaktieren
Sie das Geschäft, in dem Sie Ihr Produkt gekauft haben, um
Probleme zu lösen.
F O R UMS VA N D E G E M EENSCHAP
https://discord.gg/2q3Z7C2
Word lid van onze community en leer samen
met andere toetsenbordenthousiastelingen.
DE
https://www.reddit.com/r/Epomaker/
Logo
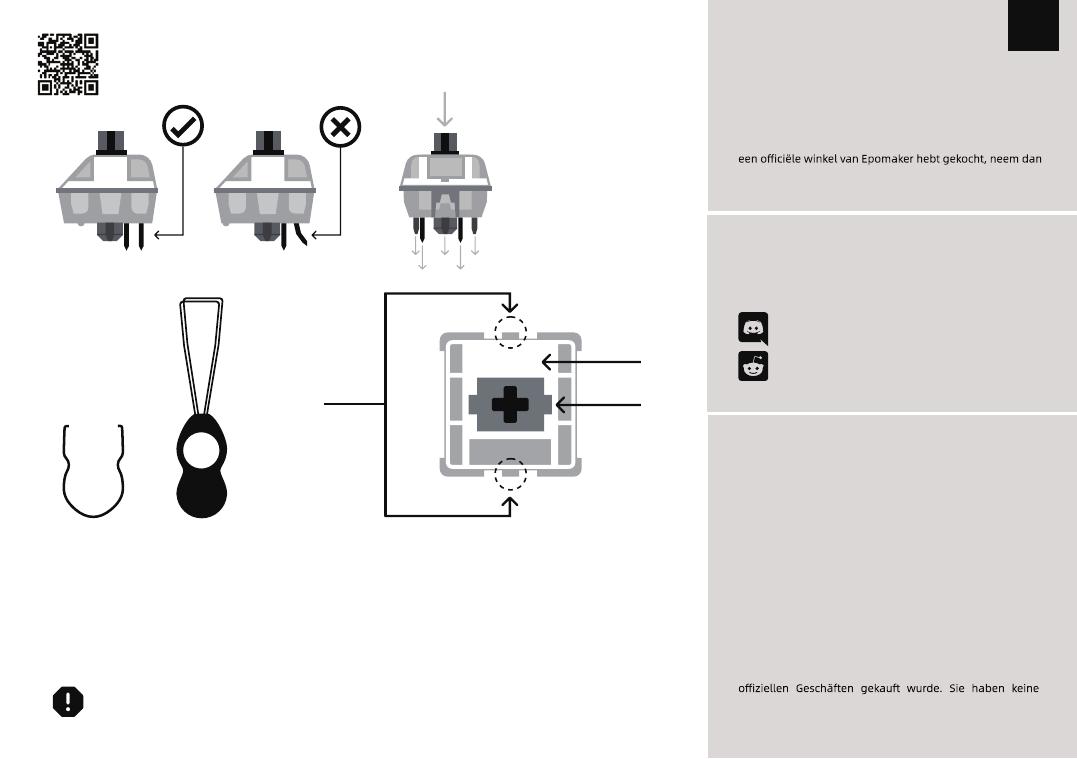
Schacht van schakelaar
Het gereedschap voor het uittrekken van schakelaars richt zich
verticaal op de schakelaar om het plastic los te maken waarmee
de schakelaar aan de plaat is bevestigd.
Voorbeeld van een
schakelaar van
bovenaf gezien nadat
u de toetskap hebt
verwijderd om het
verwijderen van de
schakelaar voor te
bereiden.
Mechanische
schakelaar
Schakelaar Toetskap trekker
Voor een volledige handleiding over het verwijderen van toetskapjes en schakelaars, scan
de QR-code of typ in uw browser: https://epomaker.com/blogs/guides/diy-guide-how-to-
remove-and-replace-your-mechanical-keyboard-switches
Meegeleverd
gereedschap
1. Pak uw gereedschap voor het verwijderen van schakelaars en
lijn de grijptanden verticaal (op de Y-as) uit op het midden van de
schakelaar, zoals weergegeven in de voorbeeldafbeelding hierboven.
2. Pak de schakelaar vast met de schakelaartrekker en oefen druk uit
tot de schakelaar zichzelf losmaakt van de plaat
3. Trek de schakelaar met een stevige maar zachte kracht met een
verticale beweging weg van het toetsenbord.
Schakelaars verwijderen
1. Controleer of alle metalen pennen van de schakelaar perfect recht en
schoon zijn.
2. Lijn de schakelaar verticaal uit, zodat het Gateron-logo naar het noorden
wijst. De pinnen moeten uitgelijnd zijn met de PBC van het toetsenbord.
3. Druk de schakelaar omlaag totdat u een klik hoort. Dit betekent dat de
clips van de schakelaar zich aan de toetsenbordplaat hebben bevestigd.
4. Inspecteer de schakelaar om er zeker van te zijn dat hij goed is bevestigd
aan uw toetsenbord, en test hem
Schakelaars installeren
Opmerking: Als de toets niet werkt, is het mogelijk dat u een van de schakelaars verbogen hebt tijdens de installatie ervan. Trek de schakelaar
eruit en herhaal het proces
Als dit proces niet correct wordt uitgevoerd, kunnen de pennen onherstelbaar beschadigd raken en moeten ze worden vervangen. Oefen nooit
overmatige kracht uit bij het vervangen van toetskapjes of schakelaars. Als u de toetskapjes of schakelaars niet kunt verwijderen of installeren,
neem dan zo snel mogelijk contact op met de klantenservice om schade aan het toetsenbord als gevolg van bedieningsfouten te voorkomen.
Ga voorzichtig te werk. Zorg
ervoor dat de pinnen zijn
uitgelijnd met de gleuven.
Voordat u de schakelaars monteert, moet u ervoor zorgen dat de
pennen schoon en recht zijn.
Gerade nach
unten drücken
EPOMAKER
GUÍA DE INICIO RÁPIDOES
Si necesita más ayuda, por favor envíenos un correo electrónico a support@epomaker.com
60% Teclado mecánico de triple modo intercambiable en caliente
Manufacturer: Shenzhen Changyun Technology Co., Ltd.
Address: Seventh Floor, Kai Daer Building, No.168 Tongsha Road,
Xili Street, Nanshan Disctrict, Shenzhen,Guangdong, CN
Email: support@epomaker.com
Web: www.epomaker.com
Made in China RoHS
COMPLIANT
Created by Heipi
from the Noun Project
EPOMAKER EP64
ES
WINDOWS ATAJO
FN + ESC
FN + 1
F1
FN + 2@
F2
FN + 3#
F3
FN + 4$
F4
FN + 5%
F5
FN + 6^
F6
FN + 7&
F7
FN + 8*
F8
FN + T
Prtsc
FN + Y
Scrlk
FN + U
Pause
FN + G
Insert
FN + H
Home
FN + J
PgUp
FN + B
Delete
FN + N
End
FN + M
PgDn
FN + WIN
Cerradura WIN Key
FN + L_CTRL
Secundaria
Modo Clave
FN + SPACEBAR
Comprobación de
la batería
FN + Z/X/C
Cambiar a Capa 1/2/3
FN + V
Comprobar capa
FN + 9(
F9
FN + 0)
F10
FN + -_
F11
FN + SHIFT+ESC
~
FN+BACKSPACE
(HOLD 3S)
Reiniciar el teclado
FN + Q
Pulsación corta para cambiar a BT1;
Pulsación larga para emparejar dispositivos
FN + W
Pulsación corta para cambiar a BT2;
Pulsación larga para emparejar dispositivos
FN + E
Pulsación corta para cambiar a BT3;
Pulsación larga para emparejar dispositivos
FN + R
Pulsación corta para cambiar al modo 2.4G;
Pulsación larga para emparejar dispositivos
FN + A
Modo cableado
COMBINACIONES DE
TECLAS DE FUNCIÓN
EMPAREJAMIENTO BLUETOOTH
Coloque el interruptor de la parte posterior en la posición ON para
asegurarse de que el teclado está en modo inalámbrico.
1. Mantenga pulsado Fn+Q/W/E durante 3-5 segundos hasta que los indicadores
parpadeen rápidamente en rojo/verde/azul, el teclado está listo para emparejarse.
2. Encienda su dispositivo Bluetooth y busque 'EP64 BT3.0' o 'EP64 BT5.0', después
conéctelo. Cuando el teclado esté conectado al dispositivo Bluetooth, la luz de la
tecla Q/W/E dejará de parpadear y la conexión se habrá realizado.
3. Pulse Fn+Q/W/E para alternar entre los dispositivos Bluetooth 1/2/3.
PAREO INALÁMBRICO 2,4 GHZ
CAMBIAR EFECTOS RGB
Pulse Fn + I/O/P para cambiar los efectos RGB de su teclado Epomaker EP64.
MAC ATAJO
FN + =+
F12
FN + ESC
FN + 1
Brillo de la pantalla -
FN + 2@
Brillo de la pantalla +
FN + 3#
Tarea
FN + 4$
Panel de control
FN + 5%
FN + 6^
FN + 7&
Pista anterior
FN + 8*
Reproducir/Pausa
EFECTOS DE LUZ
FN + O
Efectos RGB 7-12
FN + P
Efectos RGB 13-18
FN + ,<
Retroiluminación Brillo +
FN + .>
Retroiluminación Brillo -
Cambiar dinámica
Dirección RGB
FN + I
Efectos RGB 1-6
Alternar colores RGB
FN + ;:
FN + ‘”
FN + [{
Retroiluminación Velocidad -
FN + ]}
Retroiluminación Velocidad +
FN + 9(
Siguiente pista
FN + 0)
Silenciar
FN + -_
Volumen -
FN + SHIFT+ESC
~
FN + =+
Volumen +
(HOLD 3S)
Coloque el interruptor de la parte posterior en la posición ON para
asegurarse de que el teclado está en modo inalámbrico.
1. Pulse brevemente la combinación de teclas FN+R, la retroiluminación parpadeará
en azul 3 veces, el teclado entrará en modo 2.4G
2. Mantenga pulsada la combinación de teclas FN+R durante 3-5 segundos para
entrar en el modo de emparejamiento, el indicador R parpadeará en blanco, conecte
el receptor, después del emparejamiento exitoso, el indicador R se encenderá
durante 2 segundos y luego se apagará, conexión exitosa
ES
MODO CABLEADO
Pulsa Fn+A, todo el teclado parpadea en rojo tres veces, y el teclado entra en el modo
con cable con éxito.
COMPROBAR BATERÍA
Manteniendo pulsadas Fn+Spacebar espaciadora, las teclas de 1! a 0) se iluminan
para mostrar el porcentaje de batería; por ejemplo, si las teclas de 1! a 6^ se iluminan
al mantener pulsadas Fn+Spacebar, significa que la duración de la batería es
actualmente del 60%; si se iluminan las teclas de 1!-0), la duración de la batería es del
100%.
COMPROBAR CAPA
Mantenga pulsado Fn+V (HOLD 3S), los indicadores de Z/X/C se iluminan para
mostrar en qué capa se encuentra el teclado; por ejemplo, si las teclas de X se
iluminan al mantener pulsado Fn+V, significa que el teclado está en la capa 2.
INDICADOR LUMINOSO DE CARGA
(DEBAJO DE LA BARRA ESPACIADORA)
Cargando: La luz roja sigue encendida
Cargado: Luz apagada
ESPECIFICACIONES
CANTIDAD DE LLAVES: 64 Claves
TIPO DE ESTABILIZADOR: Montaje en placa
MATERIAL DE LA CAJA: Plástico ABS
MATERIAL DE LA PLACA: Acero
TIPO PCB: Placa de circuito impreso Hotswap de 3/5 patillas
CAPACIDAD DE LA BATERÍA: 2000mAh
CONECTIVIDAD: Tipo-C con cable, 2.4 y Bluetooth inalámbrico
LLAVE ANTIFANTASMA: NKRO en todos los modos
COMPATIBILIDAD: WINDOWS/MAC
DIMENSIONES: 293x103x41mm
PESO: Alrededor de 0,6 kg
MODO DE LLAVE SECUNDARIA
Cuando el modo está activado, el indicador L_Ctrl se ilumina en blanco y
las teclas se introducen como se indica a continuación:
ESC = `
1! = F1
2@ = F2
3# = F3
4$ = F4
5% = F5
6^ = F6
7& = F7
8* = F8
9( = F9
0) = F10
-_ = F11
=+ = F12
T = PrtSc
Y = ScrLk
U = Pause
G = Insert
H = Home
J = PgUp
B = Del
N = End
M = PgDn
ASIS T E NCIA TÉCNIC A
S U S TITUCN D E L A S TECL A S Y DE L O S I N TER R U P T O R E S
Para obtener asistencia técnica, envíe un correo
electrónico a support@epomaker.com con su número de
pedido y una descripción detallada de su problema.
Normalmente respondemos a las consultas en un plazo
de 24 horas. Si ha adquirido su teclado a través de un
póngase en contacto con ellos directamente para
cualquier ayuda adicional.
GARANTÍ A
La garantía de EPOMAKER cubre cualquier defecto de
fábrica que pueda afectar al correcto funcionamiento
de su compra. No cubre ningún daño que pueda ocurrir
por el desgaste normal. Si su producto es defectuoso, le
enviaremos una unidad de reemplazo. Las unidades de
reemplazo pueden requerir que usted envíe la unidad
defectuosa de vuelta a Epomaker.
Ofrecemos una garantía de 1 año para nuestros productos
cuando se compran en nuestra página web (EPOMAKER.
com). Su artículo no estará cubierto por su garantía
de 1 año si la inspección muestra cualquier signo de
original, estos incluyen: Cambio de componentes internos,
Montaje y remontaje del producto, Sustitución de baterías,
etc.
Sólo cubriremos el artículo si se ha comprado en nuestras
si usted compró el artículo de otro revendedor o de la
misma manera. Por favor, póngase en contacto con la
tienda en la que compró el producto para resolver los
problemas.
F O R O S DE LA COMU N I D A D
https://discord.gg/2q3Z7C2
Únase a nuestra comunidad y aprenda junto a
otros entusiastas de los teclados.
ES
https://www.reddit.com/r/Epomaker/
Logo
Eje del interruptor
La herramienta de extracción de interruptores se alinea
verticalmente con el interruptor para soltar el plástico que
asegura el interruptor a la placa.
Ejemplo de un
interruptor visto
desde arriba después
de quitar la tapa del
teclado para preparar
la extracción del
interruptor.
Interruptor
mecánico
Extractor de
interruptores
Extractor de
tapas de teclas
Para obtener una guía completa sobre cómo quitar las tapas de las teclas y los interruptores, escanee el
código QR o escriba en su navegador:
https://epomaker.com/blogs/guides/diy-guide-how-to-remove-and-replace-your-mechanical-keyboard-
switches
Herramientas
incluidas
1. Agarre su herramienta de extracción de interruptores y alinee
los dientes de agarre verticalmente (en el eje Y) en el centro del
interruptor, como se muestra en el gráfico de ejemplo anterior.
2. Agarre el interruptor con el extractor de interruptores y aplique
presión hasta que el interruptor se libere de la placa
3. Con una fuerza firme pero suave, separe el interruptor del teclado
con un movimiento vertical.
Quitar los interruptores
1. Compruebe que todos los pasadores metálicos del interruptor están
perfectamente rectos y limpios.
2. Alinee el interruptor verticalmente para que el logotipo de Gateron
esté orientado hacia el norte. Los pines deben alinearse con el PBC del
teclado.
3. Presione el interruptor hacia abajo hasta que oiga un clic. Esto significa
que los clips del interruptor se han unido a la placa del teclado.
4. Inspeccione el interruptor para asegurarse de que está bien conectado
a su teclado, y pruébelo.
Instalar los interruptores
Nota: Si la tecla no funciona es posible que haya doblado uno de los interruptores al instalarlo. Saque el interruptor y repita el proceso
Las clavijas pueden dañarse de forma irreparable y necesitar ser reemplazadas si este proceso no se realiza correctamente. No aplique nunca
una fuerza excesiva al sustituir las tapas de las teclas o los interruptores. Si no puede retirar o instalar las tapas de las teclas o los interruptores,
póngase en contacto con el servicio de atención al cliente lo antes posible para evitar que el teclado sufra daños debido a errores de
funcionamiento.
Tenga cuidado. Asegúrese de
que las clavijas estén alinea-
das con las ranuras.
Antes de instalar los interruptores, asegúrese de que las clavijas estén
limpias y rectas.
Empuje hacia
abajo.
EPOMAKER
GUIDE DE DÉMARRAGE RAPIDEFR
Si vous avez besoin d’aide, envoyez-nous un e-mail à support@epomaker.com
Manufacturer: Shenzhen Changyun Technology Co., Ltd.
Address: Seventh Floor, Kai Daer Building, No.168 Tongsha Road,
Xili Street, Nanshan Disctrict, Shenzhen,Guangdong, CN
Email: support@epomaker.com
Web: www.epomaker.com
Made in China RoHS
COMPLIANT
Created by Heipi
from the Noun Project
60% Clavier mécanique triple mode remplaçable à chaud
EPOMAKER EP64
FR
WINDOWS RACCOURCI
FN + ESC
FN + 1
F1
FN + 2@
F2
FN + 3#
F3
FN + 4$
F4
FN + 5%
F5
FN + 6^
F6
FN + 7&
FN + 8*
F8
FN + T
Prtsc
FN + Y
Scrlk
FN + U
Pause
FN + G
Insert
FN + H
Home
FN + J
PgUp
FN + B
Delete
FN + N
End
FN + M
PgDn
FN + WIN
Clé Lock WIN
FN + L_CTRL
Secondaire
Mode clé
FN + SPACEBAR
Vérification de
la batterie
FN + Z/X/C
Passer à la couche 1/2/3
FN + V
Vérifier la couche
FN + 9(
F9
FN + 0)
F10
FN + -_
F11
FN + SHIFT+ESC
~
FN+BACKSPACE
(TENIR 3S)
Réinitialisation
du clavier
FN + Q
Une pression courte permet de
passer à BT1 ;
Appui long pour coupler les appareils
FN + W
Une pression courte permet de
passer à BT2 ;
Appui long pour coupler les appareils
FN + E
Une pression courte permet de
passer à BT3 ;
Appui long pour coupler les appareils
FN + R
Une pression courte permet de
passer en mode 2.4G ;
Appui long pour coupler les appareils
FN + A
Mode câblé
COMBINAISONS DE
TOUCHES DE FONCTION
APPAIRAGE BLUETOOTH
Basculer l'interrupteur à l'arrière sur ON pour s'assurer que le clavier est en
mode sans fil.
1. Maintenez Fn+Q/W/E pendant 3-5 secondes jusqu'à ce que les indicateurs
clignotent rapidement en rouge/vert/bleu, le clavier est prêt à être apparié.
2. Allumez votre appareil Bluetooth et trouvez 'EP64 BT3.0' ou 'EP64 BT5.0', puis
connectez. Lorsque le clavier est connecté au périphérique Bluetooth, le voyant de
la touche Q/W/E cesse de clignoter et la connexion est établie.
3. Appuyez sur Fn+Q/W/E pour basculer entre les périphériques Bluetooth 1/2/3.
PAIRING SANS FIL 2.4GHZ
MODIFIER LES EFFETS RGB
Appuyez sur Fn + I/O/P pour changer les effets RGB de votre clavier Epomaker EP64.
MAC RACCOURCI
FN + =+
F12
FN + ESC
FN + 1
Luminosité de l'écran -
FN + 2@
Luminosité de l'écran +
FN + 3#
Tâche
FN + 4$
Clavier de commande
FN + 5%
FN + 6^
FN + 7&
Voie précédente
FN + 8*
Lecture/Pause
EFFETS DE LUMIÈRE
FN + O
Effets RVB 7-12
FN + P
Effets RVB 13-18
FN + ,<
Rétro-éclairage Luminosité +
FN + .>
Rétro-éclairage Luminosité -
Modifier la dynamique
Direction RVB
FN + I
Effets RVB 1-6
Basculer entre les
couleurs RVB
FN + ;:
FN + ‘”
FN + [{
Vitesse des rétro-éclairages -
FN + ]}
Vitesse des rétro-éclairages +
FN + 9(
Voie suivante
FN + 0)
Muet
FN + -_
Volume -
FN + SHIFT+ESC
~
FN + =+
Volume +
(HOLD 3S)
Basculer l'interrupteur à l'arrière sur ON pour s'assurer que le
clavier est en mode sans fil.
1. Appuyez brièvement sur la combinaison de touches FN+R, le rétroéclairage clignote
3 fois en bleu, le clavier passe en mode 2.4G.
2. Appuyer longuement sur la combinaison de touches FN+R pendant 3 à 5 secondes
pour entrer dans le mode d'appairage, le voyant R clignote en blanc, brancher le
récepteur, une fois l'appairage réussi, le voyant R s'allume pendant 2 secondes puis
s'éteint, la connexion est réussie.
FR
MODE CÂBLÉ
Appuyer sur Fn+A, l'ensemble du clavier clignote en rouge trois fois, et le clavier
passe en mode câblé avec succès.
VÉRIFIER LA BATTERIE
Si vous maintenez Fn+Spacebar d'espacement, les touches de 1 ! à 0) s'allument pour
indiquer le pourcentage de la batterie ; par exemple, si les touches de 1 ! à 6^
s'allument lorsque vous maintenez Fn+Spacebar, cela signifie que l'autonomie de la
batterie est actuellement de 60 % ; si les touches de 1!-0) s'allument, l'autonomie de la
batterie est de 100 %.
VÉRIFIER LA COUCHE
Si vous maintenez Fn+V (HOLD 3S), les indicateurs Z/X/C s'allument pour
indiquer la couche du clavier ; par exemple, si les touches X s'allument lorsque
vous maintenez Fn+V, cela signifie que le clavier se trouve dans la couche 2.
TÉMOIN DE CHARGE (SOUS LA BARRE D'ESPACEMENT)
Chargement : Le voyant rouge reste allumé
Chargé : Lumière éteinte
SPECS
MONTANT DES CLÉS : 64 Touches
TYPE DE STABILISATEUR : Monté sur plaque
MATÉRIAU DU BOÎTIER : Plastique ABS
MATÉRIAU DE LA PLAQUE : Acier
TYPE DE PCB : Carte de circuit imprimé 3/5 broches Hotswap
CAPACITÉ DE LA BATTERIE : 2000mAh
CONNECTIVITÉ : Type-C filaire, 2.4 & Bluetooth sans fil
CLÉ ANTI-FUGUE : NKRO dans tous les modes
COMPATIBILITÉ : WINDOWS/MAC
DIMENSION : 293x103x41mm
POIDS : Environ 0,6 kg
MODE CLÉ SECONDAIRE
Lorsque le mode est activé, le voyant L_Ctrl s'allume en blanc et les touches sont
saisies comme suit :
ESC = `
1! = F1
2@ = F2
3# = F3
4$ = F4
5% = F5
6^ = F6
7& = F7
8* = F8
9( = F9
0) = F10
-_ = F11
=+ = F12
T = PrtSc
Y = ScrLk
U = Pause
G = Insert
H = Home
J = PgUp
B = Del
N = End
M = PgDn
A S SIS TANCE T E CHNIQ U E
REMPL A CEME N T D E S CAPUCHONS DE TOUCHES E T D E S INTERRUPTEURS
Pour obtenir une assistance technique, veuillez envoyer un
courriel à support@epomaker.com en indiquant votre numéro
de commande et une description détaillée de votre problème.
Nous répondons normalement aux demandes dans les 24
heures. Si vous avez acheté votre clavier chez un distributeur
directement pour toute aide supplémentaire.
GARANTI E
La garantie EPOMAKER couvre tout défaut d’usine qui
Elle ne couvre pas les dommages qui pourraient résulter
d’une usure normale. Si votre produit est défectueux, nous
vous enverrons une unité de remplacement. Les unités
de remplacement peuvent nécessiter que vous renvoyiez
l’unité défectueuse à Epomaker.
achetés sur notre site Internet (EPOMAKER.com). Votre
article ne sera pas couvert par la garantie d’un an si
changement non pris en charge par le produit d’origine :
Le changement de composants internes, l’assemblage et
le réassemblage du produit, le remplacement des piles,
etc.
Nous ne couvrirons l’article que s’il est acheté dans nos
si vous avez acheté l’article chez un autre revendeur ou de
la même manière. Veuillez contacter le magasin vous
avez acheté votre produit pour résoudre les problèmes.
F O R UMS D E L A C O MMUNA U T É
https://discord.gg/2q3Z7C2
Rejoignez notre communauté et apprenez
avec d’autres passionnés de claviers.
FR
https://www.reddit.com/r/Epomaker/
Logo
Arbre de l’interrupteur
L’outil d’extraction de l’interrupteur s’aligne verticalement sur
l’interrupteur pour déclipser le plastique qui fixe l’interrupteur à
la plaque.
Exemple d’un inter-
rupteur vu du dessus
après avoir retiré le
capuchon du clavier
pour préparer le retrait
de l’interrupteur.
Interrupteur
mécanique
Extracteur
d’interrupteur
Extracteur de capu-
chon de touche
Pour obtenir un guide complet sur la façon de retirer les capuchons et les interrupteurs, scannez le code QR ou
tapez dans votre navigateur : https://epomaker.com/blogs/guides/diy-guide-how-to-remove-and-replace-
your-mechanical-keyboard-switches.
Outils
inclus
1. Saisissez votre outil de retrait d’interrupteur et alignez les dents de
préhension verticalement (sur l’axe Y) au centre de l’interrupteur,
comme indiqué dans l’exemple graphique ci-dessus.
2. Saisissez l’interrupteur avec l’extracteur d’interrupteur et exercez
une pression jusqu’à ce que l’interrupteur se détache de la plaque.
3. En utilisant une force ferme mais douce, éloignez l’interrupteur du
clavier en effectuant un mouvement vertical.
Retirer les interrupteurs
1. Vérifiez que toutes les broches métalliques de l’interrupteur sont
parfaitement droites et propres.
2. Alignez l’interrupteur verticalement pour que le logo Gateron soit
orienté vers le nord. Les broches doivent s’aligner sur le PBC du clavier.
3. Appuyez sur le commutateur jusqu’à ce que vous entendiez un clic.
Cela signifie que les clips de l’interrupteur se sont fixés à la plaque du
clavier.
4. Inspectez le commutateur pour vous assurer qu’il est correctement fixé
à votre clavier, et testez-le.
Install Switches
Remarque : si la touche ne fonctionne pas, il est possible que vous ayez plié l’un des commutateurs lors de son installation. Retirez l’interrupteur
et répétez le processus.
Si ce processus n’est pas effectué correctement, les broches peuvent être endommagées au point d’être irréparables et doivent être
remplacées. N’appliquez jamais une force excessive lorsque vous remplacez des capuchons de touches ou des commutateurs. Si vous ne
pouvez pas retirer ou installer les capuchons de touches ou les commutateurs, veuillez contacter le service clientèle dès que possible afin
d’éviter d’endommager le clavier en raison d’erreurs de manipulation.
Faites attention. As-
surez-vous que les broches
sont alignées avec les fentes.
Avant d’installer les interrupteurs, assurez-vous que les broches sont
propres et droites.
Pousser droit
vers le bas
EPOMAKER
ク イッ ク ス タ ー ト ガ イ ド JP
より詳しい情報をご希望の方は、[email protected]宛でメールでお問い合わせください。
60%ホットスワップ対応有線メカニカルキーボード
Manufacturer: Shenzhen Changyun Technology Co., Ltd.
Address: Seventh Floor, Kai Daer Building, No.168 Tongsha Road,
Xili Street, Nanshan Disctrict, Shenzhen,Guangdong, CN
Email: support@epomaker.com
Web: www.epomaker.com
Made in China RoHS
COMPLIANT
Created by Heipi
from the Noun Project
EPOMAKER EP64
JP
WINDOWS ショートカットキー
FN + ESC
FN + 1!
F1
FN + 2@
F2
FN + 3#
F3
FN + 4$
F4
FN + 5%
F5
FN + 6^
F6
FN + 7&
F7
FN + 8*
F8
FN + T
Prtsc
FN + Y
Scrlk
FN + U
Pause
FN + G
Insert
FN + H
Home
FN + J
PgUp
FN + B
Delete
FN + N
End
FN + M
PgDn
FN + WIN
WINキーのロック
FN + L_CTRL
セカンダリーキーモード
FN + SPACEBAR
電気について
問い合わせる
FN + Z/X/C
スイッチング1/2/3構成層
FN + V
クエリーコンフィギ
ュレーションレイヤー
FN + 9(
F9
FN + 0)
F10
FN + -_
F11
FN + SHIFT+ESC
~
FN+BACKSPACE
(3秒間の長押し)
(3秒間の長押し)
キーボードをリ
セットする
FN + Q
短押しでBT1、
長押しでペアリングモードへ
FN + W
短押しでBT2、
長押しでペアリングモードへ
FN + E
短押しでBT3、
長押しでペアリングモードへ
FN + R
短押しで2.4G、
長押しでペアリングモードに入ります。
FN + A
有線モード
ファンクションキー
BLUETOOTHペアリング
まず、キーボード背面のスイッチをONにします
1.Fn+Q/W/Eキーを3-5秒長押ししてペアリングモードに入り、この時Bluetooth
インジケータランプが赤/緑/青に点滅します。
2.デバイスのBluetoothをオンにし、'EP64 BT3.0'または'EP64 BT5.0'を見つ
け、成功した接続後にインジケータライトが2秒間点灯し、その後成功した
Bluetooth接続を示して、全体のバックライト効果に戻るでしょう。
3.短いプレスFn + Q / W / Eは、Bluetoothデバイス1/2 / 3を切り替えることがで
きます。
2.4Gペアリング
バックライトモード
Fn+I/O/P キーの組み合わせを押して、Epomaker EP64 キーボードのバックライト
モードを切り替えます。
MAC ショートカットキー
FN + =+
F12
FN + ESC
FN + 1!
画面の明るさ -
FN + 2@
画面の明るさ +
FN + 3#
タスクウィンドウ
FN + 4$
コンソール
FN + 5%
FN + 6^
FN + 7&
前の曲
FN + 8*
再生一時停止
光量調整
FN + O
ライトエフェクト 7-12
FN + P
ライトエフェクト 13-18
FN + ,<
光量 +
FN + .>
光量 -
FN + I
ライトエフェクト1~6
FN + ;:
FN + ‘”
FN + [{
ライトエフェクトスピード-
FN + ]}
ライトエフェクトスピード+
FN + 9(
次の曲
FN + 0)
クワイエット
FN + -_
ボリューム -
FN + SHIFT+ESC
~
FN + =+
ボリューム+
ダイナミックライトエフェクト
の演出を切り替える
RGBライトの色を切り替える
まず、キーボード背面のスイッチをONにします
1.FN+Rキーの組み合わせを短く押すと、バックライトは青3回点滅し、キーボード
は、2.4Gモードに入ります。
2.ペアリングモードに入るために3-5秒の長押しFN + Rキーの組み合わせ、Rインジ
ケータは、ペアリング成功後、Rインジケータは2秒間点灯し、その後外出、成功した
接続で、受信機のプラグを白く点滅させます。
JP
有線モード
Fn+Aキーの組み合わせを押すと、キーボードが全体的に3回赤く点滅し、キーボード
が有線モードになります。
電気について問い合わせる
キーコンビネーションFn + Spacebarを押すと、バックライトが消え、数字キー1~0
が点灯して電力割合を表示します:
例えば、1が点灯すると10%の充電を示し、1と2が点灯すると20%の充電を示しま
す。 といった具合です。
クエリーコンフィギュレーションレイヤー
キーの組み合わせFn+V(3秒間の長押し)を押すと、バックライトが消え、
Z/X/Cが点灯してキーボードの設定レベルを示します(例:Xキーが点灯する
と、キーボードはレベル2であることを意味します)。
チャージインジケーター(スペースバーの下)
充電中:赤いランプが常に点灯している
満充電時:消灯
製品パラメーター
キーの数です: 64キー
ハウジングの材質です: プラスチックABS
衛星軸タイプです: 鋼板製衛星シャフト
シート材の位置決め: 鋼板
PCB基板タイプです: 3/5ピンホットスワップPCB
バッテリー容量です。 2000mAh
接続方法です: Type-C有線、2.4G&Bluetoothワイヤレス
ANTI-GHOSTキーです: 全モードでフルキーレスパンチ
システム互換性があります: WINDOWS/MAC
寸法です: 293 x 103 x 41 mm
重量です: 約0.6kg
セカンダリーキーモード
このモードがオンの場合、左のCtrlランプは常に白色に点灯し、キーの機
能は以下のようになります。
ESC = `
1! = F1
2@ = F2
3# = F3
4$ = F4
5% = F5
6^ = F6
7& = F7
8* = F8
9( = F9
0) = F10
-_ = F11
=+ = F12
T = PrtSc
Y = ScrLk
U = Pause
G = Insert
H = Home
J = PgUp
B = Del
N = End
M = PgDn
テクアシスタンス
ス イッ チ と キ ャッ プ を 交 す る
技術的なサポーにつsupport@epomaker.com宛てにメー
で問い合わせださい。れとールの中に注文番号おび問題
詳細を添えださい。
問い合わせには24時間以内に対応で
EPOMAKERオル店舗以外の代理店舗から製品を購入すれば、
直接その代理店舗に連絡をださい。
いて
EPOMAKERの保証には、工場よ購入した製品がう使用で
んの状況に適用ていこの保証が正常に使た製品
故障或いは摩損な状況に適ていせんご注意ださい。
た製品初期不良品になれば、交換できすとご安心ださ
い。新品を再送する前に、初期不良品を返送しなければならない
ご注意ださい。
EPOMAKERはオル店舗(epomaker.com)から購入た製
品に一年の保証を提供ル認定さない改造/調
整/修復/改た製品に保証おび交換サースを提供で
ん。改良/修復/改造/調整の行製品中の部品を交換、手に
製品を分解とーを交換などが含まれていますが、
上の行為だけではあません。
弊社はオルサイト(epomaker.com)から販売した製品だ
けに保証修理サービスを提供し社オ舗以
外の店舗から製品にーサースを提供でせんご注意
ださい。の場合、なんの問題があれば、
直接にその店舗に連絡
ださい。
ミュニティフォーラム
https://discord.gg/2q3Z7C2
JP
https://www.reddit.com/r/Epomaker/
ロゴ
チシ
付属ツ
チを引き出す
モ:軸を引き抜き過程に、軸のそのピが曲がていれば、キーボーのキーが動作でん。その時に軸本体を抜き出て、の状態
に調整再びに差し込んださい。
軸を引き抜き過程に誤操作ンが壊れると回復でませんの可能性がある軸とキーキプをトールする時に強力過ぎではないご注意ださい。
ールする過程に暴力的に引き抜ん。トールする途中でなんの問題があれば、ご遠慮せずに問い合わせださい。
縦に
機械軸
EPOMAKER
  • Page 1 1
  • Page 2 2
  • Page 3 3
  • Page 4 4
  • Page 5 5
  • Page 6 6
  • Page 7 7
  • Page 8 8
  • Page 9 9
  • Page 10 10
  • Page 11 11
  • Page 12 12
  • Page 13 13
  • Page 14 14
  • Page 15 15
  • Page 16 16
  • Page 17 17
  • Page 18 18
  • Page 19 19
  • Page 20 20
  • Page 21 21
  • Page 22 22
  • Page 23 23
  • Page 24 24

EPOMAKER EP64 ユーザーガイド

タイプ
ユーザーガイド