
PerfectCare Aqua
GC8600 series
系列


4
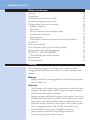
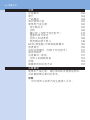
Table of contents
Important 4
Introduction 7
Product overview 8
Before rst use 9
Using your steam generator 9
Filling the water tank 9
Heating up 10
Carry lock (specic types only) 11
Temperature and steam setting 12
Ironing 12
Putting down the iron during ironing 14
ECO mode 14
Ironing tips 14
Auto-off mode (specic types only) 15
Cleaning and maintenance 15
IMPORTANT - DESCALING 15
Descaling the soleplate of the iron 17
Storage 19
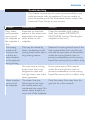
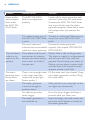
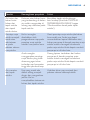
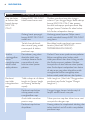
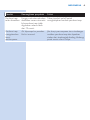
Troubleshooting 21
Important
Read this user manual carefully before you use the appliance
and save it for future reference.
Danger
- Never immerse the iron or the steam generator in water.
Warning
- Check if the voltage indicated on the type plate
corresponds to the local mains voltage before you
connect the appliance.
- Do not use the appliance if the plug, the mains cord, the
supply hose or the appliance itself shows visible damage,
or if the appliance has been dropped or leaks.
- If the mains cord or the supply hose is damaged, you must
have it replaced by Philips, a service centre authorised by
Philips or similarly qualied persons in order to avoid a
hazard.
- Never leave the appliance unattended when it is
connected to the mains.
ENGLISH

- This appliance can be used by children aged 8 or above
and by persons with reduced physical, sensory or mental
capabilities or lack of experience and knowledge if they
have been given instructions in safe use of the appliance
or supervision to establish safe use and if they have been
made aware of the hazards involved.
- Do not allow children to play with the appliance.
- Keep the iron and its mains cord out of the reach of
children aged 8 or under when the appliance is switched
on or cooling down.
- Children are not allowed to clean the appliance and
perform the Calc-Clean procedure without supervision.
- Do not let the mains cord and supply hose come into
contact with the hot soleplate of the iron.
- If steam or hot water droplets escape from under
the EASY DE-CALC knob when the appliance heats
up, switch off the appliance and let it cool down for 2
hours. Then reinsert the EASY DE-CALC knob. If steam
continues to escape when the appliance heats up, switch
off the appliance and contact a service centre authorised
by Philips.
- Do not remove the EASY DE-CALC knob from the
steam generator when the steam generator is still hot or
under pressure.
- Do not use any other cap on the steam generator than
the EASY DE-CALC knob that has been supplied with
the appliance.
Caution
- Only connect the appliance to an earthed wall socket.
- Always place and use the steam generator on a stable,
level and horizontal surface.
- Check the mains cord and the supply hose regularly for
possible damage.
- Fully unwind the mains cord before you plug it in the wall
socket.
- The iron platform and the soleplate of the iron can
become extremely hot and may cause burns if touched. If
you want to move the steam generator, do not touch the
iron platform.
ENGLISH 5

- Always switch off the appliance and remove the plug from
the wall socket when you have nished ironing.
- Put the iron back on the iron platform, switch off the
appliance and remove the mains plug from the wall socket:
- a. when you have nished ironing
- b. when you clean the appliance
- b. when you ll or empty the water tank
- c. when you leave the iron, even if it is only for a short
while
- Descale the steam generator regularly according to the
instructions in chapter ‘Cleaning and maintenance’.
- This appliance is intended for indoor household use only.
Electromagnetic elds (EMF)
This Philips appliance complies with all standards regarding
electromagnetic elds (EMF). If handled properly and according
to the instructions in this user manual, the appliance is safe to
use based on scientic evidence available today.
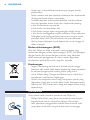
Disposal
- Do not throw away the appliance with the normal
household waste at the end of its life, but hand it in at an
ofcial collection point for recycling. By doing this, you help
to preserve the environment.
- To make recycling possible, the plastic parts used for this
appliance have been coded. The cardboard packaging is
made of 90% recycled material and is fully recyclable.
ENGLISH
6

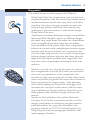
Introduction
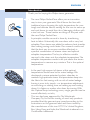
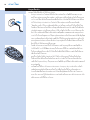
Thank you for buying this Philips steam generator.
- The new Philips PerfectCare offers you an innovative
way to iron your garments. We all know the fuss with
traditional irons: choosing the right temperature for your
tough and delicate fabrics, waiting for the iron to warm up
and cool down to avoid the risk of damaging clothes with
a too hot iron. Those hassles are things of the past with
the new Philips PerfectCare.
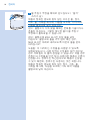
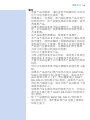
- In principle, wrinkle removal is done by transferring
heat to fabric. Historically, this was done with a very hot
soleplate. Then steam was added to enhance heat transfer,
thus making ironing much faster. Our research conrmed
that the best way to remove wrinkles effectively is
a perfect combination of intense steam and optimal
soleplate temperature. The key to effective wrinkle
removal is the steam not the soleplate temperature. The
soleplate temperature needs to be just above the steam
temperature to remove any moisture. This is the optimal
temperature.
- In the past, high amount of steam at this optimal
temperature would have led to water leakage. We
developed a unique patented cyclonic chamber to
maintain high-pressure steam that penetrates deep into
the fabric for fast ironing with no risk of water leakage.
- Ironing is now truly simple - no temperature adjustment,
no scorching, no waiting time on heating up and cooling
down. It is faster, no matter who does the ironing. With
this OptimalTemp technology, every single garment can be
ironed effectively
and safely.
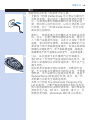
- This iron has been approved by The Woolmark
Company Pty Ltd for the ironing of wool only products
provided that the garments are ironed according to the
instructions on the garment label and those issued by
the manufacturer of this iron. R1101. In United Kingdom,
Eire, Hong Kong and India, the Woolmark trademark is a
Certication trademark.
ENGLISH 7

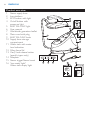
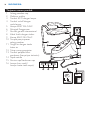
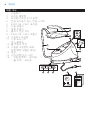
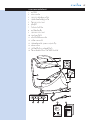
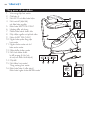
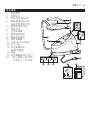
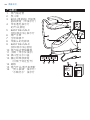
Product overview
1 Steam supply hose
2 Iron platform
3 ECO button with light
4 On/off button with
power-on light
5 EASY DE-CALC light
6 User manual
7 Worldwide guarantee leaet
8 Mains cord with plug
9 EASY DE-CALC knob
10 Supply hose storage
compartment
11 Water tank with water
level indication
12 Filling funnel lid
13 Carry lock release button
(specic types only)
14 Soleplate
15 Steam trigger/Steam boost
16 ’Iron ready’ light/’
Water tank empty’ light
ENGLISH
8

ENGLISH 9
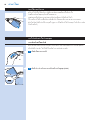
Before rst use
This steam generator is intended for ironing and refreshing
fabrics only.
Remove all packaging material and stickers.
Remove the protective cover from the soleplate before you
use the steam generator.
Always place the steam generator on a stable and horizontal
surface.
Fill the water tank before every use (see chapter ‘Using your
steam generator’, section ‘Filling the water tank’).
Using your steam generator
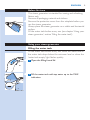
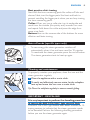
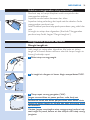
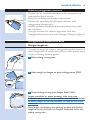
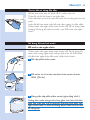
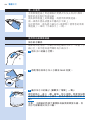
Filling the water tank
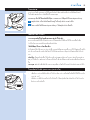
Fill the water tank before every use, when the water level in
the water tank drops below the minimum level or when the
‘water tank empty’ light ashes quickly.
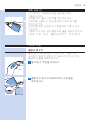
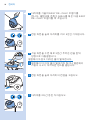
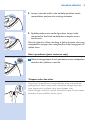
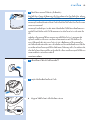
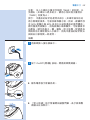
1 Openthellingfunnellid.
2 FillthewatertankwithtapwateruptotheMAX
indication.

3 Properlyclosethellingfunnellid(‘click’).
Donotputhotwater,perfume,vinegar,starch,descaling
agents,ironingaidsorotherchemicalsinthewatertank,as
theappliancehasnotbeendesignedforthis.
Note: Do not tilt or shake the steam generator when the water
tank is full, otherwise water may spill out of the lling funnel lid.
Note: Do not ll the water tank beyond the MAX indication to
avoid spillage. If you have overlled the water tank, empty it until
the water level drops below the MAX indication again.
Tip: Your appliance has been designed to be used with tap
water. If you live in an area with very hard water, fast scale
build-up may occur. Therefore, it is recommended to mix 50%
distilled water and 50% tap water to prolong the lifetime of your
appliance. Do not use distilled water only, as it is slightly acidic
and may cause damage to your appliance. Do not put perfume,
vinegar, starch, descaling agents, ironing aids or other chemicals
in the water tank, as your appliance is not designed to work with
these chemicals.
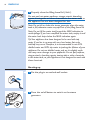
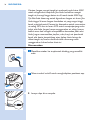
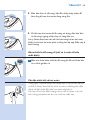
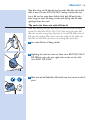
Heating up
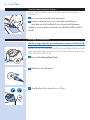
1 Putthepluginanearthedwallsocket.
2 Presstheon/offbuttontoswitchonthesteam
generator.
ENGLISH
10

, Thebluepower-onlightgoeson.
, The‘ironready’lightstartstoashslowlytoindicate
thatthesteamgeneratorisheatingup.
, Whenthesteamgeneratorisreadyforuse,the‘iron
ready’lightstopsashingandlightsupcontinuously.
Note: Water is pumped into the boiler inside the steam
generator, which causes the steam generator to produce a
pumping sound. This is normal.
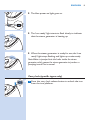
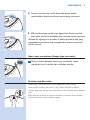
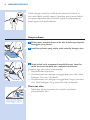
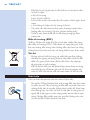
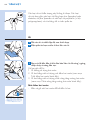
Carry lock (specic types only)
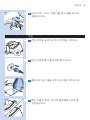
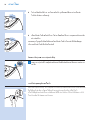
1 Pressthecarrylockreleasebuttontounlocktheiron
fromtheironplatform.
ENGLISH 11

Temperature and steam setting
The OptimalTemp technology enables you to iron all types
of ironable fabrics, in any order, without adjusting the iron
temperature or steam setting.
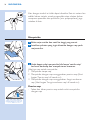
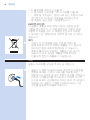
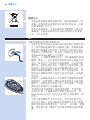
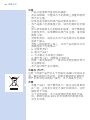
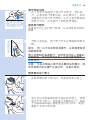
Fabrics with these symbols are ironable, for example linen,
cotton, polyester, silk, wool, viscose, rayon.
Fabrics with this symbol are not ironable. These fabrics
include synthetic fabrics such as Spandex or elastane,
Spandex-mixed fabrics and polyolens (e.g. polypropylene),
but also prints on garments.
Ironing
1 Unfoldyourironingboardandsetittotheappropriate
height.
2 Placethegarmentyouwanttosteamirononthe
ironingboard.
3 Youcanstartironingwhenthe‘ironready’lightstops
ashingandlightsupcontinuously.
There are three ways to iron:
1 Ironing without steam
2 Steam ironing by using the steam trigger (see section
‘Steam trigger’ below).
3 Steam ironing by using the steam boost function (see
section ‘Steam boost function’ below).
ENGLISH
12

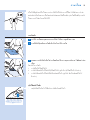
Steam trigger
- Press and hold the steam trigger to start steam ironing.
Steam boost function
- Press the steam trigger twice quickly and release it within
1 second to activate the steam boost function. In this
mode, the system will deliver a high continuous steam
output. This makes it unnecessary for you to press the
steam trigger continuously, which improves your ironing
experience.
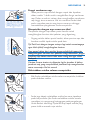
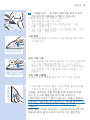
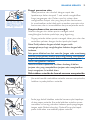
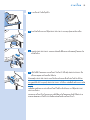
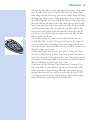
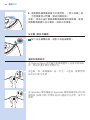
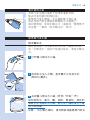
Vertical steam ironing
Steam iron in vertical position to remove wrinkles from
hanging clothes
- Hold the iron in vertical position, press the steam trigger
and touch the garment lightly with the soleplate.
Tip: Pull the garment with one hand to stretch it for more
effective wrinkle removal.
Hotsteamisemittedfromtheiron.Neverattemptto
removewrinklesfromagarmentwhilesomeoneiswearing
it.Donotapplysteamnearyourorsomeoneelse’sbodyto
preventburns.
Note: Regularly water is pumped into the boiler inside the steam
generator again, which causes the steam generator to produce a
pumping sound. This is normal.
ENGLISH 13

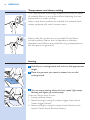
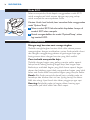
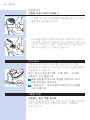
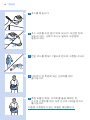
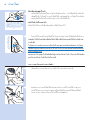
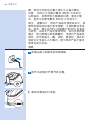
Putting down the iron during ironing
- When you put down the iron during ironing, put it on the
iron platform.
- You can also place the iron with its soleplate on the
ironing board. If you put down the iron horizontally, this
puts less stress on your wrist. Thanks to the OptimalTemp
technology, the hot soleplate does not damage the ironing
board.
ECO mode
During ironing, you can use the ECO mode to save energy
but still have sufcient steam to iron all your garments.
Note: For the best results, we advise you to use the
‘OptimalTemp’ mode.
1 PresstheECObuttonwhentheapplianceisswitched
on.ThelightintheECObuttongoeson.
2 Togobacktothe‘OptimalTemp’mode,presstheECO
buttonagain.
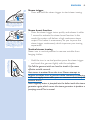
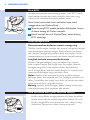
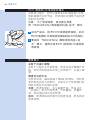
Ironing tips
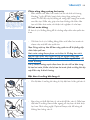
Minimising wrinkles while drying
Start wrinkle removal early in the drying process by
spreading out your laundry properly after washing and by
putting garments on hangers to make them dry naturally with
fewer wrinkles.
ENGLISH
14

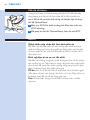
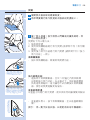
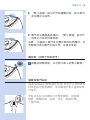
Best practice shirt ironing
Start with the time-consuming parts like collar, cuff links and
sleeves. Next, iron the bigger parts like front and back to
prevent wrinkling the bigger parts when you are busy ironing
the time-consuming parts.
Collar: When you iron a collar, start on its underside and
work from the outside (the pointy end) inwards. Turn over
and repeat. Fold down the collar and press the edge for a
more crisp nish.
Buttons: Iron on the reverse side of the buttons for more
effective and faster ironing.
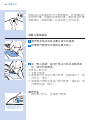
Auto-off mode (specic types only)
- To save energy, the steam generator switches off
automatically when it has not been used for 10 minutes.
- To reactivate the steam generator, press the on/off button.
The steam generator starts to heat up again.
Cleaning and maintenance
To properly maintain your appliance, clean the iron and the
steam generator regularly.
1 Cleantheappliancewithamoistcloth.
2 Toeasilyandeffectivelyremovestains,letthesoleplate
heatupandmovetheironoveramoistcloth.
Tip: Clean the soleplate regularly to ensure smooth gliding.
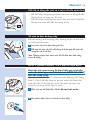
IMPORTANT - DESCALING
It is very important to perform the descaling procedure
as soon as the EASY DE-CALC light starts to ash.
The EASY DE-CALC light ashes after about a month or 10
ironing sessions to indicate that the steam generator needs
to be descaled. Perform the following descaling procedure
before you use the steam generator again.
ENGLISH 15

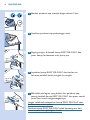
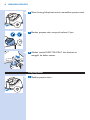
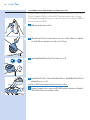
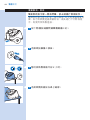
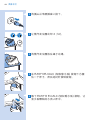
1 Presstheon/offbuttontoswitchoffthesteam
generator.
2 Removetheplugfromthewallsocket.
3 Letthesteamgeneratorcooldownfor2hours.
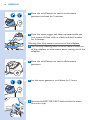
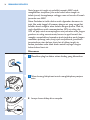
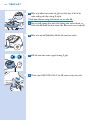
4 Placethesteamgeneratorontheedgeofthetable.
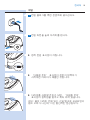
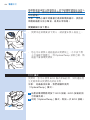
5 HoldacupundertheEASYDE-CALCknobandturn
theknobanti-clockwise.
ENGLISH
16

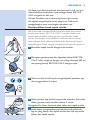
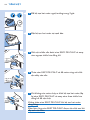
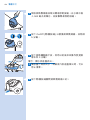
6 RemovetheEASYDE-CALCknobandletthewater
withscaleparticlesowintothecup.
7 Whennomorewatercomesoutofthesteam
generator,reinserttheEASYDE-CALCknobandturnit
clockwisetotightenit.
NeverremovetheEASYDE-CALCknobwhenthesteam
generatorishot.
MakesuretheEASYDE-CALCknobisproperlytightened
afterdescaling.
Tip: You can also take the steam generator to a sink and place it
in such a way that the EASY DE-CALC knob points towards the
sink.
Note: This steam generator is specially designed to easily
and effectively remove scale together with the water. It is not
necessary to shake or tilt the steam generator.
Descaling the soleplate of the iron
If you do not descale your steam generator regularly when
the EASY DE-CALC light goes ON, scale starts building up
inside the supply hose, the iron and the soleplate. This may
cause brown spots on your clothes due to scale particles. You
can still remove the scale by following the instructions below.
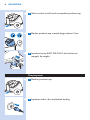
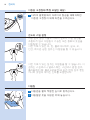
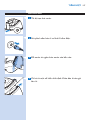
1 Cleanthesoleplatewithadampcloth.
2 TiltthesteamgeneratorandremovetheEASYDE-
CALCknob.Fillthewatertankwith500mldistilled
waterandtightentheEASYDE-CALCknob.
ENGLISH 17

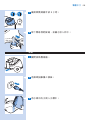
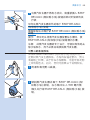
3 Presstheon/offbuttontoswitchonthesteam
generatorandwaitfor5minutes.
4 Pressthesteamtriggerandkeepitpressedwhileyou
ironapieceofthickclothinaback-and-forthmotion
for3minutes.
Warning:Hot,dirtywatercomesoutofthesoleplate.
5 Youcanstopcleaningwhennomorewatercomesout
ofthesoleplateorwhensteamstartscomingoutofthe
soleplate.
6 Presstheon/offbuttontoswitchoffthesteam
generator.
7 Letthesteamgeneratorcooldownfor2hours.
8 RemovetheEASYDE-CALCknobandletthewater
owintoacup.
ENGLISH
18

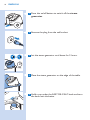
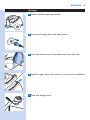
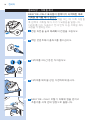
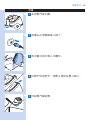
Storage
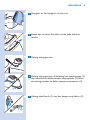
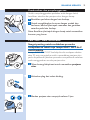
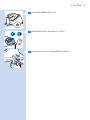
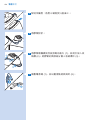
1 Switchoffthesteamgenerator.
2 Removetheplugfromthewallsocket.
3 Pourthewateroutofthewatertankintothesink.
4 Specictypesonly:Locktheironontotheironplatform.
5 Foldthesupplyhose.
ENGLISH 19

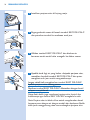
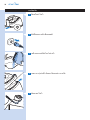
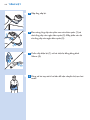
6 Passtheloopofthesupplyhosebehindthestorage
hook(1)andinsertitintothestoragecompartment
(2).Pushtherestofthesupplyhoseintothestorage
compartment(3).
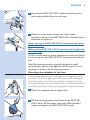
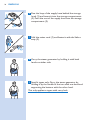
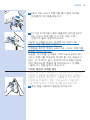
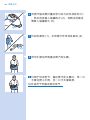
7 Foldthemainscord(1)andfastenitwiththeVelcro
strip(2).
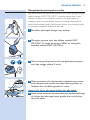
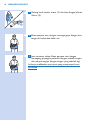
8 Carrythesteamgeneratorbyholdingitwithboth
handsoneitherside.
9 Specictypesonly:Carrythesteamgeneratorby
holdingitbythehandleoftheironwithonehandand
supportingthebottomwiththeotherhand.
Thisonlyappliestotypeswithcarrylock.
ENGLISH
20
ページが読み込まれています...
ページが読み込まれています...
ページが読み込まれています...
ページが読み込まれています...
ページが読み込まれています...
ページが読み込まれています...
ページが読み込まれています...
ページが読み込まれています...
ページが読み込まれています...
ページが読み込まれています...
ページが読み込まれています...
ページが読み込まれています...
ページが読み込まれています...
ページが読み込まれています...
ページが読み込まれています...
ページが読み込まれています...
ページが読み込まれています...
ページが読み込まれています...
ページが読み込まれています...
ページが読み込まれています...
ページが読み込まれています...
ページが読み込まれています...
ページが読み込まれています...
ページが読み込まれています...
ページが読み込まれています...
ページが読み込まれています...
ページが読み込まれています...
ページが読み込まれています...
ページが読み込まれています...
ページが読み込まれています...
ページが読み込まれています...
ページが読み込まれています...
ページが読み込まれています...
ページが読み込まれています...
ページが読み込まれています...
ページが読み込まれています...
ページが読み込まれています...
ページが読み込まれています...
ページが読み込まれています...
ページが読み込まれています...
ページが読み込まれています...
ページが読み込まれています...
ページが読み込まれています...
ページが読み込まれています...
ページが読み込まれています...
ページが読み込まれています...
ページが読み込まれています...
ページが読み込まれています...
ページが読み込まれています...
ページが読み込まれています...
ページが読み込まれています...
ページが読み込まれています...
ページが読み込まれています...
ページが読み込まれています...
ページが読み込まれています...
ページが読み込まれています...
ページが読み込まれています...
ページが読み込まれています...
ページが読み込まれています...
ページが読み込まれています...
ページが読み込まれています...
ページが読み込まれています...
ページが読み込まれています...
ページが読み込まれています...
ページが読み込まれています...
ページが読み込まれています...
ページが読み込まれています...
ページが読み込まれています...
ページが読み込まれています...
ページが読み込まれています...
ページが読み込まれています...
ページが読み込まれています...
ページが読み込まれています...
ページが読み込まれています...
ページが読み込まれています...
ページが読み込まれています...
ページが読み込まれています...
ページが読み込まれています...
ページが読み込まれています...
ページが読み込まれています...
ページが読み込まれています...
ページが読み込まれています...
ページが読み込まれています...
ページが読み込まれています...
ページが読み込まれています...
ページが読み込まれています...
ページが読み込まれています...
ページが読み込まれています...
ページが読み込まれています...
ページが読み込まれています...
ページが読み込まれています...
ページが読み込まれています...
ページが読み込まれています...
ページが読み込まれています...
ページが読み込まれています...
ページが読み込まれています...
ページが読み込まれています...
ページが読み込まれています...
ページが読み込まれています...
ページが読み込まれています...
ページが読み込まれています...
ページが読み込まれています...
ページが読み込まれています...
ページが読み込まれています...
ページが読み込まれています...
ページが読み込まれています...
ページが読み込まれています...
ページが読み込まれています...
ページが読み込まれています...
ページが読み込まれています...
ページが読み込まれています...
ページが読み込まれています...
ページが読み込まれています...
ページが読み込まれています...
ページが読み込まれています...
ページが読み込まれています...
ページが読み込まれています...
ページが読み込まれています...
ページが読み込まれています...
ページが読み込まれています...
ページが読み込まれています...
ページが読み込まれています...
ページが読み込まれています...
ページが読み込まれています...
ページが読み込まれています...
ページが読み込まれています...
ページが読み込まれています...
ページが読み込まれています...
ページが読み込まれています...
ページが読み込まれています...
ページが読み込まれています...
ページが読み込まれています...
ページが読み込まれています...
ページが読み込まれています...
ページが読み込まれています...
ページが読み込まれています...
ページが読み込まれています...
ページが読み込まれています...
ページが読み込まれています...
ページが読み込まれています...
-
 1
1
-
 2
2
-
 3
3
-
 4
4
-
 5
5
-
 6
6
-
 7
7
-
 8
8
-
 9
9
-
 10
10
-
 11
11
-
 12
12
-
 13
13
-
 14
14
-
 15
15
-
 16
16
-
 17
17
-
 18
18
-
 19
19
-
 20
20
-
 21
21
-
 22
22
-
 23
23
-
 24
24
-
 25
25
-
 26
26
-
 27
27
-
 28
28
-
 29
29
-
 30
30
-
 31
31
-
 32
32
-
 33
33
-
 34
34
-
 35
35
-
 36
36
-
 37
37
-
 38
38
-
 39
39
-
 40
40
-
 41
41
-
 42
42
-
 43
43
-
 44
44
-
 45
45
-
 46
46
-
 47
47
-
 48
48
-
 49
49
-
 50
50
-
 51
51
-
 52
52
-
 53
53
-
 54
54
-
 55
55
-
 56
56
-
 57
57
-
 58
58
-
 59
59
-
 60
60
-
 61
61
-
 62
62
-
 63
63
-
 64
64
-
 65
65
-
 66
66
-
 67
67
-
 68
68
-
 69
69
-
 70
70
-
 71
71
-
 72
72
-
 73
73
-
 74
74
-
 75
75
-
 76
76
-
 77
77
-
 78
78
-
 79
79
-
 80
80
-
 81
81
-
 82
82
-
 83
83
-
 84
84
-
 85
85
-
 86
86
-
 87
87
-
 88
88
-
 89
89
-
 90
90
-
 91
91
-
 92
92
-
 93
93
-
 94
94
-
 95
95
-
 96
96
-
 97
97
-
 98
98
-
 99
99
-
 100
100
-
 101
101
-
 102
102
-
 103
103
-
 104
104
-
 105
105
-
 106
106
-
 107
107
-
 108
108
-
 109
109
-
 110
110
-
 111
111
-
 112
112
-
 113
113
-
 114
114
-
 115
115
-
 116
116
-
 117
117
-
 118
118
-
 119
119
-
 120
120
-
 121
121
-
 122
122
-
 123
123
-
 124
124
-
 125
125
-
 126
126
-
 127
127
-
 128
128
-
 129
129
-
 130
130
-
 131
131
-
 132
132
-
 133
133
-
 134
134
-
 135
135
-
 136
136
-
 137
137
-
 138
138
-
 139
139
-
 140
140
-
 141
141
-
 142
142
-
 143
143
-
 144
144
-
 145
145
-
 146
146
-
 147
147
-
 148
148
-
 149
149
-
 150
150
-
 151
151
-
 152
152
-
 153
153
-
 154
154
-
 155
155
-
 156
156
-
 157
157
-
 158
158
-
 159
159
-
 160
160


関連論文
その他のドキュメント
-
Electrolux ESI400 ユーザーマニュアル
-
-
Tefal UR17 Series Tweeny Steamshot 2 In 1 Garment Steamer ユーザーマニュアル
-
Panasonic NI-GT500 ユーザーマニュアル
-
-
-
-
-
IKEA 704.565.91 取扱説明書
-