
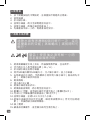
PRO STYLE ONE - IT24****
www.tefal.com
EN
ZH
MS
AR

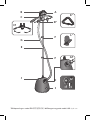
E
G
C
C1
B
J
F
F
A
D*
H
I
I2
I3I1
L*
G1
K*
1,3L
44OZ
MAX
1
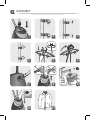
ASSEMBLY
1 2 3
4 5 6
7 8 9
10 11
* ENdepending on model /ZH視乎型號而定 / MSbergantung pada model / AR

E
G
C
C1
B
J
F
F
A
D*
H
I
I2
I3I1
L*
G1
K*
1,3L
44OZ
MAX
1
ASSEMBLY
1 2 3
4 5 6
7 8 9
10 11

1,3L
44OZ
MAX
2
BEFORE USE
1 2 3
4
K* D*
3
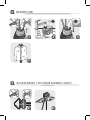
ACCESSORIES (*IN SOME MODELS ONLY)

45 sec.
1 2
3
4 5 6
4
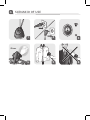
SCENARIO OF USE

1,3L
44OZ
MAX
A
B
1 2 3
4 5 6
1 2 3
5
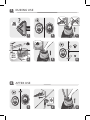
DURING USE
6
AFTER USE
?

7
DESCALING PROCEDURE
1
2
2
50%
White
Vinegar
50%
Water
1
2
2
1L
34 OZ
1h
1
2
4 5 6
1 2 3
4
5 6
6
AFTER USE

5 MINS.
*5-6 times
7
DESCALING PROCEDURE
1,3L
44OZ
MAX
7 98
10
12
11
13 14
step 1 to 9
* 5-6 times

9
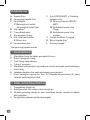
EN
DESCRIPTION
A Steam Head
B Steam head holder
C Hanger
C1 Lock button for hanger
foldability
D Trouser clips *
E Adjustable pole
F Pole locking clips
G Woven fabric steam hose
G1 Hose Lock
H Hose Connector
I ON/OFF switch + 2 steam
setting button
I1 ON/OFF Light indicator
I2 High steam level position
I3 Low steam level position
J Removable Water tank
K Steam head brush *
L Glove *
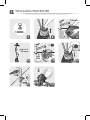
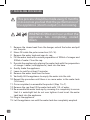
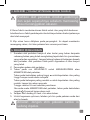
1. ASSEMBLY
1. Insert the pole in the housing & then lock.
2. Open the 2 pole locks.
3. Extend the pole fully.
4. Close the 2 locks.
5. Fully insert the hanger vertically on top of the pole.
6. Position the steam head on the holder of the hanger.
7. Lock the extremity of the steam hose (G1) to the connector (H)
located on the product base.
2. BEFORE USE
1. Remove the water tank.
2. Remove the cap then fill the water tank.
3. Fully screw the water tank cap and insert tank back into the appliance.
4. Place the garment on the hanger.
* Depending on model

10
3. ACCESSORIES (* IN SOME MODELS ONLY)
Make sure the appliance is unplugged
and completely cool before attaching or
removing accessories.
K. The fabric brush opens the weaves of the fabrics for better steam
penetration.
Attach the fabric brush to the steam head when appliance is unplugged
and has cooled down.
D. The trouser clip should be clipped on the hanger. It helps to hold
trousers, skirts and other clothes during steaming.
4. SCENARIO OF USE
1. Only operate the appliance on a floor clear of any materials which
may obstruct the base of the steamer (flat and horizontal surface).
Do not obstruct the openings on the lower part of the appliance. This
appliance should not be used on very thick carpets or rugs.
2. Plug in the appliance.
3. Press on the ON/OFF switch to turn the appliance ON or OFF.
Press on the highest position for higher steam concentration. A red
light will turn on.
Press on the lowest position for a lower steam concentration. A blue
light will turn on.
Wait for 45 seconds before steaming.
If you want to turn OFF the appliance, press on the middle position .
The light indicator will turn off.
4. After 45 seconds approximately, steam will come out.
5. For optimal use, pass the steam jets on your garment from top to
bottom.
Warning: Never steam a garment while it is
being worn.

11
EN
5. DURING USE
1. If steam is not coming out anymore, this can be due to low water
level in tank.
2. Press the ON/OFF switch to the middle position and check that light
is switched OFF.
3. Remove the water tank.
4. Remove the cap then fill the water tank.
5. Fully screw the water tank cap and insert tank back in appliance.
6. Press the ON/OFF switch and select your desired steam concentration.
Check that light is switching on. Wait for 45 seconds before steaming.
6. AFTER USE
1. Press the ON/OFF switch to the middle position and check that light
is switched OFF.
2. Unplug the appliance.
3. Remove the water tank.
4. Unscrew the cap and then empty the water tank completely in a sink.
5. Screw back the cap and place the water tank back onto the appliance.
6. Wait for an hour for your appliance to cool before storing.

12
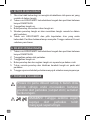
7. DESCALING PROCEDURE
This process should be made every 6 months
or as soon as you feel that the performance of
the appliance (steam output) is decreasing.
WARNING! Wait an hour so that the
appliance has completely cooled
down.
1. Remove the steam head from the hanger, unlock the locker and pull
out the pole.
2. Never fill inside the pole connection (G1 / H).
3. Remove the water tank and open its cap.
4. Fill the water tank with a mixed preparation of 500ml of vinegar and
500ml of water. Close the cap.
5. Descale the appliance by placing the water tank with the preparation
of vinegar / water (cold appliance), back into the base.
6. Gently shake the appliance.
7. Leave to soak for at least 5 minutes.
8. Remove the water tank from the base.
9. Vertically tilt the appliance to empty the water into the sink.
10. Repeat the procedure until there is no more water in the water tank
(5-6 times).
11. Once completed, re-assemble the product (Step 1 to 7).
12. Remove the cap then fill the water tank with 1.3L of water.
13. Re-assemble the water tank cap by screwing it in completely to ensure
that it is watertight but do not over tighten it and insert the water
tank back into the appliance.
14. Plug in the appliance.
15. Let the appliance run until the water tank has completely emptied.

13
EN
8. CLEANING
• Wait an hour so that the appliance has completely cooled down.
• Only use a damp sponge/cloth with water to clean the base.
• Only use a damp sponge/cloth with water to clean the steam head.
• Never use detergents when cleaning your appliance.
• Never wash or rinse appliance directly over a sink.

14
描述
A 蒸氣噴嘴
B 蒸氣噴嘴架
C 衣架
C1 衣架折疊鎖定按鈕
D 長褲夾*
E 伸縮桿
F 長竿鎖定夾
G 梭織布料製蒸氣管
G1 蒸氣管鎖環
H 蒸氣管接頭
I 開關按鈕 + 兩段蒸氣設定
按鈕
I1 開關指示燈
I2 高檔蒸氣設定
I3 低檔蒸氣設定
J 可拆式儲水箱
K 蒸氣噴嘴刷頭*
L 手套*
1.組裝
1. 將長竿插入機身並鎖緊。
2. 將兩個伸縮桿鎖解開。
3. 將伸縮桿完全伸展。
4. 將兩個伸縮桿鎖重新鎖上。
5. 將衣架垂直完全插入長竿頂。
6. 將蒸氣噴嘴掛在衣架托盤上。
7. 將蒸氣管頭(G1)銜接底座的接頭(H)鎖緊。
2.使用前
1. 拆出儲水箱。
2. 扭開箱蓋並注水。
3. 將水箱蓋完全扭緊,然後將水箱放回機身。
4. 將衣服掛在衣架上。
* 視乎型號

15
ZH
3.配件(*只適用於特定型號)
裝上或拆卸配件前,請先確定產品的電源
已經拔除,並已徹底冷卻。
K. 衣物纖維刷可梳鬆衣物纖維,令蒸氣更易穿透衣物。
在蒸氣噴嘴上安裝衣物纖維擦時,須先拔除產品電源及待其冷卻。
D. 長褲夾應夾在衣架上。長褲夾可固定長褲、裙及其他衣物,方便蒸
燙。
4.使用步驟
1. 操作本產品前,請確定產品所在的地板上並無任何會阻礙產品底
座(平坦且水平的表面)的物件。請勿阻礙本產品下面部分的開
口。本產品不可在非常厚的地毯上使用。
2. 插上電源。
3. 按下開關按鈕,以啟動或關閉設備。
輕按最上方設定 ,選擇較高蒸氣密度。裝置將會亮起紅燈。
輕按最下方設定 ,選擇較低蒸氣密度。裝置將會亮起藍燈。
使用蒸氣前,等候45秒。
如欲關閉裝置,請輕按中間設定 。指示燈將會熄滅。
4. 約45秒後,蒸氣噴嘴會噴出蒸氣。
5. 為達到最佳效果,請朝著衣物由上而下移動噴嘴。
警告:衣服穿在身上時切勿蒸熨。
5.使用期間
1. 如噴嘴再沒有噴出蒸氣,可能是由於儲水箱的水位過低。
2. 按下開關按鈕的中間設定,並檢查指示燈是否已熄滅。
3. 拆出儲水箱。
4. 扭開箱蓋並注水。
5. 將水箱蓋完全扭緊,然後將水箱放回機身。
6. 按下開關按鈕,選擇自己心儀的蒸氣密度。檢查指示燈是否已亮
起。使用蒸氣前,等候45秒。

16
6.使用後
1. 按下開關按鈕的中間設定,並檢查指示燈是否已熄滅。
2. 拔除插頭。
3. 拆出儲水箱。
4. 扭開水箱蓋,將水全部倒進盥洗盆中。
5. 扭緊水箱蓋,將儲水箱放回產品上。
6. 先讓產品冷卻一小時,再將產品存放好。
7.清除水垢步驟
清除水垢程序應每6個月進行一次,或在
感覺產品的效能(蒸氣輸出)減弱時即可
進行。
警告!使用後必須等候一小時,
直至產品徹底冷卻。
1. 將蒸氣噴嘴從衣架上拆出,然後解開長竿鎖,拉出長竿。
2. 切勿將水注入長竿連接孔裏(G1/H)。
3. 拆出儲水箱並扭開水箱蓋。
4. 混合500毫升醋和500毫升水,注入儲水箱中。扭上水箱蓋。
5. 去除產品的水垢時,可將醋與水混合倒入儲水箱中(產品須先冷
卻),將儲水箱放回底座。
6. 輕搖機身。
7. 浸水最少5分鐘。
8. 將儲水箱從底座拆出。
9. 將機身垂直傾側,將水倒至盥洗盆中。
10. 重覆以上步驟,直至儲水箱完全清空為止(重覆5至6次)。
11. 完成以上步驟後重新組裝產品(第1至7步)。
12. 扭開水箱蓋,並將1.3公升水注入水箱。
13. 將儲水箱蓋放回並完全扭緊,確定無液體滲出(但切勿扭得過
緊),然後將儲水箱裝回機身。
14. 插上電源。
15. 讓產品持續運作,直至儲水箱完全清空為止。

17
ZH
8.清潔
• 使用後必須等候一小時,直至產品徹底冷卻。
• 除了濕海綿/布及水以外,清理底座時請勿使用其他工具。
• 除了濕海綿/布及水以外,清理蒸氣噴嘴時請勿使用其他工具。
• 切勿使用清潔劑清洗機身。
• 切勿直接將機身放在盥洗盆沖洗。

18
PENERANGAN
A Kepala Stim
B Pemegang kepala stim
C Penyangkut
C1 Butang kunci untuk
penyangkut boleh lipat
D Klip seluar *
E Tiang boleh laras
F Klip pengunci tiang
G Hos stim kain berkait
G1 Kunci hos
H Penyambung hos
I Suis HIDUP/MATI + 2 butang
tetapan stim
I1 Penunjuk lampu HIDUP/
MATI
I2 Kedudukan paras stim
tinggi
I3 Kedudukan paras stim
rendah
J Tangki Air Boleh Tanggal
K Berus kepala stim *
L Sarung tangan *
1. PEMASANGAN
1. Masukkan tiang ke dalam perumah & kunci.
2. Buka 2 pengunci tiang.
3. Tarik tiang sepenuhnya.
4. Tutup 2 pengunci.
5. Masukkan penyangkut sepenuhnya secara menegak pada bahagian
atas tiang.
6. Letakkan kepala stim pada pemegang penyangkut.
7. Kunci bahagian hujung hos stim (G1) kepada penyambung (H) yang
terletak pada tapak produk.
2. SEBELUM MENGGUNAKAN
1. Tanggalkan tangki air.
2. Buka penutup, kemudian isikan tangki air.
3. Skrukan penutup tangki air dan masukkan tangki semula ke dalam
alat perkakas.
4. Sangkutkan pakaian pada penyangkut.
* Bergantung kepada model

19
MS
3. AKSESORI (* DALAM SESTENGAH MODEL SAHAJA)
Pastikan alat perkakas dicabut palamnya
dan sejuk sepenuhnya sebelum memasang
atau menanggalkan aksesori.
K. Berus fabrik membuka alunan fabrik untuk stim yang lebih berkesan.
Lekatkan berus fabrik pada kepala stim ketika perkakas dicabut palamnya
dan telah menyejuk.
D. Klip seluar harus diklipkan pada penyangkut. Ini dapat membantu
memegang seluar, skirt dan pakaian lain semasa penstiman.
4. SENARIO PENGGUNAAN
1. Gunakan alat perkakas hanya di atas lantai yang bebas daripada
sebarang bahan yang boleh menghalang tapak alat stim (permukaan
yang rata dan mendatar). Jangan halang bukaan di bahagian bawah
alat perkakas. Alat perkakas tidak patut digunakan di atas karpet
yang tebal.
2. Pasangkan palam alat perkakas.
3. Tekan pada suis HiDUP/MATI untuk MENGHIDUPKAN atau
MEMATIKAN alat perkakas.
Tekan pada kedudukan paling tinggi untuk kepekatan stim paling
tinggi. Lampu merah akan menyala.
Tekan pada bahagian paling rendah untuk kepekatan stim paling
rendah. Lampu biru akan menyala.
Tunggu selama 45 saat sebelum penstiman.
Jika anda mahu MEMATIKAN alat perkakas, tekan pada kedudukan
tengah . Penunjuk lampu akan mati.
4. Selepas lebih kurang 45 saat, stim akan keluar.
5. Untuk kegunaan optimum, lalukan jet stim pada pakaian anda dari
atas ke bawah.
Amaran: Jangan stim pakaian ketika ia
sedang dipakai.

20
5. KETIKA PENGGUNAAN
1. Jika stim tidak keluar lagi, ini mungkin disebabkan oleh paras air yang
rendah di dalam tangki.
2. Tekan suis HIDUP/MATI ke kedudukan tengah dan pastikan bahawa
lampu DIMATIKAN.
3. Tanggalkan tangki air.
4. Buka penutup, kemudian isikan tangki air.
5. Skrukan penutup tangki air dan masukkan tangki semula ke dalam
alat perkakas.
6. Tekan suis HIDUP/MATI dan pilih kepekatan stim yang anda
kehendaki. Pastikan bahawa lampu menyala. Tunggu selama 45 saat
sebelum penstiman.
6. SELEPAS PENGGUNAAN
1. Tekan suis HIDUP/MATI ke kedudukan tengah dan pastikan bahawa
lampu DIMATIKAN.
2. Tanggalkan palam alat perkakas.
3. Tanggalkan tangki air.
4. Buka penutup dan kosongkan tangki air sepenuhnya dalam sinki.
5. Tutup semula penutup dan letakkan kembali tangki air pada alat
perkakas.
6. Tunggu sejam untuk alat perkakas menyejuk sebelum menyimpannya.
7. PROSEDUR NYAHKERAK
Proses ini perlu dibuat setiap 6 bulan atau
sebaik sahaja anda merasakan bahawa
prestasi alat perkakas (output stim) semakin
berkurangan.
AMARAN! Tunggu selama sejam
supaya alat perkakas telah
menyejuk sepenuhnya.
ページが読み込まれています...
ページが読み込まれています...
ページが読み込まれています...
ページが読み込まれています...
ページが読み込まれています...
ページが読み込まれています...
ページが読み込まれています...
ページが読み込まれています...
-
 1
1
-
 2
2
-
 3
3
-
 4
4
-
 5
5
-
 6
6
-
 7
7
-
 8
8
-
 9
9
-
 10
10
-
 11
11
-
 12
12
-
 13
13
-
 14
14
-
 15
15
-
 16
16
-
 17
17
-
 18
18
-
 19
19
-
 20
20
-
 21
21
-
 22
22
-
 23
23
-
 24
24
-
 25
25
-
 26
26
-
 27
27
-
 28
28


