
Thank you very much for your purchasing of the Hitachi
Dehumidifier. Please read this Instruction Manual well
to use the dehumidifier correctly and keep this Instruc-
tion Manual at a certain place for future reference.
CONTENTS
● BEFORE YOU BEGIN .................................................2
● USEFUL IN THE FOLLOWING CASES.....................2
● CAUTIONS FOR SAFETY ..........................................3
• CAUTIONS ON INSTALLATION ........................3~4
• CAUTIONS ON USE .............................................4~6
• CAUTIONS FOR REPAIR .........................................6
● INDISPENSABLE KNOWLEDGE FOR
DEHUMIDIFIER.............................................7~8
● NAME AND FUNCTION OF EACH PART ................8
● OPERATION PANEL ....................................................9
● HOW TO OPERATE .............................................10~22
● EFFICIENT USE OF DEHUMIDIFIER .....................23
● ADDITIONAL CAUTIONS ........................................23
● MAINTENANCE AND INSPECTION ................24~26
● STORING DEHUMIDIFIER ......................................26
● WHEN REQUIRING REPAIR SERVICE ............27~28
● SPECIFICATIONS ......................................................29
● OPTIONAL ACCESSORIES ......................................29
• DRAINING DEHUMIDIFIED WATER
CONTINUOUSLY ...................................................30
• CAUTIONS IN THE USE OF THE DEHUMIDIFIER
IN CONTINUOUS DRAINAGE .............................30
Thoroughly read this instruction manual to ensure correct use, and keep the manual in a handy place for future reference.
RD-250EX
01
● ................................................................................2
● .........................................................................2
● .................................................................3
• ..................................................3~4
• ..................................................4~6
• .....................................................6
● ...................................................................7~8
● ......................................................8
● ........................................................................9
● .............................................................10~22
● ...........................................................23
● .......................................................................23
● ............................................................24~26
● ............................................................26
● .............................................................27~28
● ................................................................................29
● ........................................................................29
•.........................................................30
•.....................................30
INSTRUCTION MANUAL FOR THE HITACHI DEHUMIDIFIER RD-250EX
HOW TO USE

BEFORE YOU BEGIN
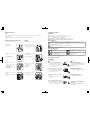
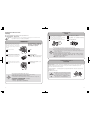
USEFUL IN THE FOLLOWING CASES:
Use the dehumidifier effectively.
This dehumidifier is for general household use: Do not use it for such purposes as storing food, precision equipment, art
objects, medicines, etc.
● Carpet is damp.
●
● Faster drying of clothes in a
room.
●
● Drawers of wardrobe are
difficult to pull out because
contents are damp.
●
● Moisture adheres to ceiling or
walls, or they are moldy.
● Clothes and leather goods are
moldy or stained.
●
● Sound from piano is distorted
or its keys are heavy.
●
● To keep CDs, books, cameras,
etc. dry.
●
●
●
Strictly observed
Strictly observed
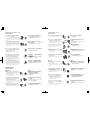
CAUTIONS FOR SAFETY
● Read the following thoroughly before starting operation for correct use.
● Be sure to observe the following cautions that are critical for safety.
■ The indications and meanings of cautions shown here are as follows:
■
■ The icons have the following meanings:
■
After reading, be sure to keep the manual in a place where you can refer to it anytime.
CAUTIONS ON INSTALLATION
indicates a potentially very hazardous situation, which could result in death or serious injury.
indicates a potentially hazardous situation, which could result in minor or moderate injury, or
damage to device.
WARNING
CAUTION
Prohibited
Prohibited
Prohibited
Prohibited
Indicates prohibition.
Be sure to unplug the power cord from AC outlet.
Do not splash water on dehumidifier or get it wet.
Instructions to be observed strictly.
CAUTION
CAUTION
● Use only on a horizontal and stable spot:
If the dehumidifier falls during use, the water
inside will leak and wet household goods: At
worst, it could result in electric shock or fire
caused by a short-circuit.
● Do not use in a narrow space, such as in
closet or between pieces of furniture:
Doing so will deteriorate air ventilation, which
could cause heat generation or fire.
● Do not use in a place where water is likely
to splash:
This could cause electric shock or fire as a result
of short-circuit.
● Do not install the dehumidifier in a place
where oil or inflammable gas could leak:
If oil or gas leaks and accumulates around the
dehumidifier, it could cause fire or explosion.
●
●
●
●
Prohibited
Prohibited
●
● Closet and its contents are
damp.
●
32
Less than 5mm
5mm

CAUTIONS ON INSTALLATION (CONTINUED)
Prohibited
Prohibited
Prohibited
Prohibited
Prohibited
Prohibited
Prohibited
Prohibited
Prohibited
Prohibited
Prohibited
Prohibited
Prohibited
Prohibited
Prohibited
Prohibited
Prohibited
Prohibited
Prohibited
Prohibited
Prohibited
Prohibited
Prohibited
Prohibited
Strictly observed
Strictly observed
Strictly observed
Strictly observed
Strictly observed
Strictly observed
Unplug
Unplug
Unplug
Unplug
220 V/
Prohibited
● Do not place a container with water, such
as a vase, on dehumidifier:
If it falls and water enters the dehumidifier,
the electrical insulation will deteriorate, which
could cause electric shock or fire as a result of
short-circuit.
● Do not hold the power plug with wet hand:
Doing so could cause electric shock.
● Be sure to use the dehumidifier with the
rated voltage (single-phase 220V):
Using with a voltage other than the rated one
could result in electric shock or fire.
● Do not bend the power cord forcibly:
Doing so could cause electric shock or fire as a
result of short-circuit.
● Do not insert your finger or rod into the
air outlet or inlet:
This could result in injury since the fan inside
rotates at high speed.
● Do not place the dehumidifier near any
heating appliance:
Doing so could deform the plastic parts or ignite
a fire.
● Do not hold the cord when pulling out
the power cord:
Doing so could disconnect part of core wires,
which could result in heat generation or fire
ignition.
● When cleaning the dehumidifier, be sure
to stop it and pull out the power cord
from the AC outlet:
Neglecting this could cause injury since the fan
inside rotates at high speed.
● If you do not use the dehumidifier for a
long period of time, unplug the power
cord from the AC outlet for safety:
Neglecting this could result in electric shock or
fire as a result of short-circuit.
● Do not place any heating appliance
where the air from the dehumidifier
blows directly:
Doing so could cause incomplete combustion
of the heater, resulting in gas or oil fumes.
● Make sure that no dust adheres to the
power plug, and securely insert plug up
to the roots of prongs:
Dust or incomplete connection could cause
electric shock or fire.
● Do not damage or modify the power cord
in any way: Doing so could cause electric
shock, heat generation or fire.
Do not place any heavy object on the power
cord, or subject it to heat or stretch it: Doing so
will damage the cord.
● Do not start or stop the dehumidifier by
plugging in or unplugging the power cord:
Doing so could cause electric shock or fire.
● The dehumidifiers exclusively for indoor
use. Do not use it in a place which is
exposed to direct sunlight, rain or wind:
This could cause electric shock or fire as a
result of short-circuit.
● Do not use the dehumidifier for special
purposes such as keeping art objects,
scientific materials, etc. dry:
Doing so could deteriorate the quality of the
stored goods.
● When performing continuous drainage,
do not make ambient temperature of the
drain hose drop below freezing point.
Water inside the drain hose freezes and water
inside the dehumidifier can spill in the room and
wet the property such as furniture.
● For continuous drainage, attach a hose
for secure drainage, taking care with
bending of hose or drops in water level:
Neglecting this could allow the water in
dehumidifier to leak and wet household goods.
●
●
●
●
●
●
●
●
WARNING
CAUTION
●
●
●
●
●
●
●
●
●
CAUTIONS ON USE
CAUTIONS ON USE (CONTINUED)
54

CAUTIONS ON USE (CONTINUED)
CAUTIONS FOR REPAIR
● Do not block the air inlet or outlet with a
cloth, etc.:
Doing so will deteriorate ventilation, and could
cause heat generation or fire ignition.
● Do not mount the dehumidifier or sit on it:
Falling or stumbling could cause injury.
● Do not wash the dehumidifier with water:
Doing so could cause electric shock.
● When moving the dehumidifier, be sure
to stop it completely and dispose of the
water in water receptacle:
If disposal of water is neglected, water will leak
either inside the dehumidifier or outside, which
could wet household goods, cause electric shock
or fire as a result of short-circuit.
● When using the dehumidifier without any-
one attendant, inspect it periodically:
Neglecting inspection could result in heat gen-
eration or water leak.
● If the ambient temperature of dehumidifier
drops below zero, do not leave the water
in water receptacle as is:
Neglecting disposal will allow the water to
freeze, which could crack the receptacle, causing
water leak.
● If any abnormality occurs in the dehu-
midifier (smelling scorch, etc.), imme-
diately turn it off, unplug the power cord,
and consult your dealer:
Continuing operation with abnormality left as
is could cause electric shock or fire.
● Do not attempt to repair the dehumidifier
yourself:
Be sure to ask your dealer for repair.
WARNING
●
●
●
●
●
●
●
●
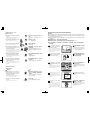
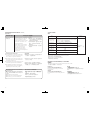
INDISPENSABLE KNOWLEDGE FOR DEHUMIDIFIER
■ Read the following items carefully and avoid using the dehumidifier outside the specified available range.
■ The dehumidifier does not have any cooling function. On the contrary, it generates heat during operation:
the room temperature will rise by 1-2°C.
■ Install the dehumidifier at least 1 m away from your TV, radio, and radio antenna, to prevent image distortion
or interference.
■
■
■
A protection device may act at high
temperature, stopping operation
to prevent excessive strain.
This dehumidifier is not suitable
for maintaining humidity at less
than 50%.
This dehumidifier removes moisture that
is a bother in everyday life (damage due
to dampness, discomfort, etc.)
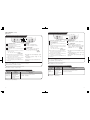
The dehumidification level also varies
depending on the room temperature.
The lower the temperature, the less the
dehumidification amount, as shown in
the diagram.
Prohibited
Prohibited
Prohibited
Strictly observed
Strictly observed
Strictly observed
Unplug
Prohibited
Refer to the table on the right for
the floor space required for the
dehumidifier to be used.
The room space where the dehumidifier
can be used differs depending on the
structure of house etc.: Use the table on
the right for reference.
Dehumidification amount (l/d)
15
10
5
0
20
25
25.0L
10
15 20 25 30
The compressor stops during
defrosting.
If the temperature drops to about 13
°C
or lower, since frost forms on the cooler,
the compressor is stopped for defrosting.
Frequency of defrosting varies depend-
ing on the temperature and humidity at
that time.
40 80
76
0
10
-10
-20
20
30
40
50
Adequete
humidity
Low humidity
(
less than 50%
)
High
humidity
Frost
Compressor stops /
Frost

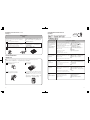
NAME AND FUNCTION OF EACH PART
If
2 units of dehumidifier operate in
the same room at the same time, dehu-
midifying amount differs from each
other.
In “Automatic Dehumidifying Mode” operation,
the dehumidifier of which humidity sensor
has lower function has priority to operate
over the other dehumidifier. Thus,
dehumidifying amount will differ from each
other after certain time has elapsed.
In Case of Power Failure while
Using the Dehumidifier...
When restored from power failure,
operation mode automatically returns to
the one which was set prior to the
power failure.
When restored from power failure
while OFF timer is set, the OFF timer
and swing remain set.
FRONT PANEL /
REAR PANEL /
■ Automatic louver (Air outlet)
Dehumidified dry air is released. Pressing
the SWING Switch, the automatic louver
can be switched. (
☞Page 20)
■
☞
■ Air filter (☞Page 24)
■ ☞
■ Air inlet opening
Humid air is drawn into the inlet opening.
■
■
☞
■
☞
■ Drain hose opening
This opening is used when water is drained
continuously. (
☞Page 30)
■
■ Filter frame
The frame is already attached to an air filter.
■ Casters
The casters are used when the dehumi-
difier is moved indoors. (
☞Page 22)
■ Handle
The handle is used to move the dehumidifier
with casters, or to move it down steps or
stairs. (
☞Page 22)
■
☞
■
☞
■ Water receptacle
Dehumidified water is contained in the water
receptacle. The operation is automatically
stopped once the receptacle is full. Amount
of dehumidified water can be known at a
glance. (
☞Page 22)
■
☞
■ Operation panel (☞Page 9)
Restored from
power failure.
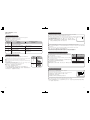
OPERATION PANEL
Continuous Dehumidifying Mode Indicator
☞
DEFROSTING Indicator (☞Page 21)
“DEFROSTING” is indicated on the LCD display when
defrosting is in process.
Automatic Clothes Drying Mode Indicator
Silent Dehumidifying Mode Indicator
MODE Switch
Every time the switch is pressed, the operation mode is changed in
this sequence:
“Automatic Dehumidifying Mode” - “Continuous Dehumidifying
Mode” - “Automatic Clothes Drying Mode” - “Silent
Dehumidifying Mode” repeatedly.
POWER Switch
The dehumidifier is turned on/off.
FULL WATER Indicator (☞Page 21)
“FULL WATER” is indicated on the LCD display when the
water receptacle is full.
☞
HUMIDITY Indicator
The indoor humidity (around the inlet opening of the
dehumidifier) is indicated.
TEMPERATURE Indicator
The indoor temperature is indicated.
LOCK Switch
All Switch except Power Switch can't be used while Lock is set.
TIMER Switch (☞Page 18,19)
The SHUT-OFF and ON timer can be set from 1 to 12 hours.
☞
SET HUMIDITY Indicator
The set indoor humidity is indicated.
TIME Indicator (☞Page 18,19)
The time of Shut-Off and On timer is indicated.
☞
HUMIDITY Switch
Indoor humidity can be set from 30% to 80% in Continuous
Dehumidifying Mode and Silent Dehumidifying Mode.
☞
SWING Switch (☞Page 20)
The automatic louver can be switched.
☞
FAN Indicator (☞Page 20)
Fan speed is indicated as level 1 to 3.
Level 4 is available in Automatic Clothes Drying Mode only.
LOCK Indicator
Displayed while Lock function is set.
FAN Switch (☞Page 20)
Fan speed can be set from level 1 to 3 in “Continuous Dehumidi-
fying Mode”. Level 4 is available in Automatic Clothes Drying
Mode only. The number of wing and bar show the setting level.
☞
1 9
10
11
12
13
14
15
16
17
18
2
3
4
5
6
7
8
1 2 3
18
8 94 5 6 7
101113151617 14 12
98

HOW TO OPERATE
AUTOMATIC DEHUMIDIFYING MODE
(Example of display) Fan speed: level 1, Room temperature: 15, Humidity: 80
Insert the power plug into an outlet.
● Hear beep sound three times. This is Standby Mode.
Press the POWER Switch.
● The dehumidifier is turned on and Automatic
Dehumidifying Mode is started.
● Fan speed is automatically changed according to the
room temperature and humidity.
Press the MODE Switch.
● Continuous Dehumidifying Mode Indicator is shown
on the LCD display.
● Every time the switch is pressed, the operation mode
is changed in this sequence:
Press the LOCK Switch for 3 seconds.
●
Lock Indicator is shown on the LCD display. While the lock
is set, all the Switch except for Power Switch is not operated.
● When pressing the Lock Switch for 3 seconds again, the
lock is cancelled.
Press the SWING Switch.
●
The automatic louver is moved for front: 45° back: 47°
repeatedly.
●
When pressing the SWING Switch again, the move is stopped.
●
●
●
●
●
●
● 3
●
●
Press the TIMER Switch.
●
The OFF timer can be set from 1 to 12 hours (per 1
hour) while the dehumidifer is operated. Set time is
indicated on the LCD display.
●
When set time comes, the dehumidifier is turned off automatically.
●
When pressing the TIMER Switch in set timer 12 hours,
the TIMER indicator disappears.
When pressing the TIMER Switch again, the TIMER
indicator shows 1 hour.
●
●
●
Automatic
Dehumidifying
Continuous
Dehumidifying
→
Automatic
Clothes
Drying
→
Silent
Dehumidifying
→
6
Press the POWER Switch again.
●
The LCD display disappears and operation stops. Then
the automatic louver closes.
●
7
7
6
PROHIBITED
■ Do not close the automatic louver and operate the dehumidifier.
■ Do not touch the unit while the automatic louver is operating.
■
■
■ If FULL WATER Indicator is shown on the LCD display when plugged in, empty water in the water receptacle
and reattach the receptacle.
■
THE MECHANISM OF DEHUMIDIFYING /
Operation type Situation Mechanism of operation
Automatic
Dehumidifying
When the user wants to keep
comfortable humidity level.
● The humidity in the room is automatically controlled to 55~60%.
● Only the dehumidifying and the backwind are repeated to
keep the comfortable humidity.
●
●
1110

HOW TO OPERATE (CONTINUED)
Insert the power plug into an outlet.
●
Hear beep sound three times. This is Standby Mode.
Press the POWER Switch.
●
The dehumidifier is turned on and Automatic
Dehumidifying Mode is started.
Press the MODE Switch.
●
Continuous Dehumidifying Mode Indicator is shown
on the LCD display.
At the beginning, “CO” indicator is shown on the LCD
display. This is Continuous Dehumidifying.
●
Every time the switch is pressed, the operation mode is
changed in this sequence:
Press the FAN Switch
●
Fan speed can be set from level 1 to 3. The number of
wing and bar show the setting level.
●
●
●
●
●
CONTINUOUS DEHUMIDIFYING MODE /
(Example of display)
Continuous Dehumidifying Mode Indicator, Fan speed: level 3, CO indicator, Room temperature: 15
°C
, Humidity: 80
%
Press the LOCK Switch for 3 seconds.
●
Lock Indicator is shown on the LCD display. While the lock
is set, all the Switch except for Power switch is not operated.
●
When pressing the Lock Switch for 3 seconds again,
the lock is cancelled.
●
● 3
Press the SWING Switch.
●
The automatic louver is moved for front: 45° back: 47° repeatedly.
●
When pressing the SWING Switch again, the move is stopped.
●
●
6
Press the HUMIDITY Switch.
● CO indicator is displayed. Press the HUMIDITY
Switch then the CO indicator is changed to 30%.
● Indoor humidity can be set from 30% to 80% per 5%.
●
The SET HUMIDITY Indicator is changed in this sequence:
CO → 30% → 35% → 40%
......
→ 80%
●
●
●
7
7
6
●
●
●
8
9
●
Automatic
Dehumidifying
Continuous
Dehumidifying
→
Automatic
Clothes
Drying
→
Silent
Dehumidifying
→
Press the TIMER Switch.
● The OFF timer can be set from 1 to 12 hours (per 1
hour) while the dehumidifer is operated. Set time is
indicated on the LCD display.
● When set time comes, the dehumidifier is turned off
automatically.
● When pressing the TIMER Switch in set timer 12 hours,
the TIMER indicator disappears.
When pressing the TIMER Switch again, the TIMER
indicator shows 1 hour.
8
9
Press the POWER Switch again.
● The LCD display disappears and operation stops. Then
the automatic louver closes.
THE MECHANISM OF DEHUMIDIFYING /
Operation type Situation Mechanism of operation
Continuous
Set humidity
When the user wants to dehumidify
regardless of humidity level.
When the user wants to keep
humidity level as they want.
● Dehumidification is operated continuously.
●
● The humidity in the room is controlled to the set humidity.
●
The humidity may not be set correctly during the “Automatic Dehumidifying mode”, when the room becomes humid after
opening and closing windows and doors, and depending on the number of people in a room and on the room conditions.
12 13

AUTOMATIC CLOTHES DRYING MODE /
Insert the power plug into an outlet.
● Hear beep sound three times. This is Standby Mode.
Press the POWER Switch.
● The dehumidifier is turned on and Automatic
Dehumidifying Mode is started.
Press the MODE Switch twice.
● Automatic Clothes Drying Mode Indicator and CO
indicator are shown on the LCD display.
● Every time the switch is pressed, the operation mode is
changed in this sequence:
Press the LOCK Switch for 3 seconds.
● Lock Indicator is shown on the LCD display. While the
lock is set, all the Switch except for Power switch is
not operated.
● When pressing the Lock Switch for 3 seconds again, the
lock is cancelled.
Press the SWING Switch.
● The automatic louver is moved for front: 45° back: 47°
repeatedly.
● When pressing the SWING Switch again, the move is
stopped.
Press the TIMER Switch.
● The OFF timer can be set from 1 to 12 hours (per 1
hour) while the dehumidifer is operated. Set time is
indicated on the LCD display.
● When set time comes, the dehumidifier is turned off
automatically.
● When pressing the TIMER Switch in set timer 12
hours, the TIMER indicator disappears.
When pressing the TIMER Switch again, the TIMER
indicator shows 1 hour.
Press the POWER Switch again.
● The LCD display disappears and operation stops. Then
the automatic louver closes.
●
●
●
●
●
●
●
●
(Example of display) Automatic Clothes Drying Mode Indicator, Fan speed: level 4, CO indicator, Room temperature: 15°C, Humidity: 80
%
Automatic
Dehumidifying
Continuous
Dehumidifying
→
Automatic
Clothes
Drying
→
Silent
Dehumidifying
→
5
●
7
●
●
● 12
1
6
6
7
HOW TO OPERATE (CONTINUED)
THE MECHANISM OF THE AUTOMATIC CLOTHES DRYING /
Operation type Situation Mechanism of operation
Automatic Clothes
Drying
When the clothes
are drying.
● Fan speed remains level 4.
●
Start operating the dehumidifier after draining the water in the water receptacle. The operation will stop when the container is full.
The Automatic Clothes Draying Mode is adjusted so that the laundry is approximately 4kg. The laundry will not dry well if:
(1) the load is large; (2)the fabric in the load is thick; (3)clothes are hung very closely; (4)the room where clothes are hung is large;
and/or(5)the humidity in the room is low.
The AUTOMATIC CLOTHES DRYING is an assistant function for clothes drying. If the clothes have not yet been dried, in such
case, change to the CONTINUOUS DEHUMIDIFYING MODE and set OFF timer to continue drying.
1514

HOW TO OPERATE (CONTINUED)
Insert the power plug into an outlet.
●
Hear beep sound three times. This is Standby Mode.
Press the POWER Switch.
●
The dehumidifier is turned on and Automatic
Dehumidifying Mode is started.
Press the MODE Switch three times.
●
Silent Dehumidifying Mode Indicator and CO indicator
are shown on the LCD display.
●
Every time the switch is pressed, the operation mode is
changed in this sequence:
Press the LOCK Switch for 3 seconds.
●
Lock Indicator is shown on the LCD display. While the
lock is set, all the Switch except for Power switch is
not operated.
●
When pressing the Lock Switch for 3 seconds again,
the lock is cancelled.
●
●
●
●
●
●
SILENT DEHUMIDIFYING MODE /
(Example of display) Silent Dehumidifying Mode Indicator, Fan speed: level 1, CO indicator Room temperature: 15
°C
, Humidity: 80
%
Press the SWING Switch.
● The automatic louver is moved for front: 45° back: 47°
repeatedly.
●
When pressing the SWING Switch again, the move is
stopped.
●
●
●
● 30%80%5%
●
6
Press the HUMIDITY Switch.
● CO indicator is displayed. Press the HUMIDITY
Switch then the CO indicator is changed to 30%.
● Indoor humidity can be set from 30% to 80% per 5%.
●
The SET HUMIDITY Indicator is changed in this sequence:
CO → 30% → 35% → 40%
......
→ 80%
7
8
●
●
●
12
1
7
●
8
Press the POWER Switch again.
● The LCD display disappears and operation stops. Then
the automatic louver closes.
Press the TIMER Switch.
● The OFF timer can be set from 1 to 12 hours (per 1
hour) while the dehumidifer is operated. Set time is
indicated on the LCD display.
● When set time comes, the dehumidifier is turned off
automatically.
● When pressing the TIMER Switch in set timer 12 hours,
the TIMER indicator disappears.
When pressing the TIMER Switch again, the TIMER
indicator shows 1 hour.
6
Automatic
Dehumidifying
Continuous
Dehumidifying
→
Automatic
Clothes
Drying
→
Silent
Dehumidifying
→
THE MECHANISM OF SILENT DEHUMIDIFYING /
Operation type Situation Mechanism of operation
Silent
Dehumidifying
When the user wants to dehumidify
silently.
● Fan speed remains level 1.
●
Start operating the dehumidifier after draining the water in the water receptacle. The operation will stop when the container is full.
1716

The setting time can be changed after setting the Shut-off timer.
The time can be set only during the operation.
SHUT-OFF TIMER OPERATION /
Press the POWER Switch.
● The dehumidifier is turned on and Automatic
Dehumidifying Mode is started.
● SHUT-OFF TIMER can be set in any MODE.
Press the TIMER Switch.
● The setting time “X hours” on the LCD display will
appear.
● Every time the switch is pressed, the hour is displayed
from 01 to 12 in order.
→ 01 → 02 → 03
....
10 → 12 →
no display
● The time indicator moves forward when the switch is
kept pressed for more than approximately 1 second, and
it keeps moving in order continuously.
● After the Shut-off timer is set, the number in the time
indicator is reduced by “1” for each hour passed.
To change the setting time, press the TIMER Switch to set
the time again.
●
●
●
●
●
●
THE MECHANISM OF THE SHUT-OFF TIMER /
Shut-off timer
● The operation will stop after the time has been set.
●
To cancel the setting
● Keep pressing the TIMER Switch until nothing is indicated in the setting time.
●
When the user wants to
stop to operation after
setting the time.
Operation type Situation Mechanism of operation
HOW TO OPERATE (CONTINUED)
The setting time can be changed after setting the On timer.
The time can be set only during the operation.
ON TIMER OPERATION /
Insert the power plug into an outlet.
● Hear beep sound three times. This is Standby Mode.
Press the TIMER Switch.
● The setting time “X hours” on the LCD display will
appear.
● Every time the switch is pressed, the hour is displayed
from 00 to 12 in order. (00 is just Standby condition
and ON timer is not set yet)
→ 01 → 02 → 03
....
12 → 00 →
no display
● The time indicator moves forward when the switch is
kept pressed for more than approximately 1 second, and
it keeps moving in order continuously.
● After the On timer is set, the number in the time indicator
is reduced by “1” for each hour passed.
To change the setting time, press the TIMER Switch to set
the time again.
●
●
●
●
●
THE MECHANISM OF ON TIMER /
On timer
● The operation will start after the time has been set.
●
To cancel the setting
● Keep pressing the TIMER Switch until 00 is indicated in the setting time.
●
When the user wants to
start operation after
setting the time.
Operation type Situation Mechanism of operation
(cancelling setting)
(cancelling setting)
1918

HOW TO OPERATE (CONTINUED)
ABOUT THE FAN /
Level 4
Level 3
Level 4 is available in Automatic Clothes Drying Mode only.
When the user wants to dry clothes quickly.
When the user wants to dehumidify quickly.
● Fan speed is high.
●
Level 2
● Fan speed is medium.
●
Level 1
● Fan speed is low.
●
Operation type Situation Mechanism of operation
The automatic louver will open fully to adjust the position when the operation starts.
After the operation is stopped, the automatic louver will close fully.
Do not move the automatic louver manually or put weight in it, as either action may
cause damage to it.
If some object hits the swing and the position of the swing is changed, press the
Swing Switch again to reset the position.
The level of noise from the fan depends on the direction of air.
ABOUT THE SWING /
Swing Indications
ON
OFF
■ You can switch the swing of automatic louver by pressing the SWING Switch.
■
■ Fan speed can be set from level 1 to 3 in “Continuous Dehumidifying Mode”.
■
■ The number of wing and bar show the setting level.
■
When the user wants to operate with reduced
noise.
The compressor will stop during defrosting and the noise may vary. This change is due to the automatic defrosting operation
to defrost the inside of the unit, and it is not a malfunction. Please wait for a while.
ABOUT DEFROSTING /
● When defrosting starts, DEFROSTING Indicator is displayed.
● The operation will resume after defrosting.
● The operation of Mode and automatic louver is same as before defrosting starts.
●
●
●
● If any abnormality occurs in the dehumidifier, the operation is stopped and
abnormal indications are displayed on the LCD. Then the automatic louver
closes automatically.
● The abnormal status is as the right table.
● If the abnormal indications are displayed, immediately turn off the dehumidi-
fier and consult your dealer.
●
●
●
While the FULL WATER Indicator is displayed, all the Switch except for POWER Switch is not available.
When the SHUT-OFF TIMER is set, even while FULL WATER Indicator is displayed, the setting time of SHUT-OFF TIMER
moves forward.
When the water receptacle is removed without FULL WATER, hear beep sound 10 times. This is normal.
ABOUT FULL WATER /
● When the water receptacle is full, the operation stops automatically, hear beep sound 10 times.
Then LCD display disappears, and FULL WATER Indicator is displayed.
● When the receptacle is re-installed after the water is drained again, the operation automatically
starts and the LCD display reappears. The operation of Mode and automatic louver is same as
before FULL WATER.
●
●
ABOUT ABNORMAL CONDITIONS /
Indications
Object part/
C1 Defrost sensor /
Temperature-humidity sensor /
Motor /
Radiator /
C2
C7
C8
20 21

HITACHI
RD-250EX
HITACHI
RD-250EX
Rear >20cm
Float
Water receptacle
Side >20cm
Cotton bud
Hole of lid
Cotton bud
Drain outlet
Cover of drain outlet
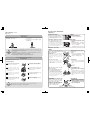
How to move casters
● Move the unit using casters (4 wheels). ● Lift dehumidifier to move it when there is height
difference or stairs.
●
●
● Before the dehumidifier is moved, stop the operation, dr
ain water in the water receptacle, and re
install
the water receptacle. If the dehumidifier is moved with the container full of water, water comes out
of the water receptacle, and it may wet the floor.
● If the dehumidifier tilts or moves, it may damage the floor. Also, water in the dehumidifier may spill
and wet the floor.
●
●
How to drain water in the water receptacle
Pull out the water receptacle securely.
● If water drains from areas other than the drain outlet, water may spill and wet the floor.
●
Hold both sides of water receptacle and
slowly pull it toward the front so water does
not spill. fingers so it does not move.
Hold the handle and bottom of water
receptacle, carry it securely, take off the lid
and tilt the water receptacle to drain water
from the drain outlet.
Match the widths of water receptacle and
dehumidifier and gently insert the water
receptacle all the way in.
Hold both sides of water receptacle with
hands and push using thumbs, while at the
same time holding dehumidifier with other
fingers so it does not move.
CAUTION
CAUTION
WARNING
WARNING
EFFICIENT USE OF DEHUMIDIFIER
HOW TO OPERATE (CONTINUED)
DEHUMIDIFYING ROOM:
● Open and close windows and doors of
room no more often than necessary:
If external air enters the room, the dehumidify-
cation effect will be reduced.
ADDITIONAL DRYING OF CLOTHES:
●
Use a dressing room beside bathroom, etc. to operate
the dehumidifier so that air is blown onto clothes.
The smaller the room space, the faster drying will finish.
Fully squeeze dry laundry so that no water droplet will
fall on the dehumidifier. At low temperature(lower than
approx.20°C), the laundry will be hard to dry out.
●
●
●
●
HAVE SOME SPACE AROUND THE
DEHUMIDIFIER:
● If the air outlet and the inlet opening
are blocked, it may cause malfunc-
tions because of overloading.
● Have some space between the dehu-
midifier and two walls behind it, as
shown in the figure. Have open
spaces on the other sides.
●
Make sure that no water or foreign
object is in the float:
● Do not run dehumidifier with water or
foreign material inside the float.
If water is left in the float after cleaning the
water receptacle with water, automatic stop
device to stop operation when the water is
full may not work properly. Wipe off the
water in the float completely. Never put any
foreign material in the float.
Be sure to clean the drain outlet and
hole of water receptacle lid at least
once every half a year.
● Drain outlet
Remove the water receptacle. Move the
cover of drain outlet sideways then clean the
drain outlet with object such as cotton bud.
Replace the cover and insert the water
receptacle.
●
●
● Lid of the water receptacle
Remove the water receptacle and the lid.
Clean the hole of lid with object such as
cotton bud. Replace the lid and insert the
water receptacle.
ADDITIONAL CAUTIONS
22 23

Float
Water receptacle
Clean with soft
cloth
moistened with
clean water.
MAINTENANCE AND INSPECTION
● Completely wipe off all water from the float: If water
remains in the float, the auto stop mechanism may not
work normally when full water level is detected.
●
CLEANING AIR FILTER
If dust accumulates on the air filter, it will not
only take much more time than usual to lower
the humidity, but also cause a fault. Clean the
filter once every two weeks by the following
procedure:
● Do not wash the air filter with hot water over 40°C
When drying the filter, do not expose it to direct sunlight, to prevent shrinkage.
● After cleaning the air filter, do not forget to insert it.
If the dehumidifier is operated without the filter, dust will accumulate inside it, causing a fault.
●
●
●
Water splashed on the dehumidifier will degrade insulation or cause rust.
Use a cloth tightly wrung out when cleaning the operation block (operation switch, etc.).
●
Do not use the following when cleaning. Using such an object will damage the plastic parts.
Thinner, benzene, alcohol, oil, soap powder, polishing powder, alkaline detergent, boiling water, acid
detergent, scrubbing brush.
●
When using chemical dust cloth, follow the instructions.
Remove the filter frame.
CLEANING EXTERIOR
CLEANING EXTERIOR
CLEANING WATER RECEPTACLE
CLEANING WATER RECEPTACLE
Remove the air filter from the filter frame.
Dirt in the air filter can be washed out with
water or removed with a vacuum cleaner. If
it is washed with water, dry it in the shade.
Re-install the air filter in the filter frame as
it was, and attach the filter frame to the
main unit.
■ Clean the dehumidifier periodically to ensure long, trouble-free use.
■
Before cleaning, be sure to turn off the dehumidifier and unplug the power cord from the AC outlet.
Use soft cloth moistened with lukewarm water or neutral
detergent to clean the case of dehumidifier.
After cleaning with neutral detergent, be sure to wipe
it off using cloth moistened with clean water.
Use dry cloth to wipe off any water drops from the case.
The water receptacle is a critical component in the dehumidifier: Full water level in it, and its presence or absence, will
always be detected.
Handle the receptacle with care so that it is not bent out of shape: If it is deformed, the dehumidifier may not work.
●
Use water to wash the float and water receptacle.
●
CAUTION
CAUTION
CAUTION
CAUTION
●
●
●
2524

Phenomena / Checking points /
Before calling service, check the following items.
Do not allow anyone other than qualified service personnel to remove this cabinet.
WHEN REQUIRING REPAIR SERVICE
PERIODIC CHECKS
Does power plug generate abnormal heat?
Unplug the power cord from the AC outlet.
Dispose of all water in the receptacle.
Clean the air filter.
Dry the dehumidifier in a well-ventilated place which is
not exposed to direct sunlight for half a day.
Then cover
the dehumidifier with a vinyl bag and store it in the
upright state.
Is there any crack or scratch on power cord?
Is air filter torn or otherwise damaged?
Check the following once every half year to one year to
secure safe use. If you have any doubts, immediately
consult your dealer.
If the supply cord is damaged, it must be replaced by
the manufacturer or its service agent or a similarly
qualified person in order to avoid a hazard.
STORING DEHUMIDIFIER
● If you do not use the dehumidifier for a long period of time, store it after performing the following procedure:
●
The dehumidifier can
not be operated even if
the POWER Switch is
turned on.
Any indicator is shown on the LCD display.
The water receptacle is not installed correctly.
The dehumidifier is defrosting
(DEFROSTING INDICATOR is displayed).
(Refer page 21 for details)
The power plug is not inserted securely into
the power outlet.
The breaker or fuse blown.
Power failure occur.
The water receptacle is full of water.
The air filter is clogged with dust.
Room temperature /humidity is low. (Refer
page 7 for details.)
The air suction port or air outlet is blocked.
Doors or windows has been opened
frequently.
There is a devide which generates steam,
such as oil stove, etc.
Room is too large.
The floor is not steady.
The dehumidifier is not installed correctly
and is unstable.
If noise is heard from water receptacle,
remove it once, and then reinsert it securely.
Dry air does not strike washing.
Amount of washing is too much.
Room temperature is 20
°C
or less.
Room is too large.
Dehumidifying cannot
be done sufficiently.
Humidity not reduced
properly.
Noisy sound is heard.
Drying of washing is
slow.
MAINTENANCE AND INSPECTION (CONTINUED)
27
26

2928
OPTIONAL (SOLD SEPARATELY) ACCESSORIES
The following optional accessories are available. Order and purchase from your dealer.
Drain hose
(Service parts No: RD-250EX 031)
Drain hose for continuous drainage: Use this to drain
dehumidified water.
Air filter
(Service parts No: RD-250EX 002)
The standard effective lift of the air cleaning filter is about
1 year.
If the following phenomena occur, immediately
consult your dealer.
■ If the following phenomena occur, immediately
turn off the dehumidifier and consult your
dealer.
● When breaker and fuse blow frequently.
● When foreign object or water enters the dehumidifier.
● When power plug or power cord is abnormally hot.
■
●
●
●
SPECIFICATIONS
Accessories
RD-250EX
Type
Quantity of
Dehumidified Water
25.0L/D (when the room air temp. is 30
°C
and the relative hum. 80%)
14.6L/D (when the room air temp. is 26.7
°C
and the relative hum. 60%)
Instruction manual.......1
.............
Outer Dimensions
Rated Voltage
Rated Frequency
Consumption Power
Weight
644 mm (Height) x 378 mm (Width) x 287 mm (Depth)
● Specification may be changed partially for improvement of the product.
● This dehumidifier is provided with auto defroster.
●
●
220 V
50 Hz
330 W
15.0 kg
Phenomena /
Phenomena /
Checking points /
Checking points /
Clothes do not dry soon.
The following are not defects of the dehumidifier.
1 When the dehumidifier starts to operate, the
room air may smell dustly for a while.
Because the moisture comes out of the walls
and other parts of the room. This is not a
smell from the dehumidifier.
2 When the humidity is very high, condensed
water may adhere to the water receptacle.
This occurs due to cold water from
dehumidifying and is not a problem.
3 Some time, sound like water flowing is
heard. This is the sound that refrigerant flow
in the refrigerator.
The following do not indicate a fault:
● After the dehumidifier is operated, the room smells moldy
for a while. This odor is caused by moisture derived from
wall, etc., and does not originate from dehumidifier.
● If the humidity is too high, moisture may condense on the
water receptacle. This is because the dehumidified water is
cold, and does not indicate a fault.
● A sound like water flowing is heard occasionally. The sound
is heard when refrigerant flows inside the dehumidifier.
● If the dehumidifier remains defective after checking the
above and performing due corrective action, immediately
unplug and the power cord and consult your dealer.
●
●
●
●
WHEN REQUIRING REPAIR SERVICE (CONTINUED)

Drain hose opening
DRAINING DEHUMIDIFIED WATER CONTINUOUSLY /
●
For continuous drainage, inquire at the dealer about a drain hose (sold separately; refer to “Optional Accessories” on page 29).
●
CAUTIONS IN THE USE OF THE DEHUMIDIFIER IN CONTINUOUS DRAINAGE
● For the use of the dehumidifier in continuous drainage, inspect the filters for dirt, the clogging in the drain outlet, and so
on, once very two weeks, and confirm that there is no malfunction.
●
MEMO
31
● I
nstall the drain hose to slope downward. Make sure that water runs in the hose during the trial operation.
● When installing the drain hose, avoid the end of the hose from going in water or causing winding hose.
● Do not perform continuous drainage in an environment where the ambient temperature of drain hose
drops below freezing point.
● If there is a difference in temperature between water in drain hose and ambient temperature, moisture
may condense on the surface of hose. Depending on the environment where the dehumidifier is being
used, use generally available insulation material to insulate the hose.
●
●
●
●
Remove the water receptacle. (☞Page 22)
Remove the rubber lid of drain hose
opening.
Move the cover of drain outlet sideways
then insert the drain hose into the drain
outlet.
When using a drain hose, put it on flat floor
and do not fold it. Otherwise water may not
flow out smoothly.
☞
When stopping continuous drainage /
● Remove the drain hose and close the rubber lid.
● Install the water receptacle.
●
●
CAUTION
30
-
 1
1
-
 2
2
-
 3
3
-
 4
4
-
 5
5
-
 6
6
-
 7
7
-
 8
8
-
 9
9
-
 10
10
-
 11
11
-
 12
12
-
 13
13
-
 14
14
-
 15
15
-
 16
16


