
Register your product and get support at
www.philips.com/welcome
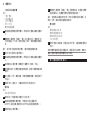
HR7772, HR7771


3
2 3 4 5
6
7 8 9
10 11 12 13
14 15 16 17
0
1
2
3
18 19 20 21

4


6
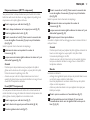
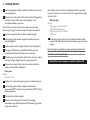
Introduction
Congratulations on your purchase and welcome to Philips! To fully benefit
from the support that Philips offers, register your product at www.philips.
com/welcome.
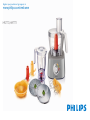
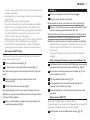
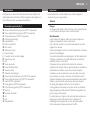
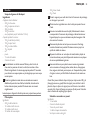
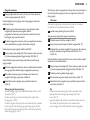
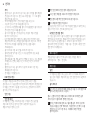
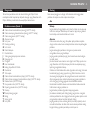
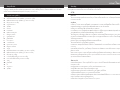
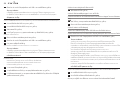
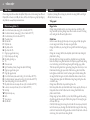
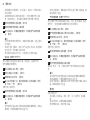
General description (Fig. 1)
A Fine/medium slicing disc (yellow) (HR7771 only)
B Fine/medium shredding disc (yellow) (HR7771 only)
C Emulsifying disc (HR7771 only)
D Kneading accessory
E Blade unit
F Protective cover
G Motor unit
H Speed selector
I Inner pusher
J Lid of food processor bowl
K Tool holder
L Bowl
M Safety lock
N Pulse/Easy Clean button
O Outer pusher
P Feeding tube
Q Fine/medium slicing disc (green) (HR7772 only)
R Fine/medium shredding disc (green) (HR7772 only)
S Balloon beater (HR7772 only)
T Citrus press cone (HR7772 only)
U Citrus press sieve (HR7772 only)
V Stopper
W Lid of blender jar
X Jar
Y Rubber ring
Z Blade unit
ENGLISH
Important
Read this user manual carefully before you use the appliance and save it
for future reference.
General
Danger
- Never immerse the motor unit in water or any other liquid, nor rinse
it under the tap. Use only a moist cloth to clean the motor unit.
Warning
- Check if the voltage indicated on the appliance corresponds to the
local mains voltage before you connect the appliance.
- Never connect this appliance to a timer switch in order to avoid a
hazardous situation.
- Do not use the appliance if the plug, the mains cord or other parts
are damaged.
- If the mains cord is damaged, you must have it replaced by Philips, a
service centre authorised by Philips or similarly qualified persons in
order to avoid a hazard.
- This appliance is not intended for use by persons (including children)
with reduced physical, sensory or mental capabilities, or lack of
experience and knowledge, unless they have been given supervision
or instruction concerning use of the appliance by a person
responsible for their safety.
- Children should be supervised to ensure that they do not play with
the appliance.
- Never let the appliance run unattended.
- If food sticks to the wall of the blender jar or bowl, switch off the
appliance and unplug it. Then use a spatula to remove the food from
the wall.
- Never use your fingers or an object (e.g. a spatula) to push
ingredients down the feeding tube while the appliance is running.
Only use the pusher for this purpose.
- Be very careful when you handle the discs, blender blade unit or food
processor blade unit. Be especially careful when you remove them

from the bowl or blender jar, when you empty the bowl or jar and
when you clean them. Their cutting edges are very sharp.
Caution
- Never switch off the appliance by turning the blender jar, the bowl or
their lids. Always switch off the appliance by turning the speed
selector to 0.
- Switch off the appliance before you detach any accessory.
- Unplug the appliance immediately after use.
- Always unplug the appliance before you reach into the blender jar
with your fingers or an object (e.g. a spatula).
- Wait until moving parts stop running before you remove the lid of
the bowl or jar.
- Never use any accessories or parts from other manufacturers or that
Philips does not specifically recommend. If you use such accessories
or parts, your guarantee becomes invalid.
- Do not exceed the maximum level indication on the jar and the bowl.
- Consult the table in this user manual for the correct quantities and
processing times.
- Certain ingredients may cause discolourations on the surface of the
parts. This does not have a negative effect on the parts. The
discolourations usually disappear after some time.
- Never fill the blender jar or food processor bowl with ingredients
hotter than 80ºC.
- This appliance is intended for household use only.
Electromagnetic fields (EMF)
This Philips appliance complies with all standards regarding
electromagnetic fields (EMF). If handled properly and according to the
instructions in this user manual, the appliance is safe to use based on
scientific evidence available today.
Safety features
Thermal safety cut-out
This appliance is equipped with a thermal safety cut-out that automatically
cuts off the power supply to the appliance in case of overheating.
If the appliance stops running:
1 Remove the mains plug from the wall socket.
2 Let the appliance cool down for 1 hour.
3 Put the mains plug back into the wall socket.
4 Switch on the appliance again.
Please contact your Philips dealer or an authorised Philips service centre
if the thermal safety cut-out activates too often.
Built-in safety lock
This feature ensures that you can only switch on the appliance if you
have assembled the blender jar or the bowl correctly on the motor unit
and the lid correctly on the blender jar or bowl. If the blender jar or bowl
and its lid are assembled correctly (see chapter ‘Using the appliance’), the
built-in safety lock will be unlocked.
Before first use
Thoroughly clean the parts that come into contact with food before you
use the appliance for the first time (see chapter ‘Cleaning’).
Using the appliance
General
- The appliance is equipped with a built-in safety lock that prevents it
from functioning if the blender or food processor is not assembled
properly.
Food processor
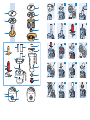
1 Put the bowl on the motor unit (1) and turn it clockwise to fix it
(2) (Fig. 2).
Note: The bowl is assembled correctly when the handle is directly above the
closed lock symbol.
2 Put the tool holder with the desired accessory in the bowl (blade
unit, kneading accessory, emulsifying disc, balloon beater, citrus
press or one of the discs). See the appropriate section below.
ENGLISH 7

8
3 When you use the blade unit, the kneading accessory or the
balloon beater, put the ingredients to be processed in the bowl.
Note: Do not fill the bowl beyond the MAX indication.
4 Put the lid on the bowl (1). Turn the lid clockwise (2) to fix it
(‘click’) (Fig. 3).
Note: Make sure the projection on the lid locks into the slot of the bowl
handle
5 When you use one of the discs, add the ingredients through the
feeding tube and push them down with the pusher.
6 Select the speed setting that corresponds with the colour of the
accessory in the bowl. See the appropriate section below.
7 When you have finished processing, turn the speed selector to
0 (Fig. 4).
Feeding tube and pusher
- Use the feeding tube to add liquid and/or solid ingredients. (Fig. 5)
- Use the outer pusher to push solid ingredients down the feeding
tube. (Fig. 6)
- If the ingredients you are going to shred or slice have a small
diameter, put the outer pusher in the feeding tube to make the
feeding tube smaller. Then use the inner pusher to push the
ingredients down the feeding tube. (Fig. 7)
Tip: You can also use the inner and outer pusher to close the feeding tube.
This prevents ingredients from escaping through the feeding tube.
Blade unit
You can use the blade unit to chop, mix, blend or puree ingredients.
1 Remove the protective cover from the blade (Fig. 8).
The cutting edges are very sharp. Do not touch them.
2 Put the tool holder in the bowl. (Fig. 9)
3 Put the blade unit on the tool holder in the bowl (Fig. 10).
ENGLISH8
4 Put the ingredients in the bowl. Pre-cut large pieces of food into
pieces of approx. 3 x 3 x 3cm (Fig. 11).
Note: Always put the tool holder with the blade unit in the bowl before you
add the ingredients.
5 Put the lid on the bowl (1). Turn the lid clockwise (2) to fix it
(‘click’) (Fig. 12).
6 Put the pusher in the feeding tube.
7 Select the speed that corresponds with the colour of the
accessory (Fig. 13).
8 When you have finished processing, turn the speed selector to 0
and unplug the appliance (Fig. 4).
Tips
- When you chop onions, press the pulse/Easy Clean button a few
times to prevent the onions from becoming too finely
chopped. (Fig. 14)
- Do not let the appliance run too long when you chop (hard) cheese
or chocolate. Otherwise these ingredients become too hot, start to
melt and turn lumpy.
- Do not use the blade unit to chop very hard ingredients like coffee
beans, turmeric, nutmeg and ice cubes, as this may cause the blade to
get blunt.
- The standard processing time for all chopping jobs is 30-60 seconds.
- If food sticks to the blade or to the wall of the bowl, switch off the
appliance and unplug it. Then use a spatula to remove the food from
the blade or from the wall of the bowl.
Kneading accessory
You can use the kneading accessory to knead yeast dough for bread and
pizzas.
The standard processing time for all kneading jobs is 30-180 seconds.
1 Put the tool holder in the bowl (Fig. 9).
2 Put the kneading accessory on the tool holder. (Fig. 15)

Note: Always put the tool holder with the kneading accessory in the bowl
before you add the ingredients.
3 Put the ingredients in the bowl (Fig. 16).
4 Put the lid on the bowl (1). Turn the lid clockwise (2) to fix it
(‘click) (Fig. 17).
5 Put the pusher in the feeding tube.
6 Select the speed that corresponds with the colour of the
accessory (Fig. 13).
7 When you have finished processing, turn the speed selector to 0
and unplug the appliance (Fig. 4).
Slicing and shredding discs
Never process hard ingredients like ice cubes with the discs.
The cutting edges of the discs are very sharp. Do not touch them.
1 Put the tool holder in the bowl (Fig. 9).
2 Place the desired disc (slicing or shredding disc) on the tool
holder (Fig. 18)
3 Put the lid on the bowl (1). Turn the lid clockwise (2) to fix it
(‘click’) (Fig. 19).
4 Put the ingredients in the feeding tube. (Fig. 20)
- Pre-cut large ingredients into chunks that fit in the feeding tube.
- Fill the feeding tube evenly for the best results.
- When you have to process a large amount of ingredients,
process small batches and empty the bowl between batches.
- If the ingredients you are going to shred or slice have a small
diameter, put the outer pusher in the feeding tube to make the
feeding tube smaller. Then use the inner pusher to push the
ingredients down the feeding tube.
5 Select the speed that corresponds with the colour of the
accessory (Fig. 13).
6 Press the pusher lightly onto the ingredients in the feeding tube.
7 When you have finished processing, turn the speed selector to 0
and unplug the appliance (Fig. 4).
Tips
- When you shred or granulate soft ingredients, use a low speed to
prevent the ingredients from turning into puree.
- Do not let the appliance run too long when you shred (hard) cheese.
If you do, the cheese becomes too hot, starts to melt and turns
lumpy.
- Do not use the discs to process chocolate. Only use the blade
unit for this purpose.
Emulsifying disc (HR7771 only)
You can use the emulsifying disc to whip cream and to whisk eggs, egg
whites, instant pudding, mayonnaise and sponge cake mixtures.
1 Put the tool holder in the bowl (Fig. 9).
2 Place the emulsifying disc on the tool holder (Fig. 21).
3 Put the ingredients in the bowl. (Fig. 22)
4 Put the lid on the bowl (1). Turn the lid clockwise (2) to fix it
(‘click’) (Fig. 23).
Put the pusher in the feeding tube.
5 Select the speed that corresponds with the colour of the
accessory (Fig. 24).
6 When you have finished processing, turn the speed selector to 0
and unplug the appliance (Fig. 25).
Tips
- Do not use the emulsifying disc to prepare cake mixtures with butter
or margarine or to knead dough. Use the kneading accessory for
these jobs.
- Make sure the bowl and the emulsifying disc are dry and free from
grease when you whisk egg whites. Make sure the egg whites are at
room temperature.
ENGLISH 9

10
Balloon beater (HR7772 only)
You can use the balloon beater to whip cream and to whisk eggs, egg
whites, instant pudding, mayonnaise, sponge cake mixture and other soft
ingredients.
1 Put the tool holder in the bowl (Fig. 9).
2 Put the balloon beater on the tool holder in the bowl (Fig. 26).
3 Put the ingredients in the bowl (Fig. 27).
4 Put the lid on the bowl (1). Turn the lid clockwise (2) to fix it
(‘click’) (Fig. 28).
Put the pusher in the feeding tube.
5 Select the speed that corresponds with the colour of the
accessory (Fig. 29).
6 When you have finished processing, turn the speed selector to 0
and unplug the appliance (Fig. 30).
7 Always clean the balloon beater after use.
See chapter cleaning for instructions on how to take the balloon beater
apart and how to clean it.
Tips
- Do not use the balloon beater to prepare cake mixtures with butter
or margarine or to knead dough. Use the kneading accessory for
these jobs.
- Make sure the bowl and the balloon beater are dry and free from
grease when you whisk egg whites. Make sure the egg whites are at
room temperature.
Blender
The blender is intended for:
- Blending fluids, e.g. dairy products, sauces, fruit juices, soups, mixed
drinks, shakes.
- Mixing soft ingredients, e.g. pancake batter or mayonnaise.
- Pureeing cooked ingredients, e.g. for making baby food.
ENGLISH10
1 Place the rubber ring on the blade unit (Fig. 31).
2 Place the blade unit in the bottom of the blender jar (1) and screw
the blade unit clockwise (2) (Fig. 32).
3 Place the blender jar on the motor unit (1) and turn it clockwise to
fix it (2). The handle has to point to one of the four corners of the
motor unit (Fig. 33).
Do not exert too much pressure on the handle of the blender jar.
4 Put the ingredients in the blender jar (Fig. 34).
Never fill the blender jar with ingredients hotter than 80ºC.
To avoid spillage, never fill the jar above the maximum level indication,
particularly not when you blend hot liquids.
5 Place the lid on the blender jar (1) and turn it clockwise to fix it
(2) (Fig. 35).
6 Select the speed that corresponds with the colour of the
accessory (Fig. 13).
Never open the lid when the blade rotates.
Never put your hand or any object in the jar while the blender is
running.
Always let the appliance cool down to room temperature after you
have processed two batches.
7 When you have finished processing, turn the speed selector to 0
and unplug the appliance (Fig. 4).
Tips
- While the appliance is running, you can put liquid or solid ingredients
in the blender jar through the opening in the lid (Fig. 36).
- The longer you let the appliance run, the finer the blending result will
be.
- Pre-cut solid ingredients into smaller pieces before you put them in
the blender jar. If you want to prepare a large quantity, process small
batches of ingredients instead of a large quantity at once.

- To crush ice cubes, put the cubes in the jar, close the lid and press the
pulse/Easy Clean button.
- Some ingredients, e.g. fruits, are easier to blend if you add some liquid
e.g. lemon juice.
- When you blend soup, use cooked ingredients.
- If you are not satisfied with the results, let the appliance run briefly a
number of times by pressing the pulse/Easy Clean button. You can
also try to get a better result by stirring the ingredients with a spatula
(not while the blender is running), or by pouring out some of the
contents in order to process a smaller amount.
- When you process a liquid that is hot or tends to foam (e.g. milk), do
not put more than 1 litre in the blender jar to avoid spillage.
- If food sticks to the wall of the blender jar, switch off the appliance
and unplug it. Then use a spatula to remove the food from the wall.
Citrus press (HR7772 only)
You can use the citrus press to squeeze fresh fruit juices. Pulp, pips and
skins are removed from the juice.
1 Put the tool holder in the bowl (Fig. 9).
2 Put the citrus press on the tool holder in the bowl (Fig. 37).
Note: Make sure the projection on the sieve locks into the slot of the bowl
handle.
3 Select the speed that corresponds with the colour of the
accessory (Fig. 29).
4 Press the citrus fruit onto the cone (Fig. 38).
Note: Stop pressing from time to time to remove the pulp from the sieve.
Note: When you want to remove pulp from the sieve turn the speed selector
to 0 to switch off the appliance.
5 When you have finished processing, turn the speed selector to 0
and unplug the appliance (Fig. 30).
Cleaning
1 Make sure the appliance is switched off and unplugged.
2 Clean the motor unit with a moist cloth.
Never immerse the motor unit in water nor rinse it under the tap.
3 Clean the parts that have come into contact with food in hot water
with some washing-up liquid immediately after use.
Clean the blade unit of the food processor, the discs, the blade unit of
the blender very carefully. The cutting edges are very sharp.
Note: All parts, except the motor unit, can also be cleaned in the dishwasher.
- Make sure that the cutting edges of the blades and the discs do not
come into contact with hard objects. This could cause them to
become blunt.
- You can pull the beaters out of the balloon beater to clean them
separately.
Easy cleaning of the food processor bowl and blender jar
1 Pour lukewarm water (not more than 0.5 litres) and some washing-
up liquid into the food processor bowl or blender jar. (Fig. 39)
2 Place the lid on the food processor bowl or blender jar (1) and
turn it clockwise to fix it (2).
3 Press the pulse/Easy Clean button (Fig. 14).
4 Let the appliance run for at least 30 seconds until the food
processor bowl or blender jar is clean.
5 Detach the blender jar or food processor bowl and rinse it with
clean water.
Balloon beater (HR7772)
Always clean the balloon beater immediately after use.
The balloon beater can be cleaned in the dishwasher. You can also pull the
beaters out of the balloon beater to clean them separately.
1 Pull the beaters out of the balloon beater housing. (Fig. 40)
ENGLISH 11

12
2 To reassemble, push the beaters back into the balloon beater
housing.
Citrus press
Always clean the citrus press immediately after use.
The citrus press can be cleaned in the dishwasher. You can also pull the
cone from the sieve to clean them separately.
1 Pull the cone from the sieve (Fig. 41).
2 To reassemble, push the cone back on the sieve of the citrus press.
Storage
1 Push the cord into the cord storage compartment on the back of
the motor unit. (Fig. 42)
Environment
- Do not throw away the appliance with the normal household waste
at the end of its life, but hand it in at an official collection point for
recycling. By doing this, you help to preserve the
environment (Fig. 43).
Guarantee & service
If you need service or information or if you have a problem, please visit
the Philips website at www.philips.com or contact the Philips Consumer
Care Centre in your country (you find its phone number in the
worldwide guarantee leaflet). If there is no Consumer Care Centre in
your country, go to your local Philips dealer.
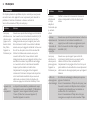
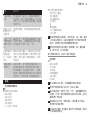
Troubleshooting
This chapter summarises the most common problems you could
encounter with the appliance. If you are unable to solve the problem with
the information below, contact the Consumer Care Centre in your country.
ENGLISH12
Problem Solution
When I select a
speed or press the
pulse/Easy Clean
button, appliance
does not start to
operate.
Make sure the food processor or blender jar and
its lid are assembled correctly (‘click’).Make sure
that the tool holder has been inserted properly if
you are using any accessory with the food
processor bowl. If you use the blender jar, make
sure that the handle of the blender points to one
of the four corners of the motor unit. Keep the
lid fixed to avoid spillage. If you use the food
processor, make sure that the bowl handle is
directly above the closed lock symbol. The bowl
lid is correctly assembled when the projection is
locked into the slot of the bowl handle. If all parts
are assembled correctly, the appliance starts to
operate when you select a speed with the speed
selector or press the pulse/Easy Clean button.
The
appliance suddenly
stops running.
The thermal safety cut-out has probably cut off
the power supply to the appliance because the
appliance has overheated. 1) Unplug the
appliance. 2) Let the appliance cool down for 1
hour. 3) Put the mains plug in the socket. 4)
Switch on the appliance again.
I have selected the
wrong speed for
the attachment I
want to use.
Check the colour of the attachment and choose
the corresponding speed with the speed selector.
The emulsifying
disc, balloon
beater or kneading
accessory does not
turn.
Make sure the emulsifying disc, balloon beater or
kneading accessory is assembled properly onto
the tool holder. Also make sure the food
processor bowl and the lid are assembled
properly (‘click’).

Problem Solution
When I select the
speed for the
citrus press, the
appliance does not
work.
Make sure that the tool holder has been inserted
properly. Make sure the projection on the sieve is
locked in the slot of the bowl handle. When the
projection is locked in the slot, the appliance starts
to operate when you select the correct speed.
The sieve of the
citrus press is
damaged.
If the sieve is damaged, do not use the citrus
press anymore. Contact the Philips Consumer
Care Centre in your country (you find its phone
number in the worldwide guarantee leaflet) to
order a new sieve. If there is no Consumer Care
Centre in your country, go to your local Philips
dealer.
Recipes
Nourishing vegetable soup from Budapest
Ingredients
To be processed in the blender:
- 240g kohlrabi
- 240g potatoes
- 360g celery
- 120g carrots
- water (fill up to1.5-litre indication)
To be added during cooking:
- 150g dal (from can)
- 150g smoked pork
- 190g crème fraîche
- 15g parsley
- salt
- fresh pepper
- 1.5 stock cubes
- 2 bay leaves
1 Assemble the blender jar onto the motor unit. Put the kohlrabi,
potatoes, celery, carrots and water in the blender in this order.
Blend the ingredients for 10 seconds at the speed appropriate for
the blender for a coarse soup or longer for a finer soup.
2 Put the blended ingredients in a pan and bring to the boil. Add
crème fraîche, dal, pork and herbs. Cook for 30 minutes while
stirring constantly.
Always let the appliance cool down to room temperature after you
have processed two batches.
Pizza dough
Ingredients:
- 240g white flour
- 1/2 teaspoon sugar
- 1/2 teaspoon salt
- 1/2 packet of quick yeast
- 140g warm water
- 25g oil
1 Put the tool holder in the bowl and place the kneading accessory
on the tool holder.
2 Put all the dry ingredients in the bowl and add the water and the oil.
3 Close and lock the lid (‘click’). Select the speed that corresponds to
the kneading accessory and let the appliance run until the dough
has become a well-mixed ball. This takes about 2 minutes.
4 Put the dough in a bowl, cover it with a damp cloth and let it rise
for about 40 minutes until it has doubled in volume.
5 Dust your worktop with flour, roll the dough and create two pizza
dough bases and put them on a greased baking tray.
6 Cover the pizza dough bases with tomato sauce and your favourite
topping. You can use cheese, ham, salami, bacon, mushrooms, tuna
fish, onions, artichokes, bell pepper etc. Spread some oregano and
pour olive oil over the pizzas and bake them.
ENGLISH 13

14
Tip: You can use the shredding disc to shred about 200g cheese (Parmesan or
Gouda).Put the tool holder in the bowl and place the shredding disc on the
tool holder. Close and lock the lid (‘click’). Cut the cheese into pieces that fit
into the feeding tube and shred the cheese.
Cucumber salad with yoghurt sauce
Ingredients:
- 1 cucumber
- 2 cups parsley leaves
- 1 cup natural yoghurt
- 1 tablespoon mustard
- Salt and black pepper to taste
1 Put the tool holder in the bowl and place the slicing disc on the
tool holder.
2 Close and lock the lid (‘click’). Slice the cucumber. See chapter
‘Using the appliance’ under ‘Slicing and shredding discs’ for the
appropriate speed.
Tip: Use the thin-slice side of the slicing disc to cut thin slices. Do not exert
too much pressure on the pusher.
3 Put the sliced cucumber into a serving bowl.
4 Put the tool holder in the bowl and place the blade unit on the tool
holder.
5 Put the parsley in the bowl. Close and lock the lid (‘click’).
6 Chop the parsley. Press the pulse/Easy Clean button to have better
control over the chopping process.
7 Add the yoghurt, mustard, salt and pepper and process for a few
more seconds until a homogeneous mixture is obtained.
8 Mix the sauce with the cucumber slices and refrigerate the
cucumber salad before serving.
ENGLISH14
Whipped cream
Ingredients:
- 250ml fresh cream
1 Chill the cream for at least 2 hours before processing.
2 Put the tool holder in the bowl and place the emulsifying disc
(HR7771 only) or the balloon beater (HR7772 only) on the tool
holder.
3 Put the cream in the bowl.
4 Close and lock the lid (‘click’). Process the cream until the desired
consistency is obtained. Select the speed setting that corresponds
with the colour of the accessory.
Tip: Refrigerate the whipped cream before serving. You can serve whipped
cream on cakes, ice cream, fruits, coffee, or use it as a filling for cakes, etc.
Baby food
Ingredients:
- 250g cooked chicken meat
- 250g cooked potatoes
- 250g cooked french beans
- 375ml milk
1 Assemble the blender jar onto the motor unit. Put the ingredients
in the blender. Blend the ingredients for 25 seconds at the speed
appropriate for the blender.
If you want to prepare a larger quantity of baby food, let the appliance
cool down for 60 minutes after processing the ingredients for each batch.
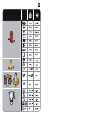
Maximum quantities and processing times (Fig. 44)

Introduction
Félicitations pour votre achat et bienvenue dans l’univers Philips ! Pour
profiter pleinement de l’assistance Philips, enregistrez votre produit sur le
site à l’adresse suivante : www.philips.com/welcome.
Description générale (fig. 1)
A Disque à trancher fin/moyen (jaune) (HR7771 uniquement)
B Disque à râper fin/moyen (jaune) (HR7771 uniquement)
C Disque émulsionneur (HR7771 uniquement)
D Accessoire de pétrissage
E Ensemble lames
F Cache de protection
G Bloc moteur
H Sélecteur de vitesse
I Poussoir interne
J Couvercle du bol du robot ménager
K Support pour outil
L Bol
M Verrou de sécurité
N Bouton Pulse/Easy Clean
O Poussoir externe
P Cheminée de remplissage
Q Disque à trancher fin/moyen (vert) (HR7772 uniquement)
R Disque à râper fin/moyen (vert) (HR7772 uniquement)
S Fouet (HR7772 uniquement)
T Presse-agrumes (HR7772 uniquement)
U Filtre du presse-agrumes (HR7772 uniquement)
V Bouchon
W Couvercle du blender
X Bol
Y Joint
Z Ensemble lames
Important
Lisez attentivement ce mode d’emploi avant d’utiliser l’appareil et
conservez-le pour un usage ultérieur.
Général
Danger
- Ne plongez jamais le bloc moteur dans l’eau, ni dans d’autres liquides
et ne le rincez pas. Nettoyez-le avec un chiffon humide.
Avertissement
- Avant de brancher l’appareil, vérifiez que la tension indiquée sur
l’appareil correspond à la tension secteur locale.
- Pour éviter tout accident, il est vivement déconseillé de connecter
l’appareil à un minuteur.
- N’utilisez pas l’appareil si la fiche, le cordon d’alimentation ou d’autres
pièces sont endommagées.
- Si le cordon d’alimentation est endommagé, il doit être remplacé par
Philips, par un Centre Service Agréé Philips ou par un technicien
qualifié afin d’éviter tout accident.
- Cet appareil n’est pas destiné à être utilisé par des personnes
(notamment des enfants) dont les capacités physiques, sensorielles ou
intellectuelles sont réduites, ou par des personnes manquant
d’expérience ou de connaissances, à moins que celles-ci ne soient
sous surveillance ou qu’elles n’aient reçu des instructions quant à
l’utilisation de l’appareil par une personne responsable de leur sécurité.
- Veillez à ce que les enfants ne puissent pas jouer avec l’appareil.
- Ne laissez jamais l’appareil fonctionner sans surveillance.
- Si des ingrédients s’accumulent sur les parois du bol ou du blender,
éteignez l’appareil, puis débranchez-le. Détachez les ingrédients des
parois au moyen d’une spatule.
- Ne mettez jamais vos doigts ou tout autre objet (par exemple, une
spatule) pour introduire des aliments dans la cheminée de
remplissage lorsque l’appareil est en cours de fonctionnement.
Utilisez exclusivement le poussoir prévu à cet effet.
FRANÇAIS 15

16
- Soyez très prudent lorsque vous manipulez les disques, l’ensemble
lames du blender ou la lame du robot ménager, en particulier
lorsque vous les retirez du bol ou du blender, lorsque vous videz le
bol ou le blender et lorsque vous les nettoyez. Leurs bords sont en
effet très coupants.
Attention
- N’éteignez jamais l’appareil en tournant le blender, le bol ou leur
couvercle. Éteignez toujours l’appareil en réglant le sélecteur de
vitesse sur 0.
- Éteignez l’appareil avant d’en retirer un accessoire.
- Débranchez l’appareil immédiatement après utilisation.
- Débranchez toujours l’appareil avant de mettre vos doigts ou tout
autre objet (par ex. une spatule) dans le blender.
- Avant de retirer le couvercle du bol ou du blender, patientez jusqu’à
l’arrêt complet des éléments en mouvement.
- N’utilisez jamais d’accessoires, ni de pièces d’autres fabricants ou qui
n’ont pas été spécifiquement recommandés par Philips. Votre garantie
ne sera pas valable en cas d’utilisation de tels accessoires ou pièces.
- Ne remplissez pas le bol et le blender au-delà de l’indication de
niveau maximal.
- Consultez le tableau de ce mode d’emploi pour connaître les
quantités et les temps de préparation adéquats.
- Certains aliments peuvent provoquer une décoloration de la surface
des accessoires. Cela est sans conséquence sur le bon
fonctionnement de l’appareil. Les décolorations disparaissent
généralement après un certain temps.
- Ne remplissez jamais le blender ou le bol du robot ménager avec des
ingrédients dont la température dépasse 80 °C.
- Cet appareil est destiné à un usage domestique uniquement.
Champs électromagnétiques (CEM)
Cet appareil Philips est conforme à toutes les normes relatives aux champs
électromagnétiques (CEM). Il répond aux règles de sécurité établies sur la
base des connaissances scientifiques actuelles s’il est manipulé
correctement et conformément aux instructions de ce mode d’emploi.
FRANÇAIS16
Consignes de sécurité
Dispositif antisurchauffe
L’appareil est équipé d’un dispositif antisurchauffe qui coupe
automatiquement l’alimentation en cas de surchauffe.
En cas d’arrêt soudain de l’appareil :
1 Retirez le cordon d’alimentation de la prise secteur.
2 Laissez l’appareil refroidir pendant 1 heure.
3 Rebranchez le cordon d’alimentation sur la prise secteur.
4 Remettez l’appareil en marche.
Consultez votre revendeur ou un Centre Service Agréé Philips si le
dispositif antisurchauffe se déclenche trop fréquemment.
Verrou de sécurité intégré
Grâce à cette fonctionnalité, l’appareil se met en marche uniquement
lorsque le blender ou le bol est correctement placé sur le bloc moteur et
que le couvercle est correctement fixé sur le blender ou sur le bol. Si le
blender ou le bol et son couvercle sont correctement assemblés (voir
chapitre « Utilisation de l’appareil »), le verrou de sécurité intégré sera
déverrouillé.
Avant la première utilisation
Avant la première utilisation, nettoyez soigneusement toutes les pièces en
contact avec des aliments (voir le chapitre « Nettoyage »).
Utilisation de l’appareil
Général
- Le blender ou le robot ménager est équipé d’un verrou de sécurité
intégré empêchant son fonctionnement lorsqu’il n’est pas
correctement assemblé.
Robot ménager
1 Placez le bol sur le bloc moteur (1) et fixez-le en le tournant dans
le sens des aiguilles d’une montre (2) (fig. 2).

Remarque : Le bol est correctement assemblé lorsque la poignée se situe
juste au-dessus du symbole de verrouillage.
2 Placez le support pour outil et l’accessoire souhaité dans le bol
(ensemble lames, accessoire de pétrissage, disque émulsionneur,
fouet, presse-agrumes ou l’un des disques). Consultez la section
appropriée ci-dessous.
3 Lorsque vous utilisez l’ensemble lames, l’accessoire de pétrissage
ou le fouet, mettez les ingrédients dans le bol.
Remarque : Ne remplissez pas le bol au-delà de l’indication de niveau
maximal (MAX).
4 Placez le couvercle sur le bol (1). Faites tourner le couvercle dans
le sens des aiguilles d’une montre (2) jusqu’à ce qu’il s’enclenche
(clic) (fig. 3).
Remarque : Assurez-vous que la partie saillante du couvercle s’enclenche
correctement dans le logement de la poignée du bol.
5 Lorsque vous utilisez l’un des disques, insérez les ingrédients par la
cheminée de remplissage et poussez-les vers le bas à l’aide du
poussoir.
6 Sélectionnez la vitesse correspondant à la couleur de l’accessoire
installé dans le bol. Consultez la section appropriée ci-dessous.
7 Lorsque vous avez terminé, mettez le sélecteur de vitesse en
position 0 (fig. 4).
Cheminée de remplissage et poussoir
- Utilisez la cheminée de remplissage pour ajouter des ingrédients
liquides et/ou solides. (fig. 5)
- Utilisez le poussoir externe pour introduire des ingrédients solides
dans la cheminée de remplissage. (fig. 6)
- Si les ingrédients à râper ou émincer sont de petit diamètre, insérez le
poussoir externe dans la cheminée pour rétrécir son ouverture, puis
introduisez les ingrédients dans la cheminée à l’aide du poussoir
interne. (fig. 7)
Conseil : Vous pouvez aussi utiliser le poussoir interne et externe pour fermer
la cheminée de remplissage. Ainsi, les ingrédients ne peuvent pas s’en échapper.
Ensemble lames
Vous pouvez utiliser l’ensemble lames pour hacher, mélanger ou mixer
des ingrédients, ou encore pour en faire de la purée.
1 Enlevez le revêtement de protection de la lame (fig. 8).
Les lames sont très coupantes. Ne les touchez pas.
2 Placez le support pour outil dans le bol. (fig. 9)
3 Placez l’ensemble lames sur le support pour outil dans le
bol (fig. 10).
4 Mettez les ingrédients dans le bol. Découpez les grands aliments en
dés de 3 cm environ (fig. 11).
Remarque : Placez toujours le support pour outil ainsi que l’ensemble lames
dans le bol avant d’ajouter les ingrédients.
5 Placez le couvercle sur le bol (1). Faites tourner le couvercle dans
le sens des aiguilles d’une montre (2) jusqu’à ce qu’il s’enclenche
(clic) (fig. 12).
6 Insérez le poussoir dans la cheminée de remplissage.
7 Sélectionnez la vitesse correspondant à la couleur de
l’accessoire (fig. 13).
8 Lorsque vous avez terminé, réglez le sélecteur de vitesse sur 0, puis
débranchez l’appareil (fig. 4).
Conseils
- Lorsque vous hachez des oignons, appuyez sur le bouton Pulse/Easy
Clean à plusieurs reprises afin d’éviter que les oignons ne soient
hachés trop finement. (fig. 14)
- Ne faites pas fonctionner l’appareil trop longtemps lorsque vous
hachez du fromage (à pâte dure) ou du chocolat car les ingrédients
deviendraient trop chauds, commenceraient à fondre et à former
des grumeaux.
FRANÇAIS 17

18
- N’utilisez pas l’ensemble lames pour hacher des ingrédients très durs,
tels que des grains de café, du curcuma, des noix de muscade ou des
glaçons. Cela pourrait émousser les lames.
- La durée d’utilisation standard pour le hachage d’ingrédients est de 30
à 60 secondes.
- Si des ingrédients s’accumulent sur la lame ou sur les parois du bol,
éteignez l’appareil et débranchez-le. Détachez ensuite les ingrédients
de la lame ou des parois du bol à l’aide d’une spatule.
Accessoire de pétrissage
Vous pouvez utiliser l’accessoire de pétrissage pour pétrir de la pâte à
pain ou à pizza.
La durée d’utilisation standard pour le pétrissage d’ingrédients est de 30 à
180 secondes.
1 Placez le support pour outil dans le bol (fig. 9).
2 Placez l’accessoire de pétrissage sur le support pour outil. (fig. 15)
Remarque : Placez toujours le support pour outil ainsi que l’accessoire de
pétrissage dans le bol avant d’ajouter les ingrédients.
3 Placez les ingrédients dans le bol (fig. 16).
4 Placez le couvercle sur le bol (1). Faites tourner le couvercle dans
le sens des aiguilles d’une montre (2) jusqu’à ce qu’il s’enclenche
(clic) (fig. 17).
5 Insérez le poussoir dans la cheminée de remplissage.
6 Sélectionnez la vitesse correspondant à la couleur de
l’accessoire (fig. 13).
7 Lorsque vous avez terminé, réglez le sélecteur de vitesse sur 0, puis
débranchez l’appareil (fig. 4).
Disques à trancher et à râper
Ne hachez jamais des ingrédients durs, tels que des glaçons, avec
les disques.
FRANÇAIS18
Les lames des disques sont très coupantes. Ne les touchez pas.
1 Placez le support pour outil dans le bol (fig. 9).
2 Placez le disque souhaité (disque à trancher ou à râper) sur le
support pour outil (fig. 18).
3 Placez le couvercle sur le bol (1). Faites tourner le couvercle dans
le sens des aiguilles d’une montre (2) jusqu’à ce qu’il s’enclenche
(clic) (fig. 19).
4 Insérez les ingrédients dans la cheminée de remplissage. (fig. 20)
- Précoupez les gros aliments afin de pouvoir les introduire dans la
cheminée de remplissage.
- Pour de meilleurs résultats, remplissez la cheminée de façon régulière.
- Si vous devez préparer d’importantes quantités d’aliments, procédez
par petites portions et videz le bol après chaque utilisation.
- Si les ingrédients à râper ou émincer sont de petit diamètre, insérez le
poussoir externe dans la cheminée pour rétrécir son ouverture, puis
introduisez les ingrédients dans la cheminée à l’aide du poussoir
interne.
5 Sélectionnez la vitesse correspondant à la couleur de
l’accessoire (fig. 13).
6 Appuyez légèrement sur les ingrédients avec le poussoir pour les
enfoncer dans la cheminée de remplissage.
7 Lorsque vous avez terminé, réglez le sélecteur de vitesse sur 0, puis
débranchez l’appareil (fig. 4).
Conseils
- Pour râper ou couper finement des ingrédients à consistance molle,
utilisez une vitesse lente afin d’éviter de les réduire en purée.
- Ne faites pas fonctionner l’appareil trop longtemps lorsque vous
hachez du fromage (à pâte dure) car il deviendrait trop chaud,
commencerait à fondre et à former des grumeaux.
- Pour le chocolat, n’utilisez pas les disques, mais uniquement
l’ensemble lames.

Disque émulsionneur (HR7771 uniquement)
Vous pouvez utiliser le disque émulsionneur pour fouetter de la crème,
battre des œufs, monter des blancs en neige, préparer du pudding, de la
mayonnaise ou de la pâte à gâteau de Savoie.
1 Placez le support pour outil dans le bol (fig. 9).
2 Placez le disque émulsionneur sur le support pour outil (fig. 21).
3 Placez les ingrédients dans le bol. (fig. 22)
4 Placez le couvercle sur le bol (1). Faites tourner le couvercle dans
le sens des aiguilles d’une montre (2) jusqu’à ce qu’il s’enclenche
(clic) (fig. 23).
Insérez le poussoir dans la cheminée de remplissage.
5 Sélectionnez la vitesse correspondant à la couleur de
l’accessoire (fig. 24).
6 Lorsque vous avez terminé, réglez le sélecteur de vitesse sur 0, puis
débranchez l’appareil (fig. 25).
Conseils
- N’utilisez pas le disque émulsionneur pour préparer des pâtes à
gâteau avec du beurre ou de la margarine, ou pour pétrir de la pâte.
Utilisez l’accessoire de pétrissage à cet effet.
- Assurez-vous que le bol et le disque émulsionneur sont secs et
exempts de graisse lorsque vous montez des blancs en neige. Ceux-ci
doivent être à température ambiante.
Fouet (HR7772 uniquement)
Le fouet permet de battre des œufs, de faire de la crème fouettée, de
monter des blancs en neige, de réaliser des crèmes, de la mayonnaise, des
pâtes à gâteau et autres préparations à consistance molle.
1 Placez le support pour outil dans le bol (fig. 9).
2 Placez le fouet sur le support pour outil dans le bol (fig. 26).
3 Placez les ingrédients dans le bol (fig. 27).
4 Placez le couvercle sur le bol (1). Faites tourner le couvercle dans
le sens des aiguilles d’une montre (2) jusqu’à ce qu’il s’enclenche
(clic) (fig. 28).
Insérez le poussoir dans la cheminée de remplissage.
5 Sélectionnez la vitesse correspondant à la couleur de
l’accessoire (fig. 29).
6 Lorsque vous avez terminé, réglez le sélecteur de vitesse sur 0, puis
débranchez l’appareil (fig. 30).
7 Nettoyez toujours le fouet après utilisation.
Consultez le chapitre relatif au nettoyage pour savoir comment retirer et
nettoyer le fouet.
Conseils
- N’utilisez pas le fouet pour préparer des pâtes à gâteau contenant du
beurre ou de la margarine, ou pour pétrir de la pâte. Utilisez
l’accessoire de pétrissage à cet effet.
- Assurez-vous que le bol et le fouet sont secs et exempts de graisse
lorsque vous montez des blancs en neige. Ceux-ci doivent être à
température ambiante.
Blender
Le blender est destiné à :
- mélanger des ingrédients liquides, tels que des produits laitiers, sauces,
jus de fruits, soupes, cocktails et milk-shakes ;
- mixer des préparations à consistance molle, telles que de la pâte à
crêpes ou de la mayonnaise ;
- réduire en purée des aliments cuits, pour préparer des repas pour
bébés par exemple.
1 Placez le joint en caoutchouc sur l’ensemble lames (fig. 31).
2 Placez l’ensemble lames au fond du blender (1), puis tournez
l’ensemble lames dans le sens des aiguilles d’une montre pour le
fixer (2) (fig. 32).
FRANÇAIS 19

20
3 Placez le blender sur le bloc moteur (1) et tournez le blender dans
le sens des aiguilles d’une montre pour le fixer (2). La poignée doit
se trouver en face de l’un des quatre coins du bloc moteur (fig. 33).
N’exercez pas une pression trop forte sur la poignée du blender.
4 Placez les ingrédients dans le blender (fig. 34).
Ne remplissez jamais le blender avec des ingrédients dont la
température dépasse 80 °C.
Pour éviter tout risque d’éclaboussure, ne remplissez jamais le blender
au-delà de l’indication du niveau maximal, en particulier lorsqu’il s’agit
de liquides chauds.
5 Placez le couvercle sur le blender (1), puis tournez-le dans le sens
des aiguilles d’une montre pour le fixer (2) (fig. 35).
6 Sélectionnez la vitesse correspondant à la couleur de
l’accessoire (fig. 13).
N’ouvrez jamais le couvercle lorsque la lame est en rotation.
N’introduisez jamais vos doigts ou tout objet dans le blender pendant
son fonctionnement.
Laissez toujours l’appareil refroidir après avoir préparé deux portions.
7 Lorsque vous avez terminé, réglez le sélecteur de vitesse sur 0, puis
débranchez l’appareil (fig. 4).
Conseils
- Pendant le fonctionnement de l’appareil, vous pouvez ajouter des
ingrédients solides ou liquides dans le blender en les introduisant par
l’ouverture du couvercle (fig. 36).
- Plus vous laissez l’appareil tourner longtemps, plus le mélange que
vous obtenez est fin.
- Coupez les aliments en morceaux pour les introduire dans le blender.
Si vous devez préparer d’importantes quantités d’aliments, procédez
par petites portions et ne préparez pas tout en une seule fois.
- Pour piler des glaçons, introduisez-les dans le bol, fermez le couvercle
et appuyez sur le bouton Pulse/Easy Clean.
FRANÇAIS20
- Certains ingrédients, comme les fruits, sont plus faciles à mixer si vous
ajoutez un peu de liquide (du jus de citron par exemple).
- Pour faire de la soupe, utilisez des ingrédients cuits.
- Si vous n’êtes pas satisfait du résultat, appuyez sur le bouton Pulse/
Easy Clean à plusieurs reprises pour faire fonctionner l’appareil
brièvement. Vous pouvez aussi mélanger les ingrédients avec une
spatule (uniquement après l’arrêt complet du blender) ou verser un
peu du contenu dans un autre bol afin de préparer une quantité
moins importante.
- Si vous préparez un liquide chaud susceptible de mousser (par ex.
lait), ne versez pas plus d’1 litre dans le blender afin d’éviter tout
risque d’éclaboussure.
- Si des ingrédients s’accumulent sur les parois du blender, éteignez
l’appareil, puis débranchez-le. Détachez les ingrédients des parois au
moyen d’une spatule.
Presse-agrumes (HR7772 uniquement)
Vous pouvez utiliser le presse-agrumes pour préparer des jus de fruits
frais. La pulpe, les pépins et la peau sont séparés du jus.
1 Placez le support pour outil dans le bol (fig. 9).
2 Placez le presse-agrumes sur le support pour outil dans le
bol (fig. 37).
Remarque : Assurez-vous que la partie saillante du filtre s’enclenche
correctement dans le logement de la poignée du bol.
3 Sélectionnez la vitesse correspondant à la couleur de
l’accessoire (fig. 29).
4 Pressez l’agrume sur le cône (fig. 38).
Remarque : De temps à autre, arrêtez-vous de presser les agrumes pour
retirer la pulpe du filtre.
Remarque : Pour éliminer la pulpe du filtre, éteignez l’appareil en réglant le
sélecteur de vitesse sur 0.
5 Lorsque vous avez terminé, réglez le sélecteur de vitesse sur 0, puis
débranchez l’appareil (fig. 30).
ページが読み込まれています...
ページが読み込まれています...
ページが読み込まれています...
ページが読み込まれています...
ページが読み込まれています...
ページが読み込まれています...
ページが読み込まれています...
ページが読み込まれています...
ページが読み込まれています...
ページが読み込まれています...
ページが読み込まれています...
ページが読み込まれています...
ページが読み込まれています...
ページが読み込まれています...
ページが読み込まれています...
ページが読み込まれています...
ページが読み込まれています...
ページが読み込まれています...
ページが読み込まれています...
ページが読み込まれています...
ページが読み込まれています...
ページが読み込まれています...
ページが読み込まれています...
ページが読み込まれています...
ページが読み込まれています...
ページが読み込まれています...
ページが読み込まれています...
ページが読み込まれています...
ページが読み込まれています...
ページが読み込まれています...
ページが読み込まれています...
ページが読み込まれています...
ページが読み込まれています...
ページが読み込まれています...
ページが読み込まれています...
ページが読み込まれています...
ページが読み込まれています...
ページが読み込まれています...
ページが読み込まれています...
ページが読み込まれています...
ページが読み込まれています...
ページが読み込まれています...
ページが読み込まれています...
ページが読み込まれています...
ページが読み込まれています...
ページが読み込まれています...
ページが読み込まれています...
ページが読み込まれています...
ページが読み込まれています...
ページが読み込まれています...
ページが読み込まれています...
ページが読み込まれています...
ページが読み込まれています...
ページが読み込まれています...
ページが読み込まれています...
ページが読み込まれています...
ページが読み込まれています...
ページが読み込まれています...
ページが読み込まれています...
ページが読み込まれています...
ページが読み込まれています...
ページが読み込まれています...
ページが読み込まれています...
ページが読み込まれています...
ページが読み込まれています...
ページが読み込まれています...
ページが読み込まれています...
ページが読み込まれています...
ページが読み込まれています...
ページが読み込まれています...
ページが読み込まれています...
ページが読み込まれています...
ページが読み込まれています...
ページが読み込まれています...
ページが読み込まれています...
ページが読み込まれています...
ページが読み込まれています...
ページが読み込まれています...
ページが読み込まれています...
ページが読み込まれています...
-
 1
1
-
 2
2
-
 3
3
-
 4
4
-
 5
5
-
 6
6
-
 7
7
-
 8
8
-
 9
9
-
 10
10
-
 11
11
-
 12
12
-
 13
13
-
 14
14
-
 15
15
-
 16
16
-
 17
17
-
 18
18
-
 19
19
-
 20
20
-
 21
21
-
 22
22
-
 23
23
-
 24
24
-
 25
25
-
 26
26
-
 27
27
-
 28
28
-
 29
29
-
 30
30
-
 31
31
-
 32
32
-
 33
33
-
 34
34
-
 35
35
-
 36
36
-
 37
37
-
 38
38
-
 39
39
-
 40
40
-
 41
41
-
 42
42
-
 43
43
-
 44
44
-
 45
45
-
 46
46
-
 47
47
-
 48
48
-
 49
49
-
 50
50
-
 51
51
-
 52
52
-
 53
53
-
 54
54
-
 55
55
-
 56
56
-
 57
57
-
 58
58
-
 59
59
-
 60
60
-
 61
61
-
 62
62
-
 63
63
-
 64
64
-
 65
65
-
 66
66
-
 67
67
-
 68
68
-
 69
69
-
 70
70
-
 71
71
-
 72
72
-
 73
73
-
 74
74
-
 75
75
-
 76
76
-
 77
77
-
 78
78
-
 79
79
-
 80
80
-
 81
81
-
 82
82
-
 83
83
-
 84
84
-
 85
85
-
 86
86
-
 87
87
-
 88
88
-
 89
89
-
 90
90
-
 91
91
-
 92
92
-
 93
93
-
 94
94
-
 95
95
-
 96
96
-
 97
97
-
 98
98
-
 99
99
-
 100
100


他の言語で
- français: Philips HR7771/53 Manuel utilisateur
関連論文
その他のドキュメント
-
Bosch MCMV504ACN/01 取扱説明書
-
-
Bosch MUMVC204CN/05 ユーザーマニュアル
-
Bosch MUMVC00LCN/05 ユーザーマニュアル
-
-
-
KitchenAid 5K5SSCWH0 取扱説明書
-
KitchenAid 9KSM95 ユーザーマニュアル
-
IKEA Double Walled Clear Glass Coffee and Tea Maker ユーザーマニュアル
-
IKEA 405.132.82 ユーザーマニュアル