
Moodpic 1
63,2 x 50,25mm
CMYK & GREY
Moodpic 2
98,6 x 46,7mm
CMYK & GREY
立即注册您的新博世产品:
www.bosch-home.cn
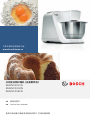
多功能食物料理机(全能厨师机)
MUMVC00VCN
MUMVC20QCN
MUMVC20RCN
zh 使用说明书
en Instruction manual
使用产品前请仔细阅读本使用说明书,并请妥善保管

zh 简体中文 3
en English 12

3
zh
安全须知
安全须知
在使用前,请仔细阅读这些说明,以便熟悉本电器的重要安全和操作说
明。若未遵守正确使用电器的说明,制造商对造成的任何损害概不承
担责任。
本电器用于加工普通家庭用量或非商业应用中类似用量的食材。非商
业应用包括诸如商场、办公室、农业和其他商业企业的员工厨房,以及
供公寓、小型旅馆和类似住所的客人使用。本电器用于加工满足家庭所
需用量的食材。请勿超出允许的最大数量(请参见“应用示例”)。本电
器适用于混合、揉捏、挤压和切碎食材。不得将其用于加工其他物品或
物质。若在制造商准许的使用范围内,则附件可用于其他应用。本电器
仅限与原装附件一起使用。在使用附件时,请遵循随附的操作说明。请
妥善保管使用说明书。若将本电器转让给第三方,请务必随附上使用说
明书。仅限在室温及海拔2000米以下的室内使用本机器。
一般安全说明
W 有电击危险!
儿童不得使用本电器。必须将本电器及其电源线放在远离儿童的地方。
可以让有身体、感官、精神障碍或缺乏使用经验和使用知识的人使用本
电器,不过前提是操作时必须有人在场监督并指导他们如何安全地使
用本电器,而且还要让他们了解操作时可能面临的危险。儿童不应玩耍
本电器。请勿让运行中的电器无人照看。电器必须按照铭牌上的技术规
范进行连接和操作。仅供室内使用。若电源线和/或电器损坏,请勿使
用本电器。
在更换附件或其他活动部件之前,请关闭电器并断开电源连接。若无人
照看时或者在装配、拆卸或清洁之前,请始终记得断开电器的电源连
接。请勿将电源线放在锐利边缘或热表面上。为防止受伤,损坏的电源
线必须交由制造商或其客服以及类似的合格人员进行更换。本电器只
可交由我们的客服进行维修。
电器安全说明
W 有受伤危险!
W 有电击危险!
在完成所有使用电器的准备工作之前,请勿插入电源插头。切勿将底
座装置浸入液体中或用流水冲洗。请勿使用蒸汽清洁器。请勿在电器
开启后调节多功能臂。等待驱动接口完全停止。在驱动接口完全停止之
前,请勿更换工具/附件-在将本电器关闭后,驱动接口仍会短暂运转。
仅使用旋转开关来开启或关闭本电器。在不使用本电器时,请拔下电源
插头。在清除故障前,请拔下电源插头。

4
zh 安全须知
W 旋转工具容易引发受伤!
双手不得接触旋转部件。本电器正在工作时,切勿将手指伸入搅拌碗
中。请在操作电器之前安装盖子。在驱动接口完全停止之前,请勿更换
工具-在将本电器关闭后,驱动接口仍会短暂运转并最终停在工具更
换位置。在工具完全停止之前,请勿移动多功能臂。出于安全考虑,除
非在未使用的驱动接口上盖上了驱动接口保护盖,否则不得操作本电
器。在安装/卸下切片切丝附件之前,请等待驱动接口完全停止并拔下
电源插头。请勿将手伸入进料管内。
W 锋利的刀片容易引发受伤危险!
请勿抓住切碎刀盘锋利的刀刃或边缘。只能通过边缘抓住切碎刀盘。
请 勿赤手触碰 搅拌刀片。
W 锋利的刀片/旋转驱动装置容易引发受伤危险!
切勿将手指伸入连接的搅拌杯中!在驱动接口完全停止之前,请勿拆
卸/安装搅拌杯!只能操作装配好并已加盖的搅拌杯。
W 有烫伤危险!
若加工热液体,蒸汽会从盖子上的漏斗逸出。最多可加入0.5升热液体
或起泡液体。
W 重要信息!
本电器仅限与原装附件一起使用。在使用附件时,请遵循随附的操作说
明。任何时候均只能使用一种工具或附件。
W 电器或附件的符号解释
i
按照操作说明中的说明操作。
Y
小 心 !旋 转 刀 片 。
W
小 心 !旋 转 工 具 。
请勿将手指伸入进料管内。

5
zh
安全系统
安全系统
启动锁定
请参见“工作位置”表。
只能在位置1和3时开启本电器:
■ 当搅拌碗(11)已安装并尽可能地旋转到位
且
■ 搅拌杯驱动接口保护盖已安装(8)。
重新启动锁定
若运行的电器被干扰导致运行中断,即使开
关仍处于运行状态,当排除干扰后机器也不
会自动重新运行。要重新开启电器,请将旋转
开关旋至0,然 后 即 可 开 启 。
过载保护
若在本电器使用过程中电机自动关闭,则表
明过载保护功能已被激活。这可能是因为一
次加工的食材太多所致。
若安全系统被激活,请参见“故障排除”。
操作说明介绍了多种型号,另请参见型号概述
(图 M)。本电器无需维护。
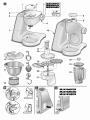
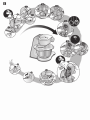
概述
请翻开图示页。
图 A:
底座装置
1 释放按钮
2 多功能臂
“EasyArmlift”功能支持向上移动多功能
臂(请参见“工作位置”)。
3 旋转开关
若本电器已被关闭(位置0),则 它 会 自
动运行至方便更换工具的最佳位置。
0=停止
M=以最高速度点动,按住开关可以持
续所需的搅拌时间。
档位1-7,工 作 速 度 :
1=低速-慢,
7=高速-快。
4 开/关显示
电器正在运行时亮起(旋转开关处于M
或1-7档)。电器操作不当、电子保险丝
断开或电器出现电器故障时闪烁-请参
见“故障排除”部分。
目录
安全须知................................................ 3
安全系统................................................ 5
概述....................................................... 5
工作位置................................................ 6
操作....................................................... 7
清洁和维修............................................. 9
储存....................................................... 9
故障排除................................................ 9
菜谱......................................................10
环保型处理........................................... 11
保修..................................................... 11
感谢您购买新的 Bosch 电器。您可以在我们
的网页上找到更多关于产品的信息。
原产地:
斯洛文尼亚
总经销商:
博 西 家 用 电 器( 中 国 )有 限 公 司
南京市中山路129号中南国际大厦20、21楼
执行标准:
GB4706.1-2005
家用和类似用途电器的安全第1部分:
通用要求
GB4706.30-2008
家用和类似用途电器的安全厨房机械的特
殊要求
全国统一客户服务热线:
4008855888
客户服务电子邮箱:
careline.china@bshg.com
公司网站:
www.bosch-home.cn
技术数据:
电气连接
(电压–频率)
220-240 V~
50/60 Hz
额定功率 1000 W
尺寸(高x宽x深) 402x63x63毫米

6
zh 工作位置
5 驱动接口保护盖
要取下驱动接口保护盖,请按下保护盖后
部并取下盖子。
6 连接如下附件的驱动接口
–切片切丝附件和
– 柳橙汁附件( 可 选 附 件 * )。
在不使用时,请装上驱动接口保护盖。
7 连接工具(搅拌桨、打发桨、揉面钩)和
碎肉附件(可选附件*)的驱动接口
8 搅拌杯驱动接口保护盖
9 搅拌杯(可选附件*)驱动接口
在不使用时,请装上搅拌杯驱动接口保
护盖。
10 电线贮存仓
将电线收入电线贮存仓内
搅拌碗及附件
11 不锈钢搅拌碗
12 防溅盖
工具
13 搅拌桨
14 打发桨
15 带面团挡板的揉面钩
16 附件包
用于存放工具和切碎刀盘。
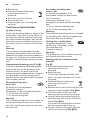
切片切丝附件
17 推料杆
18 带进料管的盖子
19 切碎刀盘
a 双面切片刀盘–粗/细
b 双面切丝刀盘–粗/细
c 磨碎刀盘–中细
20 刀盘支架
21 带出口孔的外壳
搅拌杯*
22 搅拌杯
23 防溅盖
24 漏斗
*若产品包装内未随附某种附件,则可在市面
上或向客服购买。
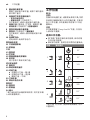
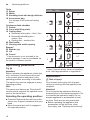
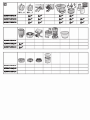
工作位置
图 B:
注意!
在操作本电器之前,请按照此表将工具/附件
安装到正确驱动接口上的正确位置,并使其
处于工作位置。多功能臂必须在每个工作位
置啮合。
注意
多功能臂具有“EasyArmlift”功能,支持向
上移动多功能臂。
选择工作位置:
■ 按“释放”按钮并移动多功能臂。移动时用
手扶住多功能臂。
■ 移动多功能臂,直到它在所需的位置啮合。
位置 驱动接口
1
7
1-7
1-7
1-3
2
7 * –
3
6
3-7
3-5
4
9 5-7
7
5-7
*插入/卸下打发桨、搅拌桨或揉面钩。加入
大量食材。

7
zh
操作
操作
W 有受伤危险!
在完成所有使用电器的准备工作之前,请勿
插入电源插头。
注意!
附件/工具未处于工作位置时,请勿操作本电
器 。请 勿 让 本 电 器 空 转 。请 勿 将 本 电 器 或 附 件
暴露在热源下。部件不适合微波炉加热。
■ 在 首 次 使 用 电 器 和 附 件 之 前 ,请 彻 底 清 洁 ;
请参见“清 洁和 维修”。
重要信息
这些使用说明中有关工作速度的建议参考值
适用于带有7速旋转开关的电器。对于带有
4速旋转开关的电器,您可以参考7速旋转
开关值后面括号中对应的值。
这些操作说明中带有一张贴纸,上面列出了
在使用工具或附件时电器的工作速度的参考
值。建议将该贴纸粘贴在电器上(图 C)。
准备
■ 将底座装置安放在光滑清洁的表面上。
■ 拉 出 电 源 线( 图 D)。
■ 插上电源插头。
搅拌碗和工具
W 旋转工具容易引发受伤
本电器正在工作时,切勿将手指伸入搅拌碗
中。请在操作本电器之前安装盖子(12)!
在驱动接口完全停止之前,请勿更换工具-
在将本电器关闭后,驱动接口仍会短暂运转
并最终停在工具更换位置。在工具完全停止
之前,请勿移动多功能臂。
出于安全考虑,只有当未使用的驱动接口上
盖上了驱动接口保护盖(5,8)后才能操作
本电器。
注意!
只能将搅拌碗与本电器配合使用。
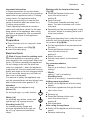
搅拌桨 (13)
用 于 搅 拌 面 团 ,如 蛋 糕 料
打发桨 (14)
用于搅拌蛋白、奶油和松软的生面
团 ,如 海 绵 蛋 糕 料
揉面钩 (15)
用于揉捏较硬的生面团和混合不用
切碎的食材(如葡萄干和巧克力屑)
使用搅拌碗和工具(图 E):
■ 按“释放”按钮并将多功能臂移动到
位置2。
■ 固定搅拌碗:
将搅拌碗朝前倾斜然后将其放下。
逆时针旋转直到其卡入到位。
■ 根据加工量将搅拌桨、打发桨或揉面钩用
力插入驱动接口,直到其卡入到位。
注:
若使用揉面钩,请旋转面团挡板直到揉面钩
可 以 锁 定 到 位( 图 E-4b)。
■ 将要加工的食材放入搅拌碗中。
■ 按“释放”按钮并将多功能臂移动到
位1。
■ 安装防溅盖。
■ 将旋转开关设定至所需的档位。
我们的建议:
– 搅拌桨:首先以1档搅拌,然后选择7档
– 打发桨:7档,在1档下混合
– 揉面钩:首先以1 档 搅 拌 ,然 后 以 3档揉捏
加入更多食材
■ 用旋转开关关闭电器。
■ 通过盖子上的进料管加入更多食材。
或
■ 取下防溅盖。
■ 按“释放”按钮并将多功能臂移动到
位置2。
■ 加入食材。
使用电器后
■ 用旋转开关关闭电器。
■ 拔下电源插头。
■ 取下防溅盖。
■ 按“释放”按钮并将多功能臂移动到
位置2。
■ 将工 具从驱 动 接口 上 取 下。
■ 取出搅拌碗。
■ 清洁所有部件,请参见“清洁和维修”。
切片切丝附件
W 有受伤危险
请勿抓住切碎刀盘锋利的刀刃或边缘。只能
通过边缘抓住切碎刀盘。在安装/卸下切片切
丝 附 件 之 前 ,请 等 待 驱 动 接 口 完 全 停 止 并 拔
下电源插头。请勿将手伸入进料管内。

8
zh 操作
警告!
切片切丝附件必须完全组装好才能使用。切
勿将切片切丝附件组装到底座装置上。只能
在指定的工作位置操作切片切丝附件。
预 置 过 载 保 护 易 断 点( 图 F):
内置预置过载保护易断点可保护电器的驱
动。若发生过载,切片切丝附件的驱动轴会自
动断裂。但是,驱动轴也可轻松更换。可向客
服购买新的带驱动轴的刀盘支架。
双面切片刀盘 – 粗/细
用于水果和蔬 菜切片。
在5档下加工。
双面切片刀盘上的标示:
“1”表示粗切面
“3”表示细切面
警告!
双面切片刀盘不适用于硬质奶酪、面包、圆
面包或巧克力切片。煮过的软马铃薯只能在
冷却后切片。
双面切丝刀盘 – 粗/细
用于蔬菜、水果和奶酪切丝,但硬质
奶酪除外(如帕马森干酪)。
在3或4档下加工。
双面切丝刀盘上的标示:
“2”表示粗丝面
“4”表示细丝面
警告!
双面切丝刀盘不适用于坚果切丝。软质奶酪
只能在7档下用粗丝面切丝。
磨碎刀盘 – 中细
用于磨碎生土豆、硬质奶酪(如帕马
森干酪)、冷巧克力和坚果。
在7档下加工。
警告!
磨碎刀盘不适用于磨碎软质奶酪和奶酪片。
配合切片切丝附件使用
图 G:
■ 按“释放”按钮并将多功能臂移动到
位置2。
■ 固定搅拌碗:
将搅拌碗朝前倾斜然后将其放下。
逆时针旋转直到其卡入到位。
■ 按“释放”按钮并将多功能臂移动到
位置3。
■ 从切片切丝附件的驱动接口上取
下驱动接口保护盖(图 G-5a)。
■ 握住刀盘支架下端,确保两个尖端面朝上。
■ 将切片或切丝刀盘小心地安放到刀盘支架
的 尖 端( 图 G-6a)。若是双面刀盘,请确
保将要用的一面朝上。
■ 抓住刀盘支架上端并将其插入外壳中
(图 G-6b)。
■ 安装盖子(注意标记)并以顺时针方向旋
转到底。
■ 将切片切丝附件安放到驱动接口上,然后
以顺时针方向旋转到底,如图 G-8所示。
■ 将旋转开关旋至建议的档位。
■ 将要加工的食材放入进料管并用推料杆向
下推。
警告!
避免加工好的食材在出口孔处堆积。
提示:为确保切碎均匀,请成串地加工食材。
注:若要加工的食材在切片切丝附件中卡住,
请关闭多功能食物料理机并拔下电源插头,
等驱动接口完全停止后从切片切丝附件上取
下盖子并清空进料管。
使用电器后
■ 用旋转开关关闭电器。
■ 逆 时 针旋 转 切片 切 丝 附件 并将 其 卸 下。
■ 逆时针旋转盖子并将其卸下。
■ 卸下带刀盘的刀盘支架。为此,请用手指从
下 方 按 驱 动 接 口 轴( 图 H)。
■ 清洁部件。
搅拌杯
W 锋利的刀片/旋转驱动装置容易引发受伤
危险!
切勿将手指伸入连接的搅拌杯中!在驱动接
口完全停止之前,请勿拆卸/安装搅拌杯!只
能操作装配好并已加盖的搅拌杯。
W 有烫伤危险!
若加工热液体,蒸汽会从盖子上的漏斗逸出。
最多可加入0.5升热液体或起泡液体。
警告!
搅拌杯可能会损坏。请勿加工速冻食材(冰
块除外)。请勿让搅拌杯空转。
使用搅拌杯(图 J):
■ 按“释放”按钮并将多功能臂移动到
位置4。
■ 取下搅拌杯驱动接口保护盖。
■ 安装搅拌杯(将把手对准底座装置上的标
记 )并 以 逆 时 针 方 向 旋 转 到 底 。

9
zh
清洁和维修
■ 加入食材。
液体最大加工量=1.25升;起泡或热液体
最大加工量=0.5升;最佳加工量–固态
=50-100克;
■ 安装盖子并以逆时针方向完全旋入搅拌杯
把手。盖子必须锁定到位。
■ 将旋转开关设定至所需的档位。
加 入 更 多 食 材( 图 J- 8 ):
■ 用旋转开关关闭电器。
■ 取下盖子并加入食材
或
■ 取下漏斗并通过添加口慢慢地加入固态
食材
或
■ 通过漏斗倒入液体食材。
使用电器后
■ 用旋转开关关闭电器。
■ 顺时针转动搅拌杯并将其卸下。
提示:建议在使用后立即清洁搅拌杯。
清洁和维修
注意!
请勿使用磨蚀性清洁剂。否则可能会损坏表
面。
清洁底座装置
W 有电击危险!
切勿将底座装置浸入水中或用流水冲洗。请
勿使用蒸汽清洁器。
■ 拔下电源插头。
■ 用湿抹布擦拭底座装置和驱动接口保护
盖 。若 需 要 ,可 使 用 少 量 清 洁 剂 。
■ 然后晾干底座装置。
清洁搅拌碗和工具
搅拌碗和工具可在洗碗机内清洗。请勿将塑
料部件塞入洗碗机内,否则可能会在清洗过
程中出现永久性变形!
清洁切片切丝附件
切片切丝附件的所有部件均可在洗碗机内
清洗。
提示:要去除加工胡萝卜等留下的颜色,请用
抹 布 蘸 上 少 量 食 用 油 ,即 可 将 颜 色 从 切 片 切
丝 附 件( 并 非 切 碎 刀 盘 )上 擦 拭 掉 。然 后 冲 洗
切片切丝附件。
清洁搅拌杯
W 锋利的刀片容易引发受伤危险!
请勿赤手触碰 搅拌刀片。
搅拌杯、盖子和漏斗可在洗碗机内清洗。
提示:在 加 工 液 体 后 ,通 常 可 以 不 用 将 搅 拌
杯从本电器上卸下即可进行清洁。在安装的
搅拌杯中倒入少量水和洗洁精。让搅拌杯开
启 数 秒( M档)。将水倒出并用干净水清洗
搅拌杯。
重要信息
若需要,请清洁附件袋。请遵循袋子上的保
养说明。
储存
W 有受伤危险!
在不使用本电器时,请拔下电源插头。
图 K:
■ 将工具和切碎刀盘存放在附件袋中。
■ 将附件袋放在搅拌碗中。
■ 要在原包装中存放,请参见图 L 。
故障排除
W 有受伤危险!
在清除故障前,请拔下电源插头。
重要信息
如果本电器操作不当、电子保险丝断开或出
现电器故障,则操作指示灯将闪烁。
多功能臂必须在每个工作位置啮合。
参考以下信息开始尝试消除所出现的问题。
故障
电器无法启动。
补救措施
■ 检查电源。
■ 检查电源插头。
■ 检 查 多 功 能 臂 。位 置 正 确 ? 已 啮 合 ?
■ 尽可能拧紧搅拌杯或搅拌碗。
■ 装上搅拌杯盖并尽可能拧紧。
■ 用驱动接口保护盖盖住未使用的驱动接口。
■ 安 全 锁 已 激 活 。将 电 器 切 换 至 0然后再调
回所需的档位。

10
zh 菜谱
故障
电器在使用时突然关闭。过载保护功能已被
激活。一次加工的食材太多。
补救措施
■ 关闭电器。
■ 减少加工的量。
■ 请勿超出允许的最大数量(请参见“应用
示 例 ” )。
故障
当驱动接口正在运行时,不小心按下了释放
按 钮 。多 功 能 臂 上 移 。驱 动 接 口 关 闭 ,但 未 停
在工具更换位置。
补救措施
■ 将旋转开关设定至0。
■ 将多功能臂移至位置1。
■ 开启电器(1档)。
■ 再次关闭电器。
工具将停在工具更换位置。
故障
搅拌杯在使用时未开始工作或停止运行,驱
动接口发出“嗡嗡”声。刀片被卡住。
补救措施
■ 关闭电器并拔下电源插头。
■ 拆开搅拌杯并消除堵塞物。
■ 重新安装搅拌杯。
■ 开启本电器。
重要信息
若故障无法消除,请与客服联系。
菜谱
打发鲜奶油
– 100克-600克
■ 在7档下用打发桨将奶油打发1½
至4分钟,具体取决于奶油的量和特性。
蛋白
– 1至8个鸡蛋的蛋白
■ 在7档下用打发桨将蛋白搅打4
至6分钟。
海绵蛋糕料
– 基本菜谱
– 2个鸡蛋
– 2-3汤匙热水
– 100克白糖
– 1包香草糖
– 70克面粉
– 70克玉米淀粉
– 发 酵 粉( 若 需 要 )
■ 在7档下用打发桨将食材(暂不添加面粉
和玉米淀粉)搅打约4-6分钟直至起泡。
■ 将开关旋至1档并在半分到1分钟内用勺
子加入筛过的面粉和玉米淀粉。
最大加工量:2x基本菜谱
蛋糕料
– 基本菜谱
– 6个鸡蛋
– 500克白糖
– 盐少许
– 2包香草糖或半个柠檬皮
– 500克黄油或人造黄油(室温)
– 1000克面粉
– 1包发酵粉
– 250毫升牛奶
■ 在1档下用搅拌桨将鸡蛋、白糖、盐和香
草糖或柠檬皮混合约10秒。
■ 设定为5档并加工约120秒。
■ 加入黄油并在3档下加工约60秒。
■ 加 入 面 粉 和 发 酵 粉 ,然 后 在 1档下加工约
2分钟。
■ 设定为3档并在两分钟内慢慢地加入牛奶。
最大加工量:1x基本菜谱

11
zh
环保型处理
酥类糕点
基本菜谱
– 125克黄油(室温)
– 100-125克白糖
– 1个鸡蛋
– 盐少许
– 柠檬皮或香草糖少许
– 250克面粉
– 发 酵 粉( 若 需 要 )
■ 在1档下用搅拌桨将所有食材加工约½
分 钟 ,然 后 在 6档下再加工约2-3分钟。
加工500克面粉:
■ 在1档下用揉面钩将食材揉捏约½分钟,
然后在3档下再揉捏约3-4分钟。
最大加工量:2x基本菜谱
酵母面团
基本菜谱
– 500克面粉
– 1个鸡蛋
– 80克油脂(室温)
– 80克白糖
– 200-250毫升温牛奶
– 25克新鲜酵母或1包干酵母
– 半个柠檬皮
– 盐少许
■ 在1档下用揉面钩将所有食材加工约½
分 钟 ,然 后 在 3档下再加工约3-6分钟。
最大加工量:2x基本菜谱
意面面团
基本菜谱
– 300克面粉
– 3个鸡蛋
– 1-2汤匙(10-20克)凉水(根据需要)
■ 在3档下将所有食材加工约3-5分钟直到
形成面团。
最大加工量:1.5x基本菜谱
面包面团
基本菜谱
– 1000克面粉
– 3包干酵母
– 2汤匙盐
– 660毫升温水
■ 在1档下用揉面钩将所有食材加工约½
分 钟 ,然 后 在 3档下再加工约4-5分钟。
蛋黄酱
– 2个鸡蛋
– 2汤匙芥末
– ¼升油
– 2汤匙柠檬汁或醋
– 盐少许
– 糖少许
食材必须温度相同。
■ 在3或4档下将食材(暂不添加食用油)
在 搅拌 杯 中加 工数 秒。
■ 将搅拌杯切换至7档并通过漏斗慢慢加入
食用油,然后混合直至蛋黄酱乳化。
蛋黄酱须立即食用,请勿存放。
环保型处理
J
对本设备根据有关电气和电子设备报
废的欧洲规定2012/19/EU
(wasteelectricalandelectronic
equipment—WEEE)进行标记。该
规定管理在欧洲范围内对报废设备的
回收和再生。
请咨询专业零售商,了解可用的处置
方式。
保修
该设备的保修条款将由售出国的销售代表来
确定。您可向售出此设备的经销商详细了解这
些条款。
当根据保修条款进行任何索赔时,必须出具销
售凭证或收据。
如有更改,恕不另行通知。

12
en For your safety
For your safety
Before use, read these instructions carefully in order
to become familiar with important safety and operating
instructions for this appliance. If the instructions for correct use of
the appliance are not observed, the manufacturer’s liability for any
resulting damage will be excluded.
This appliance is designed for processing normal household
quantities in the home or similar quantities in non-industrial
applications. Nonindustrial applications include e.g. use in employee
kitchens in shops, ofces, agricultural and other commercial
businesses, as well as use by guests in boarding houses, small
hotels and similar dwellings. Use the appliance for processing
normal quantities of food for domestic use. Do not exceed permitted
maximum quantities (see “Application examples”). This appliance
is suitable for mixing, kneading and beating food. It must not be
used for processing other objects or substances. Other applications
are possible if the accessories approved by the manufacturer are
used. Use the appliance with original accessories only. When using
the accessories, follow the enclosed operating instructions. Please
keep the operating instructions in a safe place. If passing on the
appliance to a third party, always include the operating instructions.
Only use the appliance indoors at room temperature and up to
2000 m above sea level.
General safety instructions
W Danger of electric shock!
The appliance must not be used by children. The appliance and
its power cord must be kept away from children. Appliances can
be used by persons with reduced physical, sensory or mental
capabilities or lack of experience and knowledge if they have been
given supervision or instruction concerning use of the appliance in
a safe way and if they understand the hazards involved. Children
shall not play with the appliance. Do not leave the running appliance
unattended. Connect and operate the appliance only in accordance
with the specications on the rating plate. Only use indoors. Do not
use the appliance if the power cord and/or appliance are damaged.
Before replacing accessories or additional parts, which move during
operation, switch off the appliance and disconnect from the power
supply. Always disconnect the appliance from the supply if it is left
unattended and before assembling, disassembling or cleaning. Do
not place the power cord over sharp edges or hot surfaces.

13
en
For your safety
To prevent injury, a damaged power cord must be replaced by the
manufacturer or his customer service or a similarly qualied person.
Only our customer service may repair the appliance.
Safety instructions for this appliance
W Risk of injury!
W Danger of electric shock!
Do not insert mains plug until all preparations for working with the
appliance are complete. Never immerse the base unit in liquid or
hold under running water. Do not use a steam cleaner. Do not adjust
the swivel arm while the appliance is switched on. Wait until the
drive has come to a standstill. Do not change tool / accessory until
the drive is at a standstill – when the appliance is switched off, the
drive continues running briey. Use only the rotary switch to switch
the appliance on or off. When the appliance is not in use, pull out
the mains plug. Before eliminating a fault, pull out the mains plug.
W Risk of injury from the rotating tools!
Keep hands clear of rotating parts. While the appliance is operating,
never place ngers in the mixing bowl. Attach the cover before
operating the appliance! Do not change tools until the drive has
come to a standstill – when the appliance is switched off, the drive
continues running briey and stops in the tool change position. Do
not move the swivel arm until the tool has come to a standstill. For
reasons of safety the appliance cannot be operated unless unused
drives are covered with drive guards. Before attaching / removing
the continuous-feed shredder, wait until the drive has come to a
standstill and pull out the mains plug. Do not reach into the feed
tube.
W Risk of injury from sharp blades!
Do not grip the sharp blades or edges of the cutting discs. Take hold
of cutting discs by the edge only. Do not touch blender blades with
bare hands.
W Risk of injury from sharp blades / rotating drive!
Never place ngers in the attached blender! Do not remove / attach
the blender until the drive is at a standstill! Operate the assembled
blender only and with the lid attached.
W Risk of scalding!
If processing hot liquids, steam escapes through the funnel in the
lid. Add a max. 0.5 litres of hot or frothing liquid.

14
en For your safety
W Important!
Use the appliance with original accessories only. When using the
accessories, follow the enclosed operating instructions. Use only
one tool or accessory at any one time.
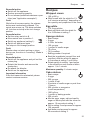
W Explanation of the symbols on the appliance or accessory
i
Follow the instructions in the operating instructions.
Y
Caution! Rotating blades.
W
Caution! Rotating tools.
Do not place ngers in the feed tube.
Contents
For your safety..........................................12
Safety systems .........................................15
Overview...................................................15
Operating positions...................................16
Operation .................................................. 16
Cleaning and servicing .............................20
Storage .....................................................20
Troubleshooting ........................................ 20
Recipes.....................................................21
Disposal .................................................... 23
Guarantee.................................................23
Applicable standards:
GB 4706.1-2005
Safety of Household and Similar Electrical
Appliances Part 1: General Requirements
GB 4706.30-2008
Safety of Household and Similar Electrical
Appliances – Particular Requirements for
Kitchen Machines
Careline:
4008855888
Service E-mail:
Company website:
www.bosch-home.cn
Technical specications:
Electrical connection
(voltage – frequency)
220-240 V~
50/60 Hz
Power rating 1000 W
Dimensions
(H x W x D)
282 x 280 x 271 mm
Congratulations on the purchase of
your new Bosch appliance. You can nd
further information about our products
on our web page.
Country of origin:
Slovenia
Exclusive distributor:
BSH Home Appliances (China) Co., Ltd.
20/F,21/F, CN International Mansion,
129 Zhongshan Road, Nanjing,
Jiangsu Province, PRC.

15
en
Safety systems
Safety systems
Start lock-out
See “Operating positions” table.
The appliance can be switched on in
pos. 1 and 3 only:
■ when the bowl (11) has been inserted and
turned until it locks into place
and
■ the blender drive cover has been
attached (8).
Restart lock-out
If the power is interrupted, the appliance
remains switched on but the motor does
not start running again when the power is
restored. To switch the appliance on again,
turn the rotary switch to 0, then switch on.
Overload protection
If the motor switches itself off while the
appliance is being used, the overload
protection feature has been activated.
A possible cause may be that too much
food was processed at one time.
If a safety system is activated, see
“Troubleshooting”.
The operating instructions describe several
models, see also overview of models
(Fig. M). The appliance requires no
maintenance.
Overview
Please fold out the illustrated pages.
Fig. A:
Base unit
1 Release button
2 Swivel arm
“Easy Armlift” function to support the
upward movement of the arm (see
“Work positions”).
3 Rotary switch
When the appliance has been switched
off (position 0), the appliance runs
automatically to the optimum position for
changing the tools.
0 = Stop
M = Instantaneous switching at
maximum speed, hold switch for
required blending duration.
Settings 1-7, Operating speed:
1 = low speed – slow,
7 = high speed – fast.
4 On/Off display
Is lit while the appliance is operating
(rotary switch on M or 1-7). Flashes if
the appliance has been operated incor-
rectly, the electronic fuse has tripped or
the appliance is defective – see section
“Troubleshooting”.
5 Drive cover
To remove the drive cover, press on the
rear area and remove cover.
6 Drive for
– Continuous-feed shredder and
– Citrus press (optional accessory*).
When not in use, attach the drive cover.
7 Drive for tools (stirrer, whisk, kneading
hook) and mincer (optional accessory*)
8 Blender drive cover
9 Drive for blender (optional accessory*)
When not in use, attach the blender
drive cover.
10 Cord store
Stow the cord in the cord store
Bowl with accessories
11 Stainless steel stirring bowl
12 Lid

16
en Operating positions
Tools
13 Stirrer
14 Whisk
15 Kneading hook with dough deector
16 Accessories bag
For storage of the tools and cutting
discs.
Continuous-feed shredder
17 Pusher
18 Cover with lling shaft
19 Cutting discs
a Reversible slicing disc – thick / thin
b Reversible shredding disc –
coarse / ne
c Grating disc – medium-ne
20 Disc holder
21 Housing with outlet opening
Blender*
22 Blender jug
23 Lid
24 Funnel
* If an accessory is not included in the
product package, it can be purchased via
the trade or customer service.
Operating positions
Fig. B:
Attention!
Before operating the appliance, attach the
tool / accessory to the correct drive and
in the correct position and place in the
operating position according to this table.
The swivel arm must be engaged in every
operating position.
Note
The swivel arm features an “Easy Armlift”
function which supports the upwards move-
ment of the swivel arm.
Selecting the operating position:
■ Press the Release button and move the
swivel arm. Support movement with your
hand.
■ Move the swivel arm until it engages in
the required position.
Position Drive
1
7
1-7
1-7
1-3
2
7 * –
3
6
3-7
3-5
4
9 5-7
7
5-7
* Insert / remove whisk, stirrer or kneading
hook. Add large quantities of ingredients.
Operation
W Risk of injury!
Do not insert mains plug until all prepa-
rations for working with the appliance are
complete.
Attention!
Do not operate the appliance without an
accessory/tool in the operating position. Do
not operate the appliance empty. Do not
expose appliance or accessories to heat
sources. Parts are not microwave-safe.
■ Before operating the appliance and
accessories for the rst time, clean
thoroughly; see “Cleaning and servicing”.

17
en
Operation
Important information
In these instructions for use the recom-
mended reference values for the operating
speed refer to appliances with a 7-setting
rotary switch. For appliances with a
4-setting rotary switch you can nd the
values in brackets after the values for a
7-setting rotary switch.
These operating instructions contain a
sticker with reference values for the oper-
ating speed of the appliance when using
the tools or accessories. We recommend
attaching this sticker to the appliance
(Fig. C).
Preparation
■ Place the base unit on a smooth, clean
surface.
■ Pull out the power cord (Fig. D).
■ Insert the mains plug.
Bowl and tools
W Risk of injury from the rotating tools
While the appliance is operating, never
place ngers in the mixing bowl. Attach the
cover (12) before operating the appliance!
Do not change tools until the drive has
come to a standstill – when the appliance
is switched off, the drive continues running
briey and stops in the tool change position.
Do not move the swivel arm until the tool
has come to a standstill.
For reasons of safety the appliance may
only be operated when unused drives have
been covered with drive guards (5, 8).
Attention!
Use bowl with this appliance only.
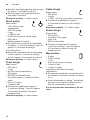
Stirrer (13)
for stirring dough, e.g. cake mixture
Whisk (14)
for whisking egg whites, cream and
light dough, e.g. sponge mixture
Kneading hook (15)
for kneading heavy dough and
mixingin ingredients that ought not
be cut (e.g. raisins and chocolate
chips)
Working with the bowl and the tools
(Fig. E):
■ Press the Release button and
move the swivel arm to
position 2.
■ Insert the bowl:
Tilt the bowl forwards and then set it
down. Turn anti-clockwise until it locks
into place.
■ Depending on the processing task, insert
the stirrer, whisk or kneading hook until it
locks into position.
Note:
If using the kneading hook, rotate the dough
deector until the kneading hook can lock
into position (Fig. E-4b).
■ Put the ingredients to be processed into
the bowl.
■ Press the Release button and
move the swivel arm to
position 1.
■ Attach the cover.
■ Set the rotary switch to the desired
setting.
Our recommendation:
– Stirrer:
rst stir in at setting 1, then select
setting 7
– Whisk:
setting 7, mix in at setting 1
– Kneading hook:
rst stir in at setting 1, knead at setting 3
Adding more ingredients
■ Switch off the appliance with the rotary
switch.
■ Add more ingredients through the feed
tube in the cover.
or
■ Remove lid.
■ Press the Release button and
move the swivel arm to
position 2.
■ Add ingredients.
After using the appliance
■ Switch off the appliance with the rotary
switch.
■ Remove mains plug.

18
en Operation
■ Remove lid.
■ Press the Release button and
move the swivel arm to
position 2.
■ Take the tool out of the drive.
■ Remove the bowl.
■ Clean all parts, see “Cleaning and
servicing”.
Continuous-feed shredder
W Risk of injury
Do not grip the sharp blades or edges of the
cutting discs. Take hold of cutting discs by
the edge only. Before attaching / removing
the continuousfeed shredder, wait until the
drive has come to a standstill and pull out
the mains plug. Do not reach into the feed
tube.
Warning!
The continuous-feed shredder must be
completely assembled before use. Never
assemble the continuous-feed shredder on
the base unit. Operate the continuous-feed
shredder in the indicated operating position
only.
Predetermined breaking point (Fig. F):
The built-in predetermined breaking point
protects the drive of the appliance. If an
overload occurs, the drive shaft of the
continuous-feed shredder breaks. However,
the drive shaft can easily be replaced. A
new disc holder with drive shaft is available
from customer service.
Reversible slicing disc –
thick / thin
for slicing fruit and vegetables.
Process at setting 5.
Designation on the reversible slicing disc:
“1” for the thick slicing side
“3” for the thin slicing side
Warning!
The reversible slicing disc is not suitable for
slicing hard cheese, bread, rolls or choco-
late. Slice boiled, waxy potatoes only when
they are cold.
Reversible shredding disc –
coarse / ne
for shredding vegetables, fruit
and cheese, except for hard cheese
(e.g. Parmesan).
Processing at setting 3 or 4.
Designation on the reversible shredding
disc:
“2” for the coarse shredding side
“4” for the ne shredding side
Warning!
The reversible shredding disc is not suitable
for shredding nuts. Shred soft cheese with
the coarse side only at setting 7.
Grating disc – medium-ne
for grating raw potatoes, hard
cheese (e.g. Parmesan), cooled
chocolate and nuts.
Process at setting 7.
Warning!
The grating disc is not suitable for grating
soft cheese and cheese slices.
Working with the continuous-feed
shredder
Fig. G:
■ Press the Release button and
move the swivel arm to
position 2.
■ Insert the bowl:
Tilt the bowl forwards and then set it
down. Turn anti-clockwise until it locks
into place.
■ Press the Release button and
move the swivel arm to
position 3.
■ Remove drive cover from the drive of the
continuous-feed shredder (Fig. G-5a).
■ Hold disc holder at the lower end,
ensuring that the two tips are face up.
■ Carefully place the required slicing or
shredding disc onto the tips of the disc
holder (Fig. G-6a).
In the case of reversible discs, ensure
that the required side is face up.
■ Grip disc holder at the upper end and
insert into the housing (Fig. G-6b).

19
en
Operation
■ Attach the cover (note mark) and turn all
the way in a clockwise direction.
■ Place continuous-feed shredder on the
drive and rotate all the way in a clockwise
direction, as illustrated in Fig. G-8.
■ Turn rotary switch to recommended
setting.
■ Put food to be processed in the feed tube
and push down with the pusher.
Warning!
Prevent the cut ingredients from building up
in the outlet opening.
Tip: To ensure even cutting results, process
thin ingredients in bunches.
Note: If the food to be processed sticks in
the continuous-feed shredder, switch food
processor off, pull out mains plug, wait until
the drive comes to a standstill, remove
cover from the continuous-feed shredder
and empty feed tube.
After using the appliance
■ Switch off the appliance with the rotary
switch.
■ Rotate the continuous-feed shredder in
an anti-clockwise direction and remove.
■ Rotate the lid in an anti-clockwise direc-
tion and remove.
■ Remove disc holder with disc. To do this,
press nger from below against the drive
shaft (Fig. H).
■ Clean parts.
Blender
W Risk of injury from sharp blades /
rotating drive!
Never place ngers in the attached blender!
Do not remove / attach the blender until the
drive is at a standstill! Operate the assem-
bled blender only and with the lid attached.
W Risk of scalding!
If processing hot liquids, steam escapes
through the funnel in the lid. Add a
max. 0,5 litres of hot or frothing liquid.
Warning!
Blender may be damaged. Do not process
deep-frozen ingredients (except ice cubes).
Do not operate blender when empty.
Working with the blender (Fig. J):
■ Press the release button and
move the swivel arm to
position 4.
■ Remove the blender drive cover.
■ Attach blender jug (mark on the handle
on mark on the base unit) and turn all the
way in an anti-clockwise direction.
■ Add ingredients.
Maximum amount of liquid = 1.25 litres;
maximum amount of frothing or hot
liquids = 0.5 litres;
Optimal processing capacity –
solids = 50-100 g;
■ Attach the cover and turn anti-clockwise
all the way into the blender handle. The
cover must be locked in position.
■ Set the rotary switch to the desired
setting.
Adding more ingredients (Fig. J-8):
■ Switch off the appliance with the rotary
switch.
■ Remove the lid and add ingredients
or
■ remove the funnel and gradually add solid
ingredients through the rell opening
or
■ pour liquid ingredients through the funnel.
After using the appliance
■ Switch off the appliance with the rotary
switch.
■ Rotate the blender in a clockwise direc-
tion and remove.
Tip: It is recommended to clean the blender
immediately after use.

20
en Cleaning and servicing
Cleaning and servicing
Attention!
Do not use abrasive cleaning agents.
Surfaces may be damaged.
Cleaning the base unit
W Danger of electric shock!
Never immerse the base unit in water or
place under running water. Do not use a
steam cleaner.
■ Remove mains plug.
■ Wipe the base unit and drive cover with
a damp cloth. If required, use a little
detergent.
■ Then dry the base unit.
Cleaning the bowl and tools
The bowl and tools are dishwasher-proof.
Do not wedge plastic parts in the dish-
washer, as they could be permanently
deformed during the washing process!
Cleaning the continuous-feed
shredder
All parts of the continuous-feed shredder
are dishwasher-proof.
Tip: To remove the red lm after processing
e.g. carrots, pour a little cooking oil on
a cloth and rub the lm off the continu-
ous-feed shredder (not the cutting discs).
Then rinse the continuous-feed shredder.
Cleaning the blender
W Risk of injury from sharp blades!
Do not touch blender blades with bare
hands.
The blender jug, lid and funnel are
dishwasher-proof.
Tip: After processing liquids, it is often suf-
cient to clean the blender without removing
it from the appliance. Pour a little water and
washing-up liquid into the attached blender.
Switch on the blender for several seconds
(setting M). Pour out the water and rinse out
the blender with clear water.
Important information
If required, clean accessories bag. Follow
care instructions in the bag.
Storage
W Risk of injury!
When the appliance is not in use, pull out
the mains plug.
Fig. K:
■ Store tools and cutting discs in the
accessories bag.
■ Keep accessories bag in the bowl.
■ To store in the original packaging, see
Fig. L.
Troubleshooting
W Risk of injury!
Before eliminating a fault, pull out the mains
plug.
Important information
The Operating indicator ashes if the appli-
ance has been operated incorrectly or the
electronic fuse has tripped or the appliance
is defective.
The swivel arm must be engaged in
every operating position.
Initially try to eliminate the problem which
has occurred with the help of the following
information.
Fault
Appliance does not start.
Remedial action
■ Check the power supply.
■ Check the mains plug.
■ Check swivel arm. Correct position?
Engaged?
■ Screw on blender or bowl as far as
possible.
■ Attach the blender cover and screw on as
far as possible.
■ Attach drive cover to unused drives.
■ The safety lock is active. Switch appli-
ance to 0 and then back to the required
setting.
Fault
Appliance switches off during use. The
overload protection feature has been
activated. Too much food was processed at
one time.
ページが読み込まれています...
ページが読み込まれています...
ページが読み込まれています...
ページが読み込まれています...
ページが読み込まれています...
ページが読み込まれています...
ページが読み込まれています...
ページが読み込まれています...
ページが読み込まれています...
ページが読み込まれています...
ページが読み込まれています...
ページが読み込まれています...
ページが読み込まれています...
-
 1
1
-
 2
2
-
 3
3
-
 4
4
-
 5
5
-
 6
6
-
 7
7
-
 8
8
-
 9
9
-
 10
10
-
 11
11
-
 12
12
-
 13
13
-
 14
14
-
 15
15
-
 16
16
-
 17
17
-
 18
18
-
 19
19
-
 20
20
-
 21
21
-
 22
22
-
 23
23
-
 24
24
-
 25
25
-
 26
26
-
 27
27
-
 28
28
-
 29
29
-
 30
30
-
 31
31
-
 32
32
-
 33
33


他の言語で
- English: Bosch MUMVC00VCN User manual