KitchenAid 9KSM95 ユーザーマニュアル

カテゴリー
ミキサー
タイプ
ユーザーマニュアル

KitchenAid 9KSM95は、お菓子作りやパン作りを愛する方にとって、なくてはならない調理家電です。最大2.8リットルのステンレス製ボウルが付属しており、ケーキやパン生地などの大量の材料を一度に混ぜることができます。また、スピードコントロール機能を搭載しており、混ぜる速度を9段階から選べます。さらに、さまざまなアタッチメントが付属しており、ホイップクリームを作ったり、パスタを切ったりすることができます。

KitchenAid 9KSM95は、お菓子作りやパン作りを愛する方にとって、なくてはならない調理家電です。最大2.8リットルのステンレス製ボウルが付属しており、ケーキやパン生地などの大量の材料を一度に混ぜることができます。また、スピードコントロール機能を搭載しており、混ぜる速度を9段階から選べます。さらに、さまざまなアタッチメントが付属しており、ホイップクリームを作ったり、パスタを切ったりすることができます。

9KSM95
Stand Mixer
W11647988B.indb 1W11647988B.indb 1 6/15/2023 12:42:37 PM6/15/2023 12:42:37 PM
3
1
2
4
5
6
7
8
9
10
11
12 13
14 15
1Locking Lever
(not shown)
2Attachment Knob
3Attachment Hub
4Motor Head
5Speed Control Lever
6Beater Height Adjustment Screw
(not shown)
7Bowl Clamping Plate
8Bowl**
9Beater Shaft
10 Pouring Shield*
11 2.8 L Stainless Steel Bowl*
12 Flat Beater
13 Flex Edge Beater*
14 Wire Whip
15 Dough Hook
PARTS AND FEATURES
*Included with select models only. Also available as an optional accessory.
**The Bowl design and material depend on the Stand Mixer model.
W11647988B.indb 2W11647988B.indb 2 6/15/2023 12:42:38 PM6/15/2023 12:42:38 PM
ENGLISH
3
PRODUCT SAFETY
IMPORTANT SAFEGUARDS
When using electrical appliances, basic safety precautions should always
be followed, including the following:
1. Read all instructions. Misuse of appliance may result in personal injury.
2. To protect against risk of electrical shock, do not put Stand Mixer in water or
other liquid.
3. This appliance is not intended for use by persons (including children) with
reduced physical, sensory, or mental capabilities, or lack of experience and
knowledge, unless they are closely supervised and instructed concerning use
of the appliance by a person responsible for their safety. Close supervision is
necessary when any appliance is used by or near children. Children should be
supervised to ensure that they do not play with the appliance.
4. Turn the appliance off (OFF/0), then unplug from the outlet when not in use,
before assembling or disassembling parts, and before cleaning. To unplug, grasp
the plug and pull from the outlet. Never pull from the power cord.
5. Avoid contacting moving parts. Keep hands, hair, and clothing, as well
as spatulas and other utensils, away from beater during operation to reduce
the risk of injury to persons and/or damage to the Stand Mixer.
6. Do not operate any appliance with a damaged cord or plug, or after the
appliance malfunctions, or is dropped or damaged in any manner. Return
appliance to the nearest Authorised Service Facility for examination, repair, or
electrical or mechanical adjustment.
7. The use of accessories/attachments not recommended or sold by KitchenAid
may cause fire, electrical shock, or injury to persons.
8. Do not use the appliance outdoors.
9. Do not let the cord hang over the edge of table or counter.
10. Remove the beaters, Wire Whip, or Dough Hook from the Stand Mixer before
washing.
W11647988B.indb 3W11647988B.indb 3 6/15/2023 12:42:38 PM6/15/2023 12:42:38 PM
4
PRODUCT SAFETY
11. All accessories (beaters, Dough Hook and Whisk) should not be used for longer
than 15 minutes. When mixing extremely heavy loads the appliance should not
be operated for more than 10 minutes.
12. Allow the appliance to cool completely before putting on or taking off parts, and
before cleaning the appliance.
13. This appliance is intended to be used in household and similar applications such
as:
– staff kitchen areas in shops, offices and other working environments;
– farm houses;
– by clients in hotels, motels and other residential type environments;
– bed and breakfast type environments.
SAVE THESE INSTRUCTIONS
Electrical Shock Hazard
Plug into an earthed outlet.
Do not remove earth prong.
Do not use an adapter.
Do not use an extension cord.
Failure to follow these
instructions can result in
death, fire, or electrical shock.
ELECTRICAL REQUIREMENTS
Voltage: 100 V
Frequency: 50-60 Hz
NOTE: The power rating for your Stand
Mixer is printed on the serial plate.
Do not use an extension cord. If the
power supply cord is too short, have
a qualified electrician or service technician
install an outlet near the appliance.
W11647988B.indb 4W11647988B.indb 4 6/15/2023 12:42:38 PM6/15/2023 12:42:38 PM
ENGLISH
5
GETTING STARTED
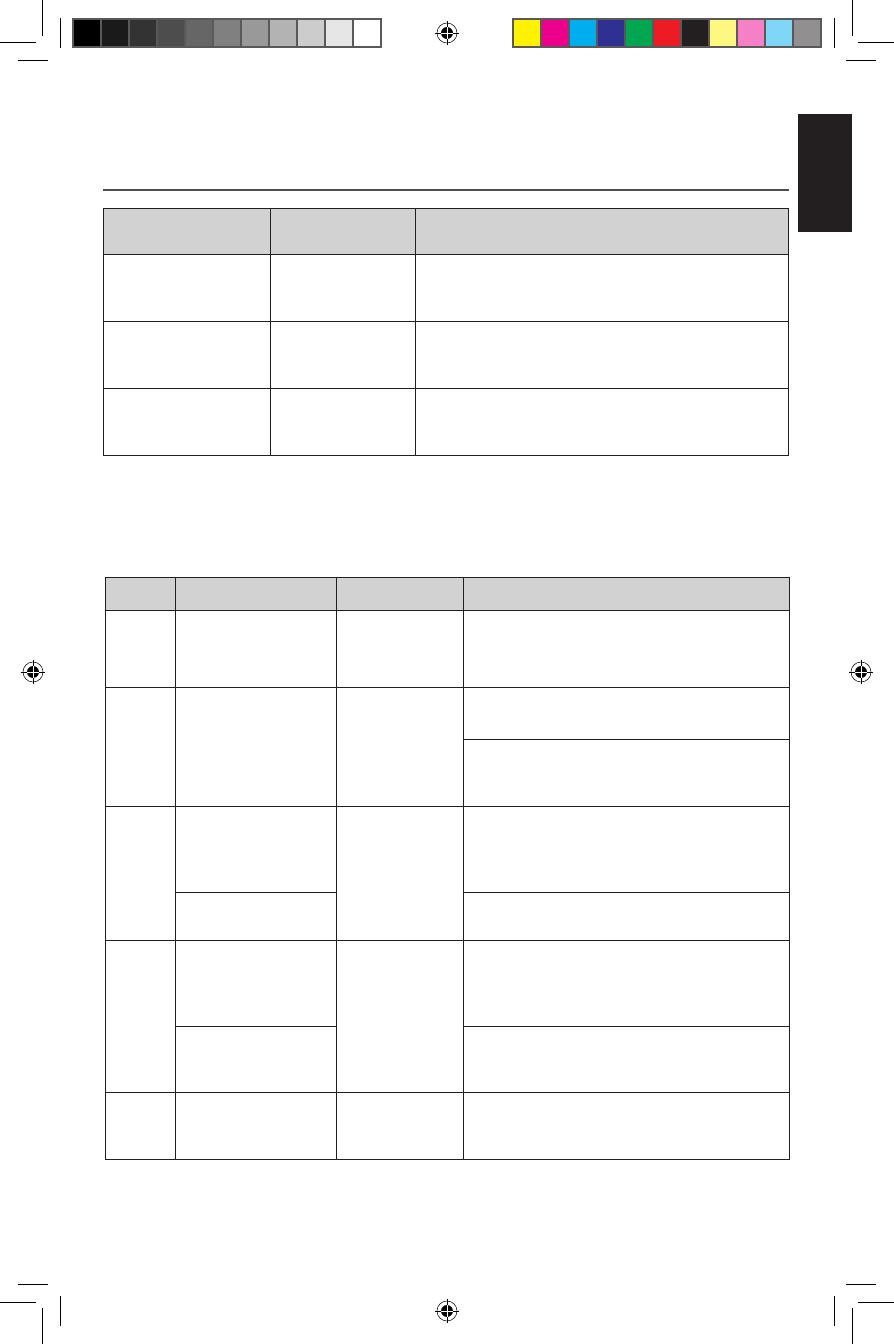
ACCESSORY USE TO MIX SUGGESTED ITEMS
Flat Beater
Flex Edge Beater*
Normal to heavy
mixtures
Cakes, creamed frostings, candies, cookies,
biscuits, pie pastry, meatloaf, mashed
potatoes.
Wire Whip
Mixtures
that need air
incorporated
Eggs, egg whites, heavy cream, boiled
frostings, sponge cakes, mayonnaise, some
candies.
Dough Hook
Mixing and
kneading yeast
doughs
Breads, rolls, pizza dough, buns.
CHOOSING THE RIGHT ACCESSORY
SPEED CONTROL GUIDE
NOTE: The speed control can be set to obtain speeds 1, 3, 5, 7, and 9 if a finer
adjustment is required. Do not exceed Speed 2 when preparing yeast doughs as this
may cause damage to the Stand Mixer.
SPEED ACCESSORY ACTION DESCRIPTION
Stir Flat Beater
Flex Edge Beater* Stir For starting all mixing procedures, slow
stirring, combining, and mashing.
2Flat Beater
Flex Edge Beater* Slow mixing
For slow mixing, mashing, and faster
stirring.
To mix and knead yeast doughs, heavy
batters, and candies; mix thin or splashy
batters.
4
Flat Beater
Flex Edge Beater* Mixing,
Beating
For mixing semi-heavy batters, such
as cookies, or to combine sugar and
shortening. Medium speed for cake
mixes.
Wire Whip For adding sugar to egg whites for
meringues.
6
Flat Beater
Flex Edge Beater* Beating,
Creaming
For medium-fast beating (creaming),
or whipping. Use to nish mixing cake,
doughnut, and other batters. High
speed for cake mixes.
Wire Whip
For medium-fast whipping of
ingredients requiring incorporation of
air, such as egg whites.
8Wire Whip Fast beating,
Whipping
For whipping cream, egg whites,
and boiled frostings.
NOTE: To move the Speed Control Lever with ease, lift slightly up as you move it across
the settings in either direction.
*Included with select models only. Also available as an optional accessory.
W11647988B.indb 5W11647988B.indb 5 6/15/2023 12:42:38 PM6/15/2023 12:42:38 PM
6
PRODUCT ASSEMBLY
Unplug and turn the Stand Mixer off
(OFF/0).
1
Unlock and lift the Motor Head. Then,
lock** the head to keep it lifted.
2
*Included with select models only. Also available as an optional accessory.
**Locking option is available on selected models.
Place the Bowl* on the Clamping Plate
and twist to lock in place.
3
1
2
Slide and rotate the accessory aligning
over the pin on the shaft.
4
W11647988B.indb 6W11647988B.indb 6 6/15/2023 12:42:38 PM6/15/2023 12:42:38 PM
ENGLISH
7
PRODUCT ASSEMBLY
Unlock the Motor Head and move it
down. Then, lock** the head to keep
it down. Before mixing, test lock by
attempting to raise the Motor Head.
5
(OPTIONAL) To adjust Beater to Bowl*
Clearance: Tilt and lock** the Motor
Head back. Turn the screw slightly
counterclockwise (left) to raise the
beater, or clockwise (right) to lower it.
NOTE: If you over-adjust the screw, the
Bowl* lock lever may not lock into place.
(OPTIONAL) Place the Pouring
Shield***: From the front of the Stand
Mixer, place the Pouring Shield** onto
the bowl so that the Motor Head covers
the u-shaped gap in the shield. This
will position the pouring chute just to
the right of the Attachment Hub as you
face the mixer. Press lightly so that the
Easy Snap tabs snap the shield onto the
bowl*.
*The Bowl design and material depend on the Stand Mixer model.
**Locking option is available on selected models.
***Included with select models only. Also available as an optional accessory.
W11647988B.indb 7W11647988B.indb 7 6/15/2023 12:42:39 PM6/15/2023 12:42:39 PM
8
PRODUCT USAGE
Electrical Shock Hazard
Plug into an earthed outlet.
Do not remove earth prong.
Do not use an adapter.
Do not use an extension cord.
Failure to follow these
instructions can result in
death, fire, or electrical shock.
Plug it into an earthed outlet. Start
with lower speed to avoid splashing and
increase it gradually. Refer to the “Speed
Control Guide”section.
1
Do not scrape the Bowl* while operating.
Scraping the Bowl* once or twice during
mixing is usually sufficient.
(OPTIONAL): Pour ingredients into the
Bowl* through the Pouring Chute.
2
*The Bowl design and material depend on the Stand Mixer model.
W11647988B.indb 8W11647988B.indb 8 6/15/2023 12:42:39 PM6/15/2023 12:42:39 PM
ENGLISH
9
PRODUCT DISASSEMBLY
Turn the Stand Mixer off (OFF/0) and
unplug. Unlock and lift the Motor Head.
Then, lock* the head to keep it lifted.
1
(OPTIONAL): Lift the front of the Pouring
Shield**, clear of the rim of the Bowl***.
Pull away from the Stand Mixer.
Press the accessory upward, turn it and
pull it away from the Beater Shaft.
2
Twist to unlock the Bowl*** from the
Clamping Plate.
3
Unplug and turn the Stand Mixer off
(OFF/0).
1
KitchenAid offers a wide range of optional attachments such as the Spiralizer, Pasta
Cutters, or Food Grinder that may be attached to the Stand Mixer Attachment Hub as
shown here.
Remove the Attachment Hub cover.
2
*Locking option is available on selected models.
**Included with select models only. Also available as an optional accessory.
***The Bowl design and material depend on the Stand Mixer model.
OPTIONAL ATTACHMENTS
W11647988B.indb 9W11647988B.indb 9 6/15/2023 12:42:39 PM6/15/2023 12:42:39 PM
10
Insert attachment into Attachment Hub,
making certain that attachment power
shaft ts into the square Attachment
Hub socket.
3
Tighten the Attachment Knob by turning
it clockwise until the attachment is
secured to the Stand Mixer.
4
OPTIONAL ATTACHMENTS
IMPORTANT: Do not immerse the Stand Mixer body in water or other liquids.
IMPORTANT: Allow the appliance to cool completely before putting on or taking off
parts, and before cleaning the appliance.
CARE AND CLEANING
Unplug and turn the Stand Mixer off
(OFF/0).
1
Dishwasher-safe parts, top rack only:
Stainless Steel Bowl, Bowl Lid, Flat Beater,
Dough Hook, Flex Edge Beater*, and
Pouring Shield*.
2
Wipe the Stand Mixer body with a soft,
damp cloth.
3
Clean the Wire Whip thoroughly with
hand wash only.
4
*Included with select models only. Also available as an optional accessory.
W11647988B.indb 10W11647988B.indb 10 6/15/2023 12:42:40 PM6/15/2023 12:42:40 PM
ENGLISH
11
TROUBLESHOOTING
WARNING
Electrical Shock Hazard
Plug into an earthed outlet.
Do not remove an earth prong.
Do not use an adapter.
Do not use an extension cord.
Failure to follow these instructions can result in death, re,
or electrical shock.
PROBLEM SOLUTION
If Stand Mixer warms up
during use
Under heavy loads with extended mixing time periods,
you may not be able to comfortably touch the top of the
unit. This is normal.
If the Flat Beater hits the
Bowl
Stop the Stand Mixer. See the “Product Assembly”
section and adjust the Beater to Bowl Clearance.
The Speed Control Lever
does not move smoothly or
easily
To move the Speed Control Lever with ease, lift slightly
up as you move it across the settings in either direction.
If your Stand Mixer should
fail to operate, please check
the following
Is the Stand Mixer plugged in?
Is the fuse in the circuit to the Stand Mixer in working
order? If you have a Circuit Breaker Box, be sure the
circuit is closed.
Turn off the Stand Mixer for 10-15 seconds, then turn it
back on. If the Stand Mixer still does not start, allow it to
cool for 30 minutes before turning it back on.
NOTE: If the problem cannot be corrected, see the “Warranty and Service” section.
Do not return the Stand Mixer to the retailer; retailers do not provide service.
©2023 All rights reserved.
KITCHENAID and the design of the stand mixer are trademarks in the U.S. and elsewhere.
W11647988B.indb 11W11647988B.indb 11 6/15/2023 12:42:40 PM6/15/2023 12:42:40 PM
3
1
2
4
5
6
7
8
9
10
11
12 13
14 15
1ックレ バ ー
(非表示)
2アタッチメンノブ
3アタッチメン
4ーターヘッ
5スピードコローレバ
6ビーター高さ調節ネジ
(非表示)
7ル固定レー
8ボウル**
9ーターシ
10 注入用カバー*
11 2.8 Lステンレスボウル*
12 ーター
13 レッーター*
14 ヤ ー ホ イップ
15 ド ーック
ーツお
*選択モデルのみに同梱ンのセサ使用可能
**ルのデザンおよび材料はキサーのモデルにます
W11647988B.indb 12W11647988B.indb 12 6/15/2023 12:42:40 PM6/15/2023 12:42:40 PM
13
日本
製品の安全性
重要な予防措置
電化製品使用す際は以下含め基本的な安全手順を厳守い。
1. 指示事項にださ電化製品の誤用でガをるおそれがます
2. 感電かを守には、キサーを水なの液体に入れないださい。
3. 本製品は、身体活動の低下、感覚の低下、知的能力の低下、体験や知識の欠如のあ
(子ども) 向けではないため安全のため近で見張製品の使い方を教
れた人が必要ですが使用いたにいる場合は見張
の人が必要ですが製品で遊ばない見張い。
4. 部品の組立や分解を場合洗浄す場合、製品のスイチを (OFF/0) にして、
ンセントかコードをいてださい。コードをプラグを掴んでコンセン
ら外ださい。にコードを引っ張らないでださい。
5. いているパーツしないよださい。ケガをけ、サー
ないにするため、製品を使用中はビーか手、髪の毛、衣類、
た調理器具を離い。
6. 損傷ドやプラグの製品を使用せず製品が誤動作
た時も使用ないださい。最寄の正規修理店に製品を戻点検、
理、電気系や機械系の調整を依頼ださい。
7. キで推奨または販売わけではないセサーやア
を使用す火災、感電、ガなの原因それが
8. 屋外で製品を使わないださ
9. テールやカウーにコードを垂さないでださい。
10. 洗う前ワイプ、ーフックをスタンドミキから外して
さい。
11. (ビーー、泡立て器)れも15以上にわた使わない
ださ大量の食材をキシグす際、10分を超えて製品を使わないでださい
W11647988B.indb 13W11647988B.indb 13 6/15/2023 12:42:40 PM6/15/2023 12:42:40 PM
14
製品の安全性
12. パーツを付けたした際や、製品を洗浄す際は、完全に製品が冷
にしてく
13. 本製品は、以下の製品のに家庭で使用すです
- 店、ス、その他仕事場のキ
- 農家
- ホテル、ル、その他施設の宿泊客
- ドや朝食の場
上の指示事項保存
電気関連の要求事項
電圧: 100V
周波数: 50-60Hz
備考: キサーの電力定格は、シー
載されています
長コードを使いでさい。源コ
ドが短する場合正規電気工事士か修理
業者に、製品の近にコンセを取付け
もらってく
W11647988B.indb 14W11647988B.indb 14 6/15/2023 12:42:40 PM6/15/2023 12:42:40 PM
15
日本
使用開始
クセサリー ぜる推奨品目
ーター
ックス エ ビ ー
ター*
通常~大量混合
リーティングキャンィ、ッキ
パ イ ペ イストリー 、ートロ ー フシュ
ポ テト
ヤーホイ気を入る混生クリーム熱したフロステスポ
キャンィ類
ド ーック
生地の混
せと練り合
わせ
パンロール、ピザ生地丸いパン
正しクセサリー
スピガイ
備考: 微調整が必要な時は、スピ13579でスピードコロールを設定できますイー
生地を調理する時キサーが壊れるので、スピ2以上しなさい
ード アクセサリ作業 解説
かき混
ぜる
ーター
ックス エ
ビーター*
き混ぜる
混ぜ合わせ作業、かき混ぜ、
および押しぶしなどすべてのス
ート
2
ーター
ックス エ
ビーター*
ゆ っ くり と か
混ぜ合わせ、つぶ
び迅速なかき混ぜ
イースト生ター、およびキャ
ディ
バッターまたはスプラュバッター。
4
ーター
ックス エ
ビーター*ぜる、ぜる
キーった半厚バターたは
糖とショーングキミ
スの間スピド。
ヤ ー ホ イップ ゲ用の卵白身に砂糖追加
6
ーター
ックス エ
ビーター* き混ぜる、
てる
中速で泡立てなが混ぜ (
リーミン)また立てケーキ、
地、その他仕上げ混ぜ合わせた衣を
たりする使用します。キミ
けの高スピド。
ヤ ー ホ イップ 卵白身空気混合が必要な中身の中
高スピード泡立て
8ヤ ー ホ イップ 高速スピードでかき
混ぜなが泡立て
ーム、身、およびしたフロス
グの泡立て
備考: 簡単にスピーールレバーを動かすにはいずれかの設定方向に動かす時に心
持ち持ちげま
*選択モデルのみに同梱ンのセサ使用可能
W11647988B.indb 15W11647988B.indb 15 6/15/2023 12:42:40 PM6/15/2023 12:42:40 PM
16
製品の組
グを抜きキサーをオ
(OFF/0) にしす。
1
モーターヘドをロ解除て持ち上
ますらヘドをロ**上げた
状態を維ます
2
*選択モデルのみに同梱ンのセサ使用可能
**したモデルでロオプシンが用できます
ボウル*プレトにセッし、捻っ
任意の位置に固定
3
1
2
のピンに合わせ、セサーを回
しながらスライドさます。
4
W11647988B.indb 16W11647988B.indb 16 6/15/2023 12:42:41 PM6/15/2023 12:42:41 PM
17
日本
製品の組
ヘッロッ除して、
ますらヘドをロ**、下
げた状態を維持混ぜ前にモー
ドを持ち上げてみて固されている
か確認
5
(ン) ル*の隙間に
せます: **、上げた状態
を維持ます反時計方向(左側)に若干ネ
を回ーを上げるか時計方向(
右側)に回下げま備考:を過剰
に調整すボウル*レバーが任
意の所で固定でせん。
(プ ショ) 注入用バー***セッしま
す。タンドミにして、*
に流し込みシールド***をセトす
ーターヘッU字 形 ギャップ
を覆いますキサーの正面か
ると、流しュートがアタッチメン
ブのち右側にきます押す
ージスナプタボウル*
ッとまりま
*ルのデザンおよび材料はキサーのモデルにます
**したモデルでロオプシンが用できます
****選択モデルのみに同梱ンのセサ使用可能
W11647988B.indb 17W11647988B.indb 17 6/15/2023 12:42:41 PM6/15/2023 12:42:41 PM
18
製品の使い方
アー付きコンセンし込みます
飛散を防ぐため低スピードから始め、徐々
に上げていきますスピードコロー
ガイド」セクンを参ださい。
1
使用中はボ*こすらなでく
混ぜ合わせ時のボ*は、普通は
一回たは二回で十分です
(プ ショ): 入用カバーか中身を
*れます
2
*ルのデザンおよび材料はキサーのモデルにます
警告
傷害につながる危険
ミキサーのコードを抜いてからビー
ターに触るようにしてください。
これを怠ると骨折や切り傷、打撲傷
につながる恐れがあります。
W11647988B.indb 18W11647988B.indb 18 6/15/2023 12:42:41 PM6/15/2023 12:42:41 PM
19
日本
製品の分
スタンドミキ (OFF/0) にして
グを抜きますモーターヘドをロ
て持ち上げますそれからドをロ
クし **上げた状態を維持ます
1
(プ ショ): し込みシール**,面を持
ち上げ、ボウル***外周を空ます
ミキ引っ張り外しす。
セサを上方向にて回次に
ーターシトから外します
2
ボウル***プレトから捻ロッ
除しす。
3
グを抜きキサーをオ
(OFF/0) にしす。
1
キッチンすようにスタンドミキーアタッチメン取り付ける
ララタカッードグインダーといっオプッチ
ています
アタッチメン外します。
2
*したモデルでロオプシンが用できます
**選択モデルのみに同梱ンのセサ使用可能
***ルのデザンおよび材料はキサーのモデルにます
オプアタッチメン
W11647988B.indb 19W11647988B.indb 19 6/15/2023 12:42:41 PM6/15/2023 12:42:41 PM
20
アタッチメンシャ
したアッチトハブソトに入る
アタッチメントをアタッチメン
入しす。
3
がスキサーに固定
で、ブを時計方向
に回て締め付け
4
オプアタッチメン
重要キサー本体を水なの液体に入れないい。
重要パーツを取付け際や、製品を洗浄する際は製品が十分に冷てか
ださい。
しながらニンます
グを抜きキサーをオ
(OFF/0) にしす。
1
食器洗浄機の安全パ頂部棚のみ:
ス鋼製ボル、平面ビ
ーター、ドーフレッスエッータ
*び注入用カバ**.
2
かくスタンドミキ
本体を拭き取ます
3
ーホイプは手洗いでのみ洗浄
ださい。
4
*選択モデルのみに同梱ンのセサ使用可能
W11647988B.indb 20W11647988B.indb 20 6/15/2023 12:42:42 PM6/15/2023 12:42:42 PM
  • Page 1 1
  • Page 2 2
  • Page 3 3
  • Page 4 4
  • Page 5 5
  • Page 6 6
  • Page 7 7
  • Page 8 8
  • Page 9 9
  • Page 10 10
  • Page 11 11
  • Page 12 12
  • Page 13 13
  • Page 14 14
  • Page 15 15
  • Page 16 16
  • Page 17 17
  • Page 18 18
  • Page 19 19
  • Page 20 20
  • Page 21 21
  • Page 22 22
  • Page 23 23
  • Page 24 24

KitchenAid 9KSM95 ユーザーマニュアル

カテゴリー
ミキサー
タイプ
ユーザーマニュアル

KitchenAid 9KSM95は、お菓子作りやパン作りを愛する方にとって、なくてはならない調理家電です。最大2.8リットルのステンレス製ボウルが付属しており、ケーキやパン生地などの大量の材料を一度に混ぜることができます。また、スピードコントロール機能を搭載しており、混ぜる速度を9段階から選べます。さらに、さまざまなアタッチメントが付属しており、ホイップクリームを作ったり、パスタを切ったりすることができます。

他の言語で