
Yealink Network Technology CO., LTD
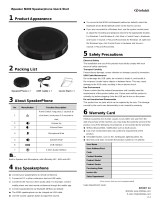
V32.35
English | 简体中文
Yealink CP960-UVC Zoom Rooms Kit Quick Start Guide
V30.20
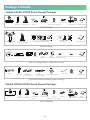
Yealink CP960-UVC Zoom Rooms Kit

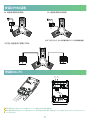
Mini-PC Package (Mini-PC and Mini-PC Box)
1
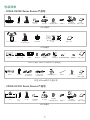
Package Contents
UVC80
2.5m
USB Cable
Power Adapter
48V/0.7A
Mounting Bracket
and Accessories
UVC80
Quick Start Guide
Cable Tie×5
VESA Accessory
(1/4”-20 UNC screw)
(T4×30 screw)
(M3×8 screw)
7.5m
Ethernet Cable
Velcro×2
UVC80 Package
Mini-PC Upper Cover
1.8M
HDMI Cable×2
Velcro×2
Machine Screw×6
Bracket
Expansion screws and
Self-tapping screws
2
2
(One Velcro is on the bracket)
Mini-PC
Yealink CP960-UVC80 Zoom Rooms Package
PoE Adapter
CP960 Zoom Rooms
Edition
Ethernet Cable
(7.5m CAT5E UTP cable)
Quick Start Guide
CP Wireless Expansion Mic CPW90
Charging Cradle
0.3m
Micro USB Cable
Quick Start Guide
Wireless Expansion Mic
Power Cord
Ethernet Cable
(2m CAT5E FTP cable)
PSE
X 2
CP960 Package
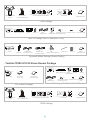
Yealink CP960-UVC50 Zoom Rooms Package
UVC50
2.5m
USB Cable
Power Adapter
48V/0.7A
VESA Accessory
Mounting Bracket
and Accessories
UVC50
Quick Start Guide
Cable Tie×5
(1/4”-20 UNC screw)
(T4×30 screw)
(M3×8 screw)
7.5m
Ethernet Cable
Velcro×2
UVC50 Package
(One Velcro is on the bracket)
Quick Start Guide
MShare
3M
Cable Tie Mounting Base×2
Cable Ties×2
×4
1.2m
HDMI Cable
1.2m
Mini-DP Cable
7m
USB Cable
(for content sharing)
(for content sharing)
Velcro×2
MShare
Quick Start Guide
(Optional) MShare Package (Screen Sharing)
USB to
HDMI Adapter

2
CP960 Package
UVC30 Room
Quick Start Guide
UVC30 Room Package
Yealink CP960-UVC30 Zoom Rooms Package
CP960 Package
Camera Lens
Privacy Cover
UVC30 Room
3m
Mini-PC Package (Mini-PC and Mini-PC Box)
Mini-PC Upper Cover
Bracket
1.8M
HDMI Cable×2
Velcro×2
Machine Screw×6
Expansion screws and
Self-tapping screws
2
2
Mini-PC
Quick Start
Guide
MShare
3M
Cable Tie Mounting Base×2
Cable Ties×2
×4
1.2m
HDMI Cable
1.2m
Mini-DP Cable
7m
USB Cable
(for content sharing)
(for content sharing)
Velcro×2
MShare
Quick Start Guide
(Optional) MShare Package (Screen Sharing)
PoE Adapter
CP960 Zoom Rooms
Edition
Ethernet Cable
(7.5m CAT5E UTP cable)
Quick Start Guide
CP Wireless Expansion Mic CPW90
Charging Cradle
0.3m
Micro USB Cable
Quick Start Guide
Wireless Expansion Mic
Power Cord
Ethernet Cable
(2m CAT5E FTP cable)
PSE
X 2
PoE Adapter
CP960 Zoom Rooms
Edition
Ethernet Cable
(7.5m CAT5E UTP cable)
Quick Start Guide
CP Wireless Expansion Mic CPW90
Charging Cradle
0.3m
Micro USB Cable
Quick Start Guide
Wireless Expansion Mic
Power Cord
Ethernet Cable
(2m CAT5E FTP cable)
PSE
X 2
Mini-PC Package (Mini-PC and Mini-PC Box)
Mini-PC Upper Cover
1.8M
HDMI Cable×2
Velcro×2
Machine Screw×6
Bracket
Expansion screws and
Self-tapping screws
2
2
Mini-PC
Quick Start Guide
USB to
HDMI Adapter
USB to
HDMI Adapter

3
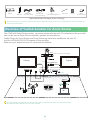
We recommend that you use the accessories provided or approved by Yealink. The use of unapproved third-party accessories may
result in poor performance.
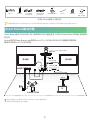
Overview of Yealink Solution for Zoom Rooms
The CP960 with Zoom Rooms version, can communicate with the mini-PC connected to the same LAN
and can be used as Zoom Rooms controller, speaker and microphone.
Yealink Plugin for Zoom Rooms and Zoom Rooms app have been installed on the mini-PC.
And the UVC80/UVC50/UVC30 camera is Plug-and-play.
Make sure your phone and mini-PC can access the Internet.
The CP960 should be powered by PoE adapter (54V/0.56A) or PoE switch. All devices are powered separately.
The cable should be replaced at once if its skin is broken.
MShare
3M
Cable Tie Mounting Base×2
Cable Ties×2
×4
1.2m
HDMI Cable
1.2m
Mini-DP Cable
7m
USB Cable
(for content sharing)
(for content sharing)
Velcro×2
MShare
Quick Start Guide
(Optional) MShare Package (Screen Sharing)
UVC80
CPW90
MShare
The Back of Mini-PC
The Front of Mini-PC
DisplayDisplay
USB2.0
USB2.0
Type-B
HDMI
HDMI
Ethernet Cable
Yealink CP960
PoE
Local Area Network
...
USB Type-C
HDMI
USB
USB to HDMI Adapter
(UVC80 can be replaced by UVC50/UVC30)
(Optional)
(Optional)

4
2(Optional).Connect the wireless microphone.
1
2
0.3m
Micro USB Cable
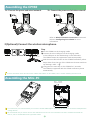
Assembling the Mini-PC
Internet
Display/Projector
Display/Projector
UVC80/UVC50
We recommend that you use the mini-PC with Yealink mini-PC box. For more information on how to assemble and install the
mini-PC, refer to Yealink Mini-PC Box Quick Start Guide.
For convenience, we recommend that you connect a wireless USB dongle to the back of the mini-PC to use mouse and keyboard to
manage devices.
Mouse
(Optional)
Keyboard
(Optional)
Assembling the CP960
1a. Connect the power and wired network.
7.5m
2m
1b. Connect the power and wireless network.
7.5m
Refer to Wireless Network Connection mentioned
below in Configuring Your CP960 for more
information.
1
2
Step
3
Put the CPW90 on the charging cradle.
Connect the micro USB port on the charging cradle
to the USB port on the CP960 using a 0.3m USB cable.
The CPW90 enters the registration mode automatically.
And the mute LED indicator on the CPW90 fast flashes yellow.
Swipe down from the top of the CP960 touch screen and then
tap Settings->MIC-> .
Long press the mute key on the CPW90 for 5 seconds.
The CPW90 is registered with the CP960 conference phone
automatically.
4
For more information about the instructions of Mute LED indicator on the CPW90, refer to Yealink CPW90 Quick Start Guide.

5
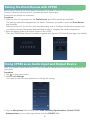
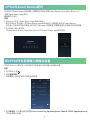
Pairing the Zoom Rooms with CP960
Before using CP960 as the Zoom Rooms controller, you need to pair the CP960 (preload the Zoom
Rooms Controller) with the mini-PC (preload the Zoom Rooms app).
Ensure that the plugin is in operation.
Procedure
1. After the mini-PC is powered on, the Zoom Rooms app will be started automatically.
The pairing code will be displayed on the screen. Otherwise, you need to open the Zoom Rooms
app manually.
Starting the mini-PC for the first time may take a long time to configure the Windows system, and
you need to connect the wireless keyboard and mouse to complete the initial configuration.
2. Enter the pairing code on the touch screen of the CP960.
Then the CP960 (Zoom Rooms Controller) is paired with the mini-PC (Zoom Rooms app) successfully.
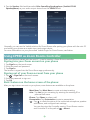
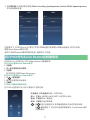
Using CP960 as an Audio Input and Output Device
1. Tap on the touch screen.
2. Disable Lock Settings.
You need to enter the room password to change the setting.
3. Tap the Microphone field and then select Echo Cancelling Speakerphone (Yealink CP960
Speakerphone) as your audio input device from the SOURCE field.
After your phone is paired with mini-PC, it can be used as a default audio input and output device for
the system.
Procedure

6
Generally, you can use the Yealink solution for Zoom Rooms after pairing your phone with the mini-PC
and setting your phone as an audio input and output device.
For more information on your phone and Yealink Plugin for Zoom Rooms, read below.
4. Tap the Speaker field and then select Echo Cancelling Speakerphone (Yealink CP960
Speakerphone) as your audio output device from the SOURCE field.
Using CP960 as Zoom Rooms Controller
After your phone is paired with the mini-PC, it can be used as a Zoom Rooms controller.
Signing into your Zoom account on your phone
1. Tap Sign In on the touch screen.
2. Enter the email and password.
3. Tap Sign In.
The account is signed into the Zoom Room app synchronously.
Signing out of your Zoom account from your phone
1. Tap ->Sign Out on the touch screen.
2. Enter the password to sign out.
3. Tap OK.
Basic features on the home screen of the phone:
After you sign into an account on your phone, more features are available on the phone.
-Meet Now: Tap
Meet Now to create an instant meeting.
-Join: Tap
Join
t
o join a meeting by entering the meeting ID or
personal link name.
-Phone: Tap
Phone
to place a call.
-Presentation: Tap
Presentation
to start a presentation.
-
: Tap
to check the status of the connected microphone, speaker
and camera, and configure basic settings.
You can also view the Controller version, Zoom Rooms version
and Controller IP at the path of ->About.

7
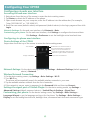
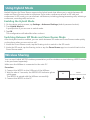
Configuring Your CP960
Configuring via web user interface
Accessing the web user interface:
1. Swipe down from the top of the screen to enter the device setting screen.
2. Tap Status to obtain the IP address of the phone.
3. Open a web browser on your computer, enter the IP address into the address bar (For example.,
"http://192.168.0.10" or “192.168.0.10”).
4. Enter the user name (default: admin) and password (default: admin) in the login page and then click
Login.
Network Settings: On the web user interface, click
Network->Basic.
Customizing your phone: On the web user interface, click Settings to configure the time and date.
Click Settings->Preference to set the backlight active level and time.
Network Setings: On the device setting screen, tap Settings->Advanced Settings (default password:
admin)->Network.
Wireless Network Connection:
1. On the device setting screen, tap Settings->Baisc Settings->Wi-Fi.
2. Turn Wi-Fi on.
The phone will automatically search for available wireless networks in your area.
3. Tap an available wireless network from the list of networks.
4. If the network is secure, enter its password in the
Password field and then tap Connect.
Settings the signal port of Yealink Plugin: On the device setting screen, tap Settings->
Advanced Settings (default password: admin)->Yealink Plug-in Settings->Signal Port.
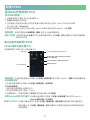
Swipe down from the top of the screen to enter the device settingscreen.
Wireless Mic icon and the number of
the connected wireless microphones
Tap to clear all notifications
Time and Date
Display notifications
Tap the icon to turn the function on
or enter the corresponding function screen
Swipe left or right to delete a notification
Device Settings of the CP960:
Customizing your phone:
On the device setting screen, tap Settings->Baisc Settings->
Language & Input to set the language and input for the phone. Tap Settings->Baisc Settings->
Display to set the backlight active level, backlight time, screensaver wait time and screensaver type.
Configuring via phone user interface

8
Using Hybrid Mode
1. On the device setting screen, tap Settings->Advanced Settings (default password: admin).
2. Turn
Hybrid Mode
on.
It prompts that if you are sure to switch mode.
3. Tap
OK.
This configuration will take effect after a reboot.
Yealink Solution for Zoom Rooms supports the hybrid mode that allows you to switch between SIP
mode and Zoom Rooms mode to experience Zoom video conferences as well as SIP calls and
conferences. In SIP mode, you can use basic call features, including placing/answering calls, initiating a
conference, recording calls, and so on.
Enabling the Hybrid Mode
Switching Between SIP Mode and Zoom Rooms Mode
After the hybrid mode is enabled, you can switch between SIP mode and Zoom Rooms mode quickly
on the phone when you are not in a call.
1. Under the Zoom Rooms mode, tap the floating circle to switch to the SIP mode.
2. Under the SIP mode, tap the floating circle or tap the Zoom Rooms app icon to switch back to the
Zoom Rooms mode.
Wireless Sharing
WPP20
Wireless Presentation Pod
PC
You can use Yealink WPP20 wireless presentation pod for wireless content sharing. WPP20 needs
to be purchased separately.
Make sure the MShare is connected to the mini-PC.
Procedure
1. Connect the WPP20 to the USB port of the MShare.
2. Wait for about 3 seconds, the WPP20 LED indicator glows
solid green.
The WPP20 is paired with the MShare successfully.
3. Connect the WPP20 to the PC.

9
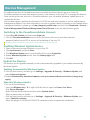
Devices Management
ZoomRooms account is the default account from which the Zoom Rooms app runs. Only the
ZoomRoomsAdmin account has access to return to the desktop of the mini-PC to manage the devices.
After switching the user account to ZoomRoomsAdmin, you can enable Windows Update service to
update the devices.
And we also support updating the firmware for CP960 via web user interface or on the Yealink device
management platform. For more information on how to update a batch of phones on the Yealink device
management platform, please go to http://support.yealink.com, and then click Download->Service->
Device Management Platform/Management Cloud Service to see the administrator guide.
Switching to the ZoomRoomsAdmin Account
1. Press Ctrl+Alt+Delete and then select Sign out.
2. Click the ZoomRoomsAdmin account from the bottom-left corner and then enter the
pasword (default: zoom123) to return to the desktop of the mini-PC.
The default password required to switch back to the ZoomRooms account is zoom123.
Enabling Windows Update Service
1. Open a command prompt Windows on your mini-PC.
2. Type services.msc, and press Enter.
3. Find Windows Update service, and double-click to open Properties.
4. Enable Windows Update service from the Startup tpye field.
5. Click OK.
Update the Devices
The devices can be upgrade manually or can be automatically upgraded if you enable automatically
Windows Update.
Enabling Automatically Windows Update
1. Click the Start button, and then go to Settings->Upgrade & Security->Windows Update, and
select Advanced options.
2. Enable Automatically download updates, even over metered data connections (charge may
apply).
Manually Windows Update
1. Do one of the following:
Press the Windows key + X or right-click the Start to open the Power User Menu.
Click Device Manager.
Right click the desired device and then select Update driver.
Select a desired way to update.
Click the Start button, and then go to Settings->Upgrade & Security->Windows Update, and
select Check for updates.
Select the plugin or UVC80/UVC50/UVC30 camera and then complete the installation.

包装清单
CP960-UVC80 Zoom Rooms 产品包
10
Mini-PC套件 (Mini-PC 和Mini-PC锁线盒)
(1/4”-20 UNC screw)
(T4×30 screw)
(M3×8 screw)
UVC80套件
2.5m
USB 线
电源适配器
48V/0.7A
VESA 配件UVC80
7.5m 网线
UVC80
快速入门指南
(一套已贴在支架上)
魔术贴x2
束线带x 5
支架配件
(用于安装主机)
2
2
Mini-PC 上盖
挂架板
1.8M
HDMI 线×2
机械螺丝×6
膨胀螺丝和自攻螺丝
魔术贴x2
Mini-PC
PSE
X 2
CP960套件
Zoom Rooms特制CP960
7.5米
UTP超五类以太网线
快速入门指南
CP有线扩展麦
2米
FTP超五类以太网线
电源线
PoE电源
快速入门指南
CP960-UVC50 Zoom Rooms 产品包
(1/4”-20 UNC screw)
(T4×30 screw)
(M3×8 screw)
UVC50套件
2.5m
USB 线
电源适配器
48V/0.7A
VESA 配件UVC50
7.5m 网线
UVC50
快速入门指南
(一套已贴在支架上)
魔术贴x2
束线带x 5
支架配件
(用于安装主机)
×4
(可选)MShare套件 (内容分享)
MShare
1.2米 HDMI线
1.2米 Mini-DP线
7米USB线
(用于内容分享) (用于内容分享)
3M背胶固定座×2
扎带×2
魔术贴×2
MShare
快速入门指南
USB转
HDMI适配器

11
PSE
X 2
CP960套件
Zoom Rooms特制CP960
7.5米
UTP超五类以太网线
快速入门指南
CP有线扩展麦
(可选)
2米
FTP超五类以太网线
电源线
PoE电源
Mini-PC套件 (Mini-PC 和Mini-PC锁线盒)
2
2
Mini-PC 上盖
挂架板
1.8M
HDMI 线×2
机械螺丝×6
膨胀螺丝和自攻螺丝
魔术贴x2
Mini-PC
CP960-UVC30 Zoom Rooms 产品包
UVC30 Room套件
镜头盖
UVC30 Room
3m
UVC30
快速入门指南
快速入门指南
PSE
X 2
CP960套件
Zoom Rooms特制CP960
7.5米
UTP超五类以太网线
快速入门指南
CP有线扩展麦
(可选)
2米
FTP超五类以太网线
电源线
PoE电源
×4
(可选)MShare套件 (内容分享)
MShare
1.2米 HDMI线
1.2米 Mini-DP线
7米USB线
(用于内容分享) (用于内容分享)
3M背胶固定座×2
扎带×2
魔术贴×2
MShare
快速入门指南
USB转
HDMI适配器
Mini-PC套件 (Mini-PC 和Mini-PC锁线盒)
2
2
Mini-PC 上盖
挂架板
1.8M
HDMI 线×2
机械螺丝×6
膨胀螺丝和自攻螺丝
魔术贴x2
Mini-PC
快速入门指南
USB转
HDMI适配器

12
局域网
显示器1
(UVC80 可由UVC50代替)
Zoom Rooms解决方案
Zoom Rooms版本CP960与接入同一局域网的PC进行通信连接,并可作为Zoom Rooms控制器,扬声器和
麦克风。
Yealink插件和Zoom Rooms app预装在mini-PC上。UVC80/UVC50/UVC30摄像机即插即用。
确保CP960和mini-PC可访问外网。
显示器2
我们要求使用Yealink原装PoE电源( 54V/0.56A),所有设备单独供电。
如果电源线或网线破皮,请立即更换。
USB转HDMI适配器
我们推荐使用由Yealink提供或经Yealink认可的配件和线缆,使用未经认可的第三方配件和线缆可能会导致性能的下降。
×4
(可选)MShare套件 (内容分享)
MShare
1.2米 HDMI线
1.2米 Mini-DP线
7米USB线
(用于内容分享) (用于内容分享)
3M背胶固定座×2
扎带×2
魔术贴×2
MShare
快速入门指南
UVC80
MShare
USB2.0
USB2.0
Type-B
HDMI
HDMI
Yealink CP960
PoE
...
USB Type-C
HDMI
USB
Mini-PC
背面
Mini-PC正面
1.2米
Mini-DP线
或
1.2米
HMDI线
网线
(可选)

13
安装CP960话机
1a. 连接电源和有线网线。
2(可选).连接有线扩展麦CPE90。
想要了解更多信息,请参考配置话机章节中的无线网络连接。
7.5米
2米
1b. 连接电源和无线网线:
7.5米
Wi-Fi
安装Mini-PC
我们推荐你使用亿联提供mini-PC盒安装mini-PC。有关如何组装和的更多信息安装mini-PC,请参阅 Yealink Mini-PC Box Quick Start
Guide(EN&CN)。
我们推荐你将无线USB dongle连接到mini-PC,以便使用无线鼠标和键盘操作。
显示设备
UVC80/50
显示设备
鼠标
(可选)
键盘
(可选)

14
9
CP960与Zoom Rooms配对
CP960作为Zoom Rooms控制器前,你需要将CP960(预装Zoom Rooms Controller)和 mini-PC
(预装Zoom Rooms app)配对。
确保插件在运行。
过程
1. 启动mini-PC后, Zoom Rooms app会自动启动。
配对码显示在显示器上。若Zoom Rooms app未自动运行,你需要手动开启 Zoom Rooms。
主机第一次启动可能会花费较长时间进行Windows系统配置,你需要连接无线键鼠完成初始配置。
2. 在CP960上输入配对码。
CP960(Zoom Rooms Controller)与mini-PC(Zoom Rooms app)配对成功。
1. 在CP960上,按 。
2. 关闭锁定设置。
你需要输入会议室密码才能更改该配置。
将CP960作为音频输入和输出设备
CP960与mini-PC配对后,CP960将作为系统默认的音频输入和输出设备。
过程
3. 选择麦克风,在设备列表区域选择Echo Cancelling Speakerphone (Yealink CP960 Speakerphone)
作为音频输入设备。

正常情况下,CP960与mini-PC配对,并将CP960设置为音频输入和输出设备后,你可以开始
使用Zoom Rooms解决方案。
有关CP960和Yealink插件的更多信息,请阅读以下内容。
4. 选择扬声器,在设备列表区域选择Echo Cancelling Speakerphone (Yealink CP960 Speakerphone)
作为音频输出设备。
1
将CP960作为Zoom Rooms控制器使用
CP960与mini-PC配对后,可作为Zoom Rooms控制器使用。
在CP960上登录Zoom Rooms账号
1. 按登录。
2. 输入电子邮件地址和密码。
3. 按登录。
账号同时自动登录Zoom Room app。
在CP960上登出Zoom Rooms账号
1. 按 ->退出登录。
2. 输入会议室密码退出登录。
3. 按确定。
CP960上可操作的基本功能:
在CP960上登录帐户后,你可以使用以下基本功能:
-开始会议:按开始会议创建一个即时会议。
-加入: 按加入,通过输入会议ID或个人标签加入会议。
-电话: 按电话呼出一路通话。
-演示: 按演示开始共享屏幕。
- :
按 检查已连接麦克风,扬声器和摄像头的状态并基本设置。
在 ->关于路径下,你还可以查看控制器版本, ZoomRooms版本
和控制器IP。
15

配置CP960
通过Web界面配置CP960
访问Web界面
1. 从屏幕顶部向下滑动,进入设备设置中心。
2. 按状态查看话机的IP地址。
3. 打开电脑上的网页浏览器,在地址栏里输入话机的IP地址( 例如: http://192.168.0.10或
192.168.0.10), 按Enter键。
4. 在登录界面的输入用户名(默认密码:admin)和密码(默认密码:admin), 点击登录。
自定义话机:在网页界面点击设置,你可以设置日期和时间;点 击 设置->优先设置背光灯激活亮度等级
和背光灯时间。
网络配置: 在网页界面点击网络配置->基础,你可以为话机配置网络。
从屏幕顶部向下滑动,进入设备设置中心。
显示无线麦图标和连接的无线麦个数
删除所有通知消息
时间和日期
显示所有通知消息
按相应的图标,快速开启或关闭对应的功能或
进入功能设置界面
向左或向右滑动某一通知消息删除该消息
CP960话机设备设置中心
网络配置: 在话机设备设置中心界面,点击设置->高级设置(默认密码:admin)->网络为话机配置网络。
无线网络连接:
1. 在话机设备设置中心界面,点击设置->基础设置->无线网络。
2.开启无线网络。
话机将自动搜索附近可用的Wi-Fi。
3.从可用的网络列表中,选择一个Wi-Fi。
4. 如果要连接一个加密的网络,在密码区域中输入密码,再按连接。
设置Yealink插件信令端口:在话机设备设置中心界面,按设置->高级设置(默认密码:admin)->
Yealink插件设置->信令端口。
自定义CP960: 在话机设备设置中心界面,按设置->基础设置->语言和输入法设置CP960话机显示
语言和输入法,按设置->基础设置->显示设置背光灯亮度与激活时间和屏保激活时间
与屏保类型。
通过话机界面配置CP960
16

使用混合模式
亿联Zoom Rooms解决方案支持混合模式,使你可以在SIP模式和Zoom Rooms模式之间任意切换,让你
既可以体验Zoom视频会议也可以使用SIP通话和会议。
SIP模式下 ,你可以使用基本通话功能,包括拨打、接听电话、发起会议和录制呼叫等。
开启混合模式
过程
1. 在话机设备设置中心界面,点击设置->高级设置(默认密码:admin)
。
2.开启混合模式。
界面提示模式切换会设备重新启动,是否确认继续。
3.按确定。
话机重启后,配置生效。
切换SIP模式与Zoom Rooms 模式
启用混合模式后,你可以在非通话状态下快速切换SIP模式和Zoom Rooms模式。
过程
1. 在Zoom Rooms模式下,按悬浮球切换至SIP模式。
2. 在SIP模式下,按悬浮球或桌面的Zoom Rooms app图标切换至Zoom Rooms模式。
17
无线辅流分享内容
WPP20
无线传屏助手
PC
你可以使用WPP20无线传屏助手进行无线辅流分享内容。WPP20需要单独购买。
分享内容前,确保MShare已正确连接在mini-PC上。
过程
1. 将WPP20连接到MShare的USB口。
2. 约3秒后,WPP20指示灯显示绿色常亮。
WPP20与MShare配对成功。
3. 将WPP20连接到电脑上。

设备管理
开启Windows Update服务
1. 在mini-PC桌面打开命令窗口。
2. 输入services.msc,按 Enter键。
3. 找到Windows Update服务,双击打开属性。
4. 在启动类型区域,开启Windows Update服务。
5. 点击确定。
Zoom Rooms会议系统默认使用ZoomRoom帐户,只有ZoomRoomsAdmin帐户才有权限返回桌面操作
mini-PC。 切换到管理员帐户并开启Windows Update服务后,你可以手动升级设备,或开启自动Windows
Update更新升级设备。
我们还支持在亿联设备管理平台上升级CP960。更多关于如何在设备管理平台上批量升级更新设备,请前往
http://support.yealink.com,选 择 文档&软件->服务平台->设备管理平台/设备管理云服务查看对应平台
的管理员指南。
切换到ZoomRoomsAdmin帐户
1. 按Ctrl+Alt+Delete,选 择 注销。
2. 在界面左下角选择ZoomRoomsAdmin帐户,输入密码(默认:zoom123)返回桌面。
重新切换回ZoomRooms帐户的密码默认也为zoom123。
1. 执行以下任一操作:
按Windows+X或者右击开始菜单打开
用户高级菜单, 选择设备管理器。
选择并右击需要更新的设备,并选择
更新驱动程序。
选择需要更新的方式。
点击开始菜单,选择设置->更新和安全->Windows更新, 选择检查更新。
选择插件或UVC80/UVC50/UVC30摄像机,并完成安装。
手动更新升级设备
开启Windows自动更新
1. 点击开始菜单,选择
设置->更新和安全->Windows更新, 再按高级选项。
2. 开启
自动下载更新,即使通过按流量计费的数据连续也是如此(可能会收费)。
更新设备
你可以通过Windows Update手动更新设备,也可以开启自动Windows更新功能自动升级设备。
18

YEALINK NETWORK TECHNOLOGY CO., LTD
E-Mail: [email protected] | Website: www.yealink.com
Regulatory Notices
About Yealink
Technical Support
Visit Yealink WIKI (http://support.yealink.com/) for the latest firmware, guides, FAQ, Product documents, and more. For better service, we sincerely recommend
you to use Yealink Ticketing system (https://ticket.yealink.com) to submit all your technical issues.
Yealink is a global leading provider of enterprise communication and collaboration solutions, offering video conferencing service to worldwide enterprises. Focusing on
research and development, Yealink also insists on innovation and creation. With the outstanding technical patents of cloud computing, audio, video and image processing
technology, Yealink has built up a panoramic collaboration solution of audio and video conferencing by merging its cloud services with a series of endpoints products. As
one of the best providers in more than 140 countries and regions including the US, the UK and Australia, Yealink ranks No.1 in the global market share of SIP phones
shipments.
Operating Ambient Temperatures
Operating temperature: +32 to 104°F (0 to 40°C)
Relative humidity: 5% to 90%, noncondensing
Storage temperature: -22 to +160°F (-30 to +70°C)
Warranty
Our product warranty is limited only to the unit itself, when used normally
in accordance with the operating instructions and the system environment.
We are not liable for damage or loss resulting from the use of this product,
or for any claim from a third party. We are not liable for problems with
Yealink device arising from the use of this product; we are not liable for
financial damages, lost profits, claims from third parties, etc., arising from
the use of this product.
Explanation of the symbols
DC symbol
is the DC voltage symbol.
WEEE Warning symbol
To avoid the potential effects on the environment and human health
as a result of the presence of hazardous substances in electrical and
electronic equipment, end users of electrical and electronic
equipment should understand the meaning of the crossed-out wheeled bin
symbol. Do not dispose of WEEE as unsorted municipal waste and have to
collect such WEEE separately.
Restriction of Hazardous Substances Directive (RoHS)
This device complies with the requirements of the EU RoHS Directive. Statements
of compliance can be obtained by contacting [email protected].
Safety Instructions
Save these instructions. Read these safety instructions before use!
General Requirements
Before you install and use the device, read the safety instructions
carefully and observe the situation during operation.
During the process of storage, transportation, and operation, please
always keep the device dry and clean, avoid collision and crash.
Please attempt not to dismantle the device by yourself. In case of any
discrepancy, please contact the appointed maintenance center for repair.
Please refer to the relevant laws and statutes while using the device.
Legal rights of others should be respected as well.
Environmental Requirements
Place the device at a well-ventilated place. Do not expose the device
under direct sunlight.
Keep the device dry and free of dusts.
Do not place the device on or near any inflammable or fire-vulnerable
object, such as rubber-made materials.
Keep the device away from any heat source or bare fire, such as a candle
or an electric heater.
Operating Requirements
Do not let a child operate the device without guidance.
Do not let a child play with the device or any accessory in case of
accidental swallowing.
Please use the accessories provided or authorized by the manufacturer
only.
The power supply of the device shall meet the requirements of the input
voltage of the device. Please use the provided surge protection power
socket only.
Before plugging or unplugging any cable, make sure that your hands are
completely dry.
Do not spill liquid of any kind on the product or use the equipment near
water, for example, near a bathtub, washbowl, kitchen sink, wet
basement or near a swimming pool.
During a thunderstorm, stop using the device and disconnect it from the
power supply. Unplug the power plug and the Asymmetric Digital
Subscriber Line (ADSL) twisted pair (the radio frequency cable) to avoid
lightning strike.
If the device is left unused for a rather long time, disconnect it from the
power supply and unplug the power plug.
When there is smoke emitted from the device, or some abnormal noise
or smell, disconnect the device from the power supply, and unplug the
power plug immediately.
Contact the specified maintenance center for repair.
Do not insert any object into equipment slots that is not part of the
product or auxiliary product.
Before connecting a cable, connect the grounding cable of the device
first. Do not disconnect the grounding cable until you disconnect all other
cables.
Cleaning Requirements
Before cleaning the device, disconnect it from the power supply.
Use a piece of soft, dry and anti-static cloth to clean the device.
Keep the power plug clean and dry.
Troubleshooting
The unit cannot supply power to Yealink device.
There is a bad connection with the plug.
1. Clean the plug with a dry cloth.
2. Connect it to another wall outlet.
The usage environment is out of operating temperature range.
1. Use in the operating temperature range.
The cable between the unit and the Yealink device is connected incorrectly.
1. Connect the cable correctly.
You cannot connect the cable properly.
1. You may have connected a wrong Yealink device.
2. Use the correct power supply.
Some dust, etc., may be in the port.
1. Clean the port.
Contact your dealer or authorized service facility for any further questions.
FCC Statement
This device complies with part 15 of the FCC Rules. Operation is subject to the
following
two conditions: (1) this device may not cause harmful interference, and (2) this
device must accept any interference received, including interference that may
cause undesired operation.
Any Changes or modifications not expressly approved by the party responsible
for compliance could void the user's authority to operate the equipment.
IC Statement
This device complies with Industry Canada’s licence-exempt RSSs. Operation is
subject to the following two conditions:
(1) this device may not cause interference; and
(2) this device must accept any interference, including interference that may
cause undesired operation of the device. CAN ICES-3(B)
Le présent appareil est conforme aux CNR d’Industrie Canada applicables aux
appareils radio exempts de licence. L’exploitation est autorisée aux deux
conditions suivantes :
(1) l’appareil ne doit pas produire de brouillage;
(2) l’utilisateur de l’appareil doit accepter tout brouillage radioélectrique subi,
même si le brouillage est susceptible d’en compromettre le
fonctionnement.NMB-3(B)
Radiation Exposure Statement(Only applicable for CP960)
This equipment complies with FCC and IC radiation exposure limits set forth for
an uncontrolled environment. This equipment should be installed and operated
with minimum distance 20cm between the radiator and your body.
Cet émetteur ne doit pas être Co-placé ou ne fonctionnant en même temps
qu'aucune autre antenne ou émetteur. Cet équipement devrait être installé et
actionné avec une distance minimum de 20 centimètres entre le radiateur et
votre corps.
Contact Information
YEALINK NETWORK TECHNOLOGY CO.,LTD.
309, 3rd Floor, No.16, Yun Ding North Road, Huli District, Xiamen City, Fujian, P.R. China
YEALINK (EUROPE) NETWORK TECHNOLOGY B.V.
Strawinskylaan 3127, Atrium Building, 8th floor, 1077ZX Amsterdam, The Netherlands
YEALINK (USA) NETWORK TECHNOLOGY CO., LTD.
999 Peachtree Street Suite 2300, Fulton, Atlanta, GA, 30309, USA
Made in China
CP960- UVC- Zoom Rooms-EN+CN
-
 1
1
-
 2
2
-
 3
3
-
 4
4
-
 5
5
-
 6
6
-
 7
7
-
 8
8
-
 9
9
-
 10
10
-
 11
11
-
 12
12
-
 13
13
-
 14
14
-
 15
15
-
 16
16
-
 17
17
-
 18
18
-
 19
19
-
 20
20


Yealink CP960-UVC Zoom Rooms Kit V30 20(EN&CN) クイックスタートガイド
- タイプ
- クイックスタートガイド
- このマニュアルも適しています
関連論文
-
Yealink Yealink ZVC Series Zoom Rooms Kit for Mac-ZR V30.21 (EN,CN) クイックスタートガイド
-
-
-
-
-
-
-
Yealink MeetingBar A20 Microsoft Team Video Bar ユーザーガイド
-
-
その他のドキュメント
-
Superlux PS2A 仕様
-
Samsung MNA110MS1AC ユーザーマニュアル
-
 KANDAO Dual-Lens 3D Camera all in one conference ユーザーガイド
-
Escene ES380-PG Quick operation guide
-
Emprex E5XRXM969TUL3 ユーザーマニュアル
-
Philips PSE0500 ユーザーマニュアル
-
 infobit iSpeaker M200 ユーザーマニュアル
-
German pool ADR-289 ユーザーマニュアル
-
ATEN UC3021 クイックスタートガイド
-
ATEN UC3020 クイックスタートガイド

