
Wireless USB dongle / M969TUL III EMPREX / BTC
Q
Q
u
u
i
i
c
c
k
k
I
I
n
n
s
s
t
t
a
a
l
l
l
l
a
a
t
t
i
i
o
o
n
n
G
G
u
u
i
i
d
d
e
e
Important Information
For Windows® 2000 and Windows® XP, please visit our website at http://www.emprex.com/ to download
and install the “MouseMaestro Input Device Driver” to access the mouse functions of Tilt Wheel Left, Tilt
Wheel Right.
For Windows Vista®, you could use the mouse immediately after plugging the dongle receiver into your
PC USB port. If you want to enjoy the full functionality of the mouse, please go to the website at
http://www.emprex.com/ to install the "KeyMaestro Input Device Driver."
Hardware Installation
1. Plug the receiver connector into your available USB port on PC.
2. Make sure the batteries of the mouse are installed correctly, please follow the polarity
signs in the battery compartment.
3. Please make sure the slide switch on the back of the mouse is switched to “on” before
using the mouse. When not in use, please turn the power switch to “off” for power
saving.
Change the cursor pointer speed
You can modify the mouse pointer speed settings in the control panel.
1. Open the Start Menu by clicking “Start” at the lower-left corner on the screen
2. Then click on Settings / Control Panel / Mouse
3. In the Mouse Properties window that appears, click the Motion tab
4. Move the slide bar toward either the faster end or the slower end
5. Click OK to exit and make the change effective
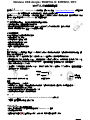
Pairing Procedure
The wireless mouse can operate out of the box immediately after you plug the receiver USB connector
into your PC USB port. If it can’t work, please follow the steps below to process ID setting of the wireless
mouse.
The pairing button locates on the top of the receiver with a LED under to show the pairing or data
reception status.
1. Press and hold the ID pairing/connect button on the top of the dongle receiver at least 2 seconds until
the receiver LED flashes. The receiver LED will flash 60 seconds to wait for mouse pairing information. (If
you release the button within 2 seconds, the ID doesn’t make any changes.)
2. Hold the mouse close to the dongle receiver within 30 cm.
3. Press and hold the mouse ID pairing/connect button on the bottom of the mouse at least 2 seconds
until the LED indicator on the top of the mouse flashes once. (If you release the button within 2 seconds,
the ID pairing will fail.)
Power
Switch
ID pairing button/
c
o
nn
ec
t
b
u
tt
o
n
LED indicator
(Battery low/
ID pairing
indicator)
ID
pa
i
r
i
n
g
b
u
tt
on
/
connec
t
b
u
tt
on
on
the top of the receiver (With an LED
under the pairing button)
ID Pairing button/ connect button on
the bottom of the mouse
Note:
1. Your PC must be turned on before doing this pairing procedure.
2. You don’t have to pair ID again after changing batteries. If it can’t work, please follow the steps above
to complete ID pairing.
3. The whole procedure should be completed within 60 seconds.
4. The mouse can operate freely up to 10 meter from the receiver.
5. Mouse battery life is up to 9 months. It depends on the intensity of usage.
System Requirements
- Microsoft® Windows® 2000, Windows® XP and Windows Vista® operating system
- Available USB port
- CD-ROM driver (for CD or Video operation)
Driver Installation
MouseMaestro Input Device Driver
1. After you download the driver, please find the “SetupKey.exe” in the directory and double-click this file.
2. Then follow the on-screen instruction to install the driver.

Wireless USB dongle / M969TUL III EMPREX / BTC
3. The driver icon or will show at the bottom right of the Windows system tray when the driver is
loaded.
English

Wireless USB dongle / M969TUL III EMPREX / BTC
若 Windows® 2000 Windows® XP http://www.emprex.com/
“MouseMaestro ” 輪 輪
若 Windows Vista® USB連 立 滑 若 更
“MouseMaestro ”
1. 連 連 連
2.
3. 滑 切 ” (on)” 狀 滑 不 滑
切 ” (off)” 省 量
度
滑 度
1. ” ”
2. / / 滑
3. 滑 ” ”
4. 滑 度
5. OK離
ID
USB 連 USB 連 立 滑 滑
列 ID
LED ID LED ID 狀
1. ID 2 LED ID LED
滑 (若 ID 2 ID)
2. 滑 30
3. 滑 ID 2 滑 LED (若 ID
2 ID)
ID
LED
( 量/
ID )
:
ID (ID LED )
滑 ID
1. 狀 ID
2. 更
不 ID 滑 ID
3. ID 60
4. 滑 離 10
5. 滑 9 率
- Microsoft® Windows® 2000, Windows® XP or Windows Vista®
- USB 連
- ( 樂 )
MouseMaestro
1. 錄 ”SetupKey .exe”
2.
3.
列

Wireless USB dongle / M969TUL III EMPREX / BTC
Important Usage Information
English
Battery Information
1. We recommend using alkaline batteries for a longer battery life.
2. Always change batteries when battery low alarm appears, otherwise the mouse will shut down once
the battery voltage is too low.
3. Don't mix different types of batteries or new and old batteries together. Always replace old batteries
with new and same type batteries.
4. Remove batteries after long periods of non-use. Battery leakage or corrosion may damage the device
quality and cause danger.
Battery Low Alarm
When the mouse battery is low, the RED LED indicator on the top of the mouse will flash when the mouse
is moved. Please change batteries immediately when the RED LED indicator flashes to ensure the good
use of this mouse. After you change the batteries, the RED LED indication will disappear.
Usage Information
- This laser mouse can work on most surfaces, including polished or wood-grain surfaces.
- While functioning, this mouse emits invisible laser light that may be hazardous to eyes. Avoid looking
directly into the emitter hole on the bottom of the mouse.
Laser Safety Information
This product complies with International Standards EN 60825-1/A2: 2001, Class 1 Laser Product, and also
complies with FDA standards Title 21 CFR 1040.10 and 1040.11, except for deviations pursuant to Laser
Notice No.50, dated June 24, 2007.
1.
2. 量立更量滑
3. 不不來更
4. 不滑漏滑
量 :
若滑滑LED 不滑量 立更滑
滑更輪LED
- 雷滑數
- 滑 狀 不 見雷滑
雷
EN 60825-1:2001/A2:2001 雷 FDA Title 21 CFR 1040.10
1040.11 FDA 2007年6 24Laser Notice No. 50 異(deviations pursuant to Laser
Notice No. 50 dated June 24, 2007)

Wireless USB dongle / M969TUL III EMPREX / BTC
FCC GUIDELINES
This equipment has been tested and found to comply with the limits for a Class B digital device, pursuant
to Part 15 of the FCC Rules. These limits are designed to provide reasonable protection against harmful
interference in a residential installation. This equipment generates, uses and can radiate radio frequency
energy and, if not installed and used in accordance with the instructions may cause harmful interference
to radio communications. However, there is no guarantee that interference will not occur in a particular
installation. If this equipment does cause harmful interference to radio or television reception, which can
be determined by turning the equipment off and on, the user is encouraged to try to correct the
interference by one or more of the following measures:
Reorient or relocate the receiving antenna.
Increase the separation between the equipment and receiver.
Connect the equipment into an outlet on a circuit different from that to which the receiver is
connected.
Consult the dealer or an experienced radio/TV technician for help.
Use only shielded cables to connect I/O devices to this equipment.
FCC Warning: This device complies with Part 15 of the FCC Rules. Operation is subject to the following two
conditions: (1) this device may not cause harmful interference, (2) this device must accept any
interference received, including interference that may cause undesired operation.
FCC Caution: Any changes or modifications not expressly approved by the party responsible for
compliance could void the user's authority to operate this equipment.
Information to user:
The users manual or instruction manual for an intentional or unintentional radiator shall caution the user
that changes or modifications not expressly approved by the party responsible for compliance could void
the user’s authority to operate the equipment.
IMPORTANT NOTE:
FCC Radiation Exposure Statement:
This equipment complies with FCC radiation exposure limits set forth for an uncontrolled environment. End
users must follow the specific operating instructions for satisfying RF exposure compliance.
This transmitter must not be co-located or operating in conjunction with any other antenna or transmitter.
Specifications:
率 : 2402MHz-2479 MHz
滑 Output power: 88.01 dBuV/m
Output power: 96.22 dBuV/m
率 輻 理
率 不 更 率 率
更
率 不 立
率 療 輻
Do not litter
-
 1
1
-
 2
2
-
 3
3
-
 4
4
-
 5
5


Emprex E5XRXM969TUL3 ユーザーマニュアル
- タイプ
- ユーザーマニュアル
- このマニュアルも適しています
他の言語で
- English: Emprex E5XRXM969TUL3 User manual
その他のドキュメント
-
Philips SNP6000/97 ユーザーマニュアル
-
Logitech MX 5000 LASER ユーザーマニュアル
-
Gigabyte GKM-WM01C インストールガイド
-
Steelseries Free Mobile Wireless Controller ユーザーマニュアル
-
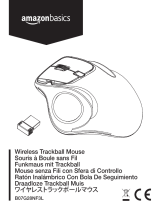 AmazonBasics B07G28NF3L ユーザーマニュアル
-
Lenovo N70 ユーザーマニュアル
-
Steelseries RIVAL 650 ユーザーマニュアル
-
Lenovo Multimedia Remote with Keyboard N5902 ユーザーマニュアル
-
Yealink CP960-UVC Zoom Rooms Kit V30 20(EN&CN) クイックスタートガイド
-
