
www.lg.com
Copyright © 2020 LG Electronics Inc. All Rights Reserved
MFL69883656
USER’S MANUAL
A9 K
Make sure to read the “SAFETY INSTRUCTIONS” carefully before starting to use this product.
Please keep this Owner’s Manual within easy reach of the user.
As the product is only intended for domestic use such as household cleaning, it must not be used for
commercial, experimental or industrial purposes.
Make sure to fully charge the product’s battery before first use of the product after purchasing it.
ENGLISH
粵語


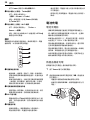
TABLE OF CONTENTS
This manual may contain images or
content that may be different from the
model you purchased.
This manual is subject to revision by the
manufacturer.
SAFETY INSTRUCTION
READ ALL INSTRUCTIONS BEFORE USE...........................................................4
WARNING............................................................................................................4
CAUTION ...........................................................................................................11
INSTALLATION
Product Overview.............................................................................................13
Installing the Charging Station ......................................................................17
Storing the Accessories ...................................................................................19
OPERATION
Getting Started .................................................................................................21
Charging the Battery .......................................................................................23
Using the Mop Nozzle .....................................................................................24
Using the Nozzles and Tools...........................................................................27
SMART FUNCTIONS
Using LG ThinQ Application............................................................................30
Smart Diagnosis Function...............................................................................32
MAINTENANCE
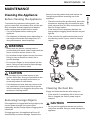
Cleaning the Appliance ...................................................................................33
Cleaning the Nozzles .......................................................................................36
TROUBLESHOOTING
Before Calling for Service................................................................................40
Rev.01_100520

4
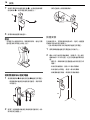
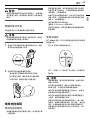
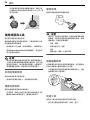
SAFETY INSTRUCTION
SAFETY INSTRUCTION
READ ALL INSTRUCTIONS BEFORE USE
The following safety guidelines are intended to prevent unforeseen
risks or damage from unsafe or incorrect operation of the appliance.
The guidelines are separated into ‘
WARNING
’ and ‘
CAUTION
’ as
described below.
Safety Messages
WARNING
WARNING
• To reduce the risk of explosion, fire, death, electric shock, injury or
scalding to persons when using this product, follow basic
precautions, including the following:
Technical Safety
• This appliance is not intended for use by persons (including children)
with reduced physical, sensory or mental capabilities, or lack of
experience and knowledge, unless they have been given supervision
or instruction concerning use of the appliance by a person
This symbol is displayed to indicate matters and
operations that can cause risk. Read the part with this
symbol carefully and follow the instructions in order to
avoid risk.
WARNING
This indicates that the failure to follow the instructions can
cause serious injury or death.
CAUTION
This indicates that the failure to follow the instructions can
cause the minor injury or damage to the product.

5
SAFETY INSTRUCTION
ENGLISH
responsible for their safety. Children should be supervised to ensure
that they do not play with the appliance.
• Do not allow the appliance to be used as a toy. Close attention is
necessary when used by or near children.
• Do not allow children to play with or hang on the appliance.
• Do not use the appliance with damaged power cord or plug. The cord
must be replaced. If the appliance is not working as it should, has
been dropped, damaged, left outdoors, or dropped into water, return
it to an LG Electronics service centre.
• Do not pull or carry by cord, use cord as a handle, close a door on
cord, or pull cord around sharp edges or corners. Do not run
appliance over cord. Keep cord away from heated surfaces.
• Do not unplug by pulling on cord. To unplug, grasp the plug, not the
cord.
• Place the cords from other appliances out of the area to be cleaned.
Battery
• Never use the battery, adapter, and the charging station from other
appliances with this appliance. Use only the battery and the charging
station provided by LG Electronics.
• Never use the battery, adapter, and the charging station from this
appliance with other appliances.
• Do not disassemble, remove or short-circuit the battery.
• Have specifically designated battery packs replaced when it is no
longer able to hold a charge.
• Refer to the
Charging the Battery
section instructions for the
method of replacing the battery.
• When disposing of this appliance, follow regulations for disposal of
rechargeable lithium-ion batteries.
• Follow all local ordinances and regulations when handling or
disposing of the battery.

6
SAFETY INSTRUCTION
• Prevent unintentional starting. Ensure the switch is in the off position
before connecting to the battery pack, picking up or carrying the
appliance.
• Disconnect the battery pack from the appliance before making any
adjustments, changing accessories, cleaning, serviing, or storing
appliance.
• When battery pack is not in use, keep it away from other metal
objects, like paper clips, coins, keys, nails, screws or other small metal
objects, that can make a connection from one terminal to another.
• Under abusive conditions, liquid may be ejected from the battery. If
this happens, avoid contact. If contact accidentally occurs, flush with
water. If liquid contacts eyes, additionally seek medical help.
• If the appliance is to be stored unused for a long period, the batteries
should be removed.
• Before removing the battery, you must turn off this appliance.
Battery Specifications
• One or two batteries are provided, the number of batteries varies
depending on the model purchased.
-
Model Name
: EAC63382204
-
Type
: Rechargeable Lithium-ion Battery
-
Rated Capacity
: 25.2 V
%
, 2400 mAh
Installation
• To avoid an electrical shock or fire, do not install, charge or store the
appliance where it may be exposed to water, rainfall or high
humidity.
• Install, charge and store the appliance in a well-ventilated place.
• Avoid operating the appliance in areas where there is a risk of
leakage of flammable gas, industrial oil or metallic dust.
• Do not store or install the appliance, power cord or plug near heating
devices or open flames.
• Install the charging station on a firm, level surface.

7
SAFETY INSTRUCTION
ENGLISH
• To prevent tipping, floor standing mode installations should be
anchored to the wall using the provided stand anchoring screw,
anchoring block and double-sided tape.
• In wall-mounted mode installations, the charging station should be
secured tightly to the wall using the provided wall anchoring screws.
• Use the anchoring screws only when attaching to concrete or similar
solid surfaces.
• Never drill into a wall without first checking that the area behind it is
free from power conduits, plumbing, vents, or cables.
• Do not use or store the appliance at temperatures below 5 ℃ or
above 38 ℃.
• Do not store or install the appliance where it is exposed to
temperatures below freezing or exposed to outdoor weather
conditions.
• When installing or moving the appliance, be careful not to pinch,
crush, or damage the power cord or plug.
Operation
• Read all instructions before using the appliance, and save these
instructions.
• Use only as described in this manual. Use only manufacturer’s
recommended attachment.
• This appliance is designed for normal indoor domestic use only. It is
not to be used for any non-residential, commercial, or industrial
application.
• This product should only be used with a 100 V - 240 V~ 50/60 Hz, 0.8
amp outlet. Make sure to check the power specifications of the place
where you intend to use the appliance.
• Do not handle the power cord, plug, or appliance controls with wet
hands.
• Wipe any moisture or dirt off the cord or plug with a dry cloth.
• Never attempt to operate this appliance if it is damaged,
malfunctioning, partially disassembled, or has missing or broken

8
SAFETY INSTRUCTION
parts, including a damaged cord or plug. Take it to an authorized LG
Electronics service centre or dealer for assistance.
• Do not apply excessive force to the power cord to bend it, or place it
under a heavy object as this will damage it.
• Do not use multiple-outlet adapters with this appliance. Make sure to
use a power socket with a capacity of 10 A.
• Do not plug the appliance into a damaged or loose outlet.
• Make sure to unplug the power cord when the appliance is not to be
used for an extended period of time.
• Do not damage, alter, excessively bend, twist, pull, pinch or heat the
power cord.
• Before using the appliance, remove any wire or string on the floor.
• Avoid touching the prongs of the power plug with your finger(s) when
unplugging the power cord.
• Do not cover the power cord with a rug or carpeting.
• Push the power plug firmly into the wall outlet so that it is not loose.
• If the product has been submerged, contact an LG Electronics service
centre or dealer for instructions before resuming use.
• If the product makes a strange noise or emits an odour or smoke,
discontinue use and contact an LG Electronics customer information
centre.
• Only qualified technicians or service personnel from LG Electronics
may disassemble, repair or modify the appliance.
• Never insert a sharp metallic object such as a pin, nail or knife in a
hole or gap in the appliance or the charging station.
• Do not vacuum liquids with this appliance. Make sure that no water,
beverage or detergent gets inside the appliance or the charging
station.
• Do not allow the appliance to sweep up blades, thumb tacks,
sawdust, sharp objects, or hot or cold ashes.
• Do not allow children to use the appliance.
• Do not let children or pets get close to the appliance when using,
charging or storing.

9
SAFETY INSTRUCTION
ENGLISH
• Do not insert the nozzle or tools in your mouth.
• Keep clothing and hair, fingers, or other parts of the body away from
openings and moving parts.
• Do not operate the appliance with the suction inlet or outlet blocked.
• Do not use the appliance without the dust bin and filters in place.
• Do not use in an enclosed space where vapors are present from paint
thinner, mothproofing substances, flammable dust or other
explosive or toxic materials.
• Do not touch the charging terminals on the appliance or the charging
station, or insert an electrified object inside the appliance or the
station.
• Always store the appliance on the floor standing or wall-mounted
charging station when it is not in use.
• Do not lean the appliance on walls, chairs or tables.
• If the earth leakage breaker is tripped when the product is put on the
charging station, immediately remove the appliance from the
charging station. Contact an LG Electronics customer service centre.
• Use extra care when cleaning on stairs.
• Do not use or store a heating device or flammable substance(ether,
benzene, alcohol, chemicals, combustible sprays, insecticide, air
freshener or cosmetics) in close proximity to the appliance.
• Do not attempt to clean up a liquid substance (water, beverage),
odourous substances (candy, chocolate, pet excrement), metallic
objects (blades, pins), flammable substances, burning/
smoking(cigarettes, matches, or hot ashes), surfactants, or glass
shards with this appliance.
• In the event of a gas leak(natural gas, propane gas, etc.), do not
operate this or any other appliance. Open a window or door to
ventilate the area immediately.
• Do not hold the charging station upside down with the battery in the
charging station.
• Do not expose the appliance, and the battery in particular, to heat, a
heating device or direct sunlight.

10
SAFETY INSTRUCTION
• Do not keep the appliance or its battery inside a vehicle which is
exposed to direct sunlight.
• Never allow any water, beverage or detergent to get inside the
battery.
• Do not apply physical impacts to the battery.
Maintenance
• Make sure to unplug the power cord when cleaning or maintaining
the charging station.
• Do not wash the inlet port or the dust bin with water or detergent.
• Do not use detergents, polishes or air fresheners to clean the dust
bin.
• Do not apply or spray a flammable substance (gasoline or thinner) or
surfactants (detergent or bath soap) on the appliance.
• Wash hands after handling nozzles. The nozzles contain carbon fiber,
and contact may cause minor skin irritation.
Disposal
• Keep packing materials out of the reach of children. Packaging
materials can pose a suffocation risk for children.
• Destroy the carton, plastic bag, and other packing materials after the
appliance is unpacked. Children might use them for play. Cartons
covered with rugs, bedspreads, or plastic sheets can become airtight
chambers.
• Dispose of this appliance according to local, state, and regional laws
and regulations.
• Contact your local city council or the related government authority
before disposing of this appliance.
Mop Nozzle
• Do not vacuum sharp objects (glass pieces, wire, blades, pins, etc.)
with the mop nozzle attached. When cleaning the mop pads after

11
SAFETY INSTRUCTION
ENGLISH
mopping, you could be injured by a sharp object embedded in the
mop.
CAUTION
CAUTION
• To reduce the risk of injury to persons, malfunction, or damage to the
product or property when using the appliance, follow basic safety
precautions, including the following:
Operation
• This appliance has a built-in safety device to prevent damage from
overheating. If the appliance becomes overheated after extended
use, it may automatically turn off. If this occurs, leave the appliance
in a cool, well-ventilated area for about an hour before turning on the
power again.
• Do not subject the product to shocks or drop it.
• Do not install wet or damp filters.
• Always use a soft cloth to clean the appliance. Do not clean the
product with a volatile or organic solvent(thinner or acetone).
• Do not clean the same spot repeatedly for an extended period of
time. Doing so may damage the carpet or flooring surface.
• Keep fingers away from pinch points when assembling the appliance
or the charging station.
• Do not use the double-sided tape to anchor the charging station on
wallpaper. Use the provided screws to anchor the charging station.
The weight of the charging station and the appliance could damage
the paper.
• Do not apply force or any impact to the Cyclonic Mesh Filter.
• Do not remove the battery during operation.

12
SAFETY INSTRUCTION
Mop Nozzle
• Do not use the mop nozzle for any purpose(for example, polishing a
car, cleaning windows) other than domestic floor cleaning.
• Do not use the mop nozzle to vacuum up liquids(water, beverage).
• When using the mop nozzle, always attach the mop pads.
• Do not clean a coated, rough or delicate floating floor and carpets
with the mop nozzle.
• Do not use the mop nozzle to clean the same spot repeatedly for an
extended period of time. The water injection at the mop nozzle may
cause water to get into the dust inlet and damage the appliance.
• Do not step on the mop nozzle.
• Wet floors can pose a slip hazard. Allow floors to dry completely
before allowing anyone to walk on them.
• Do not store the appliance by attaching the water tank filled with
water to the mop nozzle.

13
INSTALLATION
ENGLISH
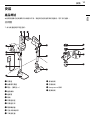
INSTALLATION
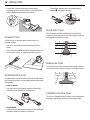
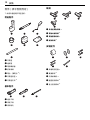
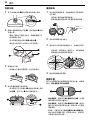
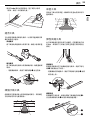
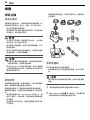
Product Overview
The images in this guide may be different from the actual components and accessories, which are subject
to change by the manufacturer without prior notice for product improvement purposes.
Front View
*1 This feature is only available on some models.
a
Charging Station
b
Auxiliary Charging Station
c
Battery (Dual Battery
*1
)
d
Product Body
e
Extension Pipe
f
Nozzle
g
Floor Stand Dock
h
Floor Stand Pipe
i
Adapter
j
Detachable Nozzle Storage
k
Tool Holders
l
Exhaust Filter
m
Pre-filter
n
Kompressor Lever
o
Cyclonic Mesh Filter

14
INSTALLATION
Accessories
*1 This accessory is only available on some models.
Included Accessories
a
Charging Station
b
Extension Pipe
c
Adapter
d
Pre-filter
e
Battery (Dual Battery
*1
)
f
Floor Stand Dock
*1
g
Floor Stand Pipe
*1
Basic Accessories
a
Combination Tool
b
Crevice Tool
c
Cleaning Brush
Nozzles
a
Multi-Surface Nozzle
*1
b
Slim Hard Floor Nozzle
*1
c
Bedding Nozzle
*1
d
Pet Nozzle
*1
Installation Kit
a
Wall Anchoring Block
*1
b
Double-Sided Tape
*1
c
Drywall Anchor
*1
d
Wall Anchoring Screw
*1
e
Stand Anchoring Screw
*1
Tools and Accessory Bag

15
INSTALLATION
ENGLISH
a
Hard Dirt Tool
*1
b
Mattress Tool
*1
c
Multi-angle Tool
*1
d
Flexible Crevice Tool
*1
e
Flexible Hose Extension
*1
f
Accessory Bag
*1
Mop Kit
a
Mop Nozzle
*1
b
Detachable Nozzle and Mop Pads Storage
*1
c
Mop Pads for General Cleaning
*1
d
Measuring Cup
*1
NOTE
• The mop pads, batteries, exhaust filter and the
pre-filter will eventually need to be replaced.
Contact an LG Electronics customer service
centre.
Specifications
Appliance
• Dimensions are given for the assembled product body, extension pipe and nozzle.
Model
A9**********
Dimensions
(Width X
Depth X Height)
260 mm X 270 mm x 1120 mm
Weight
Approximately 2.6 kg
Power Consumption
370 W in
Turbo
Mode (Maximum 590 W)
120 W in
Power
Mode
68 W in
Normal
Mode
Battery Run Time
(Using two battery)
Using with the Nozzle
*1
Up to 12 minutes in
Turbo
Mode
Up to 40 minutes in
Power
Mode
Up to 80 minutes in
Normal
Mode
Using with the Tool
Up to 14 minutes in
Turbo
Mode
Up to 60 minutes in
Power
Mode
Up to 120 minutes in
Normal
Mode
Battery Run Time
(Using one battery)
Using with the Nozzle
*1
Up to 6 minutes in
Turbo
Mode
Up to 20 minutes in
Power
Mode
Up to 40 minutes in
Normal
Mode
Using with the Tool
Up to 7 minutes in
Turbo
Mode
Up to 30 minutes in
Power
Mode
Up to 60 minutes in
Normal
Mode

16
INSTALLATION
• Suction power is an average of suction power with IEC 62885-2, 5.8 standard tested by an independent
test lab. Individually measured data would be different from a lab test result.
• Battery run time is the result of using a fully charged battery according to the LG Electronics test
standard. Results may be different depending on actual use environment and period of use.
*1 The Nozzle contains the direct drive motor that rotates the nozzle cleaning head directly.
Charger Adaptor
Model
Input
100 V - 240 V~, 50/60 Hz, 0.8 A
Output
DC 29.4 V
%
, 1.0 A
ADC-30FSA-30 29430EPB

17
INSTALLATION
ENGLISH
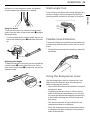
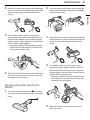
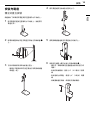
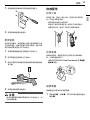
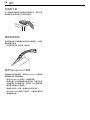
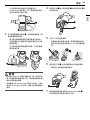
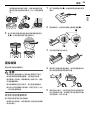
Installing the Charging
Station
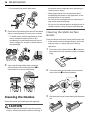
Self-Standing Installation
Follow the steps below to install the charging
station on a hard and level floor.
1
Place the floor stand dock on a hard and level
floor and assemble the floor stand pipe.
2
Clip the power cord tidily into the cord keeper
a
on the back of the floor stand pipe.
3
Slide the detachable nozzle storage onto the
floor stand pipe.
• Make sure not to pinch or tangle the power
cord behind the mop pads storage.
4
Assemble the charging station onto the top of
the floor stand pipe.
5
Connect the power adapter to the port on the
back of the charging station.
6
Drill a hole in the wall and insert the drywall
anchor
b
if needed.
• Before drilling, make sure that there are no
pipes or electrical wires inside the wall at the
desired location.
• For drywall anchor: use 1/4″ (6.5 mm) drill bit
• For concrete or wall stud: use 1/8″ (3 mm)
drill bit
• If screwing into drywall, use the drywall
anchor.
7
Align the wall anchoring block
c
of the
chanrging station, and fix the charging station

18
INSTALLATION
to the wall by tightening the anchoring screw
d
all the way.
8
Plug the power cord into the power outlet.
NOTE
• The charging station can be removed as needed.
To remove it, hold the floor stand dock steady
and pull up on the charging station.
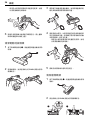
Using Double-Sided Tape to Secure
the Appliance
1
Use the double-sided tape
a
to attach the wall
anchoring block
b
to the charging station.
• Remove the centre section of double-sided
tape before attaching it to the wall
anchoring block.
2
Attach the second piece of double-sided tape
to the other side of the wall anchoring block to
secure it to the wall.
• Do not use double-sided tape on wallpaper.
Wall-Mounted Installation
For wall-mounted installations, the charging
station must be attached securely to the wall using
the provided(short) wall anchoring screws.
• The detachable nozzle storage cannot be
attached to the charging station in a wall-
mounted installation.
1
Connect the power adapter to the port on the
back of the charging station.
2
Drill 2 holes and insert the drywall anchors(if
needed) at least 1 m from the floor and near
enough to easily reach a power outlet.
• Before drilling, make sure that there are no
pipes or electrical wires inside the wall at the
desired location.
• For drywall anchor: use 6.5 mm drill bit
• For concrete or wall stud: use 3 mm drill bit

19
INSTALLATION
ENGLISH
• If screwing into drywall, use the drywall
anchors.
3
Attach the charging station to the wall with the
wall anchoring screws.
4
Plug the power cord into the power outlet.
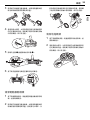
Compact Installation
For safety and convenience, install the charging
station using the self-standing or wall-mounted
installation methods. If you choose not to install
the charging station, place it on a level floor for
charging or storage.
1
Connect the power adapter to the port on the
back of the charging station.
2
Place the charging station on a hard and level
floor.
3
Separate the extension pipe and nozzle from
the product body before charging or storing
the appliance.
4
Plug the power cord into the power outlet.
CAUTION
• Leaving the appliance on a level floor for a long
time with the extension pipe and nozzle attached
may damage the appliance.
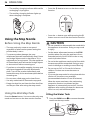
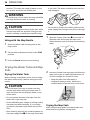
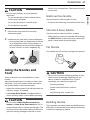
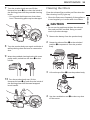
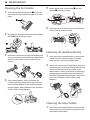
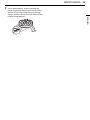
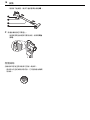
Storing the Accessories
Storing the Tools
Store the frequently used tools such as the
combination tool, crevice tool and cleaning brush
at the bottom of the charging station.
• Slide the cleaning brush up into the tool holder.
• Slide the combination tool over the cleaning
brush and onto the tool holder.
• To remove a tool, press the release button at the
front of the tool.

20
INSTALLATION
Storing the Nozzles
When a nozzle is not in use, store it in the
convenient detachable nozzle storage so you can
easily find it.
• The nozzle storage cradle is compatible with the
Hard Floor Nozzle
or the
Bedding Nozzle
.
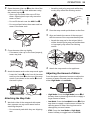
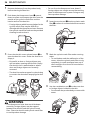
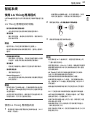
Assembling the Appliance
Follow these steps to safely assemble the
appliance.
1
Firmly attach the extension pipe
c
, nozzle
d
,
or tool onto the product body
a
.
• To detach the extension pipe, press the
extension pipe release button
b
.
2
Put the product body on the charging station.
• See
Charging the Battery
for instructions
on installing and charging the battery.
Storing the Mop Pads
Up to 2 mop pads can be stored in the detachable
mop pads storage.
• Store the mop pads completely in a dry state. It
can result in an unpleasant odour.
ページが読み込まれています...
ページが読み込まれています...
ページが読み込まれています...
ページが読み込まれています...
ページが読み込まれています...
ページが読み込まれています...
ページが読み込まれています...
ページが読み込まれています...
ページが読み込まれています...
ページが読み込まれています...
ページが読み込まれています...
ページが読み込まれています...
ページが読み込まれています...
ページが読み込まれています...
ページが読み込まれています...
ページが読み込まれています...
ページが読み込まれています...
ページが読み込まれています...
ページが読み込まれています...
ページが読み込まれています...
ページが読み込まれています...
ページが読み込まれています...
ページが読み込まれています...
ページが読み込まれています...
ページが読み込まれています...
ページが読み込まれています...
ページが読み込まれています...
ページが読み込まれています...
ページが読み込まれています...
ページが読み込まれています...
ページが読み込まれています...
ページが読み込まれています...
ページが読み込まれています...
ページが読み込まれています...
ページが読み込まれています...
ページが読み込まれています...
ページが読み込まれています...
ページが読み込まれています...
ページが読み込まれています...
ページが読み込まれています...
ページが読み込まれています...
ページが読み込まれています...
ページが読み込まれています...
ページが読み込まれています...
ページが読み込まれています...
ページが読み込まれています...
ページが読み込まれています...
ページが読み込まれています...
ページが読み込まれています...
ページが読み込まれています...
ページが読み込まれています...
ページが読み込まれています...
ページが読み込まれています...
ページが読み込まれています...
ページが読み込まれています...
ページが読み込まれています...
ページが読み込まれています...
ページが読み込まれています...
ページが読み込まれています...
ページが読み込まれています...
ページが読み込まれています...
ページが読み込まれています...
ページが読み込まれています...
ページが読み込まれています...
-
 1
1
-
 2
2
-
 3
3
-
 4
4
-
 5
5
-
 6
6
-
 7
7
-
 8
8
-
 9
9
-
 10
10
-
 11
11
-
 12
12
-
 13
13
-
 14
14
-
 15
15
-
 16
16
-
 17
17
-
 18
18
-
 19
19
-
 20
20
-
 21
21
-
 22
22
-
 23
23
-
 24
24
-
 25
25
-
 26
26
-
 27
27
-
 28
28
-
 29
29
-
 30
30
-
 31
31
-
 32
32
-
 33
33
-
 34
34
-
 35
35
-
 36
36
-
 37
37
-
 38
38
-
 39
39
-
 40
40
-
 41
41
-
 42
42
-
 43
43
-
 44
44
-
 45
45
-
 46
46
-
 47
47
-
 48
48
-
 49
49
-
 50
50
-
 51
51
-
 52
52
-
 53
53
-
 54
54
-
 55
55
-
 56
56
-
 57
57
-
 58
58
-
 59
59
-
 60
60
-
 61
61
-
 62
62
-
 63
63
-
 64
64
-
 65
65
-
 66
66
-
 67
67
-
 68
68
-
 69
69
-
 70
70
-
 71
71
-
 72
72
-
 73
73
-
 74
74
-
 75
75
-
 76
76
-
 77
77
-
 78
78
-
 79
79
-
 80
80
-
 81
81
-
 82
82
-
 83
83
-
 84
84


他の言語で
- English: LG A9KEXTRA Owner's manual
関連論文
その他のドキュメント
-
Tefal TX9125HA ユーザーマニュアル
-
Midea MVC-SC861R Vacuum Cleaner ユーザーマニュアル
-
-
Hitachi PV-X100N Cordless Stick Vacuum Cleaner ユーザーマニュアル
-
Panasonic EH-NE65 ユーザーマニュアル
-
Panasonic EH-NE82 ユーザーマニュアル
-
German pool SCC-WL60 ユーザーマニュアル
-
German pool WVC-21DC ユーザーマニュアル
-
-
Philips XC7055/01 重要情報