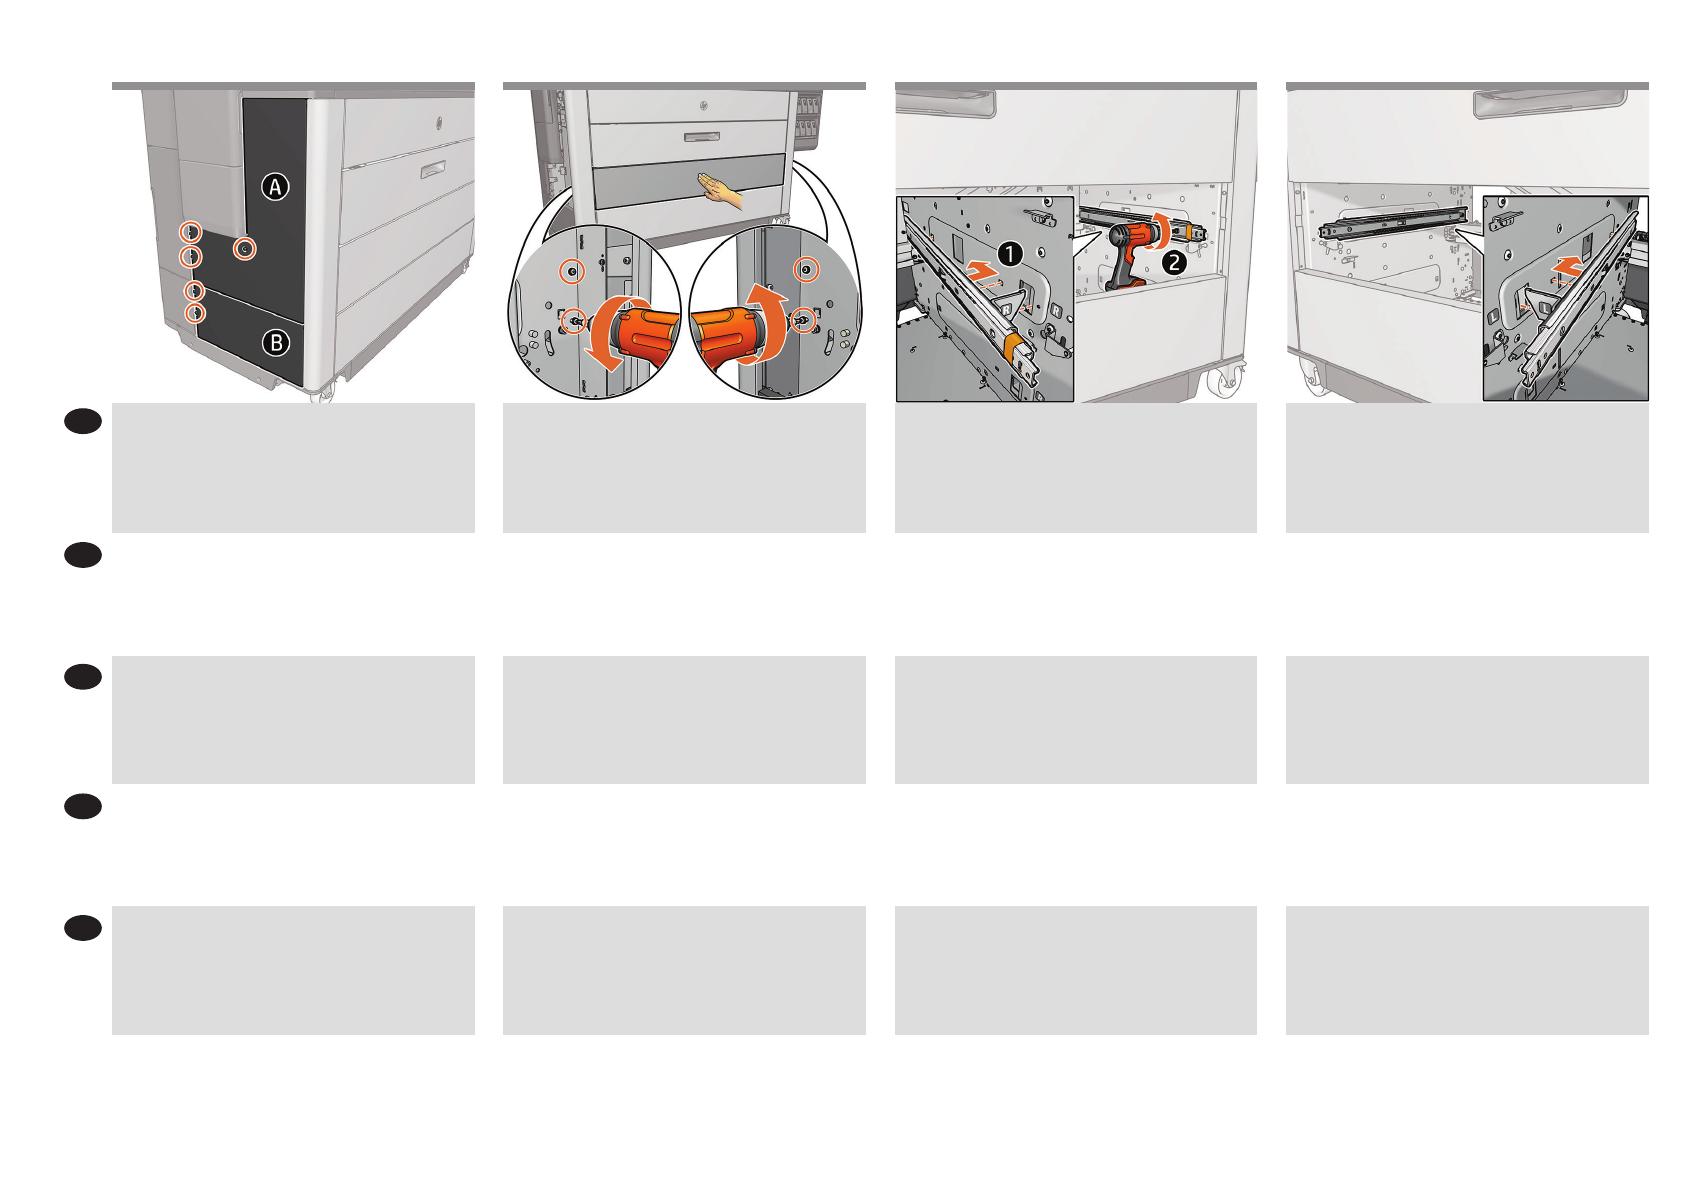
HP PageWide XL 8200 Printer Assembly Instructions

タイプ
Assembly Instructions
© Copyright 2020 HP Development Company, L.P.
Large Format Division
Camí de Can Graells 1-21 · 08174
Sant Cugat del Vallès
Barcelona · Spain
All rights reserved
Printed in XXX
ZHTW
KO
JA
ID
EN
HP PageWide XL Drawer
Assembly Instructions
HP PageWide XL ドロワ
ー組み立て説明書
HP PageWide XL 纸卷匣
組裝說明
HP PageWide XL 용지함
조립 지침
Petunjuk Pemasangan
Laci HP PageWide XL
EN
Please read these instructions carefully.
JA
以下の指示をよくお読みください。
ZHTW
請仔細閱讀下列說明。
KO
지침을 주의깊게 읽으십시오.
ID
Baca petunjuk ini dengan cermat.
EN
2 people are required to perform certain tasks.
JA
特定の作業は、2名で行う必要があります。
ZHTW
某些工作需要 2 個人才能執行。
KO
일부 작업의 경우 2명이 필요합니다.
ID
Diperlukan 2 orang untuk menjalankan tugas tertentu.
45’
EN
Time required for assembly isapproximately 45 minutes .
JA
組み立て所要時間は約45分です。
ZHTW
組裝大約要花 45 分鐘的時間。
KO
조립에 소요되는 시간은 45분입니다.
ID
Waktu yang diperlukan untuk pemasangan adalah sekitar 45 menit.
EN
Tools required: T20 Screwdriver
JA
必要な工具: T20ドライバ
ZHTW
必要工具:T20 螺絲起子
KO
필요한 공구: T20 드라이버
ID
Alat yang diperlukan: Obeng T20
EN
Legal notices
© Copyright 2020
HP Development Company, L.P.
The information contained herein is subject to change without notice. The only warranties
for HP products and services are set forth in the express warranty statements accompa-
nying such products and services. Nothing herein should be construed as constituting an
additional warranty. HP shall not be liable for technical or editorial errors or omissions
contained herein.
JA
法律に関する注記
© Copyright 2020 HP Development Company, L.P.
ここに記載した内容は、予告なしに変更することがあります。
HP製品およびサービスに対する保証は、当該製品およびサービスに付属の限定
的保証規定に明示的に記載されているものに限られます。 本書中のいかなる記
載も、付加的な保証を構成するものとして解釈されないものとします。 弊社
は、本書に含まれる技術上または編集上の誤りおよび欠落について、一切責任
を負うものではありません。
ZHTW
法律聲明
© Co
pyright 2020 HP Development Company, L.P.
此文件所包含資訊如有更改,恕不另行通知。HP 產品與服務的保固範圍,僅限於產
品與服務隨附的保固聲明中所提供的保固項目。 本文件的任何部分都不可構成任何
額外的保固。 HP 不負責本文件在技術上或編輯上的錯誤或疏失。
KO
법적 고지사항
© Copyright 2020 HP Development Company, L.P.
여기에 수록된 정보는 조건에 따라 예고 없이 변경될 수 있습니다.
HP 제품 및 서비스에 대한 유일한 보증은 해당 제품 및 서비스에 동봉된 보증서에
명시되어 있습니다. 이 문서의 어떠한 내용도 추가 보증으로 간주되어서는 안 됩니다.
HP는 이 문서에 포함된 기술 또는 편집상의 오류나 누락된 내용에 대해 책임지지
않습니다.
ID
Informasi hukum
©
Copyright 2020 HP Development Company, L.P.
Informasi yang terdapat dalam dokumen ini dapat berubah tanpa pemberitahuan sebelumnya.
Satu-satunya jaminan bagi produk dan layanan HP ditetapkan dalam pernyataan jaminan
tersurat yang diberikan bersama produk dan layanan tersebut. Tidak ada pernyataan apa pun
dalam dokumen ini yang dapat dianggap sebagai jaminan tambahan. HP tidak bertanggung
jawab atas kesalahan teknis atau editorial maupun kekurangan yang terdapat dalam dokumen ini.
1
ZHTW
KO
JA
ID
EN
Remove the basket.
バスケットを取り出します。
取出固定夾。
바스켓을 제거합니다.
Lepaskan keranjang.
Remove the rear printer covers: number 1 to install the drawer
in the second position (accessory), and numbers 1, 2, and 3 in
order, to install the drawer in the third position (only available
in HE printers) (accessory).
プリンタのリア カバーを取り外します。 2番目の位置(
アクセサリ)にドロワーを取り付ける場合は、1番のカ
バーを、3番目の位置(HEプリンタのみに提供)(アク
セサリ)にドロワーを取り付ける場合は、1番、2番、3
番のカバーを順番に外します。
移除印表機背蓋: 使用 1 號將纸卷匣安裝在第二個位置
(配件),接著依序使用 1、 2 和 3 號,將紙卷匣安裝在
第三個位置(僅在 HE 印表機中有)(配件)。
뒷면 프린터 덮개를 제거합니다. 1번은 용지함을 두 번째
위치(부속품)에 설치하며 1, 2, 3번 순서로 수행하면
용지함을 세 번째 위치에 설치합니다(HE 프린터에서만 사용
가능) (부속품).
Lepas penutup belakang printer: nomor 1 untuk memasang
laci dalam posisi kedua (aksesori), dan urutan nomor 1, 2, dan
3, untuk memasang laci pada posisi ketiga (hanya tersedia
pada printer HE) (aksesori).
Right side (front panel side): Remove the cleaning container,
and the side cover corresponding to the drawer being
installed.
右側(フロントパネル側): クリーニング コンテナ
と、取り付けるドロワーに対応するサイド カバーを取
り外します。
右側(前置面板側面): 取出清潔容器,並移除將安裝
之紙卷匣的側面蓋板。
오른쪽(앞면 조작부 쪽): 청소 컨테이너 및 설치 중인
용지함에 해당하는 옆면 덮개를 제거합니다.
Sisi kanan (sisi panel depan): Lepas wadah pembersih, dan
penutup bagian samping yang berhubungan dengan laci yang
sedang dipasang.
Printer preparation
リン
印表機準
터 준비
Persiapan printer
ZHTW
KO
JA
ID
EN
2
1 2 3
3
ZHTW
KO
JA
ID
EN
Left side of the printer: Remove the side cover corresponding
to the drawer being installed.
プリンタの左側: 取り付けるドロワーに対応するサイ
ド カバーを取り外します。
印表機左側: 移除將安裝之紙卷匣的側面蓋板。
프린터의 왼쪽: 설치 중인 용지함에 해당하는 옆면 덮개를
제거합니다.
Sisi kiri dari printer: Lepas penutup bagian samping yang
berhubungan dengan laci yang sedang dipasang.
Remove the 2 screws located on the both sides of the drawer
(2 bottom ones for bottom drawer) and remove the front
cover exposing the drawer slot.
Important: Hold the cover while removing the nal screw to
stop it falling.
ドロワーの両側にある2本のネジを外し(下部ドロワ
ーの場合は一番下の2本)、フロント カバーを取り外
して、ドロワーのスロットにアクセスできる状態にし
ます。
重要: 最後のネジを外す間、カバーを支えて落ちない
ようにしてください。
取出位於紙卷匣兩側的 2 顆螺絲(2 顆用於底部紙卷匣的
底部螺絲),並移除露出紙卷匣插槽的前側蓋板。
重要事項: 取出最後一顆螺絲時取握住蓋板,以避免蓋
板掉落。
용지함 양옆의 나사 2개(하단 용지함 아래에 있는 2개)
를 제거한 다음, 용지함 슬롯을 드러내는 전면 덮개를
제거합니다.
중요: 덮개가 떨어지지 않도록 마지막 나사를 제거하는 동안
잡고 계십시오.
Lepas 2 sekrup yang terdapat pada kedua sisi laci (2 di bagian
bawah untuk laci bawah), lalu lepas penutup depan agar slot
laci terlihat.
Penting: Pegang penutup saat melepas sekrup terakhir agar
tidak terjatuh.
Take the right drawer guide (marked with an R) from the top
of the box.
Important: Do not remove the internal cardboard and tape.
Install the drawer guide on the right side. Slide the guide all
the way in, and x with 1 screw.
箱の一番上から右のドロワー ガイド(Rと示されたも
の)を取り出します。
重要: 内側の段ボールとテープを取り外さないでくだ
さい。
右側にドロワーガイドを取り付けます。 ガイドを奥ま
でスライドさせ、1本のネジで固定します。
從包裝箱上層取出右側紙卷匣導板。
重要事項: 請勿取出內部紙板和撕下膠帶。
將紙卷匣導輪安裝在右側。 將導板滑到最底,然後用 1
顆螺絲固定。
상자 위에서 오른쪽 용지함 가이드(R 표시됨)를 꺼냅니다.
중요: 내부의 카드보드 및 테이프를 제거하지 마십시오.
오른쪽에 용지함 가이드를 설치합니다. 가이드를 완전히
밀어 넣은 다음, 나사 1개를 사용하여 고정합니다.
Ambil pemandu laci kanan (yang ditandai dengan R) dari
bagian atas kemasan.
Penting: Jangan lepaskan karton dan pita bagian dalam.
Pasang pemandu laci di sisi kanan. Dorong pemandu sampai
ke dalam, lalu kencangkan dengan 1 sekrup.
Take the left drawer guide (marked with an L) and insert it into
the left side of the printer.
Note: No screw is required.
左のドロワー ガイド(Lと示されたもの)を取り出し、
プリンタの左側に挿入します。
注記: ネジは必要ありません。
取出左側紙卷匣導板(以 L 標示),接著將導板插入印
表機左側。
附註: 不需使用螺絲。
왼쪽 용지함 가이드(L 표시 됨)를 프린터의 왼쪽에
삽입합니다.
참고: 나사는 필요없습니다.
Ambil pemandu laci kiri (yang ditandai dengan L), lalu
masukkan ke sisi kiri printer.
Catatan: Tidak memerlukan sekrup.
4 5 6 7
Drawer installation
ドローの取付け
紙卷匣安裝
지함 설
Pemasangan laci
ZHTW
KO
JA
ID
EN
Check both guides are correctly installed on the back slot, they
should be diicult to move.
両方のガイドが背面のスロットに正しく収まっている
こと、および簡単に動かないことを確認します。
檢查背面插槽上的兩個導板是否皆安裝妥當,它們應該
都很難移動。
가이드는 이동하기 어려우므로 두 개가 모두 뒷면 슬롯에
올바르게 설치되어 있는지 확인합니다.
Pastikan kedua pemandu terpasang dengan benar di belakang
slot, dan harus sulit digerakkan.
Check the wheels are aligned as shown.
ホイールが図のように配置されていることを確認しま
す。
如圖所示,檢查腳輪校正。
그림과 같이 바퀴가 잘 정렬되었는지 확인합니다.
Pastikan roda sejajar seperti ditunjukkan.
If not installing the bottom drawer: Place the end cap from
the packaging in front of the printer.
下部ドロワーを取り付けない場合: パッケージのエン
ド キャップをプリンタの手前に配置します。
如果未安裝底部紙卷匣: 將包裝中的端塞放在印表機前
面。
하단 용지함을 설치하지 않을 경우: 포장에서 엔드 캡을
꺼내 프린터 앞에 놓습니다.
Jika tidak memasang laci bawah: Letakkan penutup ujung
dari kemasan di depan printer.
ZHTW
KO
JA
ID
EN
4
8 9 10
5
ZHTW
KO
JA
ID
EN
Lift the cardboard box up and o of the drawer.
段ボール箱を持ち上げ、ドロワーから外します。
拿起紙盒並取出紙卷匣。
카드보드 상자를 위로 들어 올려 용지함을 꺼냅니다.
Angkat kotak karton ke atas dan terlepas dari laci.
Open the lower tray‘s carton aps, and remove the back
portions of the lower end caps.
下部トレイの梱包のカバーを開けて、下部エンド キャ
ップの後側を取り外します。
打開下層紙匣的紙板箱封蓋,然後取出較低端塞的背面
部分。
하단 용지함의 상자 덮개를 열고 아래쪽 엔드 캡의 뒷 부분을
제거합니다.
Buka sirip karton baki bawah, lalu keluarkan bagian belakang
ujung penutup bawah.
Open the bag and remove the desiccant bag.
袋を開いて、乾燥剤の袋を取り出します。
打開袋子,然後取出乾燥劑。
봉지를 열고 건조제 봉지를 제거합니다.
Buka kantong dan singkirkan kantong bahan pengering.
Remove the orange tapes and white foams.
Important: Do not remove the oranges handles.
オレンジ色のテープを剥がし、白いフォームを外します。
重要: オレンジ色のハンドルを外さないようにしてく
ださい。
撕下橘色膠帶並取出白色泡棉。
重要事項: 請勿取下橘色把手。
주황색 테이프 및 백색 폼을 제거합니다.
중요: 주황색 핸들은 제거하지 마십시오.
Lepaskan pita oranye, dan gabus putih.
Penting: Jangan lepaskan gagang oranye.
11 12 13 14
ZHTW
KO
JA
ID
EN
Lift up the lower foam together with the drawer by pulling the
foam handles.
Important: Do not remove the orange handles or hubs.
フォーム ハンドルを引いて、ドロワーと共に下部のフ
ォームを持ち上げます。
重要: オレンジ色のハンドルまたはハブを取り外さな
いでください。
拉住泡棉把手,將較低的泡棉連同紙卷匣一起往上提起。
重要事項: 請勿取下橘色把手或輪轂。
폼 핸들을 당겨 용지함과 아래쪽 폼을 함께 들어 올립니다.
중요: 주황색 핸들 또는 허브를 제거하지 마십시오.
Angkat busa yang lebih rendah bersama dengan laci dengan
menarik gagang busa.
Penting: Jangan lepas gagang oranye atau hub.
Not installing the bottom drawer: Place the drawer and foam
on the end cap next to the printer.
Installing the bottom drawer: Place next to the front of the
printer.
下部ドロワーを取り付けない場合: プリンタの隣のエ
ンド キャップにドロワーとフォームを配置します。
下部ドロワーを取り付ける場合: プリンタの手前の横
に配置します。
未安裝底部紙卷匣: 將紙卷匣與泡棉放在印表機旁的端
塞上。
安裝底部紙卷匣: 置於印表機前方旁邊。
하단 용지함을 설치하지 않음: 용지함과 엔드 캡 위의 폼을
프린터 옆에 놓습니다.
하단 용지함 설치: 프린터의 앞면 옆에 놓습니다.
Tidak memasang laci bawah: Letakkan laci dan busa pada
penutup ujung di sebelah printer.
Memasang laci bawah: Letakkan di sebelah bagian depan
printer.
Remove the cable protection ange.
Important: Take care when moving the drawer, as the cable
can be easily damaged.
ケーブルの保護フランジを取り外します。
重要: ドロワーを移動する際は、ケーブルを簡単に損
傷することがあるため、注意してください。
取下纜線保護凸緣。
重要事項: 移動紙卷匣時請小心,因為纜線容易損壞。
케이블 보호 플랜지를 제거합니다.
중요: 용지함을 옮길 때 케이블이 쉽게 손상될 수 있으므로
주의하십시오.
Lepaskan ens pelindung kabel.
Penting: Pindahkan laci dengan hati-hati, karena kabel mudah
rusak.
Pull the guides out onto the drawer.
ガイドをドロワーまで引き出します。
在導板拉出到紙卷匣上。
가이드를 용지함 쪽으로 빼냅니다.
Tarik pemandu keluar ke arah laci.
6
15 16 17 18
7
ZHTW
KO
JA
ID
EN
Remove the carton piece and tape from the right side.
右側から梱包具とテープを取り外します。
從右側取出紙板箱並撕下膠帶。
상자와 테이프를 오른쪽에서 제거합니다.
Keluarkan potongan karton dan pita dari sisi kanan.
Fix the drawer to the guides with two T20 screws on each side.
Important: Make sure the two preinstalled pins match the
holes.
各側に2本のT20ネジを使用して、ドロワーをガイドに
固定します。
重要: 取り付けられている2本のピンが穴に合うことを
確認してください。
每側各使用兩顆 T20 螺絲,將紙卷匣固定在導板上。
重要事項: 請確定兩個預先安裝的插腳與孔大小相符。
각 면에 T20 나사 2개를 사용하여 용지함을 가이드에
고정합니다.
중요: 사전 설치된 두 개의 핀이 구멍과 맞는지 확인합니다.
Kencangkan laci ke pemandu menggunakan sekrup T20 pada
tiap sisinya.
Penting: Pastikan pin yang telah dipasang sebelumnya cocok
dengan lubang.
Hold the drawer by the orange handles and remove the foam.
オレンジ色のハンドルを持ってドロワーを支えながら
フォームを外します。
握住橘色把手以穩住紙卷匣,然後取出
泡棉。
주황색 핸들로 용지함을 잡고 폼을
제거합니다.
Pegang laci pada bagian gagang oranye untuk melepaskan
busa.
Fix both sides of the inside of the drawer to the guide using
one T20 screw each side.
各側に1本のT20ネジを使用して、ドロワーの内側の両
サイドをガイドに固定します。
在每側使用一顆 T20 螺絲,將紙匣兩邊內側固定至導
軌。
각 측면의 T20 나사 하나를 사용하여 용지함 내부의 양쪽을
유도 장치에 고정하십시오.
Pasang kedua sisi dalam laci ke pemandu memandu
menggunakan satu sekrup T20 pada setiap sisi.
19 20 21 22
ZHTW
KO
JA
ID
EN
Remove the orange packaging pieces on both sides by
removing the two screws.
2本のネジを外して、両側のオレンジ色の梱包材を取り
外します。
取出兩顆螺絲,以取出兩側的橘色包裝。
두 개의 나사를 제거하여 양옆에 있는 주황색 포장을
제거합니다.
Keluarkan potongan kemasan oranye pada kedua sisi dengan
melepaskan kedua sekrup.
Remove the orange handles by removing the screws shown
in the image.
Note: The screws are on the inner part.
画像に示されたようにネジを外して、オレンジ色のハ
ンドルを取り外します。
注記: ネジは内部部品にあります。
如圖所示,取出螺絲以取下橘色把手。
附註: 螺絲位於內側。
이미지에 표시된 나사를 제거하여 주황색 핸들을
제거합니다.
참고: 나사는 내부에 있습니다.
Lepaskan gagang oranye dengan melepaskan sekrup yang
ditunjukkan pada gambar.
Catatan: Sekrup terletak di bagian dalam.
Remove the pin and the drawer lock bar.
ピンと用の引き出しのロック バーを取り外します。
卸下插銷和匣櫃鎖定桿。
핀과 용지함 잠금 막대를 제거합니다.
Lepas pin dan bilah kunci laci.
Remove the stoppers from inside the drawer.
引き出しの中からストッパを取り外します。
從匣櫃內部取出止動器。
용지함 내부에서 마개를 제거합니다.
Lepas pembatas dari dalam laci.
8
23 24 25 26
9
Printer conguration
リン
印表機設
터 구
Kongurasi printer
ZHTW
KO
JA
ID
EN
ZHTW
KO
JA
ID
EN
Connect the drawer cable on the back of the printer.
プリンタの背面にドロワーのケーブルを接続します。
將紙卷匣纜線連接到印表機背面。
프린터 뒷면의 용지함 케이블을 연결합니다.
Hubungkan kabel laci di bagian belakang printer.
Connect the plastic piece on the back side of the printer; slot it
into the holes and push down.
プリンタの背面にプラスチック部品を接続します。 穴
に差し込み、下に押します。
將塑膠零件裝到印表機背面; 插入孔中並往下推。
프린터 뒷면의 플라스틱 부품을 연결합니다. 부품을 구멍에
끼우고 아래로 밉니다.
Sambungkan bagian plastik di sisi belakang printer; sisipkan ke
dalam lubang dan tekan ke bawah.
Close the drawer.
Important: Take care with the cable.
引き出しを閉じます。
重要: ケーブルに注意してください。
關妥紙卷匣。
重要事項: 小心纜線 。
용지함을 닫습니다.
중요: 케이블에 주의합니다.
Tutup laci.
Penting: Tangani kabel dengan hati-hati.
27 28 29
ZHTW
KO
JA
ID
EN
Switch on the printer; the printer will recognize the installed
drawer, and if installing the printer for the rst time,
automatically start conguration. If not go to the Service menu
install/unistall drawers.
プリンタの電源を入れます。 プリンタで取り付けたド
ロワーが認識され、プリンタが初めて取り付けられた
場合は、自動的に設定が開始されます。 開始されない
場合は、サービス メニューのドロワーの設置/取り外し
を選択します
開啟印表機電源; 印表機會識別已安裝的紙卷匣。如果
第一次安裝印表機,則會自動啟動設定。 如果不想移至
「維修」功能表來安裝/解除安裝紙卷匣
프린터를 켭니다. 프린터가 설치된 용지함을 인식합니다.
프린터를 처음 설치하는 경우 자동으로 구성이 시작됩니다.
서비스 메뉴로 이동하지 않으면 용지함을 설치/
제거합니다.
Hidupkan printer; printer akan mengenali laci yang terpasang,
dan jika menginstal printer untuk pertama kalinya, secara
otomatis akan memulai kongurasi. Jika tidak, lihat menu
Layanan memasang/melepaskan laci.
Stick on the identifying labels for the roll number, at the front,
on the hubs, and the cut buttons.
前面のハブ上と切断ボタンにロール紙番号の識別ラベ
ルを貼り付けます。
貼在識別標籤上(作為捲筒紙號碼)、前側、輪轂上和
裁切按鈕上。
앞면, 허브 및 절단 버튼에 롤 번호 식별 레이블을
붙입니다.
Tempelkan pada label pengenal untuk nomor gulungan, di
bagian depan, pada hub, dan tombol pemotong.
Remove the orange tapes, and the label set.
オレンジ色のテープとラベル セットを外します。
撕下橘色膠帶和標籤組。
주황색 테이프 및 레이블 세트를 제거합니다.
Lepaskan pita oranye, dan set label.
Replace all the covers.
カバーをすべて戻します。
更換所有蓋板。
모든 덮개를 다시 덮습니다.
Pasang kembali penutup.
10
30 31 32 33
11
  • Page 1 1
  • Page 2 2
  • Page 3 3
  • Page 4 4
  • Page 5 5
  • Page 6 6
  • Page 7 7
  • Page 8 8
  • Page 9 9
  • Page 10 10
  • Page 11 11

HP PageWide XL 8200 Printer Assembly Instructions

タイプ
Assembly Instructions

他の言語で