
CMT-BX3.GB/CS.3-095-504-91(3)
Micro HI-FI
Component System
© 2007 Sony Corporation
CMT-BX3
3-095-504-91 (3)
Operating Instructions _______________________
使用说明书________________________________
在使用产品前,请仔细阅读本使用说明书
迷你音响组合
GB
CS

CMT-BX3.GB.3-095-504-91(1)
2
GB
WARNING
To reduce the risk of re or
electric shock, do not expose
this apparatus to rain or
moisture.
To reduce the risk of re, do not cover
the ventilation of the apparatus with
newspapers, tablecloths, curtains, etc.
And do not place lighted candles on the
apparatus.
To reduce the risk of re or electric shock,
do not place objects lled with liquids,
such as vases, on the apparatus.
Connect the unit to an easily accessible AC
outlet. Should you notice an abnormality
in the unit, disconnect the main plug from
the AC outlet immediately.
Do not install the appliance in a conned
space, such as a bookcase or built-in
cabinet.
Do not expose the battery to excessive heat
such as direct sunlight, re or the like.
Southeast Asian, Indian and African
models only
e nameplate is located on the bottom
exterior.
CAUTION
e use of optical instruments with this
product will increase eye hazard.
Except for customers in the U.S.A.
and Canada
is appliance is classied as a CLASS 1
LASER product. is marking is located
on the rear exterior.
Note on DualDiscs
A DualDisc is a two sided disc product
which mates DVD recorded material on
one side with digital audio material on
the other side. However, since the audio
material side does not conform to the
Compact Disc (CD) standard, playback on
this product is not guaranteed.
Music discs encoded with copyright
protection technologies
is product is designed to playback
discs that conform to the Compact Disc
(CD) standard. Recently, various music
discs encoded with copyright protection
technologies are marketed by some
record companies. Please be aware that
among those discs, there are some that
do not conform to the CD standard and
may not be playable by this product.
ATRAC, ATRAC3, ATRAC3plus and
their logos are trademarks of Sony
Corporation.
U.S. and foreign patents licensed from
Dolby Laboratories.
MPEG Layer-3 audio coding
technology and patents licensed from
Fraunhofer IIS and omson.

CMT-BX3.GB.3-095-504-91(1)
3
GB
GB

CMT-BX3.GB.3-095-504-91(1)
4
GB
Table of Contents
Guide to parts and controls .............5
Information on the display ............... 9
Getting Started
Hooking up the system
securely ..................................................10
Setting the clock ................................11
Basic Operations
Playing a CD/MP3 disc .....................12
Listening to the radio .......................13
Listening to music of an USB
device .....................................................14
Using optional audio
components .........................................16
Adjusting the sound .........................16
Changing the display .......................17
Other Operations
Creating your own program
(Program Play) .....................................18
Presetting radio stations .................19
Using the Timers .................................20
Others
Troubleshooting .................................21
Messages ...............................................24
Precautions ...........................................25
Specications ......................................27

CMT-BX3.GB.3-095-504-91(1)
5
GB
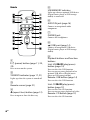
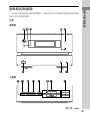
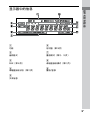
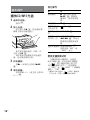
Guide to parts and controls
Guide to parts and controls
is manual mainly explains operations using the remote, but the same operations can
also be performed using the buttons on the unit having the same or similar names.
Unit
Front panel
Top panel
Continued

CMT-BX3.GB.3-095-504-91(1)
6
GB
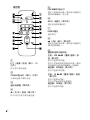
Remote
/ (power) button (page 11, 20,
23)
Press to turn on the system.
STANDBY indicator (page 17, 21)
Lights up when the system is turned o.
Remote sensor (page 21)
(open/close) button (page 12)
Press to open or close the disc tray.
USB MEMORY indicator
Lights up when an optional USB device
(Digital music player or USB storage
media) is connected.
AUDIO IN jack (page 16)
Connect to an optional audio
component.
PHONES jack
Connect the headphones.
(USB) port (page 14)
Connect to an optional USB device
(Digital music player or USB storage
media).
Playback buttons and function
buttons
Unit: USB (play/pause)
button (page 14)
Press to select the USB function.
Press to start or pause playback of an
optional USB device (Digital music
player or USB storage media).
Remote: USB button (page 14)
Press to select the USB function.
Unit: CD (play/pause)
button (page 12)
Press to select the CD function.
Press to start or pause playback of a disc.
Remote: CD button (page 12)
Press to select the CD function.

CMT-BX3.GB.3-095-504-91(1)
7
GB
Guide to parts and controls
Remote: (play) button,
(pause) button
Press to start or pause playback.
TUNER/BAND button (page 13)
Press to select the TUNER function.
Press to select FM or AM reception
mode.
Unit: AUDIO IN button (page 16)
Press to select the AUDIO IN function.
Remote: FUNCTION button
Press to select the function.
DISPLAY button (page 17)
Press to change the information on the
display.
PLAY MODE/TUNING MODE
button (page 12, 13, 15, 18, 19)
Press to select the play mode of a CD,
MP3 disc or an optional USB device
(Digital music player or USB storage
media).
Press to select the tuning mode.
Sound buttons (page 16)
Unit: DSGX button
Remote: EQ button
Press to select the sound eect.
Unit: /CANCEL (stop/cancel)
button (page 12, 13, 15)
Remote: (stop) button (page
12, 13, 15)
Press to stop playback.
ENTER button (page 11, 18, 19,
20)
Press to enter the settings.
/ (go back/go forward)
button (page 12, 15, 18)
Press to select a track or le.
Unit: TUNE +/ (tuning) button
(page
13)
Remote: +/ (tuning) button
(page
13, 19)
Press to tune in the desired station.
+/ (select folder) button
(page 12, 15, 18)
Press to select a folder.
/ (rewind/fast forward)
button (page 12, 15)
Press to nd a point in a track or le.
Unit: VOL +/ button (page 12,
13, 14, 16)
Remote: VOLUME +/ button
(page 12, 13, 14, 16)
Press to adjust the volume.
CLOCK/TIMER SELECT button
(page 20)
CLOCK/TIMER SET button (page
11, 20)
Press to set the clock and the Play Timer.
Continued

CMT-BX3.GB.3-095-504-91(1)
8
GB
REPEAT/FM MODE button (page
12, 13, 15)
Press to listen to a disc, a single track or
le repeatedly.
Press to select the FM reception mode
(monaural or stereo).
Battery compartment lid
(page
11)
CLEAR button (page 18)
Press to delete a pre-programmed track
or le.
TUNER MEMORY button (page
19)
Press to preset the radio station.
SLEEP button (page 20)
Press to set the Sleep Timer.

CMT-BX3.GB.3-095-504-91(1)
9
GB
Guide to parts and controls
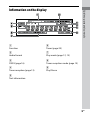
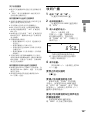
Information on the display
Function
Audio format
DSGX (page 16)
Tuner reception (page 13)
Text information
Timer (page 20)
Play mode (page 12, 15)
Tuner reception mode (page 13)
Play/Pause

CMT-BX3.GB.3-095-504-91(1)
10
GB
Getting Started
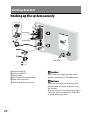
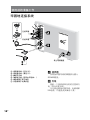
Hooking up the system securely
Speaker cord (Red/)
Speaker cord (Black/)
AM loop antenna
FM lead antenna (Extend it horizontally.)
Brown side for other regions
White side for North American model
Speakers
Insert only the stripped portion of the
speaker cords into the SPEAKER jacks.
Antennas
Find a location and an orientation that
provide good reception, and then set up
the antenna.
Keep the antennas away from the speaker
cords, the power cord and the USB cable
to avoid picking up noise.
Left speaker
Right speaker
or
Wall socket

CMT-BX3.GB.3-095-504-91(1)
11
GB
Getting Started
Power
For models with a voltage selector, set
VOLTAGE SELECTOR to the local
power line voltage.
Connect the power cord to a wall socket.
If the plug does not t the wall socket,
detach the supplied plug adaptor (only
for models equipped with an adaptor).
When carrying this system
1
Remove a disc to protect the CD
mechanism.
2
Press CD
to select the CD
function.
3
Hold down TUNER/BAND
and
DSGX
on the unit, and press
on the unit until “STANDBY” appears.
4
After “LOCK” appears, unplug the
power cord.
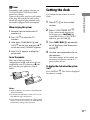
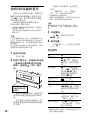
To use the remote
Slide and remove the battery
compartment lid
, and insert the two
supplied R6 (size AA) batteries, side
rst, matching the polarities shown
below.
Notes
With normal use, the batteries should last for
about six months.
Do not mix an old battery with a new one or
mix dierent types of batteries.
If you do not use the remote for a long period
of time, remove the batteries to avoid damage
from battery leakage and corrosion.
Setting the clock
Use buttons on the remote to set the
clock.
1
Press /
to turn on the
system.
2
Press CLOCK/TIMER SET
.
If the current mode appears on
the display, press /
repeatedly to select “CLOCK SET”
and then press ENTER
.
3
Press /
repeatedly
to set the hour, and then press
ENTER
.
4
Use the same procedure to set
the minutes.
e clock settings are lost when you
disconnect the power cord or if a
power failure occurs.
To display the clock when the system
is o
Press DISPLAY
. e clock is displayed
for about 8 seconds.

CMT-BX3.GB.3-095-504-91(1)
12
GB
Basic Operations
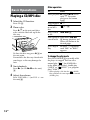
Playing a CD/MP3 disc
1
Select the CD function.
Press CD
.
2
Place a disc.
Press
on the unit, and place
a disc with the label side up on the
disc tray.
To close the disc tray, press
on
the unit again.
Do not force the disc tray closed with
your nger, as this may damage the
unit.
3
Start playback.
Press (or CD on the unit)
.
4
Adjust the volume.
Press VOLUME +/ (or VOL +/ on
the unit)
.
Other operation
To Press
Pause playback (or CD on the
unit)
. To resume
play, press the button
again.
Stop playback
.
Select a folder
on an MP3
disc
+/
.
Select a track
or le
/
.
Find a point in
a track or le
Hold down /
during playback, and
release the button at the
desired point.
Select Repeat
Play
REPEAT
repeatedly
until “REP” or “REP1”
appears.
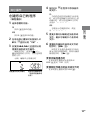
To change the play mode
Press PLAY MODE
repeatedly while
the player is stopped. You can select
normal play (“ *” for all MP3 les
in the folder on the disc), shue play
(“SHUF” or “ SHUF*”), or program
play (“PGM”).
* When playing a CD-DA disc, (SHUF)
Play performs the same operation as normal
(shue) play.

CMT-BX3.GB.3-095-504-91(1)
13
GB
Basic Operations
Notes on Repeat Play
All tracks or les on a disc are played
repeatedly up to ve times.
“REP1” indicates that a single track or le is
repeated until you stop it.
Notes on playing MP3 discs
Do not save other types of les or
unnecessary folders on a disc that has MP3
les.
Folders that have no MP3 les are skipped.
MP3 les are played back in the order that
they are recorded onto the disc.
e system can only play MP3 les that have
a le extension of “.MP3”.
If there are les on the disc that have the
“.MP3” le extension, but that are not MP3
les, the unit may produce noise or may
malfunction.
e maximum number of:
folders is 255 (including the root folder).
MP3 les is 511.
MP3 les and folders that can be
contained on a single disc is 512.
folder levels (the tree structure of les) is
8.
Compatibility with all MP3 encoding/writing
soware, recording device, and recording
media cannot be guaranteed. Incompatible
MP3 discs may produce noise or interrupted
audio or may not play at all.
Notes on playing multisession discs
If the disc begins with a CD-DA (or MP3)
session, it is recognized as a CD-DA (or
MP3) disc, and other sessions are not played
back.
A disc with a mixed CD format is recognized
as a CD-DA (audio) disc.
Listening to the radio
1
Select “FM” or “AM.”
Press TUNER/BAND
repeatedly.
2
Select the tuning mode.
Press TUNING MODE
repeatedly
until “AUTO” appears.
3
Tune in the desired station.
Press +/ (or TUNE +/ on
the unit)
. Scanning stops
automatically when a station is tuned
in, and then “TUNED” and “ST” (for
stereo programs only) appear.
When you tune in a station that
provides RDS services, the station
name appears on the display
(European model only).
4
Adjust the volume.
Press VOLUME +/ (or VOL +/ on
the unit)
.
To stop automatic scanning
Press
.
To tune in a station with a weak signal
If “TUNED” does not appear and the
scanning does not stop, press TUNING
MODE
repeatedly until “AUTO” and
“PRESET” disappear, and then press
+/ (or TUNE +/ on the unit)
repeatedly to tune in the desired station.
To reduce static noise on a weak FM
stereo station
Press FM MODE
repeatedly until
“MONO” appears to turn o stereo
reception.

CMT-BX3.GB.3-095-504-91(1)
14
GB
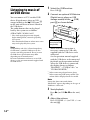
Listening to music of
an USB device
You can connect a CCC-certied USB
device (Digital music player or USB
storage media) to the (USB) port
on the unit and listen to music stored in
the USB device.
e audio formats that can be played
back by this system are as follows:
ATRAC/MP3*/WMA*/AAC*
* Files with copyright protection (Digital
Rights Management) cannot be played by
this system.
Files downloaded from an online music store
may not be played by this system.
Note
Compatibility with CCC (China Compulsory
Certication)-certied USB devices on this
system is not fully guaranteed. is is because
the USB device specications may dier
depending on the manufacturers.
For more information on how to use an USB
device, see the operation manual supplied with
the USB device.
1
Select the USB function.
Press USB
.
2
Connect an optional USB device
(Digital music player or USB
storage media) to the (USB)
port
as shown below.
When USB cable connection is
necessary, connect the USB cable
supplied with the USB device to be
connected.
See the operation manual supplied
with the USB device to be connected
for details on the operation method.
When the USB device is connected,
the display changes as follows:
“READING”
“ATRAC AD
1)
” or
“STORAGE DRIVE
2)
”
1)
When connecting a digital music player.
2)
When connecting USB storage media. e
volume label is displayed next if recorded.
Note
It may take about 10 seconds before
“READING” appears depending on the type of
USB device connected.
3
Start playback.
Press (or USB on the unit)
.
4
Adjust the volume.
Press VOLUME +/ (or VOL +/ on
the unit)
.
USB device (Digital
music player or USB
storage media)

CMT-BX3.GB.3-095-504-91(1)
15
GB
Basic Operations
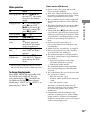
Other operation
To Press
Pause playback (or USB on
the unit)
. To resume
play, press the button
again.
Stop playback
. To resume play,
press (or USB
on the unit)
*.
To cancel resume play,
press
again.
Select a folder
+/
.
Select a le /
.
Find a point in
a le
Hold down /
during playback,
and release the button
at the desired point.
Select Repeat
Play
REPEAT
repeatedly
until “REP” or “REP1”
appears.
Remove the
USB device
Hold down
until
“NO DEVICE” appears,
then remove the USB
device.
* When playing a VBR MP3 le, the system
may resume playback from a dierent point.
To change the play mode
Press PLAY MODE
repeatedly while
the USB device is stopped. You can
select normal play (“ ” for all les in
the folder on the digital music player),
shue play (“SHUF” or “ SHUF”), or
program play (“PGM”).
Notes on the USB device
Do not connect the system and the USB
device through a USB hub.
With some connected USB devices, aer an
operation is performed, there may be a delay
before it is performed by this system.
is system does not necessarily support all
the functions provided in a connected USB
device.
e playback order for the system may dier
from the playback order of the connected
USB device.
Always hold down
and make sure that
“NO DEVICE” appears before removing the
USB device. Removing the USB device while
“NO DEVICE” is not displayed may corrupt
the data on it or damage the USB device
itself.
Do not save other types of les or
unnecessary folders on an USB device that
has audio les.
Folders that have no audio les are skipped.
Files are played back in the order that they
are transferred to the USB device.
e maximum numbers of folders and les
that can be contained on a single USB device
are as follows:
Digital music player: 65,535 groups
(maximum 999 tracks per group)
USB storage media: 999 les
e maximum number of les and folders
may vary depending on the le and folder
structure.
e audio formats that you can listen to with
this system are as follows:
MP3: le extension “.mp3”
Windows Media Audio le: le extension
“.wma”
AAC: le extension “.m4a”
Note that even when le names have the
above le extensions, if the actual le diers,
the system may produce noise or may
malfunction.
Compatibility with all encoding/writing
sowares, recording devices, and recording
media cannot be guaranteed. Incompatible
USB device may produce noise or interrupted
audio or may not play at all.

CMT-BX3.GB.3-095-504-91(1)
16
GB
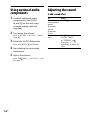
Using optional audio
components
1
Connect additional audio
component to the AUDIO
IN jack
on the unit using
an audio analog cord (not
supplied).
2
Turn down the volume.
Press VOLUME (or VOL on the
unit)
.
3
Select the AUDIO IN function.
Press AUDIO IN
on the unit.
4
Start playing the connected
component.
5
Adjust the volume.
Press VOLUME +/ (or VOL +/ on
the unit)
.
Adjusting the sound
To add a sound eect
To Press
Generate a
more dynamic
sound
(Dynamic
Sound
Generator
X-tra)
DSGX
on the unit.
Set the sound
eect
EQ
repeatedly
to select “BASS”
or “TREBLE,” and
then press +/
repeatedly to adjust the
level.

CMT-BX3.GB.3-095-504-91(1)
17
GB
Basic Operations
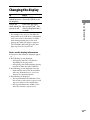
Changing the display
To Press
Change
information on
the display
1)
DISPLAY
repeatedly
when the system is on.
Check the
clock when the
system is o
DISPLAY
when
the system is o
2)
. e
clock is displayed for 8
seconds.
1)
For example, you can view CD/MP3 disc
information or the USB device information,
such as the track or le number or folder
name during normal play, or the total
playing time while the player is stopped.
2)
e STANDBY indicator
on the unit
lights up when the system is o.
Notes on the display information
Characters that cannot be displayed appear
as “_”.
e following are not displayed:
total playing time for a CD-DA disc
depending on the play mode.
total playing time and remaining playing
time for an MP3 disc and USB device.
e following are not displayed correctly:
folder and le names that do not follow
either the ISO9660 Level 1, Level 2 or
Joliet in the expansion format.
e following are displayed:
ID3 tag information for MP3 les when
ID3 version 1 and version 2 tags are used
(up to 62 characters for an MP3 disc).
ID3 tag information for “ATRAC” les
when ID3 version 2 tags are used.

CMT-BX3.GB.3-095-504-91(1)
18
GB
Other Operations
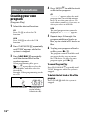
Creating your own
program
(Program Play)
1
Select the desired function.
CD
Press CD
to select the CD
function.
USB
Press USB
to select the USB
function.
2
Press PLAY MODE
repeatedly
until “PGM” appears while the
system is stopped.
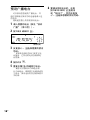
3
Press /
repeatedly
until the desired track or le
number appears.
When programming les, press
+/
repeatedly to select the
desired folder, and then select the
desired le.
Example: When programming tracks
on a CD
Selected track or le number Total playing time of
program (including
selected track or le)
4
Press ENTER
to add the track
or le to the program.
CD
“ . ” appears when the total
program time exceeds 100 minutes
for a CD, or when you select a CD
track whose number is 21 or over, or
when you select an MP3 le.
USB
e total program time cannot be
displayed, so “ . ” appears.
5
Repeat steps 3 through 4 to
program additional tracks or
les, up to a total of 25 tracks or
les.
6
To play your program of tracks
or les, press
.
e program remains available until
you open the disc tray or remove
the USB device. To play the same
program again, press
.
To cancel Program Play
Press PLAY MODE
repeatedly until
“PGM” disappears while the system is
stopped.
To delete the last track or le of the
program
Press CLEAR
while the system is
stopped.

CMT-BX3.GB.3-095-504-91(1)
19
GB
Other Operations
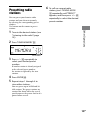
Presetting radio
stations
You can preset your favorite radio
stations and tune them in instantly
by selecting the corresponding preset
number.
Use buttons on the remote to preset
stations.
1
Tune in the desired station (see
“Listening to the radio” (page
13)).
2
Press TUNER MEMORY
.
3
Press +/
repeatedly to
select your desired preset
number.
If another station is already assigned
to the selected preset number,
the station is replaced by the new
stations.
4
Press ENTER
.
5
Repeat steps 1 through 4 to
store other stations.
You can preset up to 20 FM and 10
AM stations. e preset stations are
retained for about half a day even if
you disconnect the power cord or if a
power failure occurs.
6
To call up a preset radio
station, press TUNING MODE
repeatedly until “PRESET”
appears, and then press +/
repeatedly to select the desired
preset number.
Preset number

CMT-BX3.GB.3-095-504-91(1)
20
GB
Using the Timers
e system oers two timer functions.
If you use the Play Timer with the Sleep
Timer, the Sleep Timer has priority.
Sleep Timer:
You can fall asleep to music. is
function works even if the clock is not
set.
Press SLEEP
repeatedly.
If you select “AUTO,” the system
automatically turns o aer the current
disc stops or in 100 minutes.
Play Timer:
You can wake up to CD, tuner or optional
USB device at a preset time.
Use buttons on the remote to control the
Play Timer. Make sure you have set the
clock.
1
Prepare the sound source.
Prepare the sound source, and then
press VOLUME +/
to adjust the
volume.
To start from a specic track or le,
create your own program (page 18).
2
Press CLOCK/TIMER SET
.
3
Press /
repeatedly
to select “PLAY SET,” and then
press ENTER
.
“ON” appears, and the hour
indication ashes.
4
Set the time to start playing.
Press /
repeatedly to set
the hour, and then press ENTER
.
e minute indication ashes. Use the
procedure above to set the minutes.
5
Use the same procedure as in
step 4 to set the time to stop
playing.
6
Select the sound source.
Press /
repeatedly until
the desired sound source appears, and
then press ENTER
. e display
shows the timer settings.
7
Press /
to turn o the
system.
e system turns on 15 seconds
before the preset time. If the system is
on at the preset time, the Play Timer
will not play.
To activate or check the timer again
Press CLOCK/TIMER SELECT
, press
/
repeatedly until “PLAY
SEL” appears, and then press ENTER
.
To cancel the timer
Repeat the same procedure as above until
“TIMER OFF” appears, and then press
ENTER
.
To change the setting
Start over from step 1.
Tip
e Play Timer setting remains as long as the
setting is not canceled manually.
ページが読み込まれています...
ページが読み込まれています...
ページが読み込まれています...
ページが読み込まれています...
ページが読み込まれています...
ページが読み込まれています...
ページが読み込まれています...
ページが読み込まれています...
ページが読み込まれています...
ページが読み込まれています...
ページが読み込まれています...
ページが読み込まれています...
ページが読み込まれています...
ページが読み込まれています...
ページが読み込まれています...
ページが読み込まれています...
ページが読み込まれています...
ページが読み込まれています...
ページが読み込まれています...
ページが読み込まれています...
ページが読み込まれています...
ページが読み込まれています...
ページが読み込まれています...
ページが読み込まれています...
ページが読み込まれています...
ページが読み込まれています...
ページが読み込まれています...
ページが読み込まれています...
ページが読み込まれています...
ページが読み込まれています...
ページが読み込まれています...
ページが読み込まれています...
ページが読み込まれています...
ページが読み込まれています...
ページが読み込まれています...
ページが読み込まれています...
-
 1
1
-
 2
2
-
 3
3
-
 4
4
-
 5
5
-
 6
6
-
 7
7
-
 8
8
-
 9
9
-
 10
10
-
 11
11
-
 12
12
-
 13
13
-
 14
14
-
 15
15
-
 16
16
-
 17
17
-
 18
18
-
 19
19
-
 20
20
-
 21
21
-
 22
22
-
 23
23
-
 24
24
-
 25
25
-
 26
26
-
 27
27
-
 28
28
-
 29
29
-
 30
30
-
 31
31
-
 32
32
-
 33
33
-
 34
34
-
 35
35
-
 36
36
-
 37
37
-
 38
38
-
 39
39
-
 40
40
-
 41
41
-
 42
42
-
 43
43
-
 44
44
-
 45
45
-
 46
46
-
 47
47
-
 48
48
-
 49
49
-
 50
50
-
 51
51
-
 52
52
-
 53
53
-
 54
54
-
 55
55
-
 56
56


