
EN
ZH
VI
MS
TH
KO

D
A
B
C
D1
D2
D3
D4
D6
D5
D7
E
E1
E2
F
F1
F2
"click"
"click"
"click"
1
2
fig.1a fig.1b
fig.1c fig.2b
4.gif3.gif
D3
2
3
1
fig.2a

D
A
B
C
D1
D2
D3
D4
D6
D5
D7
E
E1
E2
F
F1
F2
"click"
"click"
"click"
1
2
fig.1a fig.1b
fig.1c fig.2b
4.gif3.gif
D3
2
3
1
fig.2a

"click"
click"
"
2
1
fig.5 fig.6a
fig.6b fig.7a
fig.7b fig.7c

1
EN
"click"
click"
"
2
1
fig.5 fig.6a
fig.6b fig.7a
fig.7b fig.7c
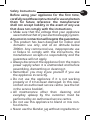
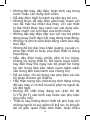
Before using your appliance for the first time,
carefully read these instructions for use and retain
them for future reference: the manufacturer
shall not accept liability in the event of any use
that does not comply with the instructions.
• Make surethat the voltagethat your appliance
usesmatchesthatofyourelectricalsupplysystem.
Any error in connection will negate the guarantee.
• Thisproducthasbeendesignedforindoorand
domestic use only, and at an altitude below
2000m.Anycommercialuse,inappropriateuse
or failure to comply with the instructions, the
manufactureracceptsnoresponsibilityandthe
guaranteewillnotapply.
• Alwaysdisconnecttheappliancefromthemains
powersupplywhenitisunattendedandbefore
assembling,dismantlingorcleaningit.
• Remember: you may injure yourself if you use
theapplianceincorrectly.
• Do not use the appliance if it is not working
properlyorifithasbeendamaged.Inthiscase,
contactanauthorisedservicecentre(seethelist
intheservicebooklet).
• All maintenance other than cleaning and
everyday upkeep by the customer must be
performedbyanauthorisedservicecentre.
• Donotusethisappliancetoblendormixnon-
fooditems.
• Neverusetheblenderjugwithoutingredientsor
Safety Instructions

2
withsolidingredientsonly.
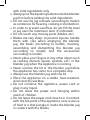
• Alwayspourtheliquidingredientsintotheblender
jugfirst,beforeaddingthesolidingredients
• Donotusethejugorbowls(accordingtomodel)
ascontainersforfreezing,cookingorsterilization.
• Inordertopreventoverflow,donotfillthebowl
orjugoverthemaximumlevel(ifindicated).
• Donottouchanymovingparts(blades,etc.).
• Bladesareverysharp:topreventinjuries,handle
them with care when emptying the blender
jug, the bowls (according to model), cleaning,
assembling and dismantling the blender jug
(according to model) and the accessories
(accordingtomodel).
• Neverplaceyourfingersoranyotherobjectsuch
ascookingutensils(spoon,spatula,etc.)in the
blenderjugwhentheapplianceisrunning.
• Neverremove the lid or the blender jug before
theappliancehascometoacompletestop.
• Alwaysusetheblenderjugwiththelid.
• Placetheappliance on a stable,heat-resistant,
cleananddryworktop.
• Do not immerse the appliance, power cord or
pluginanyliquid.
• Do not leave the power cord hanging within
reachofchildren.
• Donotleavethepowercordclosetoorincontact
withthehotpartsoftheappliance,nearasource
ofheatorasharpangleorinsidetheblenderjug
incontactwiththeblades.

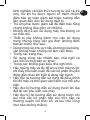
3
EN
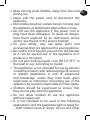
• Keepmovingparts(blades)awayfromthecord
duringuse.
• Never pull the power cord to disconnect the
appliance.
• Donotallowlonghair,scarves,tiesetc.tohangover
theapplianceorattachmentwheneitherisinuse.
• Do not use the appliance if the power cord or
plug have been damaged. To avoid all danger,
have them replaced by an authorised service
centre(seethelistintheservicebooklet).
• For your safety, only use spare parts and
accessoriesthatareapprovedforyourappliance.
• Becarefulifhotliquidispouredintotheblender
as it can be ejected out of the appliance as it
producesalotsteam.
• Donotpourboilingliquids(over80°C/176°F)in
thebowlorjug(accordingtomodel).
• Thisapplianceisnotintendedforusebypersons
(includingchildren)withreducedphysical,sensory
or mental capabilities, or lack of experience
and knowledge, unless they have been given
supervision or instruction concerning use of the
appliancebyapersonresponsiblefortheirsafety.
• Children should be supervised to ensure that
theydonotplaywiththeappliance.
• Do not allow children to use the appliance
withoutsupervision.
• It is not intended to be used in the following
applications,andtheguaranteewillnotapplyfor:
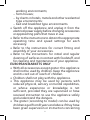
– staffkitchenareasinshops,officesandother

4
workingenvironments;
– farmhouses;
– byclientsinhotels,motelsandotherresidential
typeenvironments;
– bedandbreakfasttypeenvironments.
• Switch off the appliance and unplug it from the
electricalpowersupplybeforechangingaccessories
orapproachingpartsthatmoveinuse.
• Refertotheinstructionstoobtaintheappropriate
operating time and speed settings for each
accessory.
• Refer to the instructions for correct fitting and
assemblyofyouraccessories.
• Refer to the instructions for initial and regular
cleaningofsurfacesincontactwithfoodstuff,and
forcleaningandmaintenanceofyourappliance.
EUROPEAN MARKETS ONLY
• Withallaccessoriesexceptgrater:thisappliance
shallnotbeusedbychildren.Keeptheappliance
anditscordoutofreachofchildren.
• Childrenshallnotplaywiththeappliance.
• This appliance may be used by persons with
reducedphysical,sensoryormentalcapabilities,
or whose experience or knowledge is not
sufficient,providedtheyaresupervisedorhave
receivedinstructiontousetheappliancesafely
andunderstandthedangers.
• Thegrater(accordingtomodel)canbeusedby
childrenagedfrom8yearsandaboveiftheyhave
beengivensupervisionorinstructionconcerning

5
EN
useof the appliancein a safe wayand if they
understandthe hazardsinvolved.Cleaning and
usermaintenanceshallnotbemadebychildren
unless they are aged from 8 years and above
andsupervised.Keeptheapplianceanditscord
outofreachofchildrenagedlessthan8years.
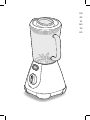
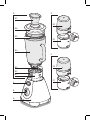
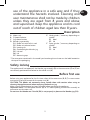
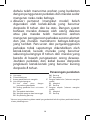
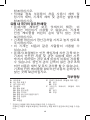
A Motorunit
B 5SpeedsSelector
C Jugreleasebutton
D Blenderjugassembly
D1 Bladeunitwithbuilt-inseal
D2 Bladeunitreleasebutton
D3 Locatingrib
D4 Graduatedglassblenderjug
D5 Lidseal
D6 Lid
D7 Measuringcap
E Herbgrinder(* accessorydepending on
model)
E1 Bowl
E2 Lid
F Spicegrinder(*accessorydependingon
model)
F1 Bowl
F2 Lid
Description
*Theaccessoriescontainedinthemodelyouhaveboughtareshownonthelabellocatedon
thetopofthepackaging.
Theappliancewillnotoperateiftheblenderjugassembly(D)ortheaccessories(E)or(F)are
notcorrectlypositionedandlockedonthemotorunit(A).
Safety locking
Beforeusingyourapplianceforthefirsttime,cleanalltheaccessories(D, E, F)inwarmwater
andwashingupliquid,exceptforthemotorunit(A).
CAUTION: The blades are extremely sharp; handle them with caution when using or
cleaning the appliance and when emptying the bowls or jug.
Makesureallthepackaginghasbeenremovedbeforeoperatingtheappliance.
Important note:Turnthespeedselector (B) to “0” beforeplacingtheblender assembly or
accessoriesonthemotorunit.
Do not turn the blender on if the lid (D6) is not properly in place on the blender jug (D4).
Before first use

6
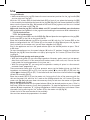
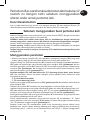
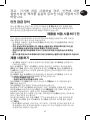
Using the blender
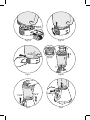
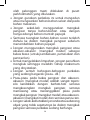
•Beforeassemblingthejug(D)choosethemostconvenientpositionforthejughandle(D4)
(ontherightorontheleft.).
Withthe“clic”button(D2)ofthebladesblock(D1)infrontofyou,placethelocatingrib(D3)
intheassemblyslotlocatedatthebaseofthejug(D4)(fig. 1a)thenlowerthebladeunit(D1)
downintothesecondslot(fig. 1b)locatedatthefrontofthejugbaseuntiltheunitislocked
inplace(youwillhearaclick)(fig. 1c).
Make sure that the jug (D4) and the blade unit (D1) are well assembled, press the button
(D2)andplacetheingredientsinthejugwithoutexceedingthemaximumlevelindicatedonit:
* 1.5L for thick mixture
* 1.25 L for liquid mixtures
Makesurethattheseal(D5)isonthelid(D6)(fig. 2a)andplacethetwotogetheronthejug(D4).
Putthecap(D7)intheslotonthetopofthelid.
Placetheassembledblenderjug(D)onthemotorunit(A),withthe“clic”button(D2)onthe
bladeunitalignedwiththe“clic”button(C)onthemotorunit(fig. 2b)andpressthejugdown
firmlytolockitonthemotorunit(youwillhearadoubleclick)(fig. 3).
Plugintheapplianceandturnthespeedselector(B)tothedesiredpositionorpress“Pulse”
afewtimes.
Tostoptheappliance,turnthespeedselector(B)tothe“0”position.Unplugtheappliance.
Removethejug(D)fromthemotorunit(A)bypressingthe“clic”button(C)thenliftoffthe
jug(fig. 4).
Using the lift herb grinder and spice grinder
•Withtheherbgrinder(E),youcanchopingredientslikeonion,garlic,meat(cutintopieces),
driedfruitsandherbsinafewsecondsandmakecrumbs(fromrusks,etc).Donotusethe
herbgrinderforliquidpreparations(fruitjuices,etc.).
•Withthespicegrinder(F),youcangrindtoapowderavarietyofspicesinafewseconds:
corianderseeds,peppercorns,etc.
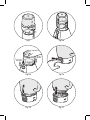
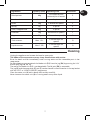
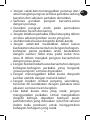
These accessories come with a lid that prevents access to the blades during use. Add the
ingredientstothebowl(E1)or(F1).Line up the symbol
onthelid(E2)or(F2)withthe
symbol
onthebowl(E1)or(F1).Fitthebowlontothelidandturnthelidclockwiseupto
tolocktheassembly(fig. 5).
Placetheassembly(E)or(F)onthemotorunit,liningupthe2ribsoftheaccessorywiththe
slotsonthemotorunit,withthe“clic”markonthelidalignedwiththe“clic”button(C)onthe
motorunit(fig. 6a)andpressdowntheaccessoryfirmlytolockitonthemotorunit(you will
hear a double click)(fig. 6b).
Plugintheapplianceandturnthespeedselector(B)tothedesiredpositionorpress“Pulse”a
fewtimes.Holdtheaccessoryfirmlyduringoperation.Tostoptheappliance,turnthespeed
selector(B)backtoposition“0”.Unplugtheappliance.Holdtheaccessoryandreleaseitfrom
themotorunitbypressingthe“clic”button(C)onthemotorunit(A)(fig. 4).
Unlockthelidinthereverseorderoftheassembly.
Youcanthenremovethepreparationinthebowl.
Use

7
EN
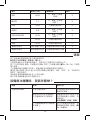
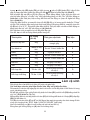
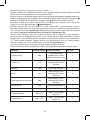
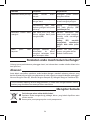
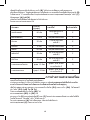
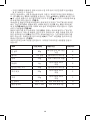
Ingredients Quantity (max) Operating time Accessories
Driedapricots 80g
Turnbuttontopulse
continuallyfor4seconds
E
Breadcrumbs 1rusk Inpulses E
Onion 50g 5secondsonspeed1 E
Parsley 6g Inpulses E
Clean,choppedmeat 60g Inpulses E
Coriander 50g 60secondsonspeed5 F
Pepper 50g 60secondsonspeed5 F
Thickmixtures Max.1.5L
3minutesmax.on
speed5
D
Liquidmixtures Max.1.25L
3minutesmax.on
speed5
D
Unplugtheapplianceandremovethebowloraccessories.
The blades of the accessories are very sharp. Handle them with caution.
Rinsethe bowls andlids immediately underrunning water and theremovableparts in hot
soapywater.
Foreasycleaning,youcandetachthebladeunit(D1)fromthejug(D4)bypressingthe“clic”
button(D2)(fig. 7a, 7b, 7c).
Thesealofthebladeunit(D1)isnotdetachable.Thelidjoint(D6)isremovable.
Thejug(D)andtheaccessories(E)and(F)canbecleanedinthedishwasherinthetopbasket
withthe“ECO”or“LIGHTLYSOILED”programme.
Cleanthemotorunit(A)withadampclothanddrycarefully.
Neverimmersethemotorunit(A)inrunningwateroranyotherliquid.
Cleaning

8
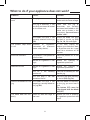
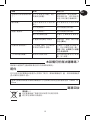
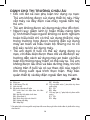
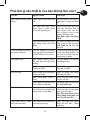
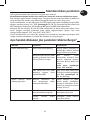
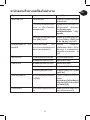
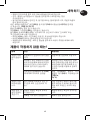
What to do if your appliance does not work?
Problems Causes Solutions
The product does not
work.
Theplugisnotconnected. Connect the appliance to a
socketwiththesamevoltage.
The jug or accessory is not
correctlypositionedorlocked
onthemotorunit.
Check that the jug or
accessories are correctly
positionedandlockedonthe
motor unit as shown in the
instructions.You must hear a
double “click”.
The blade unit (D1) is not
correctlyattachedtothejug
(D4).
Unlock the blade unit (D1)
and bolt it to the jug (D4)
(fig. 1a, 1b, 1c)onceagain.
The product stops while
inuse.
Overload of ingredients
(activation of electronic
motorsafetydevice).
In this case, unplug the
product,putthebuttonback
to 0 position and let it cool
down for a minimum of 30
minutes.
Excessivevibrations. Theproductisnotplacedon
aflatsurface.
Place the product on a flat
surface.
Volume ofingredients istoo
high.
Reduce the quantity of
ingredientsprocessed.
Leakfromthelid. Volume ofingredients istoo
high.
Reduce the quantity of
ingredientsprocessed.
The lid is not correctly
positioned.
Lock the lid correctly on the
blenderjug.
The seal (D5) is not well
placedonthelid.
Place the seal (D5) correctly
onthelid(D6)(fig. 2a).
Leakatthebottomofthe
jug.
The blade unit (D1) is not
properlyorsecurelylockedon
thejug(D4).
Placethebladeunitcorrectly
on the jug; youmust hear a
click.
The button (D2) must be
fully aligned with the blade
unit (D1).
The blade does not turn
easily.
Pieces of food too large or
toohard.
Reduce the size or quantity
ofingredientsprocessed.Add
liquid.

9
EN
Contactthecustomerservice(seecontactdetailsattheendofthisleaflet).
You can customise your appliance and obtain the following accessories from your usual
retaileroranapprovedservicecentre:Herbgrinderaccessory(E),Spicegrinderaccessory(F)
oradditionalblenderjug(D).
Your appliance still does not work?
Accessories
Recycling
Pleaserefertothisinstructionleafletfirstandcontactanapprovedservicecentre(seelist
attheend)givingtheproductcodeforyourapplianceLMxxxorBLxxx.
Think of the environment!
Yourappliancecontainsvaluablematerialswhichcanberecoveredorrecycled.
Leaveitatalocalcivicwastecollectionpoint.
•Disposal of the appliance and its packaging materials.
Thepackagingiscomprisedexclusivelyofmaterialsthatpresentnodanger
fortheenvironmentandwhichmaythereforebedisposedofinaccordance
with the recycling measures in force in your area. For disposing of the
applianceitself,pleasecontacttheappropriateserviceofyourlocalauthority.
•End of life electrical and electronic products.
Yourapplianceisexpectedtolastformanyyears.However,whenthetime
comesto replace it, donotthrowitin the binorina dump, buttake it to
the recycling centre in your town (or to a waste reception centre where
applicable).

10
第一次使用本產品之前請仔細閱讀並保存使用說明:
生產商概不承擔不按照使用說明操作造成的責任。
•確保電壓符合本產品安裝要求。
安裝不當造成之故障不在維修保養範圍內。
•本產品只能作為家用和室內用,及在海拔2000米
以下使用。
•作為商業用途、轉讓或不按照使用說明使用,維
修保養條款即告失效。
•不使用、安裝及清潔電器前,請保持電源斷開。
•注意:錯誤使用電器可能會對使用者造成傷害。
•電器使用不順暢或受損時,請不要使用。在此情
況下,請致電授權服務中心(請參閱服務手冊名
單)。
•除日常清潔及保養,所有維修需由授權服務中心
進行。
•禁止使用該本產品混合和攪拌食物以外的物質。
請勿空轉本產品。
•請勿在無任何材料或僅僅只有固體材料的情況下
使用攪拌機。
•總是在加入固體材料之前先加入液體材料。
•請勿將攪拌機或配件(取決於型號)當做容器(冷
凍,烹飪,滅菌)使用。
•為了防止食物外濺,使用時請確保食物沒有超出
盛器的最大容量。
•不要接觸活動裝置(如刀片)。
•刀片非常鋒利:為避免受傷,在清空攪拌杯、碗
(取決於型號)、安裝及拆卸攪拌杯(取決於型
號)及配件(取決於型號)時,請小心處理。
•運行時,不要將您的手指或其他與攪拌功能無關
安全說明

11
ZH
的物體放入攪拌機。
•在機器完全停止前,不要移除蓋子或攪拌杯。
•使用攪拌杯時,總是和蓋子一起使用。
•在平坦、耐熱、乾淨及乾燥的工作枱上使用攪拌
機。
•禁止將機器,電源線及插頭放置於水中或其他液
體中。
•請勿讓兒童接觸電源線。
•請勿將電源線放置於機器的發熱部位附近及其接
觸面、熱源附近、利角或攪拌杯內。
•切勿將電源線靠近活動裝置(刀片)。
•請勿拉扯電源線以斷開電源。
•請勿在本產品及其他活動裝置上方懸掛長髮、圍
巾和領帶。
•如果電源線或插頭出現損壞,請勿使用本產品。
為免發生危險,請將本產品交往授權服務中心進
行更換(請參閱服務手冊名單)。
•為確保您的安全,請只使用本產品內配置的配件
及其他組合配件。
•請留意,將熱液體倒入攪拌機時,由於沸騰的原
因,有可能出現噴濺。
•請勿將沸騰的液體(溫度高與80°C/176°F)倒入
攪拌杯或碗(取決於型號)內。
•身體、感官或心理功能障礙者、經驗及認知不全
者(包括兒童),請在負責其安全的人士監督及給予
指示下使用本產品。
•應看管好孩童,保證其不玩耍本產品。
•切勿任由兒童自行使用本產品。
•本產品並非為以下用途而設,且不會得到保養:
– 商店,辦公室或其他工作環境的員工廚房範圍;
– 農舍;

12
A 馬達裝置
B 5速旋鈕
C 攪拌杯卸除按鈕
D 攪拌杯組件
D1 刀片裝置及內置墊圈
D2 刀片卸除按鈕
D3 定位裝置
D4 附刻度玻璃攪拌杯
D5 杯蓋接合環
D6 杯蓋
D7 量杯
E 香草研磨器(*配件視機型而定)
E1 攪拌碗
E2 蓋子
F 香料研磨器(*配件視機型而定)
F1 攪拌碗
F2 蓋子
*您所購買的機型隨附的配件在包裝最上方的標籤均有標示。
說明
– 酒店、汽車旅館及其他住宿性質環境的客戶使用;
– 供住宿及早餐的旅館。
•在更換配件或會活動的部件前,關閉本產品並切
斷電源。
•請根據指引獲取本產品的操作時間及速度設定資料。
•請根據指引正確安裝配件。
•請根據指引作對與食物接觸表面的首次及定期清
潔,及對本產品的清潔及保養。
只限於歐洲市場。
•帶有除了刀片以外的所有的配件:此機器不得由兒童
使用。將機器電源線存放在兒童觸及不到的地方。
•請勿讓兒童將本產品當作玩具。
•肢體、感官或心智能力較弱,或者經驗及知識不
足的人士亦可使用本產品,唯須接受監督,或已
得到安全使用的指示及獲悉潛在危險。
•在有人陪同的情況下,或者在得到安全使用機器
的指示以及明確理解相關危險的情況下,刀片配
件(取決於型號)可以由8歲以上的兒童進行使
用。機器的清洗和維護不應該由兒童進行,除非
在兒童大於8歲並有成人陪伴的情況下。將機器和
電源線放在8歲以下兒童無法觸及的地方。

13
ZH
若攪拌杯組件(D)或是配件(E)或(F)未正確安裝並固定在馬達裝置(A)時,本設備不會運作。
注意:首次使用本產品前,請細閱安全指引及此說明書。
第一次使用本設備之前,請用溫肥皂水清潔所有配件(D、E、F),馬達裝置(A)除外。
注意:刀片極銳利,使用、清潔本設備,或清空攪拌碗及攪拌杯時,請小心拿取。操作
本設備之前,請確定已拆下所有包裝。
重要事項:在馬達裝置上安裝攪拌機組件或配件之前,請將速度旋鈕(B)轉到“0”。
如果杯蓋(D6)沒有妥當放在攪拌杯(D)上,切勿開動攪拌機。
•在組裝攪拌杯(D)之前,將把手(D4)拿在最順手的位置(右面或左面。)
讓攪拌刀裝置的刀片卸除按鈕(D2)面向自己,將定位裝置(D3)放在攪拌杯(D4)底的組
裝槽(圖1a),然後將刀片裝置(D1)放在攪拌杯(D4)底前端的第二槽位(圖1b),直至裝
置鎖緊(您會聽見咔噠一聲)(圖1c)。
確定攪拌杯 (D4) 和刀片裝置 (D1)裝妥後按下鈕 (D2),然後將材料放入攪拌杯內,但切
勿超出杯身指示的最高水位:
* 1.5 公升 濃稠混合食材
* 1.25 公升 液態混合食材
必須確保杯蓋接合環(D5)已套在杯蓋(D6)(圖2a),然後將兩者一同放在攪拌杯上(D4)。
將量杯(D7)插入蓋頂的量杯位置。
將組裝的攪拌杯(D)放在馬達裝置(A)上,讓刀片裝置的“clic”按鈕(D2)與馬達裝置的“clic”
按鈕(C)對齊(圖2b),然後往下壓,讓杯子牢牢鎖在馬達裝置(您會聽到咔噠兩聲)(圖3)。
將本設備的電源插頭插入電源插座中,加入食材後,將速度旋鈕(B)轉到想要的位置,或
是按幾下「暫動」。
若要讓本設備停止運作,請將速度旋鈕(B)轉回位置“0”。
要停頓攪拌杯,將速度旋鈕(B) 調校至“0”,然後拔掉插頭。要將攪拌杯(D) 從馬達裝
置(A)卸除,只須按動刀片卸除按鈕(C)便可提起攪拌杯(圖4)。
•使用香草研磨器 (E) 可以在幾秒內切碎洋蔥、大蒜、肉類 (切成碎肉)、水果乾及香草,
以及製作麵包屑(以麵包乾製作等)。不可使用香草研磨器處理液體食材(例如果汁)。
•使用香料研磨器(F),可以在幾秒內將芫荽籽、胡椒等各種不同的香料研磨成粉末。
這些配件隨附一個蓋子,可防止在使用時觸碰到刀片。將食材倒入攪伴碗 (E1) 或 (F1)
中。讓蓋子(E2)或(F2)上的符號
與攪伴碗(E1)或(F1)上的符號 對齊。
將攪伴碗裝在蓋上,然後以順時針方向將蓋子轉到
,以鎖住組件 (圖5)。將組件 (E) 或
(F) 放在馬達裝置上,利用馬達裝置上的溝槽對齊組件的 2 個卡位,使蓋子上的 “clic”
標記和馬達裝置的「攪拌杯卸除」按鈕(C)對齊(圖6a),然後往下壓按組件,使其牢牢鎖
在馬達裝置(您會聽到咔噠兩聲)(圖6b)。
將本設備的電源插頭插入電源插座中,將速度旋鈕(B)轉到想要的位置,或是按幾下「暫
動」。運轉時,請拿好組件並保持穩定。若要讓本設備停止運作,請將速度旋鈕(B)轉回
位置“0”。拔下本設備的電源插頭。拿好配件,按下「攪拌杯卸除」按鈕 (C),即可讓
配件自馬達裝置(A)(圖4)鬆脫。
依組裝的相反方向來鬆開蓋子。
然後便可以從碗中取出食材。
安全鎖
使用
第一次使用前

14
設備無法運轉時,我該怎麼辦?
問題 原因 解決方法
本產品無法運轉。 未插上電源插頭。 將本設備的電源插頭插入電
壓相同的插座。
攪拌杯或配件在馬達裝置上
的位置錯誤或未正確固定。
檢查攪拌杯或配件是否正確
放在馬達裝置上並固定,如
說明所示。
您必須聽到「咔噠」 兩聲。
刀片裝置(D1)無法正確安裝
在裝置上。
將刀片裝置(D1)解鎖,再
重新鎖緊在裝置上(D4) (圖
1a、1b和1c)。
食材 數量 (上限) 運轉時間 配件
杏乾 80克
以「暫動」功能攪
拌4秒
E
麵包屑 1片
以「暫動」功能攪
拌數下
E
洋蔥 50克 以速度1攪拌5秒 E
荷蘭芹 6克
以「暫動」功能攪
拌數下
E
洗乾淨的碎肉類 60克
以「暫動」功能攪
拌數下
E
胡荽籽 50克 以速度5攪拌60秒 F
胡椒 50克 以速度5攪拌60秒 F
濃稠混合食材 最大容量1.5公升 以速度5攪拌最多3分鐘 D
液體混合食材 最大容量1.25公升 以速度5攪拌最多3分鐘 D
拔下本設備的電源插頭並取下攪拌碗或配件。
配件的刀片非常鋒利。拿取時,請小心。
立即用流動的水沖洗攪拌碗與蓋子,並將可拆下的零件放入熱肥皂水中。
按下刀片卸除按鈕 (D2),可從攪拌杯 (D4) 中取下刀片裝置(D1)(圖7a、7b、7c),方便您
進行清潔。
刀片裝置(D1)的墊圈不可拆卸。杯蓋(D6)接合環(D5)是可以移除的。
攪拌杯 (D) 與配件 (E) 與 (F) 可以放在洗碗機上層的籃中,採用 “ECO” 或 “SLIGHTLY
DIRTY”程式來清洗。
使用濕布清潔馬達裝置(A)並小心加以晾乾。
絕不可將馬達裝置(A)浸入流動的水中。
清潔

15
ZH
聯絡客戶服務部門(請參閱保養手冊中的詳細聯絡資訊)。
您可以從日常的零售商或服務中心取得以下配件:香草研磨器組件 (E)、香料研磨機組件
(F)或額外的攪拌杯(D)。
本設備仍然無法運轉嗎?
配件
請首先參閱此說明書及聯絡授權服務中心(見後面的例表)並提供產品型號 LMxxx 或
BLxxx。
問題 原因 解決方法
本產品在使用期間停頓
了。
放入太多食材(啟動了電子
馬達安全裝置)。
遇有此情況,請拔掉插頭,
將按鈕較至0,將本產品放
涼至少30分鐘才繼續使用。
劇烈震動。 未將本產品放在平坦的枱
面上。
將本產品放在平坦的枱面
上。
放入太多食材。 減少所處理的食材量。
從蓋子處漏出。 放入太多食材。 減少所處理的食材量。
蓋子放在錯誤位置。 將蓋子正確固定在攪拌杯
上。
杯蓋接合環(D5)未套妥。 將接合環 (D5) 套在杯蓋
(D6)(圖2a)。
在攪拌杯底部漏出。 刀片裝置 (D1) 未正確或牢
牢固定在攪拌杯(D4)。
正確將刀片裝置放在攪拌杯
中,您必須聽到咔噠一聲。
按鈕 (D2) 必須與刀片裝置
(D1) 完全對齊。
刀片無法輕易轉動。 食物太大塊或太硬。 減少所處理的食材大小或容
量。加入液體。
環保第一 !
您的電器涵蓋了多種可回收或再次利用的物質。
將它帶往收集站以便處理。
資源回收

16
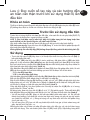
Đọc thật kỹ hướng dẫn sử dụng trước khi
sử dụng thiết bị lần đầu và hãy giữ nó cẩn
thận : nhà sản xuất không chịu trách nhiệm
về bất cử hậu quả nào do không tuân thủ
đúng hướng dẫn sử dụng này.
• Hãykiểmtracôngsuấtthiếtbịcóphùhợpvới
côngsuấtcủahệthốngđiệncủagiađìnhbạn
haykhông.
Chúng tôi không bảo hành cho những
trường hợp hư hỏng do chập cháy điện.
• Thiết bị củabạnlthiếtbị gia dụng, chỉsử
dụng bên trong ngôi nh, ở độ cao dưới
2000m.
• Chng tôi không bảo hnh cho cc trường
hợp sử dụng thiết bị cho mục đch thương
mại, không phù hợp, hoặc không tuân thủ
đngchỉdẫn.
• Cầnngắtđiệnthiếtbịtrongtrườnghợpphải
rangoi,trướckhitholắpthiếtbịhoặclau
chùithiếtbị.
• Cẩntrọngtrướcnguycơbịthươngdoviệcsử
dụngsaithiếtbị.
• Khôngsửdụngthiếtbịkhithiếtbịcótrụctrặc
hoặcbịhưhỏng.Trongtrườnghợpđó,hãy
liênhệngayvớitrungtâmbảohnhgầnnhất
(xemdanhschcctrungtâmbảohnhđnh
km).
• Khchhngchỉcóthểlauchùivbảodưỡng
Hướng dẫn an toàn
ページが読み込まれています...
ページが読み込まれています...
ページが読み込まれています...
ページが読み込まれています...
ページが読み込まれています...
ページが読み込まれています...
ページが読み込まれています...
ページが読み込まれています...
ページが読み込まれています...
ページが読み込まれています...
ページが読み込まれています...
ページが読み込まれています...
ページが読み込まれています...
ページが読み込まれています...
ページが読み込まれています...
ページが読み込まれています...
ページが読み込まれています...
ページが読み込まれています...
ページが読み込まれています...
ページが読み込まれています...
ページが読み込まれています...
ページが読み込まれています...
ページが読み込まれています...
ページが読み込まれています...
ページが読み込まれています...
ページが読み込まれています...
ページが読み込まれています...
ページが読み込まれています...
ページが読み込まれています...
ページが読み込まれています...
ページが読み込まれています...
ページが読み込まれています...
ページが読み込まれています...
ページが読み込まれています...
ページが読み込まれています...
-
 1
1
-
 2
2
-
 3
3
-
 4
4
-
 5
5
-
 6
6
-
 7
7
-
 8
8
-
 9
9
-
 10
10
-
 11
11
-
 12
12
-
 13
13
-
 14
14
-
 15
15
-
 16
16
-
 17
17
-
 18
18
-
 19
19
-
 20
20
-
 21
21
-
 22
22
-
 23
23
-
 24
24
-
 25
25
-
 26
26
-
 27
27
-
 28
28
-
 29
29
-
 30
30
-
 31
31
-
 32
32
-
 33
33
-
 34
34
-
 35
35
-
 36
36
-
 37
37
-
 38
38
-
 39
39
-
 40
40
-
 41
41
-
 42
42
-
 43
43
-
 44
44
-
 45
45
-
 46
46
-
 47
47
-
 48
48
-
 49
49
-
 50
50
-
 51
51
-
 52
52
-
 53
53
-
 54
54
-
 55
55


