
EN
KO
VI
MS
ZH
TH
ID

D7
D6
D5
D4
D1
D3
D2
D
E4
E1
E2
E
F4
F1
F2
F
G
C
B
A
E3
F3

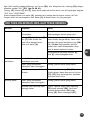
1
2.a1
2.c
2.b
3
4
1
OK
NO
"Click"
2
3
4
D3

5.b
8.a
5.a
6
5.c
7
11
F3
E3
"Click"

8.c 8.b


5
EN
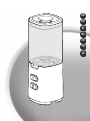
The accessories contained in the model that you have just purchased are represented on the
packaging.
• Read these instructions for use carefully before using your appliance for the first time and
keep them to hand for future reference.
• This appliance is designed for indoor domestic household use only. In case of professional use,
inappropriate use or failure to comply with the instructions, the manufacturer accepts no
responsibility and the guarantee does not apply.
• It is not intended to be used in the following cases, which are not covered by the guarantee.
- In kitchens reserved for staff use in shops, offices and other professional environments;
- On farms;
- By hotel or motel clients, or on other residential premises;
- In bed and breakfast accommodation and other similar environments.
• This appliance is suitable for use by children of 8 years and above or by persons without the necessary
experience or knowledge or with impaired physical,sensory or mental capacities if they have been
trained and are supervised, to ensure that they use the appliance safely and understand the hazards
that exist. Children should not be left to play with the appliance. Children should not attempt to
clean or service the appliance unless they are aged at least 8 years or older and supervised.
• Please keep the appliance and its power cord out of the reach of children less than 8 years of age.
• Children should be supervised to ensure they do not play with the appliance.
• For your safety, this appliance meets applicable standards and regulations (Directives on Low Voltage,
Electromagnetic Compatibility, Materials in contact with food articles, Environment, etc.).
• This appliance is designed to function on AC current only. Before using it for the first time, check
that your mains supply voltage matches that indicated on the appliance data plate.
• Any connection error will invalidate your guarantee.
• Given the diverse standards in effect, if the appliance is used in a country other than that in which
it is purchased, have it checked by an Approved Service Centre.
• Do not use an extension lead. If you accept liability for doing so, only use an extension lead which
is in good condition, has a plug with an earth connection and is suited to the power rating of the
appliance.
• This appliance is not intended to function using an external time-switch or a separate remote control
system.
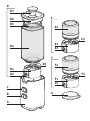
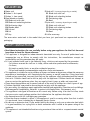
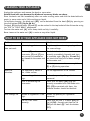
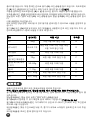
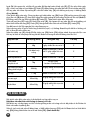
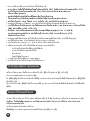
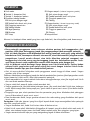
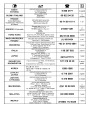
DESCRIPTION
A Motor unit
B Button 2: fast speed
C Button 1: slow speed
D Bowl blender assembly
D1 Blade unit with seal
D2 Blade unit unlocking button
D3 Positioning ridge
D4 Blender bowl
D5 Lid seal
D6 Lid
D7 Cap
E Herb mill
(*accessory depending on model)
E1 Blade unit with seal
E2 Blade unit unlocking button
E3 Positioning ridge
E4 Bowl
F Spice mill
(*accessory depending on model)
F1 Blade unit with seal
F2 Blade unit unlocking button
F3 Positioning ridge
F4 Bowl
G Lid for accessory
SAFETY INSTRUCTIONS:

6
• To avoid the risk of electric shock, never use the appliance with wet hands or on a damp or wet
surface. Never immerse the motor unit, power cord or plug in water or any other liquid.
• Never leave the appliance unattended whilst connected to the power supply, even if for a few
moments, especially where children are present.
• Do not let the power cord hang where children may reach it.
• Always switch off and disconnect the appliance from the power supply before changing attachments,
cleaning & maintenance or when not in use.
• Never disconnect the plug by pulling on the power cord.
• Do not leave the power cord close to or in contact with sources of heat or sharp edges.
• Do not allow long hair, scarves, ties etc. to hang over the appliance or attachments when in use.
• Do not touch any moving parts (blades etc.).
• If your appliance “jams” during operation, switch off, disconnect from the power supply and check
that the attachment is not overloaded with ingredients. Carefully remove any obstructions before
reconnecting.
• Do not use your appliance if it does not operate correctly, if it has been damaged or if the power
cord or plug is damaged. To maintain safety, these parts must be replaced by an Approved Service
Centre.
• Any intervention other than normal cleaning and maintenance by the customer must be performed
by an Approved Service Centre.
• For you own safety, only use accessories and spare parts from the appliance manufacturer, which are
especially designed for your appliance.
• Do not put accessories containing metal in the microwave.
• Precautions should be taken when handling the sharp blades of the blender bowl blade
unit (D1), the herb mill blade assembly (E1) and the spice mill blade assembly (F1) on
emptying the bowls and cleaning them: they are extremely sharp.
• Never touch moving parts while the appliance is in operation, wait for the appliance and
accessories to come to a complete stop before touching parts or removing these accessories.
• Never introduce kitchen utensils (spoons, spatulas, etc.) into the bowl (D) while in operation.
• Do not operate the blender bowl without ingredients, with dry or hard products only (such as sugar
cubes) or if the lid (D6) with its seal (D5) is not fitted to the bowl (D).
• Warning: Never pour or mix liquids or ingredients with a temperature of more than 60° C
(140°F). If you have to mix hot ingredients, keep your hands at a distance from the lid (D6)
and the feeder (D7) to avoid any risk of burning.
• Always pour liquid ingredients into the blender bowl first before adding the solid ingredients, without
exceeding the maximum level indicated.
• Do not use the bowls as containers (for freezing, cooking or sterilising).
• Do not operate the appliance for more than 1 minute in continuous operation.
• Place the appliance on a stable, heatproof work surface.
• Never use this appliance to blend or mix non-food ingredients.
The appliance will not operate if the blender bowl assembly (D) or the accessories (E) or (F)
are not correctly assembled and correctly positioned on the motor unit (A).
The bowls (E4) (F4) are marked with a coloured line on their base and should be assembled with
the blade units whose release buttons (E2)(F2) are the same colour.
The blender bowl (D4) is not marked with a colour, it should be assembled with the blade unit
that has a yellow release button (D2).
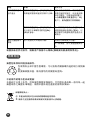
SAFETY LOCKING SYSTEM

7
EN
Before using for the first time wash all accessories (D, E, F, G) in warm water and a little washing-
up liquid but not the motor unit (A).
WARNING: The cutter blades are extremely sharp, handle them with precaution during use,
cleaning or on emptying the bowls.
Make sure that all packaging has been removed before operating the appliance.
Important: Make sure that the motor unit has come to a complete stop, with buttons (B) and
(C) released before fitting the blender assembly or accessories to the motor unit.
Never operate the appliance if the lid fitted (D6) with the seal (D5) has not been placed on the
assembled bowl (D).
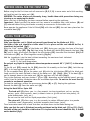
Using the Blender
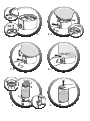
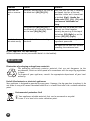
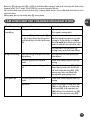
Make sure that the seal is fitted and correctly positioned on the blade unit (D1):
the folds of the seal should be visible when it is in place and the seal should be flat, it
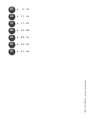
should not be buckled (fig1).
With the “click” button (D2) of the blade unit (D1) facing you, position the base of the bowl
(D4) under the ridge (D3) (fig 2a) then bring the blade unit back (D1) towards the bowl (fig
2b) until it locks, pressing on the top of the click button (D2) to ensure that the bowl (D4) and
the blade unit (D1) are fitted together correctly (fig 2c).
Add the ingredients into the bowl without exceeding the maximum level indicated:
of 0.6 L for thick preparations
and 0.5 L for liquid preparations
Do not put any liquid or ingredients whose temperature exceeds 60° C (140°F) in the mixer
bowl.
Fit the lid seal (D5) around the lid (D6) place the lid assembly on the bowl (D4), lock the cap
(D7) in its housing located on the lid.
Fit the assembled bowl (D) to the motor unit (A) with the click button (D2) of the blade unit
lined up with the notch located in front of the motor unit (A) (fig3). Note: If the bowl (D) is
not far enough down on the motor unit (A) the appliance will not work (fig4).
Plug in the appliance and press button 1 (C) or 2(B), depending on the required speed, pressing
several times or holding the button down for continuous operation. Do not use for more than 60
seconds in continuous operation.
To stop the appliance, release the pressure on button (B) or (C). Unplug the appliance.
Remove the bowl (D) from the motor unit (A).
Using the Herb Mill or Spice Mill
The herb mill (E) allows you, in a few seconds, to chop ingredients such as: parsley,
onions, garlic, dried apricots, meat (without sinews or gristle and cut into pieces), to
make breadcrumbs (rusk, etc.).
Do not use the herb mill for liquid preparations (fruit juice).
The spice mill (F) allows you, in a few seconds, to reduce different spices to a powder
(coriander seeds, peppercorns) and dried aromatic plant leaves (mint).
These accessories come with a bowl that does not allow access to the blades during use.
Make sure that the seal is fitted and correctly positioned on the blade unit (E1) or (F1) (fig1),
the folds of the seal should be visible when it is in place and the seal should be flat, it should
not be buckled (fig1).
BEFORE USING FOR THE FIRST TIME
USING YOUR APPLIANCE

8
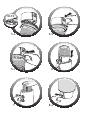
Put the ingredients in the bowl (E4) or (F4).
Take the blade unit (E1) or (F1), with the blades facing downwards, with the “click” button (E2) or
(F2) facing you, position the ridge (E3)or (F3) in the neck of the bowl (E4) or (F4) (fig 5a).
Press the “click” button (E2) or (F2), bring the bowl (E4) or (F4) back to the blade unit (E1) or (F1)
(fig 5b) and clip it on the bowl by pressing down on the top of the click button (E2) or (F2). Make
sure that the bowl (E4) or (F4) and the blade unit (E1) or (F1) are fitted together (fig 5c).
Check that there are no errors in the assembly of the accessories (E) and (F):
the colour of the click button (E2 or F2) should correspond to the colour of the line at the base of
the bowl (E4 or F4)
Turn your accessory over, place the assembled accessory (E) or (F) on the motor unit (A), lining up
the click button (E2) or (F2) with the notch on the front of the motor unit (A), the accessories (E)
or (F) should be as far down as they can go on the motor unit (A) if not the appliance will not operate
(fig6).
Plug in the appliance. Keep your hand supporting the bowl (E4) or (F4) and during operation press
the button (B) or (C) several times or continuously (fig7).
To stop the appliance, release the button (B) or (C). Unplug the appliance.
Remove the accessory (E) or (F) from the motor unit (A), turn the accessory over on the work surface
and release the blade unit (E1) or (F1) by pressing on the “click” button (E2) or (F2).
You can then take out your preparation.
The mixing of certain very hard spices (cloves, cinnamon, etc.) is not recommended because they may
discolour the bowl.
The lid (G) to be fitted on the bowl (E4) or (F4) to avoid preparations drying out and allows them
to be kept in the refrigerator for later use.
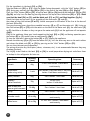
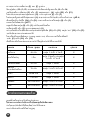
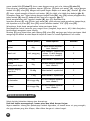
Ingredients
Quantity
(max)
Operating time Accessory
Apricots 40g
4 secs with button 2 held down
continuously
Herb mill (E)
Breadcrumbs
(made using rusks)
1 rusk
Press button 2 ten times and 15 secs with
button 2 held down continuously
Herb mill (E)
Onions/shallots 50g Press button 1 ten times Herb mill (E)
Almonds/
shelled hazelnuts
70g
10 secs with
button 2 held down
Spice mill (F)
Pieces of meat with
sinews or gristle removed
50-80g Press button 2 ten times Herb mill (E)
Parsley 7-10g Press button 2 ten times Herb mill (E)
Coriander seeds 30 to 40g
45 secs with button 2 held down
continuously
Spice mill (F)
Coffee beans 40 to 50g
45 secs with button 2 held down
continuously
Spice mill (F)

9
EN
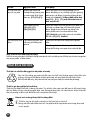
Unplug the appliance and remove the bowl or accessories.
Handle them with care because the blade and accessory blades are sharp.
Rinse the bowls and lids immediately after use under running water and also the detachable ele-
ments in warm water and a little washing-up liquid.
To facilitate cleaning, the blade unit (D1) can be detached from the bowl (D4) by pressing on
the click button (D2) (fig 8a 8b 8c).
The bowl (D) the accessories (E) and (F) can be washed in the top basket of the dishwasher using
the "ECO" or "LIGHT WASH" programme.
To clean the motor unit (A), use a damp cloth and dry it carefully.
Never immerse the motor unit (A) in water or any other liquid.
CLEANING YOUR APPLIANCE
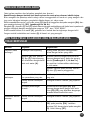
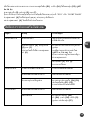
WHAT TO DO IF YOUR APPLIANCE DOES NOT WORK
Problems Causes Solutions
The appliance
does not work.
It is not plugged in. Plug the appliance in using a plug with
the same voltage.
The bowl (D) or the
accessories (E) and (F) are
not correctly assembled or
positioned on the motor unit
(A).
Check that the bowl or accessories are
correctly assembled; dismantle and start
to assemble again (Fig 2.a, 2.b and 2.c)
and check that they are far down enough
on the motor unit.
Maintain pressure on the accessory lid
(E) or (F) during operation.
Excessive
vibration.
The appliance is not on a
flat, stable surface.
Put the appliance on a flat surface.
Volume of ingredients is too
high.
Reduce the quantity of ingredients
processed.
Error in assembling the
accessories.
Check that the bowls (E4) (F4) are
correctly assembled with the blade units
(E2) (F2) associated with them, the
coloured markers should be identical.
Leak through lid. Volume of ingredients is too
high.
Reduce the quantity of ingredients
processed.
The lid is not fitted
correctly.
Check that the seal is in place (D5) on
the lid (D6). Correctly position the lid
(D6) on the bowl (D). Lock the button
(D7).

10
Is your appliance still not working?
Contact customer service (see contact details in the booklet).
Elimination of packaging and appliance materials.
The packaging exclusively contains materials that are not dangerous to the
environment, which can be disposed of in accordance with the recycling regulations
in force.
To dispose of your appliance, consult the appropriate department of your local
authority.
End-of-life electronic or electrical appliances:
Your appliance is designed to operate for many years. However, the day you plan to replace it, do
not throw it away with normal household rubbish or in a landfill but take it to a suitable collection
point.
RECYCLING
Environmental protection first!
Your appliance valuable materials that can be recovered or recycled.
Leave it at a local civic waste collection point.
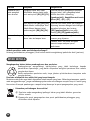
Problems Causes Solutions
Leak from the
bowl or accesso-
ries
Incorrect positioning of the seal on
the blade unit (D1)(E1)(F1).
Make sure that the seal is correctly
positioned, the lips of the seal
should be visible and it should not
be buckled (fig1). Handle the
blade units (D1), (E1), (F1) with
care because the blades are
sharp.
The blade unit (D1)(E1)(F1) is
insufficiently or incorrectly locked
on the bowl (D4)(E4)(F4).
Make sure that the blade unit and
the bowl are fitted together
correctly be pressing at the top of
the button (D2)(fig2c) or on the
buttons (E2)(F2) (fig5c)
The blade does
not rotate easily.
Pieces of food that are too big or
too hard.
Reduce the size or quantity of the
ingredients processed.
Add liquid to the bowl mix without
exceeding the maximum level.

11
KO
* 구입하신 모델에 따라 액세서리들은 다를 수 있습니다.
구매하신 제품의 모델에 포함되는 액세서리는 제품 패키지 겉면에서 확인하실 수 있습니다.
•
제품을 처음 사용하시기 전에, 사용설명서를 주의 깊게 읽어주시고 안전을 위하여 정확
하게 사용하여 주십시오. 사용설명서대로 사용하지 않아 발생한 문제는 당사의 품질보
증혜택을 받으실 수 없습니다.
•
어린이의 손에 닿지 않는 곳에 두십시오. 어린이나 몸이 불편하신 분이 제품을 사용할
때에는 곁에서 도와주시고 각별히 주의하여 주십시오. 어린이가 제품을 가지고 장난치
지 않도록 주의하십시오.
•
제품을 사용하시기 전에 제품의 전압이 가정의 전압과 맞는지 확인하여 주십시오. 전압
을 확인하지 않아 발생한 문제에 대해서는 품질보증 혜택을 받으실 수 없습니다.
• 본 제품은 가정용으로 제작되었으며, 가정용으로만 사용 가능합니다. 상업용으로 사용
되었거나 부적절하게 사용한 경우 당사의 품질보증 혜택을 받으실 수 없습니다.
• 제품을 사용하지 않거나, 조립 또는 분해할 때 또는 세척 시에는 반드시 제품의 전원코
드를 빼주십시오. 전선을 잡아당겨 전원코드를 뽑지 마십시오.
• 제품이 정상적으로 작동되지 않거나, 제품에 손상이 생긴 경우 사용하지 마시고 당사 서
비스센터에 의뢰해 주십시오. (전국 어디서나 1588-1588)
• 일반적인 세척 및 제품 관리를 위한 작업 외의 제품의 수리가 필요할 경우는 당사 서비
스센터에 의뢰해 주십시오.
• 제품 모터본체나 코드를 절대로 물에 담그지 마십시오. 제품 코드를 어린이의 손에 닿지
않는 곳에 두십시오. 전원코드 또는 전원전선을 테이블 등의 날카로운 모서리에 늘어뜨
려 놓지 마시고, 뜨거운 곳에 닿지 않도록 하십시오. 코드 손상으로 화재 및 감전의 원인
이 됩니다.
• 안전을 위하여 제품에 적합한 테팔 정품 부품 및 부속품을 사용하여 주시고 이에 따를지
않아 발생한 문제에 대해서는 품질보증 혜택을 받으실 수 없습니다.
• 경고: 사용설명서 또는 제품을 보여 주셔야만 액세사리를 구입하실 수 있습니다.
• 제품 모터본체나 코드를 절대로 물에 담그지 마십시오.
• 제품 코드를 어린이의 손에 닿지 않는 곳에 두십시오. 전원코드 또는 전원전선을 테이블
등의 날카로운 모서리에 늘어뜨려 놓지 마시고, 뜨거운 곳에 닿지 않도록 하십시오. 코
드 손상으로 화재 및 감전의 원인이 됩니다.
각부명칭
A 모터 본체
B 속도조절 버튼 2: 고속
C 속도조절 버튼 1: 저속
D 블렌더 용기
D1 칼날 몸체
D2 칼날 분리 버튼 (“클릭”버튼)
D3 용기 위치 받침 홀
D4 블렌더용기
D5 뚜껑 패킹
D6 블렌더 용기 뚜껑
D7 블렌더 뚜껑 마개
E 다지기 (*모델에 따라 다름)
E1 칼날 몸체
E2 칼날 분리 버튼
E3 용기 위치 받침 홀
E4 용기
F 분쇄기 (*모델에 따라 다름)
F1 칼날 몸체
F2 칼날 분리 버튼
F3 용기 위치 받침 홀
F4 용기
G 부속품용 뚜껑
안전상 주의사항

12
• 금속이 포함된 부속품은 전자렌지에 넣어서는 안 됩니다.
•
용기 내용물을 비우거나 씻을 때는 블렌더용기 칼날 몸체 (D1), 분쇄기 칼날 몸체(E1),
다지기 칼날 몸체 (F1)의 날카로운 칼날을 주의해서 취급하십시오. 칼날은 매우 날카롭
습니다.
•
제품 작동 중에는 절대 움직이는 부속품을 만지지 마십시오. ▪ 부속품을 만지거나 꺼내
야 할 때는 먼저 제품이 완전히 멈출 때까지 기다리십시오.
•
블렌더가 작동 중일 때는 절대 용기
(D)
안에 주방 기구(스푼, 주걱 등)를 넣지 마십시오
.
• 블렌더가 작동 중일 때는 절대 블렌더 또는 부속품 위로 긴 머리카락, 스카프 등이 늘어
지지 않도록 하십시오.
• 용기가 빈 상태일 때, 마르거나 딱딱한 재료(각설탕 등)만 들어 있거나, 뚜껑(D6)의 뚜
껑 씰 (D5)이 용기(D)에 제대로 끼워지지 않은 상태에서는 작동시키지 마십시오.
•
경고: 60° C 이상 온도에서 액체나 재료를 붓거나 혼합하지 마십시오. 뜨거운 재료를
혼합하는 경우, 양손을 뚜껑
(D6)
과 블렌더 용기 컵
(D7)
에서 어느 정도 떨어진 곳에 두
어야 화상 위험을 방지할 수 있습니다.
• 항상 블렌더 용기에는 고체 재료를 추가하기 전에 액체 재료를 먼저 부어 넣고, 표시되
어 있는 최대 높이를 초과하지 않도록 합니다.
• 용기를 보관 용기(냉동, 요리 또는 살균 용도)로 사용하지 마십시오.
• 블렌더는 1분 이상 계속해서 작동시키지 마십시오.
• 사용자의 안전을 위해 본 제품은 해당 표준 및 규정을 준수합니다:
• 절대 식품 이외의 물체를 넣고 갈거나 혼합하는 데 본 제품을 사용하지 마십시오.
블렌더 용기(D) 또는 악세사리 (E)또는 (F)가 제대로 조립되지 않거나 모터 본체(A)에 올
바로 끼워지지 않은 경우 작동하지 않습니다.
용기 (E4)(F4)에는 용기 외부에 (E4)빨간색선, (F4)황토색선으로 표시 되어 있으며 칼날
버튼(E2)(F2)이 같은 색으로 되어 있는 칼날몸체와 조립해야 합니다.
블렌더 용기(D4)에는 색이 표시되어 있지 않으며, 노란색 칼날 버튼(D2)이 있는 칼날몸체
와 함께 조립해야 합니다.
본 제품을 사용하기 전에 모터본체(A)를 제외한 모든 부속품(D, E, F, G)을 따뜻한 물로 세
척하여 주십시오.
주의: 칼날이 날카로우므로 사고의 방지를 위해 제품을 사용하거나 세척 시에 손으로 직
접 만지지 말고 주의를 기울이십시오.
제품을 작동시키기 전에 포장재를 빠짐없이 제거하십시오.
요:
블렌더 조립부나 부속 악세사리를 모터본체에 끼우기 전에 (B)와 (C) 버튼이 눌려지
지 않아 모터 본체가 완전히 멈춰 있는지 확인하십시오.
뚜껑 패킹(D5)가 뚜껑(D6)에 장착되어 있지 않은 상태에서는 절대 블렌더를 작동 시키지
마십시오.
칼날 패킹이 칼날본체(D1)에 잘 제대로 끼워져 올바르게 위치해 있는지 확인해 주십시:
끼워진 상태에서는 고무패킹의 주름 부분이 보이고, 휘지 않고 평평해야 합니다(그림 1).
안전 잠금 장치
제품을 처음 사용하기 전
제품 사용하기

13
KO
칼날 본체(D1)의 칼날 분리 버튼 (“클릭”버튼) (D2)이 사용자를 향한 상태에서, 용기(D4)
의 바닥 부분을 용기 위치 받침 홀 (D3) 아래에 위치시킨 다음, 칼날 분리 버튼(D2)의 아
랫 부분을 눌러 고정시켜 주십시오.
(그림 2b)
. 칼날분리버튼(D2)의 상단 부분을 눌러 용
기(D4)와 칼날몸체(D1)가 제대로 조립되었는지 확인합니다
(그림 2c)
.
재료를 용기에 넣을 때는, 용기에 0.6L 표시가 되어 있지 않아 혼선 우려 있음 ,
액체 내용물의 경우 0.5L라고 표시된 높이를 초과하지 않도록 합니다.
온도가 60°C를 초과하는 액체나 재료는 블렌더 용기에 넣지 마십시오.
뚜껑 씰(D5)을 뚜껑(D6) 둘레에 끼운 다음, 뚜껑을 용기(D4) 위에 놓고, 블렌더 용기 컵
(D7)을 마름모 형태가 되도록 끼운 후 뚜껑 홈에 맞도록 시계방향으로 돌려 “딸칵” 하는 소
음이 들리도록 끼웁니다.
칼날본체의 분리 버튼(D2)이 용기 본체(D) 앞면에 위치한 눈금과
일직선이 되도록, 조립한 용기(D)를 모터본체(A) 위에 끼웁니다
(그림 3)
. 블렌더가 작동하
지 않는 경우, 용기(D)가 모터본체(A)에 충분히 들어간 상태에서 끼워졌는지 확인합니다.
제품 코드를 꽂고 원하는 속도에 따라 속도조절버튼 1(C) 또는 2(B)를 여러 번 누르거나 계
속 작동시키려면 계속 누르고 있으면 됩니다.
60초 이상 계속 작동시키지 마십시오.
작동을 멈추려면 누르고 있던 버튼 (B)나 (C)를 손에서 떼시거나 제품의 플러그를 뽑습니
다.
용기(D)를 모터본체(A)에서 분리시킵니다.
다지기(E)
를 사용하면 단 몇 초 만에 파슬리, 양파, 마늘, 말린 살구, 고기(힘줄
을 제거하고 조각으로 자른 상태) 등과 같은 재료를 다지거나 빵부스러기(러스
크) 등을 만들 수 있습니다.
분쇄기는 액체를 섞는 데 사용하지 마십시오(과일 주스).
분쇄기(F)
를 사용하면 단 몇 초 만에 여러 가지 양념(고수 씨, 말린 후추)과 말
린 향신료 식물 잎(민트)을 가루로 만들 수 있습니다.
이러한 부속품에는 사용 시 칼날에 주의할 수 있도록 부속품용 뚜껑이 들어 있습니다.
밀봉씰이 칼날몸체(E1) 또는 (F1)에 제대로 끼워져 올바르게 위치해 있는지 확인하십시오
(그림1). 끼워진 상태에서 씰의 주름 부분이 보이고 ▪ 씰이 휘지 않고 평평해야 합니다(그
림1).
재료를 용기 (E4) 또는 (F4)에 넣습니다.
칼날몸체 (E1) 또는 (F1)의 칼날을 아래로 향하게, 칼날 분리 버튼 (“클릭”버튼) (E2) 또는
(F2)가 사용자를 향하게 잡고, 용기 위치 받침 홀 (E3) 또는 (F3)이 용기 (E4) 또는 (F4)의
목 부분에 위치하도록 합니다
(그림 5a)
.
칼날 분리 버튼 (“클릭”버튼)(E2) 또는 (F2)누르고, 용기 (E4) 또는 (F4)를 다시 칼날몸체
(E1) 또는 (F1)에 위치시킨
(그림 5b)
다음, 칼날 분리 버튼 (“클릭”버튼) (E2) 또는 (F2) 상
단을 눌러 용기를 끼웁니다. 용기 (E4) 또는 (F4)와 칼날몸체 (E1) 또는 (F1)가 서로 잘 맞
게 끼워져 있는지 확인하십시오
(그림 5c)
.
부속 악세사리 (E)와 (F)가 오류 없이 제대로 조립되어 있는지 확인합니다:
칼날 분리 버튼 (“클릭”버튼) (E2 또는 F2)의 색은 용기(E4 또는F4) 아래 부분 색선의 색과
일치해야 합니다.
조립된 부속 악세사리 (E) 또는 (F)를 뒤집어 모터본체(A) 위에 조립합니다. 이 때 칼날 분
리 버튼 (“클릭”버튼) (E2) 또는 (F2)가 모터본체(A) 앞쪽의 눈금과 일직선이 되어야 합니
다. 블렌더가 작동하지 않는 경우, 부속품 (E) 또는 (F)가 모터본체(A) 안으로 충분히 들어
갔는지 확인하십시오
(그림6)
.

14
플러그를 꽂습니다. 작동 중에는 손으로 용기 (E4) 또는 (F4)를 잡고 계십시오. 속도조절버
튼 (B) 또는 (C)를여러 번 누르거나 계속 누르고 계시면 됩니다
(그림7)
.
작동을 멈추려면 속도조절버튼 (B)나 (C)를 놓으면 됩니다. 제품의 플러그를 뽑습니다.
부속품 (E) 또는 (F)를 모터본체(A)에서 분리해, 부속품을 뒤집어 작업대 표면에 놓습니다.
칼날 분리 버튼 (“클릭”버튼) (E2) 또는 (F2)를 눌러 칼날 몸체(E1) 또는 (F1)을 분리 합니
다.
이제 내용물을 꺼내면됩니다.
매우 딱딱한 양념(정향, 계피 등)의 경우 용기를 변색시킬 수 있으므로 사용을 권장하지 않
습니다.
용기 (E4) 또는 (F4)위에 놓게 되어 있는 뚜껑(G)은 내용물이 건조 되는 것을 막아 주고, 냉
장고에 보관했다가 나중에 사용할 수 있게 해 줍니다.
제품의 전원코드를 뽑고 모든 액세서리들을 분리해 주십시오.
주의: 칼날이 날카롭습니다. 칼날을 분리할 때나 세척할 때는 항상 주의하십시오.
용기를 모터본체에서 분리한 후, 용기를 흐르는 물에 헹궈주시고, 주변부속품도 같이 헹
궈주십시오.
칼날몸체(D1)는 칼날 분리 버튼 (“클릭”버튼) (D2)을 눌러
용기(D4)에서 분리할 수 있기 때문에 쉽게 세척이 가능합니다
(그림 8a 8b 8c)
.
용기(D)와 액세서리(E)및 (F)는 식기세척기의 상단 바구니에서 ‘간이세척’ 또는 ‘초간편세
척’으로 사용 가능합니다
모터본체(A)는 젖은 수건으로만 닦은 후, 물기가 내부로 스며들지 않도록 건조 시켜 주십
시오.
모터본체(A)를 흐르는 물에 절대 담그지 마십시오.
세척하기
재료 양(최대) 작동 시간 부속품
살구 40g 버튼 2를 4초 동안 누름 E
빵부스러기 러스크 1개
버튼 2를 10회 누른 다음, 버튼
2를 15초 동안 누름
E
양파/샬롯 50g 버튼 1을 10회 누름 E
아몬드
껍질 벗긴 헤이즐넛
70g 버튼 2를 10초 동안 누름 F
힘줄을 제거해 조각
낸 고기
50-80g 버튼 2를 10회 누름 E
파슬리 7-10g 버튼 2를 10회 누름 E
고수 씨 30 - 40g 버튼 2를 45초 동안 누름 F
커피 40 - 50g 버튼 2를 45초 동안 누름 F

15
KO
제품이 작동하지 않을 때는?
문제 원인 해결방법
제품이 작동하지
않습니다.
전원코드가 연결되어 있지 않습
니다.
전원코드를 연결하여 주십시오.
용기 (D) 또는 부속악세사리 (E)
및 (F)가 모터본체 (A)와 제대로
조립되어 있지 않거나 잘못 끼워
져 있습니다.
용기나 부속 악세사리가 제대로
조립되어 있는지 확인합니다. 해
체한 다음 다시 조립해서
(그림
2.a, 2.b 및 2.c)
모터본체에 충
분히 깊이 들어가 있는지 확인합
니다.
작동 중에 부속품 뚜껑 (E) 또는
(F)를 눌러 줍니다.
제품 작동 시 심
한 진동이 있습
니다.
제품이 평평한 표면에 놓여있지
않습니다.
제품을 평평한 표면에 놓아주십
시오.
재료를 너무 많이 넣었습니다. 재료의 양을 줄이십시오.
부속품 조립이 잘못되었습니다. 용기 (E4) (F4)의 해당 칼날 분리
버튼 (“클릭”버튼) (E2) (F2)와
맞게 조립되었는지 확인합니다.
용기의 선 색 표시가 일치해야
합니다.
뚜껑을 통해 액
체가 새어 나옵
니다.
재료를 너무 많이 넣었습니다. 재료의 양을 줄이십시오.
뚜껑에 새는 부분이 있습니다.. 뚜껑(D6)의 뚜껑 마개가 원위치
에 있는지 확인 합니다. 뚜껑
(D6)을 용기(D)에 제대로 끼웁
니다. 뚜껑 마개가 뚜껑 홈에 맞
도록 제대로 조립 되어있는지 확
인 합니다.

16
제품이 여전히 작동하지 않습니까?
제품이 계속 작동하지 않을 경우 당사 서비스센터에 의뢰하십시오.
액세서리는 당사 서비스센터에서 구입할 수 있습니다.:
제품 및 제품 패키지는 재활용이 가능 합니다.
제품은 환경에 전혀 무해한 성분으로 만들어 졌으며 모든 제품의 부품은 재
활용이 가능합니다.
이에 관련 상세한 사항은 당사 서비스센터에 문의 바랍니다.
전자 제품의 수명
본 제품은 오랜 기간 사용이 가능 하지만 만약 제품을 폐기하실 경우에는 일반 쓰레기통
에 그냥 버리지 마시고 분리수거를 하십시오. 또는 폐기 관련 하여 궁금하신 사항이 있으
시면 당사 서비스센터에 문의하십시오.
제품문의 080-733-7878
AS문의 1588-1588(전국 어디서나)
www.tefal.co.kr
재활용을 위한 분리수거
환경을 생각합니다!
본 제품에는 재활용 할 수 있는 부품들이 있습니다.
수명이 끝난 제품을 폐기하실 때는 분리수거를 하십시오.
문제 원인 해결방법
용기 밑부분을
통해 액체가 새
어 나옵니다.
칼날몸체(D1)(E1)(F1)의
씰이 없거나 잘못 끼워져
있습니다.
씰이 제자리에 제대로 끼워 있는지 확
인합니다. 씰의 주름 부분이 보이고
접히거나 휜 부분이 없어야 합니다
(그림1). 칼날이 날카롭기 때문에 칼
날몸체
(D1)
,
(E1)
,
(F1)
는 주의해서 다
루어야 합니다
.
칼날몸체(D1)(E1)(F1)가
용기(D4)(E4)(F4)에 충분
히 끼워지지 않았거나 잘못
끼워졌습니다.
칼날분리버튼(“클릭”버튼)(D2)
(그림
2c)
상단이나 버튼(E2)(F2)
(그림5c)
을 눌러 칼날몸체와 용기가 서로 잘
끼워지도록 합니다.
칼날이 원활하게
작동하지 않습니
다.
재료가 너무 크거나 너무
단단합니다.
재료의 크기나 양을 줄여 주십시오.
최대 양을 초과하지 않고
보울에 액체를 넣어 섞어 줍니다.

17
VI
Phụ kiện đi kèm theo mẫu máy bạn mua được miêu tả trên bao bì đóng gói bên ngoài.
• Đọc kỹ hướng dẫn sử dụng trước khi dung máy lần đầu: Nhà sản xuất sẽ không chịu bất
cứ trách nhiệm nào trong trường hợp người dùng không tuân theo các hướng dẫn.
• Thiết bị gia dụng này không phù hợp với những người sử dụng (bao gồm cả trẻ em) bị
giảm khả năng về thể lực, giác quan hay trí tuệ, hoặc thiếu kinh nghiệm hay kiến thức,
trừ phi họ được hướng dẫn hay giám sát trong quá trình sử dụng bới một người khác chịu
trách nhiệm về sự an toàn của họ. Trẻ con phải được giám sát bởi người lớn để đảm bảo
chúng không dùng thiết bị này để chơi.
• Máy được thiết kế chỉ dùng với điện xoay chiều. Kiểm tra điện thế sử dụng hiển thị trên
nhãn ghi các thông số của máy để đảm bảo phù hợp với nguồn điện của bạn. Sử dụng
không đúng với thông số nguồn điện của máy sẽ làm mất hiệu lực bảo hành.
• Máy này nhằm cho mục đích sử dụng như một thiết bị gia dụng ở trong nhà. Không dùng thiết
bị này ngoài trời.
Nhà sản xuất sẽ không chấp nhận bất cứ trách nhiệm nào và bảo lưu quyền vô hiệu hóa bảo
hành nếu máy được sử dụng với mục đích thướng mại hay sử dụng không đúng cách và tuân
thủ theo các hướng dẫn.
• Luôn luôn rút phích cắm điện thiết bị ngay sau khi sử dụng, hay trong trường hợp bị mất điện
khi đang sử dụng hay mỗi khi bạn vệ sinh máy.
• Không nên sử dụng máy nếu bạn nhận thấy máy hoạt động bất thường, hoặc nếu dây điện
hay phích điện có dấu hiệu bị hư hại. Để tránh mọi nguy hiểm hãy đến các trung tâm dịch vụ
được ủy quyển để thay phụ tùng bị hỏng (xem danh sách trong cuốn sổ bảo hành).
• Mọi can thiệp vào máy ngoại trừ vệ sinh và và những bảo dưỡng thông thường bời người dùng
phải được thực hiện bởi trung tâm dịch vụ được ủy quyền.
• Vì sự an toàn của chính bạn, chỉ nên dùng phụ kiện vật tư thay thế cung cấp bởi những trung
tâm dịch vụ ủy quyền này.
Cảnh báo: Trung tâm sẽ không bán phụ tùng cho bạn nếu bạn không xuất trình được hướng
dẫn sử dụng của máy, hay máy bạn đã mua.
• Không được ngâm hoặc nhúng thiết bị, dây điện hay phích điện của máy vào bất cứ chất lỏng
nào.
MIÊU TẢ
A Thân máy
B Nút bấm 2: tốc độ nhanh
C Nút bấm 1: tốc độ chậm
D Bình xay chính
D1 Khối chứa dao xay và gioăng cao su
D2 Nút mở khóa khối chứa dao xay
D3 Rãnh cố định bình xay
D4 Bình xay
D5 Gioăng làm kín nắp bình xay
D6 Nắp bình xay
D7 Mũ trên nắp bình xay để cho thêm hay
trộn thêm nguyên liệu
E Cối xay phụ dùng để xay rau gia vị
(*phụ kiện
n
ày có kèm theo một sỗ mẫu máy)
E1 Khối chứa dao xay và gioăng cao su
E2 Nút mở khóa khối chứa dao xay
E3 Rãnh cố định chén xay
E4 Chén xay
F Cối xay phụ dùng để xay các loại gia vị khô
(*phụ kiện này có kèm theo một số mẫu máy)
F1 Khối chứa dao xay và gioăng cao su
F2 Nút mở khóa khối chứa dao xay
F3 Rãnh cố định chén xay
F4 Chén xay
G Nắp cho chén xay
HƯỚNG DẪN AN TOÀN:

18
• Dây điện phải để xa tầm với của trẻ em, không để gần hoặc chạm vào những chỗ nóng trên máy,
gần nguồn nhiệt hay đè lên các cạnh sắc nhọn.
• Không được cho các bộ phận của máy có thanh phần kim loại vào lò vi sóng.
• Phải cẩn trọng khi sử dụng các lưỡi dao sắc của cối xay bao gồm bộ phận dao xay của
bình xay chính (D1), của cối xay phụ dùng để xay rau gia vị (E1), cối xay phụ dùng để
xay gia vị khô (F1), hay khi vệ sinh bình xay: Những dao xay này rất sắc.
• Khi máy đang chạy không bao giờ được chạm vào các bộ phận chuyển động của máy, đợi
đến khi máy xay và các bộ phận hoàn toàn bất động trước khi chạm vào hay tháo rời các
bộ phận này ra.
• Không được cho các dụng cụ bếp như (thìa, cây trộn thức ăn v.v) vào trong bình xay (D)
khi máy đang hoạt động.
• Tránh để tóc dài, khăn choàng cổ, v.v… ở bên trên gần với máy khi máy xay đang chạy.
• Tránh chạy máy khi bình xay không có nguyên liệu gì bên trong, hay thứ cần xay chỉ là các sản
phẩm khô hay rắn không có nước (ví dụ như đường cục) hay khi nắp bình xay (D6) và gioăng
của nó (D5) không được lắp trên bình xay (D).
•
Cảnh báo: Không được đổ hay trộn chất lỏng và các nguyên liệu ở nhiệt độ lớn hơn
60° C (140°F). Nếu bạn phải trộn nguyên liệu nóng, đặt tay bạn xa khỏi nắp bình xay
(D6)
và mũ trên nắp bình xay
(D7)
để tránh bị phỏng.
• Không dùng bình xay làm hộp chứa thực phẩm (với mục đích trữ đông, đun nấu hay tiệt trùng)
• Không bấm nút để chạy mô tơ liên tục quá 1 phút.
• Vì sự an toàn của bạn, thiết bị gia dụng này tuân thủ với các tiêu chuẩn và quy định sau:
- Chỉ thị về điện áp thấp
- Tương thích điện từ
- Môi trường
- Vật liệu tiếp xúc với thực phẩm
• Đặt máy trên mặt phẳng chắc chắn, cách nhiệt.
• Không được sử dụng máy để xay hay trộn nguyên liệu không phải là thực phẩm.
Máy xay sẽ không hoạt động nếu bình xay (D) hay chén xay (E) hoặc (F) không được lắp vào và
khóa đúng vị trí trên thân máy (A).
Chén xay (E4) (F4) được đánh dấu bằng đường kẻ mầu ở phần đáy của chén xay và chúng phải
được lắp vào đúng khối chứa dao xay mà trên đó có nút mớ khóa (E2)(F2) cùng mầu.
Bình xay (D4) không được đánh dấu bằng đường kẻ mầu nào cả, nó cần được lắp với khối chứa
dao xay có nút mở khóa mầu vàng (D2).
Trước khi sử dụng lần đầu, rửa tất cả các bộ phận của máy (D, E, F, G) bằng nước có pha xà
phòng trừ bộ phận thân máy (A).
CẢNH BÁO: Lưỡi dao xay rất sắc, hãy cẩn trọng khi chạm vào nó khi sử dụng, vệ sinh hay làm
sạch bình xay.
Gở bỏ tất cả vật liệu là phần bao bì dùng để đóng gói thiết bị trước khi sử dụng máy xay.
QUAN TRỌNG:
Đảm bảo rằng mô tô quay trong thân máy hoàn toàn không chuyển động bằng
cách không bấm vào nút bấm (B) và (C) trên thân máy Không chạy máy nếu nắp bình xay (D6)
HỆ THỐNG KHÓA AN TOÀN
LƯU Ý TRƯỚC KHI SỬ DỤNG LẦN ĐẦU
ページが読み込まれています...
ページが読み込まれています...
ページが読み込まれています...
ページが読み込まれています...
ページが読み込まれています...
ページが読み込まれています...
ページが読み込まれています...
ページが読み込まれています...
ページが読み込まれています...
ページが読み込まれています...
ページが読み込まれています...
ページが読み込まれています...
ページが読み込まれています...
ページが読み込まれています...
ページが読み込まれています...
ページが読み込まれています...
ページが読み込まれています...
ページが読み込まれています...
ページが読み込まれています...
ページが読み込まれています...
ページが読み込まれています...
ページが読み込まれています...
ページが読み込まれています...
ページが読み込まれています...
ページが読み込まれています...
ページが読み込まれています...
ページが読み込まれています...
ページが読み込まれています...
ページが読み込まれています...
ページが読み込まれています...
ページが読み込まれています...
ページが読み込まれています...
ページが読み込まれています...
ページが読み込まれています...
-
 1
1
-
 2
2
-
 3
3
-
 4
4
-
 5
5
-
 6
6
-
 7
7
-
 8
8
-
 9
9
-
 10
10
-
 11
11
-
 12
12
-
 13
13
-
 14
14
-
 15
15
-
 16
16
-
 17
17
-
 18
18
-
 19
19
-
 20
20
-
 21
21
-
 22
22
-
 23
23
-
 24
24
-
 25
25
-
 26
26
-
 27
27
-
 28
28
-
 29
29
-
 30
30
-
 31
31
-
 32
32
-
 33
33
-
 34
34
-
 35
35
-
 36
36
-
 37
37
-
 38
38
-
 39
39
-
 40
40
-
 41
41
-
 42
42
-
 43
43
-
 44
44
-
 45
45
-
 46
46
-
 47
47
-
 48
48
-
 49
49
-
 50
50
-
 51
51
-
 52
52
-
 53
53
-
 54
54


関連論文
その他のドキュメント
-
Philips HR7620/70 ユーザーマニュアル
-
IKEA VARDAGEN ユーザーマニュアル
-
-
IKEA AA-2352789-2-100 Spice Mill Glass Brown 19 Cm 取扱説明書
-
IKEA 902.575.76 ユーザーマニュアル
-
IKEA Förskaffa Double Insulated Lunch Box Stainless Steel 取扱説明書
-
IKEA 702.576.24 ユーザーマニュアル
-
-
IKEA Double Walled Clear Glass Coffee and Tea Maker ユーザーマニュアル