Korg AW-OTB 取扱説明書

タイプ
取扱説明書

このマニュアルも適しています

Korg AW-OTBは、ギターやベースのチューニングを素早く正確に行うことができるクリップ式チューナーです。使い方は簡単で、楽器のヘッドにクリップで取り付けて電源を入れるだけです。チューニングしたい弦を弾くと、ディスプレイに音程が表示されます。音程が合っているとディスプレイ中央のランプが緑色に点灯します。

AW-OTBは、メトロノーム機能も搭載しています。メトロノーム機能を使用するには、TUNING/TEMPOボタンを長押しします。すると、ディスプレイにテンポが表示されます。テンポを調整するには、CALIBボタンを使用します。

AW-OTBは、コンパクトなサイズで持ち運びにも便利です。また、電池駆動なので、いつでもどこでも使用することができます。ギターやベースのチューニングに最適なクリップ式チューナーをお探しなら、Korg AW-OTBがおすすめです。

Thank you for purchasing the Korg AW-OTG/
AW-OTB CLIP-ON TUNER. To help you get the
most out of your new instrument, please read
this manual carefully.
Merci d’avoir choisi la CLIP-ON TUNER AW-OTG/
AW-OTB de Korg. Afin de pouvoir exploiter
au mieux toutes les possibilités offertes par
l’instrument, veuillez lire attentivement ce
manuel.
Vielen Dank, dass Sie sich für ein AW-OTG/AW-
OTB CLIP-ON TUNER von Korg entschieden
haben. Bitte lesen Sie sich diese Anleitung
vollstädig durch, um bei der Bedienung alles
richtig zu machen.
Owner's Manual (¬p. 2)
Manuel d'utilisation (¬p. 6)
Bedienungsanleitung (¬s. 10)
Manual de usuario (¬p. 14)
説明書
(¬p. 18)
Gracias por comprar el anador para enchufar
AW-OTG/AW-OTB CLIP-ON TUNER de Korg. Por
favor, lea este manual atentamente y guárdelo
para futuras consultas.
びは、グCLIP-ON TUNER AW-OTG/
AW-OTBをお買い上げいただきまして、まことにあ
りがとうございます。本製品を末永くご愛用いただ
くためにも、取扱説明書をよくお読みになって
しい方法でご使用ください。
- 2 -
Parts of the AW-OTG/AW-OTB
AW-OTG
AW-OTB
a. Power button b. DISPLAY button
c. Display d. Battery compartment (Rear)
e. TUNING/CHORD button (AW-OTG)
TUNING/TEMPO button (AW-OTB)
f. CALIB button
Installing the battery
When the battery is running
low, a battery symbol will ap-
pear in the display for a few
seconds. Immediately replace
the battery with a new one.
1. Open the battery compartment
cover on the rear of the tuner in
the direction of the arrow.
2. Insert the battery, making sure to
observe the correct polarity, and
then close the cover.
Attaching to the instrument
and range of motion
The AW-OTG/AW-OTB tunes by picking up the vibrations of
the instrument. Therefore, attach the AW-OTG/AW-OTB to the
headstock of your instrument in order to tune it. Additionally,
the AW-OTG/AW-OTB can be freely moved so that the display is
easy to read.
The AW-OTG/AW-OTB may be damaged if you apply exces-
sive force within its range of motion, or attempt to move it
beyond its intended range of motion.
15°
15°
100°
180°
360°
Please carefully attach the AW-OTG/AW-OTB to your instru-
ment. Leaving the AW-OTG/AW-OTB attached for a long
time may damage or mark the instrument's surface.
Depending on various factors such as age-related change or
the surface nish, there is a possibility that your instrument
may be damaged by attaching this product.
Turning on/o
Press the power button to turn on the AW-OTG/AW-OTB. To turn
it o, press the power button again.
When there has been no sound input for approximately three
minutes, the AW-OTG/AW-OTB will automatically turn o (Auto
power-o function).
Tuning
1. If necessary, change the reference pitch and display type
settings. For details on the setting procedures, refer to the
following descriptions.
2. Play a single note and tune the string.
The display indicating when the string is in tune diers de-
pending on the selected display type. (
¬
Setting the display
type)
Example: Type 1 on AW-OTG
GUITAR :
6E
5A
4D
1E
2B
3G
BASS : 4E, 3A, 2D, 1G
- 3 -
Reference pitch settings (*M)
The default setting for the reference pitch is 440 Hz. The refer-
ence pitch can be changed.
1. Press the CALIB button, after
which the reference pitch ap-
pears in the display.
2. While the current setting ap-
pears in the display, press the
CALIB button to change the reference pitch.
3. If the button is not pressed for approximately 2 seconds, the
setting is applied, and the tuner returns to tuning mode.
Identifying chords
(AW-OTG only)
The chord that is played can be identied.
1. Press the TUNING/CHORD but-
ton to enter chord-identifying
mode.
Each press of the TUNING/
CHORD button switches to
tuner mode or chord-identify-
ing mode.
2. Play a chord on your instrument. The chord appears in the
display.
Identifying a tempo
(AW-OTB only)
The tempo is identied from the baseline that is played.
1. Press the TUNING/TEMPO but-
ton to enter tempo-identifying
mode.
Each press of the TUNING/
TEMPO button switches to
tuner mode or tempo-identi-
fying mode.
2. Play your instrument at a steady rhythm in, for example,
double time or half time. The tempo appears in the display.
Setting the display type (*M)
Each press of the DISPLAY button switches the setting for the
display type.
Type 1
Tune the string until the needle in the meter moves to the cen-
ter (
). The needle in the meter moves to the left of the center
if the pitch is at or moves to the right of the center if the pitch
is sharp.
input frequency
The pitch is at. In tune. The pitch is sharp.
In tune (reference pitch: 440Hz)
Guitar 6E : 82.4Hz
3G : 196.0Hz
5A : 110.0Hz
2B : 246.9Hz
4D : 146.8Hz
1E : 329.6Hz
Bass 4E : 41.2Hz 3A : 55.0Hz 2D : 73.4Hz 1G : 98.0Hz
Type 2
Tune the string until the line is straight. The line bends down-
ward if the pitch is at or bends upward if the pitch is sharp.
The pitch is at. In tune. The pitch is sharp.
Type 3
Tune the string until the note name closest to the detected
pitch appears in the display. Tune until the note appears cor-
rectly. The bottom half of the note name runs right to left if the
pitch is at or left to right if the pitch is sharp.
The pitch is at. In tune. The pitch is sharp.
Type 4
Tune the string until the note name is surrounded by a full
circle. The line to surround the note name comes from the left if
the pitch is at or comes from the right if the pitch is sharp.
The pitch is at. In tune. The pitch is sharp.
- 4 -
Type 5
Tune the string until the note name appears at in the center
of the display. The note name moves to the right if the pitch is
at or to the left if the pitch is sharp.
The pitch is at. In tune. The pitch is sharp.
Type 6 (strobe mode)
Tune the string until the ellipse stops changing. The ellipse is
continuously changing if the string is out of tune. The larger
the pitch deviation, the faster the shape changes; the changing
stops when the string is in tune.
The pitch is at. In tune. The pitch is sharp.
Type 7 (strobe mode)
Tune the string until the wave stops running. The wave runs
from right to left if the pitch is flat or from left to right if the
pitch is sharp.
The pitch is at. In tune. The pitch is sharp.
Type 8
Tune the string until the cat catches the cattail. The cattail
bends downward if the pitch is flat or upward if the pitch is
sharp.
The pitch is at. In tune. The pitch is sharp.
Type 9
Tune the string until the train stops at . The train does not
reach if the pitch is at or goes past if the pitch is sharp.
The pitch is at. In tune. The pitch is sharp.
Type 10
Tune the string until the person is transported onto the UFO.
The person is on the left side if the pitch is at or on the right
side if the pitch is sharp.
The pitch is at. In tune. The pitch is sharp.
Type 11
Tune the string until the water reaches the line in the basin. The
water does not reach the line if the pitch is at or goes past the
line if the pitch is sharp.
The pitch is at. In tune. The pitch is sharp.
- 5 -
Specications
Scale: 12-note equal temperament
Range (sine wave):
A0 (27.5Hz)–C8 (4186Hz)
Precision: +/-0.1 cent (display type 6 only)
Reference pitch:
A4=436–445 Hz (1Hz steps)
Display type: 11 types
Tempo identication range (AW-OTB only):
80-160 beats per minute (bpm)
Dimensions (W x D x H):
51 mm x 64 mm x 71 mm / 2.01" x 2.52" x 2.80"
Weight: 35 g / 1.23 oz. (including battery)
Power supply: One AAA Battery (alkaline or nickel-metal hy-
dride battery)
Battery life:
approximately 18 hours (tuner continuously
operating, A4 continuous input, when using
alkaline battery)
Included items:
Quick Start Guide, One AAA battery
*M Settings are remembered even when the power is o.
• TheAW-OTG/AW-OTBmaybeunabletodetectthepitchor
the chord if the sound contains numerous overtones or if the
instrument has a rapid decay.
• Specicationsandappearancearesubjecttochangewithout
notice for improvement.
- 6 -
Parties du AW-OTG/AW-OTB
AW-OTG
AW-OTB
a. Bouton d'alimentation b. Bouton DISPLAY
c. Achage d. Compartiment de la pile (Arrière)
e. Bouton TUNING/CHORD (AW-OTG)
Bouton TUNING/TEMPO (AW-OTB)
f. Bouton CALIB
Mise en place de la pile
Quand la pile est presque
plate, l’indicateur de pile cli-
gnote à l’écran pendant
quelques secondes. Rempla-
cez la pile sans tarder, en veil-
lant à utiliser une pile neuve.
1. Ouvrez le couvercle du comparti-
ment de la pile au dos de l’accor-
deur, en tirant le couvercle dans la
direction de la èche.
2. Insérez une pile neuve dans le
compartiment de la pile en res-
pectant les indications de polarité,
puis refermez le couvercle.
Fixation sur l’instrument et plage
de manoeuvre de l’accordeur
LAW-OTG/AW-OTB détermine l’accordage en captant les vibra-
tions de l’instrument. Veillez donc à xer l’AW-OTG/AW-OTB sur
la tête de votre instrument pour garantir un accordage able.
En outre, vous pouvez déplacer et manoeuvrer l’AW-OTG/AW-
OTB comme bon vous semble pour une lisibilité parfaite de son
écran.
Vous risquez d’endommager l’AW-OTG/AW-OTB si vous le
manipulez avec une force excessive ou si vous tentez de le
manipuler en dehors de sa plage de manoeuvre.
15°
15°
100°
180°
360°
S’il vous plait, attachez soigneusement l’AW-OTG/AW-OTB
à votre instrument. Le laisser attaché pendant un long mo-
ment peut rayer la surface de votre instrument.
Selon divers facteurs tels que la nition, l’âge et l’état de
l’instrument, il se pourrait que le système de xation à pince
abîme la nition de l’instrument.
Mise sous/hors tension
Appuyez sur le bouton d’alimentation pour mettre l’AW-OTG/
AW-OTB sous tension. Pour mettre l’accordeur hors tension,
appuyez à nouveau sur son bouton d’alimentation.
Quand l’AW-OTG/AW-OTB ne reçoit aucun signal pendant envi-
ron trois minutes, il se met automatiquement hors tension (Mise
hors tension automatique).
Accordage
1. Si nécessaire, changez la hauteur de référence et de mode
d’achage. Pour des détails sur ces réglages, voyez les des-
criptions dans ce manuel.
2. Jouez une seule note et accordez la corde.
Lindication d’accordage correct varie selon le mode d’a-
chage sélectionné. (
¬
Réglage du mode d’achage)
Exemple : Type 1 sur l’AW-OTG
GUITAR :
6E
5A
4D
1E
2B
3G
BASS : 4E, 3A, 2D, 1G
- 7 -
Réglages de la hauteur de référence (*M)
Par défaut, la hauteur de référence est réglée sur 440 Hz. Vous
pouvez changer la hauteur de référence.
1. Appuyez sur le bouton CALIB.
La hauteur de référence s’af-
che alors à l’écran.
2. Pendant que le réglage actuel
est affiché à l’écran, appuyez
sur le bouton CALIB pour
changer la hauteur de référence.
3. Quand vous cessez d’appuyer sur le bouton pendant envi-
ron 2 secondes, le réglage actuel est appliqué et l’accordeur
retourne en mode d’accordage.
Reconnaissance d’accord
(AW-OTG uniquement)
Unefonctiondel’accordeurpermetd’identierl’accordjoué.
1. Appuyez sur le bouton TU-
NING/CHORD pour activer
le mode de reconnaissance
d’accord.
Chaque pression sur le bou-
ton TUNING/CHORD alterne
entre le mode d’accordage et le mode de reconnaissance
d’accord.
2. Jouez un accord sur votre instrument. Le nom de l’accord
s’ache à l’écran.
Reconnaissance de tempo
(AW-OTB uniquement)
L’accordeuridentieletemposurbasedurythmejoué.
1. Appuyez sur le bouton TU-
NING/TEMPO pour activer le
mode de reconnaissance de
tempo.
Chaque pression sur le bouton
TUNING/TEMPO alterne entre
le mode d’accordage et le mode de reconnaissance de tem-
po.
2. Jouez un rythme à un tempo régulier sur votre instrument,
en demi-temps ou en double temps, par exemple. Le tempo
s’ache à l’écran.
Réglage du mode d’achage (*M)
Chaque pression sur le bouton DISPLAY change de mode d’a-
chage.
Type 1
Accordez la corde de sorte que l’aiguille du compteur soit au
centre (
). L’aiguille du compteur se déplace à gauche quand
la hauteur est trop basse et à droite quand la hauteur est trop
élevée.
Fréquence d’entrée
Trop bas. Juste. Trop haut.
Juste. (hauteur de référence: 440Hz)
Guitare 6E : 82,4Hz
3G : 196,0Hz
5A : 110,0Hz
2B : 246,9Hz
4D : 146,8Hz
1E : 329,6Hz
Basse 4D : 41,2Hz 3G : 55,0Hz 2B : 73,4Hz 1E : 98,0Hz
Type 2
Accordez la corde de sorte que la ligne soit droite. La ligne se
courbe vers le bas quand la hauteur est trop basse et vers le
haut quand la hauteur est trop élevée.
Trop bas. Juste. Trop haut.
Type 3
Accordez la corde de sorte que le nom de la note la plus proche
delahauteurdétectées’acheàl’écran.Accordezjusqu’àce
que le nom de la note soit correctement aché. La moitié infé-
rieure du nom de note se déplace de droite à gauche quand la
hauteur est trop basse et de gauche à droite quand la hauteur
est trop élevée.
Trop bas. Juste. Trop haut.
Type 4
Accordez la corde de sorte que le nom de la note soit entou-
ré d’un cercle complet. La ligne formant le cercle vient de la
gauche quand la hauteur est trop basse et de la droite quand la
hauteur est trop élevée.
Trop bas. Juste. Trop haut.
- 8 -
Type 5
Accordez la corde de sorte que le nom de la note s’ache au
point
au centre de l’écran. Le nom de la note se déplace
vers la droite quand la hauteur est trop basse et vers la gauche
quand la hauteur est trop élevée.
Trop bas. Juste. Trop haut.
Type 6 (mode stroboscopique)
Accordez la corde de sorte que l’ellipse cesse de changer. Lel-
lipse continue de changer tant que la corde est désaccordée.
Plus la corde est désaccordée, plus la forme change vite. La
forme cesse de changer quand la corde est accordée.
Trop bas. Juste. Trop haut.
Type 7 (mode stroboscopique)
Accordez la corde de sorte que l’onde cesse de déler. Londe
déle de droite à gauche quand la hauteur est trop basse et de
gauche à droite quand la hauteur est trop élevée.
Trop bas. Juste. Trop haut.
Type 8
Accordez la corde de sorte que le chat attrape le plumeau. Le
plumeau se courbe vers le bas quand la hauteur est trop basse
et vers le haut quand la hauteur est trop élevée.
Trop bas. Juste. Trop haut.
Type 9
Accordez la corde de sorte que le train s’arrête au point . Le
train s’arrête avant
quand la hauteur est trop basse et dépasse
quand la hauteur est trop élevée.
Trop bas. Juste. Trop haut.
Type 10
Accordez la corde de sorte que la personne soit capturée par
l’ovni. La personne se trouve à gauche quand la hauteur est
trop basse et à droite quand la hauteur est trop élevée.
Trop bas. Juste. Trop haut.
Type 11
Accordez la corde de sorte que le niveau d’eau atteigne le re-
père de l’évier. Le niveau d’eau est en dessous du repère quand
la hauteur est trop basse et au-dessus du repère quand la hau-
teur est trop élevée.
Trop bas. Juste. Trop haut.
- 9 -
Spécications
Gamme: 12 notes tempérament égal
Plage de détection (onde sinus):
A0 (27,5 Hz)
~ C8 (4186 Hz)
Précision:
+/-0,1 centième
(mode d’achage: Type 6 uniquement)
Hauteur de référence:
A4 = 436 Hz ~ 445 Hz (paliers de 1 Hz)
Mode d’achage: 11 types
Plage de reconnaissance du tempo (AW-OTB uniquement):
80 à 160 battements par minute (bpm)
Dimensions (LxPxH):
51 mm x 64 mm x 71 mm
Poids: 35 g (pile comprise)
Alimentation: Une pile AAA (alcalines ou au nickel-mé-
tal-hydrure)
Autonomie de la pile:
Environ 18 heures (utilisation continue de
l’accordeur, entrée continue de la note A4,
avec une pile alcaline)
Accessoires fournis:
Guide de prise en main, une pile AAA
*M Les réglages sont conservés même quand l’appareil est
mis hors tension.
• Lescaractéristiquesetl’aspectduproduitsontsusceptibles
d’être modiés sans avis préalable en vue d’une amélioration.
- 10 -
Teile des AW-OTG/AW-OTB
AW-OTG
AW-OTB
a. Einschalttaste b. DISPLAY-Taste
c. Display d. Batteriefach (Rückseite)
e. TUNING/CHORD-Taste (AW-OTG)
TUNING/TEMPO-Taste (AW-OTB)
f. CALIB-Taste
Einsetzen der Batterie
Bei erschöpften Batterie er-
scheint einige Sekunden lang
ein Batteriesymbol im Display.
Ersetz en Sie die Batterie um-
gehend durch eine neue.
1. Klappen Sie den Batterie-
fachdeckel auf der Rückseite des
Stimmgeräts in Pfeilrichtung auf.
2. Legen Sie die Batterie ein und
achten Sie hierbei auf die richtige
Polarität. Schließen Sie den De-
ckel.
Anbringen am Instrument
und Bewegungsspielraum
Das AW-OTG/AW-OTB stimmt Ihr Instrument, indem es dessen
Schwingungen aufnimmt. Aus diesem Grund sollte das AW-
OTG/AW-OTB zum Stimmen an der Kopfplatt e Ihres Instru-
ments angebracht werden. Darüber hinaus kann das AW-OTG/
AW-OTB frei bewegt werden, um die Ablesbarkeit des Displays
zu verbessern.
Das AW-OTG/AW-OTB kann beschädigt werden, wenn inner-
halb des Bewegungsspielraums übermäßige Kraft auf das
Gerät ausgeübt wird bzw. wenn versucht wird, es über den
Bewegungsspielraum hinaus zu bewegen.
15°
15°
100°
180°
360°
Bitte befestigen sie das AW-OTG/AW-OTB vorsichtig an ih-
rem Instrument. Wenn sie das AW-OTG/AW-OTB für längere
Zeit an ihrem Instrument befestigt lassen, kann dies zu Ver-
änderungen an der Oberäche des Instruments führen.
Abhängig von verschiedenen Faktoren wie z. B. altersbe-
dingte Veränderungen der Lackierung/Oberäche Ihres In-
strumentes, kann es vorkommen dass ein Anbringen dieses
Produkts zu einer Beschädigung führt.
Ein-/ausschalten
Drücken Sie die Einschalttaste, um das AW-OTG/AW-OTB ein-
zuschalten. Zum Ausschalten drücken Sie die Einschalttaste
erneut.
Wenn etwa drei Minuten lang kein Eingangssignal anliegt,
schaltet sich das AW-OTG/AW-OTB automatisch aus (Die Ener-
giesparfunktion).
Tuning
1. Ändern Sie gegebenenfalls die Referenztonhöhe und vom
Displaytyp. Gehen Sie hierbei wie folgt vor.
2. Spielen Sie eine Note und stimmen Sie die Saite.
Je nach Displaytyp wird unterschiedlich angezeigt, ob die
Saite korrekt gestimmt ist. (
¬
Einstellen des Displaytyps)
Beispiel : Typ 1 des AW-OTG
GUITAR :
6E
5A
4D
1E
2B
3G
BASS : 4E, 3A, 2D, 1G
- 11 -
Referenztonhöhe einstellen (*M)
Die Standard-Referenztonhöhe beträgt 440 Hz (Kammerton A).
Sie können die Referenztonhöhe ändern.
1. Drücken Sie die CALIB-Taste,
um die Referenztonhöhe im
Display anzuzeigen.
2. Erscheint die aktuelle Einstel-
lung im Display, drücken Sie
die CALIB-Taste, um die Refe-
renztonhöhe zu ändern.
3. Lassen Sie die Taste los, wird nach etwa 2 Sekunden die
Einstellung übernommen und das Stimmgerät kehrt zum
Stimm-Modus zurück.
Saiten erkennen (nur AW-OTG)
Das Gerät kann Akkorde erkennen.
1. Drücken Sie die TUNING/
CHORD-Taste, um den Ak-
korderkennungsmodus zu
aktivieren.
Mit der TUNING/CHORD-Tas-
te rufen Sie abwechselnd den
Stimm- oder Akkorderkennungsmodus auf.
2. Spielen Sie einen Akkord auf Ihrem Instrument. Der Akkord
erscheint im Display.
Tempoerkennung (nur AW-OTB)
Das Tempo wird anhand der gespielten Basslinie ermittelt.
1. Drücken Sie die TUNING/TEM-
PO-Taste, um den Tempoer-
kennungsmodus zu aktivieren.
Mit der TUNING/TEMPO-Taste
rufen Sie abwechselnd den
Stimm- oder Tempoerken-
nungsmodus auf.
2. Spielen Sie einen gleichmäßigen Rhythmus, z.B. Achtel oder
Viertel. Das Tempo erscheint im Display.
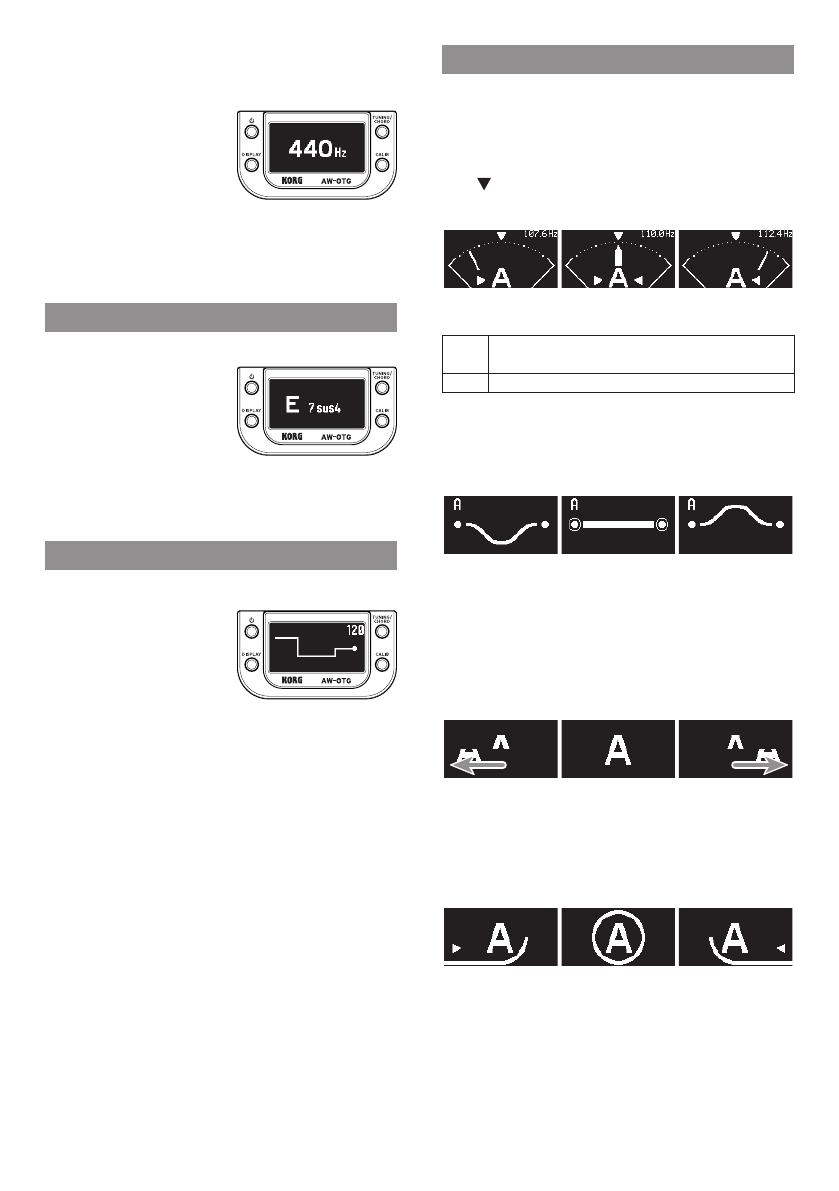
Einstellen des Displaytyps (*M)
MitjedemDruckaufdieDISPLAY-TasteschaltenSieinfolgender
Reihenfolge um:
Typ 1
Stimmen Sie die Saite, bis die Nadel in der Anzeige in der Mitte
steht (
). Ist die Stimmung zu tief, schlägt die Nadel nach links
aus; ist sie zu hoch, nach rechts.
Eingangsfrequenz
Zu tief. Richtig gestimmt. Zu hoch.
Richtig gestimmt. (Referenztonhöhe: 440Hz)
Gitarre 6E : 82,4Hz
3G : 196,0Hz
5A : 110,0Hz
2B : 246,9Hz
4D: 146,8Hz
1E : 329,6Hz
Bass 4E : 41,2Hz 3A : 55,0Hz 2D : 73,4Hz 1G : 98,0Hz
Typ 2
Stimmen Sie die Saite, bis die Linie gerade ist. Ist die Stimmung
zu tief, biegt sich die Linie nach unten; ist sie zu hoch, nach
oben.
Zu tief. Richtig gestimmt. Zu hoch.
Typ 3
Stimmen Sie die Saite, bis im Display der Notenname erscheint,
der der ermittelten Tonhöhe am nächsten liegt. Stimmen Sie,
bis die Note korrekt erscheint. Ist die Stimmung zu tief, läuft die
untere Hälfte des Notennamens von rechts nach links; ist sie zu
hoch, von links nach rechts.
Zu tief. Richtig gestimmt. Zu hoch.
Typ 4
Stimmen Sie die Saite, bis der Notenname von einem Kreis um-
schlossen ist. Ist die Stimmung zu tief, kommt die Linie, die den
Notennamen umschließt von links; ist sie zu hoch, von rechts.
Zu tief. Richtig gestimmt. Zu hoch.
- 12 -
Typ 5
Stimmen Sie die Saite, bis der Notenname zwischen mittig
im Display erscheint. Ist die Stimmung zu tief, bewegt sich der
Notenname nach rechts; ist sie zu hoch, nach links.
Zu tief. Richtig gestimmt. Zu hoch.
Typ 6 (Stroboskopmodus)
Stimmen Sie die Saite, bis die Ellipse sich nicht mehr verändert.
Ist die Saite verstimmt, ändert sich die Ellipse stetig. Je größer
die Verstimmung, desto schneller ändert sich die Form - ist die
Saite gestimmt, verändert sie sich nicht mehr.
Zu tief. Richtig gestimmt. Zu hoch.
Typ 7 (Stroboskopmodus)
Stimmen Sie die Saite, bis die Welle stehen bleibt. Ist die Stim-
mung zu tief, läuft die Welle von rechts nach links; ist sie zu
hoch, von links nach rechts.
Zu tief. Richtig gestimmt. Zu hoch.
Typ 8
Stimmen Sie die Saite, bis die Katze den Katzenschwanz fängt.
Ist die Stimmung zu tief, biegt sich der Schwanz nach unten; ist
sie zu hoch, nach oben.
Zu tief. Richtig gestimmt. Zu hoch.
Typ 9
Stimmen Sie die Saite, bis die der Zug bei stehen bleibt. Ist die
Stimmung zu tief, stoppt der Zug vor
; ist sie zu hoch, dahinter.
Zu tief. Richtig gestimmt. Zu hoch.
Typ 10
Stimmen Sie die Saite, bis das Männchen ins Ufo gebeamt wird.
Ist die Stimmung zu tief, steht das Männchen links vom Ufo; ist
sie zu hoch, rechts davon.
Zu tief. Richtig gestimmt. Zu hoch.
Typ 11
Stimmen Sie die Saite, bis das Wasser an die Linie im Becken re-
icht. Ist die Stimmung zu tief, erreicht das Wasser die Linie nicht;
ist sie zu hoch, steht es darüber.
Zu tief. Richtig gestimmt. Zu hoch.
- 13 -
Technische Daten
Skala: 12 Noten gleichschwebende Stimmung
Bereich (Sinuswelle):
A0 (27,5 Hz)–C8 (4186 Hz)
Präzision: +/-0,1 Cent (nur Displaytyps 6)
Referenztonhöhe:
A4 = 436–445 Hz (in Schritt en von 1 Hz)
Displaytyps: 11 Typen
Tempoerkennungsbereich (nur AW-OTB):
80 ~ 160 Taktschläge/Minute (bpm)
Abmessungen (BxTxH):
51 mm x 64 mm x 71 mm
Gewicht: 35 g (mit Batterie)
Stromversorgung: Eine AAA-Batterie (Alkali-Batterie oder Ni-
ckel-Metallhydrid-Akkus)
Batterielebensdauer:
ca. 18 Stunden (kontinuierlicher Betrieb
mit eingeschaltetem Stimmgerät, A4 konti-
nuierliche Eingabe, bei Verwendung einer
Alkali-Batterie)
Lieferumfang:
Blitzstart, Eine AAA-Batterie
*M Die Einstellungen bleiben gespeichert, wenn das Gerät
ausgeschaltet wird.
• ÄnderungendertechnischenDatenunddesDesignsohne
vorherige Ankündigung vorbehalten.
- 14 -
Partes del AW-OTG/AW-OTB
AW-OTG
AW-OTB
a. Botón de alimentación b. Boutón DISPLAY
c. Pantalla d. Compartiment de la pila (Parte posterior)
e. Boutón TUNING/CHORD (AW-OTG)
Boutón TUNING/TEMPO (AW-OTB)
f. Boutón CALIB
Instalación de la Pila
Cuandolapilaestébajade
carga, en la pantalla aparecerá
el símbolo de una pila durante
unos segundos. Reemplace
inmediatamente la pila por
una nueva.
1. Abra la tapa del compartimento
de la pila en la parte posterior del
a nador siguiendo la dirección de
la echa.
2. Inserte la pila asegurándose de
hacerlo con la polaridad correcta y
después cierre la tapa.
Colocación en el instrumento
e intervalo de movimiento
El sistema AW-OTG/AW-OTB realiza la a nación recogiendo las
vibraciones del instrumento. Por ello, asegúrese de colocar el AW-
OTG/AW-OTB en el cabezal del instrumento para poder a narlo.
Además, el AW-OTG/AW-OTB se puede mover libremente para
leer la pantalla con facilidad.
ElAW-OTG/AW-OTBpuederesultardañadosiejerceuna
fuerza excesiva en su intervalo de movimiento, o si intenta
desplazarlo más allá de su intervalo de movimiento previs-
to.
15°
15°
100°
180°
360°
PorfavorsujeteconcuidadoelAW-OTG/AW-OTBasuins-
trumento.SidejaelAW-OTG/AW-OTBsujetoalinstrumento
durante un largo periodo, puede dañar la super cie del ins-
trumento.
Dependiendodevariosfactores,comoelenvejecimiento
del acabado de la super cie, existe la posibilidad de que su
instrumento pueda dañarse por la colocación del a nador.
Encendido/apagado
Pulse el botón de alimentación para encender el AW-OTG/AW-
OTB. Para apagarlo, pulse otra vez el botón de alimentación.
Si no se produce ninguna entrada de sonido durante aproxima-
damente tres minutos, el AW-OTG/AW-OTB se apagará automá-
ticamente (Función de apagado automático).
Anación
1. Siesnecesario,cambielosajustesdetonodereferenciay
de tipo de pantalla. Para más información sobre los procedi-
mientosdeajuste,consultelasdescripcionesquevienena
continuación.
2. Toque una sola nota y ane la cuerda.
La pantalla que indica cuándo está anada la cuerda diere
dependiendo del tipo de pantalla seleccionado. (
¬
Ajustede
tipo de pantalla)
Ejemplo : Tipo 1 en el AW-OTG
GUITAR :
6E
5A
4D
1E
2B
3G
BASS : 4E, 3A, 2D, 1G
- 15 -
Cambio del tono de referencia (*M)
Elajustepredeterminadoparaeltonodereferenciaes440Hz.
El tono de referencia se puede cambiar.
1. Pulse el botón CALIB/FLAT y
aparecerá el tono de referen-
cia en la pantalla.
2. Mientras en la pantalla se
muestraelajusteactual,pulse
el botón CALIB/FLAT para
cambiar el tono de referencia.
3. Si no se pulsa el botón durante aproximadamente 2 se-
gundos,seaplicaelajusteyelanadorregresaalmodode
anación.
Identicación de acordes
(solo para el AW-OTG)
Es posible identicar el acorde que se toca.
1. Pulse el botón TUNING/CHORD
para acceder al modo de iden-
ticación de acordes.
Cada pulsación del botón
TUNING/CHORD cambia entre
modo de anador y modo de
identicación de acordes.
2. Toque un acorde en el instrumento. El acorde aparecerá en
la pantalla.
Identicación del tempo
(solo para el AW-OTB)
El tempo se identica a partir de la base que se toca.
1. Pulse el botón TUNING/TEMPO
para acceder al modo de iden-
ticación de tempo.
Cada pulsación del botón
TUNING/TEMPO cambia entre
modo de anador y modo de
identicación de tempo.
2. Toqueelinstrumentoconunritmoestable,porejemploa
doble tiempo o a medio tiempo. El tempo aparecerá en la
pantalla.
Ajuste de tipo de pantalla (*M)
CadapulsacióndelbotónDISPLAYcambiaelajustedetipode
pantalla.
Tipo 1
Afinelacuerdahastaquelaagujadelmedidorsemuevaal
centro ( ).Laagujadelmedidorsemuevealaizquierdadel
centrosieltonoestábajoosemuevealaderechadelcentrosi
el tono está alto.
Frecuencia de entrada
Eltonoestábajo. Anado. El tono está alto.
Anado. (tono de anación de referencia: 440Hz)
Guitarra 6E : 82,4Hz
3G : 196,0Hz
5A : 110,0Hz
2B : 246,9Hz
4D : 146,8Hz
1E : 329,6Hz
Bajo 4E : 41,2Hz 3A : 55,0Hz 2D : 73,4Hz 1G : 98,0Hz
Tipo 2
Ane la cuerda hasta que la línea esté recta. La línea se dobla
haciaabajosieltonoestábajoosedoblahaciaarribasieltono
está alto.
Eltonoestábajo. Anado. El tono está alto.
Tipo 3
Ane la cuerda hasta que aparezca en la pantalla el nombre de
la nota más cercana al tono detectado. Ane hasta que la nota
aparezca correctamente. La mitad inferior del nombre de la
notacorredederechaaizquierdasieltonoestábajoodeizqui-
erda a derecha si el tono está alto.
Eltonoestábajo. Anado. El tono está alto..
Tipo 4
Ane la cuerda hasta que el nombre de la nota quede rodeado
por un círculo cerrado. La línea que tiene que rodear el nombre
delanotavienedesdelaizquierdasieltonoestábajooviene
desde la derecha si el tono está alto.
Eltonoestábajo. Anado. El tono está alto.
- 16 -
Tipo 5
Ane la cuerda hasta que el nombre de la nota aparezca en
en el centro de la pantalla. El nombre de la nota se mueve hacia
laderechasieltonoestábajoohacialaizquierdasieltonoestá
alto.
Eltonoestábajo. Anado. El tono está alto.
Tipo 6 (modo estroboscópico)
Afinelacuerdahastaquelaelipsedejedecambiar.Laelipse
está cambiando continuamente si la cuerda está desafinada.
Cuanto mayor es la desviación del tono, más rápido cambia la
forma;dejadecambiarcuandolacuerdaestáanada.
Eltonoestábajo. Anado. El tono está alto.
Tipo 7 (modo estroboscópico)
Anelacuerdahastaquelaondadejedecorrer.Laondacorre
dederechaaizquierdasieltonoestábajoodeizquierdaade-
recha si el tono está alto.
Eltonoestábajo. Anado. El tono está alto.
Tipo 8
Anelacuerdahastaqueelgatocojalaespadaña.Laespadaña
sedoblahaciaabajosieltonoestábajoohaciaarribasieltono
está alto.
Eltonoestábajo. Anado. El tono está alto.
Tipo 9
Afine la cuerda hasta que el tren se detenga en . El tren no
llega a sieltonoestábajoosobrepasa si el tono está alto.
Eltonoestábajo. Anado. El tono está alto.
Tipo 10
Ane la cuerda hasta que la persona se transporte al OVNI. La
personaestáenelladoizquierdosieltonoestábajooenel
lado derecho si el tono está alto.
Eltonoestábajo. Anado. El tono está alto.
Tipo 11
Ane la cuerda hasta que el agua llegue a la línea del lavabo. El
aguanollegaalalíneasieltonoestábajoosobrepasalalínea
si el tono está alto.
Eltonoestábajo. Anado. El tono está alto.
- 17 -
Especicaciones
Escala: 12 notas, temperamento igual
Rango (onda sinusoidal):
A0 (27,5 Hz) – C8 (4186 Hz)
Precisión: +/-0,1 centésima
(solo para el tipo de pantalla: Tipo 6)
Tono de referencia:
A4 = 436–445 Hz (en pasos de 1 Hz)
Tipo de pantalla: 11 tipos
Rango de identicación de tempo (solo para el AW-OTB):
80–160 tiempos por minuto (bpm)
Dimensiones (Anch. x Prof. x Alt.):
51 mm x 64 mm x 71 mm
Peso: 35 g (incluyendo pila)
Alimentación: Una pila AAA (pila de alcalinas o metal
hidruro de níquel)
Vida útil de la pila:
aproximadamente 18 horas (afinador
funcionando continuamente, entrada
continua de A4 (La4), si se utiliza una pila
alcalina)
Elementos incluidos:
Guía de inicio rápido, Una pila AAA
*M LosAjustessonrecordadosalapagarlaunidad.
• Lasespecicacionesyelaspectoestánsujetasacambiossin
previoavisopormejora.
- 18 -
各部の名称
AW-OTG
AW-OTB
a.
電源ボタン
b.
DISPLAYボタン
c.
ディスプレイ
d.
電池ケース(裏面)
e.
TUNING/CHORDボタン(AW-OTG)
TUNING/TEMPOボタン(AW-OTB)
f.
CALIBボタン
電池の入れ方
電池の残量が少なくなる
電池マークが数秒ごと
にディスプレイに表示され
ます。速やかに新しい電池
と交換してください。
付属の電池は動作確認用の
ため、電池寿命が短い場合があ
ります。
1.
本機の裏側にある電池ケースの
蓋を矢印の方向に開けます。
2.
極性に注意して電池を入れ
を閉めます。
楽器への取り付けと可動範囲
本機は楽器本体の振動を拾ってチューニングを行います
ご使用になる楽器のヘッド部分に取り付けてチューニング
を行ってください。また、表示が見やすいように自由に動
かすことができます。
可動範囲内であっても、過度な力で無理に向きを変える
と破損する恐れがあります。
15°
15°
100°
180°
360°
楽器への取り付け、取り外しはていねいに行ってくださ
い。また、長時間取り付けたままにすると、取り付け跡
が残る場合があります。
楽器の経年変化や塗装などの状態によっては、本機の装
着により損傷を与える恐れがあります。
電源を入れる、切る
電源ボタンを押して電源を入れます。もう一度押すと電源
が切れます。
なお、音の入力が約3分間ないときは自動的に電源が切れ
ます(オートパワー・オフ機能)
チューニング
1.
必要に応じて基準ピッチ、ディスプレイ・タイプの設定
をします。設定方法は以降の各説明をご覧ください。
2.
楽器を単音で鳴らしてチューニングします。
チューニングが合った状態の表示はディスプレイ・タイ
プごとに異なります。
¬
ディスプレイタイプの設定)
AW-OTG タイプ1
GUITAR :
6E
5A
4D
1E
2B
3G
BASS : 4E, 3A, 2D, 1G
- 19 -
基準ピッチの設定(*M)
基準ピッチの初期設定は440Hzです。基準ピッチを変更す
ることができます。
1.
CALIBボタンを押すとディ
スプレイに基準ピッチが表
示されます。
2.
現在の設定が表示されてい
る間にCALIBボタンを押し
て、基準ピッチを変更します。
3.
ボタン操作をせずに約2秒間待つと、設定が完了しチュー
ニングできる状態に戻ります。
コード検出
(AW-OTGのみ)
演奏された和音のコードを判別します。
1.
TUNING/CHORDボタンを
押してコード検出モードに
します。
TUNING/CHORDボタンを
押すたびにチューナー・モー
ドとコード検出モードが切
り替わります。
2.
楽器を和音で弾きます。コードが画面に表示されます。
テンポ検出
(AW-OTBのみ)
演奏されたベースラインからテンポを検出します。
1.
TUNING/TEMPOボ
押してテンポ検出モードに
します。
TUNING/TEMPOボ
押すたびにチューナーモー
ドとテンポ検出モードが切
り替わります。
2.
4ビート、8ビートなどの一定の間隔のリズムで楽器を弾
きます。テンポが画面に表示されます。
ディスプレイタイプの設定(*M)
DISPLAYボタンを押すたびに、ディスプレイの表示が切り
替わります。
タイプ1
メーターが中央 を指すようにチューニングします
メーターはピッチが低いときは中央よりも左へ、高いとき
は右へ移動します。
入力周波数↓
低い方に
ずれているとき
チューニングが
合っているとき
高い方に
ずれているとき
チューニングが合っているとき(基準ピッチ440Hz)
ギター 6E : 82.4Hz
3G : 196.0Hz
5A : 110.0Hz
2B : 246.9Hz
4D : 146.8Hz
1E : 329.6Hz
ベース 4E : 41.2Hz 3A : 55.0Hz 2D : 73.4Hz 1G : 98.0Hz
タイプ2
メーターがまっすぐになるようにチューニングします
ピッチが低いときは下へ、ピッチが高いときは上へ曲がり
ます。
低い方に
ずれているとき
チューニングが
合っているとき
高い方に
ずれているとき
タイプ3
認識した音にいちばん近い音名が表示されます。音名が正
しく表示されるようにチューニングします。ピッチが低い
ときは音名の文字の下半分が右から左へ流れ、ピッチが高
いときは左から右へ流れます。
低い方に
ずれているとき
チューニングが
合っているとき
高い方に
ずれているとき
タイプ4
音名が円で囲まれるようにチューニングします。ピッチが
低いときは音名を囲う線が左へ伸び、ピッチが高いときは
右へ伸びます。
低い方に
ずれているとき
チューニングが
合っているとき
高い方に
ずれているとき
- 20 -
タイプ5
音名が中央の の位置に表示されるようにチューニングし
ます。ピッチが低いときは音名は右側に移動しピッチが
高いときは音名は左側に移動します。
低い方に
ずれているとき
チューニングが
合っているとき
高い方に
ずれているとき
タイプ6(ストロボモード)
楕円の形の変化が止まるようにチューニングします。ピッ
チがずれているときは連続的に形が変化します。ピッチの
ずれが大きいほど速く変化し、チューニングが合うと変形
が止まります。
低い方に
ずれているとき
チューニングが
合っているとき
高い方に
ずれているとき
タイプ7(ストロボモード)
波形の流れが止まるようにチューニングします。ピッチが
低いときは波形が右から左へ流れ、ピッチが高いときは波
形が左から右へ流れます。
低い方に
ずれているとき
チューニングが
合っているとき
高い方に
ずれているとき
タイプ8
猫がねこじゃらしをつかむようにチューニングします
ピッチが低いときはねこじゃらしが下向きに、ピッチが高
いときはねこじゃらしが上向きになります。
低い方に
ずれているとき
チューニングが
合っているとき
高い方に
ずれているとき
タイプ9
電車が の位置に止まるようにチューニングします。ピッ
チが低いときは電車が の位置に届かず、ピッチが高いとき
の位置を超えてしまいます。
低い方に
ずれているとき
チューニングが
合っているとき
高い方に
ずれているとき
タイプ10
人がUFOに連れ去られるようにチューニングします。ピッ
チが低いときは人が画面の左の方に、ピッチが高いときは
人が画面の右の方に表示されます。
低い方に
ずれているとき
チューニングが
合っているとき
高い方に
ずれているとき
タイプ11
水を、容器の内側の線の高さに注ぐようにチューニングし
ます。ピッチが低いときは水位が線に届かず、ピッチが高
いときは水位が線を越えてしまいます。
低い方に
ずれているとき
チューニングが
合っているとき
高い方に
ずれているとき
  • Page 1 1
  • Page 2 2
  • Page 3 3
  • Page 4 4
  • Page 5 5
  • Page 6 6
  • Page 7 7
  • Page 8 8
  • Page 9 9
  • Page 10 10
  • Page 11 11
  • Page 12 12
  • Page 13 13
  • Page 14 14
  • Page 15 15
  • Page 16 16
  • Page 17 17
  • Page 18 18
  • Page 19 19
  • Page 20 20
  • Page 21 21
  • Page 22 22

Korg AW-OTB 取扱説明書

タイプ
取扱説明書
このマニュアルも適しています

Korg AW-OTBは、ギターやベースのチューニングを素早く正確に行うことができるクリップ式チューナーです。使い方は簡単で、楽器のヘッドにクリップで取り付けて電源を入れるだけです。チューニングしたい弦を弾くと、ディスプレイに音程が表示されます。音程が合っているとディスプレイ中央のランプが緑色に点灯します。

AW-OTBは、メトロノーム機能も搭載しています。メトロノーム機能を使用するには、TUNING/TEMPOボタンを長押しします。すると、ディスプレイにテンポが表示されます。テンポを調整するには、CALIBボタンを使用します。

AW-OTBは、コンパクトなサイズで持ち運びにも便利です。また、電池駆動なので、いつでもどこでも使用することができます。ギターやベースのチューニングに最適なクリップ式チューナーをお探しなら、Korg AW-OTBがおすすめです。