
EN
ZH
MS
TH
Spherical Pot Rice cooker

1 5 6
7
14
9
2
3
4
10
15
8
13
12
11
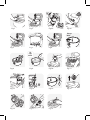
Fig.1 Fig.2 Fig.3aFig.3b
Fig.4 Fig.5 Fig.6 Fig.7
Fig.12Fig.13Fig.14Fig.15
Fig.16Fig.17Fig.18
Fig.8 Fig.9 Fig.10Fig.11
MAX.
10cups
10
cups
MAX.
a
b
a
b

1 5 6
7
14
9
2
3
4
10
15
8
13
12
11
Fig.1 Fig.2 Fig.3aFig.3b
Fig.4 Fig.5 Fig.6 Fig.7
Fig.12Fig.13Fig.14Fig.15
Fig.16Fig.17Fig.18
Fig.8 Fig.9 Fig.10Fig.11
MAX.
10cups
10
cups
MAX.
a
b
a
b

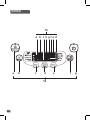
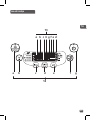
1
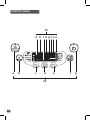
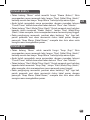
CONTROL PANEL
12
a
abchgfed
bcde fg
13

2
EN
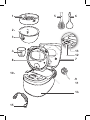
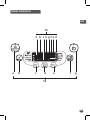
DESCRIPTION
1 Steam basket
2 Graduation for water and rice
3 Removable pot
4 Measuring cup
5 Rice spoon
6 Soup spoon
7 Lid
8 Removable inner lid
9 Micro pressure valve
10 Lid opening button
11 Handle
12 Control panel
a “Keep warm/Cancel” key
b “Reheat” key
c “Hour” key
d “Preset/Timer” key
e “Minute” key
f “Menu” key
g “Start/Stop” key
13 Function indicators
a White rice function
b Brown rice function
c Glutinous rice function
d Congee function
e Porridge function
f Clay pot function
g Steam function
h Soup function
14 Housing
15 Power cord
12
a
abchgfed
bcde fg
13

3
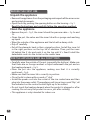
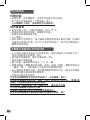
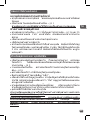
BEFORE THE FIRST USE
Unpack the appliance
• Remove the appliance from the packaging and unpack all the accessories
and printed documents.
• Open the lid by pushing the opening button on the housing – fig.1.
Read the Instructions and carefully follow the operation method.
Clean the appliance
• Remove the pot – fig.2, the inner lid and the pressure valve – fig.3a and
3b.
• Clean the pot, the valve and the inner lid with a sponge and washing
up liquid.
• Wipe the outside of the appliance and the lid with a damp cloth.
• Dry off carefully.
• Put all the elements back in their original position. Install the inner lid
in the right positions on the top lid of machine. Then, put the inner
lid behind the 2 ribs and push it on the top until it’s fixed. Install the
detachable cord into the socket on the cooker base.
FOR THE APPLIANCE AND ALL FUNCTIONS
• Carefully wipe the outside of the pot (especially the bottom). Make sure
that there are no foreign residues or liquid underneath the pot and on
the heating element – fig.5.
• Place the pot into the appliance, making sure that it is correctly
positioned – fig.6.
• Make sure that the inner lid is correctly in position.
• Close the lid in place with a sound of “click”.
• Install the power cord into the socket of the rice cooker base and then
plug into the power outlet. The appliance will ring a long sound “Bip”, all
the indicators on the control box will light up for an instant.
• Do not touch the heating element when the product is plugged or after
cooking. Do not carry the product in use or just after cooking.
• This appliance is only intended for indoor use.

4
EN
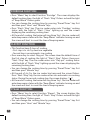
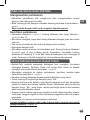
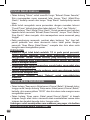
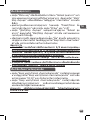
Never place your hand on the steam vent during cooking, as there is a
danger of burns – fig.10.
After start the cooking, if you wish to change the selected cooking
menu because of an error, press “Keep warm / Cancel” key and re-
choose the menu you want.
You can stop the cooking by pressing “Keep warm / Cancel” or “Start
/ Stop” key.
Only use the inner pot provided with the appliance.
Do not pour water or put ingredients in the appliance without the pot
inside.
The maximum quantity of water + ingredient should not exceed the
highest mark inside the pot - fig.7.
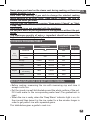
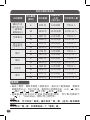
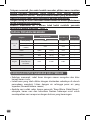
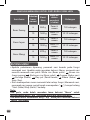
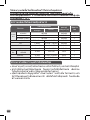
COOKING PROGRAM TABLE
Programs
Cooking Time
Temperature
Default (°C)
Keep warm
Default time Time setting
Rice
cooking
Brown rice auto auto *
White Rice auto auto *
Glutinous Rice
(sticky)
auto auto *
Porridge 1h30min 5min-3h auto *
Congee 1h 10min-2h auto *
Steam 30min 5min-3h auto *
Soup 50min 10min-3h auto *
Claypot
Stir fry + automatic
rice cooking
10min 2-20min 130°C *
Reheat 25min 5min-1h 100°C *
Keep warm auto auto 70°C *
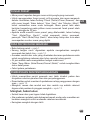
• Before cooking, measuring the rice with measuring cup and rinse it
except risotto rice.
• Put the rinsed rice well distributed around the whole surface of the pot.
Fill it with water to the corresponding water level (The graduations in
cups).
• When the rice is ready, when the “Keep Warm” indicator light is on, stir
the rice and then leave it in the rice cooker for a few minutes longer in
order to get perfect rice with separated grains.
This table below gives a guide to cook rice :
RECOMMENDATIONS FOR BEST RICE COOKING

5
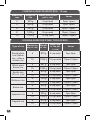
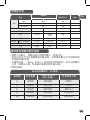
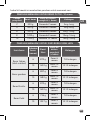
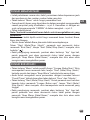
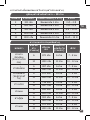
COOKING GUIDE FOR WHITE RICE - 10 cups
Measuring
cups
Weight of
rice
Water level in the
pot (+ rice)
Serves
2 300 g 2 cup mark 3pers.-4pers.
4 600 g 4 cup mark 5pers.-6pers.
6 900 g 6 cup mark 8pers.-10pers.
8 1200 g 8 cup mark 13pers.-14pers.
10 1500 g 10 cup mark 16pers.-18pers.
COOKING GUIDE FOR OTHER TYPES OF RICE
Type of rice
Measuring
cup of rice
Weight
of rice
Water level
in the pot
(+ rice)
Serves
Round white
rice (Italian
rice - often a
stickier rice)
6 870 g 6 cup mark 7per.-8per.
10 1450 g 10 cup mark 10pers-12pers
Whole grain
Brownrice
6 887 g 6 cup mark 7per.-8per.
10 1480 g 10 cup mark 10pers-12pers
Risotto rice
(Arboriotype)
6 870 g 6 cup mark 7per.-8per.
10 1450 g 10 cup mark 10pers-12pers
Glutinous rice
6 736 g 5 cup mark 7per.-8per.
10 1227 g 9 cup mark 10pers-12pers
Brown rice
6 840 g 6 cup mark 7per.-8per.
10 1400 g 10 cup mark 10pers-12pers
Japanese rice
6 900 g 6 cup mark 7per.-8per.
10 1500 g 10 cup mark 10pers-12pers
Fragrant rice
6 870 g 6 cup mark 7per.-8per.
10 1450 g 10 cup mark 10pers-12pers

6
EN
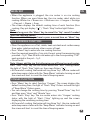
• When the appliance is plugged, the rice cooker is on rice cooking
function. When you press Menu key, the rice cooker select white rice
cooking. White rice -> Brown rice -> Glutinous rice -> Congee -> Porridge
-> Clay pot -> Steam -> Soup
• The screen displays the default cooking time of each function (Rice
cooking, Clay pot display “ ”), “Start / Stop” button light flickers.
Note:
You can long press the “Menu” key to cancel the “bip” sound if needed
(until the long bip sound).
If you want to add bip , you have to press a second time on “Menu” key.
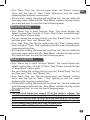
MENU KEY
• Place the appliance on a flat, stable, heat-resistant work surface away
from water splashes and any other sources of heat.
• Press “Menu” key to enter into rice cooking function.
• Pour the required quantity of rice into the pot using the measuring cup
provided – fig.8. Then fill with cold water up to the corresponding “CUP”
mark printed in the pot – fig.9.
• Close the lid.
Note: Always add the rice first otherwise you will have too much water.
Press “Start / Stop” key, the rice cooker enters into “Rice” cooking status,
the light of “Start / Stop” lights up, the screen flickers “ ”.
• At the end of cooking, the buzzer will ring three “bip”, the rice cooker will
enter keep warm status with the “Keep Warm” indicator turning on and
the screen will start to count the time of keeping warm.
RICE COOKING FUNCTION
CONGEE FUNCTION
• Press “Menu” key to select function “Congee”. The screen displays the
default cooking time, the light of “Start / Stop” flickers red and the light
of “Keep Warm” flickers green..
• You can change the cooking time by pressing “Preset/Timer” key first
and then press “Hour” and “Minute” keys.
• Press “Start / Stop” key. The rice cooker enters into “Congee” cooking
status with the light of “Start / Stop” lighting up and the screen
displaying the remaining cooking time.
• At the end of cooking, the buzzer will ring three “bip”, the rice cooker will
enter keep warm status with the “Keep Warm” indicator turning on and
the screen will start to count the time of keeping warm.

7
PORRIDGE FUNCTION
• Press “Menu” key to select function “Porridge”. The screen displays the
default cooking time, the light of “Start / Stop” flickers red and the light
of “Keep Warm” flickers green.
• You can change the cooking time by pressing “Preset/Timer” key first
and then press “Hour” and “Minute” keys.
• Press “Start / Stop” key. The rice cooker enters into “Porridge” cooking
status with the light of “Start / Stop” lighting up and the screen
displaying the remaining cooking time.
• At the end of cooking, the buzzer will ring three “bip”, the rice cooker will
enter keep warm status with the “Keep Warm” indicator turning on and
the screen will start to count the time of keeping warm.
CLAYPOT FUNCTION
• This function have 2 steps of cooking.
– First step is to stir fry meat ore vegetable
– Second step is an automatic rice cooking
• Press menu key to select Clay pot. The screen show the default time of
the first step of cooking, the light of “Start / Stop” flickers, then press
“Start / Stop” key. The rice cooker enters into “Clay pot” cooking status
with the light of “Start / Stop” lighting up and the screen displaying the
remaining cooking time.
• You can change the cooking time by pressing “Preset/Timer” key first
and then press “Minute” key.
• At the end of stir fry, the rice cooker bip twice and the screen flickers.
Press “Start / Stop” key, the rice cooker enters into automatic rice cooking
status. During the second cooking step, the screen displays “ ”.
• At the end of cooking, the buzzer will ring three “bip”, the rice cooker will
enter keep warm status with the “Keep Warm” indicator turning on and
the screen will start to count the time of keeping warm.
STEAM FUNCTION
• Press “Menu” key to select function “Steam”. The screen displays the
default cooking time, the light of “Start / Stop” flickers red and the light
of “Keep Warm” flickers green.
• You can change the cooking time by pressing “Preset/Timer” key first
and then press “Hour” and “Minute” keys.

8
EN
SOUP FUNCTION
• Press “Menu” key to select function “Soup”. The screen displays the
default cooking time, the light of “Start / Stop” flickers red and the light
of “Keep Warm” flickers green.
• You can change the cooking time by pressing “Preset/Timer” key first
and then press “Hour” and “Minute” keys.
• Press “Start / Stop” key. The rice cooker enters into “Soup” cooking status
with the light of “Start / Stop” lighting up and the screen displaying the
remaining cooking time.
• At the end of cooking, the buzzer will ring three “bip”, the rice cooker will
enter keep warm status with the “Keep Warm” indicator turning on and
the screen will start to count the time of keeping warm.
REHEAT FUNCTION
• Press “Menu” key to select function “Reheat”. The screen displays the
default cooking time, the light of “Start / Stop” flickers red and the light
of “Keep Warm” flickers green.
• You can change the cooking time by pressing “Preset/Timer” key first
and then press “Hour” and “Minute” keys.
• Press “Start / Stop” key. The rice cooker enters into “Reheat” cooking
status with the light of “Start / Stop” lighting up and the screen
displaying the remaining cooking time.
• At the end of cooking, the buzzer will ring three “bip”, the rice cooker will
enter keep warm status with the “Keep Warm” indicator turning on and
the screen will start to count the time of keeping warm.
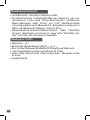
CAUTION
• The cold food should not exceed 1/2 of the cooker’s volume. Too
much food cannot be thoroughly heated. Repeated use of “Reheat”
or too little food will lead to burnt food and hard layer at the bottom.
• It is recommended not to reheat thick porridge, or it may become pasty.
• Do not reheat long-stored cold food to avoid smell.
• Do not use “Reheat” function to defrost food.
• Press “Start / Stop” key. The rice cooker enters into “Steam” cooking
status with the light of “Start / Stop” lighting up and the screen
displaying the remaining cooking time.
• At the end of cooking, the buzzer will ring three “bip”, the rice cooker will
enter keep warm status with the “Keep Warm” indicator turning on and
the screen will start to count the time of keeping warm.

9
• The preset time corresponds to the time for end of cooking.
• To use the preset function, choose a cooking program and the cooking
time first. Then, press the key “Preset/Timer” and choose the delayed
time. Press “Hour” and “Minute” keys to adjust the delayed start time.
The default preset time will change depending on the selected cooking
time. The Range of preset is from 1 up to 24 hours.
• When you have chosen the required preset time, press the “Start / Stop”
key to enter cooking status, the “Start / Stop” indicator will remain on
and screen will display the number of time you have chosen.
PRESET FUNCTION
• Open the lid – fig.1.
• Glove must be used when manipulating the cooking pot and steam
basket – fig.11.
• Serve the food using the spoon provided with your appliance and reclose
the lid.
• 24 hours is the maximum keeping warm time.
• Press “Keep warm/Cancel“ to stop the keep warm status.
• Unplug the appliance.
ON COMPLETION OF COOKING
• Press “Keep warm/Cancel” key under standby status, the light of “Keep
warm/Cancel” key flickers, the screen shows “00:00” and the screen will
start to count the time of keeping warm.
• Press “Keep warm/Cancel” key under function setting or cooking status
will cancel all setting data and back to standby status.
Recommendation: in order to keep the food in good taste, please limit
the holding time within 12h.
KEEP WARM/CANCEL FUNCTION

10
EN
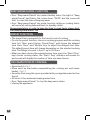
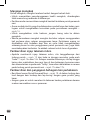
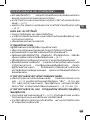
• To ensure the rice cooker is unplugged and completely cooled down
before cleaning and maintenance.
• It is strongly advised to clean the appliance after each use with a
sponge – fig.12.
• The pot, the cup and the rice and soup spoons are dishwasher safe -
fig.13.
Pot, steam basket
• Scouring powders and metal sponges are not recommended.
• If food has stuck to the bottom, you may put water in the pot to soak
for a while before washing.
• Dry the pot carefully.
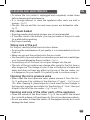
Taking care of the pot
For the pot, carefully follow the instructions below:
• To ensure the maintenance of pot quality, it is recommended not to cut
food in it.
• Make sure you put the pot back into the rice cooker.
• Use the plastic spoon provided or a wooden spoon and not a metal type
so as to avoid damaging the pot surface – fig.14.
• To avoid any risk of corrosion, do not pour vinegar into the pot.
• The color of the pot surface may change after using for the first time or
after longer use. This change in color is due to the action of steam and
water and does not have any effect on the use of the rice cooker, nor
is it dangerous for your health. It is perfectly safe to continue using it.
Cleaning the micro pressure valve
• When clean the micro-pressure valve, please remove it from the lid –
fig.15 and open it by rotating in the direction of “open” – fig.16a and
16b. After cleaning it, please wipe dry it and meet the two triangle in
the two parts together and rotate it in the direction of “close”, then put
it back to the lid of the rice cooker – fig.17a and 17b.
Cleaning and care of the other parts of the appliance
• Clean the outside of the Rice Cooker – fig.18, the inside of the lid and
the cord with a damp cloth and wipe dry. Do not use abrasive products.
• Do not use water to clean the interior of the appliance body as it could
damage the heat sensor.
CLEANING AND MAINTENANCE

11
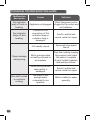
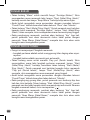
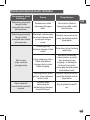
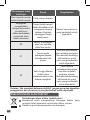
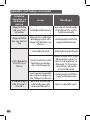
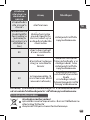
Malfunction
description
Causes Solutions
Any indicator
lamp off and no
heating.
Appliance not plugged.
Check the power cord is
plugged in the socket and
on the Mains.
Any indicator
lamp off and
heating.
Problem of the
connection of the
indicator lamp or
indicator lamp is
damaged.
Send to authorized
service center for repair.
Steam leakage
during using
Lid is badly closed.
Open and close again
the lid.
Micro pressure valve
not well positioned or
uncomplete.
Stop the cooking (unplug
the product) and check
the valve is complete
(2parts locked together)
and well positioned.
Lid or micro pressure
valve gasket is
damaged.
Send to authorized
service center for repair.
Rice half cooked
or overtime
cooking.
Too much or not
enough water
compared to rice
quantity.
Refer to table for water
quantity.
TECHNICAL TROUBLESHOOTING GUIDE

12
EN
ENVIRONMENTAL PROTECTION
Help protect the environment!
Your appliance contains a number of materials that may be
recovered or recycled.
Leave it at a local civic waste collection point.
Malfunction
description
Causes Solutions
Rice half cooked
or overtime
cooking
Not sufficient
simmered.
Send to the authorized
service center for repair.
Automatic
warm-keeping
fails (product
stay in cooking
position, or no
heating).
The keep warm
function has been
cancelled by user
during the setting.
See keep warm
function paragraph.
E0
The sensor on the top
open circuit or short
circuit.
E1
The sensor on the
bottom open or short
circuit.
Stop the appliance and
restart the program.
Ifthe problem repeats,
please send to the
authorized service center
for repair.
E3
High temperature
detected (not enough
food or liquid in the
pot)
Unplug the appliance few
seconds, and restart the
program.
If the problem repeats,
please send to the
authorized service center
for repair.
Remark: If inner pot is deformed, do not use it anymore and get a
replacement from the authorized service center for repair.

13
12
a
abchgfed
bcde fg
13
控制面板

14
ZH
12
a
abchgfed
bcde fg
13
描述
1 蒸盤
2 水量和米量刻度
3 可拆式內鍋
4 量杯
5 飯勺
6 湯勺
7 蓋
8 可拆式內蓋
9 微壓閥
10 開蓋按鈕
11 手挽
12 控制面板
a 「Keep warm/Cancel」
(保溫/取消)鍵
b 「Reheat」(翻熱)鍵
c 「Hour」(小時)鍵
d 「Preset/Timer」
(預定時間/計時)鍵
e 「Minute」(分鐘)鍵
f 「>」鍵
g 「Menu」(選單)鍵
h 「Start/Stop」(開始/停
止)鍵
13 功能指示燈
a 白米功能
b 糙米飯功能
c 糯米飯功能
d 煲粥功能
e 稀飯功能
f 煲仔飯功能
g 蒸煮功能
h 煲湯功能
14 外殼
15 電源線

15
初次使用前
拆開包裝
• 拆開包裝,取出電飯煲,並取出所有配件及印刷品。
• 按下煲外的開蓋按鈕,打開煲蓋 – 圖1.
小心閱讀以下指引,並按照所示方法操作。
清洗電飯煲
• 取出內鍋 – 圖2,內蓋及微壓閥 – 圖3a 及 3b。
• 用海綿及梘液清洗內鍋、微壓閥及內蓋。
• 用濕布擦拭機身表面及蓋。
• 小心擦乾。
• 將所有組件放回原位。將內蓋裝在電飯煲頂蓋正確的位置。然後將
內蓋放在兩個勾位後,並向下按直至固定為止。將可拆式電線插入
電飯煲底座插頭。
本電器注意事項以及所有功能
• 小心擦拭內鍋外面部分(特別是底部)。確定內鍋底下或發熱元件上
無任何殘餘食材或液體 – 圖5.
• 將內鍋放進電飯煲,確定位置妥當 – 圖6.
• 確定內蓋已放置妥當。
• 關上煲蓋,確定飯煲有發出一下「咔」聲。
• 將電源線插入電飯煲底座插頭;將另一端插上電源。電飯煲會發出
一聲長「嗶」,控制面板上所有指示燈會隨即亮起。
• 插上電源或烹調完成後,請勿觸摸電飯煲發熱元件。請勿在烹調進
行期間或剛好結束時拿起電飯煲。
• 本產品只適合室內使用。
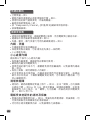
切勿在烹調期間將手放近蒸汽排放口,以免燙傷 – 圖10.
如想更改誤選的烹調功能,請按「KEEP WARM/CANCEL」(保溫/取
消)鍵,然後重新選擇你所需的功能。
你可以按「保溫/取消」或「開始/停止」鍵來終止烹調
只可使用隨電飯煲提供的內鍋。
未裝置內鍋前請勿將水或食材放進電飯煲內。
米和水的總量最多不應超過內鍋內側最高水位線 – 圖7.

16
ZH
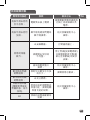
烹調程式表
程式
烹調時間
溫度預設(°C) 保溫
預設時間 時間設定
煮飯
糙米 自動 自動 *
白米 自動 自動 *
糯米(黏身) 自動 自動 *
稀飯 1小時30分鐘 5分鐘至3小時 自動 *
煲粥 1小時 10分鐘至2小時 自動 *
蒸煮 30分鐘
5分鐘至
3小時
自動 *
煲湯 50分鐘 10分鐘至3小時 自動 *
煲仔飯 拌炒+自動煮飯 10分鐘 2-20分鐘 130°C *
翻熱 25分鐘 5分鐘至1小時 100°C *
保溫 自動 自動 70°C *
• 除意大利飯外,煮飯前請先用量杯量米,然後洗米。
• 將洗好的米均勻地鋪滿整個內鍋表面。依照量杯數加水至相應高度
(內鍋有相應刻度)。
• 米飯煮好後,「Keep Warm」(保溫)指示燈會亮起,為令米飯顆粒
分明,請攪拌米飯,然後讓米飯留在鍋中數分鐘。
米飯烹調表:
達至最佳煮飯效果的建議
白米的烹調指引 - 10 量杯
量杯數 白米重量
內鍋中的水位
(加入米後)
可供享用人數
2 300克 2杯刻度 3到4人
4 600克 4杯刻度 5到6人
6 900克 6杯刻度 8到10人
8 1200克 8杯刻度 13到14人
10 1500克 10杯刻度 16到18人

17
• 當插上電源,電飯煲會進入煮飯模式。當你按下選單鍵時,電飯煲
會選取煮白米。自訂功能後,會返回正常煮飯功能。白米 糙米
糯米 粥 稀飯 煲仔飯 蒸煮 煲湯
• 螢幕會顯示每項功能的預設烹調時間(煮飯、煲仔飯則會顯示
“ ”),「Start/Stop」(開始/停止)燈閃爍。
注意:
如有需要,你可長按「選單」鍵來取消「嗶」聲。(直到一聲長嗶聲
響起)
如你想加「嗶」聲,你需要再按一下「選單」鍵。
選單鍵
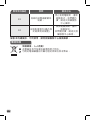
其他米種烹煮指南
米的種類
用米數量
(量杯)
米的重量
內鍋中的
水位
(加入米)
可供享用人數
圓白大米
(意大利大米
– 通常為
較黏身米)
6 870 克 6 杯刻度 7 到-8 人
10 1450 克 10 杯刻度 10 到-12 人
全麥糙米
6 887 克 6 杯刻度 7 到-8 人
10 1480 克 10 杯刻度 10 到-12 人
意大利米
(短圓梗米)
6 870 克 6 杯刻度 7 到-8 人
10 1450 克 10 杯刻度 10 到-12 人
糯米
6 736 克 5 杯刻度 7 到-8 人
10 1227 克 9 杯刻度 10 到-12 人
糙米
6 840 克 6 杯刻度 7 到-8 人
10 1400 克 10 杯刻度 10 到-12 人
日本米
6 900 克 6 杯刻度 7 到-8 人
10 1500 克 10 杯刻度 10 到-12 人
香米
6 870 克 6 杯刻度 7 到-8 人
10 1450 克 10 杯刻度 10 到-12 人
ページが読み込まれています...
ページが読み込まれています...
ページが読み込まれています...
ページが読み込まれています...
ページが読み込まれています...
ページが読み込まれています...
ページが読み込まれています...
ページが読み込まれています...
ページが読み込まれています...
ページが読み込まれています...
ページが読み込まれています...
ページが読み込まれています...
ページが読み込まれています...
ページが読み込まれています...
ページが読み込まれています...
ページが読み込まれています...
ページが読み込まれています...
ページが読み込まれています...
ページが読み込まれています...
ページが読み込まれています...
ページが読み込まれています...
ページが読み込まれています...
ページが読み込まれています...
ページが読み込まれています...
ページが読み込まれています...
ページが読み込まれています...
ページが読み込まれています...
ページが読み込まれています...
ページが読み込まれています...
ページが読み込まれています...
ページが読み込まれています...
ページが読み込まれています...
ページが読み込まれています...
ページが読み込まれています...
-
 1
1
-
 2
2
-
 3
3
-
 4
4
-
 5
5
-
 6
6
-
 7
7
-
 8
8
-
 9
9
-
 10
10
-
 11
11
-
 12
12
-
 13
13
-
 14
14
-
 15
15
-
 16
16
-
 17
17
-
 18
18
-
 19
19
-
 20
20
-
 21
21
-
 22
22
-
 23
23
-
 24
24
-
 25
25
-
 26
26
-
 27
27
-
 28
28
-
 29
29
-
 30
30
-
 31
31
-
 32
32
-
 33
33
-
 34
34
-
 35
35
-
 36
36
-
 37
37
-
 38
38
-
 39
39
-
 40
40
-
 41
41
-
 42
42
-
 43
43
-
 44
44
-
 45
45
-
 46
46
-
 47
47
-
 48
48
-
 49
49
-
 50
50
-
 51
51
-
 52
52
-
 53
53
-
 54
54


