1
a
2
3
4
5
1
2
b
3
4
5
c
1
2
3
4
-3-
d
5
6
7
1
-5-
e
2
3
-4-A
4-B
-4-C
-4-D
-4-E
-4-F
-4-G
-4-H
-4-I
-4-J
-4-K
-4-L
5
1
a
2
3
4
5
1
2
b
3
4
5
c
1
2
3
4
-3-
d
5
6
7
1
-5-
e
2
3
-4-A
4-B
-4-C
-4-D
-4-E
-4-F
-4-G
-4-H
-4-I
-4-J
-4-K
-4-L
5
ⷪ⌮㩂ጚ
ⷦⱂ⳺
⾻∏ぇ#⮛⓼㿓#Vrq|#ᾋ㐷㮯#KG#⢻ᾋ゛#㣫Ⓥ⇳#≿㧋᷋#⚆#ᾋ㐷㮯#⢻ᾋ゛#㣫Ⓥ⇳#
≿㧋᷋+㿏#%㍞Ἶᱦ%⇳#㿟,㇏#┟ᷯㆷ#┟ὗ#៤ᙷ2㐷つぇ⮓#⬣ㄠ㿗#ⲏ#ㇿᴋ#
ㆷ#⾻ᵐᴿᵛ1
#➎㣖㌊㠓#ⷪ⌮㩂ጚ
1
#ᦡ#⇢㆞Ṧ#⫞ᇊ#➎㢂ⱞ☆#
a
#Ṧ#ⴆᅚ㩓ឲ៎1
2
#Rẫⱞᖂ#㬲##ዢ#℀ⱂ#⳻ㇳ⪺☆#ἦ⺪ᖂ#ᾒᲂ/#ἢẖ㍞ᱧ#ⱂ#
ⱞ…⺲Ⱞ#ⴆᅚ㩆#㮮/#Rẫ⪺#ዊ㩂ᅶ#ዢẖ➎Ṧ#ṯឲ៎1
△㐿ㆻ#㊓ᛧ㿏㐷#⿁#❯㜫⏳#ᵢㆳ⓫#ᡯ#⟷⟻#Ⰷ⬸ẏ#△#⭇#び⊛ᙷ#
ㇿᴿᵛ1
R㇏#㡟ᢀぇ#㿓#㈇⮯㿓#ᬫㄠㆷ#⬣ㄠ⮛⓼⮓㇏#%R㇏#㡟ᢀ%ㆻ#㚯㋧㿏っ#
㍳ⵤⵓ゛1
3
#ᦡ#⇢㆞Ṧ#៕Ⱚ#㮮#Ⅾ㕞Ⱞ#ⵚⱯឲ៎1
4
#ዢầ#→㞢Ṧ#ⵚⳲ㩓ឲ៎1
❯#ᢧᢧ⏳#㈘ㆷ#⬸㭓⋓#ᡯ#ⴛ㴯∠㇏#⏳#㋧㉿㿫⮓#VWDUW2VWRS#
⛻㴳/#Whohskrwr#⛻㴳/#Zlgh#⛻㴳#⚆#SKRWR#⛻㴳ㆻ#Ⰷᙷ⇴ㆳ⋓#㋧㈈㿏ᢧ#
ḻ⋔#㿫#㍳ⵤⵓ゛1
5
#⪞ፒ#ᔲⰮ#ⲏㄓ㩓ឲ៎1
㍞Ἶᱦ#Ẳ⮞㟯#❲#☊㗇㩂ጚ
1
#➎㣖㌊㠓Ⱞ#⫧ឲ៎1
#㈗#㿫㊓#⛻㴳#
#ㆻ#䃋⬫㻓#⚠䀜ㆳ⋓#ⴣ⇳ὓⵓ㬟#⬸㭓⋓#゛㽿#ⴣ⇳᷋##
#⏳#ⴣ⇳ὓⵓ㦓⮓#⛻㫫ㆻ#㼀ᴿᵛ1
#Ἦ⓫#❯㜫⏳#ぴᴿᵛ1
2
#㍞Ἶᱦ#Ẳ⮞㟯#❲ᵆ≪㘚#⬎᧾⬎2ẖᾒ㞢#㧶᳖ዢ#
b
#Ṧ#᪦⪞ᖯឲ៎1
3
#⇢#ጚጚ⪺#≪ㄓᤆ#㍞Ἶᱦ#Ẳ⮞㟯#❲Ṧ#ⴆᅚ㩓ឲ៎1#
䃋⬫㻓#⚠䀜ㆳ⋓#㣫Ⓥ⇳#ㄫ㵼#⳿㇏#㿓㔴#ᯯ⢃⏳#ᱻ⏯#⬸㭓⋓#㿫⮓#
㈗㈜㣏⏳#㻷#㣫Ⓥ⇳#ㄫ㵼#⳿⏳#㜓㜓䇿#ⴣ⇳ὓⵓ㬬ᴿᵛ1
❯#ᢧᢧ⏳#㠓㿏㿓#ῃぇᴋ#㣫Ⓥ⇳#ㄫ㵼#⳿#Pᙷ#❯#ᢧᢧぇ#⟷㚠ẏ〫#
ㇿᴿᵛ1
4
#៎ⰶ#㥆⪺☆#㍞Ἶᱦ#Ẳ⮞㟯#❲⬪#ⅲ㬢Ṧ#☊㗇㩓ឲ៎1
㣫Ⓥ⇳#
ㄫ㵼#⳿
⛿䂯 㣫Ⓥ⇳
I05
4 KGU0F[452F[442F[:2F[9
5
KGU0SM933Y2SM9332SM8<3Y2SM8;3Y2
SM8;32SM593Y2SM5932SM83Y2SM832SM73Y2
SM63Y2SM632SM532SM43/
KGU0[U593Y2[U5932[U493/
KGU0VU;2VU:2VU8
6
KGU0F[:33Y2F[:332F[9<32F[893Y2
F[893
K4
KGU0F[8<3Y2F[8;3Y2F[8;32F[8:32
F[693Y2F[693/
KGU0[U853Y2[U8532[U833Y2[U8332
[U533Y2[U5332[U4392[U4382[U4342
[U433/
KGU0VU452VU442VU43/#
GFU0VU5532VU543
L05
4
KGU0F[853Y2F[8532F[838Y2F[833Y2
F[833/
GFU0VU;;2VU;82VU:;2VU:82VU9;2VU982
VU8;2VU882VU792VU782VU692VU68
5 KGU0[U683Y2[U683
O
4
KGU0F[883Y2F[883/
KGU0[U883Y2[U883
5 KGU0[U4882[U483
P4
KGU0SM:93Y2SM:932SM:73Y2SM:532
SM:43Y2SM:43/
KGU0F[:93Y2F[:932F[:73Y2F[:632
F[:53Y
5
#㍞Ἶᱦ#Ẳ⮞㟯#❲#P#ⱞ⭢ⱂ#㍞Ἶᱦ#Ẳ⮞㟯#❲Ṧ#▖⮓㩂#
ᆧ⮚⪺#▦ძ#ᖂ▖#㧶ᳲⱞ㞢#
c
#Ṧ#㍞Ἶᱦ#Ẳ⮞㟯#❲#PⰦᵆ≪㘚#
᪦⪞ᖞ⟗⟆⬎1#ዢẖᇊᖂ☆#▦ძ#ᖂ▖#㧶ᳲⱞ㞢Ṧ#☊㗇㩆#㍞Ἶᱦ#
Ẳ⮞㟯#❲ⱂ#⬖Ṣ#ⅲ㬢⬪#Ỉ㉾ᇊ#ⴆⱺẖ⪺#Ⲋጢ#ᨶጶ⺪#ᛶ᳖#
ⷦ⟗⟆⬎1
❯#ᢧᢧ㇏#ᝬ㈜#㠓㿏#ⵓ#⬳ᙸᵷ#ᬏ⬣#㾃≿㴯ᴋ#㣫Ⓥ⇳#ㄫ㵼#⳿#Pぇ#
㈜㚠ẏ〫#ㇿᴿᵛ1#㣫Ⓥ⇳#ㄫ㵼#⳿#Pㆻ#⬣ㄠ㿏ᴋ#᜴ㄧぇᴋ##ᵟᙷ#
㾻ㄋ㿏㐷#⿁ᴿᵛ1
⌮᧾⬎#㍞Ἶᱦ#ⷪ⌮㩂ጚ
㈇⮯㿓#ᬫㄠㆷ#㣫Ⓥ⇳㇏#⬣ㄠ⮛⓼⮓ḻ#㚯㋧㿏ⵤⵓ゛1
1
#⩋☢☆ẖṦ#᪦⪞ᖯឲ៎1
㣫Ⓥ⇳ぇ⮓#㾻㮧/#㥟⛻㉻#⊃㏿/#⊃㏿#㤘/#⊃㏿#䄻ὓ#₇ᴋ#〫ᣟ#ᪿㆻ#
⟻␣㿠ᴿᵛ1
ⲏṐ#⊃㏿#⯋㮧⏳#⬣ㄠ㿫⮓#㣫Ⓥ⇳⏳#⬣ㄠ㿏ᴋ#᜴ㄧぇᴋ#⊃㏿#⯋㮧⏳#に〫#
㍳ⵤⵓ゛1
2
#ℚ㘚ẖ㠓Ⱞ#ⲏㄓ㩓ឲ៎1
⑃㠠㉻㿓#⚧㮧␣㶠ㆻ#㈜㚠㿏っ#㍳ⵤⵓ゛1
3
#⃢᧾⪞Ṧ#ᘍ➟ឲ៎1#
⬣ㄠ㎈㇯#㣫Ⓥ⇳シ#䂯䃏㿏ᴋ#Ⓥ┟␣#㣫ὓ+%Phpru|#Vwlfn#Gxr%/#VG#
㣫ὓ,㇏#㋼⏏ぇ#㿫⮓ᴋ#㣫Ⓥ⇳㇏#⬣ㄠ⮛⓼⮓⏳#㚯㋧㿫#㍳ⵤⵓ゛1
ⷦⱂ⳺
Ⓥ┟␣#㣫ὓシ#㯃㽻㇏#⽧ᢧ㐷#㭤#㈗ㆻ#㿫㊓㿫⮓#♯㐷⏳#ᢧ⋔㿗#ⲏ#ㇿᴋ#
⬸㭓⋓#㿫#ᰊᴿᵛ1
Ⓥ┟␣#㣫ὓ/#㿏ὓ#ᾋⴛ㫣#⚆#ᬫ⟷#Ⓥ┟␣ぇ#♯㐷⏳#㉷㈜㿗#ⲏ#ㇿᴋ#㠠⟻㿓#
ᝬᙻ#ㇿᴋ㐷#䃌㇯㿏ⵤⵓ゛1
4
#ℂ▖#ℓ⺪#ẫ#+
060
d
,#Ⱞ#㍞Ἶᱦⱂ#㨮㘚#ⲏㄓ#ᖂ▖⪺#ⲏㄓ㩓ឲ៎1
⚏⬣#⚠㐷#ㆷ#ワ⟷㇏#⣒#ⴛ㹣㢗㶠#+㿏#%⇢#ጚጚ%⇳#㿟,#ᬫ⟷⋓#
⚏⬣ẏ〫#⊃㏿⋓#Ὓ〫゛ᴋ#ㆻ#⚠㐷㿠ᴿᵛ1
⚏⬣#⚠㐷#
㣫Ⓥ⇳
⚏⬣#⚠㐷#
+P63#啑#堬#7:,
KGU0F[693Y2F[693/
KGU0[U4882[U483
⚏⬣#⚠㐷#
+P63#啑#堬#83,
GFU0VU;;2VU:;2VU9;2VU8;
⚏⬣#⚠㐷#
+P63#啑#堬#8;,
KGU0SM933Y2SM9332SM8<3Y2SM8;3Y2SM8;3/
KGU0F[8<3Y2F[8;3Y2F[8;32F[8:3/
KGU0[U683Y2[U683/#
GFU0VU;82VU:82VU982VU882VU792VU782
VU692VU68
⚏⬣#⚠㐷#
+P63#啑#堬#95,
KGU0SM83Y2SM832SM73Y2SM63Y2SM63/
KGU0[U533Y2[U5332[U4392[U4382[U4342
[U433/
KGU0VU43/#
GFU0VU5532VU543
⚏⬣#⚠㐷#
+P6:#啑#堬#7<,
KGU0F[:33Y2F[:332F[9<32F[893Y2F[893
⚏⬣#⚠㐷#
+P6:#啑#堬#88,
KGU0SM593Y2SM5932SM532SM43/
KGU0F[883Y2F[8832F[853Y2F[8532
F[838Y2F[833Y2F[8332F[452F[442F[:2
F[9/
KGU0[U883Y2[U8832[U853Y2[U8532
[U833Y2[U8332[U593Y2[U5932[U493/
KGU0VU452VU442VU;2VU:2VU8
⚏⬣#⚠㐷#
+P85#啑#堬#8;,
KGU0SM:93Y2SM:932SM:73Y2SM:532SM:43Y2
SM:43/
KGU0F[:93Y2F[:932F[:73Y2F[:632
F[:53Y
5
#OFG#㠒ᗺⰮ#ᢶᴎ☆#℀Ⱞ#㪏㩂ᵇ#㩞☆#៎⟆#㍞Ἶᱦ⪺#៕⨮#
ᘍ➟ឲ៎1
6
#ㇲ⳺ⱞᖂ#ⵚὯ#ⱂ#ጚតⰮ#DXWRᵆ#☎⳿㩓ឲ៎1
7
#KGU0SM:93Y2SM:932SM:73Y2SM:532SM:43Y2SM:43#
#KGU0F[:93Y2F[:932F[:73Y2F[:632F[:53Yⱂ#
Vwhdg|Vkrw#ጚតⰮ#▖⮓㩂#ᆧ⮚⪺#Vwhdg|Vkrw#ጚតⰮ#
⩋㟚⋶#ᾒᧆᵆ#☎⳿㩞#ⷦ⟗⟆⬎1
#⌮᧾⬎#㍞Ἶᱦ#ⲏㄓ㩂ጚ
SRZHU#ⴛㅻ㣏ᙷ#ㇿᴋ#㣫Ⓥ⇳⏳#⬣ㄠ㿏ᴋ#᜴ㄧぇᴋ#SRZHU#ⴛㅻ㣏⏳#ᤳ#
㍳ⵤⵓ゛1#₇㿓#❯#ᢧᢧ㇏#㉻ㅇḻ#ᪿ#⬸㭓⋓#㿫#㍳ⵤⵓ゛1#OFG#䃋⓫㇏#ⴛㅻ㣤#㋧㈈ぇ#
㫣ẓ#ᬫ⟷#㉻ㅇ#ⴛㅻ㣏ᙷ#㈜㚠ẓ#㣫Ⓥ⇳⏳#⬣ㄠ㿏ᴋ#᜴ㄧぇᴋ#㣫Ⓥ⇳㇏#㉻ㅇㆻ#᫃#
㾻ㄋᙷ#〽ᴿᵛ1
ⷦⱂ⳺
❯#
ᢧᢧぇ
㣫Ⓥ⇳⏳
㈜㚠㿓
䄻ᴋ
❯
ᢧᢧ㇏
POWER
⛻㴳ㆻ
ᲃ≣⮓
㣫Ⓥ⇳㇏
㉻ㅇㆻ
㦓ᛧᬏ
᫃
ⲏ
ㇿᴿᵛ
.
1# ㍞Ἶᱦ#Ẳ⮞㟯#❲Ṧ#ⲏㄓ㩓ឲ៎1
#㣫Ⓥ⇳#⚈⓫㇏#⬳ᙸᵷ#㈜㚠#ᬏ⬣ぇ#㣫Ⓥ⇳#ㄫ㵼#⳿㇏#ᬏ⬣#ㅻ㣏⏳#㠋ⵤⵓ゛1
#ᡯᝳ#ᚐ#〫ᣟ#ᪿ㇏#Ⰴ#⟷㻿#
+
080
e
,
ㆻ#⬣ㄠ㿫⮓#㣫Ⓥ⇳ぇ#㣫Ⓥ⇳#ㄫ
㵼#⳿⏳#⟷㚠㿠ᴿᵛ1
2
#ᅞⵚⴆṦ#≪ㄓ㩂⟗⟆⬎1
⟷Ⰴẓ#᛫㋧㊓⏳#⟷㚠㿏ⵤⵓ゛1#㈇⮯㿓#ᬫㄠㆷ#⟷Ⰴẓ#⮛⓼⮓㇏#%᛫㋧㊓%⏳#
㚯㋧㿏っ#㍳ⵤⵓ゛1
3
#㍞Ἶᱦ⪺#㧶᳖ዢṦ#⫚ᆚ㩂ᇊ#⇢#ጚጚ⪺#㍞ἾᱦṦ#ⲏㄓ㩓ឲ៎1
㣫Ⓥ⇳ぇ#㠋〫#゛ᾋ゛2␣┟㴯#㾃≣ᡯ⏳#D2Y#ᵟ㈇/#D2Y#RXW#ᵟ㈇#₇ᴋ#D2Y#
␣┟㴯#ᵟ㈇ぇ#ᵟᵟ䇿#⬴ㇼ㿏ⵤⵓ゛1
❯#ᢧᢧぇ#㣫Ⓥ⇳⏳#㈜㚠㿗#ῃぇᴋ#㣫Ⓥ⇳#ㄫ㵼#⳿⏳#❯#ᢧᢧ#⿕#⟷⟻#⾿㔴㇏#
ᙷὓぇ#㠏#ᵛ㇃/#㊌ẏᴋ#Ⰳ␣ᙷ#ᬗ#ῃᣃ㐷#㣫Ⓥ⇳#ㄫ㵼#⳿㇏#Ἦ#⟷⟻ㆻ#
ᲃ≣#ᮚᴿᵛ1
ⷦⱂ⳺
㣫Ⓥ⇳#ㄫ㵼#⳿⏳#㈜㚠㿗#ῃぇᴋ#❯#ᢧᢧ⏳#ⲏ㹀ㆳ⋓#㆗㐷㿫#㍳ⵤⵓ゛1#㣫Ⓥ⇳#
#
ㄫ㵼#⳿⏳#⮯⋓#⚠䀜ㆳ⋓#㈜㚠㿏⓫#㣫Ⓥ⇳#ㄫ㵼#⳿シ#⿕㔴#❯㜫ᙷ#Ⰷ⬸ẗ#
び⊛ᙷ#ㇿᴿᵛ1
⊃㏿/#OFG#䃋⓫/#⡧㶃㇯㮧/#㎃#≿⛻#₇ᴋ#SKRWR#⛻㴳ぇ#㥷⢋#ᛯ␣㐷#
#
⿁ḻ⋔#㍳㇏㿏ⵤⵓ゛1
OFG#䃋⓫㇏#ⴛㅻ㣤#㋧㈈ぇ#㫣ẓ#ᬫ⟷#㉻ㅇ#ⴛㅻ㣏ᙷ#㈜㚠ẓ#㣫Ⓥ⇳⏳#
#
⬣ㄠ㿏ᴋ#᜴ㄧぇᴋ#゛ᾋ゛2␣┟㴯#㾃≣ᡯ⏳#でᜧ㿏⓫#㣫Ⓥ⇳㇏#㊌㐷へ⬸#㞣へ#
┟ὓ2⢻ᾋ゛#㈣⭔#┟ὓ⏳#Ṑへ⬸#㞣へ#┟ὓ⋓#✷᜴ⵓ㬬ᴿᵛ1
KGU0[U853Y2[U8532[U833Y2[U833Ⱞ#▖⮓㩂#ᆧ⮚+ዢẦ#070D#ㄢⵚ,
#ᵟ㈇#㥛⛻⏳#に#㾃≣ᡯ⏳#でᜧ㿠ᴿᵛ1#+ᡯᝳ#ᚐ#❯#ᢧᢧぇ#でᜧẓ#㥷⢋
ㆻ#㾃≣ᡯ#Ἓ㔴ㆳ⋓#ㅇ#ẏḻ⋔#㿠ᴿᵛ1,
#❯#ᢧᢧ#ᬫ⟷㇏#⟷㻿ぇ#㥷⢋#ᛯ␣㐷#⿁ḻ⋔#㍳㇏㿫⮓#❯#ᢧᢧぇ#㣫Ⓥ⇳⏳#⮛
㣏㿠ᴿᵛ1
#㣫Ⓥ⇳⏳#❯#ᢧᢧぇ#⮛㣏㿓#䄻ぇ#㥷⢋ㆷ#㣫Ⓥ⇳#ᡯ#✟㴯#㔴ㆳ⋓#㿫#ᰊᴿ
ᵛ1
KGU0[U533Y2[U5332[U4392[U4382[U4342[U433Ⱞ#▖⮓㩂#ᆧ⮚+ዢẦ#
070E#ㄢⵚ,
#ᵟ㈇#㥛⛻⏳#に#㾃≣ᡯ⏳#でᜧ㿠ᴿᵛ1
#ᡯᝳ#ᚐ#❯#ᢧᢧぇ#でᜧẓ#㥷⢋ㆻ#㾃≣ᡯ#Ἓ㔴ㆳ⋓#ㅇ#ẏḻ⋔#㿠ᴿᵛ1
#❯#ᢧᢧ#ᬫ⟷㇏#⟷㻿ぇ#㥷⢋#ᛯ␣㐷#⿁ḻ⋔#㍳㇏㿫⮓#❯#ᢧᢧぇ#㣫Ⓥ⇳⏳#⮛
㣏㿠ᴿᵛ1
#㣫Ⓥ⇳⏳#❯#ᢧᢧぇ#⮛㣏㿓#䄻ぇ#㥷⢋ㆷ#㣫Ⓥ⇳#ᡯ#✟㴯#㔴ㆳ⋓#㿫#ᰊᴿ
ᵛ1
KGU0VU452VU442VU43/#GFU0VU5532VU543Ⱞ#▖⮓㩂#ᆧ⮚+ዢẦ#
070F#ㄢⵚ,
#ᵟ㈇#㥛⛻⏳#に#㾃≣ᡯ⏳#でᜧ㿠ᴿᵛ1#+ᡯᝳ#ᚐ#❯#ᢧᢧぇ#でᜧẓ#㥷⢋
ㆻ#㾃≣ᡯ#Ἓ㔴ㆳ⋓#ㅇ#ẏḻ⋔#㿠ᴿᵛ1,
#㣫Ⓥ⇳⏳#❯#ᢧᢧぇ#⮛㣏㿓#䄻ぇ#㥷⢋ㆻ#⬫㑔#ᲃ≣⮓#㣫Ⓥ⇳#ᡯ#✟㴯#㔴ㆳ⋓#
㿫#ᰊᴿᵛ1
KGU0SM933Y2SM9332SM83Y2SM83/#KGU0[U593Y2[U5932[U493##
KGU0VU;2VU:2VU8Ṧ#▖⮓㩂#ᆧ⮚+ዢẦ#070G#ㄢⵚ,
#ᵟ㈇#㥛⛻⏳#ぴᴿᵛ1
#㾃≣ᡯ⏳#でᜧ㿠ᴿᵛ1
#㣫Ⓥ⇳⏳#❯#ᢧᢧぇ#⮛㣏㿓#䄻ぇ#㥷⢋ㆷ#㣫Ⓥ⇳#ᡯ#✟㴯#㔴ㆳ⋓#㿫#ᰊᴿ
ᵛ1
KGU0[U683Y2[U6832[U4882[U483Ⱞ#▖⮓㩂#ᆧ⮚+ዢẦ#070H#ㄢⵚ,
#ᵟ㈇#㥛⛻⏳#に#㾃≣ᡯ⏳#でᜧ㿠ᴿᵛ1
#㣫Ⓥ⇳#ㄫ㵼#⳿#₇ᴋ#ᢧ㬷#⟷㻿ぇ#㥷⢋#ᛯ␣㐷#⿁ḻ⋔#㍳㇏㿫⮓#㣫Ⓥ⇳⏳#
❯#ᢧᢧぇ#⮛㣏㿓#䄻ぇ#㥷⢋ㆷ#㣫Ⓥ⇳#ᡯ#✟㴯#㔴ㆳ⋓#㿫#ᰊᴿᵛ1
KGU0F[452F[442F[:2F[9Ⱞ#▖⮓㩂#ᆧ⮚+ዢẦ#070I#ㄢⵚ,#
#ᵟ㈇#㥛⛻⏳#ぴᴿᵛ1
#㾃≣ᡯ⏳#でᜧ㿠ᴿᵛ1
#㥷⢋ㆻ#㣫Ⓥ⇳#ㄫ㵼#⳿#ㅻぇ#ィ⊛ᰊ#㣫Ⓥ⇳⏳#❯#ᢧᢧぇ#㈜㚠㿠ᴿᵛ1
#㣫Ⓥ⇳⏳#❯#ᢧᢧぇ#⮛㣏㿓#䄻ぇ#㣫Ⓥ⇳#ㄫ㵼#⳿⋓⟷㮧#㥷⢋#‟〫㐷㐷#⿁
ḻ⋔#㿫⮓#㥷⢋ㆻ#㣫Ⓥ⇳#ᡯ#✟㴯#㔴ㆳ⋓#㿫#ᰊᴿᵛ1
KGU0F[853Y2F[8532F[838Y2F[833Y2F[833##GFU0VU;82VU:82
VU982VU882VU792VU782VU692VU68Ṧ#▖⮓㩂#ᆧ⮚+ዢẦ#070J#ㄢⵚ,#
#ᵟ㈇#㥛⛻⏳#に#㾃≣ᡯ⏳#でᜧ㿠ᴿᵛ1#+ᡯᝳ#ᚐ#❯#ᢧᢧぇ#でᜧẓ#㥷⢋
ㆻ#㾃≣ᡯ#Ἓ㔴ㆳ⋓#ㅇ#ẏḻ⋔#㿠ᴿᵛ1,
#㣫Ⓥ⇳⏳#❯#ᢧᢧぇ#⮛㣏㿓#䄻ぇ#㥷⢋ㆻ#⬫㑔#ᲃ≣⮓#㣫Ⓥ⇳#ᡯ#✟㴯#㔴ㆳ⋓#
㿫#ᰊᴿᵛ1
KGU0F[883Y2F[8832[U883Y2[U883Ⱞ#▖⮓㩂#ᆧ⮚+ዢẦ#070K#ㄢⵚ,#
#ᵟ㈇#㥛⛻⏳#ぴᴿᵛ1
#㾃≣ᡯ⏳#でᜧ㿠ᴿᵛ1
#㣫Ⓥ⇳⏳#❯#ᢧᢧぇ#⮛㣏㿓#䄻#㥷⢋ㆻ#㊌⊣㿠ᴿᵛ1#+㥷⢋ㆷ#㥷⢋#䂷᷋ぇ#
ᛯ〫#ᰊᴿᵛ1,
GFU0VU;;2VU:;2VU9;2VU8;Ⱞ#▖⮓㩂#ᆧ⮚+ዢẦ#070L#ㄢⵚ,#
#ᵟ㈇#㥛⛻⏳#ぴᴿᵛ1
#㾃≣ᡯ⏳#でᜧ㿠ᴿᵛ1
#ᡯᝳ#ᚐ#㥷⢋ㆻ#⚏⬣#⚠㐷##䂿ぇ#ㄸᴿᵛ1
#ᡯᝳ#ᚐ#㥷⢋ㆻ#㊌⊣㿫⮓#㣫Ⓥ⇳#ㄫ㵼#⳿⏳#❯#ᢧᢧぇ#㈜㚠㿠ᴿᵛ1
ⲏㄓ㩊#ᨶⱂ#ⷦⱂ=#
㥷⢋ㆻ#៣⟷␣㐷#ⵤⵓ゛1
#
㥷⢋#⚏⬣#⚠㐷##䂿ぇ⮓#⣗㐷㐷#⿁ḻ⋔#㿏ⵤⵓ゛1
#
#㣫Ⓥ⇳⏳#❯#ᢧᢧぇ#⮛㣏㿓#䄻#㥷⢋#⢻ᾋ゛#㣫Ⓥ⇳㇏#⊃㏿ぇ#ᛯ␣㐷#⿁⿏ᴋ
㐷#䃌㇯㿠ᴿᵛ1
KGU0F[:33Y2F[:332F[9<32F[893Y2F[893Ṧ#▖⮓㩂#ᆧ⮚+ዢẦ#
070M#ㄢⵚ,
#ᵟ㈇#㥛⛻⏳#ぴᴿᵛ1
#㥷⢋ㆻ#㣫Ⓥ⇳㇏#ᡯ#✟㴯#⾻∏⋓#㰬ᝳⵓ㬛#㾃≣ᡯ⏳#でᜧ㿠ᴿᵛ1
#㣫Ⓥ⇳⏳#❯#ᢧᢧぇ#⮛㣏㿓#䄻ぇ#㥷⢋ㆷ#㣫Ⓥ⇳㇏#ᡯ#✟㴯#㔴ㆳ⋓#
㊌⊣㿠ᴿᵛ1
KGU0SM8<3Y2SM8;3Y2SM8;32SM593Y2SM5932SM73Y2SM63Y2SM632SM532
SM43##KGU0F[8<3Y2F[8;3Y2F[8;32F[8:32F[693Y2F[693
Ṧ#
▖⮓㩂#ᆧ⮚+ዢẦ#
070N#ㄢⵚ,
#ᵟ㈇#㥛⛻⏳#に#㾃≣ᡯ⏳#でᜧ㿠ᴿᵛ1
#㣫Ⓥ⇳⏳#❯#ᢧᢧぇ#⮛㣏㿓#䄻ぇ#㥷⢋ㆷ#㣫Ⓥ⇳㇏#ᡯ#✟㴯#㔴ㆳ⋓#
㊌⊣㿠ᴿᵛ1
KGU0SM:93Y2SM:932SM:73Y2SM:532SM:43Y2SM:43##
KGU0F[:93Y2F[:932F[:73Y2F[:632F[:53Y#▖⮓⟆+ዢẦ#
070O#
ㄢⵚ,
#ᵟ㈇#㥛⛻⏳#ぴᴿᵛ1
#ᡯᝳ#ᚐ#⬸⟷⋓⟷㮧#㾃≣ᡯ⏳#でᜧ㿠ᴿᵛ1
#㣫Ⓥ⇳⏳#❯#ᢧᢧぇ#⮛㣏㿓#䄻ぇ#㥷⢋ㆷ#㣫Ⓥ⇳㇏#ᡯ#✟㴯#㔴ㆳ⋓#
㊌⊣㿠ᴿᵛ1
5# ᦡ#⇢㆞Ṧ#៕➟ឲ៎1
Ἦ⓫#❯㜫⏳#ᲃ≣⮓#ᵢ#㈗ᢧᴋ#Ⰳ␣ᙷ#ᬗ#ῃᣃ㐷#⛻㫫ㆻ#㈗ᢀᴿᵛ1
ⷦⱂ⳺
Ἦ⓫#❯㜫⏳#ᵢㆻ#ῃぇᴋ#㥷⢋#㐷#⿁ḻ⋔#㍳㇏㿏ⵤⵓ゛1
#
ㇳ⟷#㣫Ⓥ⇳#┟ᷯ㇏#⊃㏿#㎈ⵣㆷ#⮛㣏㿗#ῃ#⊃㏿㇏#㎈ⵣ#❯#ᢧᢧ㇏#⿕#㆗␣#
#
㎈ⵣᝳ#ㇳ㣏㿏㐷#⿁ᴋ#᜴ㄧᙷ#ㇿ㐷⑃#㞣へぇᴋ#▯㊓#〽ᴿᵛ1
Préparation
Remarques
Les modèles de caméscopes HD numériques et de caméscopes numériques Sony (appelés
ci-dessous le «
caméscope
») mentionnés ci-dessous peuvent ne pas être commercialisés
dans tous les pays ou toutes les régions.
Préparation du caisson sport
1 Ouvrez la partie arrière et retirez l’entretoise
.
2 Enlevez les matières étrangères, poussière, sable ou cheveux, du
joint torique, de la rainure et des surfaces au contact du caméscope,
et appliquez de la graisse régulièrement sur tout le joint torique.
Si vous fermez le boîtier sans nettoyer ces parties, celles-ci risquent d’être endommagées
et de laisser l’eau pénétrer à l’intérieur.
Pour le détail sur l’entretien du joint torique, reportez-vous à « Entretien du joint
torique » dans le mode d’emploi.
3 Fermez la partie arrière et bloquez les fermoirs.
4 Réglez la sangle.
Réglez la longueur de la sangle tout en tenant ce boîtier de manière à toucher
facilement les touches START/STOP, Téléobjectif, Grand-angle et PHOTO du bout
des doigts.
5 Fixez la bandoulière.
Sélection du sabot de montage de caméscope
1 Ouvrez ce boîtier.
Faites glisser le bouton de déverrouillage
dans le sens de la èche et maintenez-
le ainsi, puis faites glisser la glissière d’ouverture
et relâchez le fermoir.
Ouvrez la partie arrière.
2 Débranchez la che Audio/Commande à distance
du sabot de
montage de caméscope.
3 Détachez le sabot de montage de caméscope xé à cet appareil.
Tout en maintenant le bouton sur le côté du sabot de montage de caméscope pressé
dans le sens de la èche pour libérer le verrou, sortez lentement le sabot de montage de
caméscope en le faisant glisser.
Le sabot de montage de caméscope F-2 a été xé à ce boîtier en usine.
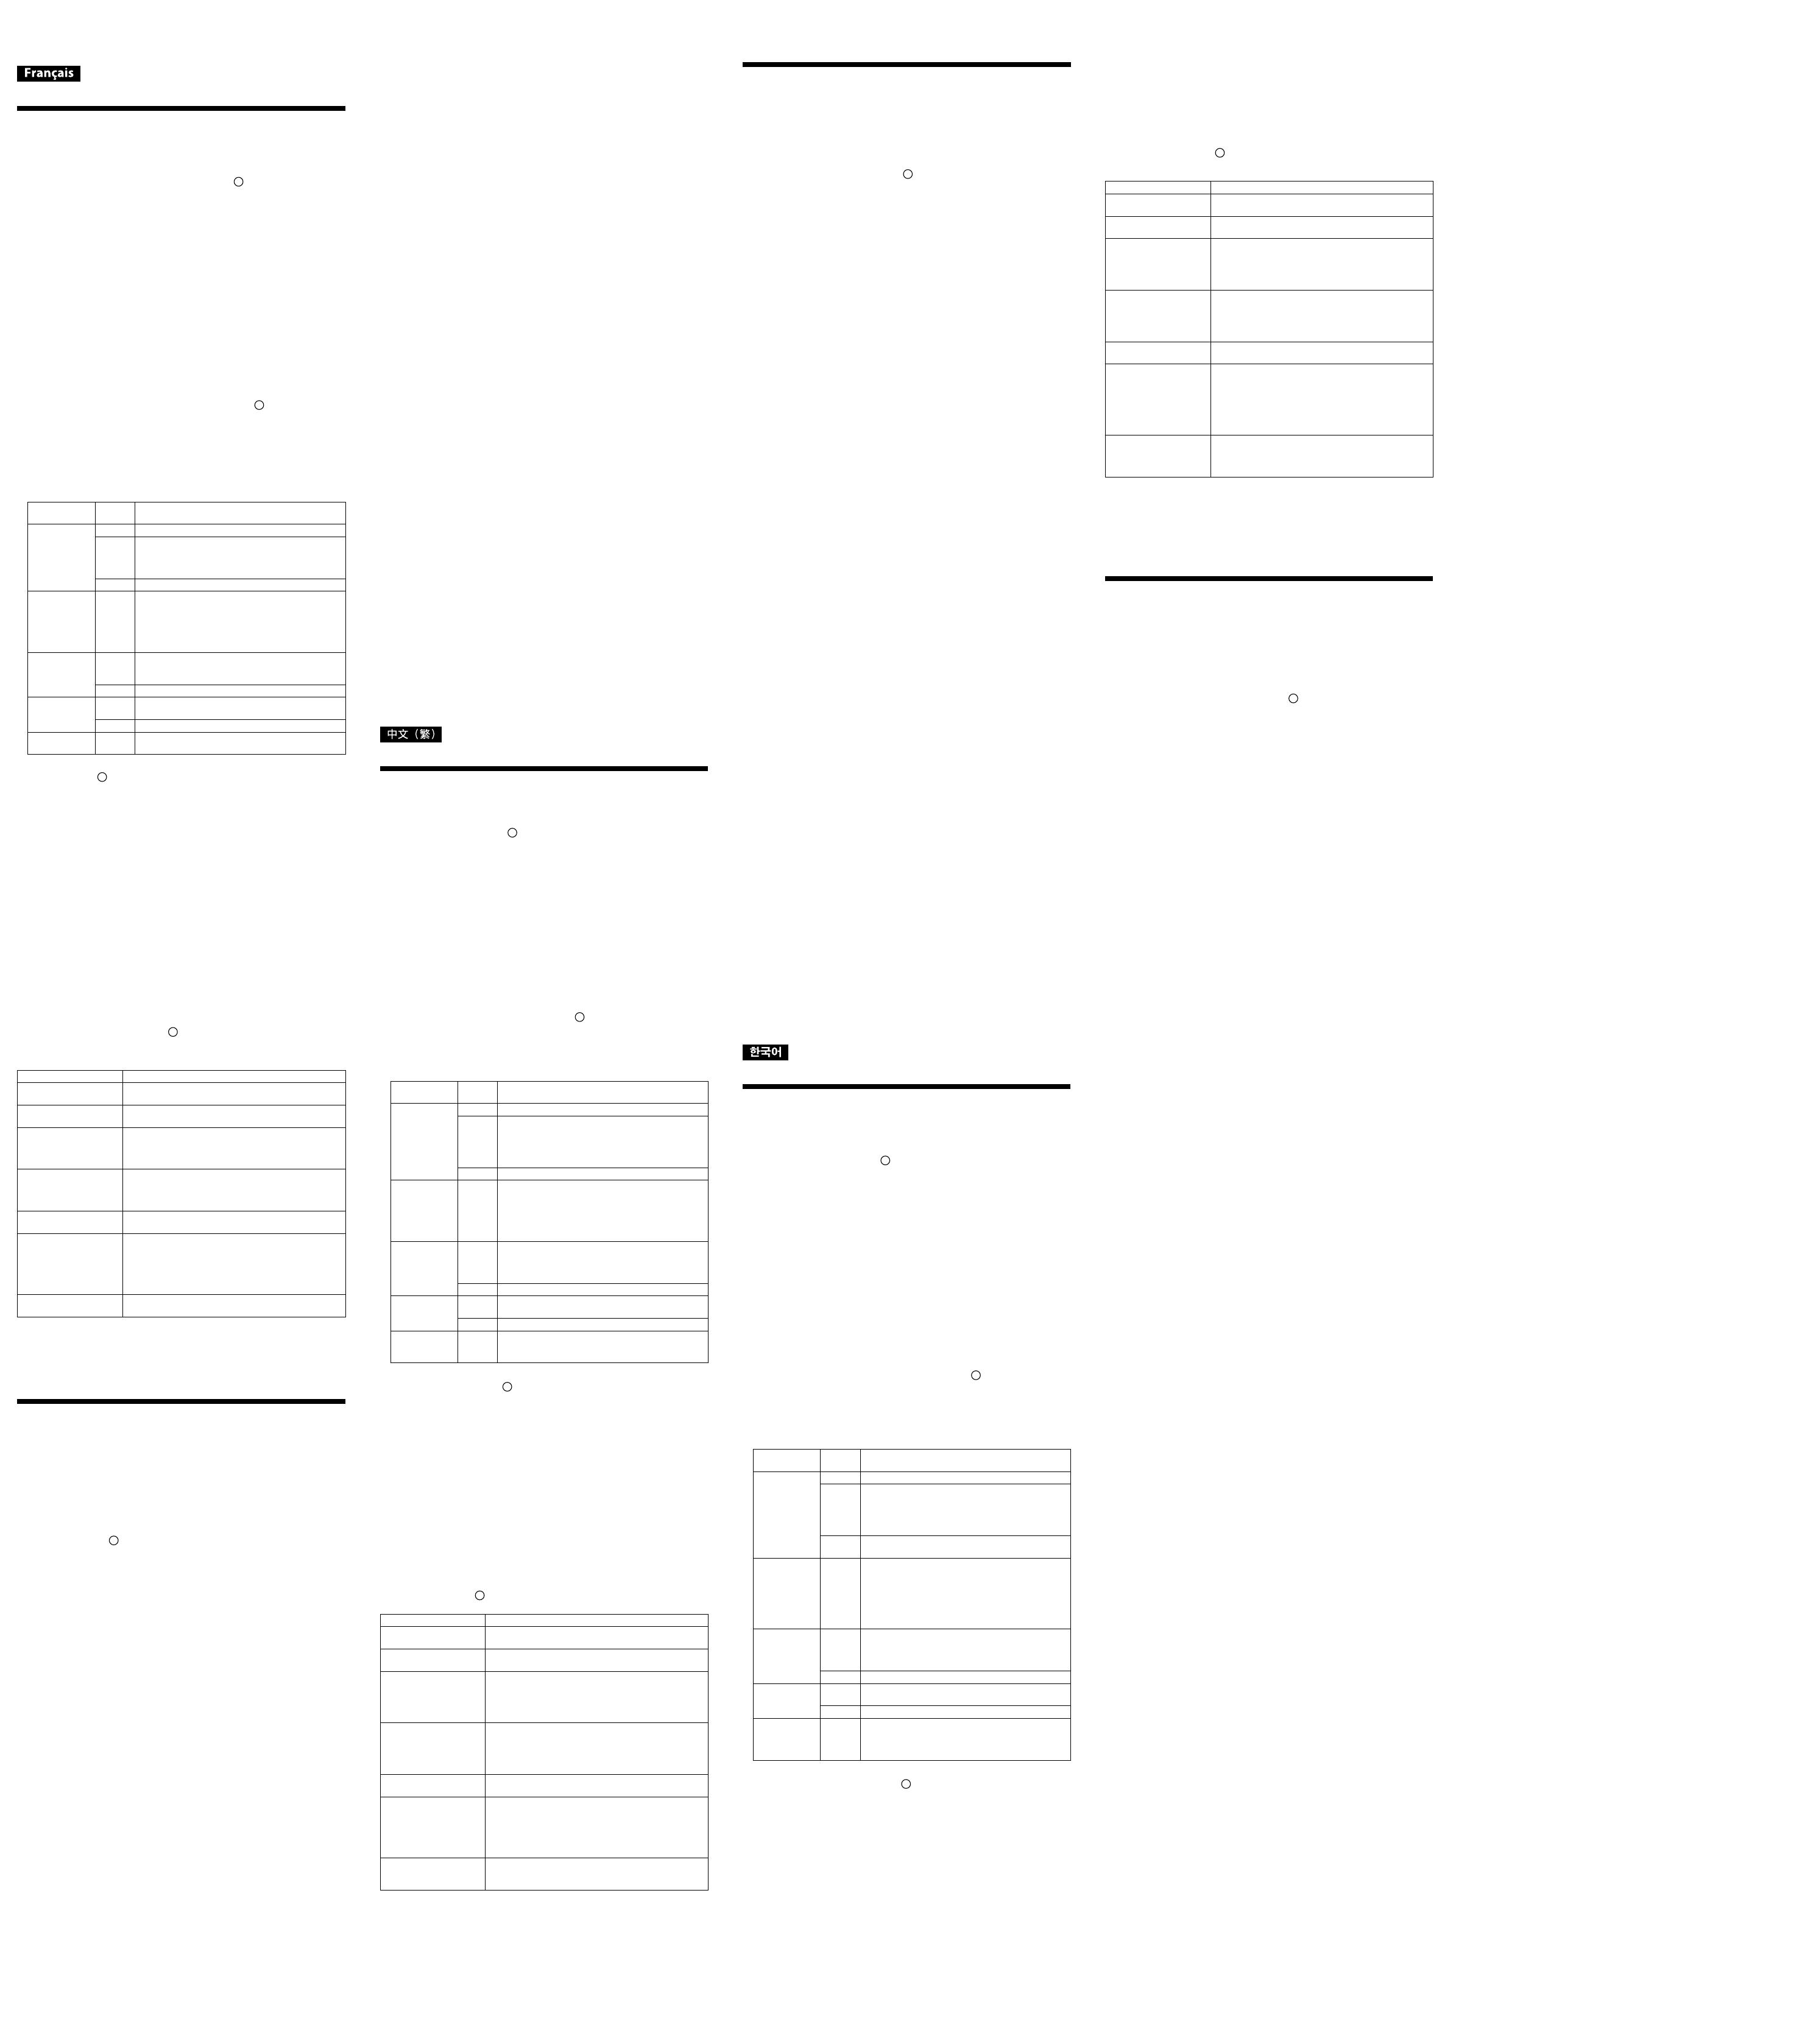
4 Choisissez le sabot de montage et le numéro en vous reportant au
tableau suivant.
Sabot de montage
de caméscope
Numéro Caméscope
F-2
1 HDR-CX12/CX11/CX7/CX6
2
HDR-PJ600V/PJ600/PJ590V/PJ580V/PJ580/PJ260V/
PJ260/PJ50V/PJ50/PJ40V/PJ30V/PJ30/PJ20/PJ10,
HDR-XR260V/XR260/XR160,
HDR-SR8/SR7/SR5
3 HDR-CX700V/CX700/CX690/CX560V/CX560
H 1
HDR-CX590V/CX580V/CX580/CX570/CX360V/
CX360,
HDR-XR520V/XR520/XR500V/XR500/XR200V/
XR200/XR106/XR105/XR101/XR100,
HDR-SR12/SR11/SR10,
DCR-SR220/SR210
I-2
1
HDR-CX520V/CX520/CX505V/CX500V/CX500,
DCR-SR88/SR85/SR78/SR75/SR68/SR65/SR58/SR55/
SR46/SR45/SR36/SR35
2 HDR-XR350V/XR350
L
1
HDR-CX550V/CX550,
HDR-XR550V/XR550
2 HDR-XR155/XR150
M 1
HDR-PJ760V/PJ760/PJ740V/PJ720/PJ710V/PJ710,
HDR-CX760V/CX760/CX740V/CX730/CX720V
5 Si vous utilisez un autre sabot de montage que le M, détachez la
plaquette à vis
du sabot de montage de caméscope M. Alignez
ensuite la plaquette à vis sur le numéro correct sur le sabot de
montage de caméscope choisi, puis appuyez dessus de sorte qu'elle
s'encliquette.
La plaquette à vis a été xée au sabot de montage M en usine. Si vous utilisez le sabot
de montage M, cette étape est inutile.
Préparation du caméscope
Pour le détail, reportez-vous au mode d’emploi fourni avec le caméscope.
1 Détachez l’accessoire.
Retirez le ltre, le convertisseur, le capuchon d’objectif, le pare-soleil ou la bandoulière
du caméscope.
Si le caméscope que vous utilisez est pourvu d’un obturateur central manuel, ouvrez cet
obturateur.
2 Installez la batterie.
Installez une batterie complètement rechargée.
3 Introduisez le support.
Pour les types de cartes mémoire (« Memory Stick Duo », carte SD) compatibles avec
votre caméscope, reportez-vous au mode d’emploi du caméscope.
Remarques
Désactivez le taquet de sécurité de la carte mémoire et de la cassette pour permettre
l’enregistrement.
Assurez-vous que l’espace sur la carte mémoire, sur le disque dur et dans la mémoire
interne est susant pour l’enregistrement.
4 Fixez la bague antireet (
-3-
) sur le letage de l’objectif du
caméscope.
La bague antireet empêche la lumière extérieure de se rééchir dans le caisson sport
(appelé ci-dessous «
ce boîtier
») et de pénétrer dans l’objectif.
Bague antireet
Caméscope
Bague antireet
(M30 × ø 47)
HDR-CX360V/CX360,
HDR-XR155/XR150
Bague antireet
(M30 × ø 50)
DCR-SR88/SR78/SR68/SR58
Bague antireet
(M30 × ø 58)
HDR-PJ600V/PJ600/PJ590V/PJ580V/PJ580,
HDR-CX590V/CX580V/CX580/CX570,
HDR-XR350V/XR350,
DCR-SR85/SR75/SR65/SR55/SR46/SR45/SR36/SR35
Bague antireet
(M30 × ø 62)
HDR-PJ50V/PJ50/PJ40V/PJ30V/PJ30,
HDR-XR200V/XR200/XR106/XR105/XR101/XR100,
HDR-SR10,
DCR-SR220/SR210
Bague antireet
(M37 × ø 49)
HDR-CX700V/CX700/CX690/CX560V/CX560
Bague antireet
(M37 × ø 55)
HDR-PJ260V/PJ260/PJ20/PJ10,
HDR-CX550V/CX550/CX520V/CX520/CX505V/CX500V/
CX500/CX12/CX11/CX7/CX6,
HDR-XR550V/XR550/XR520V/XR520/XR500V/XR500/
XR260V/XR260/XR160,
HDR-SR12/SR11/SR8/SR7/SR5
Bague antireet
(M52 × ø 58)
HDR-PJ760V/PJ760/PJ740V/PJ720/PJ710V/PJ710,
HDR-CX760V/CX760/CX740V/CX730/CX720V
5 Tournez le panneau LCD vers l’extérieur et appliquez-le contre le
caméscope.
6 Réglez la mise au point, l’éclairage, etc. sur AUTO.
7 Lorsque vous utilisez la fonction SteadyShot du HDR-PJ760V/PJ760/
PJ740V/PJ720/PJ710V/PJ710 ou du HDR-CX760V/CX760/CX740V/
CX730/CX720V, réglez cette fonction sur le mode Actif.
Installation du caméscope
Si vous utilisez un caméscope avec interrupteur POWER, réglez l’interrupteur POWER
sur arrêt. Laissez aussi ce boîtier éteint. Si vous utilisez un caméscope avec interrupteur
d’alimentation interne activé par l’écran LCD, vous n’avez pas besoin d’éteindre le
caméscope.
Remarques
Après avoir installé le caméscope dans ce boîtier, vous pouvez allumer et éteindre le
ˎ
caméscope en appuyant sur le bouton POWER de ce boîtier.
1 Fixez le sabot de montage de caméscope.
Alignez la vis du sabot de montage de caméscope sur le letage de pied photo sous
le caméscope.
Fixez le sabot de montage de caméscope au caméscope en utilisant les pièces
métalliques (
-5-
) de la bandoulière, comme indiqué sur l’illustration.
2 Fixez le dessiccatif.
Fixez le dessiccatif fourni. Pour plus de détails, reportez-vous à « Dessiccatif » dans
mode d’emploi fourni.
3 Raccordez la che du caméscope et installez le caméscope dans ce
boîtier.
Insérez à fond la che Audio/Commande à distance dans la prise A/V, la prise A/V
OUT ou la prise de commande à distance A/V selon le caméscope utilisé.
Lorsque vous installez le caméscope dans ce boîtier, alignez le sabot de montage de
caméscope sur le guide dans la partie avant de ce boîtier, puis poussez l’arrière du sabot
de montage caméscope jusqu’à ce que le sabot s’encliquette.
Remarques
Veillez à tenir ce boîtier à l’horizontale lorsque vous installez le sabot de montage
ˎ
de caméscope. Si vous installez le sabot de montage de caméscope en inclinant le
caméscope, vous risquez d’endommager le sabot ainsi que la partie avant du boîtier.
Attention de ne pas masquer l’objectif, l’écran LCD, le viseur, le levier de zoom ou le
ˎ
bouton PHOTO avec le câble.
Si vous utilisez un caméscope pourvu d’un interrupteur d’alimentation interne
ˎ
activé par l’écran LCD, le mode d’enregistrement de photos/lecture vidéo du
caméscope se réglera sur le mode d’enregistrement vidéo lorsque vous branchez la
che Audio/Commande à distance.
Si vous utilisez un HDR-XR520V/XR520/XR500V/XR500 (Voir l’illustration
-4-A)
Ouvrez le cache-prise et branchez la che. (Rangez le câble raccordé à ce boîtier en
formant une boucle vers l’arrière de la che, comme indiqué sur l’illustration.)
Installez le caméscope dans ce boîtier, en prenant soin de ne pas coincer le câble
dans les pièces à l’intérieur de ce boîtier.
Après avoir installé le caméscope dans ce boîtier, rangez le câble du côté de la
sangle du caméscope.
Si vous utilisez un HDR-XR200V/XR200/XR106/XR105/XR101/XR100 (Voir
l’illustration
-4-B)
Ouvrez le cache-prise et branchez la che.
Rangez le câble raccordé à ce boîtier en formant une boucle vers l’arrière de la che,
comme indiqué sur l’illustration.
Installez le caméscope dans ce boîtier, en prenant soin de ne pas coincer le câble
dans les pièces à l’intérieur de ce boîtier.
Après avoir installé le caméscope dans ce boîtier, rangez le câble du côté de la
sangle du caméscope.
Si vous utilisez le HDR-SR12/SR11/SR10, DCR-SR220/SR210 (Voir l’illustration
-4-C)
Ouvrez le cache-prise et branchez la che. (Rangez le câble raccordé à ce boîtier en
formant une boucle vers l’arrière de la che, comme indiqué sur l’illustration.)
Après avoir installé le caméscope dans ce boîtier, appuyez légèrement sur le câble
pour le ranger du côté de la sangle du caméscope.
Si vous utilisez le HDR-PJ600V/PJ600/PJ50V/PJ50, HDR-XR260V/XR260/XR160
ou le HDR-SR8/SR7/SR5 (Voir l’illustration
-4-D)
Ouvrez le cache-prise.
Branchez la prise.
Après avoir installé le caméscope dans ce boîtier, rangez le câble du côté de la
sangle du caméscope.
Si vous utilisez le HDR-XR350V/XR350/XR155/XR150 (Voir l’illustration
-4-E)
Ouvrez le cache-prise et branchez la che.
Après avoir installé le caméscope dans ce boîtier, rangez le câble du côté de la sangle
du caméscope, en prenant soin de ne pas coincer le câble sur le sabot de montage
de caméscope ou d’autres pièces.
Si vous utilisez le HDR-CX12/CX11/CX7/CX6 (Voir l’illustration
-4-F)
Ouvrez le cache-prise.
Branchez la prise.
Placez le câble sur le sabot de montage de caméscope et installez le caméscope dans
ce boîtier.
Après avoir installé le caméscope dans ce boîtier, rangez le câble du côté de la
sangle du caméscope, en le plaçant de sorte qu’il ne tombe pas du sabot de montage
de caméscope.
Si vous utilisez le HDR-CX520V/CX520/CX505V/CX500V/CX500 ou le DCR-
SR85/SR75/SR65/SR55/SR46/SR45/SR36/SR35 (Voir l’illustration
-4-G)
Ouvrez le cache-prise et branchez la che. (Rangez le câble raccordé à ce boîtier en
formant une boucle vers l’arrière de la che, comme indiqué sur l’illustration.)
Après avoir installé le caméscope dans ce boîtier, appuyez légèrement sur le câble
pour le ranger du côté de la sangle du caméscope.
Si vous utilisez le HDR-CX550V/CX550/XR550V/XR550 (Voir l’illustration
-4-H)
Ouvrez le cache-prise.
Branchez la prise.
Après avoir installé le caméscope dans ce boîtier, rangez le câble. (Accrochez le
câble au support de câble.)
Si vous utilisez le DCR-SR88/SR78/SR68/SR58 (Voir l’illustration
-4-I)
Ouvrez le cache-prise.
Branchez la prise.
Coincez le câble dans la rainure de la bague antireet de la façon illustrée.
Rangez le câble de la façon illustrée et xez le sabot de montage de caméscope à ce
boîtier.
Remarques sur le câble :
Ne tordez pas le câble.
ˎ
Veillez à ce que le câble ne ressorte pas de la rainure de la bague antireet.
ˎ
Après avoir installé le caméscope dans ce boîtier, assurez-vous que le câble ne gêne
pas l’objectif du caméscope.
Si vous utilisez le HDR-CX700V/CX700/CX690/CX560V/CX560 (Voir l’illustration
-4-J)
Ouvrez le cache-prise.
Faites passer le câble sous la sangle du caméscope et branchez la che.
Après avoir installé le caméscope dans ce boîtier, rangez le câble du côté de la
sangle du caméscope.
Si vous utilisez le HDR-PJ590V/PJ580V/PJ580/PJ260V/PJ260/PJ40V/PJ30V/
PJ30/PJ20/PJ10 ou le HDR-CX590V/CX580V/CX580/CX570/CX360V/CX360
(Voir l’illustration
-4-K)
Ouvrez le cache-prise et branchez la che.
Après avoir installé le caméscope dans ce boîtier, rangez le câble du côté de la
sangle du caméscope.
Si vous utilisez le HDR-PJ760V/PJ760/PJ740V/PJ720/PJ710V/PJ710 ou le HDR-
CX760V/CX760/CX740V/CX730/CX720V (Voir l'illustration
-4-L)
Ouvrez le cache-prise.
Raccordez la che du haut comme indiqué sur l'illustration.
Après avoir installé le caméscope dans ce boîtier, rangez le câble du côté de la
sangle du caméscope.
5 Fermez la partie arrière.
Appuyez sur la partie arrière du boîtier pour le refermer et serrez les fermoirs jusqu’à ce
qu’ils s’encliquettent.
Remarques
Veillez à ne pas coincer les câbles lorsque vous fermez la partie arrière.
ˎ
Bien que le centre de l’objectif de certains modèles de caméscopes ne soit pas aligné
ˎ
sur le centre de la vitre avant de ce boîtier lorsque le caméscope est installé, la prise
de vue s’eectue normalement.