1
2
4
3
2
1
Sports Pack Preparation Guide
Guide de préparation du caisson
3-097-874-02(1)
SPK-HCC
1
4
C
1
2
B
5
3
1
2
1
2
M
G
ABC
1
N
1
2
1
Camera mounting shoe
Sabot de montage du caméscope
카메라 마운팅 슈
Guide
Guide
가이드
Body
Corps
본체
© 2007 Sony Corporation Printed in Japan
P
L
2
2
1
1
12
1
2
H
1
2
1
2
3
I
J
2
1
2
K
O
2
2
3
4
5
6
A
1
2
A 1
B
1
START/STOP PHOTO
2
C
1
1 1 2
2
2
2
3
3
O
O
O O
4
HDR-HC3 DCR-SR100/SR90 DCR-DVD905/DVD805/DVD505/
DVD405/DVD404
HDR-UX7/UX5/UX3 DCR-DVD908/DVD808/DVD508/DVD506/
DVD408/DVD406
* /
A/V A/V OUT
5
/ A/V
A/V OUT 4*
HDR-SR8/SR7/SR5
C
-5-A
1
2
3
HDR-CX7/CX6
C
-5-B
1
2
3
4
HDR-UX7/UX5/UX3 DCR-DVD908/DVD808/DVD508/DVD506/
DVD408/DVD406
C
-5-C
C
-4
12 3
1
2
3
HDR-HC7/HC5
C
-5-D
1
2
3
HDR-HC3
C
-5-E
1
2
3
DCR-SR300/SR290/SR200/SR190/SR82/SR72/SR62/SR52/SR42/
SR33/SR32
C
-5-F
1
2
3
DCR-SR100/SR90
C
-5-G
1
2
3
4
DCR-DVD905/DVD505
C
-5-H
1
2
3
4
DCR-DVD805/DVD405/DVD404
C
-5-I
1
2
3
DCR-DVD803/DVD703/DVD653/DVD602/DVD403/DVD203/
DVD202/DVD103/DVD92
C
-5-J
1
2
/
DCR-DVD755/DVD705/DVD605/DVD305/
DVD304/DVD205/DVD105,
25 DCR-HC46/HC44/HC43/HC42/HC41/
HC39/HC36/HC35/HC33/HC32/HC28/
HC27/HC26/HC24/HC23/HC22/HC21/
HC19/HC17
HDR-HC3, DCR-SR100/SR90/SR82/
M30 62
SR72/SR62/SR52/SR42/SR33/SR32,
DCR-DVD905/DVD805/DVD505/DVD405/
DVD404
DCR-DVD803/DVD708/DVD703/DVD653/
DVD608/DVD602/DVD403/DVD308/
M30 43
DVD306/DVD203/DVD202/DVD109/
DVD108/DVD106/DVD103/DVD92,
DCR-HC96/HC94/HC90/HC48/HC47/
HC45/HC38/HC37
HDR-SR8/SR7/SR5,
HDR-CX7/CX6,
M37 55
HDR-UX7/UX5/UX3, HDR-HC7/HC5,
DCR-SR300/SR290/SR200/SR190,
DCR-DVD908/DVD808/DVD508/DVD506/
DVD408/DVD406
DCR-DVD905/DVD805/DVD755/DVD705/
1 DVD605/DVD505/DVD405/DVD404/DVD305/
A
DVD304/DVD205/DVD105
2 DCR-HC90
3
DCR-HC43/HC42/HC41/HC39/HC33/HC32/
HC22/HC21/HC19/HC17
HDR-UX7/UX5/UX3,
DCR-DVD908/DVD808/DVD803/DVD703/
1 DVD653/DVD602/DVD508/DVD506/DVD408/
B
DVD406/DVD403/DVD203/DVD202/DVD103/
DVD92
2
DCR-HC96/HC94/HC46/HC44/HC36/HC35/
HC28/HC27/HC26/HC24/HC23
3 HDR-HC3
C DCR-SR100/SR90
HDR-HC7/HC5
D
1 DCR-DVD708/DVD608/DVD308/DVD306/
DVD109/DVD108/DVD106
2 DCR-HC48/HC47/HC45/HC38/HC37
E
1 DCR-SR300/SR290/SR200/SR190
2 DCR-SR82/SR72/SR62/SR52/SR42/SR33/SR32
F
1 HDR-CX7/CX6
2 HDR-SR8/SR7/SR5
DEF
2
1
3
4
A
3
2
1
D
1
2
3
2
1
C
B
E
1
2
3
2
1
F
1
MC ND
DCR-DVD755/DVD705/DVD605/DVD305/DVD304/DVD205/
DVD105
C
-5-K
1
2
DCR-DVD708/DVD608/DVD308/DVD306/DVD109/DVD108/
DVD106
C
-5-L
1
2
3
DCR-HC96/HC94/HC46/HC44/HC36/HC35/HC28/HC27/HC26/
HC24/HC23
C
-5-M
1
2
DCR-HC90
C
-5-N
1
2
DCR-HC48/HC47/HC45/HC38/HC37
C
-5-O
1
2
3
DCR-HC43/HC42/HC41/HC39/HC33/HC32/HC22/HC21/HC19/
HC17
C
-5-P
1
2
6
•
•
English
Preparing
Note
The video camera models described below may not be available in all countries/
regions.
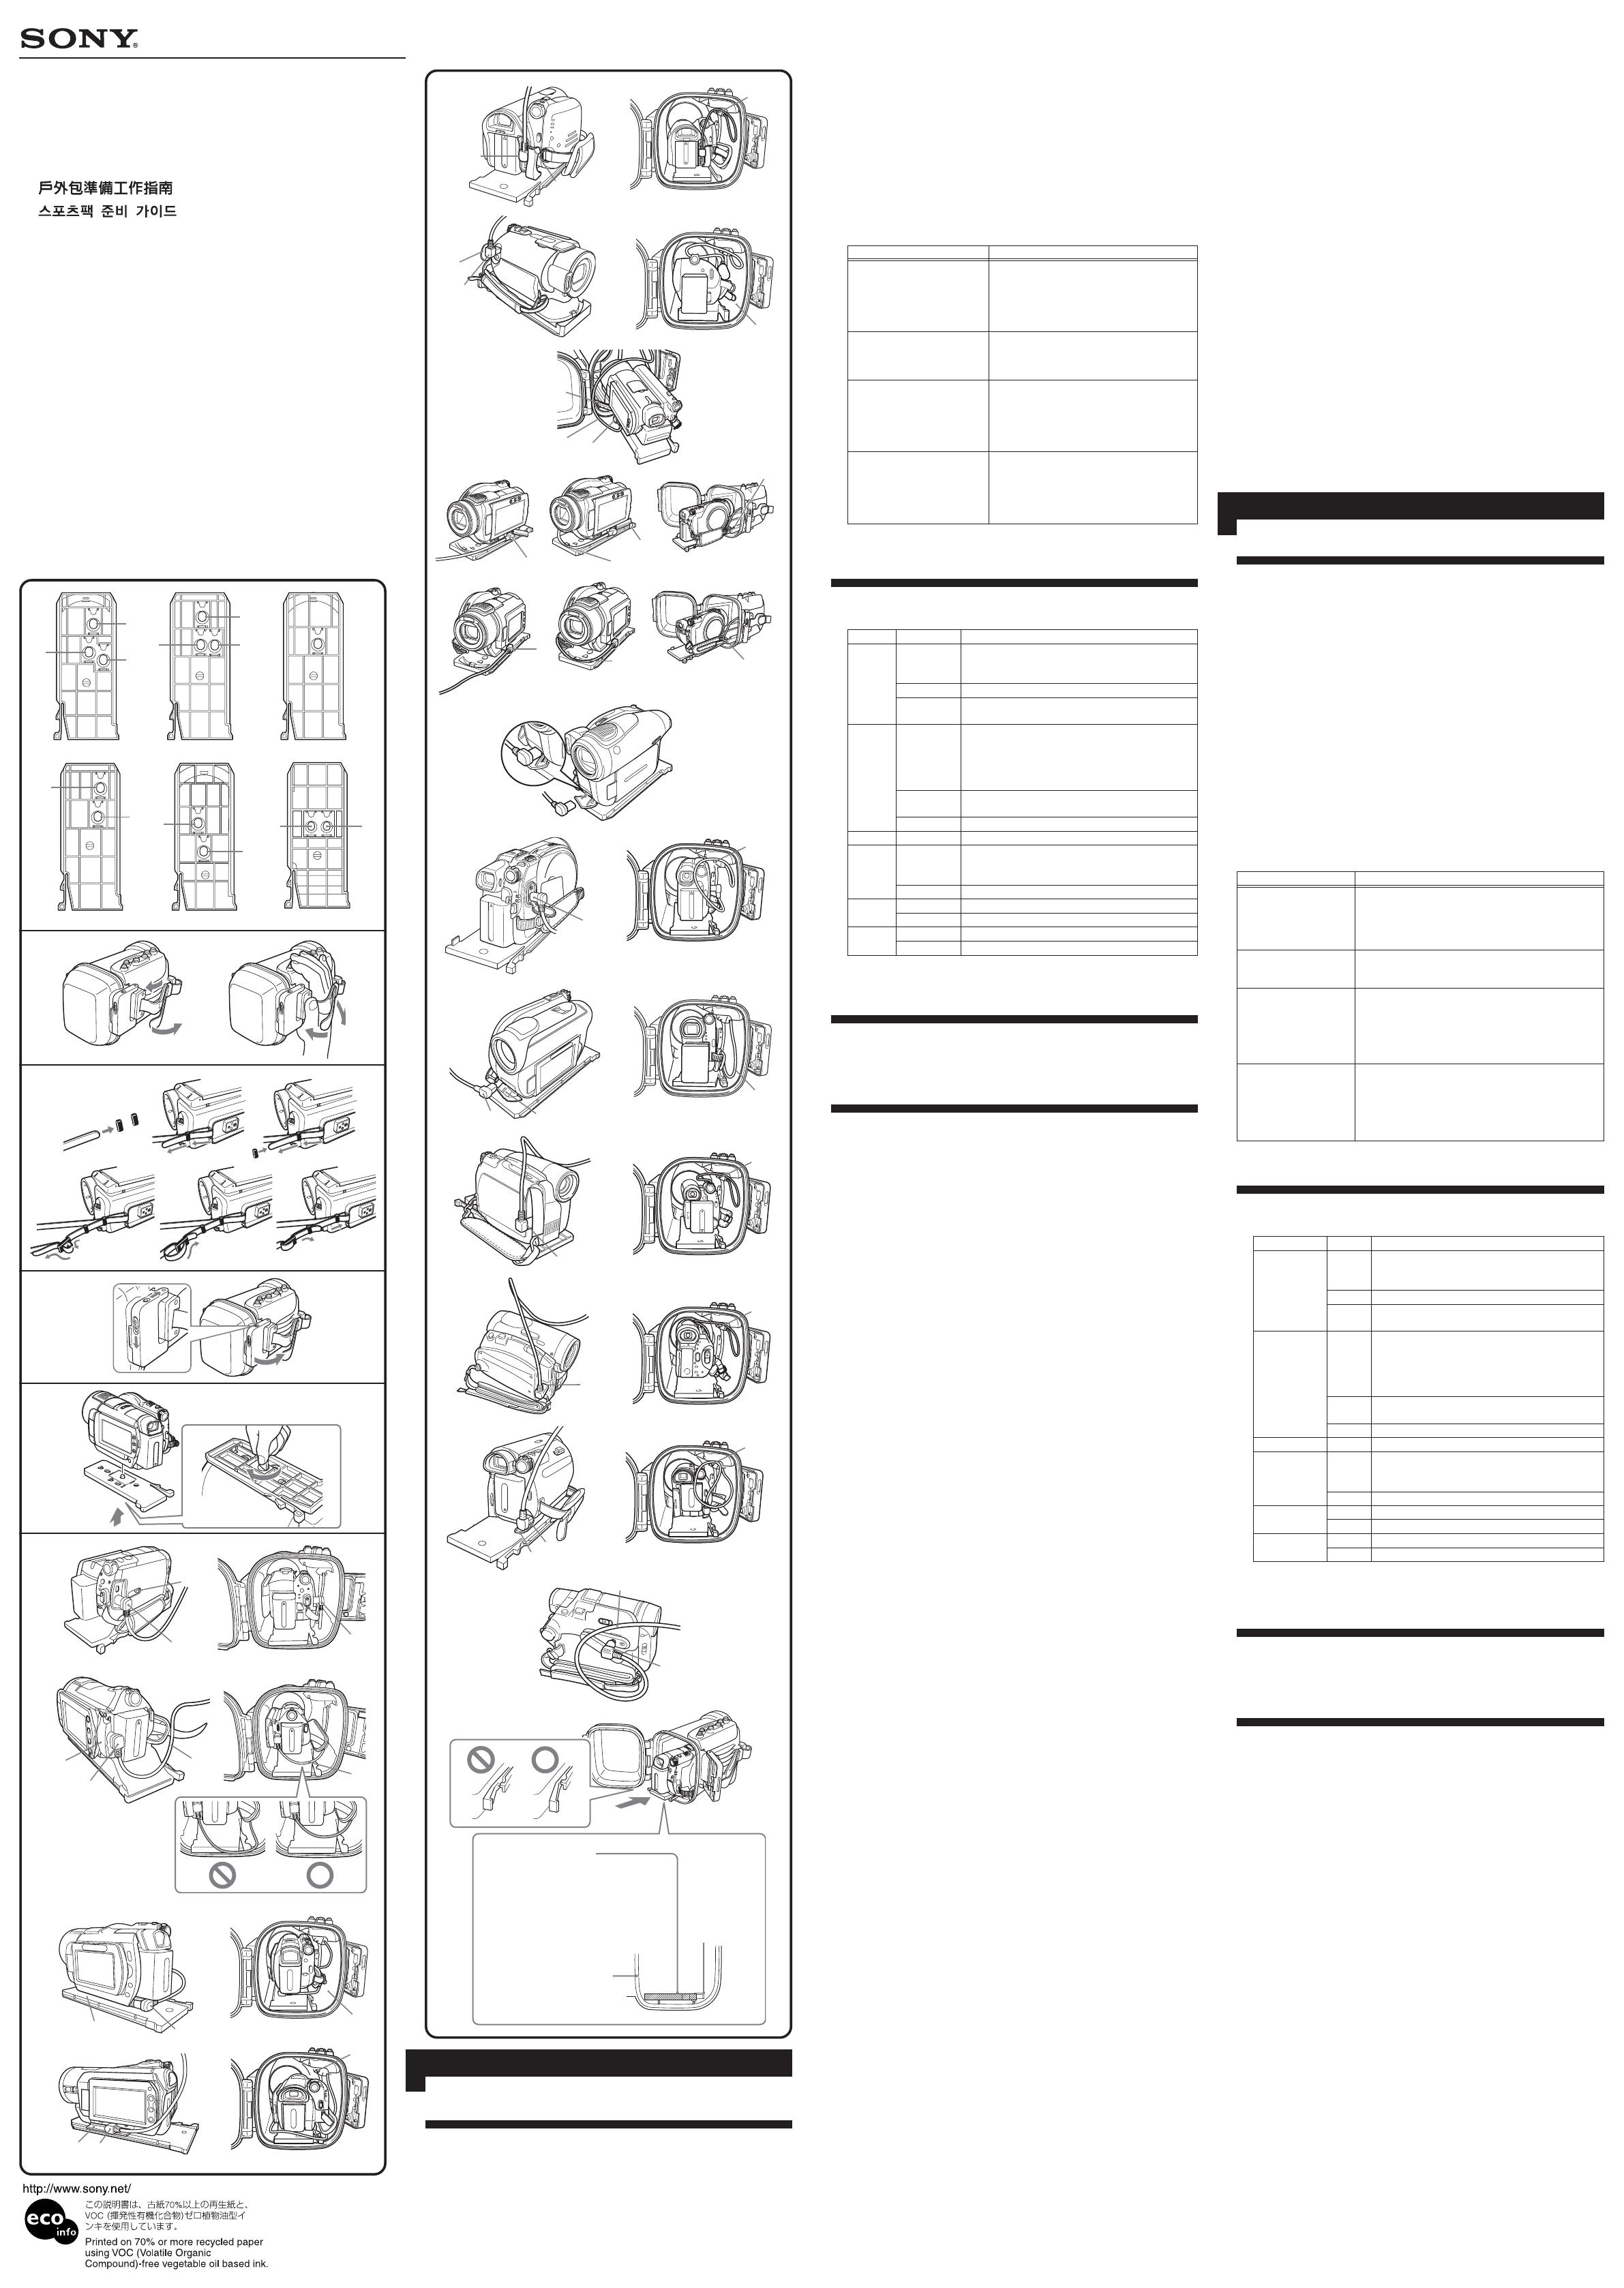
Preparing the Video Camera
For details, please refer to the operating instructions supplied with your video
camera.
1 Remove filter, conversion lens, lens cap or the shoulder strap
from the video camera.
When using a video camera with a manual lens shutter, open the lens shutter.
2 Install the battery pack.
Attach a fully recharged battery.
3 Insert the media.
Insert a media compatible with your video camera.
For details, refer to the operating instructions supplied with your video
camera.
Notes
Unlock the safety tab on the “Memory Stick Duo” and the cassette tape, and
make them possible to record images.
Be sure that the tape, “Memory Stick Duo,” disc and hard disk have enough
space to record images.
Be sure that the disc is not finalized.
4 Attach the reflex prevention ring to the filter attachment screw
of the video camera.
The reflex prevention ring prevents external light from being reflected inside
the sports pack and entering the lens.
5 Turn the LCD panel over and move back to the video camera
with the LCD screen facing out.
6 Set the functions, such as focusing and lightning, to AUTO.
A Selecting the Camera Mounting Shoe
1 Choose the mounting shoe and the number according to the
table below.
2 Align the tripod screw plate with the chosen number on the
mounting shoe and press the tripod screw plate until it clicks
into place.
On leaving the factory, the tripod screw plate is attached in the number 1
position on mounting shoe A.
B Preparing the Sports Pack
1 Adjust the grip strap.
Holding the sports pack so that the tips of your finger can easily touch the
START/STOP button, Telephoto button, Wide button and PHOTO button,
adjust its length.
2 Attach the shoulder strap.
C Installing the Video Camera
Turn the POWER switch of the video camera to “OFF (CHG)” and leave the
power of the sports pack turned off.
1 Release the buckles.
1 Keep sliding the unlock button 1 in the direction of the arrow, slide the
open slider 2 and release the buckle.
2 Open the rear body.
2 Coat the front glass with anti-fogging lens solution.
Apply 2 to 3 drops of the anti-fogging lens solution provided onto the inside
surface of the front glass of the sports pack. To increase the anti-fogging effect,
use the desiccant supplied. For details, refer to “Desiccant” in the supplied
operating instructions.
3 Remove foreign materials such as dust, sand or hair from the O-
ring, the groove and any surface it touches. Then, put the grease
evenly on the O-ring.
If the body is closed with such materials present, these areas may be damaged
and water may leak in.
For details on handling the O-ring, refer to the “Handling the O-ring” in the
operating instructions.
4 Attach the camera mounting shoe.
Align the screw position of the mounting shoe with the tripod screw on the
bottom of the video camera.
When using the HDR-HC3, DCR-SR100/SR90 or DCR-DVD905/DVD805/
DVD505/DVD405/DVD404, open the jack cover before attaching the
mounting shoe.
When using the HDR-UX7/UX5/UX3 or DCR-DVD908/DVD808/DVD508/
DVD506/DVD408/DVD406 (*), open the jack cover and firmly insert the
Audio/Remote plug into the A/V jack or A/V OUT jack before attaching the
camera mounting shoe.
Use the metal parts of shoulder strap as shown in the illustration.
5 Connect the plug and install the video camera.
Depending on your video camera, firmly insert the Audio/Remote plug into
the A/V jack or A/V OUT jack. (except models marked * in step 4)
When installing the video camera into the sports pack, align the camera
mounting shoe with the guide inside the front body of the sports pack, and
then push the rear of the camera mounting shoe until it clicks into place.
Note
Be sure to keep the sports pack horizontal when installing the camera
mounting shoe.
Installing the camera mounting shoe in a vertical motion may damage the
camera mounting shoe and the front body. Be sure not to cover the lens, LCD
screen, view finder, zoom lever or photo button with the cable.
(Continued on the reverse side.)
Reflex prevention ring
Reflex prevention ring
(ø 25)
Reflex prevention ring
(M30 × ø 62)
Reflex prevention ring
(M30 × ø 43)
Reflex prevention ring
(M37 × ø 55)
Video camera
DCR-DVD755/DVD705/DVD605/DVD305/
DVD304/DVD205/DVD105,
DCR-HC46/HC44/HC43/HC42/HC41/HC39/
HC36/HC35/HC33/HC32/HC28/HC27/HC26/
HC24/HC23/HC22/HC21/HC19/HC17
HDR-HC3, DCR-SR100/SR90/SR82/SR72/SR62/
SR52/SR42/SR33/SR32,
DCR-DVD905/DVD805/DVD505/DVD405/DVD404
DCR-DVD803/DVD708/DVD703/DVD653/
DVD608/DVD602/DVD403/DVD308/DVD306/
DVD203/DVD202/DVD109/DVD108/DVD106/
DVD103/DVD92,
DCR-HC96/HC94/HC90/HC48/HC47/HC45/
HC38/HC37
HDR-SR8/SR7/SR5,
HDR-CX7/CX6,
HDR-UX7/UX5/UX3, HDR-HC7/HC5,
DCR-SR300/SR290/SR200/SR190,
DCR-DVD908/DVD808/DVD508/DVD506/
DVD408/DVD406
Mounting shoe Number Video camera
DCR-DVD905/DVD805/DVD755/DVD705/
1 DVD605/DVD505/DVD405/DVD404/DVD305/
A
DVD304/DVD205/DVD105
2 DCR-HC90
3
DCR-HC43/HC42/HC41/HC39/HC33/HC32/
HC22/HC21/HC19/HC17
HDR-UX7/UX5/UX3,
DCR-DVD908/DVD808/DVD803/DVD703/
1 DVD653/DVD602/DVD508/DVD506/DVD408/
B
DVD406/DVD403/DVD203/DVD202/DVD103/
DVD92
2
DCR-HC96/HC94/HC46/HC44/HC36/HC35/
HC28/HC27/HC26/HC24/HC23
3 HDR-HC3
C–DCR-SR100/SR90
HDR-HC7/HC5,
D
1 DCR-DVD708/DVD608/DVD308/DVD306/
DVD109/DVD108/DVD106
2 DCR-HC48/HC47/HC45/HC38/HC37
E
1 DCR-SR300/SR290/SR200/SR190
2 DCR-SR82/SR72/SR62/SR52/SR42/SR33/SR32
F
1 HDR-CX7/CX6
2 HDR-SR8/SR7/SR5
1
2
3
1
2
3

