
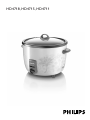
HD4718, HD4715, HD4711

2

3
B
A
C
D
E
F
G
H
I
J
K P
O
N
M
L
1

4

HD4718, HD4715, HD4711
ENGLISH 6
BAHASA MELAYU
11
ภาษาไทย 16
20
简体中文 25

6
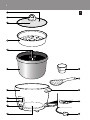
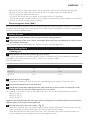
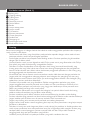
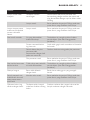
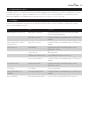
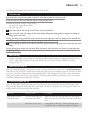
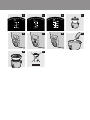
General description (Fig. 1)
A Steam vent
B Lid handle
C Glass lid
D Steam tray
E Water level indication
F Inner pot
G Body
H Keep-warm light
I Cook light
J Control lever
K Heating element
L Measuring cup
M Rice scoop
N Side handle
O Mains cord connection
P Mains cord
Important
Read this user manual carefully before you use the appliance and save it for future reference.
Check if the voltage indicated on the appliance corresponds to the local mains voltage before
you connect the appliance.
Only connect the appliance to an earthed wall socket. Always make sure that the plug is
inserted rmly into the wall socket.
If the mains cord is damaged, you must have it replaced by Philips, a service centre authorised by
Philips or similarly qualied persons in order to avoid a hazard.
This appliance is not intended for use by persons (including children) with reduced physical,
sensory or mental capabilities, or lack of experience and knowledge, unless they have been given
supervision or instruction concerning use of the appliance by a person responsible for their
safety.
Children should be supervised to ensure that they do not play with the appliance.
Never use any accessories or parts from other manufacturers or that Philips does
not specically recommend. If you use such accessories or parts, your guarantee becomes
invalid.
Only use the rice scoop provided. Avoid using sharp utensils.
Never immerse the housing of the rice cooker in water, nor rinse it under the tap.
Do not expose the rice cooker to high temperatures, nor place it on a working or still hot stove
or cooker.
Make sure the heating element, the magnetic switch and the outside of the inner pot are clean
and dry before you put the plug in the wall socket.
Always insert the inner pot before you put the plug in the wall socket.
Always unplug the rice cooker and let it cool down before you clean it.
Do not place the inner pot directly over an open re to cook rice.
Do not cover the steam vent and the lid while the rice cooker is operating.
Do not let the mains cord hang over the edge of the table or worktop on which the
appliance stands.
This appliance is intended for household use only. If the appliance is used improperly or for
professional or semiprofessional purposes or if it is not used according to the instructions in this
user manual, the guarantee becomes invalid and Philips refuses liability for any damage caused.
Place the rice cooker on a stable, horizontal and level surface.
The accessible surfaces may become hot when the appliance is operating.
Do not plug in the appliance or operate the control lever with wet hands.
-
-
-
-
-
-
-
-
-
-
-
-
-
-
-
-
-
-
-
ENGLISH

Beware of the hot steam that comes out of the steam vent of the lid during cooking. Also
beware of the hot steam that comes out of the rice cooker when you open the lid.
Always unplug the appliance after use.
Do not lift and move the rice cooker by its handle while it is operating.
Avoid hard contact between objects and the glass lid and do not put any objects on top of the
glass lid, to prevent the glass from breaking.
Electromagnetic elds (EMF)
This Philips appliance complies with all standards regarding electromagnetic elds (EMF). If handled
properly and according to the instructions in this user manual, the appliance is safe to use based on
scientic evidence available today.
Before rst use
1
Remove the sheet between the inner pot and the heating element.
2 Cleanthepartsofthericecookerthoroughlybeforeyouusetheapplianceforthersttime
(see chapter ‘Cleaning’).
Make sure all parts are completely dry before you start using the appliance.
Using the appliance
Cooking rice
1 Measure the rice with the measuring cup provided.
Each cup of uncooked rice normally gives 2 bowls of cooked rice. Do not exceed the quantities
indicated on the inside of the inner pot. 1 cup of rice is approx. 180ml.
See the table below.
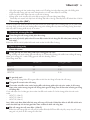
Menu Volume (L) Quantity of rice (cups)
HD4711 1.0 1-5
HD4715 1.8 2-10
HD4718 2.8 5-15
1 Wash the rice thoroughly.
Use a separate container to wash the rice to avoid damaging the surface of the inner pot.
2 Put the pre-washed rice in the inner pot.
3 Add water to the level indicated on the scale inside the inner pot that corresponds to the
number of cups of rice used. Then smooth the rice surface.
For instance, if you cook 4 cups of rice, add water up to the 4-cup level indicated on the scale.
HD4711 (Fig. 2)
HD4715 (Fig. 3)
HD4718 (Fig. 4)
Note: The level marked inside the inner pot is just an indication. You can always adjust the water level for
different types of rice and your own preference.
4 Put the inner pot in the rice cooker. (Fig. 5)
Make sure the inner pot is in proper contact with the heating element. To achieve this, turn the
inner pot slightly to the left and right a few times inside the rice cooker.
Make sure that the outside of the inner pot is dry and clean. Also make sure that there is no
foreign residue on the heating element or the magnetic switch.
-
-
-
-
-
-
-
-
-
ENGLISH 7

5 Put the lid on the rice cooker and put the plug in the wall socket.
The keep-warm light goes on to indicate that the appliance is on. (Fig. 6)
6 Press the control lever down to start the cooking process (Fig. 7).
The cook light goes on (Fig. 8).
If you fail to press down the control lever, the keep-warm light stays on.
Whenthecookingprocessisnished,thecooklightgoesoutandthekeep-warmlightgoes
on to indicate that the rice cooker has automatically switched to the keep-warm
mode (Fig. 6).
7 Open the lid and stir the rice to loosen it (Fig. 9).
For the best results, do this just after the rice cooker has switched to the keep-warm mode. Then
close the lid rmly. Stirring the rice allows excess steam to escape. This gives ufer rice.
8 To end the cooking process, pull up the control lever and remove the mains plug from the
wall socket. To end the keep-warm mode, remove the mains plug from the wall socket.
Steaming
1 Measure 3 cups of water with the measuring cup and pour it into the inner pot.
The amount of water varies based on to the quantity of food to be steamed.
It takes approx. 8 minutes for 3 cups of water to come to the boil.
Make sure that the inner pot is in proper contact with the heating element. To achieve this, turn
the inner pot slightly to the left and right a few times inside the rice cooker.
Make sure that the outside of the inner pot is dry and clean. Also make sure that there is no
foreign residue on the heating element or the magnetic switch.
2 Put the food to be steamed on a plate or in the steam tray.
To ensure even steaming, spread out the food evenly and do not pile it up.
3 Put the steam tray in the inner pot (Fig. 10).
When you cook rice and steam food at the same time, make sure you measure out an amount of
rice that leaves enough room for the steam tray. The steamed food is ready when the rice cooking
process is nished.
4 If you use a separate plate, put it in the steam tray.
5 Closethelidrmly.
6 Follow steps 6, 7 and 8 in section ‘Cooking rice’
The steaming time varies based on the quantity of food to be steamed.
When the steaming process is nished, the cook light goes out and the keep-warm light goes on to
indicate that the appliance has automatically switched to the keep-warm mode.
7 To end the cooking process, pull up the control lever and remove the mains plug from the
wall socket. To end the keep-warm mode, remove the mains plug from the wall socket.
8 Open the lid and carefully remove the steamed food from the plate or steam tray. Use a
kitchen glove or a cloth, as the plate and the steam tray are very hot.
Beware of the hot steam.
Keeping warm
This mode allows you to keep your rice warm for a longer period of time.
Whenthecookingprocessisnished,thericecookerautomaticallyswitchestothekeep-
warm mode. The cook light goes out and the keep-warm light goes on.
We advise you not to keep rice warm for more than 5 hours, to preserve its taste.
The keep-warm mode does not switch off automatically.
To end the keep-warm mode, remove the mains plug from the wall socket.
,
,
,
-
-
,
ENGLISH8

Cleaning
Unplug the rice cooker before you clean it.
Waituntilthericecookerhascooleddownsufcientlybeforeyoucleanit.
To protect the surface of the inner pot, do not:
use the inner pot for washing dishes;
put vinegar in the pot.
1 Take the steam tray and the inner pot out of the body of the appliance.
2 Clean the lid, inner pot, steam tray and rice scoop with a sponge or a cloth in hot water with
some washing-up liquid.
Do not use abrasive cleaning agents, scourers or metal utensils to clean the inner pot, as
they damage the surface of the inner pot.
3 Use only a damp cloth to wipe the outside and inside of the body of the rice cooker.
Never immerse the body of the rice cooker in water, nor rinse it under the tap. Wipe the heating
element with a dry cloth.
Environment
Do not throw away the appliance with the normal household waste at the end of its life, but
hand it in at an ofcial collection point for recycling. By doing this, you help to preserve the
environment (Fig. 11).
Guarantee & service
If you need information or if you have a problem, please visit the Philips website at www.philips.com
or contact the Philips Customer Care Centre in your country (you nd its phone number in the
worldwide guarantee leaet). If there is no Customer Care Centre in your country, go to your local
Philips dealer or contact the Service Department of Philips Domestic Appliances and Personal Care
BV.
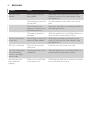
Troubleshooting
If your rice cooker does not function properly or if the quality of the cooked food is insufcient,
consult the table below. If you are unable to solve the problem, please contact the Philips Customer
Care Centre in your country.
Problem Cause Solution
The cook light does
not go on.
There is a connection
problem.
Check if the rice cooker is connected to the
mains and if the plug is inserted rmly into
the wall socket.
The light is defective. Take the appliance to your Philips dealer or a
service centre authorised by Philips.
The keep-warm light
does not go on when
the cooking process is
nished.
The light is defective. Take the appliance to your Philips dealer or a
service centre authorised by Philips.
-
-
-
ENGLISH 9

Problem Cause Solution
The rice is not
cooked.
Not enough water has
been added.
Add water according to the scale on the
inside of the inner pot (see chapter ‘Using
the appliance’).
The cooking process has
not started.
You have failed to press down the control
lever.
The inner pot is not
properly in contact with
the heating element.
Make sure that there is no foreign residue on
the heating element.
The heating element is
damaged.
Take the appliance to your Philips dealer or a
service centre authorised by Philips.
The rice is too hard
or too soft.
Not enough or too much
water has been added.
Add water according to the scale on the
inside of the inner pot (see chapter ‘Using
the appliance’).
The rice is scorched. The rice has not been
rinsed well.
Rinse the rice until water runs clear.
The rice cooker does
not automatically
switch to the keep-
warm mode.
The temperature control
is defective.
Take the appliance to your Philips dealer or a
service centre authorised by Philips.
The food has not
been steamed
properly.
There is too much food
in the steam tray.
Distribute the food evenly and do not steam
too much food at one time.
ENGLISH10

11
Perihalan umum (Gamb. 1)
A Bolong stim
B Gagang tudung
C Tudung kaca
D Dulang stim
E Penunjuk paras air
F Perikut dalam
G Badan
H Lampu tetap panas
I Lampu masak
J Tuil kawalan
K Elemen pemanasan
L Cawan penyukat
M Senduk nasi
N Pemegang sisi
O Sambungan kord utama
P Kord sesalur kuasa
Penting
Baca manual pengguna ini dengan berhati-hati sebelum anda menggunakan perkakas dan simpannya
untuk rujukan masa depan.
Periksa sama ada voltan yang ditunjukkan pada perkakas sepadan dengan voltan sesalur kuasa
setempat sebelum anda menyambungkan perkakas.
Sambungkan perkakas hanya kepada soket dinding terbumi. Sentiasa pastikan plag dimasukkan
dengan rapi ke dalam soket.
Jika kord sesalur rosak, ia mesti digantikan oleh Philips, pusat servis yang dibenarkan oleh Philips
atau pihak yang telah diluluskan bagi mengelakkan bahaya.
Perkakas ini bukan dimaksudkan untuk digunakan oleh orang (termasuk kanak-kanak) yang
kurang upaya dari segi zikal, deria atau mental, atau kurang berpengalaman dan pengetahuan,
kecuali mereka diawasi atau diberi arahan berkenaan penggunaan perkakas ini oleh orang yang
bertanggungjawab atas keselamatan mereka.
Kanak-kanak kecil harus diawasi untuk memastikan mereka tidak bermain dengan perkakas itu.
Jangan sekali-kali menggunakan sebarang aksesori atau bahagian dari pengilang lain atau yang
tidak disarankan secara khusus oleh Philips. Jika anda menggunakan aksesori atau bahagian yang
sedemikian, jaminan anda akan dibatalkan.
Gunakan hanya senduk nasi yang disediakan. Elakkan menggunakan perkakas yang tajam.
Jangan tenggelamkan perumah pemasak nasi di dalam air atau membilasnya di bawah pili air.
Jangan dedahkan pemasak nasi pada suhu yang tinggi, atau letakkannya di atas pemanas atau
dapur yang sedang berfungsi atau masih panas.
Pastikan elemen pemanasan, suis magnet dan bahagian luar periuk dalam bersih dan kering
sebelum anda memasukkan plag ke dalam soket dinding.
Sentiasa masukkan periuk dalam sebelum anda memasukkan plag ke dalam soket dinding.
Sentiasa cabutkan plag pemasak nasi dan biarkan sehingga sejuk sebelum anda membersihkannya.
Jangan letakkan periuk dalam terus di atas api terbuka untuk memasak nasi.
Jangan tutup bolong stim semasa periuk pemasak nasi sedang beroperasi.
Jangan biarkan kord sesalur utama tergantung dari tepi meja atau permukaan ruang kerja tempat
perkakas itu diletakkan.
Perkakas ini bertujuan untuk kegunaan dalam rumah sahaja. Jika perkakas ini disalahgunakan atau
untuk tujuan profesional atau semiprofesional atau jika ia digunakan tidak mengikut arahan yang
terdapat dalam manual pengguna, jaminan menjadi tidak sah dan Philips tidak menerima
tanggungjawab bagi apa-apa kerosakan yang berlaku.
Letakkan periuk pemasak nasi pada permukaan yang stabil, mendatar dan rata.
-
-
-
-
-
-
-
-
-
-
-
-
-
-
-
-
-
BAHASA MELAYU

Permukaan yang dapat dicapai mungkin menjadi panas apabila perkakas beroperasi.
Jangan memasang plag perkakas atau mengendalikan tuil kawalan dengan tangan yang basah.
Berwaspada dengan wap panas yang keluar melalui bolong stim pada tudung semasa sedang
memasak. Berwaspada juga dengan wap panas yang keluar dari pemasak nasi apabila anda
membuka tudung.
Cabutkan plag perkakas setiap kali selepas digunakan.
Jangan angkat dan pindahkan periuk pemasak nasi dengan tangkainya semasa ia sedang
beroperasi.
Elakkan sentuhan yang kasar antara objek dan tudung kaca dan jangan letakkan sebarang objek
pada bahagian atas tudung, bagi mengelakkan kaca itu daripada pecah.
Medan Elektro Magnet (EMF)
Perkakas Philips ini mematuhi semua piawai yang berhubung dengan medan elektromagnet (EMF).
Jika dikendalikan dengan betul dan mematuhi arahan dalam manual pengguna ini, perkakas selamat
untuk digunakan menurut bukti saintik yang boleh didapati pada masa ini.
Sebelum penggunaan pertama
1
Keluarkan alas di antara periuk dalam dan plat pemanas.
2 Bersihkan bahagian pemasak nasi dengan rapi sebelum anda menggunakan perkakas itu buat
kali pertama (lihat bab ‘Pembersihan’).
Pastikan semua bahagian telah kering sepenuhnya sebelum anda mula menggunakan perkakas itu.
Menggunakan perkakas
Memasak nasi
1 Ukur beras menggunakan cawan penyukat yang disediakan.
Setiap cawan beras biasanya memberikan 2 mangkuk nasi. Jangan lebihi kuantiti yang ditunjukkan
pada permukaan dalam periuk dalam. 1cawan nasi adalah kira-kira 180ml.
Lihat jadual di bawah.
Menu Isipadu (L) Kuantiti beras (cawan)
HD4711 1.0 1-5
HD4715 1.8 2-10
HD4718 2.8 5-15
1 Basuh beras dengan sempurna.
Gunakan bekas lain untuk membasuh beras supaya permukaan periuk dalam tidak rosak.
2 Tuangkan beras yang sudah dibasuh ke dalam periuk dalam.
3 Tambahkan air sehingga aras yang ditunjukkan pada skala di dalam periuk, yang sepadan
dengan bilangan cawan beras yang digunakan. Kemudian ratakan permukaan beras.
Contohnya, jika anda memasak 4 cawan beras, tambahkan air sehingga aras 4 cawan yang
ditunjukkan pada skala.
HD4711 (Gamb. 2)
HD4715 (Gamb. 3)
HD4718 (Gamb. 4)
Nota: Aras yang ditandakan pada periuk dalam hanyalah panduan. Anda boleh melaraskan aras air bagi
jenis beras yang berlainan ataupun mengikut cita rasa anda.
-
-
-
-
-
-
-
-
-
BAHASA MELAYU12

4 Masukkan periuk dalam ke dalam pemasak nasi. (Gamb. 5)
Pastikan periuk dalam bersentuhan betul-betul dengan elemen pemanas. Untuk memastikan
perkara ini, pusingkan periuk dalam ke kiri dan ke kanan beberapa kali semasa ia berada di dalam
periuk pemasak nasi.
Pastikan bahagian luar periuk dalam kering dan bersih. Pastikan juga tiada sisa asing pada elemen
pemanas atau pada suis magnet.
5 Letakkan tudung ke atas periuk pemasak nasi dan masukkan plag ke dalam soket dinding.
Lampu tetap panas akan menyala untuk menunjukkan bahawa perkakas telah
dihidupkan. (Gamb. 6)
6 Tekan turun tuil kawalan untuk memulakan proses memasak (Gamb. 7).
Lampu masak menyala (Gamb. 8).
Jika anda gagal untuk menekan ke bawah tuil kawalan, lampu tetap panas akan terus menyala.
Apabila proses memasak telah selesai, lampu masak akan padam dan lampu simpan panas akan
menyala untuk menunjukkan bahawa periuk pemasak nasi telah beralih ke mod simpan panas
secara automatik (Gamb. 6).
7 Buka tudung dan kacau nasi agar rata (Gamb. 9).
Untuk hasil terbaik, lakukan sebaik saja periuk pemasak nasi beralih ke mod tetap panas. Kemudian
tutup tudung dengan rapi. Mengacau nasi membolehkan stim keluar. Ini akan menjadikan nasi lebih
lembut.
8 Untuk menamatkan proses memasak, tarik ke atas tuil kawalan dan cabutkan plag sesalur dari
soket dinding. Untuk menamatkan mod tetap panas, cabutkan plag sesalur kuasa dari dinding
soket.
Mengukus
1 Sukat 3 cawan air dengan cawan penyukat dan tuangkannya ke dalam pot dalam.
Jumlah air berbeza berdasarkan pada kuantiti makanan yang dimasak.
Ia akan mengambil kira-kira 8 minit untuk 3 cawan air mendidih.
Pastikan periuk dalam bersentuhan betul-betul dengan elemen pemanas. Untuk memastikan
perkara ini, pusingkan periuk dalam ke kiri dan ke kanan beberapa kali semasa ia berada di dalam
periuk pemasak nasi.
Pastikan bahagian luar periuk dalam kering dan bersih. Pastikan juga tiada sisa asing pada elemen
pemanas atau pada suis magnet.
2 Letakkan makanan yang hendak dikukus di atas pinggan atau dulang kukus.
Untuk memastikan pengewapan yang rata, ratakan makanan dan jangan longgokkannya..
3 Letak dulang kukus di dalam periuk dalam (Gamb. 10).
Apabila anda memasak nasi dan mengukus makanan pada masa yang sama, pastikan anda mengukur
jumlah beras yang meninggalkan ruang yang mencukupi pada dulang kukus. Makanan yang dikukus
telah siap apabila proses memasak nasi telah selesai.
4 Jika anda menggunakan pinggan yang berasingan, masukkannya ke dalam dulang kukus.
5 Tutup dengan tudung periuk dengan rapi.
6 Ikuti langkah 6, 7 dan 8 dalam bahagian ‘Memasak nasi’
Masa mengukus berbeza berdasarkan pada kuantiti makanan yang dikukus.
Apabila proses pengukusan telah selesai, lampu masak akan padam dan lampu simpan panas akan
menyala untuk menunjukkan bahawa periuk pemasak nasi telah beralih ke mod simpan panas secara
automatik.
7 Untuk menamatkan proses memasak, tarik ke atas tuil kawalan dan cabutkan plag sesalur
kuasa dari soket dinding. Untuk menamatkan mod tetap panas, cabutkan plag sesalur kuasa
dari dinding soket.
-
-
,
,
,
-
-
BAHASA MELAYU 13

8 Bukakan tudung dan keluarkan makanan kukus dengan teliti dari pinggan atau dulang kukus.
Gunakan sarung tangan ketuhar atau kain, kerana pinggan dan dulang kukus pada ketika ini
sangat panas.
Hati-hati terhadap stim panas.
Menyimpan panas
Mod ini membolehkan anda menyimpan panas nasi anda untuk tempoh yang lebih panjang.
Apabila proses memasak selesai, periuk pemasak nasi akan beralih ke fungsi simpan panas
secara automatik. Lampu masak akan padam dan lampu simpan panas menyala.
Anda dinasihati agar tidak menyimpan nasi panas selama lebih dari 5 jam, untuk mengekalkan
rasanya.
Mod tetap panas tidak akan mati secara automatik.
Untuk menamatkan mod tetap panas, cabutkan plag sesalur kuasa dari soket dinding.
Pembersihan
Cabutkan plag pemasak nasi sebelum anda membersihkannya.
Tunggu sehingga periuk pemasak nasi telah sejuk secukupnya sebelum membersihkannya.
Untuk melindungi permukaan periuk dalam, jangan:
atau membasuh pinggan;
tuangkan cuka ke dalam periuk.
1 Angkat keluar dulang kukus dan periuk dalam dari perkakas.
2 Bersihkan tudung, periuk dalam, dulang kukus dan senduk nasi dengan span atau kain di dalam
air panas dengan sedikit cecair pencuci.
Jangan gunakan agen pembersih yang melelas, kain penyental atau alatan logam untuk
membersihkan periuk dalam, kerana ini akan merosakkan permukaan periuk dalam.
3 Gunakan hanya kain yang lembap untuk mengesat permukaan luar dan dalam jasad utama
periuk pemasak nasi.
Jangan sekali-kali tenggelamkan jasad periuk pemasak nasi di dalam air, atau membilasnya di bawah
pili air. Kesat plat pemanas dengan kain kering.
Alam sekitar
Jangan buang perkakas bersama sampah rumah pada akhir hayatnya, tetapi bawanya ke pusat
pungutan rasmi untuk dikitar semula. Dengan melakukan sedemikian anda akan membantu
memelihara alam sekitar (Gamb. 11).
Jaminan dan servis
Jika anda memerlukan maklumat atau menghadapi masalah, sila kunjungi laman web Philips di
www.philips.com atau hubungi Pusat Layanan Pelanggan Philips di negara anda (anda boleh
mendapatkan nombor telefonnya di dalam risalah jaminan sedunia). Jika tiada Pusat Layanan
Pelanggan di negara anda, hubungi wakil pengedar Philips tempatan atau Jabatan Servis Syarikat
Perkakas Domestik dan Penjagaan Diri Philips.
Menyelesaikan masalah
Jika periuk pemasak nasi tidak berfungsi dengan betul atau jika kualiti masakan tidak baik, rujuk jadual
di bawah. Jika anda tidak dapat menyelesaikan masalahnya, sila hubungi Pusat Penjagaan Pelanggan
Philips di negara anda.
,
-
-
-
BAHASA MELAYU14

Masalah Penyebab Penyelesaian
Lampu masak tidak
menyala.
Terdapat masalah
sambungan.
Periksa sama ada periuk pemasak nasi
bersambung dengan sesalur dan sama ada
plag dimasukkan dengan rapi ke dalam soket
dinding.
Lampu rosak. Bawa perkakas ke penjual Philips anda atau
pusat servis yang disahkan oleh Philips.
Lampu simpan panas
tidak menyala apabila
proses memasak
selesai.
Lampu rosak. Bawa perkakas ke penjual Philips anda atau
pusat servis yang disahkan oleh Philips.
Nasi masih mentah. Air yang dimasukkan
tidak mencukupi.
Tambahkan air mengikut skala di dalam
periuk dalam (lihat bab ‘Menggunakan
perkakas’).
Proses memasak belum
lagi bermula.
Anda telah gagal untuk menekan tuil kawalan
ke bawah.
Periuk dalam dan plat
pemanas tidak
bersentuhan dengan baik
pada satu sama lain.
Pastikan tiada sisa asing pada plat pemanas.
Plat pemanas rosak. Bawa perkakas ke penjual Philips anda atau
pusat servis yang disahkan oleh Philips.
Nasi terlalu keras atau
terlalu lembut.
Tidak cukup atau terlebih
air telah dimasukkan.
Tambahkan air mengikut skala di dalam
periuk dalam (lihat bab ‘Menggunakan
perkakas’).
Nasinya hangus. Beras tidak dibasuh
dengan betul.
Basuh beras sehingga air yang mengalir
bersih.
Periuk pemasak nasi
tidak beralih ke mod
tetap panas secara
automatik.
Kawalan suhu rosak. Bawa perkakas ke penjual Philips anda atau
pusat servis yang disahkan oleh Philips.
Makanan belum lagi
dikukus dengan betul.
Terdapat terlalu banyak
makanan di dalam dulang
kukus.
Ratakan makanan dan jangan kukus terlalu
banyak makanan dengan serentak.
BAHASA MELAYU 15

16
ส่วนประกอบ (รูปที่ 1)
A ช่องระบายไอน้ำ
B หูจับเปิดฝา
C ฝาแก้ว
D ถาดสำหรับนึ่งอาหาร
E ขีดแสดงระดับน้ำ
F หม้อภายใน
G ตัวเครื่อง
H สัญญาณไฟอุ่นข้าว
I สัญญาณไฟแสดงการหุงข้าว
J ปุ่มควบคุม
K แผ่นทำความร้อน
L ถ้วยตวง
M ทัพพีตักข้าว
N ด้ามจับด้านข้าง
O ช่องเชื่อมต่อสายไฟ
P สายไฟ
ข้อควรจำ
ควรอ่านคู่มืออย่างละเอียดก่อนใช้งานและเก็บไว้เพื่อใช้อ้างอิงในครั้งต่อไป
ก่อนใช้งานโปรดตรวจสอบแรงดันไฟฟ้าที่ระบุบนผลิตภัณฑ์ว่าตรงกับแรงดันไฟฟ้าที่ใช้ภายในบ้านหรือไม่
เสียบปลั๊กไฟหม้อหุงข้าวเข้ากับเต้ารับบนผนังที่ต่อสายดินไว้เรียบร้อยแล้ว จากนั้นตรวจดูให้แน่ใจอีกครั้งว่าเสียบปลั๊กไฟเข้ากับเต้ารับบนผนังเรียบร้อยแล้วหรือไม่
หากสายไฟชำรุด ควรนำไปเปลี่ยนที่บริษัทฟิลิปส์ หรือศูนย์บริการที่ได้รับอนุญาตจากฟิลิปส์ หรือบุคคลที่ผ่านการอบรมจากฟิลิปส์ดำเนินการเปลี่ยนให้
เพื่อหลีกเลี่ยงอันตรายที่อาจเกิดขึ้นได้
ไม่ควรให้บุคคล (รวมทั้งเด็กเล็ก) ที่มีสภาพร่างกายไม่แข็งแรงหรือสภาพจิตใจไม่ปกติ หรือขาดประสบการณ์และความรู้ความเข้าใจ นำอุปกรณ์นี้ไปใช้งาน เว้นแต่
จะอยู่ในการควบคุมดูแลหรือได้รับคำแนะนำในการใช้งานโดยผู้ที่รับผิดชอบในด้านความปลอดภัย
เด็กเล็กควรได้รับการดูแลเพื่อป้องกันไม่ให้เด็กนำอุปกรณ์นี้ไปเล่น
ห้ามใช้อุปกรณ์เสริม หรือชิ้นส่วนที่ผลิตโดยผู้ผลิตรายอื่น หรือบริษัทที่ฟิลิปส์ไม่ได้แนะนำเป็นการเฉพาะ การรับประกันจะเป็นโมฆะทันที หากคุณใช้อุปกรณ์เสริม
หรือชิ้นส่วนดังกล่าว
ใช้ทัพพีตักข้าวที่ให้มาเท่านั้น ไม่ควรใช้อุปกรณ์อื่นๆ ที่มีความคม
ห้ามจุ่มหม้อหุงข้าวลงในน้ำหรือเปิดก๊อกน้ำล้าง
ไม่ควรวางหม้อหุงข้าวลงบนบริเวณที่มีอุณหภูมิสูง หรือวางบนเตาไฟหรือเครื่องหุงต้มที่กำลังใช้งานหรือที่มีความร้อน
ตรวจดูให้แน่ใจว่าแผ่นทำความร้อน เทอร์โมสตัท และด้านนอกของหม้อในสะอาดและแห้งก่อนเสียบปลั๊กไฟเข้ากับเต้ารับบนผนัง
ใส่หม้อในทุกครั้งก่อนเสียบปลั๊กไฟเข้ากับเต้ารับบนผนัง
ถอดปลั๊กไฟออกทุกครั้งหลังเลิกใช้งาน แล้วปล่อยให้เย็นลงก่อนทำความสะอาด
ห้ามตั้งหม้อในไว้บนเตาไฟเพื่อหุงข้าวโดยตรง
ไม่ควรปิดช่องระบายไอน้ำและฝาหม้อในขณะที่หม้อหุงข้าวกำลังทำงาน
ไม่ควรปล่อยให้สายไฟห้อยลงมาจากขอบโต๊ะหรือบริเวณที่วางเครื่องอยู่
หม้อหุงข้าวเครื่องนี้ใช้ภายในครัวเรือนเท่านั้น หากนำไปใช้ในทางการค้าหรือกึ่งการค้า หรือนำไปใช้โดยไม่ถูกต้องตามคำแนะนำการใช้งานในคู่มือนี้
การรับประกันถือว่าเป็นโมฆะ และทางบริษัทฟิลิปส์จะไม่รับผิดชอบค่าเสียหายใดๆ ทั้งสิ้น
วางหม้อหุงข้าวไว้บนพื้นผิวที่เรียบและมั่นคง
ขณะที่หม้อหุงข้าวกำลังทำงานอยู่ บริเวณรอบๆ พื้นที่วางหม้ออาจจะมีความร้อน
ไม่ควรใช้มือเปียกเสียบปลั๊กไฟเครื่องหรือใช้งานปุ่มควบคุม
ให้ระวังไอความร้อนที่ออกจากช่องระบายไอน้ำของฝาหม้อในระหว่างหุงข้าว และควรระวังไอความร้อนที่ออกจากหม้อหุงข้าวขณะเปิดฝาหม้อด้วยเช่นกัน
ถอดปลั๊กไฟออกทุกครั้งหลังเลิกใช้งาน
ห้ามยกและเคลื่อนย้ายหม้อหุงข้าวโดยดึงด้ามจับขณะหม้อหุงข้าวทำงาน
ไม่ควรให้วัตถุกระแทกกับฝาแก้ว และไม่ควรวางวัตถุบนด้านบนของฝาแก้ว ทั้งนี้เพื่อป้องกันไม่ให้ฝาแก้วแตก
Electromagnetic fields (EMF)
ผลิตภัณฑ์ของฟิลิปส์ได้มาตรฐานด้านคลื่นแม่เหล็กไฟฟ้า (EMF) หากมีการใช้งานอย่างเหมาะสมและสอดคล้องกับคำแนะนำในคู่มือนี้ คุณสามารถใช้ผลิตภัณฑ์ได้อย่าง
ปลอดภัยตามข้อพิสูจน์ทางวิทยาศาสตร์ในปัจจุบัน
-
-
-
-
-
-
-
-
-
-
-
-
-
-
-
-
-
-
-
-
-
-
-
ภาษาไทย

ก่อนใช้งานครั้งแรก
1
ลอกแผ่นรองระหว่างหม้อในและแผ่นทำความร้อนออกก่อน
2 ควรทำความสะอาดส่วนต่างๆ ของหม้อหุงข้าวให้เรียบร้อยก่อนการใช้งานครั้งแรก (ดูหัวข้อ ‘การทำความสะอาด’)
ควรเช็ดส่วนต่างๆ ให้แห้งก่อนเริ่มใช้งาน
การใช้งาน
วิธีหุงข้าว
1 ตวงข้าวด้วยถ้วยตวงที่จัดให้
ข้าวสาร 1 ถ้วยสามารถหุงข้าวสวยได้ 2 ชาม ทั้งนี้ไม่ควรตวงข้าวสารเกินตำแหน่งที่ระบุไว้ภายในหม้อ ข้าวสาร 1 ถ้วยจะมีปริมาณราว 180 มิลลิลิตร
โปรดดูตามตารางข้างล่างนี้
เมนู ปริมาณ (ลิตร) ปริมาณข้าว (ถ้วย)
รุ่น HD4711 1.0 1-5
รุ่น HD4715
1.8 2-10
รุ่น HD4718
2.8 5-15
1 ซาวข้าวให้สะอาด
ไม่ควรใช้หม้อในซาวข้าว เพื่อหลีกเลี่ยงผิวเคลือบของหม้อในเสียหาย
2 เทข้าวที่ซาวเรียบร้อยแล้วลงในหม้อใน
3 เติมน้ำตามระดับน้ำที่แสดงอยู่ภายในหม้อตามจำนวนข้าวที่ตวง จากนั้นเกลี่ยข้าวที่จะหุงให้อยู่ในระดับที่เสมอกัน
ตัวอย่างเช่น ถ้าหุงข้าว 4 ถ้วยตวง ควรเติมน้ำถึงระดับน้ำเลข 4
รุ่น HD4711 (รูปที่ 2)
รุ่น HD4715 (รูปที่ 3)
รุ่น HD4718 (รูปที่ 4)
หมายเหตุ: ขีดระดับน้ำที่แสดงภายในหม้อเป็นเพียงเครื่องหมายแนะนำเท่านั้น คุณสามารถปรับเปลี่ยนปริมาณน้ำได้ตามความต้องการหรือตามชนิดข้าว
ที่หุงได้
4 วางหม้อในลงในตัวเครื่อง (รูปที่ 5)
พยายามวางหม้อในให้แนบสนิทกับแผ่นทำความร้อนภายในหม้อหุงข้าวโดยหมุนหม้อในไปทางซ้ายและขวาเล็กน้อยสองสามครั้ง
ตรวจสอบให้แน่ใจว่าด้านนอกของหม้อในแห้งและสะอาด และด้านบนแผ่นทำความร้อนหรือบนเทอร์โมสตัทปราศจากสิ่งแปลกปลอม
5 ปิดฝาหม้อหม้อหุงข้าวแล้วเสียบปลั๊กเข้ากับเต้ารับบนผนัง
สัญญาณไฟอุ่นข้าวจะสว่างขึ้น เมื่อหม้อหุงข้าวเริ่มทำงาน (รูปที่ 6)
6 กดปุ่มควบคุมลง เพื่อเริ่มการหุงข้าว (รูปที่ 7)
สัญญาณไฟหุงแสดงการหุงข้าวสว่างขึ้น (รูปที่ 8)
หากไม่ได้กดปุ่มควบคุมลง สัญญาณไฟอุ่นข้าวจะยังคงติดสว่างอยู่
เมื่อหุงข้าวเสร็จเรียบร้อยแล้ว สัญญาณไฟหุงข้าวจะดับลงและสัญญาณไฟอุ่นข้าวจะสว่างขึ้นแทน เพื่อให้ทราบว่าหม้อหุงข้าวเข้าสู่โหมดอุ่นร้อน
โดยอัตโนมัติเรียบร้อยแล้ว (รูปที่ 6)
7 เปิดฝาและคนข้าวไม่ให้ติดกัน (รูปที่ 9)
เพื่อให้ได้ผลดีที่สุด ควรคนข้าวทันทีหลังจากหม้อหุงข้าวเข้าสู่โหมดอุ่นร้อน จากนั้นปิดฝาให้สนิท การคนข้าวนี้เป็นการระบายไอน้ำส่วนเกิน ซึ่งจะช่วยให้ข้าวสวยร่วนซุย
ยิ่งขึ้น
8 ถ้าต้องการยุติการทำงานของหม้อหุงข้าว ให้ดึงปุ่มควบคุมขึ้นและถอดปลั๊กไฟออกจากเต้ารับบนผนัง ถ้าต้องการยุติโหมดอุ่นร้อน ให้ถอดปลั๊กไฟ
ออกจากเต้ารับบนผนัง
การนึ่งอาหาร
1 ตวงน้ำ 3 ถ้วยตวง แล้วเทใส่ลงในหม้อใน
ปริมาตรของน้ำจะแตกต่างกันไปตามปริมาณของอาหารที่ต้องการนึ่ง
-
-
-
-
-
,
,
,
ภาษาไทย 17

น้ำ 3 ถ้วยตวงจะเดือดในเวลาประมาณ 8 นาที
พยายามวางหม้อในให้แนบสนิทกับแผ่นทำความร้อนภายในหม้อหุงข้าวโดยหมุนหม้อในไปทางซ้ายและขวาเล็กน้อยสองสามครั้ง
ตรวจสอบให้แน่ใจว่าด้านนอกของหม้อในแห้งและสะอาด และด้านบนแผ่นทำความร้อนหรือบนเทอร์โมสตัทปราศจากสิ่งแปลกปลอม
2 วางอาหารที่ต้องการนึ่งลงในจานหรือบนถาดสำหรับนึ่งอาหาร
เพื่อการนึ่งอย่างทั่วถึง ควรจัดอาหารให้กระจายออกเสมอกัน และไม่ควรกองอาหารทับกัน
3 วางถาดสำหรับนึ่งอาหารลงในหม้อใน (รูปที่ 10)
หากหุงข้าวและนึ่งอาหารในเวลาเดียวกัน ให้ตรวจดูว่าตวงข้าวในปริมาณที่เหลือที่ว่างไว้พอดีสำหรับถาดสำหรับนึ่งอาหาร อาหารจะนึ่งเสร็จเมื่อข้าวหุงสุก
4 หากใช้จานแยกต่างหาก ให้วางจานบนถาดสำหรับนึ่ง
5 ปิดฝาหม้อหุงข้าวให้สนิท
6 ทำตามขั้นตอนที่ 6, 7 และ 8 ในบท ‘วิธีหุงข้าว’
เวลาของการนึ่งจะแตกต่างกันไปตามปริมาณของอาหารที่ต้องการนึ่ง
เมื่อหุงข้าวเสร็จเรียบร้อยแล้ว สัญญาณไฟแสดงการหุงข้าวจะดับลงและสัญญาณไฟอุ่นข้าวจะสว่างขึ้นแทน เพื่อให้ทราบว่าหม้อหุงข้าวเข้าสู่โหมดอุ่นร้อนโดยอัตโนมัติ
เรียบร้อยแล้ว
7 ถ้าต้องการยุติการทำงานของหม้อหุงข้าว ให้ดึงปุ่มควบคุมขึ้นและถอดปลั๊กไฟออกจากเต้ารับบนผนัง ถ้าต้องการยุติโหมดอุ่นร้อน ให้ถอดปลั๊กไฟ
ออกจากเต้ารับบนผนัง
8 เปิดฝาแล้วนำอาหารที่นึ่งออกจากแผ่นทำความร้อนหรือออกจากถาดสำหรับนึ่งอย่างระมัดระวัง ควรใช้ถุงมือกันความร้อนหรือผ้านำอาหารออกมา
เพราะแผ่นทำความร้อนและถาดสำหรับนึ่งอาหารมีความร้อนมาก
ระวังไอน้ำร้อน
การอุ่น
โหมดนี้สามารถอุ่นข้าวให้ร้อนได้นานขึ้น
เมื่อหุงข้าวสุกเรียบร้อยแล้ว หม้อหุงข้าวจะเปลี่ยนไปที่โหมดอุ่นร้อนโดยอัตโนมัติ สัญญาณไฟแสดงการหุงข้าวจะดับลงและสัญญาณไฟอุ่นข้าว
จะสว่างขึ้นแทน
ขอแนะนำไม่ให้อุ่นข้าวนานเกิน 5 ชั่วโมง เพื่อคงรสชาติที่ดีไว้
โหมดการอุ่นไม่ปิดสวิตช์โดยอัตโนมัติ
ถ้าต้องการยุติโหมดอุ่นร้อน ให้ถอดปลั๊กไฟออกจากเต้ารับบนผนัง
การทำความสะอาด
ถอดปลั๊กไฟหม้อหุงข้าวออกก่อนเริ่มทำความสะอาด
รอจนกว่าหม้อหุงข้าวเย็นลงก่อนเริ่มทำความสะอาด
เพื่อเป็นการป้องกันสารเคลือบภายในหม้อเสียหาย ไม่ควร:
ใช้หม้อในล้างจานชาม
ใส่น้ำส้มสายชูลงในหม้อ
1 นำถาดสำหรับนึ่งอาหารและหม้อในออกจากตัวหม้อหุงข้าว
2 ทำความสะอาดฝา หม้อใน ถาดสำหรับนึ่งอาหาร และทัพพีตักข้าว ด้วยฟองน้ำหรือผ้าชุบน้ำอุ่นที่ผสมน้ำยาล้างจานเล็กน้อย
ไม่ควรใช้สารขัดถู ใยขัดถูหรือฝอยขัดหม้อ หรือเครื่องใช้ที่เป็นโลหะทำความสะอาดหม้อใน เพราะอาจทำลายสารเคลือบภายในหม้อได้
3 ควรใช้ผ้าชุบน้ำบิดพอหมาดเช็ดทำความสะอาดด้านนอกและด้านในของตัวหม้อหุงข้าวเท่านั้น
ห้ามจุ่มหม้อหุงข้าวลงในน้ำและห้ามเปิดน้ำก๊อกล้างเป็นอันขาด ควรเช็ดแผ่นทำความร้อนด้วยผ้าแห้ง
สภาพแวดล้อม
ห้ามทิ้งหม้อหุงข้าวรวมกับขยะในครัวเรือนทั่วไป เมื่อเครื่องหมดอายุการใช้งานแล้ว ควรทิ้งลงในถังขยะสำหรับนำกลับไปใช้ใหม่ได้ (รีไซเคิล) เพื่อช่วยรักษา
สภาวะสิ่งแวดล้อมที่ดี (รูปที่ 11)
-
-
,
-
-
-
ภาษาไทย18

การรับประกันและการบริการ
หากคุณมีปัญหาหรือต้องการทราบข้อมูล โปรดเข้าชมเว็บไซต์ของฟิลิปส์ได้ที่ www.philips.com หรือติดต่อศูนย์บริการดูแลลูกค้าของบริษัทฟิลิปส์ในประเทศของคุณ
(หมายเลขโทรศัพท์ของศูนย์บริการฯ อยู่ในเอกสารแผ่นพับเกี่ยวกับการรับประกันทั่วโลก) หากในประเทศของคุณไม่มีศูนย์บริการ โปรดติดต่อตัวแทนจำหน่ายผ
ลิตภัณฑ์ของบริษัทฟิลิปส์ในประเทศ หรือติดต่อแผนกบริการของบริษัท Philips Domestic Appliances and Personal Care BV
การแก้ปัญหา
หากหม้อหุงข้าวทำงานผิดปกติ หรือหากคุณภาพของอาหารที่ปรุงไม่ดีพอ โปรดดูวิธีแก้ไขตามในตารางด้านล่างนี้ หากยังไม่สามารถแก้ไขปัญหาได้ กรุณาติดต่อ
ศูนย์บริการลูกค้าของฟิลิปส์ในประเทศของคุณ
ปัญหา สาเหตุ การแก้ปัญหา
สัญญาณไฟแสดงการหุงข้าวไม่ทำงาน มีปัญหาเกี่ยวกับการต่อสายไฟ ตรวจดูว่าต่อสายไฟหม้อหุงข้าวเรียบร้อยแล้วหรือยัง หรือปลั๊กไฟเสีย
บเข้ากับเต้ารับที่ผนังแน่นดีแล้วหรือยัง
สัญญาณไฟทำงานบกพร่อง นำหม้อหุงข้าวไปที่ตัวแทนจำหน่ายฟิลิปส์หรือศูนย์บริการที่ได้รับอนุญาต
จากฟิลิปส์
สัญญาณไฟอุ่นข้าวไม่ทำงาน เมื่อข้าว
หุงเสร็จเรียบร้อยแล้ว
สัญญาณไฟทำงานบกพร่อง นำหม้อหุงข้าวไปที่ตัวแทนจำหน่ายฟิลิปส์หรือศูนย์บริการที่ได้รับอนุญาต
จากฟิลิปส์
หม้อหุงข้าวไม่ทำงาน เติมน้ำไม่เพียงพอ ควรเติมน้ำตามที่กำหนดไว้ภายในหม้อในโดยดูที่ขีดบอกระดับน้ำ
(ดูได้จากหัวข้อ ‘การใช้งาน’)
หม้อหุงข้าวไม่ทำงาน ไม่ได้กดปุ่มควบคุมลง
หม้อในไม่แนบสนิทกับแผ่นความร้อน ตรวจดูว่าไม่มีสิ่งแปลกปลอมอยู่บนทำแผ่นความร้อน
แผ่นทำความร้อนชำรุดเสียหาย นำหม้อหุงข้าวไปที่ตัวแทนจำหน่ายฟิลิปส์หรือศูนย์บริการที่ได้รับอนุญาต
จากฟิลิปส์
ข้าวแข็งหรือแฉะเกินไป เติมน้ำน้อยหรือมากเกินไป ควรเติมน้ำตามที่กำหนดไว้ภายในหม้อในโดยดูที่ขีดบอกระดับน้ำ
(ดูได้จากหัวข้อ ‘การใช้งาน’)
ข้าวไหม้เกรียม ซาวข้าวไม่ดีพอ ซาวข้าวจนกระทั่งน้ำใสขึ้น
หม้อหุงข้าวไม่เข้าสู่โหมดการอุ่น
โดยอัตโนมัติ
ปุ่มควบคุมอุณหภูมิมีความผิดปกติ นำหม้อหุงข้าวไปที่ตัวแทนจำหน่ายฟิลิปส์หรือศูนย์บริการที่ได้รับอนุญาต
จากฟิลิปส์
นึ่งอาหารร้อนไม่ทั่วถึง มีอาหารในถาดสำหรับนึ่งมากเกินไป ควรวางอาหารให้กระจายออกไปและไม่ควรนึ่งอาหารครั้งละมากๆ
ภาษาไทย 19

20
A Lỗthônghơi
B Taycầmnắp
C Nắpthủytinh
D Khayhấp
E Chỉbáomứcnước
F Nồitrong
G Cơthể
H Đènbáohâm
I Đènbáonấucơm
J Cầnđiềukhiển
K Đếnhiệt
L Ccđnhlưng
M Muỗngcơm
N Taycầmnồicơm
O Ổnidâyđiện
P Dâyđiệnnguồn
Hãyđọckýhướngdẫnsửdụngnàytrướckhisửdụngthiếtbvàcấtgiữđểtiệnthamkhảosaunày.
Kiểmtraxemđiệnápghitrênmáyctươngứngvớiđiệnápnguồnnơisửdụngtrướckhibn
nimáyvàonguồnđiện.
Chỉnithiếtbnàyvàocắmđiệncdâytiếpđất.Luônđảmbảorngphchcắmđưccắm
chtvàođiện.
Nếudâyđiệnbhưhng,bnnênthaydâyđiệntitrungtâmbảohànhcủaPhilips,trungtâm
bảohànhdoPhilipsủyquyềnhocnhữngnơickhảnăngvàtrnhđtươngđươngđểtránh
gâynguyhiểm.
Thiếtbnàykhôngdànhchongưidùng(baogồmcảtrẻem)csứckhekém,khảnănggiác
quanhoccdấuhiệutâmthần,hocthiếukinhnghiệmvàkiếnthức,trừkhihọđưcgiámsát
hochướngdẫnsửdụngthiếtbbởingưictráchnhiệmđảmbảoantoànchohọ.
Trẻemphảiđưcgiámsátđểđảmbảorngchngkhôngchơiđùavớithiếtbnày.
KhôngsửdụngbấtkỳphụkiệnhocbphậnnàomàPhilipskhôngđcbiệtkhuyêndùng.Nếu
bnsửdụngcácphụkiệnhocbphậnkhôngpahỉcủaPhilips,việcbảohànhsẽbmấthiệulực.
Chỉsửdụngthamccơmđikèm.Tránhsửdụngnhữngdụngcụsắc.
Khôngnhngphầnvcủanồivàotrongnước,hayrửadướivòinước.
Khôngđểnồidướinhiệtđcao,hayđtnồilênbếphaydụngcụnấukhácđangđunhocvẫn
cònnng.
Đảmbảođếnhiệt,côngtắctừvàmtngoàicủanồitrongluônschsẽvàkhôtrướckhicắm
phchcắmvàođiện.
Luônđtnồitrongvàotrướckhicắmphchcắmvàođiện.
Luônrtphchcắmcủanồicơmđiệnravàđểchonồinguitrướckhilauchùi.
Khôngđtnồitrongtrựctiếplênngọnlửađểnấucơm.
Khôngchelỗthoáthơinướcvànắptrongkhinồicơmđiệnđanghotđng.
Khôngđểdâyđiệnnguồntreotrêncnhbànhocnơichuẩnbđồăn,nơiđtlòchiên.
Thiếtbnàyđưcthiếtkếchỉđểdùngtronggiađnh.Nếusửdụngthiếtbnàykhôngđngcách
haydùngchonhữngmụcđchchuyênnghiệphaybánchuyênnghiệphocnếusửdụngthiếtb
nàykhôngtheohướngdẫn,chếđbảohànhsẽbmấthiệulựcvàPhilipssẽkhôngchutrách
nhiệmđivớibấtcứhưhngnàogâyra.
Đtnồicơmđiệnnàytrênmtmtphẳngnmngang,vữngchắcvàbngphẳng.
Nhữngbphậncthểtiếpxccủathiếtbnàycthểtrởnênrấtnngkhithiếtbđanghot
đng.
Khôngcắmphchcắmcủathiếtbvàođiệnhayđiềukhiểncầnđiềukhiểnkhitaycònướt.
-
-
-
-
-
-
-
-
-
-
-
-
-
-
-
-
-
-
-
ページが読み込まれています...
ページが読み込まれています...
ページが読み込まれています...
ページが読み込まれています...
ページが読み込まれています...
ページが読み込まれています...
ページが読み込まれています...
ページが読み込まれています...
ページが読み込まれています...
ページが読み込まれています...
ページが読み込まれています...
ページが読み込まれています...
-
 1
1
-
 2
2
-
 3
3
-
 4
4
-
 5
5
-
 6
6
-
 7
7
-
 8
8
-
 9
9
-
 10
10
-
 11
11
-
 12
12
-
 13
13
-
 14
14
-
 15
15
-
 16
16
-
 17
17
-
 18
18
-
 19
19
-
 20
20
-
 21
21
-
 22
22
-
 23
23
-
 24
24
-
 25
25
-
 26
26
-
 27
27
-
 28
28
-
 29
29
-
 30
30
-
 31
31
-
 32
32


Philips HD4715/61 ユーザーマニュアル
- カテゴリー
- 炊飯器
- タイプ
- ユーザーマニュアル
他の言語で
- English: Philips HD4715/61 User manual