
繁体中文

FIG.A FIG.B
FIG.D
FIG.G
FIG.E
FIG.F
FIG.C
1
2
7
8
4
4
6
5
3
9
11
10
13
12

4 8
15
10
11
9
14
15
11
8
10
16
20
8
18
19
19
17
5
FIG.I
FIG.K
FIG.M
FIG.J
FIG.L
FIG.H

3
ENGLISH
INTENDED USE
Your Stanley saw has been designed for sawing wood and
wood products.
GENERAL SAFETY RULES
Warning! Read and understand all instructions.
Failure to follow all instructions listed below, may result in
electric shock, fire and/or serious personal injury.
SAFE THESE INTRUCTIONS
SAFETY INSTRUCTIONS
General power tool safety warnings.
Warning! Read all safety warnings and all
instructions. Failure to follow the warnings and
instructions listed below may result in electric shock, fire
and/or serious injury.
Save all warnings and instructions for future
reference. The term "power tool" in all of the warnings
listed below refers to your mains operated (corded) power
tool or battery operated (cordless) power tool.
1. Work area
a. Keep work area clean and well lit. Cluttered and
dark areas invite accidents.
b. Do not operate power tools in explosive
atmospheres, such as in the presence of
flammable liquids, gases or dust. Power tools
create sparks which may ignite the dust or fumes.
c. Keep children and bystanders away while
operating a power tool. Distractions can cause you
to lose control.
2. Electrical safety
a. Power tool plugs must match the outlet. Never
modify the plug in any way. Do not use any
adapter plugs with earthed (grounded) power
tools. Unmodified plugs and matching outlets will
reduce risk of electric shock.
b. Avoid body contact with earthed or grounded
surfaces such as pipes, radiators, ranges and
refrigerators. There is an increased risk of electric
shock if your body is earthed or grounded.
c. Do not expose power tools to rain or wet
conditions. Water entering a power tool will increase
SPECIFICATION
STEL311
TECHNICAL DATA
STEL311
1510W Circular Saw
VOLTAGE
POWER
NO-LOAD SPEED
MAX. BLADE DIAMETER
MAX. CUTTING DEPTH
V
W
/min
mm
mm
110
1510
5500
185
62
the risk of electric shock.
d. Do not abuse the cord. Never use the cord for
carrying, pulling or unplugging the power tool.
Keep cord away from heat, oil, sharp edges or
moving parts.
Damaged or entangled cords increase
the risk of electric shock.
e.
When operating a power tool outdoors, use an
extension cord suitable for outdoor use.
Use of a
cord suitable for outdoor use reduces the risk of electric
shock.
f. If operating a power tool in a damp location is
unavoidable, use a residual current device (RCD)
protected supply.
Use of an RCD reduces the risk of
electric shock.
3. Personal safety
a. Stay alert, watch what you are doing and use
common sense when operating a power tool. Do
not use a power tool while you are tired or under
the influence of drugs, alcohol or medication. A
moment of inattention while operating power tools may
result in serious personal injury.
b. Use safety equipment. Always wear eye
protection. Safety equipment such as dust mask,
non-skid safety shoes, hard hat, or hearing protection
used for appropriate conditions will reduce personal
injuries.
c. Prevent unintentional starting. Ensure the switch
is in the off-position before connecting to power
source and/or battery pack, picking up or
carrying the tool. Carrying power tools with your
finger on the switch or energising power tools that have
the switch on invites accidents.
d. Remove any adjusting key or wrench before
turning the power tool on. A wrench or a key left
attached to a rotating part of the power tool may result
in personal injury.
e. Do not overreach. Keep proper footing and
balance at all times. This enables better control of
the power toolin unexpected situations.
f. Dress properly. Do not wear loose clothing or
jewellery. Keep your hair, clothing and gloves
away from moving parts. Loose clothes, jewellery or
long hair can be caught in moving parts.
g. If devices are provided for the connection of dust
extraction and collection facilities, ensure these
are connected and properly used. Use of these
devices can reduce dust related hazards.
4. Power tool use and care
a. Do not force the power tool. Use the correct
power tool for your application. The correct power
tool will do the job better and safer at the rate for which
it was designed.
b. Do not use the power tool if the switch does not
turn it on and off. Any power tool that cannot be
controlled with the switch is dangerous and must be
repaired.
c. Disconnect the plug from the power source
and/or the battery pack from the power tool
before making any adjustments, changing
accessories, or storing power tools.Such
preventive safety measures reduce the risk of
starting the power tool accidentally
d. Store idle power tools out of the reach of children
and do not allow persons unfamiliar with the
power tool or these instructions to operate the
power tool. Power tools are dangerous in the hands
of untrained users.
e. Maintain power tools. Check for misalignment or
binding of moving parts, breakage of parts and
any other condition that may affect the power
tools operation. If damaged, have the power tool
repaired before use. Many accidents are caused by
poorly maintained power tools.
f. Keep cutting tools sharp and clean. Properly
maintained cutting tools with sharp cutting edges are
less likely to bind and are easier to control.
g. Use the power tool, accessories and tool bits etc.
in accordance with these instructions, taking into
account the working conditions and the work to
be performed. Use of the power tool for operations
different from those intended could result in a
hazardous situation.
5. Service
a. Have your power tool serviced by a qualified
repair person using only identical replacement
parts. This will ensure that the safety of the power tool
is maintained.
6. Electrical safety
This appliance is double insulated therefore no
earth wire is required.Always check that the
power supply corresponds to the voltage on
the rating plate.
Warning! If the power cord is damaged, it
must be replaced by the manufacturer,
authorized Stanley Service Center or an
equally qualified person in order to avoid damage or
injury. If the power cord is replaced by an equally
qualified person, but not authorized by Stanley, the
warranty will not be valid.
7. Labels on tool
The label on your tool may include the following
symbols:
V ...................Volts
A....................Amperes
Hz .................Hertz
W ..................Watts
min ...............minutes
...............Alternating Current
...............Direct Current
n
0
..................No-Load Speed

and kickback.
Accessories
The performance of your tool depends on the accessory
used. Stanley and Piranha accessories are
engineered to high quality standards and designed to
enhance the performance of your tool. By using these
accessories you will get the very best from your tool.
Warning! The use of any accessory not recommended
for use with this tool could be hazardous. Use only
185mm blades with 19mm or 20mm diameter arbor.
Exception: 175mm abrasive blades can be used. When
cutting metal, be careful of hot sparks which are thrown
by the blade.
MAINTENANCE
Your tool has been designed to operate over a long period
of time with a minimum of maintenance. Continuous
satisfactory operation depends upon proper tool care and
regular cleaning.
Warning! Before performing any maintenance,
switch off and unplug the tool.
• Regularly clean the ventilation slots in your tool using
a soft brush or dry cloth.
• Regularly clean the motor housing using a damp cloth.
Do not use any abrasive or solvent-based cleaner.
Important! To assure product Safety and
Reliability, repairs, maintenance and adjustment
(other than those listed in this manual) should be
performed by authorized service centers or other
qualified service personnel, always using identical
replacement parts.
LUBRICATION
Stanley tools are properly lubricated at the factory and
are ready for use.
PROTECTING THE ENVIRONMENT
Separate collection. This product must not be
disposed of with normal household waste.
Should you find one day that your Stanley product
needs replacement, or if it is of no further use to you,
do not dispose of it with household waste. Make this
product available for separate collection.
Separate collection of used products and
packaging allows materials to be recycled and
used again. Re-use of recycled materials helps
prevent environmental pollution and reduces
the demand for raw materials.
Sawing
Warning! To reduce the risk of serious personal
injury,always hold the tool with both hands.
• Let the blade run freely for a few seconds before
starting the cut.
• Apply only a gentle pressure to the tool while
performing the cut.
• Work with the shoe pressed against the workpiece.
HINTS FOR OPTIMUM USE
• As some splintering along the line of cut on the top
side of the workpiece cannot be avoided, cut on the
side where splintering is acceptable.
• Where splintering is to be minimized, e.g. when
cutting laminates, clamp a piece of plywood onto the
top of the workpiece.
Pocket Cutting (Fig. K)
Pocket cutting is used to cut a hole in a piece of
material without cutting from the side.
• Measure and mark work.
• Tilt saw forward and rest front of the shoe on
material to be cut. Align so that cut will begin at the
back of the drawn rectangle shown in Fig. K.
• Using the retracting lever, retract blade guard to an
upward position, with the blade just clearing the
material, start motor and gradually lower the saw into
the material.
Warning! As blade starts cutting the material,
release the retracting lever immediately.
• Never tie the blade guard in a raised position.
• When the shoe rests flat on the material being cut,
complete the cut in forward direction.
• Allow the blade to come to a complete stop before
lifting saw from material.
• When starting each new cut, repeat the above steps.
Wrench Storage (Fig. L)
The spanner wrench (8) can be stored on the saw shoe as
shown in Fig. L.
Attaching and Removing the Rip Fence (Fig. M)
The rip fence is used to saw in a straight line parallel to
the edge of the working piece.
Attaching
• Loosen the locking knob (17).
• Insert the rip fence (18) through the openings (19).
• Slide the rip fence into the desired position.
• Tighten the locking knob.
Removing
• Loosen the locking knob.
• Pull the rip fence out of the tool. Note: If you do not
have a proper fitting fence, use a straight edge guide
in contact with the edge of the shoe to improve
accuracy of cut and reduce the possibility of binding
• Check and re-assembly inner flange (20) on spindle
(16). Insure the correct side of inner flange (20) faces
outward and match saw blade.
• Place the saw blade (5) onto the inner flange (20),
making sure that the arrow on the blade points in the
same direction as the arrow on the tool.
• Fit the outer washer (10) on the spindle.
• Insert the blade retaining screw (11) into the hole in
the spindle.
• Prevent spindle rotation by engaging the spanne
wrench into the holes of the outer washer.
• Securely tighten the blade retaining screw by
holding the spanner wrench and turning hex wrench
clockwise to tighten the blade retaining screw.
Warning! Inner flange (20) respectively marked
with “19” and “20”, match the saw blade (5) with
19mm or 20mm diameter arbor.
Removing the Blade
• To prevent spindle rotation, engage the protrusions of
the spanner wrench (8) into the holes in the outer
washer (10).
• Loosen and remove the blade retaining screw (11)
by turning it counterclockwise using the hex wrench
(15).
• Remove the outer washer (10).
• Remove the saw blade (5).
Warning! To reduce the risk of serious personal
injury, read, understand and follow all important
safety warnings and instructions prior to using tool.
GENERAL CUTS
Guard Against Kickback
With unit unplugged, follow all assembly, adjustment and
set up instructions. Make sure lower guard operates.
Select the proper blade for the material to be cut.
• Measure and mark work for cutting.
• Support and secure work properly (See Safety Rules
and Instructions).
• Use appropriate and required safety equipment (See
Safety Rules).
• Secure and maintain work area (See Safety Rules).
• With plug inserted and guard closed, make sure
switch turns saw on and off.
Warning! It is important to support the work
properly and to hold the saw firmly to prevent loss of
control which could cause personal injury. Fig. C
illustrates recommended hand position.
OPERATION
Switch
• To operate the tool, depress the trigger switch (1).
The tool will continue to run as long as the trigger is
depressed.
• To turn the tool off, release the trigger switch (1).
There is no provision for locking the tool on, and the
switch should never be locked on by any other means.
times.
• Stay alert and exercise control. Keep body
positioned to one side of blade. Always maintain a
firm grip and control of saw with both hands. Do not
change hand grip or body position while saw is
running. Take precaution to avoid injury from cut off
pieces and other falling material during operation.
Danger! Release switch immediately if blade
binds or saw stalls.
FEATURES (Fig. E)
1. On/Off Switch
2. Main Handle
3. Secondary Handle
4. Shoe
5. Saw Blade
6. Saw Blade Guard
7. Blade Guard Retracting Lever
8. Saw Blade Spanner Wrench
9. Bevel Adjustment Knob
10. Outer Washer
11. Blade Retaining Screw
Saw Blade Hex Wrench (Shown on Fig.I (15))
Rip Fence (Shown on Fig. M (18))
Inner Flange (Shown on Fig. J (20))
ASSEMBLY/ADJUSTMENT SET-UP
Warning! Always unplug saw from power
supply before any of the following operations.
Adjusting the Depth of Cut (Fig. F and G)
The depth of cut should be set according to the thickness
of the workpiece.
• Loosen the lever (12) to unlock the saw shoe.
• Move the saw shoe (4) into the desired position. The
corresponding depth of cut can be read from the
scale (13).
• Tighten the lever to lock the saw shoe in place.
• Set depth adjustment of saw such that one tooth of
the blade projects below the workpiece as shown in
Fig. G.
Adjusting the Bevel Angle (Fig. H)
This tool can be set to bevel angles between 0° and 45°
• Loosen the locking knob (9) to unlock the saw shoe.
• Move the saw shoe (4) into the desired position. The
corresponding bevel angle can be read from the
scale (14).
• Tighten the locking knob to lock the saw shoe in place.
Attaching the Blade (Fig. I and J)
• To prevent spindle rotation engage the protrusions of
the spanner wrench (8) into the holes in the outer
washer (10) as shown in Fig. I.
• Loosen and remove the blade retaining screw (11) by
turning the hex wrench (15) counter- clockwise.
• Remove the outer washer.
.................Class II Construction
.................Earthing Terminal
...............Safe Alert Symbol
.../min ...........Revolutions or Reciprocation per
.............Read instructions manual
• For tools intended to cut wood, instruction on correct
use of the dust collection system.
• For tools intended to cut wood, instruction to wear a
dust mask.
• Instrcution to only use saw blades recommended.
• Instruction to always wear hearing protection.
SAFETY INTRUCTIONS FOR ALL SAWS
CUTTING PROCEDURES
a. DANGER: Keep hands away from cutting area
and the blade. Keep your second hand on
auxiliary handle, or motor housing. If both hands
are holding the saw, they cannot be cut by the blade.
b. Do not reach underneath the workpiece. The
guard cannot protect you from the blade below the
workpiece.
c. Adjust the cutting depth to the thickness of the
workpiece. Less than a full tooth of the blade teeth
should be visible below the workpiece.
d. Never hold piece being cut in your hands or
across your leg. Secure the workpiece to a stable
platform. It is important to support the work properly
to minimize body exposure, blade binding, or loss of
control.
e. Hold power tool by insulated gripping surfaces
when performing an operation where the cutting
tool may contact hidden wiring or its own cord.
Contact with a "live" wire will also make exposed
metal parts of the power tool "live" and shock the
operator.
f. When ripping always use a rip fence or straight
edge guide. This improves the accuracy of cut and
reduces the chance of blade binding.
g. Always use blades with correct size and shape
(diamond versus round) of arbour holes. Blades
that do not match the mounting hardware of the saw
will run eccentrically, causing loss of control.
h. Never use damaged or incorrect blade washers
or bolt. The blade washers and bolt were specially
designed for your saw, for optimum performance and
safety of operation.
FURTHER SAFETY INSTRUCTIONS FOR ALL SAWS
Causes and operator prevention of kickback:
• Kickback is a sudden reaction to a pinched, bound or
misaligned saw blade, causing an uncontrolled saw
to lift up and out of the workpiece toward the
operator;
• When the blade is pinched or bound tightly by the
kerf closing down, the blade stalls and the motor
reaction drives the unit rapidly back toward the
operator;
• If the blade becomes twisted or misaligned in the cut,
the teeth at the back edge of the blade can dig into
the top surface of the wood causing the blade to climb
out of the kerf and jump back toward the operator.
• Kickback is the result of saw misuse and/or incorrect
operating procedures or conditions and can be
avoided by taking proper precautions as given below.
a. Maintain a firm grip with both hands on the saw
and position your arms to resist kickback forces.
Position your body to either side of the blade, but not
in line with the blade. Kickback could cause the saw
to jump backwards, but kickback forces can be
controlled by the operator, if proper precautions are
taken.
NOTE For circular saws with 185 mm or smaller
diameter blades, the words "with both hands" may
be omitted.
b. When blade is binding, or when interrupting a
cut for any reason, release the trigger and hold
the saw motionless in the material until the blade
comes to a complete stop. Never attempt to remove
the saw from the work or pull the saw backward
while the blade is in motion or kickback may occur.
Investigate and take corrective actions to eliminate
the cause of blade binding.
c. When restarting a saw in the workpiece, centre
the saw blade in the kerf and check that saw
teeth are not engaged into the material. If saw
blade is binding, it may walk up or kickback from the
workpiece as the saw is restarted.
d. Support large panels to minimise the risk of
blade pinching and KICKBACK. Large panels tend
to sag under their own weight. Supports must be
placed under the panel on both sides, near the line of
cut and near the edge of the panel.
e. Do not use dull or damaged blades. Unsharpened
or improperly set blades produce narrow kerf
causing excessive friction, blade binding and
kickback.
f. Blade depth and bevel adjusting locking levers
must be tight and secure before making cut. If
blade adjustment shifts while cutting, it may cause
binding and kickback.
g. Use extra caution when making a "plunge cut"
into existing walls or other blind areas. The
protruding blade may cut objects that can cause
kickback.
SAFETY INSTRUCTIONS FOR CIRCULAR SAW
LOWER GUARD FUNCTION
a. Check lower guard for proper closing before each
use. Do not operate the saw if lower guard does
not move freely and close instantly. Never clamp
or tie the lower guard into the open position. If
saw is accidentally dropped, lower guard may be
bent. Raise the lower guard with the retracting
handle and make sure it moves freely and does not
touch the blade or any other part, in all angles and
depths of cut.
b. Check the operation of the lower guard spring. If
the guard and the spring are not operating
properly, they must be serviced before use. Lower
guard may operate sluggishly due to damaged parts,
gummy deposits, or a build-up of debris.
c. Lower guard may be retracted manually only for
special cuts such as "plunge cuts" and
"compound cuts." Raise lower guard by
retracting handle and as soon as blade enters the
material, the lower guard must be released. For
all other sawing, the lower guard should operate
automatically.
d. Always observe that the lower guard is covering
the blade before placing saw down on bench or
floor. An unprotected, coasting blade will cause the
saw to walk backwards, cutting whatever is in its
path. Be aware of the time it takes for the blade to
stop after switch is released.
SAFETY INSTRUCTIONS FOR CIRCULAR SAW
a. Check guard for proper closing before each use.
Do not operate the saw if guarddoes not move
freely and enclose the blade instantly. Never
clamp or tie the guard with the blade exposed. If saw
is accidentally dropped, guard may be bent. Check to
make sure that guard moves freely and does not
touch the blade or any other part, in all angles and
depths of cut.
b. Check the operation and condition of the guard
return spring. If the guard and the spring are not
operating properly, they must be serviced before
use. Guard may operate sluggishly due to damaged
parts, gummy deposits, or a build-up of debris.
c. Assure that the guide plate of the saw will not
shift while performing the “plunge cut” when the
blade bevel setting is not at 90°. Blade shifting
sideways will cause binding and likely kick back.
d. Always observe that the guard is covering the
blade before placing saw down on bench or floor.
An unprotected, coasting blade will cause the saw to
walk backwards, cutting whatever is in its path. Be
aware of the time it takes for the blade to stop after
switch is released.
SAFETY GUIDELINES/DEFINITIONS
It is important for you to read and understand this
manual. The information it contains relates to protecting
Your Safety and Preventing Problems. The symbols
below are used to help you recognize this information.
Danger! Indicates an imminently hazardous
situation which, if not avoided, will result in death or
serious injury.
Warning! Indicates a potentially hazardous
situation which, if not avoided, could result in death
or serious injury.
Caution! Indicates a potentially hazardous
situation which, if not avoided, may result in minor or
moderate injury.
Caution! Used without the safety alert symbol
indicates potentially hazardous situation which, if not
avoided, may result in property damage.
ADDITIONAL SAFETY RULES FOR CIRCULAR SAW
Warning! Use of this tool can generate and/or
disburse dust, which may cause serious and
permanent respiratory or other injury. Always use
NIOSH/OSHA approved respiratory protection
appropriate for the dust exposure. Direct particles
away from face and body.
Caution! Wear appropriate hearing protection
during use. Under some conditions and duration of
use, noise from this product may contribute to
hearing loss.
• Snagging the lower guard on a surface below the
material being cut can momentarily reduce
operatol control. The saw can lift partially out of the
cut increasing the chance of blade twist. Ensure there
is sufficient clearance under the workpiece.
• When necessary to raise lower guard manually,
use the retracting lever.
• Keep the Blades Clean and Sharp. Sharp blades
minimize stalling and kickback. The use of dull and/or
dirty blades can increase the saw loading causing the
operator to push harder which promotes twisting.
Caution! Laceration Hazard. Keep hands
away from cutting areas. Keep hands away from
blades. Never place hands in front of or behind the
path of the blade while cutting. Do not reach
underneath work while blade is rotating. Do not
attempt to remove cut material when blade is moving.
• Support large panels. Large panels must be
supported as shown (Fig. A) in this manual to
minimize the risk of blade pinching and kickback.
Material supported only at the ends (Fig. B) will lead to
blade pinching. When cutting operation requires the
resting of the saw on the workpiece, the saw shall be
rested on the larger portion and the smaller piece cut
off.
• Use only correct blades and blade assembly
components when mounting blades. Do not use
blades with incorrect size holes. Never use defective
or incorrect blade washers or bolts. Follow blade
assembly procedures.
• Adjustments. Before cutting be sure depth and
bevel adjustments are tight.
• Support and secure the work properly. Insure that
the material to be cut is clamped (Fig. C) and solidly
supported and balanced on a strong, stable and level
work surface. Support the work so that the wide
portion of the saw shoe is on the portion of the
material that doesn’t fall after the cut is made. Never
hold cut off piece by hand (Fig. D). KICKBACK from
blade pinch can result. Keep both hands on saw at all
4
ENGLISH
the risk of electric shock.
d. Do not abuse the cord. Never use the cord for
carrying, pulling or unplugging the power tool.
Keep cord away from heat, oil, sharp edges or
moving parts.
Damaged or entangled cords increase
the risk of electric shock.
e.
When operating a power tool outdoors, use an
extension cord suitable for outdoor use.
Use of a
cord suitable for outdoor use reduces the risk of electric
shock.
f. If operating a power tool in a damp location is
unavoidable, use a residual current device (RCD)
protected supply.
Use of an RCD reduces the risk of
electric shock.
3. Personal safety
a. Stay alert, watch what you are doing and use
common sense when operating a power tool. Do
not use a power tool while you are tired or under
the influence of drugs, alcohol or medication. A
moment of inattention while operating power tools may
result in serious personal injury.
b. Use safety equipment. Always wear eye
protection. Safety equipment such as dust mask,
non-skid safety shoes, hard hat, or hearing protection
used for appropriate conditions will reduce personal
injuries.
c. Prevent unintentional starting. Ensure the switch
is in the off-position before connecting to power
source and/or battery pack, picking up or
carrying the tool. Carrying power tools with your
finger on the switch or energising power tools that have
the switch on invites accidents.
d. Remove any adjusting key or wrench before
turning the power tool on. A wrench or a key left
attached to a rotating part of the power tool may result
in personal injury.
e. Do not overreach. Keep proper footing and
balance at all times. This enables better control of
the power toolin unexpected situations.
f. Dress properly. Do not wear loose clothing or
jewellery. Keep your hair, clothing and gloves
away from moving parts. Loose clothes, jewellery or
long hair can be caught in moving parts.
g. If devices are provided for the connection of dust
extraction and collection facilities, ensure these
are connected and properly used. Use of these
devices can reduce dust related hazards.
4. Power tool use and care
a. Do not force the power tool. Use the correct
power tool for your application. The correct power
tool will do the job better and safer at the rate for which
it was designed.
b. Do not use the power tool if the switch does not
turn it on and off. Any power tool that cannot be
controlled with the switch is dangerous and must be
repaired.
c. Disconnect the plug from the power source
and/or the battery pack from the power tool
before making any adjustments, changing
accessories, or storing power tools.Such
preventive safety measures reduce the risk of
starting the power tool accidentally
d. Store idle power tools out of the reach of children
and do not allow persons unfamiliar with the
power tool or these instructions to operate the
power tool. Power tools are dangerous in the hands
of untrained users.
e. Maintain power tools. Check for misalignment or
binding of moving parts, breakage of parts and
any other condition that may affect the power
tools operation. If damaged, have the power tool
repaired before use. Many accidents are caused by
poorly maintained power tools.
f. Keep cutting tools sharp and clean. Properly
maintained cutting tools with sharp cutting edges are
less likely to bind and are easier to control.
g. Use the power tool, accessories and tool bits etc.
in accordance with these instructions, taking into
account the working conditions and the work to
be performed. Use of the power tool for operations
different from those intended could result in a
hazardous situation.
5. Service
a. Have your power tool serviced by a qualified
repair person using only identical replacement
parts. This will ensure that the safety of the power tool
is maintained.
6. Electrical safety
This appliance is double insulated therefore no
earth wire is required.Always check that the
power supply corresponds to the voltage on
the rating plate.
Warning! If the power cord is damaged, it
must be replaced by the manufacturer,
authorized Stanley Service Center or an
equally qualified person in order to avoid damage or
injury. If the power cord is replaced by an equally
qualified person, but not authorized by Stanley, the
warranty will not be valid.
7. Labels on tool
The label on your tool may include the following
symbols:
V ...................Volts
A....................Amperes
Hz .................Hertz
W ..................Watts
min ...............minutes
...............Alternating Current
...............Direct Current
n
0
..................No-Load Speed
Local regulations may provide for separate collection
of electrical products from the household, at
municipal waste sites or by the retailer when you
purchase a new product.

and kickback.
Accessories
The performance of your tool depends on the accessory
used. Stanley and Piranha accessories are
engineered to high quality standards and designed to
enhance the performance of your tool. By using these
accessories you will get the very best from your tool.
Warning! The use of any accessory not recommended
for use with this tool could be hazardous. Use only
185mm blades with 19mm or 20mm diameter arbor.
Exception: 175mm abrasive blades can be used. When
cutting metal, be careful of hot sparks which are thrown
by the blade.
MAINTENANCE
Your tool has been designed to operate over a long period
of time with a minimum of maintenance. Continuous
satisfactory operation depends upon proper tool care and
regular cleaning.
Warning! Before performing any maintenance,
switch off and unplug the tool.
• Regularly clean the ventilation slots in your tool using
a soft brush or dry cloth.
• Regularly clean the motor housing using a damp cloth.
Do not use any abrasive or solvent-based cleaner.
Important! To assure product Safety and
Reliability, repairs, maintenance and adjustment
(other than those listed in this manual) should be
performed by authorized service centers or other
qualified service personnel, always using identical
replacement parts.
LUBRICATION
Stanley tools are properly lubricated at the factory and
are ready for use.
PROTECTING THE ENVIRONMENT
Separate collection. This product must not be
disposed of with normal household waste.
Should you find one day that your Stanley product
needs replacement, or if it is of no further use to you,
do not dispose of it with household waste. Make this
product available for separate collection.
Separate collection of used products and
packaging allows materials to be recycled and
used again. Re-use of recycled materials helps
prevent environmental pollution and reduces
the demand for raw materials.
Sawing
Warning! To reduce the risk of serious personal
injury,always hold the tool with both hands.
• Let the blade run freely for a few seconds before
starting the cut.
• Apply only a gentle pressure to the tool while
performing the cut.
• Work with the shoe pressed against the workpiece.
HINTS FOR OPTIMUM USE
• As some splintering along the line of cut on the top
side of the workpiece cannot be avoided, cut on the
side where splintering is acceptable.
• Where splintering is to be minimized, e.g. when
cutting laminates, clamp a piece of plywood onto the
top of the workpiece.
Pocket Cutting (Fig. K)
Pocket cutting is used to cut a hole in a piece of
material without cutting from the side.
• Measure and mark work.
• Tilt saw forward and rest front of the shoe on
material to be cut. Align so that cut will begin at the
back of the drawn rectangle shown in Fig. K.
• Using the retracting lever, retract blade guard to an
upward position, with the blade just clearing the
material, start motor and gradually lower the saw into
the material.
Warning! As blade starts cutting the material,
release the retracting lever immediately.
• Never tie the blade guard in a raised position.
• When the shoe rests flat on the material being cut,
complete the cut in forward direction.
• Allow the blade to come to a complete stop before
lifting saw from material.
• When starting each new cut, repeat the above steps.
Wrench Storage (Fig. L)
The spanner wrench (8) can be stored on the saw shoe as
shown in Fig. L.
Attaching and Removing the Rip Fence (Fig. M)
The rip fence is used to saw in a straight line parallel to
the edge of the working piece.
Attaching
• Loosen the locking knob (17).
• Insert the rip fence (18) through the openings (19).
• Slide the rip fence into the desired position.
• Tighten the locking knob.
Removing
• Loosen the locking knob.
• Pull the rip fence out of the tool. Note: If you do not
have a proper fitting fence, use a straight edge guide
in contact with the edge of the shoe to improve
accuracy of cut and reduce the possibility of binding
• Check and re-assembly inner flange (20) on spindle
(16). Insure the correct side of inner flange (20) faces
outward and match saw blade.
• Place the saw blade (5) onto the inner flange (20),
making sure that the arrow on the blade points in the
same direction as the arrow on the tool.
• Fit the outer washer (10) on the spindle.
• Insert the blade retaining screw (11) into the hole in
the spindle.
• Prevent spindle rotation by engaging the spanne
wrench into the holes of the outer washer.
• Securely tighten the blade retaining screw by
holding the spanner wrench and turning hex wrench
clockwise to tighten the blade retaining screw.
Warning! Inner flange (20) respectively marked
with “19” and “20”, match the saw blade (5) with
19mm or 20mm diameter arbor.
Removing the Blade
• To prevent spindle rotation, engage the protrusions of
the spanner wrench (8) into the holes in the outer
washer (10).
• Loosen and remove the blade retaining screw (11)
by turning it counterclockwise using the hex wrench
(15).
• Remove the outer washer (10).
• Remove the saw blade (5).
Warning! To reduce the risk of serious personal
injury, read, understand and follow all important
safety warnings and instructions prior to using tool.
GENERAL CUTS
Guard Against Kickback
With unit unplugged, follow all assembly, adjustment and
set up instructions. Make sure lower guard operates.
Select the proper blade for the material to be cut.
• Measure and mark work for cutting.
• Support and secure work properly (See Safety Rules
and Instructions).
• Use appropriate and required safety equipment (See
Safety Rules).
• Secure and maintain work area (See Safety Rules).
• With plug inserted and guard closed, make sure
switch turns saw on and off.
Warning! It is important to support the work
properly and to hold the saw firmly to prevent loss of
control which could cause personal injury. Fig. C
illustrates recommended hand position.
OPERATION
Switch
• To operate the tool, depress the trigger switch (1).
The tool will continue to run as long as the trigger is
depressed.
• To turn the tool off, release the trigger switch (1).
There is no provision for locking the tool on, and the
switch should never be locked on by any other means.
times.
• Stay alert and exercise control. Keep body
positioned to one side of blade. Always maintain a
firm grip and control of saw with both hands. Do not
change hand grip or body position while saw is
running. Take precaution to avoid injury from cut off
pieces and other falling material during operation.
Danger! Release switch immediately if blade
binds or saw stalls.
FEATURES (Fig. E)
1. On/Off Switch
2. Main Handle
3. Secondary Handle
4. Shoe
5. Saw Blade
6. Saw Blade Guard
7. Blade Guard Retracting Lever
8. Saw Blade Spanner Wrench
9. Bevel Adjustment Knob
10. Outer Washer
11. Blade Retaining Screw
Saw Blade Hex Wrench (Shown on Fig.I (15))
Rip Fence (Shown on Fig. M (18))
Inner Flange (Shown on Fig. J (20))
ASSEMBLY/ADJUSTMENT SET-UP
Warning! Always unplug saw from power
supply before any of the following operations.
Adjusting the Depth of Cut (Fig. F and G)
The depth of cut should be set according to the thickness
of the workpiece.
• Loosen the lever (12) to unlock the saw shoe.
• Move the saw shoe (4) into the desired position. The
corresponding depth of cut can be read from the
scale (13).
• Tighten the lever to lock the saw shoe in place.
• Set depth adjustment of saw such that one tooth of
the blade projects below the workpiece as shown in
Fig. G.
Adjusting the Bevel Angle (Fig. H)
This tool can be set to bevel angles between 0° and 45°
• Loosen the locking knob (9) to unlock the saw shoe.
• Move the saw shoe (4) into the desired position. The
corresponding bevel angle can be read from the
scale (14).
• Tighten the locking knob to lock the saw shoe in place.
Attaching the Blade (Fig. I and J)
• To prevent spindle rotation engage the protrusions of
the spanner wrench (8) into the holes in the outer
washer (10) as shown in Fig. I.
• Loosen and remove the blade retaining screw (11) by
turning the hex wrench (15) counter- clockwise.
• Remove the outer washer.
.................Class II Construction
.................Earthing Terminal
...............Safe Alert Symbol
.../min ...........Revolutions or Reciprocation per
.............Read instructions manual
• For tools intended to cut wood, instruction on correct
use of the dust collection system.
• For tools intended to cut wood, instruction to wear a
dust mask.
• Instrcution to only use saw blades recommended.
• Instruction to always wear hearing protection.
SAFETY INTRUCTIONS FOR ALL SAWS
CUTTING PROCEDURES
a. DANGER: Keep hands away from cutting area
and the blade. Keep your second hand on
auxiliary handle, or motor housing. If both hands
are holding the saw, they cannot be cut by the blade.
b. Do not reach underneath the workpiece. The
guard cannot protect you from the blade below the
workpiece.
c. Adjust the cutting depth to the thickness of the
workpiece. Less than a full tooth of the blade teeth
should be visible below the workpiece.
d. Never hold piece being cut in your hands or
across your leg. Secure the workpiece to a stable
platform. It is important to support the work properly
to minimize body exposure, blade binding, or loss of
control.
e. Hold power tool by insulated gripping surfaces
when performing an operation where the cutting
tool may contact hidden wiring or its own cord.
Contact with a "live" wire will also make exposed
metal parts of the power tool "live" and shock the
operator.
f. When ripping always use a rip fence or straight
edge guide. This improves the accuracy of cut and
reduces the chance of blade binding.
g. Always use blades with correct size and shape
(diamond versus round) of arbour holes. Blades
that do not match the mounting hardware of the saw
will run eccentrically, causing loss of control.
h. Never use damaged or incorrect blade washers
or bolt. The blade washers and bolt were specially
designed for your saw, for optimum performance and
safety of operation.
FURTHER SAFETY INSTRUCTIONS FOR ALL SAWS
Causes and operator prevention of kickback:
• Kickback is a sudden reaction to a pinched, bound or
misaligned saw blade, causing an uncontrolled saw
to lift up and out of the workpiece toward the
operator;
• When the blade is pinched or bound tightly by the
kerf closing down, the blade stalls and the motor
reaction drives the unit rapidly back toward the
operator;
• If the blade becomes twisted or misaligned in the cut,
the teeth at the back edge of the blade can dig into
the top surface of the wood causing the blade to climb
out of the kerf and jump back toward the operator.
• Kickback is the result of saw misuse and/or incorrect
operating procedures or conditions and can be
avoided by taking proper precautions as given below.
a. Maintain a firm grip with both hands on the saw
and position your arms to resist kickback forces.
Position your body to either side of the blade, but not
in line with the blade. Kickback could cause the saw
to jump backwards, but kickback forces can be
controlled by the operator, if proper precautions are
taken.
NOTE For circular saws with 185 mm or smaller
diameter blades, the words "with both hands" may
be omitted.
b. When blade is binding, or when interrupting a
cut for any reason, release the trigger and hold
the saw motionless in the material until the blade
comes to a complete stop. Never attempt to remove
the saw from the work or pull the saw backward
while the blade is in motion or kickback may occur.
Investigate and take corrective actions to eliminate
the cause of blade binding.
c. When restarting a saw in the workpiece, centre
the saw blade in the kerf and check that saw
teeth are not engaged into the material. If saw
blade is binding, it may walk up or kickback from the
workpiece as the saw is restarted.
d. Support large panels to minimise the risk of
blade pinching and KICKBACK. Large panels tend
to sag under their own weight. Supports must be
placed under the panel on both sides, near the line of
cut and near the edge of the panel.
e. Do not use dull or damaged blades. Unsharpened
or improperly set blades produce narrow kerf
causing excessive friction, blade binding and
kickback.
f. Blade depth and bevel adjusting locking levers
must be tight and secure before making cut. If
blade adjustment shifts while cutting, it may cause
binding and kickback.
g. Use extra caution when making a "plunge cut"
into existing walls or other blind areas. The
protruding blade may cut objects that can cause
kickback.
SAFETY INSTRUCTIONS FOR CIRCULAR SAW
LOWER GUARD FUNCTION
a. Check lower guard for proper closing before each
use. Do not operate the saw if lower guard does
not move freely and close instantly. Never clamp
or tie the lower guard into the open position. If
saw is accidentally dropped, lower guard may be
bent. Raise the lower guard with the retracting
handle and make sure it moves freely and does not
touch the blade or any other part, in all angles and
depths of cut.
b. Check the operation of the lower guard spring. If
the guard and the spring are not operating
properly, they must be serviced before use. Lower
guard may operate sluggishly due to damaged parts,
gummy deposits, or a build-up of debris.
c. Lower guard may be retracted manually only for
special cuts such as "plunge cuts" and
"compound cuts." Raise lower guard by
retracting handle and as soon as blade enters the
material, the lower guard must be released. For
all other sawing, the lower guard should operate
automatically.
d. Always observe that the lower guard is covering
the blade before placing saw down on bench or
floor. An unprotected, coasting blade will cause the
saw to walk backwards, cutting whatever is in its
path. Be aware of the time it takes for the blade to
stop after switch is released.
SAFETY INSTRUCTIONS FOR CIRCULAR SAW
a. Check guard for proper closing before each use.
Do not operate the saw if guarddoes not move
freely and enclose the blade instantly. Never
clamp or tie the guard with the blade exposed. If saw
is accidentally dropped, guard may be bent. Check to
make sure that guard moves freely and does not
touch the blade or any other part, in all angles and
depths of cut.
b. Check the operation and condition of the guard
return spring. If the guard and the spring are not
operating properly, they must be serviced before
use. Guard may operate sluggishly due to damaged
parts, gummy deposits, or a build-up of debris.
c. Assure that the guide plate of the saw will not
shift while performing the “plunge cut” when the
blade bevel setting is not at 90°. Blade shifting
sideways will cause binding and likely kick back.
d. Always observe that the guard is covering the
blade before placing saw down on bench or floor.
An unprotected, coasting blade will cause the saw to
walk backwards, cutting whatever is in its path. Be
aware of the time it takes for the blade to stop after
switch is released.
SAFETY GUIDELINES/DEFINITIONS
It is important for you to read and understand this
manual. The information it contains relates to protecting
Your Safety and Preventing Problems. The symbols
below are used to help you recognize this information.
Danger! Indicates an imminently hazardous
situation which, if not avoided, will result in death or
serious injury.
Warning! Indicates a potentially hazardous
situation which, if not avoided, could result in death
or serious injury.
Caution! Indicates a potentially hazardous
situation which, if not avoided, may result in minor or
moderate injury.
Caution! Used without the safety alert symbol
indicates potentially hazardous situation which, if not
avoided, may result in property damage.
ADDITIONAL SAFETY RULES FOR CIRCULAR SAW
Warning! Use of this tool can generate and/or
disburse dust, which may cause serious and
permanent respiratory or other injury. Always use
NIOSH/OSHA approved respiratory protection
appropriate for the dust exposure. Direct particles
away from face and body.
Caution! Wear appropriate hearing protection
during use. Under some conditions and duration of
use, noise from this product may contribute to
hearing loss.
• Snagging the lower guard on a surface below the
material being cut can momentarily reduce
operatol control. The saw can lift partially out of the
cut increasing the chance of blade twist. Ensure there
is sufficient clearance under the workpiece.
• When necessary to raise lower guard manually,
use the retracting lever.
• Keep the Blades Clean and Sharp. Sharp blades
minimize stalling and kickback. The use of dull and/or
dirty blades can increase the saw loading causing the
operator to push harder which promotes twisting.
Caution! Laceration Hazard. Keep hands
away from cutting areas. Keep hands away from
blades. Never place hands in front of or behind the
path of the blade while cutting. Do not reach
underneath work while blade is rotating. Do not
attempt to remove cut material when blade is moving.
• Support large panels. Large panels must be
supported as shown (Fig. A) in this manual to
minimize the risk of blade pinching and kickback.
Material supported only at the ends (Fig. B) will lead to
blade pinching. When cutting operation requires the
resting of the saw on the workpiece, the saw shall be
rested on the larger portion and the smaller piece cut
off.
• Use only correct blades and blade assembly
components when mounting blades. Do not use
blades with incorrect size holes. Never use defective
or incorrect blade washers or bolts. Follow blade
assembly procedures.
• Adjustments. Before cutting be sure depth and
bevel adjustments are tight.
• Support and secure the work properly. Insure that
the material to be cut is clamped (Fig. C) and solidly
supported and balanced on a strong, stable and level
work surface. Support the work so that the wide
portion of the saw shoe is on the portion of the
material that doesn’t fall after the cut is made. Never
hold cut off piece by hand (Fig. D). KICKBACK from
blade pinch can result. Keep both hands on saw at all
5
ENGLISH
Local regulations may provide for separate collection
of electrical products from the household, at
municipal waste sites or by the retailer when you
purchase a new product.

and kickback.
Accessories
The performance of your tool depends on the accessory
used. Stanley and Piranha accessories are
engineered to high quality standards and designed to
enhance the performance of your tool. By using these
accessories you will get the very best from your tool.
Warning! The use of any accessory not recommended
for use with this tool could be hazardous. Use only
185mm blades with 19mm or 20mm diameter arbor.
Exception: 175mm abrasive blades can be used. When
cutting metal, be careful of hot sparks which are thrown
by the blade.
MAINTENANCE
Your tool has been designed to operate over a long period
of time with a minimum of maintenance. Continuous
satisfactory operation depends upon proper tool care and
regular cleaning.
Warning! Before performing any maintenance,
switch off and unplug the tool.
• Regularly clean the ventilation slots in your tool using
a soft brush or dry cloth.
• Regularly clean the motor housing using a damp cloth.
Do not use any abrasive or solvent-based cleaner.
Important! To assure product Safety and
Reliability, repairs, maintenance and adjustment
(other than those listed in this manual) should be
performed by authorized service centers or other
qualified service personnel, always using identical
replacement parts.
LUBRICATION
Stanley tools are properly lubricated at the factory and
are ready for use.
PROTECTING THE ENVIRONMENT
Separate collection. This product must not be
disposed of with normal household waste.
Should you find one day that your Stanley product
needs replacement, or if it is of no further use to you,
do not dispose of it with household waste. Make this
product available for separate collection.
Separate collection of used products and
packaging allows materials to be recycled and
used again. Re-use of recycled materials helps
prevent environmental pollution and reduces
the demand for raw materials.
Sawing
Warning! To reduce the risk of serious personal
injury,always hold the tool with both hands.
• Let the blade run freely for a few seconds before
starting the cut.
• Apply only a gentle pressure to the tool while
performing the cut.
• Work with the shoe pressed against the workpiece.
HINTS FOR OPTIMUM USE
• As some splintering along the line of cut on the top
side of the workpiece cannot be avoided, cut on the
side where splintering is acceptable.
• Where splintering is to be minimized, e.g. when
cutting laminates, clamp a piece of plywood onto the
top of the workpiece.
Pocket Cutting (Fig. K)
Pocket cutting is used to cut a hole in a piece of
material without cutting from the side.
• Measure and mark work.
• Tilt saw forward and rest front of the shoe on
material to be cut. Align so that cut will begin at the
back of the drawn rectangle shown in Fig. K.
• Using the retracting lever, retract blade guard to an
upward position, with the blade just clearing the
material, start motor and gradually lower the saw into
the material.
Warning! As blade starts cutting the material,
release the retracting lever immediately.
• Never tie the blade guard in a raised position.
• When the shoe rests flat on the material being cut,
complete the cut in forward direction.
• Allow the blade to come to a complete stop before
lifting saw from material.
• When starting each new cut, repeat the above steps.
Wrench Storage (Fig. L)
The spanner wrench (8) can be stored on the saw shoe as
shown in Fig. L.
Attaching and Removing the Rip Fence (Fig. M)
The rip fence is used to saw in a straight line parallel to
the edge of the working piece.
Attaching
• Loosen the locking knob (17).
• Insert the rip fence (18) through the openings (19).
• Slide the rip fence into the desired position.
• Tighten the locking knob.
Removing
• Loosen the locking knob.
• Pull the rip fence out of the tool. Note: If you do not
have a proper fitting fence, use a straight edge guide
in contact with the edge of the shoe to improve
accuracy of cut and reduce the possibility of binding
• Check and re-assembly inner flange (20) on spindle
(16). Insure the correct side of inner flange (20) faces
outward and match saw blade.
• Place the saw blade (5) onto the inner flange (20),
making sure that the arrow on the blade points in the
same direction as the arrow on the tool.
• Fit the outer washer (10) on the spindle.
• Insert the blade retaining screw (11) into the hole in
the spindle.
• Prevent spindle rotation by engaging the spanne
wrench into the holes of the outer washer.
• Securely tighten the blade retaining screw by
holding the spanner wrench and turning hex wrench
clockwise to tighten the blade retaining screw.
Warning! Inner flange (20) respectively marked
with “19” and “20”, match the saw blade (5) with
19mm or 20mm diameter arbor.
Removing the Blade
• To prevent spindle rotation, engage the protrusions of
the spanner wrench (8) into the holes in the outer
washer (10).
• Loosen and remove the blade retaining screw (11)
by turning it counterclockwise using the hex wrench
(15).
• Remove the outer washer (10).
• Remove the saw blade (5).
Warning! To reduce the risk of serious personal
injury, read, understand and follow all important
safety warnings and instructions prior to using tool.
GENERAL CUTS
Guard Against Kickback
With unit unplugged, follow all assembly, adjustment and
set up instructions. Make sure lower guard operates.
Select the proper blade for the material to be cut.
• Measure and mark work for cutting.
• Support and secure work properly (See Safety Rules
and Instructions).
• Use appropriate and required safety equipment (See
Safety Rules).
• Secure and maintain work area (See Safety Rules).
• With plug inserted and guard closed, make sure
switch turns saw on and off.
Warning! It is important to support the work
properly and to hold the saw firmly to prevent loss of
control which could cause personal injury. Fig. C
illustrates recommended hand position.
OPERATION
Switch
• To operate the tool, depress the trigger switch (1).
The tool will continue to run as long as the trigger is
depressed.
• To turn the tool off, release the trigger switch (1).
There is no provision for locking the tool on, and the
switch should never be locked on by any other means.
times.
• Stay alert and exercise control. Keep body
positioned to one side of blade. Always maintain a
firm grip and control of saw with both hands. Do not
change hand grip or body position while saw is
running. Take precaution to avoid injury from cut off
pieces and other falling material during operation.
Danger! Release switch immediately if blade
binds or saw stalls.
FEATURES (Fig. E)
1. On/Off Switch
2. Main Handle
3. Secondary Handle
4. Shoe
5. Saw Blade
6. Saw Blade Guard
7. Blade Guard Retracting Lever
8. Saw Blade Spanner Wrench
9. Bevel Adjustment Knob
10. Outer Washer
11. Blade Retaining Screw
Saw Blade Hex Wrench (Shown on Fig.I (15))
Rip Fence (Shown on Fig. M (18))
Inner Flange (Shown on Fig. J (20))
ASSEMBLY/ADJUSTMENT SET-UP
Warning! Always unplug saw from power
supply before any of the following operations.
Adjusting the Depth of Cut (Fig. F and G)
The depth of cut should be set according to the thickness
of the workpiece.
• Loosen the lever (12) to unlock the saw shoe.
• Move the saw shoe (4) into the desired position. The
corresponding depth of cut can be read from the
scale (13).
• Tighten the lever to lock the saw shoe in place.
• Set depth adjustment of saw such that one tooth of
the blade projects below the workpiece as shown in
Fig. G.
Adjusting the Bevel Angle (Fig. H)
This tool can be set to bevel angles between 0° and 45°
• Loosen the locking knob (9) to unlock the saw shoe.
• Move the saw shoe (4) into the desired position. The
corresponding bevel angle can be read from the
scale (14).
• Tighten the locking knob to lock the saw shoe in place.
Attaching the Blade (Fig. I and J)
• To prevent spindle rotation engage the protrusions of
the spanner wrench (8) into the holes in the outer
washer (10) as shown in Fig. I.
• Loosen and remove the blade retaining screw (11) by
turning the hex wrench (15) counter- clockwise.
• Remove the outer washer.
.................Class II Construction
.................Earthing Terminal
...............Safe Alert Symbol
.../min ...........Revolutions or Reciprocation per
.............Read instructions manual
• For tools intended to cut wood, instruction on correct
use of the dust collection system.
• For tools intended to cut wood, instruction to wear a
dust mask.
• Instrcution to only use saw blades recommended.
• Instruction to always wear hearing protection.
SAFETY INTRUCTIONS FOR ALL SAWS
CUTTING PROCEDURES
a. DANGER: Keep hands away from cutting area
and the blade. Keep your second hand on
auxiliary handle, or motor housing. If both hands
are holding the saw, they cannot be cut by the blade.
b. Do not reach underneath the workpiece. The
guard cannot protect you from the blade below the
workpiece.
c. Adjust the cutting depth to the thickness of the
workpiece. Less than a full tooth of the blade teeth
should be visible below the workpiece.
d. Never hold piece being cut in your hands or
across your leg. Secure the workpiece to a stable
platform. It is important to support the work properly
to minimize body exposure, blade binding, or loss of
control.
e. Hold power tool by insulated gripping surfaces
when performing an operation where the cutting
tool may contact hidden wiring or its own cord.
Contact with a "live" wire will also make exposed
metal parts of the power tool "live" and shock the
operator.
f. When ripping always use a rip fence or straight
edge guide. This improves the accuracy of cut and
reduces the chance of blade binding.
g. Always use blades with correct size and shape
(diamond versus round) of arbour holes. Blades
that do not match the mounting hardware of the saw
will run eccentrically, causing loss of control.
h. Never use damaged or incorrect blade washers
or bolt. The blade washers and bolt were specially
designed for your saw, for optimum performance and
safety of operation.
FURTHER SAFETY INSTRUCTIONS FOR ALL SAWS
Causes and operator prevention of kickback:
• Kickback is a sudden reaction to a pinched, bound or
misaligned saw blade, causing an uncontrolled saw
to lift up and out of the workpiece toward the
operator;
• When the blade is pinched or bound tightly by the
kerf closing down, the blade stalls and the motor
reaction drives the unit rapidly back toward the
operator;
• If the blade becomes twisted or misaligned in the cut,
the teeth at the back edge of the blade can dig into
the top surface of the wood causing the blade to climb
out of the kerf and jump back toward the operator.
• Kickback is the result of saw misuse and/or incorrect
operating procedures or conditions and can be
avoided by taking proper precautions as given below.
a. Maintain a firm grip with both hands on the saw
and position your arms to resist kickback forces.
Position your body to either side of the blade, but not
in line with the blade. Kickback could cause the saw
to jump backwards, but kickback forces can be
controlled by the operator, if proper precautions are
taken.
NOTE For circular saws with 185 mm or smaller
diameter blades, the words "with both hands" may
be omitted.
b. When blade is binding, or when interrupting a
cut for any reason, release the trigger and hold
the saw motionless in the material until the blade
comes to a complete stop. Never attempt to remove
the saw from the work or pull the saw backward
while the blade is in motion or kickback may occur.
Investigate and take corrective actions to eliminate
the cause of blade binding.
c. When restarting a saw in the workpiece, centre
the saw blade in the kerf and check that saw
teeth are not engaged into the material. If saw
blade is binding, it may walk up or kickback from the
workpiece as the saw is restarted.
d. Support large panels to minimise the risk of
blade pinching and KICKBACK. Large panels tend
to sag under their own weight. Supports must be
placed under the panel on both sides, near the line of
cut and near the edge of the panel.
e. Do not use dull or damaged blades. Unsharpened
or improperly set blades produce narrow kerf
causing excessive friction, blade binding and
kickback.
f. Blade depth and bevel adjusting locking levers
must be tight and secure before making cut. If
blade adjustment shifts while cutting, it may cause
binding and kickback.
g. Use extra caution when making a "plunge cut"
into existing walls or other blind areas. The
protruding blade may cut objects that can cause
kickback.
SAFETY INSTRUCTIONS FOR CIRCULAR SAW
LOWER GUARD FUNCTION
a. Check lower guard for proper closing before each
use. Do not operate the saw if lower guard does
not move freely and close instantly. Never clamp
or tie the lower guard into the open position. If
saw is accidentally dropped, lower guard may be
bent. Raise the lower guard with the retracting
handle and make sure it moves freely and does not
touch the blade or any other part, in all angles and
depths of cut.
b. Check the operation of the lower guard spring. If
the guard and the spring are not operating
properly, they must be serviced before use. Lower
guard may operate sluggishly due to damaged parts,
gummy deposits, or a build-up of debris.
c. Lower guard may be retracted manually only for
special cuts such as "plunge cuts" and
"compound cuts." Raise lower guard by
retracting handle and as soon as blade enters the
material, the lower guard must be released. For
all other sawing, the lower guard should operate
automatically.
d. Always observe that the lower guard is covering
the blade before placing saw down on bench or
floor. An unprotected, coasting blade will cause the
saw to walk backwards, cutting whatever is in its
path. Be aware of the time it takes for the blade to
stop after switch is released.
SAFETY INSTRUCTIONS FOR CIRCULAR SAW
a. Check guard for proper closing before each use.
Do not operate the saw if guarddoes not move
freely and enclose the blade instantly. Never
clamp or tie the guard with the blade exposed. If saw
is accidentally dropped, guard may be bent. Check to
make sure that guard moves freely and does not
touch the blade or any other part, in all angles and
depths of cut.
b. Check the operation and condition of the guard
return spring. If the guard and the spring are not
operating properly, they must be serviced before
use. Guard may operate sluggishly due to damaged
parts, gummy deposits, or a build-up of debris.
c. Assure that the guide plate of the saw will not
shift while performing the “plunge cut” when the
blade bevel setting is not at 90°. Blade shifting
sideways will cause binding and likely kick back.
d. Always observe that the guard is covering the
blade before placing saw down on bench or floor.
An unprotected, coasting blade will cause the saw to
walk backwards, cutting whatever is in its path. Be
aware of the time it takes for the blade to stop after
switch is released.
SAFETY GUIDELINES/DEFINITIONS
It is important for you to read and understand this
manual. The information it contains relates to protecting
Your Safety and Preventing Problems. The symbols
below are used to help you recognize this information.
Danger! Indicates an imminently hazardous
situation which, if not avoided, will result in death or
serious injury.
Warning! Indicates a potentially hazardous
situation which, if not avoided, could result in death
or serious injury.
Caution! Indicates a potentially hazardous
situation which, if not avoided, may result in minor or
moderate injury.
Caution! Used without the safety alert symbol
indicates potentially hazardous situation which, if not
avoided, may result in property damage.
ADDITIONAL SAFETY RULES FOR CIRCULAR SAW
Warning! Use of this tool can generate and/or
disburse dust, which may cause serious and
permanent respiratory or other injury. Always use
NIOSH/OSHA approved respiratory protection
appropriate for the dust exposure. Direct particles
away from face and body.
Caution! Wear appropriate hearing protection
during use. Under some conditions and duration of
use, noise from this product may contribute to
hearing loss.
• Snagging the lower guard on a surface below the
material being cut can momentarily reduce
operatol control. The saw can lift partially out of the
cut increasing the chance of blade twist. Ensure there
is sufficient clearance under the workpiece.
• When necessary to raise lower guard manually,
use the retracting lever.
• Keep the Blades Clean and Sharp. Sharp blades
minimize stalling and kickback. The use of dull and/or
dirty blades can increase the saw loading causing the
operator to push harder which promotes twisting.
Caution! Laceration Hazard. Keep hands
away from cutting areas. Keep hands away from
blades. Never place hands in front of or behind the
path of the blade while cutting. Do not reach
underneath work while blade is rotating. Do not
attempt to remove cut material when blade is moving.
• Support large panels. Large panels must be
supported as shown (Fig. A) in this manual to
minimize the risk of blade pinching and kickback.
Material supported only at the ends (Fig. B) will lead to
blade pinching. When cutting operation requires the
resting of the saw on the workpiece, the saw shall be
rested on the larger portion and the smaller piece cut
off.
• Use only correct blades and blade assembly
components when mounting blades. Do not use
blades with incorrect size holes. Never use defective
or incorrect blade washers or bolts. Follow blade
assembly procedures.
• Adjustments. Before cutting be sure depth and
bevel adjustments are tight.
• Support and secure the work properly. Insure that
the material to be cut is clamped (Fig. C) and solidly
supported and balanced on a strong, stable and level
work surface. Support the work so that the wide
portion of the saw shoe is on the portion of the
material that doesn’t fall after the cut is made. Never
hold cut off piece by hand (Fig. D). KICKBACK from
blade pinch can result. Keep both hands on saw at all
6
ENGLISH
Local regulations may provide for separate collection
of electrical products from the household, at
municipal waste sites or by the retailer when you
purchase a new product.

and kickback.
Accessories
The performance of your tool depends on the accessory
used. Stanley and Piranha accessories are
engineered to high quality standards and designed to
enhance the performance of your tool. By using these
accessories you will get the very best from your tool.
Warning! The use of any accessory not recommended
for use with this tool could be hazardous. Use only
185mm blades with 19mm or 20mm diameter arbor.
Exception: 175mm abrasive blades can be used. When
cutting metal, be careful of hot sparks which are thrown
by the blade.
MAINTENANCE
Your tool has been designed to operate over a long period
of time with a minimum of maintenance. Continuous
satisfactory operation depends upon proper tool care and
regular cleaning.
Warning! Before performing any maintenance,
switch off and unplug the tool.
• Regularly clean the ventilation slots in your tool using
a soft brush or dry cloth.
• Regularly clean the motor housing using a damp cloth.
Do not use any abrasive or solvent-based cleaner.
Important! To assure product Safety and
Reliability, repairs, maintenance and adjustment
(other than those listed in this manual) should be
performed by authorized service centers or other
qualified service personnel, always using identical
replacement parts.
LUBRICATION
Stanley tools are properly lubricated at the factory and
are ready for use.
PROTECTING THE ENVIRONMENT
Separate collection. This product must not be
disposed of with normal household waste.
Should you find one day that your Stanley product
needs replacement, or if it is of no further use to you,
do not dispose of it with household waste. Make this
product available for separate collection.
Separate collection of used products and
packaging allows materials to be recycled and
used again. Re-use of recycled materials helps
prevent environmental pollution and reduces
the demand for raw materials.
Sawing
Warning! To reduce the risk of serious personal
injury,always hold the tool with both hands.
• Let the blade run freely for a few seconds before
starting the cut.
• Apply only a gentle pressure to the tool while
performing the cut.
• Work with the shoe pressed against the workpiece.
HINTS FOR OPTIMUM USE
• As some splintering along the line of cut on the top
side of the workpiece cannot be avoided, cut on the
side where splintering is acceptable.
• Where splintering is to be minimized, e.g. when
cutting laminates, clamp a piece of plywood onto the
top of the workpiece.
Pocket Cutting (Fig. K)
Pocket cutting is used to cut a hole in a piece of
material without cutting from the side.
• Measure and mark work.
• Tilt saw forward and rest front of the shoe on
material to be cut. Align so that cut will begin at the
back of the drawn rectangle shown in Fig. K.
• Using the retracting lever, retract blade guard to an
upward position, with the blade just clearing the
material, start motor and gradually lower the saw into
the material.
Warning! As blade starts cutting the material,
release the retracting lever immediately.
• Never tie the blade guard in a raised position.
• When the shoe rests flat on the material being cut,
complete the cut in forward direction.
• Allow the blade to come to a complete stop before
lifting saw from material.
• When starting each new cut, repeat the above steps.
Wrench Storage (Fig. L)
The spanner wrench (8) can be stored on the saw shoe as
shown in Fig. L.
Attaching and Removing the Rip Fence (Fig. M)
The rip fence is used to saw in a straight line parallel to
the edge of the working piece.
Attaching
• Loosen the locking knob (17).
• Insert the rip fence (18) through the openings (19).
• Slide the rip fence into the desired position.
• Tighten the locking knob.
Removing
• Loosen the locking knob.
• Pull the rip fence out of the tool. Note: If you do not
have a proper fitting fence, use a straight edge guide
in contact with the edge of the shoe to improve
accuracy of cut and reduce the possibility of binding
• Check and re-assembly inner flange (20) on spindle
(16). Insure the correct side of inner flange (20) faces
outward and match saw blade.
• Place the saw blade (5) onto the inner flange (20),
making sure that the arrow on the blade points in the
same direction as the arrow on the tool.
• Fit the outer washer (10) on the spindle.
• Insert the blade retaining screw (11) into the hole in
the spindle.
• Prevent spindle rotation by engaging the spanne
wrench into the holes of the outer washer.
• Securely tighten the blade retaining screw by
holding the spanner wrench and turning hex wrench
clockwise to tighten the blade retaining screw.
Warning! Inner flange (20) respectively marked
with “19” and “20”, match the saw blade (5) with
19mm or 20mm diameter arbor.
Removing the Blade
• To prevent spindle rotation, engage the protrusions of
the spanner wrench (8) into the holes in the outer
washer (10).
• Loosen and remove the blade retaining screw (11)
by turning it counterclockwise using the hex wrench
(15).
• Remove the outer washer (10).
• Remove the saw blade (5).
Warning! To reduce the risk of serious personal
injury, read, understand and follow all important
safety warnings and instructions prior to using tool.
GENERAL CUTS
Guard Against Kickback
With unit unplugged, follow all assembly, adjustment and
set up instructions. Make sure lower guard operates.
Select the proper blade for the material to be cut.
• Measure and mark work for cutting.
• Support and secure work properly (See Safety Rules
and Instructions).
• Use appropriate and required safety equipment (See
Safety Rules).
• Secure and maintain work area (See Safety Rules).
• With plug inserted and guard closed, make sure
switch turns saw on and off.
Warning! It is important to support the work
properly and to hold the saw firmly to prevent loss of
control which could cause personal injury. Fig. C
illustrates recommended hand position.
OPERATION
Switch
• To operate the tool, depress the trigger switch (1).
The tool will continue to run as long as the trigger is
depressed.
• To turn the tool off, release the trigger switch (1).
There is no provision for locking the tool on, and the
switch should never be locked on by any other means.
times.
• Stay alert and exercise control. Keep body
positioned to one side of blade. Always maintain a
firm grip and control of saw with both hands. Do not
change hand grip or body position while saw is
running. Take precaution to avoid injury from cut off
pieces and other falling material during operation.
Danger! Release switch immediately if blade
binds or saw stalls.
FEATURES (Fig. E)
1. On/Off Switch
2. Main Handle
3. Secondary Handle
4. Shoe
5. Saw Blade
6. Saw Blade Guard
7. Blade Guard Retracting Lever
8. Saw Blade Spanner Wrench
9. Bevel Adjustment Knob
10. Outer Washer
11. Blade Retaining Screw
Saw Blade Hex Wrench (Shown on Fig.I (15))
Rip Fence (Shown on Fig. M (18))
Inner Flange (Shown on Fig. J (20))
ASSEMBLY/ADJUSTMENT SET-UP
Warning! Always unplug saw from power
supply before any of the following operations.
Adjusting the Depth of Cut (Fig. F and G)
The depth of cut should be set according to the thickness
of the workpiece.
• Loosen the lever (12) to unlock the saw shoe.
• Move the saw shoe (4) into the desired position. The
corresponding depth of cut can be read from the
scale (13).
• Tighten the lever to lock the saw shoe in place.
• Set depth adjustment of saw such that one tooth of
the blade projects below the workpiece as shown in
Fig. G.
Adjusting the Bevel Angle (Fig. H)
This tool can be set to bevel angles between 0° and 45°
• Loosen the locking knob (9) to unlock the saw shoe.
• Move the saw shoe (4) into the desired position. The
corresponding bevel angle can be read from the
scale (14).
• Tighten the locking knob to lock the saw shoe in place.
Attaching the Blade (Fig. I and J)
• To prevent spindle rotation engage the protrusions of
the spanner wrench (8) into the holes in the outer
washer (10) as shown in Fig. I.
• Loosen and remove the blade retaining screw (11) by
turning the hex wrench (15) counter- clockwise.
• Remove the outer washer.
.................Class II Construction
.................Earthing Terminal
...............Safe Alert Symbol
.../min ...........Revolutions or Reciprocation per
.............Read instructions manual
• For tools intended to cut wood, instruction on correct
use of the dust collection system.
• For tools intended to cut wood, instruction to wear a
dust mask.
• Instrcution to only use saw blades recommended.
• Instruction to always wear hearing protection.
SAFETY INTRUCTIONS FOR ALL SAWS
CUTTING PROCEDURES
a. DANGER: Keep hands away from cutting area
and the blade. Keep your second hand on
auxiliary handle, or motor housing. If both hands
are holding the saw, they cannot be cut by the blade.
b. Do not reach underneath the workpiece. The
guard cannot protect you from the blade below the
workpiece.
c. Adjust the cutting depth to the thickness of the
workpiece. Less than a full tooth of the blade teeth
should be visible below the workpiece.
d. Never hold piece being cut in your hands or
across your leg. Secure the workpiece to a stable
platform. It is important to support the work properly
to minimize body exposure, blade binding, or loss of
control.
e. Hold power tool by insulated gripping surfaces
when performing an operation where the cutting
tool may contact hidden wiring or its own cord.
Contact with a "live" wire will also make exposed
metal parts of the power tool "live" and shock the
operator.
f. When ripping always use a rip fence or straight
edge guide. This improves the accuracy of cut and
reduces the chance of blade binding.
g. Always use blades with correct size and shape
(diamond versus round) of arbour holes. Blades
that do not match the mounting hardware of the saw
will run eccentrically, causing loss of control.
h. Never use damaged or incorrect blade washers
or bolt. The blade washers and bolt were specially
designed for your saw, for optimum performance and
safety of operation.
FURTHER SAFETY INSTRUCTIONS FOR ALL SAWS
Causes and operator prevention of kickback:
• Kickback is a sudden reaction to a pinched, bound or
misaligned saw blade, causing an uncontrolled saw
to lift up and out of the workpiece toward the
operator;
• When the blade is pinched or bound tightly by the
kerf closing down, the blade stalls and the motor
reaction drives the unit rapidly back toward the
operator;
• If the blade becomes twisted or misaligned in the cut,
the teeth at the back edge of the blade can dig into
the top surface of the wood causing the blade to climb
out of the kerf and jump back toward the operator.
• Kickback is the result of saw misuse and/or incorrect
operating procedures or conditions and can be
avoided by taking proper precautions as given below.
a. Maintain a firm grip with both hands on the saw
and position your arms to resist kickback forces.
Position your body to either side of the blade, but not
in line with the blade. Kickback could cause the saw
to jump backwards, but kickback forces can be
controlled by the operator, if proper precautions are
taken.
NOTE For circular saws with 185 mm or smaller
diameter blades, the words "with both hands" may
be omitted.
b. When blade is binding, or when interrupting a
cut for any reason, release the trigger and hold
the saw motionless in the material until the blade
comes to a complete stop. Never attempt to remove
the saw from the work or pull the saw backward
while the blade is in motion or kickback may occur.
Investigate and take corrective actions to eliminate
the cause of blade binding.
c. When restarting a saw in the workpiece, centre
the saw blade in the kerf and check that saw
teeth are not engaged into the material. If saw
blade is binding, it may walk up or kickback from the
workpiece as the saw is restarted.
d. Support large panels to minimise the risk of
blade pinching and KICKBACK. Large panels tend
to sag under their own weight. Supports must be
placed under the panel on both sides, near the line of
cut and near the edge of the panel.
e. Do not use dull or damaged blades. Unsharpened
or improperly set blades produce narrow kerf
causing excessive friction, blade binding and
kickback.
f. Blade depth and bevel adjusting locking levers
must be tight and secure before making cut. If
blade adjustment shifts while cutting, it may cause
binding and kickback.
g. Use extra caution when making a "plunge cut"
into existing walls or other blind areas. The
protruding blade may cut objects that can cause
kickback.
SAFETY INSTRUCTIONS FOR CIRCULAR SAW
LOWER GUARD FUNCTION
a. Check lower guard for proper closing before each
use. Do not operate the saw if lower guard does
not move freely and close instantly. Never clamp
or tie the lower guard into the open position. If
saw is accidentally dropped, lower guard may be
bent. Raise the lower guard with the retracting
handle and make sure it moves freely and does not
touch the blade or any other part, in all angles and
depths of cut.
b. Check the operation of the lower guard spring. If
the guard and the spring are not operating
properly, they must be serviced before use. Lower
guard may operate sluggishly due to damaged parts,
gummy deposits, or a build-up of debris.
c. Lower guard may be retracted manually only for
special cuts such as "plunge cuts" and
"compound cuts." Raise lower guard by
retracting handle and as soon as blade enters the
material, the lower guard must be released. For
all other sawing, the lower guard should operate
automatically.
d. Always observe that the lower guard is covering
the blade before placing saw down on bench or
floor. An unprotected, coasting blade will cause the
saw to walk backwards, cutting whatever is in its
path. Be aware of the time it takes for the blade to
stop after switch is released.
SAFETY INSTRUCTIONS FOR CIRCULAR SAW
a. Check guard for proper closing before each use.
Do not operate the saw if guarddoes not move
freely and enclose the blade instantly. Never
clamp or tie the guard with the blade exposed. If saw
is accidentally dropped, guard may be bent. Check to
make sure that guard moves freely and does not
touch the blade or any other part, in all angles and
depths of cut.
b. Check the operation and condition of the guard
return spring. If the guard and the spring are not
operating properly, they must be serviced before
use. Guard may operate sluggishly due to damaged
parts, gummy deposits, or a build-up of debris.
c. Assure that the guide plate of the saw will not
shift while performing the “plunge cut” when the
blade bevel setting is not at 90°. Blade shifting
sideways will cause binding and likely kick back.
d. Always observe that the guard is covering the
blade before placing saw down on bench or floor.
An unprotected, coasting blade will cause the saw to
walk backwards, cutting whatever is in its path. Be
aware of the time it takes for the blade to stop after
switch is released.
SAFETY GUIDELINES/DEFINITIONS
It is important for you to read and understand this
manual. The information it contains relates to protecting
Your Safety and Preventing Problems. The symbols
below are used to help you recognize this information.
Danger! Indicates an imminently hazardous
situation which, if not avoided, will result in death or
serious injury.
Warning! Indicates a potentially hazardous
situation which, if not avoided, could result in death
or serious injury.
Caution! Indicates a potentially hazardous
situation which, if not avoided, may result in minor or
moderate injury.
Caution! Used without the safety alert symbol
indicates potentially hazardous situation which, if not
avoided, may result in property damage.
ADDITIONAL SAFETY RULES FOR CIRCULAR SAW
Warning! Use of this tool can generate and/or
disburse dust, which may cause serious and
permanent respiratory or other injury. Always use
NIOSH/OSHA approved respiratory protection
appropriate for the dust exposure. Direct particles
away from face and body.
Caution! Wear appropriate hearing protection
during use. Under some conditions and duration of
use, noise from this product may contribute to
hearing loss.
• Snagging the lower guard on a surface below the
material being cut can momentarily reduce
operatol control. The saw can lift partially out of the
cut increasing the chance of blade twist. Ensure there
is sufficient clearance under the workpiece.
• When necessary to raise lower guard manually,
use the retracting lever.
• Keep the Blades Clean and Sharp. Sharp blades
minimize stalling and kickback. The use of dull and/or
dirty blades can increase the saw loading causing the
operator to push harder which promotes twisting.
Caution! Laceration Hazard. Keep hands
away from cutting areas. Keep hands away from
blades. Never place hands in front of or behind the
path of the blade while cutting. Do not reach
underneath work while blade is rotating. Do not
attempt to remove cut material when blade is moving.
• Support large panels. Large panels must be
supported as shown (Fig. A) in this manual to
minimize the risk of blade pinching and kickback.
Material supported only at the ends (Fig. B) will lead to
blade pinching. When cutting operation requires the
resting of the saw on the workpiece, the saw shall be
rested on the larger portion and the smaller piece cut
off.
• Use only correct blades and blade assembly
components when mounting blades. Do not use
blades with incorrect size holes. Never use defective
or incorrect blade washers or bolts. Follow blade
assembly procedures.
• Adjustments. Before cutting be sure depth and
bevel adjustments are tight.
• Support and secure the work properly. Insure that
the material to be cut is clamped (Fig. C) and solidly
supported and balanced on a strong, stable and level
work surface. Support the work so that the wide
portion of the saw shoe is on the portion of the
material that doesn’t fall after the cut is made. Never
hold cut off piece by hand (Fig. D). KICKBACK from
blade pinch can result. Keep both hands on saw at all
7
ENGLISH
Local regulations may provide for separate collection
of electrical products from the household, at
municipal waste sites or by the retailer when you
purchase a new product.

and kickback.
Accessories
The performance of your tool depends on the accessory
used. Stanley and Piranha accessories are
engineered to high quality standards and designed to
enhance the performance of your tool. By using these
accessories you will get the very best from your tool.
Warning! The use of any accessory not recommended
for use with this tool could be hazardous. Use only
185mm blades with 19mm or 20mm diameter arbor.
Exception: 175mm abrasive blades can be used. When
cutting metal, be careful of hot sparks which are thrown
by the blade.
MAINTENANCE
Your tool has been designed to operate over a long period
of time with a minimum of maintenance. Continuous
satisfactory operation depends upon proper tool care and
regular cleaning.
Warning! Before performing any maintenance,
switch off and unplug the tool.
• Regularly clean the ventilation slots in your tool using
a soft brush or dry cloth.
• Regularly clean the motor housing using a damp cloth.
Do not use any abrasive or solvent-based cleaner.
Important! To assure product Safety and
Reliability, repairs, maintenance and adjustment
(other than those listed in this manual) should be
performed by authorized service centers or other
qualified service personnel, always using identical
replacement parts.
LUBRICATION
Stanley tools are properly lubricated at the factory and
are ready for use.
PROTECTING THE ENVIRONMENT
Separate collection. This product must not be
disposed of with normal household waste.
Should you find one day that your Stanley product
needs replacement, or if it is of no further use to you,
do not dispose of it with household waste. Make this
product available for separate collection.
Separate collection of used products and
packaging allows materials to be recycled and
used again. Re-use of recycled materials helps
prevent environmental pollution and reduces
the demand for raw materials.
Sawing
Warning! To reduce the risk of serious personal
injury,always hold the tool with both hands.
• Let the blade run freely for a few seconds before
starting the cut.
• Apply only a gentle pressure to the tool while
performing the cut.
• Work with the shoe pressed against the workpiece.
HINTS FOR OPTIMUM USE
• As some splintering along the line of cut on the top
side of the workpiece cannot be avoided, cut on the
side where splintering is acceptable.
• Where splintering is to be minimized, e.g. when
cutting laminates, clamp a piece of plywood onto the
top of the workpiece.
Pocket Cutting (Fig. K)
Pocket cutting is used to cut a hole in a piece of
material without cutting from the side.
• Measure and mark work.
• Tilt saw forward and rest front of the shoe on
material to be cut. Align so that cut will begin at the
back of the drawn rectangle shown in Fig. K.
• Using the retracting lever, retract blade guard to an
upward position, with the blade just clearing the
material, start motor and gradually lower the saw into
the material.
Warning! As blade starts cutting the material,
release the retracting lever immediately.
• Never tie the blade guard in a raised position.
• When the shoe rests flat on the material being cut,
complete the cut in forward direction.
• Allow the blade to come to a complete stop before
lifting saw from material.
• When starting each new cut, repeat the above steps.
Wrench Storage (Fig. L)
The spanner wrench (8) can be stored on the saw shoe as
shown in Fig. L.
Attaching and Removing the Rip Fence (Fig. M)
The rip fence is used to saw in a straight line parallel to
the edge of the working piece.
Attaching
• Loosen the locking knob (17).
• Insert the rip fence (18) through the openings (19).
• Slide the rip fence into the desired position.
• Tighten the locking knob.
Removing
• Loosen the locking knob.
• Pull the rip fence out of the tool. Note: If you do not
have a proper fitting fence, use a straight edge guide
in contact with the edge of the shoe to improve
accuracy of cut and reduce the possibility of binding
• Check and re-assembly inner flange (20) on spindle
(16). Insure the correct side of inner flange (20) faces
outward and match saw blade.
• Place the saw blade (5) onto the inner flange (20),
making sure that the arrow on the blade points in the
same direction as the arrow on the tool.
• Fit the outer washer (10) on the spindle.
• Insert the blade retaining screw (11) into the hole in
the spindle.
• Prevent spindle rotation by engaging the spanne
wrench into the holes of the outer washer.
• Securely tighten the blade retaining screw by
holding the spanner wrench and turning hex wrench
clockwise to tighten the blade retaining screw.
Warning! Inner flange (20) respectively marked
with “19” and “20”, match the saw blade (5) with
19mm or 20mm diameter arbor.
Removing the Blade
• To prevent spindle rotation, engage the protrusions of
the spanner wrench (8) into the holes in the outer
washer (10).
• Loosen and remove the blade retaining screw (11)
by turning it counterclockwise using the hex wrench
(15).
• Remove the outer washer (10).
• Remove the saw blade (5).
Warning! To reduce the risk of serious personal
injury, read, understand and follow all important
safety warnings and instructions prior to using tool.
GENERAL CUTS
Guard Against Kickback
With unit unplugged, follow all assembly, adjustment and
set up instructions. Make sure lower guard operates.
Select the proper blade for the material to be cut.
• Measure and mark work for cutting.
• Support and secure work properly (See Safety Rules
and Instructions).
• Use appropriate and required safety equipment (See
Safety Rules).
• Secure and maintain work area (See Safety Rules).
• With plug inserted and guard closed, make sure
switch turns saw on and off.
Warning! It is important to support the work
properly and to hold the saw firmly to prevent loss of
control which could cause personal injury. Fig. C
illustrates recommended hand position.
OPERATION
Switch
• To operate the tool, depress the trigger switch (1).
The tool will continue to run as long as the trigger is
depressed.
• To turn the tool off, release the trigger switch (1).
There is no provision for locking the tool on, and the
switch should never be locked on by any other means.
times.
• Stay alert and exercise control. Keep body
positioned to one side of blade. Always maintain a
firm grip and control of saw with both hands. Do not
change hand grip or body position while saw is
running. Take precaution to avoid injury from cut off
pieces and other falling material during operation.
Danger! Release switch immediately if blade
binds or saw stalls.
FEATURES (Fig. E)
1. On/Off Switch
2. Main Handle
3. Secondary Handle
4. Shoe
5. Saw Blade
6. Saw Blade Guard
7. Blade Guard Retracting Lever
8. Saw Blade Spanner Wrench
9. Bevel Adjustment Knob
10. Outer Washer
11. Blade Retaining Screw
Saw Blade Hex Wrench (Shown on Fig.I (15))
Rip Fence (Shown on Fig. M (18))
Inner Flange (Shown on Fig. J (20))
ASSEMBLY/ADJUSTMENT SET-UP
Warning! Always unplug saw from power
supply before any of the following operations.
Adjusting the Depth of Cut (Fig. F and G)
The depth of cut should be set according to the thickness
of the workpiece.
• Loosen the lever (12) to unlock the saw shoe.
• Move the saw shoe (4) into the desired position. The
corresponding depth of cut can be read from the
scale (13).
• Tighten the lever to lock the saw shoe in place.
• Set depth adjustment of saw such that one tooth of
the blade projects below the workpiece as shown in
Fig. G.
Adjusting the Bevel Angle (Fig. H)
This tool can be set to bevel angles between 0° and 45°
• Loosen the locking knob (9) to unlock the saw shoe.
• Move the saw shoe (4) into the desired position. The
corresponding bevel angle can be read from the
scale (14).
• Tighten the locking knob to lock the saw shoe in place.
Attaching the Blade (Fig. I and J)
• To prevent spindle rotation engage the protrusions of
the spanner wrench (8) into the holes in the outer
washer (10) as shown in Fig. I.
• Loosen and remove the blade retaining screw (11) by
turning the hex wrench (15) counter- clockwise.
• Remove the outer washer.
.................Class II Construction
.................Earthing Terminal
...............Safe Alert Symbol
.../min ...........Revolutions or Reciprocation per
.............Read instructions manual
• For tools intended to cut wood, instruction on correct
use of the dust collection system.
• For tools intended to cut wood, instruction to wear a
dust mask.
• Instrcution to only use saw blades recommended.
• Instruction to always wear hearing protection.
SAFETY INTRUCTIONS FOR ALL SAWS
CUTTING PROCEDURES
a. DANGER: Keep hands away from cutting area
and the blade. Keep your second hand on
auxiliary handle, or motor housing. If both hands
are holding the saw, they cannot be cut by the blade.
b. Do not reach underneath the workpiece. The
guard cannot protect you from the blade below the
workpiece.
c. Adjust the cutting depth to the thickness of the
workpiece. Less than a full tooth of the blade teeth
should be visible below the workpiece.
d. Never hold piece being cut in your hands or
across your leg. Secure the workpiece to a stable
platform. It is important to support the work properly
to minimize body exposure, blade binding, or loss of
control.
e. Hold power tool by insulated gripping surfaces
when performing an operation where the cutting
tool may contact hidden wiring or its own cord.
Contact with a "live" wire will also make exposed
metal parts of the power tool "live" and shock the
operator.
f. When ripping always use a rip fence or straight
edge guide. This improves the accuracy of cut and
reduces the chance of blade binding.
g. Always use blades with correct size and shape
(diamond versus round) of arbour holes. Blades
that do not match the mounting hardware of the saw
will run eccentrically, causing loss of control.
h. Never use damaged or incorrect blade washers
or bolt. The blade washers and bolt were specially
designed for your saw, for optimum performance and
safety of operation.
FURTHER SAFETY INSTRUCTIONS FOR ALL SAWS
Causes and operator prevention of kickback:
• Kickback is a sudden reaction to a pinched, bound or
misaligned saw blade, causing an uncontrolled saw
to lift up and out of the workpiece toward the
operator;
• When the blade is pinched or bound tightly by the
kerf closing down, the blade stalls and the motor
reaction drives the unit rapidly back toward the
operator;
• If the blade becomes twisted or misaligned in the cut,
the teeth at the back edge of the blade can dig into
the top surface of the wood causing the blade to climb
out of the kerf and jump back toward the operator.
• Kickback is the result of saw misuse and/or incorrect
operating procedures or conditions and can be
avoided by taking proper precautions as given below.
a. Maintain a firm grip with both hands on the saw
and position your arms to resist kickback forces.
Position your body to either side of the blade, but not
in line with the blade. Kickback could cause the saw
to jump backwards, but kickback forces can be
controlled by the operator, if proper precautions are
taken.
NOTE For circular saws with 185 mm or smaller
diameter blades, the words "with both hands" may
be omitted.
b. When blade is binding, or when interrupting a
cut for any reason, release the trigger and hold
the saw motionless in the material until the blade
comes to a complete stop. Never attempt to remove
the saw from the work or pull the saw backward
while the blade is in motion or kickback may occur.
Investigate and take corrective actions to eliminate
the cause of blade binding.
c. When restarting a saw in the workpiece, centre
the saw blade in the kerf and check that saw
teeth are not engaged into the material. If saw
blade is binding, it may walk up or kickback from the
workpiece as the saw is restarted.
d. Support large panels to minimise the risk of
blade pinching and KICKBACK. Large panels tend
to sag under their own weight. Supports must be
placed under the panel on both sides, near the line of
cut and near the edge of the panel.
e. Do not use dull or damaged blades. Unsharpened
or improperly set blades produce narrow kerf
causing excessive friction, blade binding and
kickback.
f. Blade depth and bevel adjusting locking levers
must be tight and secure before making cut. If
blade adjustment shifts while cutting, it may cause
binding and kickback.
g. Use extra caution when making a "plunge cut"
into existing walls or other blind areas. The
protruding blade may cut objects that can cause
kickback.
SAFETY INSTRUCTIONS FOR CIRCULAR SAW
LOWER GUARD FUNCTION
a. Check lower guard for proper closing before each
use. Do not operate the saw if lower guard does
not move freely and close instantly. Never clamp
or tie the lower guard into the open position. If
saw is accidentally dropped, lower guard may be
bent. Raise the lower guard with the retracting
handle and make sure it moves freely and does not
touch the blade or any other part, in all angles and
depths of cut.
b. Check the operation of the lower guard spring. If
the guard and the spring are not operating
properly, they must be serviced before use. Lower
guard may operate sluggishly due to damaged parts,
gummy deposits, or a build-up of debris.
c. Lower guard may be retracted manually only for
special cuts such as "plunge cuts" and
"compound cuts." Raise lower guard by
retracting handle and as soon as blade enters the
material, the lower guard must be released. For
all other sawing, the lower guard should operate
automatically.
d. Always observe that the lower guard is covering
the blade before placing saw down on bench or
floor. An unprotected, coasting blade will cause the
saw to walk backwards, cutting whatever is in its
path. Be aware of the time it takes for the blade to
stop after switch is released.
SAFETY INSTRUCTIONS FOR CIRCULAR SAW
a. Check guard for proper closing before each use.
Do not operate the saw if guarddoes not move
freely and enclose the blade instantly. Never
clamp or tie the guard with the blade exposed. If saw
is accidentally dropped, guard may be bent. Check to
make sure that guard moves freely and does not
touch the blade or any other part, in all angles and
depths of cut.
b. Check the operation and condition of the guard
return spring. If the guard and the spring are not
operating properly, they must be serviced before
use. Guard may operate sluggishly due to damaged
parts, gummy deposits, or a build-up of debris.
c. Assure that the guide plate of the saw will not
shift while performing the “plunge cut” when the
blade bevel setting is not at 90°. Blade shifting
sideways will cause binding and likely kick back.
d. Always observe that the guard is covering the
blade before placing saw down on bench or floor.
An unprotected, coasting blade will cause the saw to
walk backwards, cutting whatever is in its path. Be
aware of the time it takes for the blade to stop after
switch is released.
SAFETY GUIDELINES/DEFINITIONS
It is important for you to read and understand this
manual. The information it contains relates to protecting
Your Safety and Preventing Problems. The symbols
below are used to help you recognize this information.
Danger! Indicates an imminently hazardous
situation which, if not avoided, will result in death or
serious injury.
Warning! Indicates a potentially hazardous
situation which, if not avoided, could result in death
or serious injury.
Caution! Indicates a potentially hazardous
situation which, if not avoided, may result in minor or
moderate injury.
Caution!
Used without the safety alert symbol
indicates potentially hazardous situation which, if not
avoided, may result in property damage.
ADDITIONAL SAFETY RULES FOR CIRCULAR SAW
Warning! Use of this tool can generate and/or
disburse dust, which may cause serious and
permanent respiratory or other injury. Always use
NIOSH/OSHA approved respiratory protection
appropriate for the dust exposure. Direct particles
away from face and body.
Caution! Wear appropriate hearing protection
during use. Under some conditions and duration of
use, noise from this product may contribute to
hearing loss.
• Snagging the lower guard on a surface below the
material being cut can momentarily reduce
operatol control. The saw can lift partially out of the
cut increasing the chance of blade twist. Ensure there
is sufficient clearance under the workpiece.
• When necessary to raise lower guard manually,
use the retracting lever.
• Keep the Blades Clean and Sharp. Sharp blades
minimize stalling and kickback. The use of dull and/or
dirty blades can increase the saw loading causing the
operator to push harder which promotes twisting.
Caution! Laceration Hazard. Keep hands
away from cutting areas. Keep hands away from
blades. Never place hands in front of or behind the
path of the blade while cutting. Do not reach
underneath work while blade is rotating. Do not
attempt to remove cut material when blade is moving.
• Support large panels. Large panels must be
supported as shown (Fig. A) in this manual to
minimize the risk of blade pinching and kickback.
Material supported only at the ends (Fig. B) will lead to
blade pinching. When cutting operation requires the
resting of the saw on the workpiece, the saw shall be
rested on the larger portion and the smaller piece cut
off.
• Use only correct blades and blade assembly
components when mounting blades. Do not use
blades with incorrect size holes. Never use defective
or incorrect blade washers or bolts. Follow blade
assembly procedures.
• Adjustments. Before cutting be sure depth and
bevel adjustments are tight.
• Support and secure the work properly. Insure that
the material to be cut is clamped (Fig. C) and solidly
supported and balanced on a strong, stable and level
work surface. Support the work so that the wide
portion of the saw shoe is on the portion of the
material that doesn’t fall after the cut is made. Never
hold cut off piece by hand (Fig. D). KICKBACK from
blade pinch can result. Keep both hands on saw at all
8
ENGLISH
Local regulations may provide for separate collection
of electrical products from the household, at
municipal waste sites or by the retailer when you
purchase a new product.

技术数据
规格
STEL311
电压
伏特
110
功率
瓦特
1510
空载速度
/
分
5500
锯片最大直径
毫米
185
最大切割深度 毫米 62
用途
本电圆锯用来切割木材和木料产品。
一般电动工具安全规则
警告!阅读并理解所有指示说明。如不遵守以下任
何指示说明,可能导致触电、火灾和 / 或严重人身
伤害。
请保存好所有指示说明
安全说明
电动工具一般安全警告。
警告!请阅读所有安全警告和指示说明。
如不遵守以下任何警告和指示说明,可能导致触电、
火灾和 / 或严重伤害。
请保存好所有警告和指示说明,以备将来查阅。以下
所有警告中的“电动工具”一词是指电源驱动(有
线)电动工具,或者电池驱动(无线)电动工具。
1.
工作区域
a.
保持工作场地清洁和明亮。混乱和黑暗的场地会
引发事故。
b.
不要在易爆环境,如有易燃液体、气体或粉尘环
境中操作电动工具。电动工具产生的火花会点燃
粉尘或气体。
c.
请让儿童和旁观者离开后操纵电动工具时。分心
会使你放松控制。
2.
电气安全
a.
电动工具的插头必须与插座相配。切勿以任何方
式改装插头。需接地的电动工具不能使用任何转
换插头。未经改装的插头和相配的插座将减少触
电危险。
b.
避免人体接触接地表面,如管道、散热片、炉灶
和冰箱等。如果您的身体接地会增加触电危险。
c.
不得将电动工具暴露在雨中或潮湿环境中。水进
入电动工具将增加触电危险。
d.
不得滥用电源线。绝不能用电线搬运、拉动电动
工具或拔出其插头。让电线远离热、油、锐边或
运动部件。受损或缠绕的电线会增加触电危险。
e.
在户外使用电动工具时,使用适合户外使用的外
接电线。适合户外使用的电线将减少触电危险。
f.
如果必须在潮湿场合使用电动工具,请使用漏电
保护器(RCD)。使用RCD可减小电击危险。
3.
人身安全
a.
保持警觉。操作电动工具时,关注所从事的操作
并保持清醒。切勿在疲倦、药物、酒精或治疗反
应的情况下操作电动工具。操作电动工具期间精
力分散会导致严重人身伤害。
b.
使用安全防护装备。始终佩戴护目镜。安全装
置,诸如用于适当条件下的防尘面具、防滑安全
鞋、安全帽或听力保护等装置能减少人身伤害。
c.
避免意外启动。确保开关在插入差头时处于关断
位置。手指放在开关上搬运电动工具,或开关处
于接通状态时插入插头均可引发危险。
d.
在电动工具接通之前,取下所有调整钥匙或扳
手。遗留在电动工具旋转零件上的扳手或钥匙可
能会导致人身伤害。
e.
手不要伸得太长。时刻保持身体平衡,并找到合
适的落脚点。这样在意外情况下才能更好地控制
电动工具。
f.
着装适当。不要穿宽松衣服或佩戴饰品。让您的
头发、衣服和手套远离运动部件。宽松衣服、佩
饰或长发可能会卷入运动部件。
g.
如果提供了与排屑装置、除尘设备连接用的装
置,请确保他们连接完好且使用得当。使用这些
装置可减少粉尘引起的危险。
4.
电动工具使用和注意事项
a.
不要滥用电动工具。根据用途使用适当的电动工
具。按额定速率使用的适当电动工具会让您更有
效、更安全地执行工作。
b.
工具开关不能接通或关断电源时,请勿使用工
具。不能用开关来控制的电动工具是危险的且必
须进行修理。
c.
在进行任何调节、更换附件或存放工具之前,必
须从电源上拔掉插头和 / 或取下电池组。这种防
护性措施将降低电动工具意外启动的风险。
d.
将闲置的电动工具存放在儿童所及范围之外,并
且不要让不熟悉电动工具或对这些使用须知不了
解的人操作电动工具。电动工具在未经培训的用
户手中会发生危险。
e.
保养电动工具。检查运动部件是否错位或夹锯或
破损,以及是否存在影响电动工具运行的其它情
况。如有损坏,必须在使用前修理电动工具。许
多事故原因都是电动工具电瓶不良。
f.
保持刀具锋利和清洁。保养良好、切削锋利的刀
具不易卡住而且更易于控制。
g.
按照使用说明书以及作业条件和具体进行的工作
使用电动工具、附件和工具刀头等。电动工具用
于设计之外的目的时,可能发生危险。
STEL311
1510W
圆锯机
9
繁体中文

5.
维修
a.
将你得电动工具送交专业维修人员,必须使用同
样得备件进行更换。这样将确保所维修的电动工
具的安全性。
6.
电气安全
本设备为双重绝缘,因此无须接地线。请
务必确认电源电压是否与标牌上标明的电
压一致。
警告!如电源线损坏,必须用一条通过服
务部门购得的专门制备软线来更换。
如电源线由具备同等资格但未经史丹利授
权的人士更换,则产品质保将无效。
7.
工具上的标签
您的工具上可能包含下列符号:
伏特
安培
赫兹
瓦特
分钟
交流电
直流电
空载速度
双重绝缘
接地终端
安全警告标识
每分钟旋转或往复次数
圆锯机安全说明
l
让手始终远离切割区域和锯片。辅助手始终持握
辅手柄或马达外壳。如需双手持握电圆锯,请小
心不要被锯片割伤。
l
把身体保持在锯片的任何一侧,但不得与锯片处
于同一直线。回弹可能令电圆锯往后跳动。
(见“回弹的成因和预防”)
l
不得使肢体处于工作面下方。防护装置无法在工
作面下方保护您不受锯片伤害。
l
每次使用前检查下方防护罩是否能顺利闭合。如
果下方防护罩活动不畅或不能及时闭合,请勿操
作电圆锯。决不能以夹、捆或其他方式将下方防
护罩固定在打开位置。如电圆锯意外跌落,下方
防护罩可能会弯曲。用回拉杆抬起下方防护罩,
确保防护罩能顺畅活动,且在任何角度和深度切
割时都不触碰锯片或任何部件。
l
检查下方防护罩弹簧的状况和运作。如防护罩和
弹簧无法正常运作,必须在使用前进行维护。因
部件损坏、粘性污垢或残渣堆积等原因,下方防
护罩可能会活动不畅。
l
只有在进行“袋形切割”、“复合切割”等特殊
切割时方可手动收起下方防护罩。使用回拉杆抬
起下方防护罩。当锯片切入切割对象时必须立即
让下方防护罩恢复原位。进行所有其他切割作业
时,必须让下方防护罩处于自动运作模式。
l
将圆锯机放置在凳子或地板上之前,始终要确认
下方防护罩已盖住锯片。无防护的锯片转动时可
令电圆锯往后运动,割坏路径的一切物体。请注
意,放开扳机后需一段时间锯片才能完全停止转
动。
l
切勿手持或以两腿夹住要切割的对象。对切割对
象进行适当的支撑非常重要,以最小化身体暴
露、锯片运转不畅或失控的危险。
l
切割工具可能接触隐藏的电线或工具本身的电源
线时,请借助绝缘手柄握持工具。如果接触到“
带电”导线,电动工具金属部件表面就会“带
电”并使操作人员触电。
l
高速切割时,始终使用导尺或直边卡尺。这有助
于改善切割精度并降低锯片运转不畅的可能。
l
始终在轴孔尺寸和形状(菱形和圆形)正确的前
提下使用电圆锯。与锯台设备不匹配的锯片将出
现偏心运动,导致失控。
l
决不能使用损坏或不当的锯片垫圈或螺栓。锯片
垫圈和螺栓是为您的电圆锯特别设计的,可优化
作业效率和安全。
所有圆锯的安全说明
危险:
a.
让手始终远离锯割区域和锯片。你的另一只手
始终握住辅助手柄或电动机机壳。
如果双手都
握住圆锯,就不会被锯片伤害。
b.
不得接触工件的下面。护罩不能防止工件下方
锯片的危险。
c
.
将锯割深度调至工件的厚度。能看到在工件下
露出的锯齿应不到一个齿高。
d
.
不得手持工件或将工件架在腿上进行锯割,
应将工件夹紧在一个稳定的平台上。
适当支撑
工件对减少人身伤害、锯片卡住或操作失控是至
关重要的。
e
.
在锯割工具进行操作时有可能碰到暗线或自身
电线的场合,须通过绝缘握持面来握住电动工
具。
碰到“带电”电线也会使工具的裸露金属部
分带电,从而使操作者触电。
f
.
当作劈锯时,始终使用劈锯护栏和直边导向
器。
这样改善了锯割精度并减小了锯片卡住的
几率。
g
.
始终使用尺寸和轴心形状(菱形或圆形)得当
的锯片。
如果锯片与圆锯夹装部件不符将引起偏
心运转而导致失控。
h
.
不得使用损坏的和尺寸不符的垫圈和螺栓。为
改善作业和安全运行,锯片垫圈及螺栓是为圆锯
专门设计的。
对各种圆锯的进一步安全说明
回弹的原因和操作者防护:
——
10
参阅说明手册
繁体中文
V ...................
A....................
Hz .................
W ..................
min ...............
...............
...............
n
0
..................
.................
.................
................
.../min ...........
/分

回弹是当锯片受挤压、被卡住或偏离中心时的
突然反作用,使圆锯不受控制地抬起并脱离工
冲向操作者。
——当锯片受挤压或被收拢的切口紧紧卡住时,锯
片堵转且电动机反作用力驱使整机朝操作者快速
弹回。
——如果锯片发生扭曲或偏离锯割面,锯片后边缘上
的锯齿会挖入木材上表面从而引起锯片爬出切口
并朝操作者回弹。
回弹是误用圆锯和/或不正确操作程序或条件导致
结果,采取以下适当预防措施可避免回弹。
a
.
双手紧握圆锯上的把手,双臂放置得能抵住
回弹力。身体处于圆锯的任意一侧而不对准锯
片。
回弹会导致圆锯的向后弹起,但如果采取了
适当的防备措施,回弹力可以受操作者的控制。
b
.
当锯片卡住,或因任何原因导致的锯割中断
时,释放开关扳机并握持圆锯在材料中不移
动,直到锯片完全停止。不得在锯片处于运转
或可能发生回弹情况下尝试将圆锯从工件中拿
走或向后拉动圆锯。
调查并采取正确的措施以消
除锯片卡住的原因
。
c
.
当在工件中重新起动圆锯时,将锯片对准切口
并检查锯齿是否插入材料。
如果锯片卡住了,
工具重新起动时,锯片会爬出工件或从工件上
回弹。
d
.
支撑大型板料以减少锯片受挤压和回弹的危
害。
大型板料因自重向下垂,支撑物必须放置
在板料下面的两侧,靠近切割线和板料边缘都要
放置。
e
.
不得使用钝的或破损的锯片。没有开锋的或安
装不当的锯片会形成窄小的锯痕,从而导致剧烈
摩擦、锯片卡住和回弹。
f
.
锯割之前,锯割深度和倾角调节锁定钮必须旋
紧和紧固。
如果锯割时锯片调节器发生移动,可
能会引起锯片卡住和回弹。
g
.
当对现存墙体或其他盲区进行 “插入式锯割”
时要格外小心。
伸出锯片可能会锯割到引起回
弹的物体
。
带摆动时外护罩的圆锯、带摆动式内护罩的圆
和带拖拉式护罩的圆锯的安全说明。
a
.
每次使用前,检查下护罩闭合是否自如。如果
下护罩不能迅速回复,则不得操作圆锯。不得
将下护罩夹住或系绑在开启位置。
如果圆锯突
然跌落,下护罩可能会弯曲变形,用回缩手柄抬
起下护罩,确信在任何锯割角度和深度下护罩回
缩自如,且不会触及锯片和任何其它零件。
b
.
检查下护罩弹簧的工作情况,如果护罩及弹簧
不能正常工作,必须在使用前对其进行维修。
下护罩可能因零件损害、胶质沉积或废屑堆积而
运动迟缓。
c
.
仅当特殊锯割,例如“插入式锯割”和“组合
式锯割”,才应用手动方式抬起下护罩。用回
缩手柄抬起下护罩,锯片刚一进入到锯割材料
就必须释放下护罩。对所有其他锯割作业,下护
罩应自动回复。
d
.
在把圆锯放置在工作台或地上之前始终能看到
下护罩是遮住锯片的。
未经防护的、有惯性的锯
片引起圆锯后退,锯割到其行程上的物体,要考
虑到开关释放后锯片停下来的时间。
安全规则 / 定义
阅读并理解本手册对您非常重要。其信息事关保护
您的安全和避免麻烦。以下标识可帮助您辨认所要
传达的信息。
危险!表示紧急的危险情形,如不加以避免,将
导致死亡或严重伤害。
警告!表示潜在的危险情形,如不加以避免,可
能导致死亡或严重伤害。
小心!表示潜在的危险情形,如不加以避免,可
能导致轻度或中度伤害。
小心!(不带安全警示标志):表示潜在的危险
情形,如不加以避免,可能导致财产损坏。
其他有关圆锯机的安全规则
警告!使用本工具可产生和 / 或激起灰尘,由此
导致严重的永久性呼吸系统损伤或其他伤害。始终使
用 NIOSH/OSHA 认可的、与所暴露的灰尘类型相适
的呼吸保护装置。避免颗粒直接接触面部和身体。
小心!使用时佩戴适当的听力保护装置。在某些
情况下、以及长时间使用时,本产品的噪音可能导
致听力损伤。
l
让下方防护罩在比切割对象更低的粗糙表面上摩
擦会严重影响操控性。电圆锯会部分抬起,增加
锯片变形的风险。确保工件得到充分的清理。
l
如有必要抬起下方防护罩,应使用回拉杆。
l
保持锯片清洁和锋利。锋利的锯片能最小化失速
和回弹的可能性。使用钝化和 / 或肮脏的锯片会
增加切割负荷,迫使操作者以更大的力推拉,从
而诱发变形。
小心!撕裂伤危害。双手远离切割区域。保持双
手远离锯片。决不能在切割时将手放在锯片行进的路
径上。锯片旋转时,不得将手伸到切割对象下方。
不得在锯片运动时试图移除切割对象。
l
支撑大型切割对象。必须按本手册图示(图 A)
为大型切割对象提供支撑,以最小化锯片夹住和
回弹的风险。仅在两端支撑(图 B)会导致锯片
夹住。如切割作业需要,将电圆锯安放在工件上
时,应将锯子放在较大的一侧,将较小的一侧切
下。
l
安装锯片时仅使用正确的锯片和组装部件。不得
在轴孔不正确的情况下使用锯片。决不能使用损
坏或不当的锯片垫圈或螺栓。遵循锯片组装流
程。
11
繁体中文

l
调整。切割前务必确保深度和斜切角调整杆的紧
固度。
l
适当支撑和固定切割对象。确保切割对象被夹紧
(图 C),并在坚固、稳定和水平的工作面上获
得牢固的支撑和平衡。支撑切割对象,让锯底板
较宽的一侧位于切割对象被切割后不会掉落的一
侧。决不能用手持握切割下的工件(图 D)。锯
片夹住可导致回弹。 应始终双手持握。
l
保持警惕,注意控制身体始终位于锯片的一侧。
始终用双手牢牢握持并控制锯身。锯片运转时不
要改变握持方式或身体姿势。采取预防措施,避
免切下的物件和其他作业中掉落的物品导致受
伤。
危险!如锯片卡住或锯子停转,立即松开扳机。
功能部件(图 E)
1.
On / Off 开关
2.
主握柄
3.
次握柄
4.
底板
5.
锯片
6.
锯片防护罩
7.
锯片防护罩回拉杆
8.
锯片活动扳手
9.
斜角调整旋钮
10.
外垫圈
11.
锯片固定螺丝
锯片六角扳手(15) ( 见图 I)
导尺(18) (见图 M)
内法兰(20) (见图 J)
组装 / 调整设置
警告!进行任何以下操作前始终拔下电源插头。
调整切割深度(图 F 和 G)
切割深度可根据工件厚度设置。
l
松开卡杆(12)解锁锯底板。
l
移动锯底板(4)至所需位置。可从刻度(13)上
读出相应的切割深度。
l
拉紧卡杆锁定锯底板。
l
切割深度以一个锯齿突出到工件下方(如图 G 所
示)为宜。
调整斜切角(图 H)
本工具可在 0 至 45 度的范围内设置斜切角
l
松开锁定旋钮(9)解锁锯底板。
l
移动锯底板(4)至所需位置。可从刻度(14)上
读出相应的斜切角度。
12
繁体中文
l
拉紧锁定旋钮锁定锯底板。
安装锯片(图 I 和 J)
l
为避免轴心旋转,如图 I 所示将活动扳手(8)突
起部塞入外垫圈(10)洞内。
l
逆时针转动六角扳手(15)卸下锯片固定螺丝
(11)。
l
卸下外垫圈。
l
检查并调整内法兰(20),确保标有与锯片
(5)内孔直径相匹配的数字面朝外,装于输出轴
(16)上。
l
将锯片(5)放在内法兰(20)上,确保锯片上
的箭头与工具上的箭头朝向一致。
l
将外垫圈(10)安装在转轴上,斜边对远离锯片
的一侧。
l
将锯片固定螺丝(11)拧入转轴螺丝孔。
l
将活动扳手突起部塞入外垫圈洞内以避免转轴旋
转。
l
握住活动扳手、顺时针方向转动六角扳手,以拧
紧锯片固定螺丝。
警告!内法兰(20)正反面标有数字“19“
和“20”,用于配内孔直径分别为19mm和
20mm的锯片(5)。
卸除锯片
l
为避免轴心旋转,将活动扳手(8)突起部塞入外
垫圈(10)洞内。
l
使用六角扳手(15)逆时针旋转卸下片固定螺丝
(11)。
l
卸下外垫圈(10)。
l
卸除锯片(5)。
警告! 为减少严重人身伤害的风险,请在使用
工具前阅读、理解并遵守所有重要安全警告和指示
说明。
一般切割
谨防回弹
拔下电源插头,执行所有组装、调试和设置说明步
骤。确保下方防护罩能正常工作。
针对要切割的材质选择合适的锯片。
l
对切割工件进行测量和标记。
l
充分支撑和固定工件(见安全规则和指示说明)。
l
视需要使用合适的安全装备(见安全规则)。
l
维护工作场所安全并保持整洁(见安全规则)。
l
插上电源并闭合防护罩后,确保开关能正常启停
电圆锯。
警告!充分支撑工件并牢牢持握电圆锯非常重
要,以避免可导致人身伤害的失控。图 C 为推荐持
握姿势示意。

附件
警告!
另外:
维护
警告!
重要!
润滑
保护环境
操作
开关
切割
警告!
最佳使用的技巧
袋形切割(图 K)
袋形切割用于在工件上切出洞形切口,而不切到任
何一侧。
警告!
扳手存储(图 L)
安装
卸除
13
繁体中文


03/201590621061
-
 1
1
-
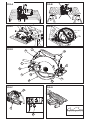 2
2
-
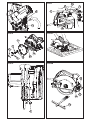 3
3
-
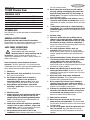 4
4
-
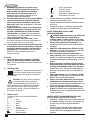 5
5
-
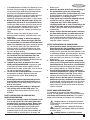 6
6
-
 7
7
-
 8
8
-
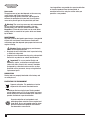 9
9
-
 10
10
-
 11
11
-
 12
12
-
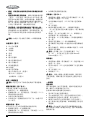 13
13
-
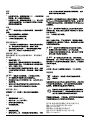 14
14
-
 15
15
-
 16
16


