
FC8820
FC8810


FC8820
FC8820
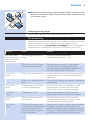
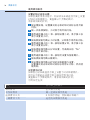
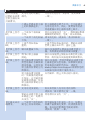
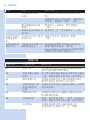
Wheels stuck
ݓઁहሂ
Top cove r or dust container not placed properly
רۆࠋࠦӧ٦ݾ
Bumper stuck
ߓԎሑᇆहሂ
Robot lifted up from floor
՚ֽϴุఓਘᇊୃስײᆋ०༏ӧచ
Colour of floor too dark
ֽϴဂ೨ขτ
Battery not inserted properly / Charging error (switch is off)
ԁሑݾԍմ༆IJऻܵၜܵтij
5
6
4
3
2
1
7
8
9
1516
13
12
14
11
10
17
18
19
21
20
22
24
25
26
23
2928
27
30
1


6
Introduction
Congratulations on your purchase and welcome to Philips!
To fully benet from the support that Philips offers, register your product at
www.philips.com/welcome.
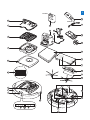
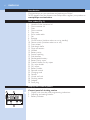
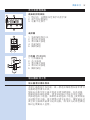
Your robot (Fig. 1)
1 Handle of dust container lid
2 Dust container lid
3 Filter
4 Dust container
5 Top cover
6 Error codes table
7 Fan
8 Bumper
9 On/off button (switches robot on or to standby)
10 Power switch (switches robot on or off)
11 Front wheel
12 Side brush shafts
13 Drop-off sensors
14 Wheels
15 Battery cavity
16 Suction opening
17 Side brushes
18 Rechargeable battery
19 Battery cavity cover
20 Fixation blocks for dry wipes
21 Dry wipe holder
22 Dry wipes
23 Battery holder
24 Remote control
25 Charging cord
26 Pointer
27 Virtual wall unit
28 Docking station
29 Adapter
30 Small plug
Displays and control panels
Control panel of docking station
1 Display with time, day and programming indications
2 Adjusting and setting buttons
3 Battery indicator
1
2
3
ENGLISH

Remote control
1 Navigation buttons and on/off
2 Cleaning time buttons
3 Cleaning mode buttons
4 Fan speed buttons
5 Docking button
Pointer (FC8820)
1 Pointer button
2 On/off button
3 Cleaning mode buttons
4 Cleaning time buttons
5 Docking button
How your robot works
What your robot cleans
This robot is equipped with features that make it a suitable cleaner to help
you clean the oors in your home.
The robot is especially suitable for cleaning hard oors, such as wooden,
tiled or linoleum oors. It may experience problems cleaning soft oors,
such as carpet or rugs. If you use the robot on a carpet or rug, please stay
close by the rst time to see if the robot can deal with this type of oor.
The robot also needs supervision when you use it on black and shiny
hard oors.
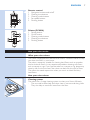
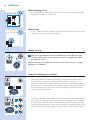
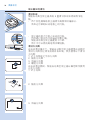
How your robot cleans
Cleaning system
The robot has a 3-stage cleaning system to clean your oors efciently.
- The two side brushes help the robot clean in corners and along walls.
They also help to work dirt loose from the oor.
1
2
3
45
5
4
3
2
1
ENGLISH 7

- The suction power of the robot picks up loose dirt and transports it
through the suction opening into the dust container.
- The robot comes with a dry wipe holder that allows you to clean your
hard oor even more thoroughly with dry wipes.
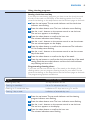
Cleaning patterns
In its auto cleaning mode, the robot uses an automatic sequence of
cleaning patterns to clean each area of the room optimally.
The cleaning patterns it uses are:
1 Z-pattern or zigzag pattern
2 Random pattern
3 Wall-following pattern
4 Spiral pattern
During auto cleaning, the robot uses these patterns in a xed sequence:
1 Z-pattern
2 Random pattern
3 Wall-following pattern
4 Spiral pattern
- When the robot has completed this sequence of patterns, it starts
moving in Z-pattern again. The robot continues to use this sequence
of patterns to clean the room until the rechargeable battery is empty,
or until it is switched off manually.
- If the robot detects a particularly dirty area during its cleaning run,
it switches to spiral mode and to turbo fan speed to ensure thorough
dirt removal.
Note: You can also select each mode individually by pressing the appropriate
button on the remote control or pointer (FC8820 only). For more details,
see chapter ‘Using your robot’, section ‘Cleaning modes’.
ENGLISH8

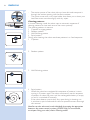
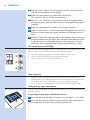
How your robot avoids height differences
- The robot has three drop-off sensors in its bottom. It uses these
drop-off sensors to detect and avoid height differences such as
staircases.
Note: It is normal for the robot to move slightly over the edge of a height
difference, as its front drop-off sensor is located behind the bumper.
Caution: In some cases, the drop-off sensors may not detect a staircase
or other height difference in time. Therefore monitor the robot carefully
the rst few times you use it, and when you operate it near a staircase
or another height difference.
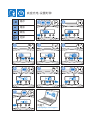
Before rst use
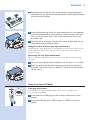
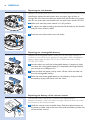
Mounting the side brushes
1 Unpack the side brushes and place the robot upside down on a table
or on the oor.
2 Push the side brushes onto the shafts on the bottom of the robot.
Note: Make sure you attach the side brushes properly. Press them onto the
shaft until you hear them lock into position with a click.
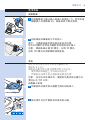
Inserting the rechargeable battery into the robot
You have to insert the rechargeable battery before use.
1 Press the ribbed sections on the battery cavity cover to unlock it.
2 Slide the battery cavity cover off the robot.
3 Remove the plastic from the rechargeable battery.
1
2
ENGLISH 9

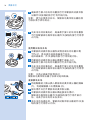
4 Place the rechargeable battery into the battery cavity.
Note: Make sure that the print on the battery points upwards and that
the connectors point in the right direction.
5 Slide the battery cavity cover back onto the robot.
Removing the protection tag from the remote control
The remote control works on a CR2025 coin-shaped battery. This battery
is protected with a protection tag that has to be removed before use.
1 Pull the battery protection tag out of the battery compartment of
the remote control.
, Now the remote control is ready for use.
Preparing for use
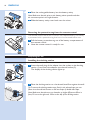
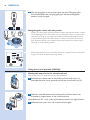
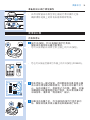
Installing the docking station
1 Insert the small plug of the adapter into the socket on the docking
station (1) and insert the adapter into the wall socket (2).
The display of the docking station lights up.
2 Place the docking station on a horizontal, level oor against the wall.
Tip: To ensure the docking station stays rmly in the selected spot, you can
fasten it to the wall with screws or with two strips of double-sided tape.
Note: Make sure that there are no obstacles or height differences 80cm in
front, 30 cm to the right and 100cm to the left of the docking station.
1
2
100
30
80
ENGLISH10

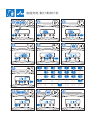
Charging
When you charge the rechargeable battery for the rst time and when
the rechargeable battery is empty, the charging time is four hours.
Your robot can be charged in two ways:
- On the docking station, either manually or automatically during use;
- By connecting the robot directly to the mains
Note: When the rechargeable battery is fully charged, your robot can clean
for up to 100 minutes.
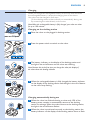
Charging on the docking station
1 Place the robot on the plugged-in docking station.
2 Press the power switch to switch on the robot.
3 The battery indicator on the display of the docking station and
the light in the on/off button on the robot start ashing.
Note: Because this is the rst time you charge the robot, the display of
the robot shows the booting indicator.
4 When the rechargeable battery is fully charged, the battery indicator
on the display of the docking station and the light in the on/of button
on the robot stop ashing.
Charging automatically during use
1 When the robot has nished cleaning or when only 15% of the
battery power remains, it automatically returns to the docking
station to recharge. When the robot returns to the docking station,
the light in the on/off button ashes.
2 When the robot is positioned correctly on the docking station, the
battery indicator on the display of the docking station starts to ash.
FC8820 FC8810
30
24
ENGLISH 11

3 When the rechargeable battery is fully charged, the battery indicator
on the display of the docking station and the light in the on/of button
on the robot stop ashing.
Note: The robot only returns to the docking station automatically when it
started cleaning from the docking station.
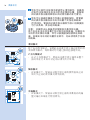
Charging directly from the mains
1 Insert the small plug of the adapter into the socket on the robot
(1). Insert the adapter into a wall socket (2).
2 Press the power switch to switch on the robot.
3 When the robot is connected to the mains correctly, the light in
the on/off button of the robot starts ashing. This indicates that the
rechargeable battery is being charged.
4 When the rechargeable battery is fully charged, the light in the on/off
button of the robot stops ashing.
Preparing the room for a cleaning run
- Before you start the robot on its cleaning run, make sure that you
remove all loose and fragile objects from the oor.
Using your robot
Starting and stopping
1 Press the on/off button. The light in the on/off button goes on and
the robot starts cleaning.
- You can press the on/off button on the robot.
- You can also press the on off button on the remote control or on
the pointer (FC8820).
FC8820 FC8810
30 24
1
2
ENGLISH12

2 Unless you press one of the mode buttons, the robot continues
cleaning in auto cleaning mode until its battery runs low. In auto
cleaning mode it follows repeated sequences of Z-pattern, random,
wall-following and spiral movements. For more information on the
cleaning modes, see section ‘Cleaning modes’.
3 When the battery runs low, the light in the on/off button starts
ashing and the robot returns to the docking station to charge.
4 You can also press the on/off button to interrupt or stop the
cleaning run. If you press the on/off button again and there is still
enough energy in the rechargeable battery, the robot continues
cleaning in the auto cleaning mode.
5 You can also make the robot return to the docking station before
the rechargeable battery runs low by pressing the docking button on
the remote control or the pointer (FC8820). The docking indicator
on the display of the robot lights up and the robot returns to the
docking station.
Note: If you did not start the robot from the docking station, it does not return
to the docking station automatically when the rechargeable battery runs low.
If there is still enough energy in the rechargeable battery, you can press the
docking button to make the robot return to the docking station.
If the rechargeable battery is completely empty, you have to place the robot
on the docking station manually.
Cleaning modes
Next to the auto cleaning mode, this robot has four individual cleaning
modes that can each be activated by pressing the appropriate button.
Z-pattern mode
- In Z-pattern mode, the robot cleans by making Z-shaped loops
through the room to clean large areas.
Random mode
- In this mode, the robot cleans the room in a mixed pattern of straight
and crisscross movements.
ENGLISH 13

Wall-following mode
- In this mode, the robot follows the walls of the room to give the area
alongside the walls an extra clean.
Spiral mode
- In this mode, the robot makes a spiral movement with the fan at turbo
speed to clean a dirty area thoroughly.
Manual driving
1 Use the arrow buttons above and below and to the left and right
of the on/off button on the remote control to navigate the robot
through the room.
Note: Do not press the downward arrow when the robot is close to a height
difference or a staircase.
Using the cleaning time buttons
- Press the maximum cleaning time button to make the robot clean in
auto cleaning mode until its rechargeable battery runs low.
When the robot has nished cleaning, it returns to the docking station
automatically if it started from the docking station. If the robot started
from another point in the room, press the docking button to send it
back to the docking station.
- The other cleaning time buttons allow you to let the robot operate for
60, 45 and 30 minutes respectively. When the cleaning time is nished,
the robot automatically returns to the docking station when it started
from the docking station. If the robot started from another point in the
room, press the docking button to send it back to the docking station.
ENGLISH14

Using cleaning programs
Setting clock time and day
If you want to use cleaning programs, you have to set the clock time and
the day of the week on the display of the docking station rst. For the
pictures that belong to the steps below, see the fold-out pages at the back.
1 Press the set button. The set mode indicator and the clock time
indicator start ashing.
2 Press the select button once. The hour indication starts ashing.
3 Use the + and - buttons on the remote control to set the hour.
The set hour appears on the display.
4 Press the select button to conrm the hour set.
The minutes indication starts ashing.
5 Use the + and - buttons on the remote control to set the minutes.
The set minutes appear on the display.
6 Press the select button to conrm the minutes set. The indication
‘Su’ for Sunday starts ashing.
7 Use the + and - buttons on the remote control to set the current
day of the week.
8 Press the select button to conrm the day of the week.
9 Press the set button to conrm the clock time and day of the week
setting. Both the set mode indicator and the clock time indicator
stop ashing and turn solid.
Programming cleaning times
If you have set the time and the day of the week on the display of the
docking station, you can program cleaning times for your robot. For the
pictures that belong to the steps below, see the fold-out pages at the back.
The programming options available are:
Program Indication on display
Cleaning every day All day indications are on
Cleaning on weekdays Mo to Fri indications are on
Cleaning on 2 consecutive days Indications of 2 days are on, e.g. Fri and Sa
Cleaning 1 day a week Indication of selected day is on
1 Press the set button. The set mode indicator and the cleaning
program indicator start ashing.
2 Press the select button once. The hour indication starts ashing.
3 Use the + and - buttons on the remote control to set the hour.
The set hour appears on the display.
4 Press the select button to conrm the hour set.
The minutes indication starts ashing.
ENGLISH 15

5 Use the + and - buttons on the remote control to set the minutes.
The set minutes appear on the display.
6 Press the select button to conrm the minutes set.
The indication ‘Su’ for Sunday starts ashing.
7 Use the + and - buttons on the remote control to toggle between
cleaning programs (see the table above for the programming options
available).
8 Press the select button to conrm the program selected.
9 Press the set button to conrm the programming. Both the set mode
indicator and the cleaning program indicator stop ashing and turn
solid.
10 When you have set a cleaning program, the display shows the cleaning
program indicator and the day or days selected. If you leave the robot
on standby and its rechargeable battery is fully charged, it will start
cleaning at the programmed time on the programmed day or days.
Fan speed buttons (FC8820)
You can use the fan speed buttons to increase the fan speed to turbo or to
switch off the fan. The default setting is normal fan speed.
1 Turbo fan speed increases the suction power of the robot.
2 You can switch off the fan by pressing this button.
3 Press this button for normal fan speed.
Clap response
- When all icons on the display ash, the robot is malfunctioning.
To stop the icons ashing and see what is wrong, clap you hands once.
This makes the error code appear on the display. See chapter
‘Error codes’ for the explanation of what these error codes mean.
Using the dry wipe attachment
The dry wipe attachment is a feature that allows you to clean hard oors
with dry wipes.
Preparing the dry wipe attachment for use
1 Turn the robot upside down and place it on the oor or on a table.
2 Place the dry wipe on a table and place the dry wipe attachment on
the wipe with its xation lugs pointing towards you.
1
2
3
ENGLISH16

3 Fold both ends of the dry wipe around the dry wipe attachment
and fasten the dry wipe onto the attachment by pushing the xation
blocks into the recesses.
4 Insert the xation lug of the dry wipe attachment into the opening
just behind the wheel on one side of the robot and push until you
hear it lock into place with a click. Then repeat these actions on
the other side.
5 Turn the robot and place it on the oor on its wheels with the dry
wipe attachment touching the oor.
Using the robot with the dry wipe attachment
When the dry wipe attachment is attached, you can use the robot in any
mode and on all hard oors. Do not use the dry wipe attachment on
carpet or rugs.
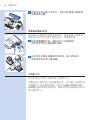
Removing the dry wipe attachment
Remove the dry wipe attachment as soon as you have nished wiping
the oor.
1 Turn the robot upside down and place it on the oor or on a table.
2 Push one end of the dry wipe attachment towards the wheel on
the other side of the robot to release it. Then pull the attachment
off the robot.
Using the pointer (FC8820)
Charging the pointer
The pointer has a rechargeable battery that can be charged with
the USB cable supplied.
1 Insert the micro-USB plug into the socket in the bottom of the
pointer.
2 Insert the USB plug into a USB charger or a USB port on your
laptop.
1
2
ENGLISH 17

3 The charging light on the pointer lights up solid. Charging takes
30 minutes. When the charging light goes off, the rechargeable
battery is fully charged.
Navigating the robot with the pointer
- When you press and hold the pointer button, the pointer emits a beam
of infrared light. With this beam you can drag the robot in a particular
direction. As long as you keep the button pressed and keep pointing
in the direction you want the robot to move, it continues to move in
that direction. When you release the pointer button, the robot starts
cleaning in auto cleaning mode.
- With the pointer you can send the robot to a specic area in the room
to give this area an extra-thorough clean.
Using the virtual wall unit (FC8820)
Placing the batteries in the virtual wall unit
The virtual wall unit operates on four AA batteries.
1 Push the two release tabs at the bottom of the back cover (1)
and slide the back cover upwards and off the virtual wall unit (2).
2 Take four new AA batteries from the pack and insert them into
the battery compartment of the virtual wall unit.
Note: Make sure the + and - poles of the batteries point in the right direction.
3 Slide the back cover onto the virtual wall unit again.
50-70
50-7
0
50-70
1
2
ENGLISH18

Positioning the virtual wall unit to stop the robot
You can use the virtual wall unit to prevent the robot from entering a
room or area that you want to keep it out of.
1 Place the unit at a spot beyond which you do not want the robot to
go, e.g near an open door to a room that is off-limits to the robot or
at the top of a staircase.
2
Switch on the virtual wall unit with the on/off slide on top of the unit.
3 Switch on the robot for a normal cleaning run.
4 When the robot comes too close to the virtual wall unit, the light
on the virtual wall unit starts ashing and the virtual wall unit emits
a beam of infrared light. This beam of infrared light makes the robot
change its course and move away from the virtual wall unit.
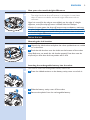
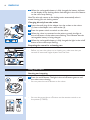
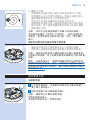
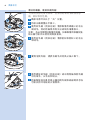
Cleaning and maintenance
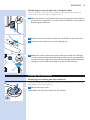
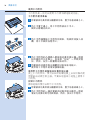
Emptying and cleaning the dust container
Empty and clean the dust container when the dust container full icon on
the display of the robot lights up.
1 Remove the top cover.
Note: Make sure the power switch is in ‘off ’ position.
ENGLISH 19

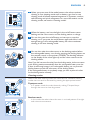
2 Pull up the handle of the dust container lid and lift the dust container
out of the dust container compartment.
Note: When you remove or reinsert the dust container, take care not to
damage the blades of the motor fan.
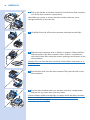
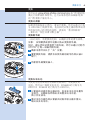
3 Carefully lift the lid off the dust container and take out the lter.
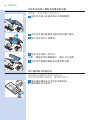
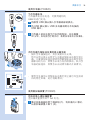
4 Shake the dust container over a dustbin to empty it. Clean the lter
and the inside of the dust container with a cloth or a toothbrush
with soft bristles. Also clean the suction opening in the bottom of the
dust container.
Caution: Do not clean the dust container and the lter with water or in
the dishwasher.
5 Put the lter back into the dust container. Then place the lid on the
dust container.
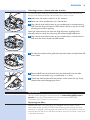
6 Put the dust container back into the dust container compartment
and put the top cover back onto the robot.
Caution: Always make sure the lter is present inside the dust container.
If you use the robot without the lter inside the dust container,
the motor will be damaged.
1
2
ENGLISH20
ページが読み込まれています...
ページが読み込まれています...
ページが読み込まれています...
ページが読み込まれています...
ページが読み込まれています...
ページが読み込まれています...
ページが読み込まれています...
ページが読み込まれています...
ページが読み込まれています...
ページが読み込まれています...
ページが読み込まれています...
ページが読み込まれています...
ページが読み込まれています...
ページが読み込まれています...
ページが読み込まれています...
ページが読み込まれています...
ページが読み込まれています...
ページが読み込まれています...
ページが読み込まれています...
ページが読み込まれています...
ページが読み込まれています...
ページが読み込まれています...
ページが読み込まれています...
ページが読み込まれています...
ページが読み込まれています...
ページが読み込まれています...
ページが読み込まれています...
ページが読み込まれています...
ページが読み込まれています...
ページが読み込まれています...
ページが読み込まれています...
ページが読み込まれています...
-
 1
1
-
 2
2
-
 3
3
-
 4
4
-
 5
5
-
 6
6
-
 7
7
-
 8
8
-
 9
9
-
 10
10
-
 11
11
-
 12
12
-
 13
13
-
 14
14
-
 15
15
-
 16
16
-
 17
17
-
 18
18
-
 19
19
-
 20
20
-
 21
21
-
 22
22
-
 23
23
-
 24
24
-
 25
25
-
 26
26
-
 27
27
-
 28
28
-
 29
29
-
 30
30
-
 31
31
-
 32
32
-
 33
33
-
 34
34
-
 35
35
-
 36
36
-
 37
37
-
 38
38
-
 39
39
-
 40
40
-
 41
41
-
 42
42
-
 43
43
-
 44
44
-
 45
45
-
 46
46
-
 47
47
-
 48
48
-
 49
49
-
 50
50
-
 51
51
-
 52
52


Philips FC8810/81 ユーザーマニュアル
- カテゴリー
- ロボット掃除機
- タイプ
- ユーザーマニュアル
他の言語で
- English: Philips FC8810/81 User manual