HP Officejet Pro 3620 Black & White e-All-in-One Printer series クイックスタートガイド
- カテゴリー
- 印刷
- タイプ
- クイックスタートガイド

Finding more information
HP Ocejet Pro 3620
© 2013 Hewlett-Packard Development Company, L.P.
*CZ293-90010*
*CZ293-90010*
CZ293-90010
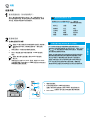
Setup Poster
To set up the printer, follow the instructions in
the poster provided.
Readme
The Readme le is available on the HP printer software CD provided with your printer. It provides information about
system requirements and updated information about setting up and using the printer.
● Windows: Insert the CD into your computer, double-click the le named ReadMe.chm, and then click the option
for your language.
● OS X: Insert the CD into your computer and open the Read Me folder. Click the Readme button for your language.
www.hp.com/support www.register.hp.com
● Windows
®
8: On the Start screen, right-click an empty area
on the screen, click All Apps on the app bar, click the icon with the printer’s name, and then select Help.
● Mac OS X v10.6: Choose Mac Help from the Help menu. In the Help Viewer, click and hold the Home button,
and then choose the Help for your device.
● OS X Lion and OS X Mountain Lion: Choose Help Center from the Help menu. Click Help for all your apps
(at the bottom left of the Help viewer) and click the Help for your device.
Note: If you cannot nd the user guide on your computer, visit www.hp.com/support for information about
installing it.
Regulatory and compliance information for the European Union is available in the “Technical information”
section of the user guide (also called “Help”). Also, the Declaration of Conformity is available at
www.hp.eu/certicates.
User Guide
The user guide (also called “Help”) will be copied to your
computer when you install the recommended HP printer software.
This guide includes usage and troubleshooting information,
specications, notices, and environmental, regulatory, and
support information, as well as links to online content.
● Windows XP
®
, Windows Vista
®
, and Windows
®
7: Click
Start, select Programs or All Programs, select HP, select
the folder for your HP printer, and then select Help.
If your computer does not have a CD or DVD
drive, you can download the HP software from
HP’s support website (www.hp.com/support).
If you are using a computer running Windows
and the installation program does not start
automatically, browse to the CD drive of the
computer, and double-click Setup.exe.
Installing HP printer software
Want to print from your smart phone or tablet? Get one of HP’s
printing apps—apps that let you print your documents and photos
directly from your mobile device. For more information, visit
www.hp.com/global/us/en/eprint/mobile_printing_apps.html.
(At this time, this website might not be available in all languages.)
Printing from mobile devices
The information contained herein is subject
to change without notice.
Power specications
Note: Use only the power adapter supplied by HP.
Power adapter
● Input voltage: 200 to 240 VAC, 50/60 Hz
● Output voltage: +32 V/+12 V at 1094 mA/250 mA
EN
Printed in China
Impreso en China
中国印刷
중국에서 인쇄
Imprimé en Chine
Impresso na China
ZHCN

2
HP ePrint
With HP ePrint, you can safely and easily print documents or photos
from your computer or mobile device (such as a smart phone or
tablet)—no extra printer software required!
To print using HP ePrint, attach the documents or photos to an email
message, and then send the email message to the email address
assigned to your printer when you signed up. The printer prints both
the email message and the attachments.
Note: In order to use HP ePrint, the printer must be connected to
a network that provides an Internet connection.
To get started with HP ePrint, press the
(HP ePrint) on the printer control panel, enable HP ePrint when prompted,
and then follow the on-screen instructions.
Acknowledgements
Microsoft, Windows, Windows XP, Windows Vista, Windows 7, and Windows 8 are U.S. registered trademarks of
Microsoft Corporation.
To learn how to use and manage
HP ePrint, visit HP Connected
(www.hpconnected.com). (At this time,
this website might not be available in all
languages.)
Learn more!
Ink cartridge information
● Setup cartridge: During setup, when you are prompted to install ink cartridge, make sure you use the cartridge
provided with the printer, labeled ‘SETUP CARTRIDGE’.
● Ink usage: Ink from ink cartridge is used in the printing process in a number of different ways, including in the
initialization process, which prepares the printer and ink cartridge for printing, and in printhead servicing, which
keeps print nozzles clear and ink owing smoothly. In addition, some residual ink is left in the cartridge after it is
used. For more information, visit www.hp.com/go/inkusage.
● Anonymous usage information storage: HP cartridge used with this printer contain a memory chip that assists
in the operation of the printer and stores a limited set of anonymous information about the usage of the printer.
This information might be used to improve future HP printers. For more information and instructions for disabling
this usage information collection, see the user guide.
1. Read and understand all instructions in the
documentation that comes with the printer.
2. Observe all warnings and instructions marked on the
printer.
3. Unplug this printer from wall outlets before cleaning.
4. Do not install or use this printer near water, or when
you are wet.
5. Install the printer securely on a stable surface.
6. Install the printer in a protected location where no
one can step on or trip over the line cord, and the line
cord cannot be damaged.
7. If the printer does not operate normally, see the user
guide (which is available on your computer after you
install the software).
8. There are no user-serviceable parts inside. Refer
servicing to qualied service personnel.
9. Use only the external power adapter provided with
the printer.
Always follow basic safety precautions when using this printer to reduce the risk of injury from re or electric shock.
Safety information
English

3
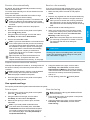
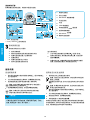
1. Phone wall jack
2. Port labeled 1-LINE on the back of the printer
Note: Do not insert into the port labeled 2-EXT.
3. DSL/ADSL lter (provided by the telephone company
or service provider)
Fax
Set up fax
Connect the phone line
How do I set up HP printers in digital phone
environments?
HP printers are designed specically for use with
traditional analog phone services. If you are in
a digital phone environment (such as DSL/ADSL,
PBX, ISDN, or FoIP), you might need to use digital-
to-analog lters or converters when setting up the
printer for faxing.
Note: The printer might not be compatible
with all digital service lines or providers in all
digital environments or with all digital-to-analog
converters. Contact your phone company to
determine which setup options are best for you.
Note: If you are setting up ring pattern detection in
a PBX phone system that has different ring patterns
for internal and external calls, make sure you dial
the fax number of your printer using an external
number when recording the ring pattern.
Using the phone line for fax only
Note: If a phone cord is provided with the printer,
HP recommends that you use this phone cord. If
the phone cord is not long enough, use a coupler
and another phone cord to extend.
1. Connect one end of the phone cord to the phone
wall jack.
2. Connect the other end to the port labeled 1-LINE on
the back of the printer.
Note: Do not insert into the port labeled 2-EXT.
3. If you have subscribed to a DSL/ADSL service,
connect a DSL/ADSL lter between the printer port
labeled 1-LINE and the phone wall jack.
If you are in one of the following countries/regions, visit
www.hp.com/uk/faxcong for information about setting up
fax.
Austria
Belgium
Denmark
Finland
France
Germany
Ireland
Italy
Norway
Netherlands
Portugal
Spain
Sweden
Switzerland
United Kingdom
Finding fax setup information in Europe
Check the “Finding fax setup information in
Europe” box. If your country/region is listed,
visit the website for setup information. If it is not
listed, follow the instructions in this guide.
Find setup information (for users in Europe)
English

4
Use fax
Send a standard fax
1. Load your document print-side down on the scanner
glass or print-side up in the document feeder.
2. From the Home screen on the printer control panel,
press the button next to Fax.
3. Enter the fax number using the keypad or by
selecting a speed dial.
Tip: To add a pause in the fax number, press *
repeatedly, until a dash (-) appears on the display.
4. Press the button next to Start Fax, and then select
Black or Color.
Tip: If the recipient reports problems with the
quality of the fax you sent, try changing the
resolution or contrast of your fax.
For more information about other ways you can send
faxes, such as scheduling a fax to be sent later or
sending faxes from a computer, see the user guide.
(For information, see “User Guide” on page 1.)
Learn more!
Send a fax using an extension phone
1. Dial the number by using the keypad on the
extension phone.
Note: Do not use the keypad on the printer control
panel when sending a fax using this method.
2. If the recipient answers the phone, you can engage
in a conversation before sending the fax.
Note: If a fax machine answers the call, you will
hear fax tones from the receiving fax machine.
3. Load your document print-side down on the scanner
glass or print-side up in the document feeder.
4. From the Home screen on the printer control panel,
press the button next to Fax.
5. When you are ready to send the fax, select Black or
Color.
6. If prompted, select Send Fax.
If you were on the phone with the recipient, ask the
recipient to start receiving the fax when they hear fax
tones on the fax machine. When the printer begins
faxing, you can hang up the phone or remain on the line.
You might not hear fax tones during fax transmission.
Test fax setup
● Tests the fax hardware
● Veries the correct type of phone cord is
connected to the printer
● Checks that the phone cord is plugged into
the correct port
● Checks for a dial tone
● Checks for an active phone line
● Tests the status of your phone line connection
To run the fax test:
1. From the Home screen on the printer control panel,
press the (Setup) button.
2. Using the buttons to the right, scroll to and
select Tools, and then select Run Fax Test.
If the test fails, review the report for information
on how to x the problem, make the suggested
changes, and run the test again.
The fax test does the following:
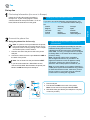
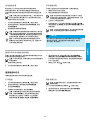
Connecting additional devices
1. Phone wall jack
2. Parallel splitter
3. DSL/ADSL modem
4. Telephone answering machine
5. Telephone
6. ISDN wall jack
7. Terminal adapter or ISDN router
8. Broadband modem
9. DSL/ADSL lter
10. Analog telephone adaptor
* TAM: Telephone answering machine
** FoIP: Fax over Internet Protocol
If you have other devices to connect, connect them as shown in the diagram below:
English

5
Reprint received faxes from memory
If Backup Fax Reception is turned on, incoming faxes will
be stored in memory even when the printer has an error
condition.
Note: All faxes stored in memory might be deleted
from memory when the printer is turned off.
1. Make sure paper is loaded in the printer.
2. From the Home screen on the printer control panel,
press the
(Setup) button.
3. Using the buttons to the right, scroll to select
Fax Setup, select Fax Tools, and then select
Reprint Faxes in Memory. The faxes are printed
in the reverse order from when they were received,
with the most recently received fax printed rst,
and so on.
4. To stop printing, press the (Cancel) button.
Use reports and logs
Fax reports provide useful system information about the printer.
Print a report
1. From the Home screen on the printer control panel,
press the (Setup) button.
2. Using the buttons to the right, scroll to select
Fax Setup, and then select Fax Reports.
3. Select the fax report you want to print, and then
select OK.
Note: If you need printed conrmation that
your faxes were successfully sent, select Fax
Conrmation and then select the desired option.
To include an image on the rst page of a fax on
the conrmation page, select On (Fax Send) or
On (Send and Receive).
For more information about fax features, such as
blocking junk faxes or forwarding faxes, see the user
guide. (For information about nding the user guide,
see “User Guide” on page 1.)
Learn more!
By default, the printer automatically answers incoming
calls and receives faxes.
To receive faxes manually, turn off Auto Answer from the
printer control panel.
The printer will answer calls after the number of rings
specied in the Rings to Answer setting.
Note: If an answering machine is connected to the
printer, the Rings to Answer setting for the printer
must be set to a higher number than the answering
machine.
1. Make sure the printer is turned on and paper is
loaded.
2. From the Home screen on the printer control panel,
press the
(Setup) button.
3. Using the buttons to the right, scroll to and select
Fax Setup, and then select Auto Answer.
4. Scroll to and select On or Off.
Note: If you have subscribed to a voicemail service
on the same phone line that you will use for faxing,
you cannot receive faxes automatically. You must
be available to respond in person to incoming fax
calls. (If you want to receive faxes automatically,
contact your phone company to subscribe to
a distinctive ring service or to obtain a separate
phone line for faxing.)
Tip: The printer can store received faxes in its
internal memory. To reprint these faxes, see
“Reprint received faxes from memory” on this page.
Receive a fax automatically
If you are on the phone with another person, you can
receive faxes manually without hanging up the phone.
1. Make sure the printer is turned on and paper is
loaded.
2. Remove any originals from the document feeder tray.
Note: Set Rings to Answer to a higher number to
allow you time to answer the incoming call before
the printer does. Or turn off Auto Answer so that
the printer does not automatically answer incoming
calls.
3. Ask the sender to start sending the fax.
4. When you hear fax tones, from the Home screen
on the printer control panel, press the button next
to Fax, select OK, and then select Receive Fax
Manually to start receiving fax.
Note: When the printer begins to receive the fax,
you can hang up the phone or remain on the line.
You might not hear fax tones during fax
transmission.
Receive a fax manually
Clear the fax log
Note: Clearing the fax log also deletes all faxes
stored in memory.
1. From the Home screen on the printer control panel,
press the
(Setup) button.
2. Using the buttons to the right, scroll to and select
Fax Setup, select Fax Tools, and then select
Clear Fax log.
English

6
Solving problems
If you still have problems using fax after successfully
completing the fax test on page 4, follow the steps
below:
Cannot send but can receive faxes
Step 1: Perform a copy or scan to ensure that the
printer is working properly.
Step 2: Check the physical fax connections.
Step 3: Check if other fax devices can send to the
same phone number. The receiving fax device
might have blocked your phone number, or it
might be having technical problems.
Step 4: If the problem persists, print the Fax Error
Report and Fax Log (and if available, the caller
ID report and junk fax report), and then contact
HP for further help.
Cannot receive but can send faxes
Step 1: Check the fax settings on the printer.
Step 2: Check the physical fax connections.
Step 3: Check if other devices connected to the same
phone line can receive faxes. The phone line
might be faulty or the sending fax device might
be having problems sending faxes. You might
also want to check if you have blocked the
sender’s phone number.
Step 4: Check the problem with the sender. If the
problem persists, print the Fax Error Report
and Fax Log (and if available, the caller ID
report and junk fax report), and then contact
HP for further help.
Cannot send and receive faxes
Step 1: Perform a copy or scan to ensure that the
printer is working properly.
Step 2: Check the physical fax connections.
Step 3: Check the fax settings on the printer.
Step 4: Check if other devices connected to this phone
line can send or receive faxes. There might be
a problem with the phone line.
Step 5: Reset the printer by turning off the printer and,
if possible, the main switch of the power supply.
Wait for a few seconds before turning on the
power again. Try to send or receive a fax on
the printer.
Step 6: If the problem persists, print the Fax Error
Report and Fax Log (and if available, the caller
ID report and junk fax report), and then contact
HP for further help.
Note: If you have subscribed to a voicemail
service on the same phone line used for faxing,
you will have to receive faxes manually.
Check the printer fax settings
● The Auto Answer feature is turned on for
the printer to receive fax automatically.
● If you have subscribed to a voicemail
service from the phone company or service
provider, ensure that the Rings to Answer
on the printer is set to be more than that
of the telephone answering machine. The
printer will monitor the line and decide if an
incoming call is a normal phone call or fax
call. If it is a fax call, the printer will start
a fax connection automatically. Otherwise,
you might have to receive the fax manually
by selecting Fax.
● If multiple phone numbers are assigned to
the same physical phone line and the line is
shared by multiple devices, ensure that the
printer is set to the correct distinctive ring
setting for receiving faxes.
Check the physical fax connections
● Connect the phone cable from the port
labeled 1-LINE on the back of the printer to
the phone wall jack and connect a phone
cable from the port labeled 2-EXT on the
back of the printer to an extension phone.
From the extension phone, call the phone
number that failed to receive the faxes.
Note: If you were trying to fax to an external
number, be sure to include any required
access code or numbers prior to entering
the number. You might also need to add
a pause in the number to prevent the printer
from dialing too fast; to add a pause, press
* repeatedly until a dash (-) appears on the
display.
● If you cannot make any outgoing calls
because no dial tone is detected or the line
is noisy, try using another phone cable in
place of the one connected to the 1-LINE
phone port, or move the printer to another
location which has a separate phone line
(if possible) and see if there are similar
problems.
● If you are in a digital phone environment
(such as FoIP, fax over VoIP), reduce the
fax speed and turn off the Error Code
Modulation (ECM) from the printer control
panel. If needed, contact your phone
company to nd out if there are problems
with the phone line or to learn more about
the capabilities of the phone network.
English

7
A. Extent of limited warranty
1. Hewlett-Packard (HP) warrants to the end-user customer that the HP products specified above will be free
from defects in materials and workmanship for the duration specified above, which duration begins on the date
of purchase by the customer.
2. For software products, HP's limited warranty applies only to a failure to execute programming instructions. HP
does not warrant that the operation of any product will be interrupted or error free.
3. HP's limited warranty covers only those defects that arise as a result of normal use of the product, and does
not cover any other problems, including those that arise as a result of:
a. Improper maintenance or modification;
b. Software, media, parts, or supplies not provided or supported by HP;
c. Operation outside the product's specifications;
d. Unauthorized modification or misuse.
4. For HP printer products, the use of a non-HP cartridge or a refilled cartridge does not affect either the warranty
to the customer or any HP support contract with the customer. However, if printer failure or damage is
attributable to the use of a non-HP or refilled ink cartridge, HP will charge its standard time and materials
charges to service the printer for the particular failure or damage.
5. If HP receives, during the applicable warranty period, notice of a defect in any product which is covered by
HP's warranty, HP shall either repair or replace the product, at HP's option.
6. If HP is unable to repair or replace, as applicable, a defective product which is covered by HP's warranty, HP
shall, within a reasonable time after being notified of the defect, refund the purchase price for the product.
7. HP shall have no obligation to repair, replace, or refund until the customer returns the defective product to HP.
8. Any replacement product may be either new or like-new, provided that it has functionality at least equal to that
of the product being replaced.
9. HP products may contain remanufactured parts, components, or materials equivalent to new in performance.
10. HP's Limited Warranty Statement is valid in any country where the covered HP product is distributed by HP.
Contracts for additional warranty services, such as on-site service, may be available from any authorized HP
service facility in countries where the product is distributed by HP or by an authorized importer.
B. Limitations of warranty
TO THE EXTENT ALLOWED BY LOCAL LAW, NEITHER HP NOR ITS THIRD PARTY SUPPLIERS MAKES
ANY OTHER WARRANTY OR CONDITION OF ANY KIND, WHETHER EXPRESS OR IMPLIED
WARRANTIES OR CONDITIONS OF MERCHANTABILITY, SATISFACTORY QUALITY, AND FITNESS FOR A
PARTICULAR PURPOSE.
C. Limitations of liability
1. To the extent allowed by local law, the remedies provided in this Warranty Statement are the customer's sole
and exclusive remedies.
2. TO THE EXTENT ALLOWED BY LOCAL LAW, EXCEPT FOR THE OBLIGATIONS SPECIFICALLY SET
FORTH IN THIS WARRANTY STATEMENT, IN NO EVENT SHALL HP OR ITS THIRD PARTY SUPPLIERS
BE LIABLE FOR DIRECT, INDIRECT, SPECIAL, INCIDENTAL, OR CONSEQUENTIAL DAMAGES,
WHETHER BASED ON CONTRACT, TORT, OR ANY OTHER LEGAL THEORY AND WHETHER ADVISED
OF THE POSSIBILITY OF SUCH DAMAGES.
D. Local law
1. This Warranty Statement gives the customer specific legal rights. The customer may also have other rights
which vary from state to state in the United States, from province to province in Canada, and from country to
country elsewhere in the world.
2. To the extent that this Warranty Statement is inconsistent with local law, this Warranty Statement shall be
deemed modified to be consistent with such local law. Under such local law, certain disclaimers and limitations
of this Warranty Statement may not apply to the customer. For example, some states in the United States, as
well as some governments outside the United States (including provinces in Canada), may:
a. Preclude the disclaimers and limitations in this Warranty Statement from limiting the statutory rights of a
consumer (e.g., the United Kingdom);
b. Otherwise restrict the ability of a manufacturer to enforce such disclaimers or limitations; or
c. Grant the customer additional warranty rights, specify the duration of implied warranties which the
manufacturer cannot disclaim, or allow limitations on the duration of implied warranties.
3. THE TERMS IN THIS WARRANTY STATEMENT, EXCEPT TO THE EXTENT LAWFULLY PERMITTED, DO
NOT EXCLUDE, RESTRICT, OR MODIFY, AND ARE IN ADDITION TO, THE MANDATORY STATUTORY
RIGHTS APPLICABLE TO THE SALE OF THE HP PRODUCTS TO SUCH CUSTOMERS.
HP product Duration of limited warranty
Software Media 90 days
Printer 1 year
Print or Ink cartridges Until the HP ink is depleted or the “end of warranty” date
printed on the cartridge has been reached, whichever
occurs first. This warranty does not cover HP ink products
that have been refilled, remanufactured, refurbished,
misused, or tampered with.
Printheads (only applies to products with customer 1 year
replaceable printheads)
Accessories 1 year unless otherwise stated
Hewlett-Packard limited warranty statement
English


查找更多信息
HP Ocejet Pro 3620
安装海报
要设置打印机,请按照海报中的说明操作。
自述文件
打印机随附的
HP
打印机软件
CD
上提供了自述文件。它提供了有关系统要求的信息和有关设置和使用打印机的更新
信息。
●
Windows
:将
CD
插入计算机,双击名为
ReadMe.chm
的文件,然后单击与您所使用语言对应的选项。
●
OS X
:将
CD
插入计算机,然后打开
Read Me
文件夹。单击与您所使用语言对应的“自述文件”按钮。
www.hp.com/support www.register.hp.com
图标,然后选择帮助。
●
Mac OS X v10.6
:从帮助菜单中选择
Mac
帮助。在帮助查看器中单击并按住“主屏幕”按钮,然后选择对应您设备的
帮助。
●
OS X Lion
和
OS X Mountain Lion
:从帮助菜单中选择帮助中心。单击所有应用程序的帮助(在帮助查看器的左下角),
然后单击对应您设备的“帮助”。
注意:如果在计算机上找不到用户指南,请访问
www.hp.com/support
以获取有关安装它的信息。
适用于欧盟的管制和符合性信息在用户指南(也称为“帮助”)的“技术信息”一节提供。另外,网站
www.hp.eu/certicates
上提供了符合性声明。
用户指南
当您安装建议的
HP
打印机软件时,会将此用户指南(也称为“帮助”)
复制到您的计算机。
该指南包括使用情况和故障排除信息、规格、通告、环境信息、管制
信息和支持信息以及在线内容的链接。
●
Windows XP
®
、
Windows Vista
®
和
Windows
®
7
:单击开始,
依次选择程序或所有程序、
HP
、
HP
打印机的文件夹和帮助。
●
Windows
®
8
:在开始屏幕上,右键单击屏幕上的空白区域,
单击应用程序栏上的所有应用程序,单击具有打印机名称的
如果您的计算机没有
CD
或
DVD
驱动器,
可从
HP
支持网站
(www.hp.com/support)
下载
HP
软件。
如果您的计算机在运行
Windows
,且安装程序
不自动启动,请浏览到计算机的
CD
驱动器,
然后双击
Setup.exe
。
安装
HP
打印机软件
想从智能手机或平板电脑打印吗?获取惠普的打印应用程序
—
允许直接从移动设备打印文档和照片。有关详细信息,请访问
www.hp.com/global/us/en/eprint/mobile_printing_apps.html
。
(目前,此网站并未提供所有语言版本。)
从移动设备打印
电源规格
注意:仅使用由
HP
提供的电源适配器。
电源适配器
● 输入电压:
200
到
240 VAC
,
50/60 Hz
● 输出电压:
+32 V/+12 V
,
1094 mA/250 mA
此处包含的信息可能会随时变动,恕不另行通知。

10
HP ePrint
有了
HP ePrint
,无需额外的打印机软件即可从计算机或移动设备
(如:智能手机或平板电脑)中安全轻松地打印文档或照片。
要使用
HP ePrint
进行打印,请将文档或照片附在电子邮件中,然后
将电子邮件发送至注册时给打印机分配的电子邮件地址。打印机将
同时打印电子邮件内容和附件。
注意:要使用
HP ePrint
,必须将打印机连接到提供
Internet
连接的网络。
要开始使用
HP ePrint
,请按
打印机控制面板上的
HP ePrint
,在出现提示时启用
HP ePrint
,然后按照屏幕上的说明
操作。
知识产权说明
Microsoft
、
Windows
、
Windows XP
、
Windows Vista
、
Windows 7
和
Windows 8
是
Microsoft Corporation
在美国的注册
商标。
要了解如何使用和管理
HP ePrint
,请访问
ePrintCenter (www.hp.com/go/eprintcenter)
。
(目前,此网站并未提供所有语言版本。)
了解更多!
墨盒信息
● 设置墨盒:在设置过程中,当系统提示安装墨盒时,请确保使用随打印机提供的标签为
“
SETUP CARTRIDGE
”(设置
墨盒)的墨盒。
● 墨水的使用:在打印过程中,墨盒中的墨水有多种不同的使用方式,包括在初始化和打印头维修过程中,前者准备进行
打印的打印机和墨盒,后者保持打印喷嘴畅通和墨水流动平稳。另外,使用后,会有一些剩余的墨水留在墨盒中。有关
详细信息,请访问
www.hp.com/go/inkusage
。
● 匿名使用情况信息存储:该打印机使用的
HP
墨盒包含协助打印机运转的存储芯片,并且存储了一组有关打印机使用
情况的有限匿名信息。该信息可以用于改进未来的
HP
打印机。有关禁用此使用情况信息集合的更多信息和说明,
请参阅用户指南。
1.
请阅读并理解本打印机随附文档中的所有说明。
2.
请遵守本打印机上标注的所有警告及说明。
3.
清洁本打印机之前,请从墙上插座拔下插头。
4.
切勿在近水处或身体潮湿时安装或使用本打印机。
5.
请将本打印机稳当地安装在平稳的表面上。
6.
请将本打印机安装在受保护的场所,以免有人踩到
线路或被线路绊倒,这样电源线就不会受到损坏。
7.
如果本打印机不能正常运行,请参见用户指南(安装
软件后便可在计算机上找到)。
8.
产品内部没有可供用户维修的部件。有关维修事宜,
请联系合格的维修人员。
9.
请仅使用随本打印机提供的外接电源适配器。
使用本打印机时,请始终遵守基本的安全防范措施,以降低导致火灾或电击伤害的危险。
安全信息
简体中文

11
1.
墙壁电话插孔
2.
打印机背面带有
1-LINE
标签的端口
注意:请勿将电话线插入带有
2-EXT
标签的端口中。
3. DSL/ADSL
过滤器(由电话公司或服务提供商提供)
传真
设置传真
连接电话线
如何在数字电话环境中设置
HP
打印机?
HP
打印机专为配合传统模拟电话服务使用设计。
如果您处于数字电话环境(如
DSL/ADSL
、
PBX
、
ISDN
或
FoIP
)中,则在设置打印机的传真功能时,可能需要
使用数模过滤器或转换器。
注意:打印机可能并非与所有数字环境中的所有数字
服务线路或提供商或者所有数模转换器兼容。请与
电话公司联系,确定哪些设置选项对于您最适用。
注意:如果您在针对内外部呼叫使用不同铃声样式的
PBX
电话系统中设置铃声样式检测功能,请确保在
录制铃声样式时使用外部号码拨打打印机的传真号码。
仅将电话线用于传真
注意:
HP
建议您使用打印机随附的电话线(如果有)。
如果电话线不够长,请用耦合器和另一条电话线
延长。
1.
将电话线的一端连接至墙壁电话插孔。
2.
将另一端连接至打印机背面带有
1-LINE
标签的
端口。
注意:请勿将电话线插入带有
2-EXT
标签的
端口中。
3.
如果您已经订购
DSL/ADSL
服务,请将
DSL/ADSL
过滤器的两端分别与带有
1-LINE
标签的打印机端口
和墙壁电话插孔相连接。
如果您位于以下国家
/
地区之一,请访问
www.hp.com/uk/faxcong
了解传真设置信息。
爱尔兰
奥地利
比利时
丹麦
德国
法国
芬兰
荷兰
挪威
葡萄牙
瑞典
瑞士
西班牙
意大利
英国
查找传真设置信息(欧洲)
选中“查找传真设置信息(欧洲)”框。如果其中列出了
您所在的国家
/
地区,请访问此网站了解设置信息。如果
未列出,请按照本指南中的说明操作。
查找设置信息(针对欧洲用户)
简体中文

12
使用传真
发送标准传真
1.
将文档打印面朝下放到扫描仪玻璃板上,或打印面朝上
放入送纸器中。
2.
从打印机控制面板的主屏幕中,按传真旁边的按钮。
3.
使用键盘或通过选择快速拨号输入传真号码。
提示:要在传真号码中添加停顿符号,请反复按
*
,
直到显示屏上出现破折号
(-)
。
4.
按开始传真旁边的按钮,然后选择黑白或彩色。
提示:如果收件人报告所发传真存在质量问题,
请尝试更改传真的分辨率或对比度。
有关其他传真发送方式(如计划在稍后发送传真或从
计算机发送传真)的详细信息,请参阅用户指南。(有关
信息,请参见第
9
页的“用户指南”。)
了解更多!
使用电话分机发送传真
1.
使用电话分机上的键盘进行拨号。
注意:通过此方式发送传真时,请勿使用打印机控制
面板上的键盘。
2.
如果接收方接听电话,您可以在发送传真之前与其进行
通话。
注意:如果是传真机应答呼叫,您会听到从接收方传
真机发出的传真提示音。
3.
将文档打印面朝下放到扫描仪玻璃板上,或打印面朝上
放入送纸器中。
4.
从打印机控制面板的主屏幕中,按传真旁边的按钮。
5.
准备发送传真时,选择黑白或彩色。
6.
如果出现提示,请选择发送传真。
如果您在与接收方通话,请让接收方听到传真机的传真音时
开始接收传真。打印机开始发送传真后,可以挂机或保持接通
状态。传真传输过程中可能听不到传真音。
测试传真设置
● 测试传真硬件
● 确认将正确的电话线类型连接到打印机
● 检查电话线是否插入正确的端口
● 检查拨号音
● 检查电话线路的工作状态
● 测试电话线路连接的状态
运行传真测试:
1.
从打印机控制面板的主屏幕按
(设置)按钮。
2.
使用右侧的按钮,滚动查找并选择工具,然后选择
运行传真测试。
3.
如果测试失败,请查看报告中有关如何解决问题的
信息,进行建议的更改,并重新运行测试。
传真测试将执行以下操作:
连接其他设备
1.
墙壁电话插孔
2.
并行分离器
3. DSL/ADSL
调制解调器
4.
电话应答机
5.
电话
6. ISDN
墙壁插孔
7.
终端适配器或
ISDN
路由器
8.
宽带调制解调器
9. DSL/ADSL
过滤器
10.
模拟电话适配器
* TAM
:电话应答机
** FoIP
:
Internet
上的传真协议
如果需要连接其他设备,请按照下图进行连接:
简体中文

13
重新打印内存中接收到的传真
如果已启用备份传真接收,则收到的传真将存储在内存中,
即使打印机出现问题也是如此。
注意:打印机关闭后,所有存储在内存中的传真都有
可能被删除。
1.
确保打印机已放好纸。
2.
从打印机控制面板的主屏幕按
(设置)按钮。
3.
使用右侧的按钮,滚动查找并依次选择传真设置、
传真工具,然后选择重新打印内存中的传真。传真的
打印顺序与接收顺序正好相反,最后收到的传真最先
打印,依此类推。
4.
要停止打印,请按
(取消)按钮。
使用报告和日志
传真报告提供有关打印机的有用系统信息。
打印报告
1.
从打印机控制面板的主屏幕按
(设置)按钮。
2.
使用右侧的按钮,滚动查找并选择传真设置,
然后选择传真报告。
3.
选择要打印的传真报告,然后选择确定。
注意:如果需要指示传真已成功发送的书面确认
消息,请选择传真确认,然后选择所需的选项。
要在确认页上包含某一传真第一页上的图像,
请选择开启(发送传真)或启用(发送和接收)。
有关如阻止垃圾传真或转发传真等传真功能的详细信息,
请参见用户指南。(有关查找用户指南的信息,请参见
第
9
页的“用户指南”。)
了解更多!
默认情况下,打印机会自动应答呼叫和接收传真。
要手动接收传真,请从打印机控制面板关闭自动应答。
打印机将在应答响铃次数设置中指定的响铃次数后应答
呼叫。
注意:如果应答机已连接到打印机上,则必须将打印
机的应答响铃次数设置为大于应答机的响铃次数。
1.
确保打印机打开并已放纸。
2.
从打印机控制面板的主屏幕按
(设置)按钮。
3.
使用右侧的按钮,滚动查找并选择传真设置,然后
选择自动接听。
4.
滚动查找并选择打开或关闭。
注意:如果购买的语音邮件服务与传真共用一条电话
线路,则无法自动接收传真。您必须亲自接听传真呼叫。
(如果希望自动接收传真,请与电话公司联系以订阅
区别铃声服务,或获取专门用于传真的电话线。)
提示:打印机可将接收到的传真存储在其内存中。
要重新打印这些传真,请参阅本页上的“重新打印
内存中接收到的传真”。
自动接收传真
与其他人通话时也可手动接收传真,无需挂断电话。
1.
确保打印机打开并已放纸。
2.
取出送纸器纸盒中的所有原件。
注意:将应答响铃次数设置成较大的数字,以便在
打印机应答之前接听来电。或者关闭自动接听,以使
打印机不会自动应答拨入的来电。
3.
让发件人开始发送传真。
4.
听到传真音后,从打印机控制面板的主屏幕中按传真
旁边的按钮,选择确定,然后选择手动接收传真以开始
接收传真。
注意:打印机开始接收传真后,可以挂机或保持接通
状态。传真传输过程中可能听不到传真音。
手动接收传真
清除传真日志
注意:在清除传真日志时,还会删除存储在内存中
的所有传真。
1.
从打印机控制面板的主屏幕按
(设置)按钮。
2.
使用右侧的按钮,滚动查找并依次选择传真设置、
传真工具,然后选择清除传真日志。
简体中文

14
解决问题
如果成功完成了第
12
页上的传真测试,但在使用传真
时仍遇到问题,请按照以下步骤操作:
无法发送传真,但可以接收传真
步骤
1
:执行复印或扫描操作以确保打印机在正常工作。
步骤
2
:检查物理传真连接。
步骤
3
:检查是否其他传真设备也可以向同一电话号码
发送传真。接收传真设备可能已阻止您的电话号码或者
可能存在技术问题。
步骤
4
:如果问题仍旧存在,请打印“传真错误报告”和
“传真日志”(如果存在呼叫方
ID
报告和垃圾传真报告,
请一并打印),然后与
HP
联系,以获取进一步的帮助。
无法接收传真,但可以发送传真
步骤
1
:检查打印机的传真设置。
步骤
2
:检查物理传真连接。
步骤
3
:检查是否其他连接至相同电话线路的设备也可以
接收传真。电话线路可能存在故障或者发送传真的设备可
能在发送传真时遇到问题。您可能还需要检查是否阻止了
此发件人的电话号码。
步骤
4
:联系发件人,核查问题。如果问题仍旧存在,请打印
“传真错误报告”和“传真日志”(如果存在呼叫方
ID
报告和
垃圾传真报告,请一并打印),然后与
HP
联系,以获取进一
步的帮助。
既无法发送传真,也无法接收传真
步骤
1
:执行复印或扫描操作以确保打印机在正常工作。
步骤
2
:检查物理传真连接。
步骤
3
:检查打印机的传真设置。
步骤
4
:检查是否其他连接至此电话线路的设备也可以
收发传真。电话线路可能有问题。
步骤
5
:通过关闭打印机来对打印机进行重置,如有可能,
也请重置电源的主开关。等待几秒钟,然后再次打开电源。
尝试通过打印机发送或接收一份传真。
步骤
6
:如果问题仍旧存在,请打印“传真错误报告”和
“传真日志”(如果存在呼叫方
ID
报告和垃圾传真报告,
请一并打印),然后与
HP
联系,以获取进一步的帮助。
注意:如果订购的语音邮件服务与传真共用一条
电话线路,则必须手动接收传真。
检查打印机的传真设置
● 已打开打印机的“自动应答”功能来自动接收
传真。
● 如果您已向电话公司或服务提供商订购语音
邮件服务,请确保已将打印机的应答响铃次数
设置为大于电话应答机的应答响铃次数。打印
机将监视线路并确定来电是普通电话呼叫还
是传真呼叫。如果是传真呼叫,则打印机会自
动开始建立传真连接。否则,您可能需要通过
选择传真手动接收传真。
● 如果为同一物理电话线路分配了多个电话号码,
并且该线路由多个设备共享,请确保打印机的
区别响铃设置正确,以便接收传真。
检查物理传真连接
● 将一条电话线的两端分别连接到打印机背面带
有
1-LINE 标签的端口和墙壁电话插孔,并将
另一条电话线的两端分别连接到打印机背面带
有 2-EXT 标签的端口和电话分机。从电话分
机中,拨打未能成功接收传真的电话号码。
注意:如果您尝试向外部号码发送传真,在输
入该号码前,一定要添加全部必需的接入代码
或号码。您可能还需要在该号码中添加停顿符
号,以防止打印机的拨号速度过快;要添加停
顿符号,请反复按
*
,直到显示屏上出现破折号
(-)
为止。
● 如果检测不到拨号音或者线路噪音太大,导致
您无法外拨电话,请尝试使用其他电话线来代
替已连接到
1-LINE
电话端口的电话线,或将
打印机移至其他拥有独立电话线的位置(如果
可能)并查看是否存在类似问题。
● 如果您处于数字电话环境(如
FoIP
、基于
VoIP
的传真),请在打印机控制面板中降低传真速度
并关闭错误代码调节
(ECM)
。如果需要,请与
电话公司联系,弄清楚电话线路是否存在问题
或者详细了解电话网络的功能。
简体中文

15
Hewlett-Packard
有限保修声明
简体中文

-
 1
1
-
 2
2
-
 3
3
-
 4
4
-
 5
5
-
 6
6
-
 7
7
-
 8
8
-
 9
9
-
 10
10
-
 11
11
-
 12
12
-
 13
13
-
 14
14
-
 15
15
-
 16
16


HP Officejet Pro 3620 Black & White e-All-in-One Printer series クイックスタートガイド
- カテゴリー
- 印刷
- タイプ
- クイックスタートガイド
関連論文
-
HP OfficeJet 7510 Wide Format All-in-One Printer series リファレンスガイド
-
HP Photosmart Premium Fax e-All-in-One Printer series - C410 リファレンスガイド
-
-
-
-
-
-
-
HP ENVY 5034 All-in-One Printer リファレンスガイド
-