HP Photosmart Premium Fax e-All-in-One Printer series - C410 リファレンスガイド
- タイプ
- リファレンスガイド

2
1
***
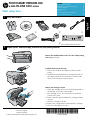
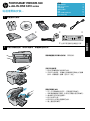
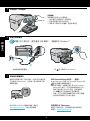
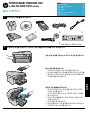
Unpack printer. Remove all tape, protective lm, and packing material.
Verify box contents
*
Not included with all models
PHOTOSMART PREMIUM FAX
e-ALL-IN-ONE C410 series
Start setup here...
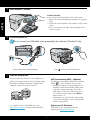
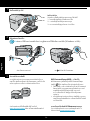
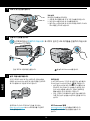
Install the document feeder tray
Remove the cardboard restraint from the top of the 1.
printer.
Install the document feeder tray, lining up the tabs on 2.
the edges with the slots in the printer. Insert the tabs
into the slots until they snap into place.
Remove the carriage restraint
Open the cartridge access door by pulling upward on 1.
the handles on the sides of the printer.
The cartridge access door cannot be opened if the •
scanner lid is open.
Remove the blue tape that holds the carriage restraint 2.
in place.
Slide the carriage to the left.3.
Remove the orange plastic restraint from the carriage.4.
Close the cartridge access door.5.
Remove the cardboard that secures the two-sided printing
accessory (if present)
Inside...
Setup troubleshooting 3
Get to know your HP Photosmart 4
Features and tips 6
Get more info 8
Specs 8
Networked printer setup and use 9
Fixing connectivity issues 10
English
© 2010 Hewlett-Packard Development Company, L.P.
Printed in [Korean]
Printed in [English]
*CQ521-90086*
*CQ521-90086*
CQ521-90086

2
Do not connect the USB cable unless prompted by the software! (Windows
®
only)
5
4
3
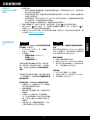
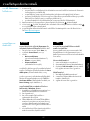
Follow the Setup Wizard
Connect and power on
Connect the power cord and adapter.
Press
to turn on the HP Photosmart.
Be sure to follow the instructions on the display as it
guides you through setting up and connecting the HP
Photosmart, including inserting ink cartridges and
setting up a wireless network connection.
For computers without a CD/DVD drive, go to
www.hp.com/support to download and install the
software.
WiFi Protected Setup (WPS) – (Optional)
This HP Photosmart supports WiFi Protected Setup
(WPS) for easy one-button wireless setup.
During the setup, if you are prompted on the •
display for Wi-Fi Protected Setup (WPS), and
your router supports this method, press the
WPS button on the router. If the connection is
successful, the wireless light on the Wireless
button will turn on.
Alternatively, you can follow the setup wizard •
on the printer display to connect using another
wireless setup method.
Register your HP Photosmart
Get quicker service and support alerts by
registering at www.register.hp.com.
Install the faceplate
If you need to install a faceplate on the control panel:
Remove the existing faceplate by pulling up on the right 1.
edge.
Position the new faceplate over the buttons on the control 2.
panel.
Press down rmly on all edges of the faceplate until it 3.
snaps into place.
Install faceplate, if included
English

3
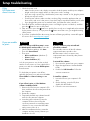
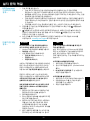
Setup troubleshooting
If the
HP Photosmart
doesn’t turn on...
Check the power cord.1.
Make sure the power cord is rmly connected to both the printer and the power adaptor. •
A light on the power supply will be on if the power cord is working.
If you are using a power strip, check that the power strip is turned on. Or, plug the printer •
directly into a power outlet.
Test the power outlet to make sure that is working. Plug in another appliance that you •
know works, and see if it has power. If not, there may be a problem with the power outlet.
If you plugged the printer into a switched outlet, check that the outlet is turned on. •
Turn off the printer, and then unplug the power cord. Plug the power cord back in, and then 2.
press the button to turn on the printer.
Take care not to press the 3. button too quickly. Press it only once. It might take a few minutes
for the printer to turn on, so if you press the button more than once, you might be turning
off the printer.
If you have completed all the above steps, but are still having a problem, contact HP support 4.
for service. Go to www.hp.com/support.
If you are unable
to print...
Make sure that your HP Photosmart is set as
the default printer and not ofine. To do this:
On the Windows taskbar, click • Start.
Then click • Control Panel.
Then open: •
Devices and Printers • (Windows 7)
• Printers (Vista)
• Printers and Faxes (XP)
Look for your printer to see if it has a check
mark in a circle next to it. If not, right-click the
printer icon and choose Set as default printer
from the menu.
To check that your printer is not off-line,
right-click the printer icon and ensure that Use
Printer Ofine and Pause Printing are not
selected.
If you still can’t print, or if the Windows
software installation failed:
Remove the CD from your computer’s CD 1.
drive, and then disconnect the printer from
the computer.
Restart the computer.2.
Temporarily disable any software rewall 3.
and close any anti-virus software.
Insert the printer software CD into the 4.
computer CD drive, then follow the
onscreen instructions to install the printer
software. Do not connect the USB cable
until you are told to do so.
After the installation nishes, restart the 5.
computer and any security software you
disabled or closed.
If you are unable to print, uninstall and
reinstall the software.
The uninstaller removes all the HP software
components that are specic to this
HP Photosmart. It does not remove any
components that are shared by other printers
or programs.
To uninstall the software:
Disconnect the printer from your computer.1.
Open the Applications: Hewlett-Packard 2.
folder.
Double-click 3. HP Uninstaller. Follow the
onscreen instructions.
To install the software:
Insert the CD into your computer’s CD 1.
drive.
On the desktop, open the CD, then 2.
double-click HP Installer.
Follow the onscreen instructions.3.
MacWindows
English

4
#
0
*
9 wxyz
8 tuv
7 pqrs
6 mno5 jkl
4 ghi
3 def
2 abc
1
OK
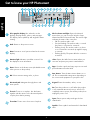
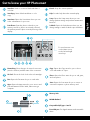
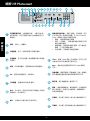
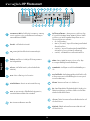
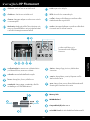
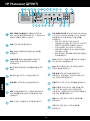
Get to know your HP Photosmart
Color graphics display (also referred to as the
display): Displays menus, photos, and messages.
The display can be pulled up and angled for better
viewing.
Back: Returns to the previous screen.
Menu: Presents a set of options related to the current
display.
OK: Selects a menu setting, value, or photo.
Directional pad: Navigates through photos and
menu options.
Zoom In: Zooms in on a photo. Use this button
together with the arrows on the directional pad to
crop the photo before printing.
Zoom Out: Zooms out to show more of a photo.
Home: Returns to the Home screen (the default screen
when you turn on the product).
Attention light: Indicates a problem occurred. See
the display for more information.
Wireless button and light: Opens the Network
menu where you can access the Wireless Setup
Wizard and Wi-Fi Protected Setup. The wireless light
indicates the status of the connection:
Off: The wireless radio is off. •
On (not ashing): The wireless radio is on and •
the printer is connected to a network.
Flashing slowly: The wireless radio is on, but it •
is not connected to a network (it might be trying
to connect).
Flashing quickly: The printer failed to connect to •
a network.
ePrint: Opens the Web Services menu where you
can view and print your printer’s email address.
Apps: Provides a quick and easy way to access and
print information from the Web.
Auto Answer: Turns the Auto Answer feature on or
off. The recommended setting varies depending on
the services and equipment on your phone line.
Keypad: Enters fax numbers, values, or text.
On: Turns the product on or off. When the product
is off, a minimal amount of power is still used. To
completely remove power, turn off the product, then
unplug the power cord.
Space: Enters spaces and pound signs for fax-
related tasks.
Symbols: Enters symbols and asterisks for fax-related
tasks.
English

5
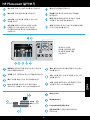
OK
N O V
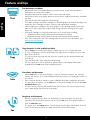
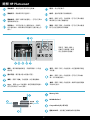
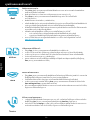
Start Fax: Sends or receives a black-and-white or
color fax.
Start Copy: Starts a black-and-white or color
copy.
Start Scan: Opens the Scan Menu where you can
select a destination for your scan.
Print Photos: Prints the photos selected on your
memory card. If no photos are currently selected,
the product prints the photo currently showing on the
display.
Cancel: Stops the current operation.
Help: Provides help about the current display.
Setup: Opens the Setup menu where you can
change product settings and perform maintenance
functions.
2-Sided: Opens the 2-sided menu where you can
change settings to make 2-sided copies and faxes.
Networking: Shows the type of network connection
(wired or wireless) and the status of the connection.
Ink level: Shows the level of ink in the ink cartridges.
Fax: Opens the Fax menu for you to send a fax.
Apps: Opens the Apps menu for you to access and
print information from the Web, without using a
computer.
Copy: Opens the Copy menu for you to choose
color and number of copies.
Photo: Opens the Photo menu for you to edit, print,
and save photos.
Scan: Opens the Scan menu for you to scan to a
connected computer or photo memory card.
Memory Stick
MultiMediaCard
CompactFlash (CF) types I and II
Front USB port: For digital cameras and removable
drives
Get to know your HP Photosmart
To move between icons
on the Home screen,
use the left and right
arrow keys.
English

6
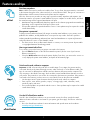
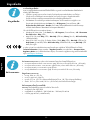
Fax photos and documents
Place the original print side down onto the right front corner of the glass. Or, place the •
original into the document feeder print side up. Use the Fax menu on the printer display or
press the Start Fax button.
For options, press the • Settings button. For best faxing, keep the glass and the back of the lid
clean. The fax interprets any spot or mark detected as part of the fax image.
Copy
Print
Scan
Print documents and photos
Use the • Print menu on the printer display to print documents and photos from software
applications on a connected computer.
Print photos directly from a memory card in various sizes and papers. •
Use the • Photo menu on the printer display to browse photos, apply automatic xes, and make
selections.
Print on both sides of the page (two-sided printing). •
Photo Black cartridges and Photo cartridges are interchangeable. Photo Black cartridges were •
renamed to Photo cartridges to reduce confusion with regular Black cartridges.
When installing new cartridges, refer to the graphic on the cartridge wrap for instructions. •
Make sure to remove the plastic wrap and the orange tab before twisting off the orange
plastic cap.
Ink from the cartridges is used in the printing process in several ways, including: •
Initialization, which prepares the printer and cartridges for printing •
Printhead servicing, which keeps print nozzles clear and ink owing smoothly •
Also, some residual ink is left in the cartridge after it is used. For more information, go to: •
www.hp.com/go/inkusage.
Copy documents in color or black and white
Use the • Copy menu on the printer display to make copies in color or black and white.
To copy a single page, open the lid and place the original onto the right front corner of the •
glass, print side down.
To copy more than one page at a time, place the originals into the document feeder tray, •
print side up.
Copy onto both sides of the page (two-sided printing). •
You can copy a photo, but to get the best quality output, use the Reprint feature that is •
available from the Scan menu (Scan and Reprint Photo).
Scan photos and documents
Use the • Scan menu on the printer display to scan to a connected computer. The scanning
software will open for you to make adjustments and other selections, including the location of
the scan le.
Save a scan le directly to a memory card or USB ash drive that is attached to the printer. •
To scan a photo and print it, use the • Scan menu on the printer display, then choose the Scan
and Reprint Photo option.
For best scanning, keep the glass and the back of the lid clean. The scanner interprets any •
spot or mark detected as part of the scan image.
Fax
Features and tips
English

7
Features and tips
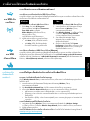
Print from anywhere
Note: A USB connection by itself won’t enable ePrint. To use ePrint, the printer must be connected
to the Internet through a router, either wirelessly or via an Ethernet cable. This type of connection is
different than a USB connection between the printer and a computer.
HP’s free ePrint service provides an easy way to print from email, anywhere and anytime. Just
forward an email to your printer’s email address from your computer or mobile device, and both
the email message and recognized attachments will print.
Attachments may print differently than they appear in the software program that created them, •
depending on the original fonts and layout options used.
Free product updates are provided with this service. Some updates may be required to enable •
certain functionality.
Your printer is protected
To help prevent unauthorized email, HP assigns a random email address to your printer, never
publicizes this address, and by default does not respond to any sender. ePrint also provides
industry-standard spam ltering and transforms email and attachments to a print-only format to
reduce the threat of a virus or other harmful content.
The ePrint service does not lter emails based on content, so it cannot prevent objectionable •
or copyrighted material from being printed.
How to get started with ePrint
To use ePrint, you need to have your printer connected to the Internet.
Press the • Wireless button on the HP Photosmart front panel. (Do this even if you have an
Ethernet connection.)
Select the • Web Services menu from the printer display. From here, you can turn the service on
or off, display the printer email address, and print an information page.
ePrint
Apps
Print from the web, without a computer
Important: A USB connection by itself will not enable Apps. To use Apps, the printer must be
connected directly to the Internet through a router, either wirelessly or via an Ethernet cable. This
type of connection is different than a USB connection between the printer and a computer. The
only exception is the Quick Forms app, which includes several standard forms that are stored on
your printer. The printer does not need to be connected to the Internet to print them. If the printer is
connected to the Internet, you have access to more Quick Forms as they become available.
Use the Apps menu to print documents directly from the web, without a computer. •
Print coupons, news articles, puzzles, recipes, coloring pages, crafts, calendars, cards, •
notebook paper, and more.
Free product updates are provided with this service. Some updates may be required to enable •
certain functionality.
ePrintCenter
Use the HP ePrintCenter website
Use HP’s free ePrintCenter website to set up increased security for ePrint, specify the email
addresses that are allowed to send email to your printer, get more Apps, and access other free
services.
Go to the ePrintCenter website for more information and specic terms and conditions: •
www.hp.com/go/ePrintCenter.
English

8
Paper specications (for detailed specications, see the onscreen Help.)
Main input tray capacity: Plain paper sheets: Up to 125 (60 to 90 gsm. (20 lb) paper) •
Output tray capacity: Plain paper sheets: Up to 50 (60 to 90 gsm. (20 lb) paper) •
Photo tray capacity: Photo paper sheets: Up to 20 •
Document feeder tray capacity: Plain paper sheets: Up to 50 (60 to 90 gsm. (20 lb) paper) •
Physical specications
Height: 28.4 cm (11.2 in.) •
Width: 46.8 cm (18.4 in.) •
Depth: 57.7 cm (22.7 in.) with tray extender open; 47.3 cm (18.7 in.) with tray extender •
closed
Weight: 10.7 kg (23.6 pounds); 10.2 kg (23.5 pounds) for units sold in Japan •
Power specications
Note: Use this printer only with the power adapter supplied by HP.
Power adapter: 0957-2259 •
Input voltage/frequency: 100 to 240 Vac ~ 1100 mA/50–60 Hz •
Power consumption: 40 watts maximum (average printing) •
Get more info
Specs
Find more information
Additional product information can be found in the onscreen Help and Readme le that are
installed with the HP Photosmart software.
Onscreen Help includes instructions on product features and troubleshooting. It also provides •
product specications, legal notices, environmental, regulatory, and support information,
plus links to more information online on the web.
The Readme le contains HP support contact information, operating system requirements, •
and the most recent updates to your product information. In Windows, go to Start > All
Programs > HP > Photosmart Prem C410 series > Readme. For Mac, open the software
CD on your desktop, then double-click the Read Me folder located at the top-level of the
software CD.
To access the onscreen Help from your computer:
Windows XP, Vista, Win 7: Click • Start > All Programs > HP > Photosmart Prem C410
series > Help.
Mac OS X v10.4: Click • Help > Mac Help, Library > HP Product Help.
Mac OS X v10.5 and v10.6: In Finder, click • Help > Mac Help. In the Help Viewer, choose
HP Product Help from the Mac Help pop-up menu.
To nd the European Union Regulatory Notice statement and compliance information, go to the
onscreen Help, click Technical information > Regulatory notices > European Union Regulatory
Notice. The Declaration of Conformity for this product is available at the following web address:
www.hp.eu/certicates.
Get more info
English

9
USB
to
Wired
Networked printer setup and use
USB
to
Wireless
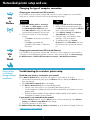
Changing the type of computer connection
Changing your connection from USB to wireless
If you initially set up your printer using a USB connection to your computer, you can switch the
connection to a wireless network connection by following these steps.
To change from USB to wireless connection:
1.
Click Start, click All Programs, click HP,
click Photosmart Prem C410 series, then
click USB to Wireless. Keep your USB cable
connected until prompted to disconnect it
.
Follow the instructions on the displayed 2.
screens.
Click • Next to move from one screen to
the next.
Click • Help to get additional
information about what is required on
that screen.
Windows
To change from USB to wireless connection:
On the HP Photosmart front panel, press 1.
the Wireless button to display the Wireless
menu on the printer display.
Select 2. Wireless Settings, then Wireless
Setup Wizard on the display.
Follow the steps in the Wireless Setup 3.
Wizard to connect the printer.
To add the printer, go to 4. System
Preferences, select Print & Fax, then click
the + button. Select your printer from the
list.
If your printer
is not found
during software
installation...
Troubleshooting for a wireless printer setup
Check that your printer is connected to your network
Run a Wireless Network Test to check that your printer is on the network. To do this:
On the HP Photosmart front panel, press the 1. Wireless button to display the Wireless menu on
the printer display.
Select 2. Run Wireless Network Test on the display.
The 3. Wireless Network Test Report is automatically printed.
Check the top of the report to see if something failed during the test. •
See the Diagnostics Summary for all tests that were performed, and whether or not your •
printer passed.
Find out the Network Name (SSID), Hardware Address (MAC), and IP Address. See the •
Conguration Summary for these details.
If your printer is not connected to the network:
Press the 1. Wireless button to open the Wireless menu on the printer display. Select Wireless
Settings, then Wireless Setup Wizard on the display.
Follow the instructions on the screen.2.
For additional help with setting up a wireless connection, go to the Wireless Printing Center site:
www.hp.com/go/wirelessprinting.
Mac
Changing your connection from USB to wired (Ethernet)
If you initially set up your printer using a USB connection to your computer, you can switch the
connection to a wired (Ethernet) network connection. In the onscreen Help, see Finish setting up
the HP Photosmart > Add the HP Photosmart to a network > Wired (Ethernet) network.
English

10
Fixing connectivity issues
Run a Wireless Network Test to check diagnostic and conguration information. To do this:
On the HP Photosmart front panel, press the 1. Wireless button to display the Wireless menu on
the printer display.
Select 2. Run Wireless Network Test on the display.
The 3. Wireless Network Test Report is automatically printed.
You may have picked the wrong network or typed in your network name (SSID)
incorrectly
Check these settings to ensure that they are correct. •
You may have typed in your wireless password (WPA passphrase or WEP key)
incorrectly.
If you are using a wireless password on your network, you’ll need to enter either a WPA •
passphrase or WEP key. These are case-sensitive so be sure that it has been entered correctly.
If the network name and the wireless password are not found automatically during installation, •
and you don’t already know them, you can download the Network Diagnostic Utility, which
can help you locate them.
The Network Diagnostic Utility runs on computers with Windows XP SP3, Vista, or Windows •
7 OS. The computer should also be wirelessly connected to your network. To download the
Network Diagnostic Utility, go to: www.hp.com/go/wirelessprinting.
You may have a router problem.
Try restarting both the printer and the router by turning off the power on each. Then, turn them •
on again.
Your computer may not be connected to your network.
Make sure that the computer is connect to the same network to which the HP Photosmart is •
connected.
Your computer may be connected to a Virtual Private Network (VPN)
Temporarily disconnect from the VPN before proceeding with the installation. Being connected •
to a VPN is like being on a different network. You will need to disconnect from the VPN to
access the printer over the home network.
Security software may be blocking communication.
Security software (rewall, anti-virus, anti-spyware) installed on your computer may be •
blocking communication between the printer and the computer. An HP diagnostic utility runs
automatically during installation and can provide messages about what might be blocked by
a rewall. Try temporarily disconnecting your rewall, anti-virus, or anti-spyware applications
to see if you can nish the installation successfully. You should re-enable the security
applications after installation is complete.
Setup your rewall software to allow communication over UDP port 427 (Windows). •
After software installation
If your printer has been successfully installed, but you are having trouble printing:
Turn off the router, printer, and computer. Then, turn on router, printer, and computer -- in that •
order.
If powering down and up doesn’t solve the problem, run the • Network Diagnostic Utility
(Windows):
Go to: • www.hp.com/go/wirelessprinting to download the Network Diagnostic Utility,
then run it.
English

11
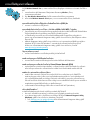
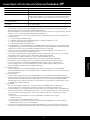
HP printer limited warranty statement
A. Extent of limited warranty
1. Hewlett-Packard (HP) warrants to the end-user customer that the HP products specified above will be free from
defects in materials and workmanship for the duration specified above, which duration begins on the date of purchase
by the customer.
2. For software products, HP's limited warranty applies only to a failure to execute programming instructions. HP does
not warrant that the operation of any product will be interrupted or error free.
3. HP's limited warranty covers only those defects that arise as a result of normal use of the product, and does not cover
any other problems, including those that arise as a result of:
a. Improper maintenance or modification;
b. Software, media, parts, or supplies not provided or supported by HP;
c. Operation outside the product's specifications;
d. Unauthorized modification or misuse.
4. For HP printer products, the use of a non-HP cartridge or a refilled cartridge does not affect either the warranty to the
customer or any HP support contract with the customer. However, if printer failure or damage is attributable to the use
of a non-HP or refilled ink cartridge, HP will charge its standard time and materials charges to service the printer for
the particular failure or damage.
5. If HP receives, during the applicable warranty period, notice of a defect in any product which is covered by HP's
warranty, HP shall either repair or replace the product, at HP's option.
6. If HP is unable to repair or replace, as applicable, a defective product which is covered by HP's warranty, HP shall,
within a reasonable time after being notified of the defect, refund the purchase price for the product.
7. HP shall have no obligation to repair, replace, or refund until the customer returns the defective product to HP.
8. Any replacement product may be either new or like-new, provided that it has functionality at least equal to that of the
product being replaced.
9. HP products may contain remanufactured parts, components, or materials equivalent to new in performance.
10. HP's Limited Warranty Statement is valid in any country where the covered HP product is distributed by HP. Contracts
for additional warranty services, such as on-site service, may be available from any authorized HP service facility in
countries where the product is distributed by HP or by an authorized importer.
B. Limitations of warranty
TO THE EXTENT ALLOWED BY LOCAL LAW, NEITHER HP NOR ITS THIRD PARTY SUPPLIERS MAKES ANY
OTHER WARRANTY OR CONDITION OF ANY KIND, WHETHER EXPRESS OR IMPLIED WARRANTIES OR
CONDITIONS OF MERCHANTABILITY, SATISFACTORY QUALITY, AND FITNESS FOR A PARTICULAR
PURPOSE.
C. Limitations of liability
1. To the extent allowed by local law, the remedies provided in this Warranty Statement are the customer's sole and
exclusive remedies.
2. TO THE EXTENT ALLOWED BY LOCAL LAW, EXCEPT FOR THE OBLIGATIONS SPECIFICALLY SET FORTH IN
THIS WARRANTY STATEMENT, IN NO EVENT SHALL HP OR ITS THIRD PARTY SUPPLIERS BE LIABLE FOR
DIRECT, INDIRECT, SPECIAL, INCIDENTAL, OR CONSEQUENTIAL DAMAGES, WHETHER BASED ON
CONTRACT, TORT, OR ANY OTHER LEGAL THEORY AND WHETHER ADVISED OF THE POSSIBILITY OF
SUCH DAMAGES.
D. Local law
1. This Warranty Statement gives the customer specific legal rights. The customer may also have other rights which vary
from state to state in the United States, from province to province in Canada, and from country to country elsewhere
in the world.
2. To the extent that this Warranty Statement is inconsistent with local law, this Warranty Statement shall be deemed
modified to be consistent with such local law. Under such local law, certain disclaimers and limitations of this Warranty
Statement may not apply to the customer. For example, some states in the United States, as well as some
governments outside the United States (including provinces in Canada), may:
a. Preclude the disclaimers and limitations in this Warranty Statement from limiting the statutory rights of a consumer
(e.g., the United Kingdom);
b. Otherwise restrict the ability of a manufacturer to enforce such disclaimers or limitations; or
c. Grant the customer additional warranty rights, specify the duration of implied warranties which the manufacturer
cannot disclaim, or allow limitations on the duration of implied warranties.
3. THE TERMS IN THIS WARRANTY STATEMENT, EXCEPT TO THE EXTENT LAWFULLY PERMITTED, DO NOT
EXCLUDE, RESTRICT, OR MODIFY, AND ARE IN ADDITION TO, THE MANDATORY STATUTORY RIGHTS
APPLICABLE TO THE SALE OF THE HP PRODUCTS TO SUCH CUSTOMERS.
HP product Duration of limited warranty
Software Media 90 days
Printer 1 year
Print or Ink cartridges Until the HP ink is depleted or the “end of warranty” date printed
on the cartridge has been reached, whichever occurs first. This
warranty does not cover HP ink products that have been refilled,
remanufactured, refurbished, misused, or tampered with.
Printheads (only applies to products with customer 1 year
replaceable printheads)
Accessories 90 days
English

12
English

2
1
***
拆開印表機的包裝。移除所有膠帶、保護膜及包裝材料。
檢查盒裝內容物
*
並非所有型號均包含這些內容
PHOTOSMART PREMIUM FAX
e-ALL-IN-ONE C410 series
從這裡開始安裝...
內含...
安裝疑難排解 15
瞭解 HP Photosmart 16
功能與訣竅 18
獲得更多資訊 20
規格 20
網路印表機安裝與使用 21
修復連接性問題 22
安裝文件送紙匣
移除印表機頂部的紙板固定材料。1.
安裝文件送紙匣,將邊緣上的標籤與印表機上的插槽2.
對齊。將標籤插入插槽,直到卡入到位。
移除托架固定材料
向上拉印表機兩側的把手,打開墨匣存取擋門。1.
如果掃描器蓋板已開啟,則無法打開墨水匣存取擋門。•
撕掉固定托架的藍色膠帶。2.
將托架滑向左側。3.
移除托架上的橙色塑膠固定材料。4.
關上墨匣存取擋門。5.
移除保護雙面列印零件的紙板 (若有的話)
繁體中文

14
軟體未顯示提示前,請勿連接 USB 纜線! (僅適用於 Windows
®
)
5
4
3
依照設定精靈操作
連接並開啟電源
連接電源線和變壓器。
按
即可開啟 HP Photosmart。
請務必依照顯示器上的指示操作,因為它將引導您設
定並連接 HP Photosmart,包括插入墨水匣與設定無
線網路連線。
對於沒有 CD/DVD 光碟機的電腦,請前往
www.hp.com/support 下載並安裝軟體。
WiFi Protected Setup (WPS) – (選用)
此 HP Photosmart 支援 WiFi Protected Setup (WPS)
進行簡單的單鍵無線設定。
在設定期間,如果顯示器上有 Wi-Fi Protected •
Setup (WPS) 提示,且您的路由器支援此方法,
請按下路由器上的 WPS 按鈕。如果連線成
功,無線按鈕上的無線指示燈將會亮起。
或者,您可以依照印表機顯示器上的設定精靈,•
使用其他無線設定方法進行連接。
註冊您的 HP Photosmart
請至以下網址註冊,可取得更快速的服務和支
援警示:www.register.hp.com。
安裝面板
如果需要在控制台上安裝面板:
從右緣拉出現有面板,將其移除。1.
將新面板置於控制台的按鈕上。2.
緊緊按下面板的所有邊緣,直到貼齊到位。3.
安裝面板(如有隨附)
繁體中文

15
安裝疑難排解
如果 HP
Photosmart 沒有
開啟...
檢查電源線。1.
確定印表機和電源變壓器雙方的電源線都穩固連接。如果電源線正常工作,則電源供應 •
器上的指示燈將會亮起。
如果使用電源延長線,請檢查電源延長線開關是否開啟。如未使用,請將印表機電源線 •
直接插入電源插座。
測試電源插座,確定它能正常工作。插入可以使用的其他電器,然後看該電器是否有電 •
源。如果沒有,則可能是電源插座有問題。
如果將印表機插入有開關的插座,請檢查該插座是否開啟。 •
關閉印表機電源,然後拔下電源線。插回電源線,然後按 2. 按鈕以開啟印表機。
請勿太快按下 3. 按鈕。僅按一次。印表機可能需要數分鐘開啟,因此,如果您按下 按
鈕超過一次,則可能將印表機的電源關閉。
如果您已完成上述所有步驟,但仍然無法解決問題,請洽詢 HP 支援人員進行維修服務。請4.
前往網站 www.hp.com/support。
如果您無法列
印...
請確定您的 HP Photosmart 設定為預設印表機
且未離線。若要執行:
在 Windows 工作列上,按一下 • 開始。
然後按一下 • 控制台。
然後開啟: •
• 裝置和印表機 (Windows 7)
• 印表機 (Vista)
• 印表機和傳真 (XP)
查看印表機旁邊的圓圈中是否有一個核取記
號。如果沒有,請用滑鼠右鍵按一下印表機
圖示,然後從功能選項中選擇設定為預設印
表機。
若要檢查印表機是否未離線,請用滑鼠右鍵按
一下印表機圖示,並確保未選取離線使用印表
機與暫停列印。
若仍無法列印,或 Windows 軟體安裝失敗:
從電腦的 CD 光碟機中取出 CD,接著斷1.
開 印表機與電腦間的連接。
重新啟動電腦。2.
暫時停用所有軟體防火牆,並關閉所有防3.
毒軟體。
在電腦 CD 光碟機中插入印表機軟體 4.
CD,然後依照螢幕上的指示安裝印表機軟
體。在提示您連接 USB 纜線之前請不要
這樣做。
安裝完成之後,請重新啟動電腦,以及您5.
已停用或關閉的任何安全性軟體。
如果您無法列印,請解除安裝軟體後再重新
安裝。
解除安裝程式會移除此 HP Photosmart 專用的
所有 HP 軟體元件。解除安裝程式不會移除其
他印表機或程式共用的任何元件。
解除安裝軟體:
中斷印表機與電腦的連線。1.
開啟 Applications: Hewlett-Packard 資料夾。2.
連按兩下 3. HP Uninstaller(HP 解除安裝程
式)。依照螢幕上的指示進行。
安裝軟體:
將 CD 插入電腦的 CD 光碟機。1.
在桌面上開啟 CD,然後按兩下 HP Installer。2.
依照螢幕上的指示進行。3.
MacWindows
繁體中文

16
#
0
*
9 wxyz
8 tuv
7 pqrs
6 mno5 jkl
4 ghi
3 def
2 abc
1
OK
瞭解 HP Photosmart
彩色圖形顯示器 (也稱為顯示器): 顯示功能表、
相片和訊息。您可以將顯示器拉出並調整角度以方
便檢視。
返回: 返回上一個畫面。
功能選項: 表示一組與目前顯示有關的選項。
OK: 選取功能選項設定、值或相片。
方向鍵盤: 瀏覽相片與功能表選項。
放大: 放大相片。使用此按鈕與方向鍵盤上的箭頭
裁剪相片,然後再列印。
縮小: 拉遠相片以顯示相片的更多部份。
首頁: 回到首頁畫面 (您開啟產品時的預設畫面)。
注意燈號: 表示發生問題。請參閱顯示器以取得更
多資訊。
無線按鈕及指示燈: 開啟「網路」功能選項,您可
以在其中存取「無線設定精靈」及 Wi-Fi Protected
Setup。無線指示燈指示連線的狀態:
關閉: 無線通訊裝置已關閉。 •
亮起 (未閃爍): 無線通訊裝置已開啟且印表 •
機已連接到網路。
緩慢閃爍: 無線通訊裝置已開啟,但未連接至 •
網絡 (它可能正嘗試連接)。
快速
閃爍: 印表機無法連接至網絡。 •
ePrint: 開啟「Web 服務」功能選項,您可以在其
中檢視及列印印表機的電子郵件位址。
Apps: 提供快速且輕鬆存取及列印 Web 資訊的
方式。
自動接聽: 開啟或關閉「自動接聽」功能。建議的
設定會隨著您電話線的服務和設備而有所不同。
數字鍵: 輸入傳真號碼、數值或文字。
開啟: 開啟或關閉產品。產品關閉時,仍然會使用
最少量的電力。若要完全中斷電源,請關閉產品,
然後拔掉電源線。
空格鍵: 用以輸入空格和 # 號以進行傳真相關工作。
符號鍵: 用以輸入符號和星號以進行傳真相關工作。
繁體中文

17
OK
N O V
開始傳真: 傳送或接收黑白或彩色傳真。
開始影印: 開始黑白或彩色影印。
開始掃描: 開啟「掃描功能選項」,您可以在其中
選取掃描目的地。
列印相片: 列印在記憶卡上選取的相片。如果目
前未選取相片,產品會列印目前顯示在顯示器上的
相片。
取消: 停止目前操作。
說明: 提供目前顯示的相關說明。
設定: 開啟「設定」功能選項,您可以在其中變更
產品設定以及執行維護功能。
雙面: 開啟「雙面」功能選項,您可以在其中變更
設定以進行雙面影印和傳真。
網路: 顯示網路連線類型 (有線或無線)以及連
線狀態。
墨水存量: 顯示墨水匣中的墨水存量。
傳真: 開啟「傳真」功能選項,供您傳送傳真。
Apps: 開啟 Apps 功能選項,讓您無需使用電腦,
即可存取與列印 Web 資訊。
影印: 開啟「影印」功能選項,供您選擇影印顏色
和份數。
相片: 開啟「相片」功能選項,您可以在其中編
輯、列印和儲存相片。
掃描: 開啟「掃描」功能選項,掃描所連
接的電腦
或相片記憶卡。
Memory Stick
MultiMediaCard
CompactFlash (CF) I 和 II 型
前端 USB 埠: 對於數位相機與抽取式磁碟機
瞭解 HP Photosmart
若要在「首頁」畫面上
的圖示之間移動,請使
用左箭頭和右箭頭鍵。
繁體中文

18
傳真相片與文件
將原始文件列印面朝下放在玻璃板上的右前方角落。或者,將原始文件列印面朝上放進文件 •
送紙匣。使用印表機顯示器上的傳真功能選項,或按開始傳真按鈕。
如需其他選項,請按 • 設定值按鈕。為達到最佳傳真效果,請保證玻璃板與蓋板背面的清潔。
傳真會將偵測到的任何點或標記,轉譯為傳真影像的一部分。
影印
列印
掃描
列印文件與相片
使用印表機顯示器上的 • 列印功能選項,列印所連接電腦上軟體應用程式中的文件和相片。
直接從記憶卡列印各種尺寸和紙張的相片。 •
使用印表機顯示器上的 • 相片功能選項,瀏覽相片、套用自動修正以及做出各種選擇。
在紙張的兩面列印 (雙面列印)。 •
亮光黑墨匣與相片墨匣可以互換。亮光黑墨匣重新命名為相片墨匣,以減少與一般黑墨匣混 •
淆的情況。
安裝新墨匣時,如需相關指示,請參閱墨匣包裝上的圖形。請確保移除塑膠包裝和橙色標籤 •
後,再擰斷橙色塑膠帽。
在列印過程中可以數種方式使用墨匣中的墨水,包括: •
起始設定,即準備印表機和墨匣進行列印 •
維護列印頭,即保持列印噴嘴清潔,墨水流動順暢。 •
此外,使用過後有些墨水還會殘留在墨匣中。如需詳細資訊,請造訪: •
www.hp.com/go/inkusage。
影印彩色或黑白文件
使用印表機顯示器上的 • 影印功能選項,以影印彩色或黑白文件。
若要影印單頁,請打開蓋板,然後將原始文件列印面朝下放在玻璃板的右前方角落。 •
若要一次影印多頁,請將原始文件列印面朝上放進文件送紙匣。 •
影印頁面的兩面 (雙面列印)。 •
您可以影印相片,但是為取得最佳的輸出品質,請使用「重印」功能,可從 • 掃描功能選項
(掃描並重印相片)中找到。
掃描相片與文件
使用印表機顯示器上的 • 掃描功能選項,掃描所連接的電腦。即會開啟掃描軟體,供您進行調
整及做出其他選擇,包括掃描檔案的位置。
將掃描檔案直接儲存至記憶卡或與印表機相連的 USB 快閃磁碟機。 •
若要掃描相片並列印,請使用印表機顯示器上的 • 掃描功能選項,然後選取掃描並重印相片選項。
為達到最佳掃描效果,請保證玻璃板與蓋板背面的清潔。掃描器會將偵測到的任何點或標 •
記,轉譯為掃描影像的一部分。
傳真
功能與訣竅
繁體中文

19
功能與訣竅
從任何地方列印
注意: 僅 USB 連線不會啟用 ePrint。若要使用 ePrint,印表機必須直接透過路由器無線或經由乙
太網路纜線連接至網際網路。這種類型的連線不同於印表機與電腦之間的 USB 連線。
HP 的免費 ePrint 服務提供隨時隨地從電子郵件列印的輕鬆方式。只需從電腦或行動裝置將電子
郵件轉寄至印表機的電子郵件位址,就會列印電子郵件及識別的附件。
附件列印效果可能與建立它們的軟體程式所顯示的有所差異,視原始文件字型和使用的版面 •
配置選項而定。
本服務提供有免費產品更新。啟用特定功能可能需要部分更新。 •
您的印表機已受保護
為協助阻止未經授權的電子郵件,HP 為您的印表機指派了一個隨機電子郵件位址,絕不公開此
位址,依預設不會回應任何發件人。ePrint 還提供行業標準垃圾郵件過濾功能,將電子郵件和附
件轉換為僅列印格式,以降低病毒或其他有害內容的威脅。
ePrint 服務不會根據內容過濾電子郵件,因此無法阻止列印不當內容或版權資料。 •
ePrint 快速入門
若要使用 ePrint,您的印表機需要已連接至網際網路。
按下 HP Photosmart 前面板上的 • 無線按鈕。(即使您已有乙太網路連線,也請執行此操作。)
從印表機顯示器中選取 • Web 服務功能選項。從此處,您可以開啟或關閉服務,顯示印表機
電子郵件位址,以及列印資訊頁。
ePrint
Apps
從網頁列印時不連接電腦
重要事項: 僅 USB 連線不會啟用 Apps。若要使用 Apps,印表機必須直接透過路由器無線或經
由乙太網路纜線連接至網際網路。這種類型的連線不同於印表機與電腦之間的 USB 連線。唯一
例外的是「快速表格」應用程式,其中包括儲存在印表機上的數個標準表格。印表機無需連接至
網際網路,即可列印它們。如果印表機連接至網際網路,您可以存取更多「快速表格」,只要它
們變成可用。
使用 Apps 功能選項,無需電腦即可直接從網頁列印文件。 •
列印優待券、新聞文章、字謎、食譜、彩頁、工藝品、行事曆、卡片、記事本紙張等等。 •
本服務提供有免費產品更新。啟用特定功能可能需要部分更新。 •
ePrintCenter
使用 HP ePrintCenter 網站
使用 HP 的免費 ePrintCenter 網站為 ePrint 設定增強的安全性、指定容許向您的印表機傳送電子
郵件的電子郵件位址、取得更多應用程式,以及存取其他免費服務。
請前往 ePrintCenter 網站,取得更多資訊及瞭解特定條款與條件: •
www.hp.com/go/ePrintCenter。
繁體中文

20
紙張規格(如需詳細規格,請參閱螢幕操作說明。)
主進紙匣容量: 普通紙: 最多 125 張 (60 至 90 gsm 20 磅紙張) •
出紙匣容量: 普通紙: 最多 50 張 (60 至 90 gsm 20 磅紙張) •
相片匣容量: 相片紙: 最多 20 張 •
文件進紙匣容量: 普通紙: 最多 50 張 (60 至 90 gsm 20 磅紙張) •
實體規格
高: 28.4 公分 (11.2 英吋) •
寬度: 46.8 公分 (18.4 英吋) •
深度: 57.7 公分 (22.7 英吋) (紙匣延伸架開啟時); 47.3 公分 (18.7 英吋)(紙匣 •
延伸架關閉時)
重量: 10.7 公斤 (23.6 磅) 10.2 公斤 (23.5 磅)(日本售出的裝置) •
電力規格
注意: 僅搭配 HP 提供的電源變壓器使用此印表機。
電源變壓器: 0957-2259 •
輸入電壓/頻率: 100 至 240 Vac ~ 1100 mA/50–60 Hz •
耗電量: 最大 40 瓦 (平均列印) •
獲得更多資訊
規格
尋找詳細資訊
其他產品資訊可從螢幕操作說明,以及隨 HP Photosmart 軟體一同安裝的讀我檔案中找到。
螢幕操作說明包括產品功能與疑難排解的相關指示。此外,還提供產品規格、法律注意事 •
項、環保、法規、支援資訊以及 Web 線上更多資訊的連結。
「讀我檔案」包含 HP 支援的連絡資訊、作業系統需求,以及您產品資訊的最新更新。在 •
Windows 中,前往開始 > 所有程式 > HP > Photosmart Prem C410 series > 讀我檔案。若
為 Mac,請開啟桌面上的軟體 CD,然後按兩下位於軟體 CD 最上層的 Read Me 資料夾。
若要從電腦存取螢幕操作說明:
•
Windows XP、Vista 及 Win 7: 按一下開始 > 所有程式 > HP > Photosmart Prem C410 series >
說明。
Mac OS X v10.4: 按一下 • 說明 > Mac 說明,資料庫 > HP 產品說明。
Mac OS X v10.5 和 v10.6: 在 • Finder 中,按一下說明 > Mac 說明。在說明檢視器中,從
Mac 說明快顯功能選項中選擇 HP 產品說明。
若要查找「歐盟法規通告」聲明與合規資訊,請前往螢幕操作說明,按一下技術資訊 > 法規通告 >
歐盟法規通告。本產品的「符合性聲明」可從下列網址找到: www.hp.eu/certificates。
獲得更多資訊
繁體中文
ページが読み込まれています...
ページが読み込まれています...
ページが読み込まれています...
ページが読み込まれています...
ページが読み込まれています...
ページが読み込まれています...
ページが読み込まれています...
ページが読み込まれています...
ページが読み込まれています...
ページが読み込まれています...
ページが読み込まれています...
ページが読み込まれています...
ページが読み込まれています...
ページが読み込まれています...
ページが読み込まれています...
ページが読み込まれています...
ページが読み込まれています...
ページが読み込まれています...
ページが読み込まれています...
ページが読み込まれています...
ページが読み込まれています...
ページが読み込まれています...
ページが読み込まれています...
ページが読み込まれています...
ページが読み込まれています...
ページが読み込まれています...
ページが読み込まれています...
ページが読み込まれています...
-
 1
1
-
 2
2
-
 3
3
-
 4
4
-
 5
5
-
 6
6
-
 7
7
-
 8
8
-
 9
9
-
 10
10
-
 11
11
-
 12
12
-
 13
13
-
 14
14
-
 15
15
-
 16
16
-
 17
17
-
 18
18
-
 19
19
-
 20
20
-
 21
21
-
 22
22
-
 23
23
-
 24
24
-
 25
25
-
 26
26
-
 27
27
-
 28
28
-
 29
29
-
 30
30
-
 31
31
-
 32
32
-
 33
33
-
 34
34
-
 35
35
-
 36
36
-
 37
37
-
 38
38
-
 39
39
-
 40
40
-
 41
41
-
 42
42
-
 43
43
-
 44
44
-
 45
45
-
 46
46
-
 47
47
-
 48
48


HP Photosmart Premium Fax e-All-in-One Printer series - C410 リファレンスガイド
- タイプ
- リファレンスガイド
関連論文
-
HP Photosmart Premium All-in-One Printer series - C309 リファレンスガイド
-
HP Photosmart D6100 Printer series クイックスタートガイド
-
-
-
-
HP OfficeJet 7510 Wide Format All-in-One Printer series リファレンスガイド
-
-
-
HP Photosmart 330 Printer series ユーザーガイド
-