
www.blackanddecker.com
KS501
KS701E
KS701PE
2
3
4
5
1
English 04
14
09

2
2
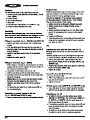
A
C
E
B
D
2
1
0
KS701PE
KS701E
KS701PE
KS701E
KS701PE
KS501
7
18
17
8
17
A
3
7
8
9
5
10
11
6
4
4
3
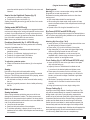
G
I
H
KS701E
KS701PE
KS701E
KS701PE
KS701E
KS701PE
F
1614
15

3
3
G
I
H
KS701E
KS701PE
KS701E
KS701PE
KS701E
KS701PE
F
1614
15

Wood
Steel
Metal
KS501-TW
110V
3,000 min
-1
65mm
5mm
10mm
1.3kg
220V
3,000 min
-1
65mm
5mm
10mm
1.3kg
220V
0-3,000 min
-1
70mm
5mm
15mm
1.6kg
KS501-KR KS701E-KR

@
u
u
u
u
u
u
u
:
#
u
fi
fi
fi
u
u
u
u
fl


7
7
ENGLISH
(Original instructions)
press the variable speed or On/Off switch once more and
release it.
How to Use the Sightline® Feature ( g. D)
Use a pencil to mark the cutting line.
Position the jig saw over the line (11).
Viewing from directly above the jig saw, the line of cut can be
followed easily.
Cutting mode (KS701PE only)
Pendulum stroke or action provides a more aggressive blade
motion and is designed for cutting soft materials such as wood
or plastic. It provides a faster cut, but with a less smooth cut
across the material. Your jig saw has a Pendulum Stroke dial.
Use of this dial is explained in the next section.
Note: Never use pendulum action to cut metal.
Pendulum Stroke dial ( g. E - KS701PE only)
The KS701PE has these four cutting modes with increasing
amounts of pendulum action:
Position 0: metal and aluminium and sheet metal (no
pendulum action).
Position 1: for laminates, hard wood, work tops.
Position 2: for plywood and PVC/Plastics.
Position 3: for soft wood and fast cutting
To adjust the pendulum action:
Rotate the Pendulum Stroke selector (6) to the required
position.
Sawing
Hold the tool rmly with both hands while cutting.
The shoe plate (4) should be held rmly against the material
being cut. This will help prevent the saw from jumping, reduce
vibration and minimise blade breakage.
Let the blade run freely for a few seconds before starting
the cut.
Apply only a gentle pressure to the tool while performing
the cut.
Hints for optimum use
Sawing laminates
When cutting laminates, splintering may occur which can
damage the presentation surface. The most common saw
blades cut on the upward stroke, therefore if the shoe plate is
sitting on the presentation surface either use a saw blade that
cuts on the downward stroke or:
Use a ne-tooth saw blade.
Saw from the back surface of the workpiece.
To minimise splintering, clamp a piece of scrap wood or
hardboard to both sides of the workpiece and saw through
this sandwich.
Sawing metal
Warning! Do not use a vacuum when cutting metal. Metal
lings will be hot and may cause re.
Be aware that sawing metal takes much more time than
sawing wood.
Use a saw blade suitable for sawing metal.
When cutting thin sheet metal, clamp a piece of scrap
wood to the back surface of the workpiece and cut through
this sandwich.
Spread a lm of oil along the intended line of cut.
Rip Fence (KS701E and KS701PE only)
Ripping and circle cutting without a pencil line are easily done
with a rip fence and circle guide (available as an optional extra
- part number X43005-XJ).
Attaching Rip Fence ( gs. F & G)
Insert rip fence (14) into the shoe plate slots with the cross
bar facing down as shown in gure F.
Place screw (15) into hole in bottom of shoe plate.
Align clamp bar (16) over screw with lipped edge facing
down and pointing towards the rear of the saw.
Using a phillips screwdriver, run the screw into the
threaded hole in the bar clamp as shown in gure G.
Adjust to width of cut and tighten screw.
Circle Cutting ( g. H - KS701E and KS701PE only)
Insert rip fence into slot on the right side of shoe plate
with cross bar facing up.
Adjust rip fence so that distance from blade to hole
in cross bar is the desired radius and tighten screw.
Place saw so that centre of hole in cross bar is over
centre of circle to be cut (make plunge cut, drill hole for
blade or cut inward from edge of material to get blade
into position).
When saw is properly positioned, drive a small nail
through hole in cross bar into exact centre of circle
to be cut.
Using rip fence as a pivot arm, begin cutting circle.
Plunge Cutting ( g. I)
A plunge cut is an easy method of making an inside cut. The
saw can be inserted directly into a panel or board without rst
drilling a lead or pilot hole. In plunge cutting, measure the
surface to be cut and mark clearly with a pencil. Next tip the saw
forward until the front end of the shoe sits rmly on the work
surface and the blade clears the work through its full stroke.
Switch the tool on and allow it to attain maximum speed. Grip
the saw rmly and lower the back edge of tool slowly until the
blade reaches its complete depth. Hold the shoe at against the
wood and begin cutting. Do not remove blade from cut while
it is still moving. Blade must come to a complete stop.

8
ENGLISH
(Original instructions)
u
u
Service Information
Black & Decker offers a full network of company-owned and
authorized service locations throughtout Asia. All Black &
Decker Service Centers are staffed with trained personnel to
provide customers with efficient and reliable product service.
Whether you need technical advice, repair, or genuine factory
replacement parts, contact the Black & Decker location nearest
to you.
NOTE
u Black & Decker's policy is one of continuous improvement to
our products and, as such, we reserve the right to change
product specifications without prior notice.
u Standard equipment and accessories may vary by country.
u Product specifications may differ by country.
u Complete product range may not be available in all countries.
Contact your local Black & Decker dealers for range
availability.

9
KS501-KR KS701E-KR
220V 220V
3,000 min
-1
0-3,000 min
-1
65mm 70mm
5mm 5mm
10mm 15mm
1.3kg 1.6kg
BLACK+DECKER ,
.
.
.
,
/
.
.
" "
( )
( ) .
1.
a. .
.
b. ,
.
.
c.
.
.
2.
a.
.
. ( )
.
.
b. , ,
.
.
c.
.
.
d. .
.
,
,
.
.
e.
.
.
f.
(RCD)
. RCD
.
3.
a.
.
, ,
.
.
b. .
. ,
,
.
c. . /
.
.
d.
.
.
e. .
.
.
f. .
. ,

10
. ,
.
g.
,
.
.
4.
a. .
.
.
b.
.
.
c.
/
.
.
d.
,
.
.
e. .
,
.
.
.
f. .
.
g. ,
,
.
.
5.
a.
.
.
!
♦
. " "
" "
.
♦
.
.
♦
.
.
.
.
♦
.
.
.
♦
,
.
♦
. .
♦
. ,
.
♦
.
.
!
.
.
♦
.
.
♦
,
( )
.
.
♦
.
.
!
.

11
.
.
♦
BLACK+DECKER
.
.
1. (KS701E KS701PE)
On/Off (KS501)
2.
3.
4.
5. (KS701E KS701PE )
6. (KS701PE )
!
,
.
.
( A - KS701E KS701 PE)
♦
(7)
.
♦
(3) (4)
.
♦
(8) .
♦
(17)
.
♦
(3) .
( A - KS501)
♦
(7)
(17)
.
♦
( ). (18).
♦
(7) .
♦
(7) (8)
.
♦
(18)
(18)
.
♦
(17)
.
♦
(7) (18)
.
( B - KS701E
KS701PE )
♦
(9) (5) .
.
,
.
.
.
.
♦
, .
♦
.
.
♦
.
( : , ,
MDF ).
( C)
.
♦
(4) , 45
.
♦
. (10)
.
♦
(4) ,
45
. (KS701E KS701 PE ).
♦
(4) , 45
. (KS501 ).
♦
.
(4) 90 :
♦
. (10).
♦
(4) ,
0 .
♦
.
(KS701E KS701PE )
♦
, PVC
.
/
♦
,
♦
(KS701E KS701PE) On/Off
(KS501) (1) . KS701E KS107PE
.

12
♦
(2)
.
.
♦
.
On/Off
.
Sightline
®
Feature ( D)
♦
.
♦
(11) .
.
(KS701PE )
.
.
.
.
:
.
( E - KS701PE )
KS701PE
.
♦
0: (
)
♦
1: , ,
♦
2: PVC/
♦
3 :
:
♦
(6)
.
.
(4)
.
.
♦
.
♦
.
,
.
,
,
,
♦
.
♦
.
♦
.
! .
.
.
♦
.
♦
.
♦
.
(KS701E KS701PE )
(
X43005-XJ )
.
( F G)
♦
F
(14)
.
♦
(15) .
♦
(16)
.
♦
G
.
♦
.
( H - KS701E KS701PE )
♦
.
♦
.
♦
( ,
).
♦
,
.
♦
.
( I)
.
.

13
,
.
.
.
.
.
. .
BLACK+DECKER
.
.
♦
.
♦
.
.
.
.
.
BLACK+DECKER
.
.
.
.
.
BLACK+DECKER BLACK+DECKER
.
.
BLACK+DECKER
.
(www.2helpU.com)
BLACK+DECKER
.
.(
1577-0933). Black & Decker
.
,
Black & Decker
.
♦ Black & Decker
.
♦
.
♦ .
♦
.
Black & Decker
.

KS501
110V
3,000 min
-1
65mm
5mm
10mm
1.3kg
BLACK+DECKER
DIY
/
1.
a.
b.
c.
2.
a.
b.
c.
d.
e.
f.
(RCD) RCD
3.
a.
b.
c. /
d.
e.
f.
g.
4.
a.

1
b.
c.
/
d.
e.
f.
g.
5.
a.
♦
♦
♦
♦
♦
♦
♦
♦
♦
/
♦
♦
♦
BLACK+DECKER
1. KS701E KS701PE
(KS501)
2.

16
3.
4.
5. KS701E KS701PE
6. KS701PE
A - KS701E KS701 PE
♦ (7)
♦ (3) (4)
♦ (8)
♦ (17)
♦ (3)
A - KS501
♦ (7)
(17)
♦ (18)
♦ (7)
♦ (7) (8)
♦ (18)
(18)
♦ (17)
♦
(7) (18)
B - KS701E
KS701PE
♦ (9) (5)
♦
/
♦
♦
♦
♦
(MDF)
C
(4) 45
♦ (10)
♦ (4)
45 KS701E
KS701 PE
♦ (4) 45
KS501
♦
(4) 90
♦
(10)
♦
(4)
0
♦
KS701E KS701PE
♦
PVC
♦
KS701E
KS701PE (KS501) (1)
KS701E KS107PE
♦
(2)
♦

17
Sightline
®
D
♦
♦
(11)
KS701PE
E - KS701PE
KS701PE
♦
0
♦
1
♦
2 PVC/
♦
3
♦
(6)
(4)
♦
♦
♦
♦
♦
♦
♦
♦
KS701E KS701PE
X43005-XJ/
F G
♦
F (14)
♦
(15)
♦
(16)
♦
G
♦
H - KS701E
KS701PE
♦
♦
♦
♦
♦

18
I
BLACK+DECKER
♦
♦
BLACK+DECKER
BLACK+DECKER
BLACK+DECKER
BLACK+DECKER
Black & Decker
Black & Decker
, Black &
Decker
♦
Black & Decker
♦
/
♦
♦
/
Black & Decker
23 1.2.5
0800-552888
/ ( )
120 4
02-2820-1065


90620513 04/2015
-
 1
1
-
 2
2
-
 3
3
-
 4
4
-
 5
5
-
 6
6
-
 7
7
-
 8
8
-
 9
9
-
 10
10
-
 11
11
-
 12
12
-
 13
13
-
 14
14
-
 15
15
-
 16
16
-
 17
17
-
 18
18
-
 19
19
-
 20
20


